Cover
Front Matter
Microsoft Blazor
Building Web Applications in .NET 6 and Beyond
3rd ed.
This Apress imprint is published by the registered company APress Media, LLC part of Springer Nature.
The registered company address is: 1 New York Plaza, New York, NY 10004, U.S.A.
Full Stack Web Development with C#
Building modern Single-Page Application websites today typically means writing JavaScript on the client and C# on the server when you are using the Microsoft development stack. But with Blazor, you can build everything using C# and reuse the knowledge and experience you gained with .NET. Porting existing C# applications like WinForms to the Web does not involve translating some of your logic to JavaScript; you can again reuse most of this code, resulting in less testing and bugs.
Is This Book for You?
This book assumes you know C#, and you have some experience writing applications with it. Since this is also about web development, basic knowledge about HTML, CSS, and JavaScript is also required. Completing this book will allow you to build professional applications with Blazor, including mastery of some harder topics like authentication. You will see learning Blazor is fun!
Practical Development
I wrote this book with practice in mind, so sit down next to your computer and follow along with the examples; the best way to learn is to just do things with Blazor. I did my best to make the code samples easy to read, but this means breaking lines of code to fit nicely on the page. When in doubt, you can always consult the included code, which you can download from the book's product page, located at www.apress.com/{{ISBN}}. You can find last-minute additions and errata at https://github.com/PeterHimschoot/microsoft-blazor-book-3, including every sample and exercise using the latest version of .NET.
When Jonathan Gennick from Apress asked me if I would be interested in writing a book on Blazor, I felt honored and of course I agreed that Blazor deserves a book. Writing a book is a group effort, so I thank Jonathan Gennick and Jill Balzano for giving me tips on styling and writing this book, and I thank Gerald Versluis for doing the technical review and pointing out sections that needed a bit more explaining. I also thank Magda Thielman and Lieven Iliano from U2U, my employer, for encouraging me to write this book.
I thoroughly enjoyed writing this book, and I hope you will enjoy reading and learning from it.
Second Edition
As the first edition of Blazor Revealed was published (using pre-release software), the Blazor team had made a bunch of changes to the razor syntax, stopping my examples in the first edition of Blazor Revealed from working. Now that Blazor has been released and is completely official (YEAH!!!!), the time has come to publish an updated version of Blazor Revealed, now renamed as Microsoft Blazor.
Should you get stuck with an example, I invite you to consult the accompanying code samples for comparison purposes.
Third Edition
I wrote the third edition of Microsoft Blazor using the previews of .NET 6 to get this book in your hands right after the official release of .NET 6. This of course means that the last-minute changes made in October 2021 could not make it to this book. However, I have set up a repository in GitHub where you can find last-minute additions and errata at https://github.com/PeterHimschoot/microsoft-blazor-book-3, including every sample and exercise using the latest version of .NET.


Not only does he like to code, but he is also passionate about spreading his knowledge – as well as gaining some in the bargain. Gerald involves himself in speaking, providing training sessions, writing blogs or articles, recording videos for his YouTube channel, and contributing to open source projects in his spare time.
Twitter: @jfversluis
Website: https://jfversluis.dev
1. Introduction to WebAssembly and Blazor
1. Introduction to WebAssembly and Blazor
I was attending the Microsoft Most Valued Professional and Regional Directors summit 2018 where we were introduced to Blazor for the first time by Steve Sanderson and Daniel Roth. And I must admit I was super excited about Blazor! Blazor is a framework that allows you to build Single-Page Applications (SPAs) using C# and allows you to run any standard .NET library in the browser. Before Blazor, your options for building a SPA were Angular, React, Vue.js (and others) using JavaScript, or one of the other higher-level languages like TypeScript (which gets compiled into JavaScript anyway). In this introduction, we will look at how browsers are now capable of running .NET assemblies in the browser using WebAssembly and Blazor.
A Tale of Two Wars
Think about it. The browser is one of the primary applications on your computer. You use it every day. Companies that build browsers know that very well and are bidding for you to use their browser. At the beginning of mainstream Internet, everyone was using Netscape, and Microsoft wanted a share of the market, so in 1995, they built Internet Explorer 1.0, released as part of Windows 95 Plus! pack.
The First Browser War
Newer versions were released rapidly, and browsers started to add new features such as <blink> and <marquee> elements. This was the beginning of the first browser war, giving people (especially designers) headaches because some developers were building pages with blinking marquee controls  . But developers were also getting sore heads because of incompatibilities between browsers. The first browser war was about having more HTML capabilities than the competition.
But all of this is now behind us with the introduction of HTML5 and modern browsers like Google Chrome, Microsoft Edge, Firefox, Safari, and Opera. HTML5 not only defines a series of standard HTML elements but also rules on how these should render, making it a lot easier to build a website that looks the same in all modern browsers. Then, in 1995, Brendan Eich wrote a little programming language known as ECMAScript (initially called LiveScript) in ten days (What!?). It was quickly dubbed JavaScript because its syntax was very similar to Java. I will be using the name JavaScript here because that is what most people call it.
JavaScript and Java are not related. Java and JavaScript have as much in common as ham and hamster (I don’t know who formulated this first, but I love this phrasing).
Little did Mr. Eich know how this language would impact the modern Web and even desktop application development. In 1995, Jesse James Garrett wrote a white paper called Ajax (Asynchronous JavaScript and XML), describing a set of technologies where JavaScript is used to load data from the server and that data is used to update the browser’s HTML. This avoids full page reloads and allows for client-side web applications, which are applications written in JavaScript that run completely in the browser. One of the first companies to apply Ajax was Microsoft when they built Outlook Web Access (OWA). OWA is a web application almost identical to the Outlook desktop application proving the power of Ajax. Soon other Ajax applications started to appear, with Google Maps stuck in my memory as one of the other keystone applications. Google Maps would download maps asynchronously and with some simple mouse interactions allowed you to zoom and pan the map. Before Google Maps, the server would do the map rendering and a browser displayed the map like any other image by downloading a bitmap from a server.
Building an Ajax website was a major undertaking that only big companies like Microsoft and Google could afford. This soon changed with the introduction of JavaScript libraries like jQuery and knockout.js (knockout was also written by Steve Sanderson, the author of Blazor!). Today, we build rich web apps with Angular, React, and Vue.js. All of them are using JavaScript or higher-level languages like TypeScript which gets transpiled into JavaScript.
Transpiling will take one language and convert it into another language. This is very popular with TypeScript which gives you a modern high-level typed language. You need JavaScript to run it in a browser, so TypeScript gets “transpiled” into JavaScript.
The Second Browser War

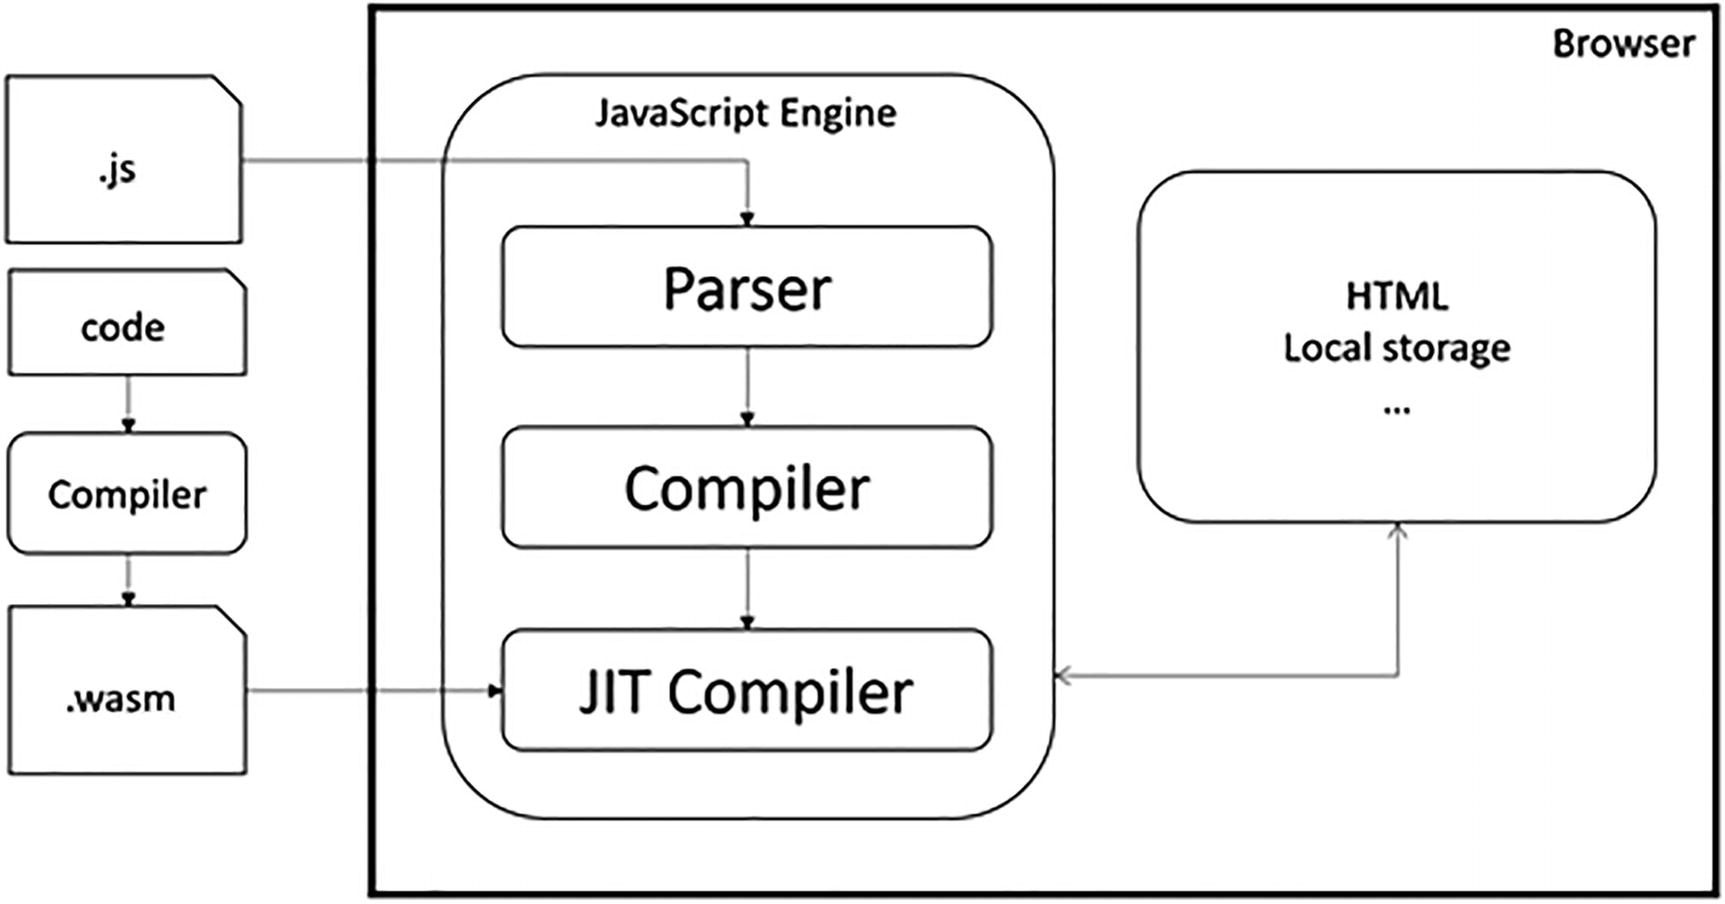
The JavaScript Execution Process
This process takes a lot of effort because JavaScript needs to be downloaded into the browser, where it gets parsed, then compiled into bytecode, and then Just-In-Time converted into native code. So how can we make this process even faster?
The second browser war is all about JavaScript performance.
Introducing WebAssembly
The WebAssembly Execution Process
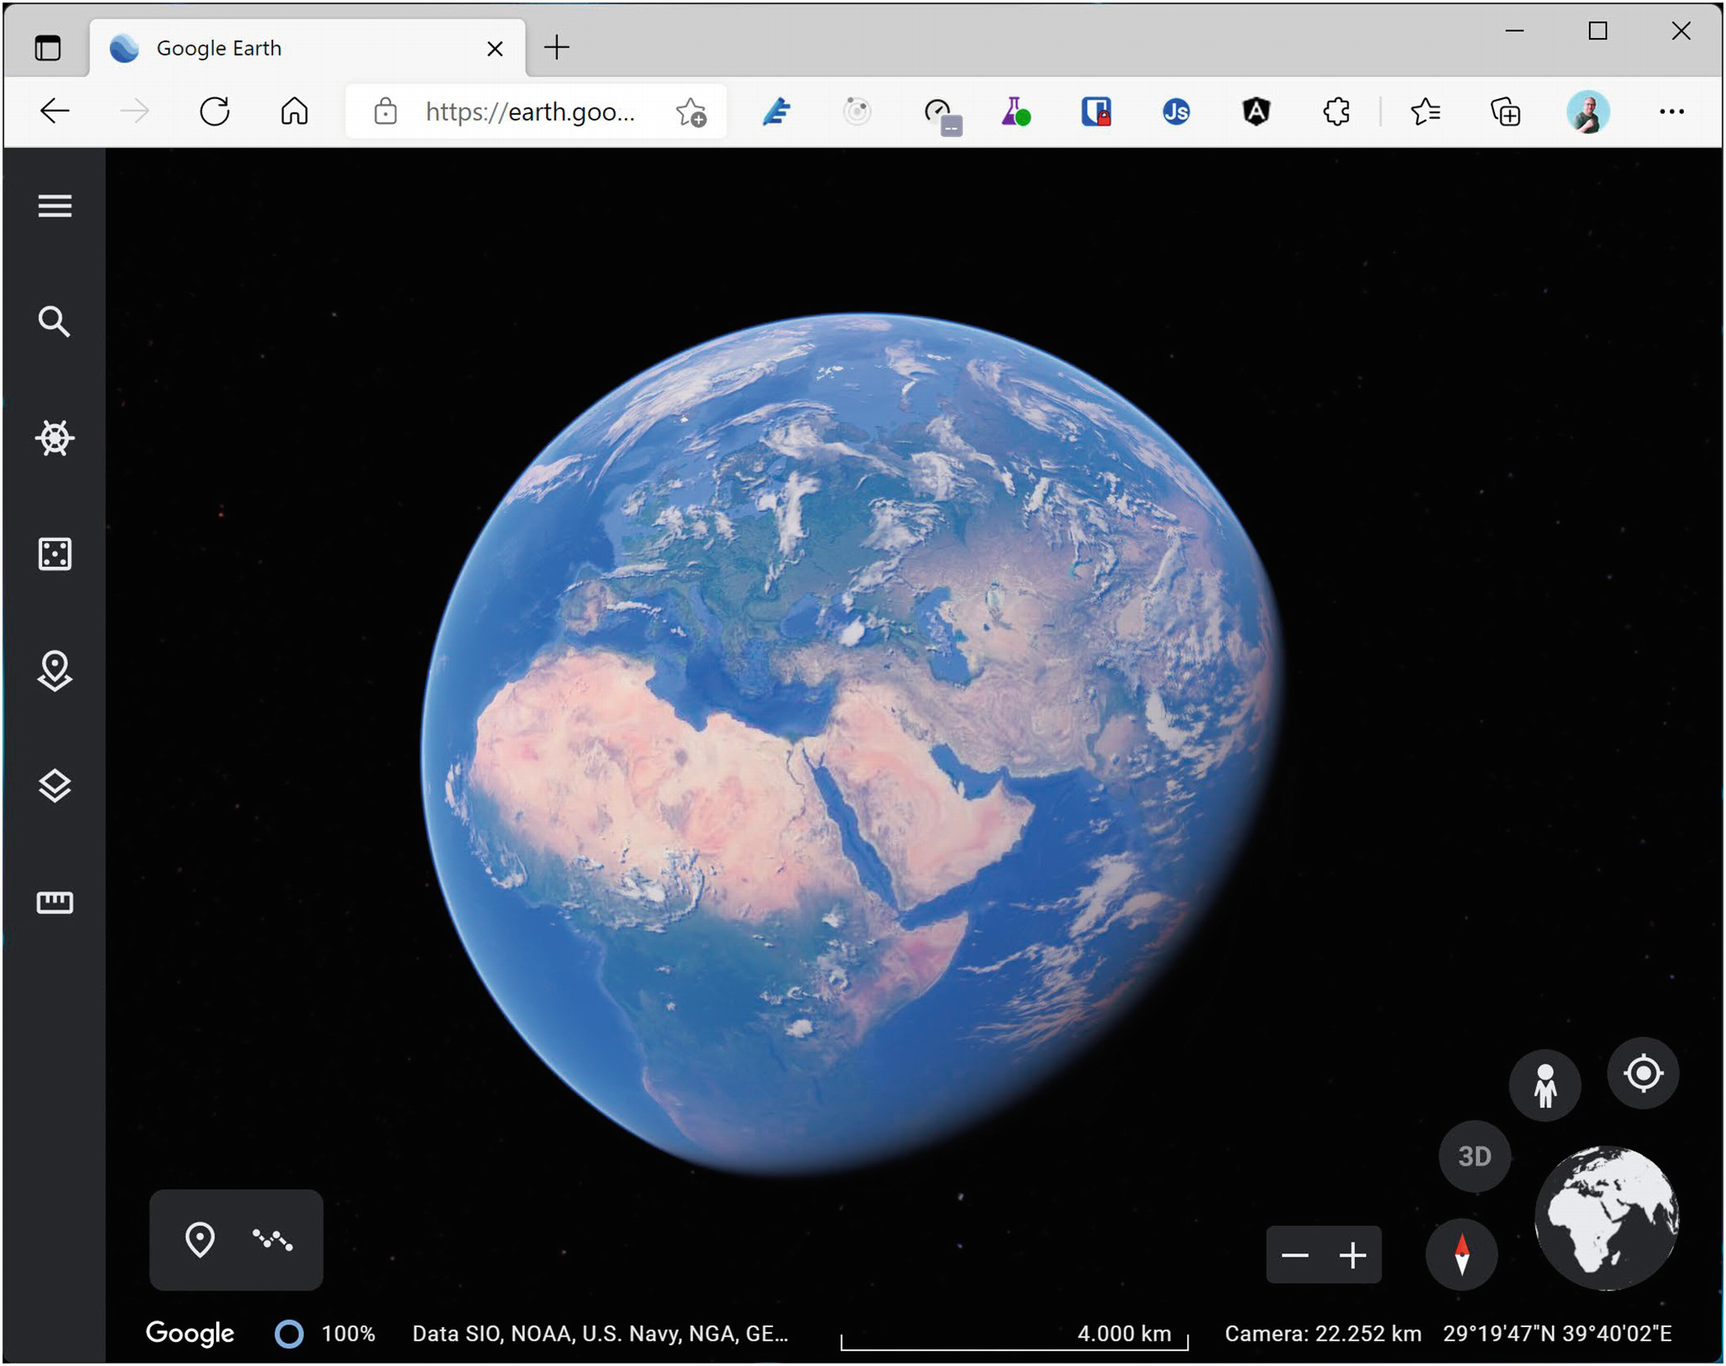
Google Earth in WebAssembly
What is WebAssembly? From the official site webassembly.org:
WebAssembly (abbreviated Wasm) is a binary instruction format for a stack-based virtual machine. Wasm is designed as a portable target for compilation of high-level languages like C/C++/Rust, enabling deployment on the web for client and server applications.
So WebAssembly as a new binary format optimized for browser execution, it is NOT JavaScript. It uses a stack-based virtual machine, just like .NET does. There are compilers for languages like C++ and Rust which compile to WASM. Some people have compiled C++ applications to WASM, allowing to run them in the browser. There is even a Windows 2000 operating system (https://bellard.org/jslinux/vm.html?url=https://bellard.org/jslinux/win2k.cfg&mem=192&graphic=1&w=1024&h=768) compiled to WASM so you can play minesweeper as shown in Figure 1-4!
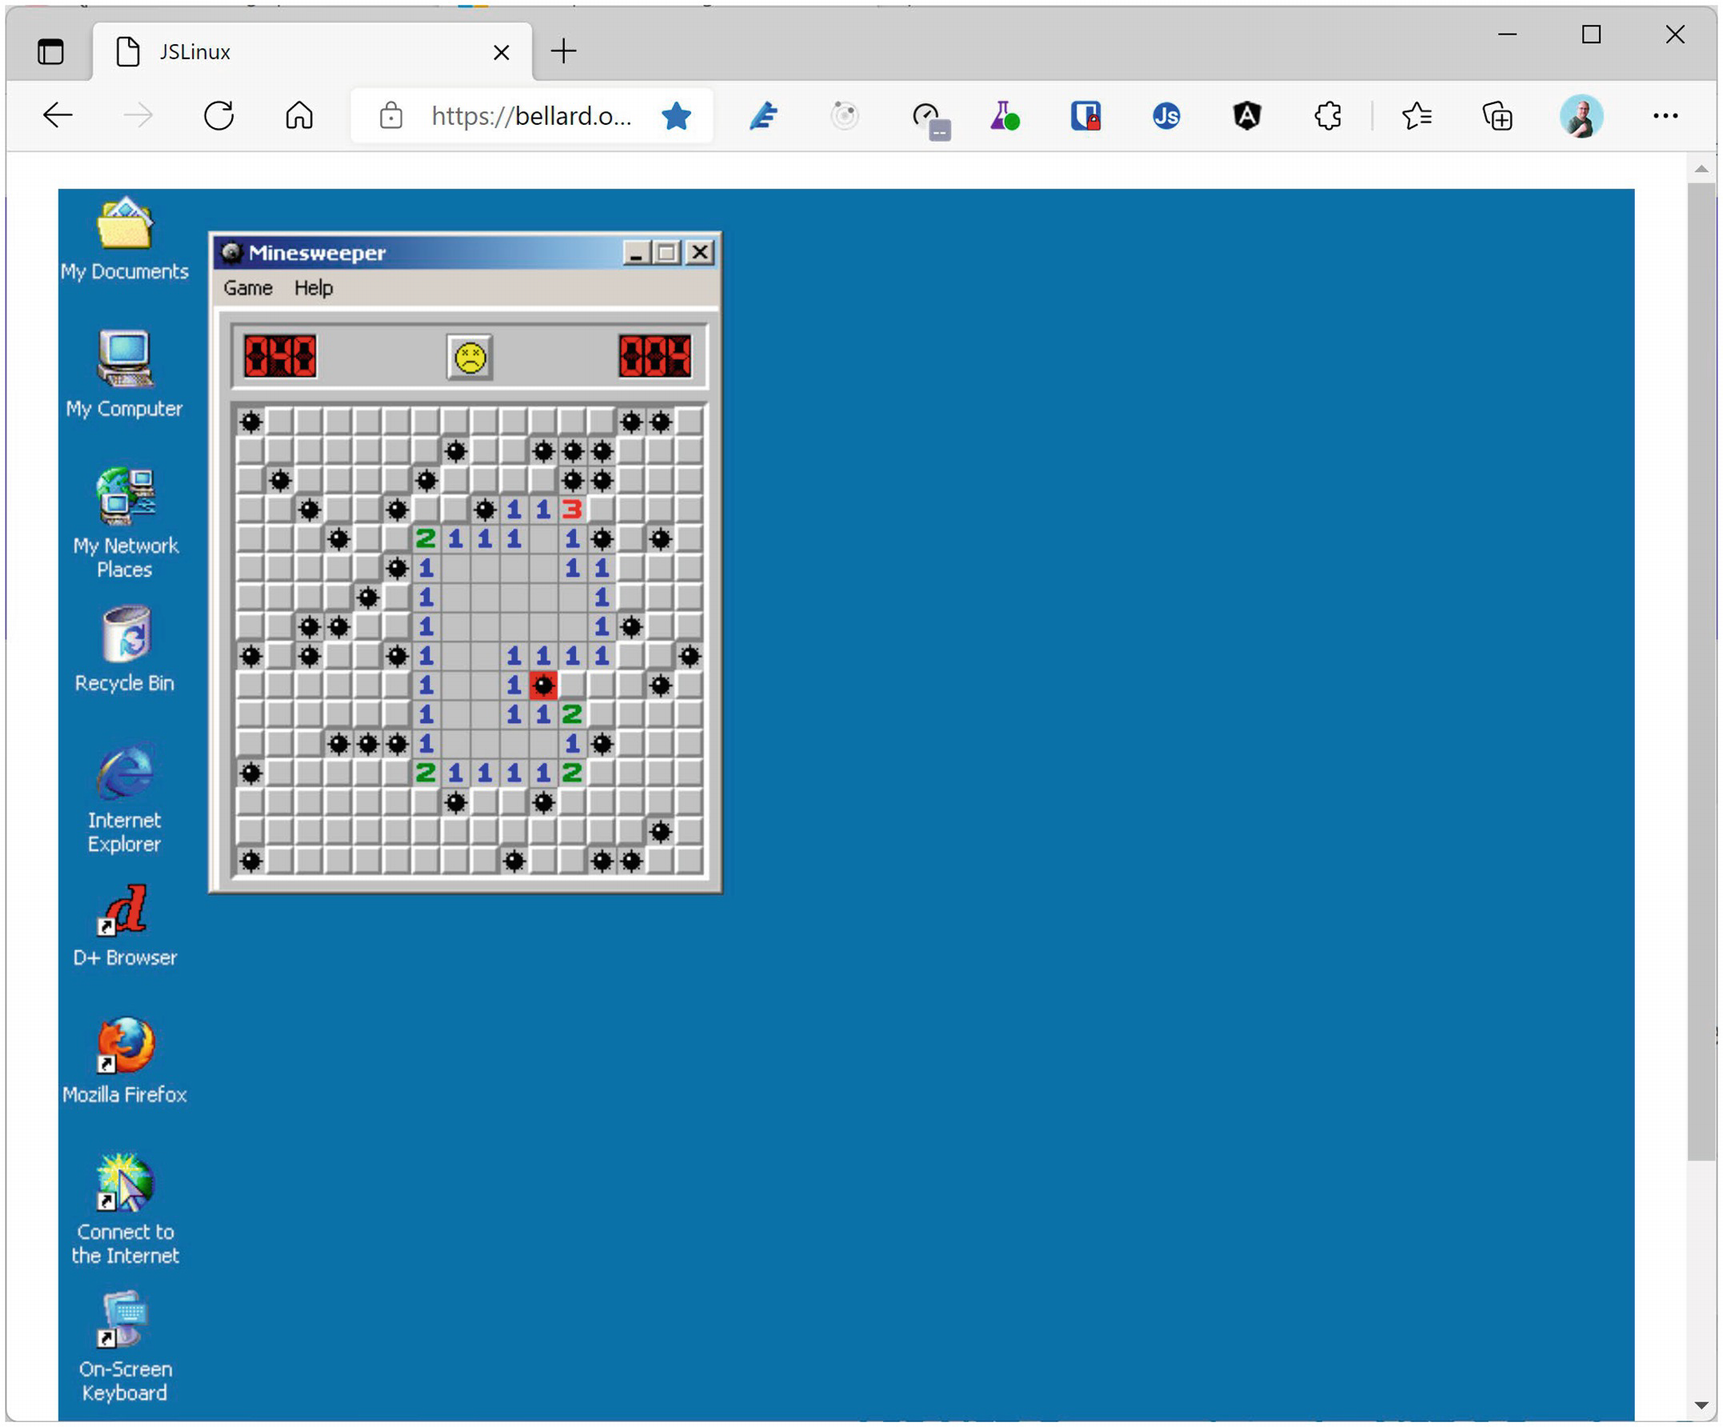
Windows 2000 Running in the Browser
Which Browsers Support WebAssembly?
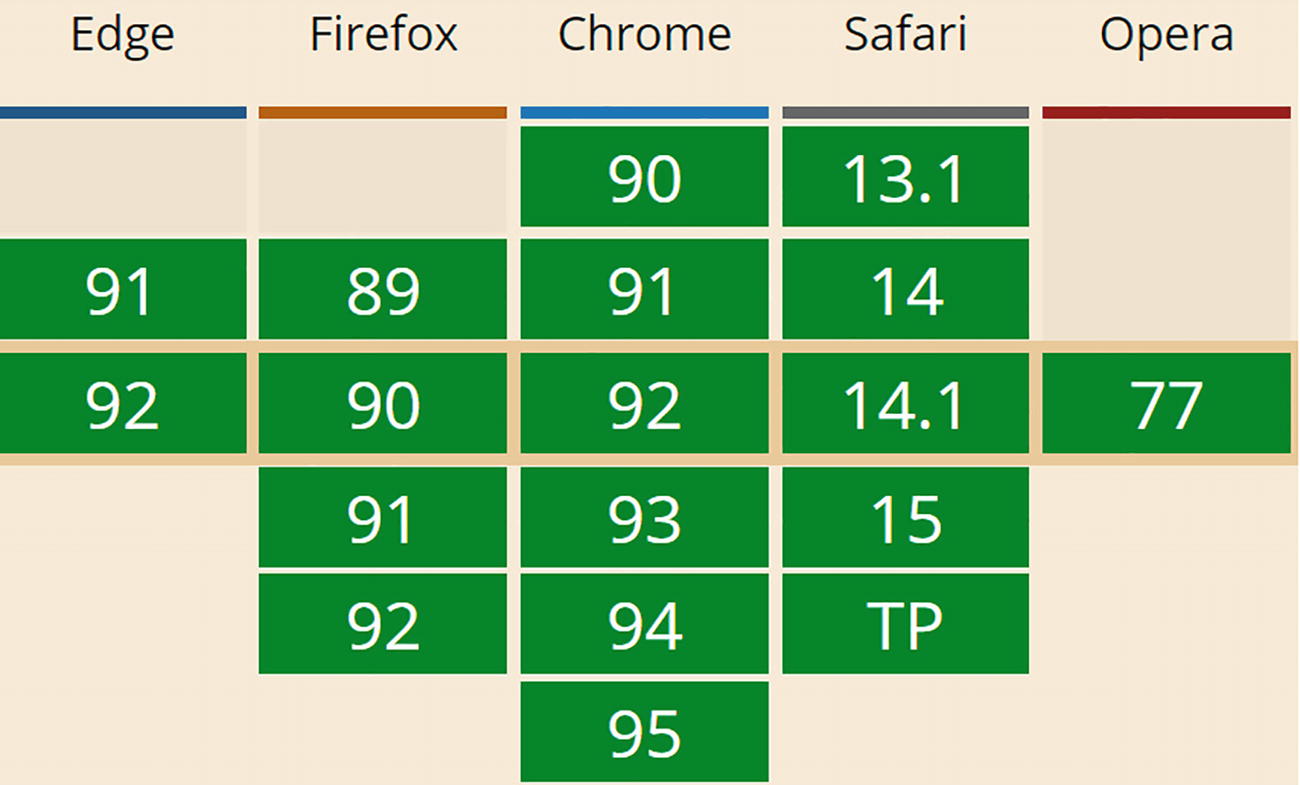
WebAssembly Support
As WebAssembly will become more and more important, we will see other browsers follow suit, but don’t expect Internet Explorer to support WASM.
WebAssembly and Mono
Mono is an open source implementation of the .NET CLI specification, meaning that Mono is a platform for running .NET assemblies. Mono is used in Xamarin (now called Multi-platform App UI, or MAUI for short) for building mobile applications that run on the Windows, Android, and iOS mobile operating systems. You can also use it to build applications for macOS, Linux, Tizen, and others. Mono also allows you to run .NET on Linux (its original purpose) and is written in C++. This last part is important because we saw that you can compile C++ to WebAssembly. So, what happened is that the Mono team decided to try to compile Mono to WebAssembly, which they did successfully. There are two approaches. One is where you take your .NET code and you compile it together with the Mono runtime into one big WASM application. However, this approach takes a lot of time because you need to take several steps to compile everything into WASM, not so practical for day-to-day development. The other approach takes the Mono runtime and compiles it into WASM, and this runs in the browser where it will execute .NET Intermediate Language just like normal .NET does. The big advantage is that you can simply run .NET assemblies without having to compile them first into WASM.
This is the approach currently taken by Blazor. In the beginning, Blazor used the Mono runtime, but they have now built their own .NET Core runtime for WebAssembly. But Blazor is not the only one taking this approach. For example, there is the Ooui project which allows you to run Xamarin.Forms applications in the browser. The disadvantage of this is that it needs to download a lot of .NET assemblies . This can be solved by using tree shaking algorithms which remove all unused code from assemblies. We will look at this in Chapter 15.
Interacting with the Browser with Blazor
WebAssembly with the .NET runtime allows you to run .NET code in the browser. Steve Sanderson used this to build Blazor. Blazor uses the popular ASP.NET MVC approach for building applications that run in the browser. MVC uses the razor syntax to generate HTML on the server. With Blazor, you build razor files (Blazor = Browser + Razor) which execute inside to browser to dynamically build a web page. With Blazor, you don’t need JavaScript to build a web app, which is good news for thousands of .NET developers who want to continue using C# (or F#). To use some browser features, you will still need JavaScript, and we will discuss this in Chapter 10.
How Does It Work?
Let’s start with a simple razor file in Listing 1-1 which you can find when you create a new Blazor project (which we will do further on in this chapter, no need to type anything yet).
Each code sample has been formatted for readability, sometimes splitting lines where this is not necessary and using less indentation. I leave it to you how you decide to format your code.
The Counter Razor File
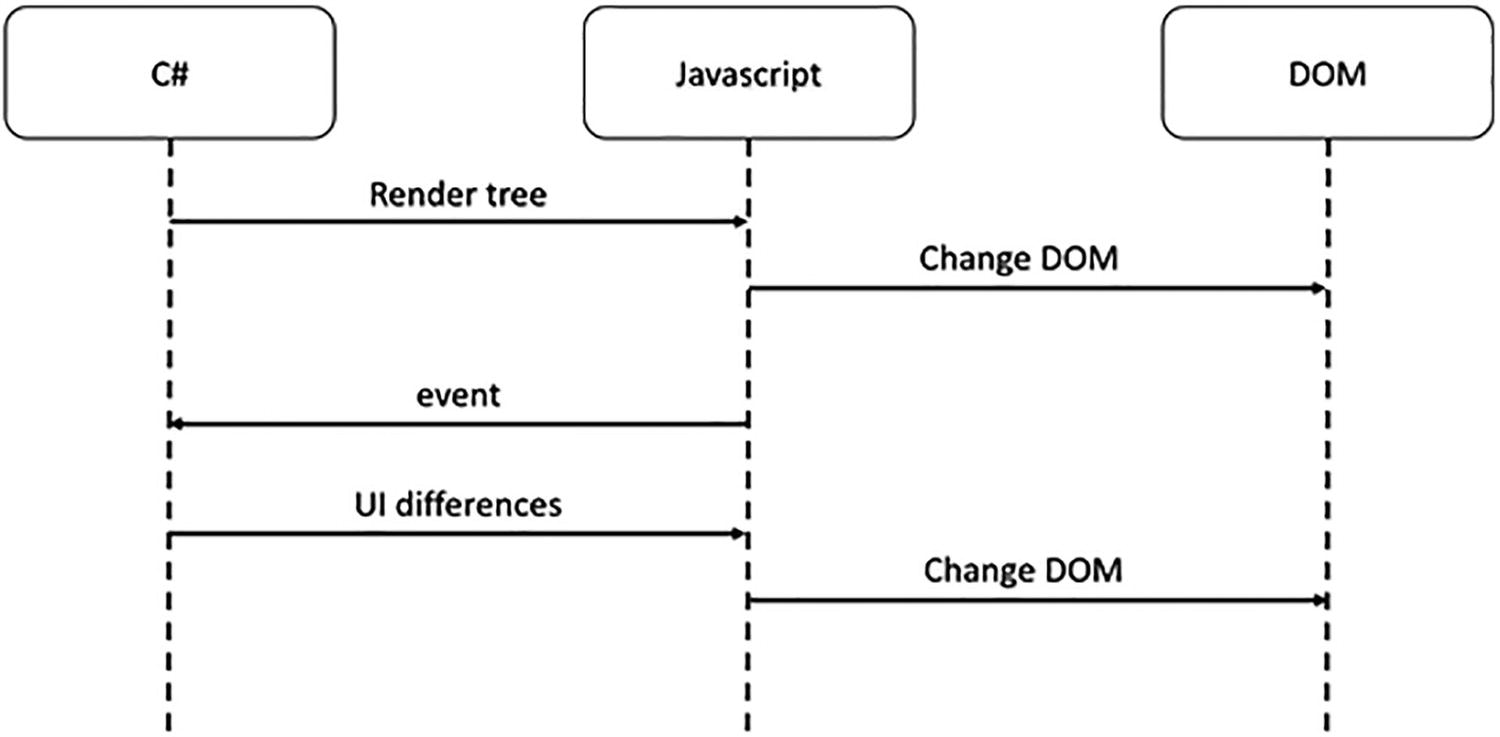
The Blazor WebAssembly DOM Generation Process
This model is very flexible. It allows you to build Progressive Web Apps, and your app can be embedded in Electron desktop applications of which Visual Studio Code is a prime example.
Blazor Server
At the August 7, 2018, ASP.NET community standup (www.youtube.com/watch?v=7Eh_l7jEcCo), Daniel Roth introduced a new execution model for Blazor now called Blazor Server. In this model, your Blazor site is running on the server resulting in a way smaller download for the browser.
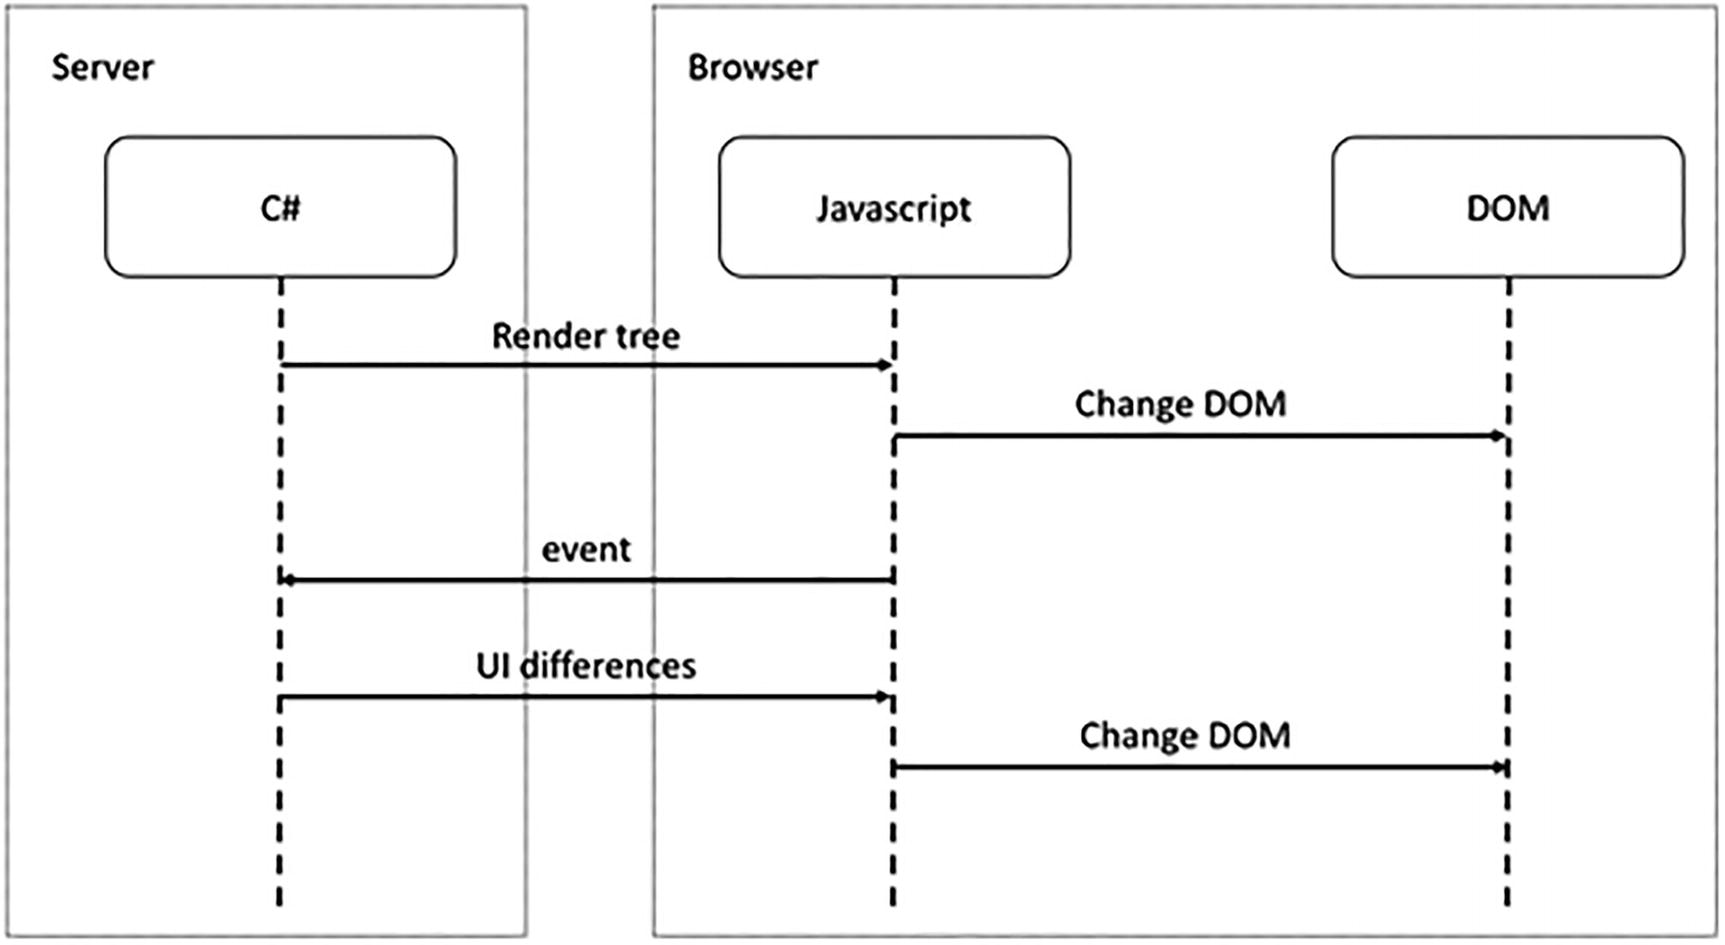
Blazor Server Runtime Model
Pros and Cons of the Blazor Server
Smaller downloads: With Blazor Server, your application does not need to download dotnet.wasm (the .NET runtime) nor all your .NET assemblies. The browser downloads a small JavaScript library which sets up the SignalR connection to the server. This means that the application will start a lot faster, especially on slower connections, but at the price that we continuously need a connection to the server to exchange small messages.
Development process: Blazor WebAssembly does not support all modern debugging capabilities, resulting in added logging. Because your .NET code is running on the server, you can use the regular .NET debugger with all of its advanced features. You could start building your Blazor application using the server-side model, and when it is finished, switch to the client-side model by switching the hosting model.
.NET APIs: Because you are running your .NET code on the server, you can use all the .NET APIs you would use with regular ASP.NET Core MVC applications, for example, accessing the database directly. Do note that doing this will stop you from quickly converting it into a client-side application. You can limit this by writing service classes and using dependency injection to inject different implementations depending on the environment your components are hosted in.
Online only: Running the Blazor application on the server does mean that your users will always need access to the server. This will prevent the application from running in Electron, nor will you be able to run it as a Progressive Web Application (PWA). And if the connection drops between the browser and server, your user could lose some work because the application will stop functioning. Blazor will try to reconnect to the server without losing any data, so most of the time, users will not lose any work done.
Server scalability: All your .NET code runs on the server, so if you have thousands of clients, your server(s) will have to handle all the work. Not only that, Blazor uses a stateful model which will require you to keep track of every user’s state on the server. So your server will need more resources than with Blazor WebAssembly which can use a stateless model.
Your First Blazor Project
Getting hands-on is the best way to learn. You will first install the prerequisites to developing with Blazor. Then you will create your first Blazor project, run the project to see it work, and finally inspect the different aspects of the project to get a “lay of the land” view for how Blazor applications are developed.
I learned an important lesson from the first edition of this book: never underestimate the speed at which Microsoft innovates! All code samples in the first edition of Blazor Revealed became invalid quite rapidly. I do not expect this to happen again with this edition since it is based on the Release To Manufacture (RTM) version of Blazor. If something does not work, simply consult the sources that come with this book. I will keep these up to date. Promise!
The source code for this book is available on GitHub via the book’s product page, located at www.apress.com/ISBN.
Installing Blazor Prerequisites
Working with Blazor requires you to install some prerequisites, so in this section, you will install what is needed to get going.
Blazor runs on top of .NET , optionally providing the web server for your project which will serve the client files that run in the browser and run any server-side APIs that your Blazor project needs. .NET (previously known as .NET Core) is Microsoft’s cross-platform solution for working with .NET on Windows, Linux, and OSX.
You can find the installation files at www.microsoft.com/net/download. Look for the latest version of the .NET SDK (you’ll need at least version 6.0). Follow the installation instructions and install it on your machine, using Windows, OSX, or Linux.
Output should indicate that you installed the correct version. The version number should be at least 6.0.
Should the command’s output show an older version, you will need to download and install a more recent version of .NET SDK. These can run side by side so you will not break other .NET projects doing this.
Using Visual Studio
For people using Windows, Visual Studio (from now on, I will refer to Visual Studio as VS) is one of the integrated development environments (IDE) we will use throughout this book. If you are using OSX or Linux, you can use Visual Studio Code, and OSX users might prefer Visual Studio for Mac. With any one, you can edit your code, compile it, and run it all from the same application. And the code samples are also the same.
If you want to use Visual Studio, download the latest version of Visual Studio from www.visualstudio.com/downloads/. The Community Edition is free and should allow you to do everything done in this book.
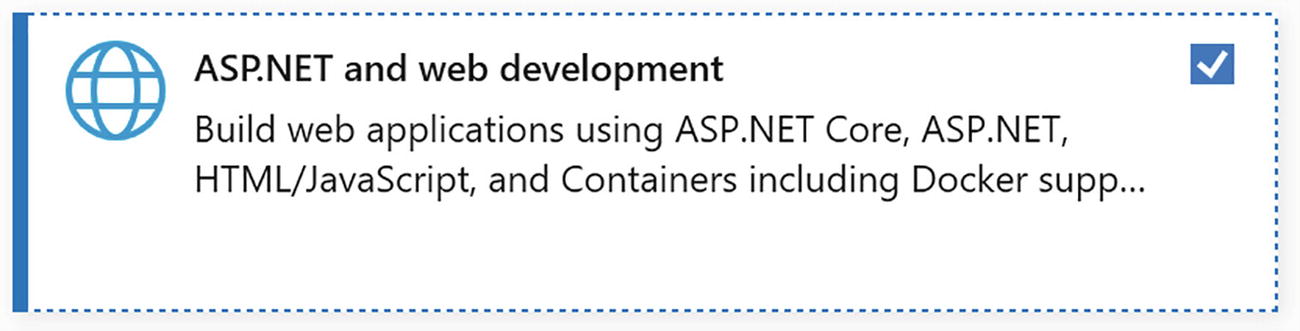
The Visual Studio Installer Workloads Selection
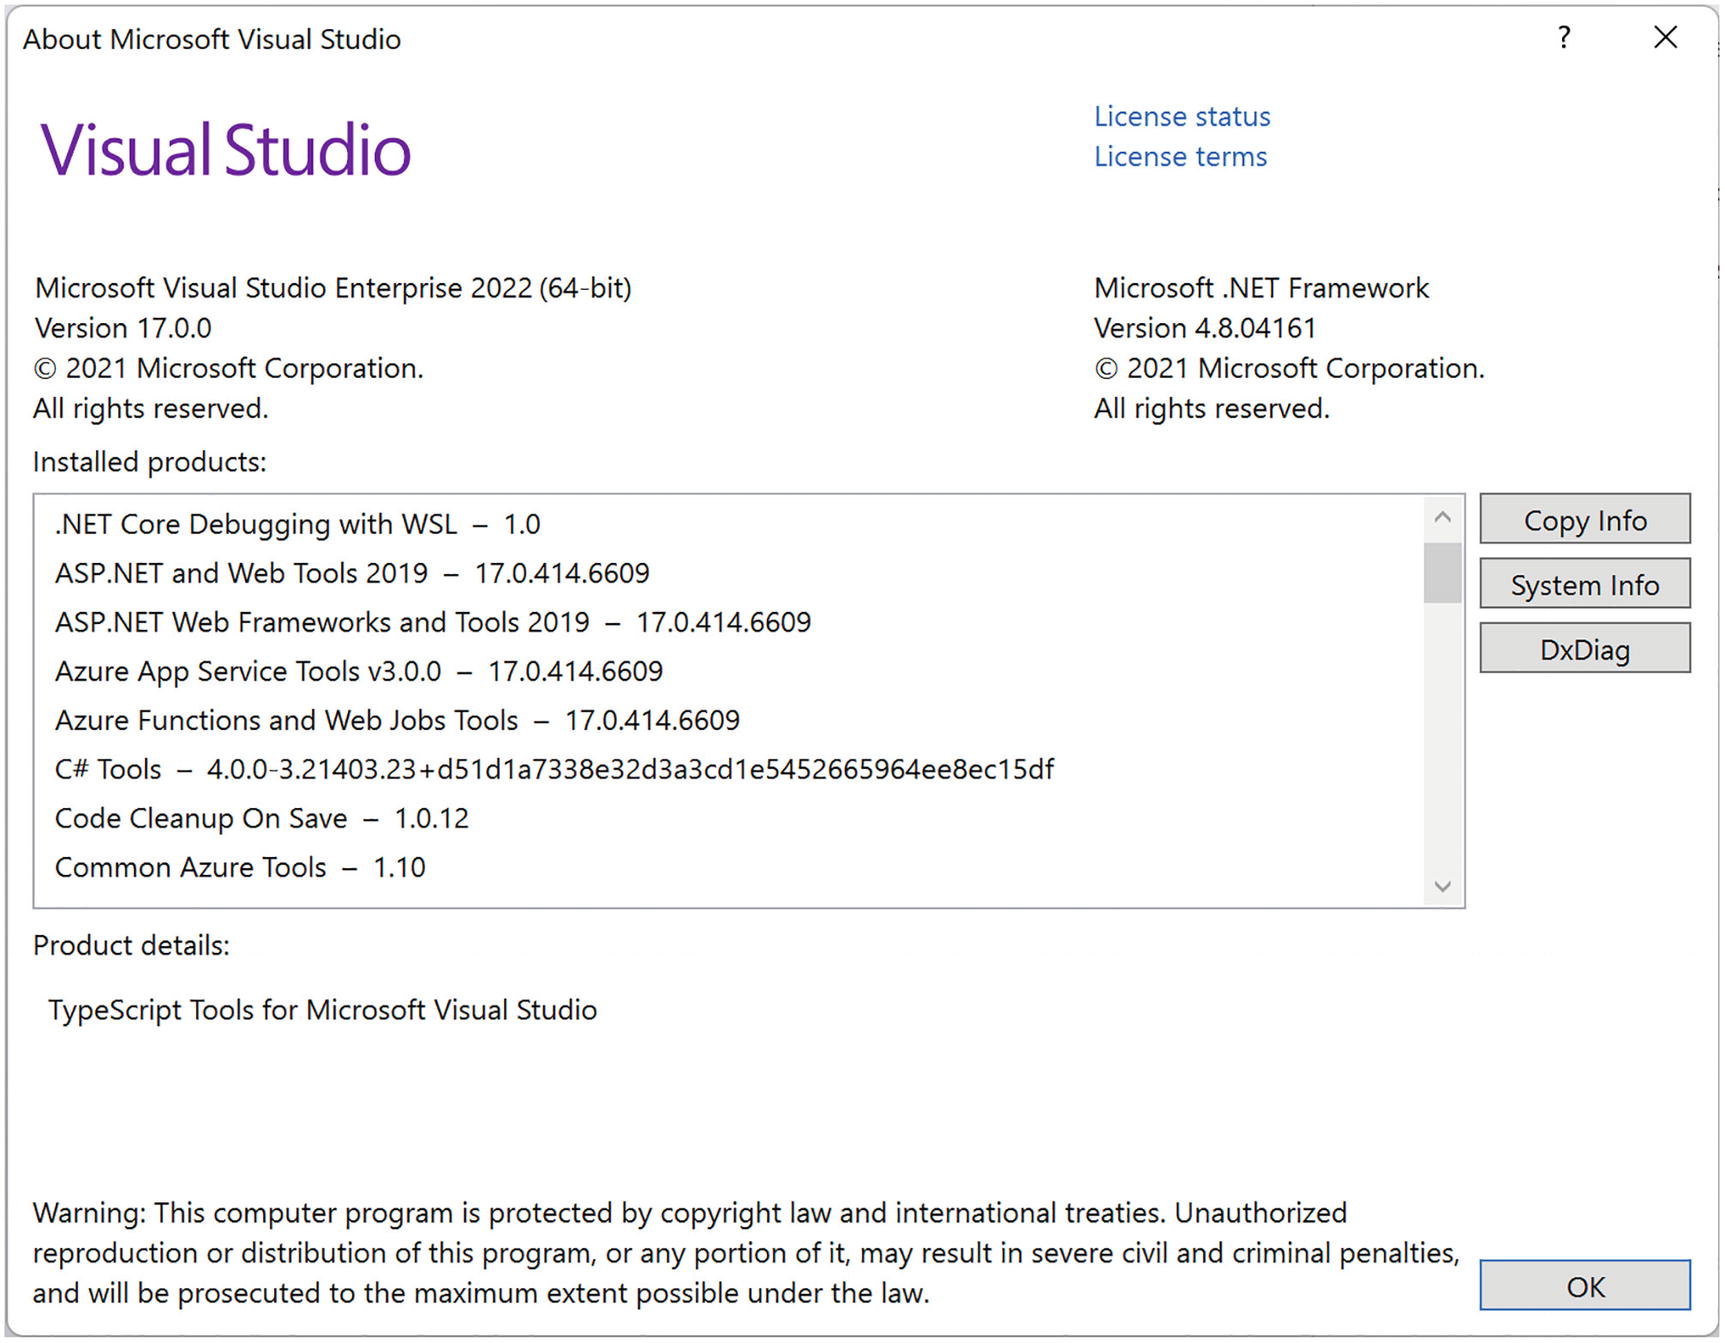
About Microsoft Visual Studio
Using Visual Studio Code
Visual Studio Code (VSC) is a free, modern, cross-platform development environment with an integrated editor, git source control, and debugger. The environment has a huge range of extensions available allowing you to use all kinds of languages and tools directly from VSC. So, if you don’t have access to (because you’re running a non-Windows operating system or you don’t want to use) Visual Studio, use VSC.
Install VSC from www.visualstudio.com/. Install using the defaults.

Visual Studio Code Extensions Tab

C# for Visual Studio Code
Click Install.
Understanding the Blazor Templates for VS/Code
Throughout this book, we will create several different Blazor projects. With .NET Core, we can use the command-line interface (CLI) to create all kinds of projects, including Blazor WebAssembly and Blazor Server.
With Blazor projects, you have a couple of choices. You can create a standalone Blazor project (using the blazorwasm template) that does not need server-side code. This kind of project known as Blazor WebAssembly has the advantage that you can simply deploy it to any web server which will function as a file server, allowing browsers to download your site just like any other site. We will look at deployment in a later chapter.
Or you can create a hosted project (adding the --hosted option) with client, server, and shared code. This kind of Blazor WebAssembly project will require you to host it where there is .NET Core support because you will execute code on the server as well, for example, to retrieve data from a database.
The third option is to run all Blazor code on the server (using the blazorserver template). In this case, the browser will use a SignalR connection to receive UI updates from the server and to send user interaction back to the server for processing.
In this book, we will use the second option (Blazor WebAssembly hosted on ASP.NET MVC Core) most of the time, but the concepts you will learn in this book are the same for all three options. You can even develop for Blazor WebAssembly and Blazor Server at the same time! Why? Because debugging support for Blazor WebAssembly is limited, so you develop with Blazor Server using all debugger features you know and love. But you can test everything with Blazor WebAssembly ensuring you can run everything in the browser later. This is the way I like to work. However, to pull this off, you need some experience with Blazor first, so keep reading.
Generating the Project with Dotnet CLI
This should build without any errors.
Open your browser on this address (here https://localhost:5001), and you are ready to play!
Generating Your Project with Visual Studio
Start Visual Studio and select Create a new project.
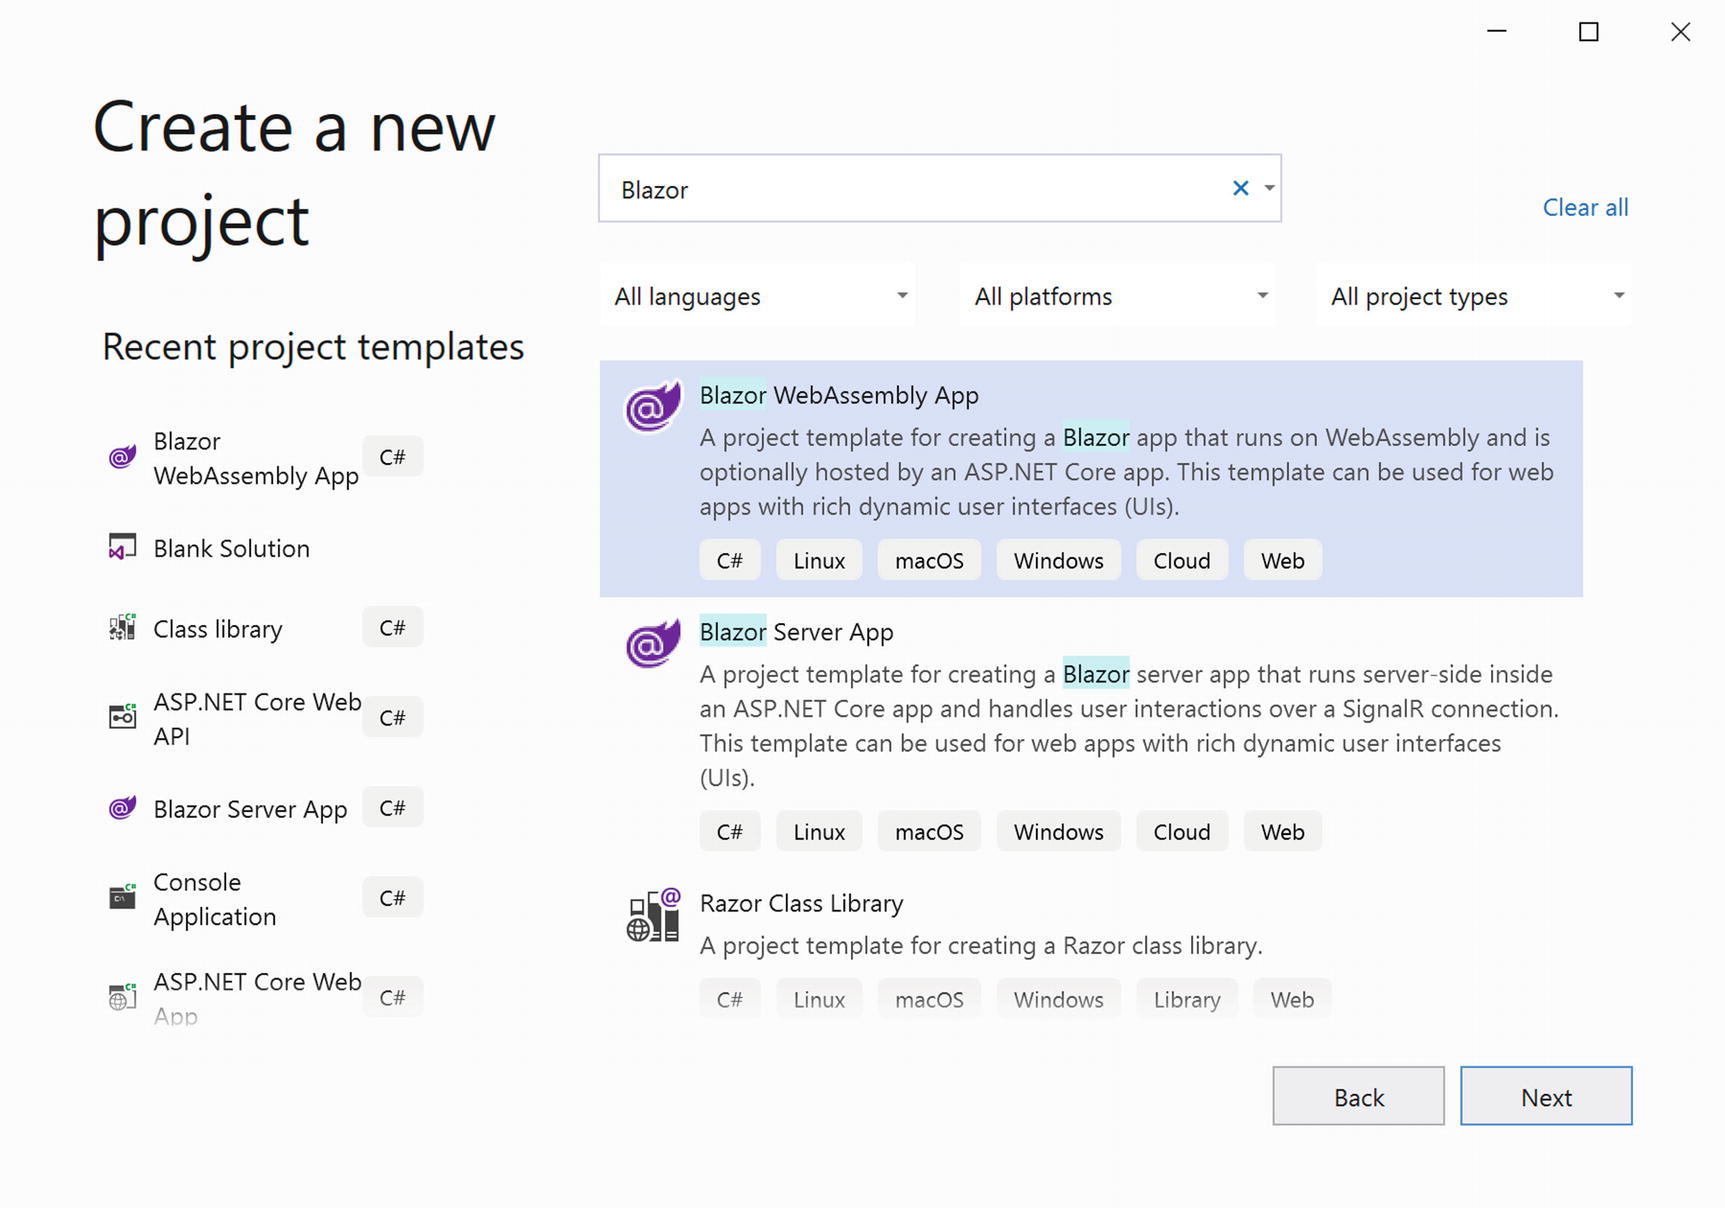
Visual Studio New Project Dialog
Click Next.
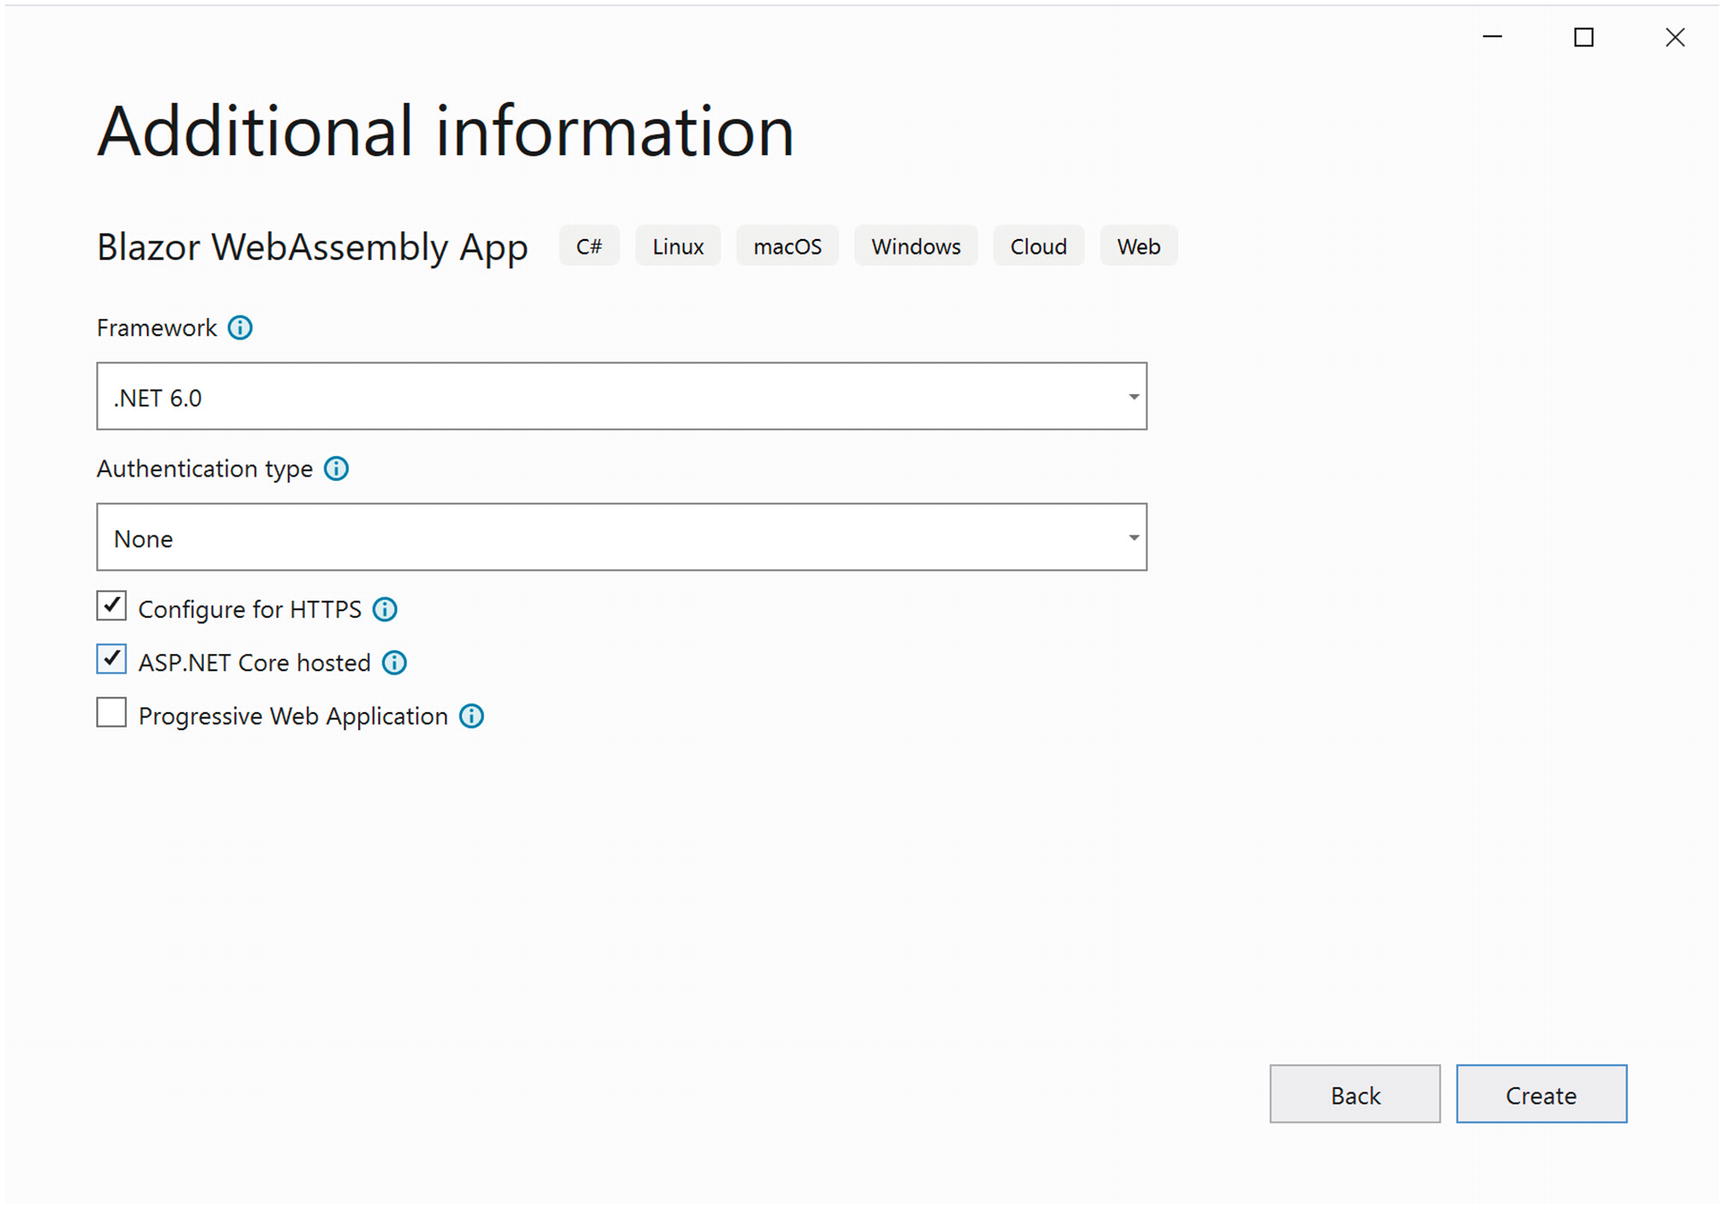
Name your project MyFirstBlazor, choose the location where the project should be generated, and click Next.
New ASP.NET Core Web Application
Wait for Visual Studio to complete. Then build and run your solution by pressing F5. After a little while, the browser will open and display the Blazor application.
Running Blazor with Visual Studio Code
Or you can open VSC and then select File ➤ Open Folder….
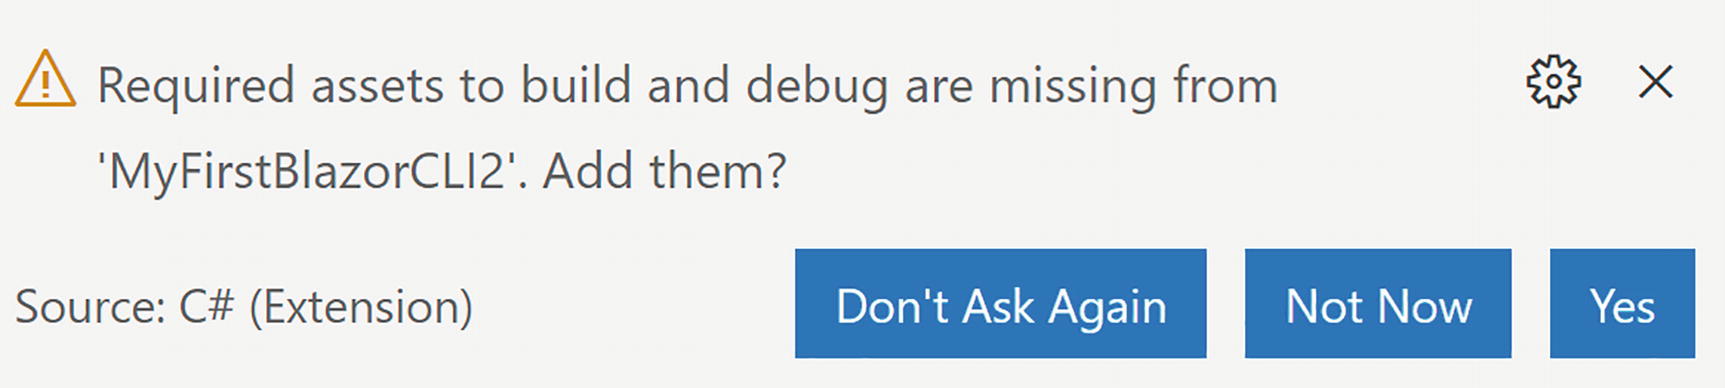
Code Asking to Add Build and Debug Assets
Thanks to this integration with Visual Studio Code, you can simply press F5 to build and run your project.
VSC now uses Workspace Trust which might pop up a dialog asking if you trust the authors of a project. When opening the provided code download, you will probably encounter this.
Running the Generated Project
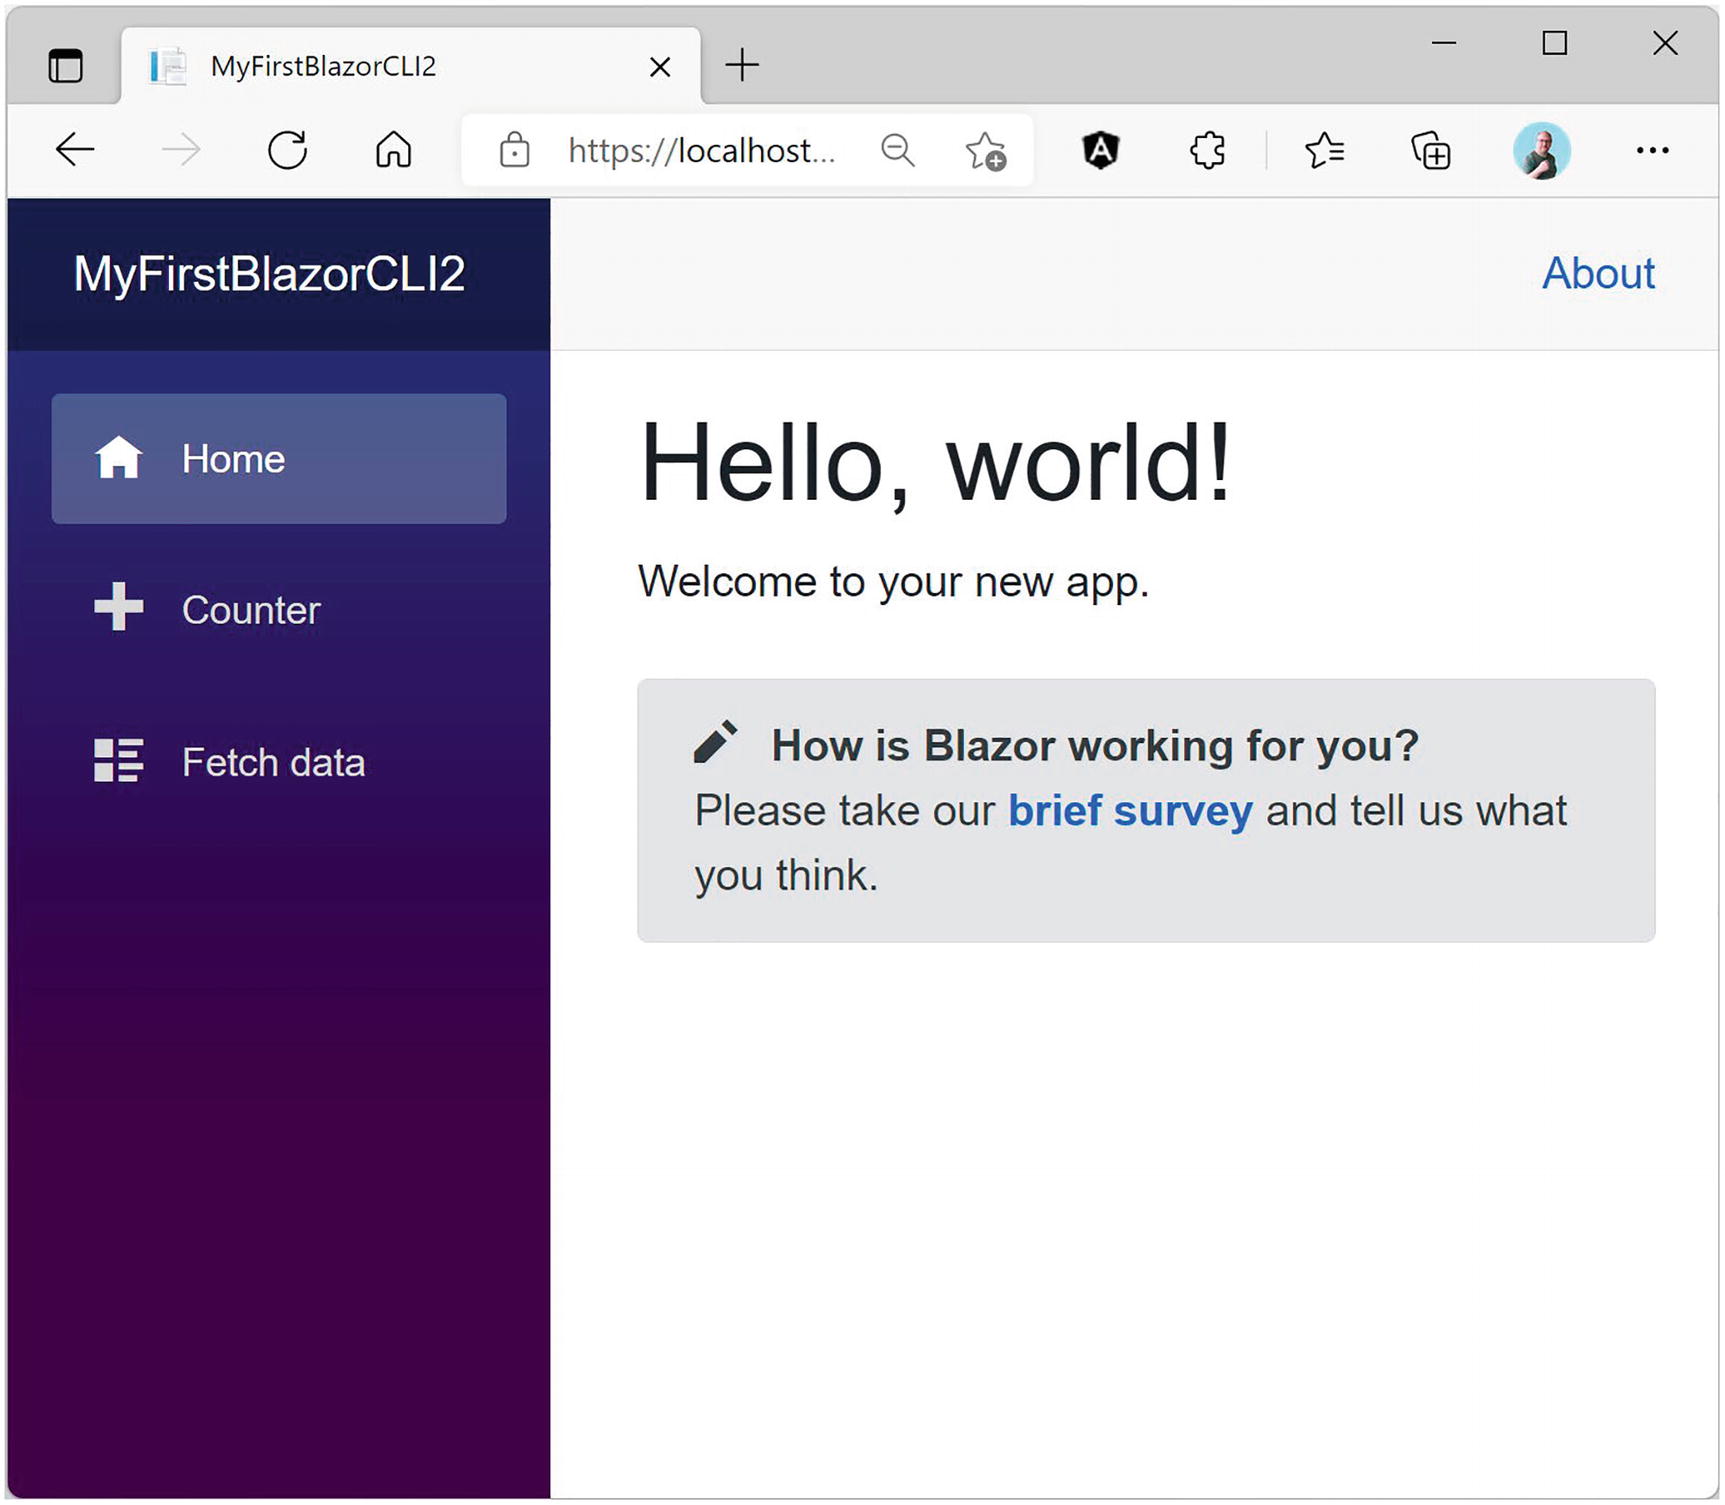
Your First Application – Home Screen
This generated Single-Page Application (SPA) has on the left side a navigation menu allowing you to jump between different pages. On the right side, you will see the selected component; in Figure 1-15, it is showing the Index component. And in the top right corner, there is an About link to https://blazor.net/ which is the official Blazor documentation website.
The Index component shows the mandatory “Hello, world!” demo, and it also contains a survey component you can click to fill out a survey (this is a real survey, so please let Microsoft know you like Blazor!). The SurveyPrompt is the first example of a custom Blazor component. We will discuss building components like SurveyPrompt in Chapters 3 and 4.
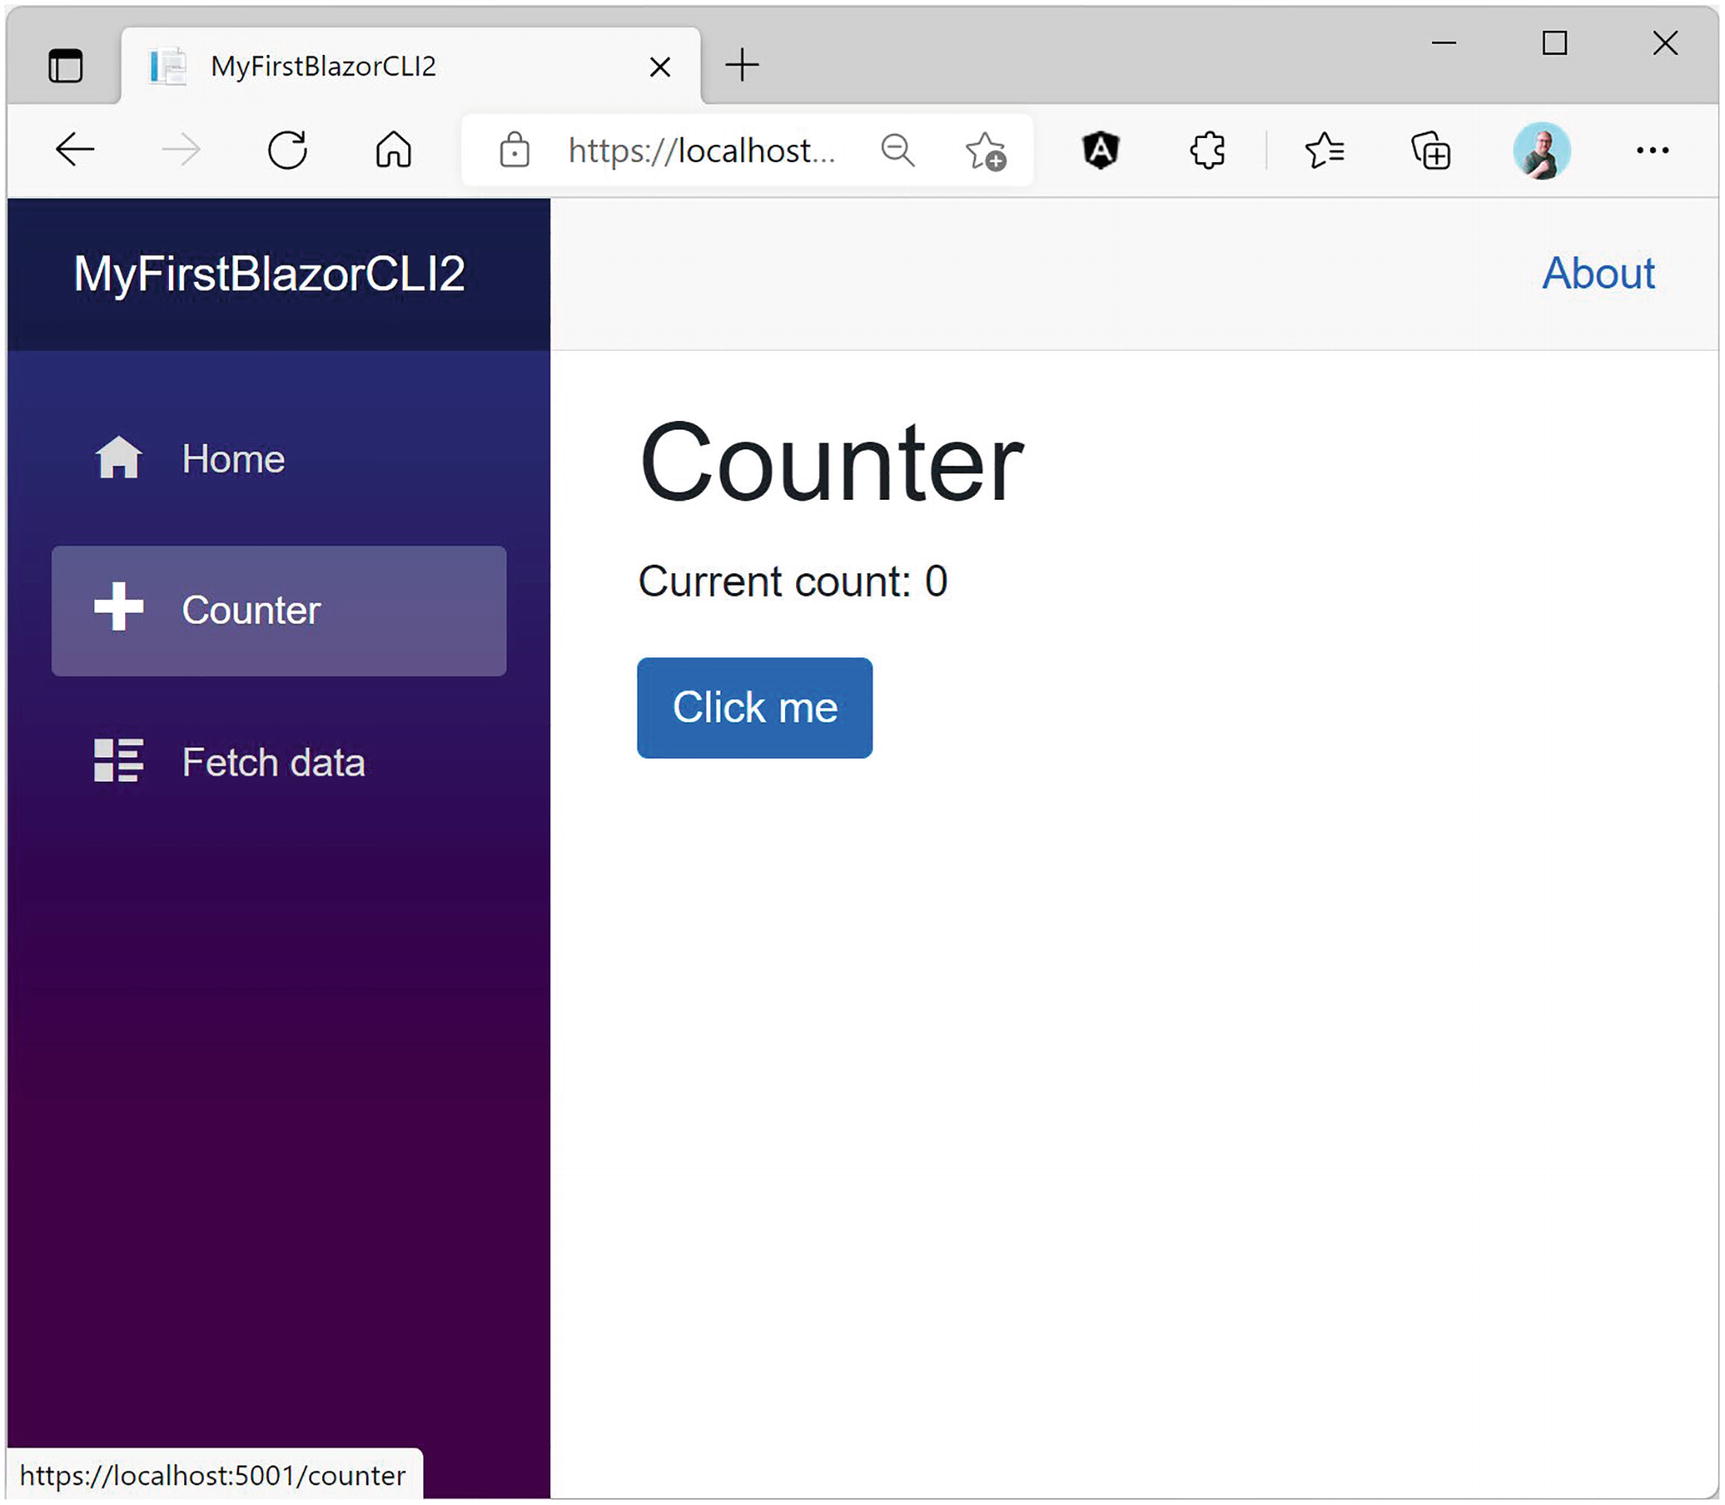
Your First Application – Counter Screen
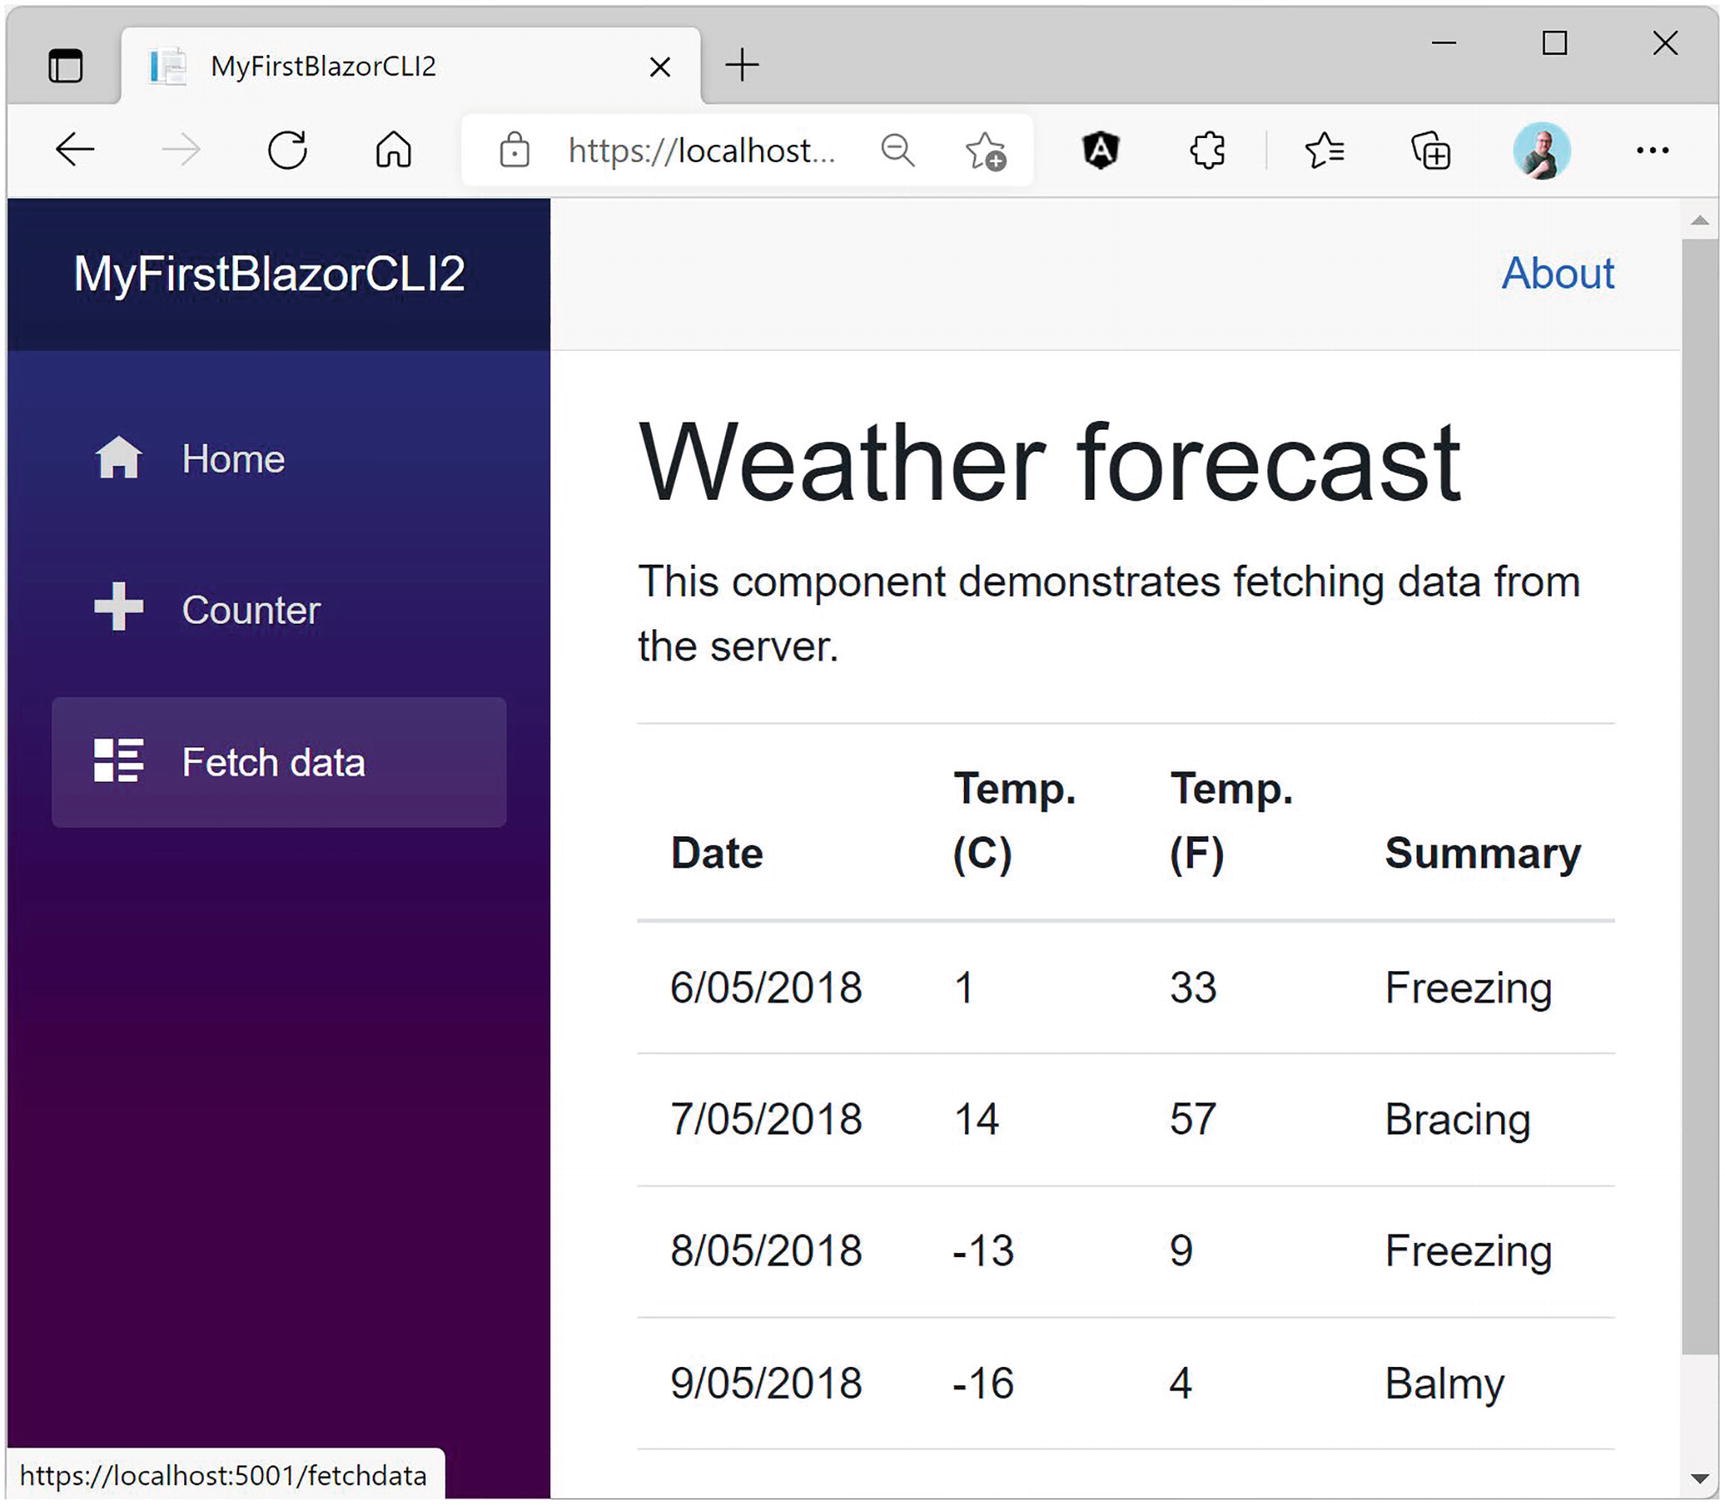
Your First Application – Fetch data Screen
Examining the Project’s Parts
Now being able to play with these pages is all nice, but let us have a look at how all this works. We will look starting with the server project which hosts our Blazor website. Then we will look at the shared project which contains classes used by both server and client. Finally, we will examine the client project which is the actual Blazor implementation.
Visual Studio, Visual Studio Code, and Visual Studio for Mac use solution files to group projects that will form an application. So, a typical Blazor WebAssembly project consists of a server, a client, and a shared project grouped into a single solution. This simplifies building everything since the solution allows tools to figure out in which order to compile everything. Hey, you could even switch between Visual Studio, VS for Mac, and VSC because they all use the same project and solution files!
The Server Project
Web applications are a bunch of files that get downloaded by the browser from a server. It is the server’s job to provide the files to the browser upon request. There is a whole range of existing servers to choose from, for example, IIS on Windows or Apache on Linux. ASP.NET Core has a built-in server known as Kestrel that you generated with the --hosted option, which you can then run on Windows, Linux, or OSX. This is the preferred option to use during development.
The Server Project’s Program Class
The UseDeveloperExceptionPage Middleware
Would you like to see a detailed error page when the server has an uncaught exception? The UseDeveloperExceptionPage method which installs some error handling middleware takes care of that. Of course, you don’t need that in production (you should handle all exceptions correctly <grin>), so this middleware is only used when running in a development environment. How does the server know if you are running in development or release? The if statement you see here checks an environment variable called ASPNETCORE_ENVIRONMENT , and if the environment variable is set to Development, it knows you are running in development mode.
The launchSettings.json File
The Blazor bootstrap process requires a bunch of special files, especially dotnet.wasm (dotnet.wasm is the .NET runtime compiled as WebAssembly). This is served by the Blazor middleware, which is installed by the UseBlazorFrameworkFiles instruction. Later in this chapter, you will see why.
Look at the end of Listing 1-2. Here is another important middleware installed. The MapFallbackToFile("index.html") will return the index.html file which takes care of loading everything your Blazor application needs.
Using a Shared Project
The FetchData component downloads weather information from the server. These kinds of requests will be handled by the MVC middleware (MapControllers). We will discuss this in more detail in Chapter 6.
The Shared WeatherForecast Class
Understanding the Client Blazor Project
After this, there is another div; this is used to display errors in case your Blazor application has an uncaught exception.
This script will install Blazor by downloading dotnet.wasm. A little further we will look at this in more detail.
Listing 1-6. The index.html File
The Main Method
The App Component
The Index Component
Layout Components
The MainLayout Component
This component contains a div HTML element with two nested divs. The first nested div with class sidebar contains a single Blazor component: NavMenu. This is where your navigation menu gets defined. The sidebar will display a menu, allowing you to navigate between Home, Counter, and Fetch data. We will look in more detail at navigation and routing in Chapter 9.
The next nested div with class main has two parts. The first is the About link you see on every page. The second part contains the @Body; this is where the selected page will be shown. For example, when you click the Counter link in the navigation menu, the @Body will be replaced with the Counter component.
This is all for now, but the rest of the book will explain each part as we go along.
Debugging Client-Side Blazor
Of course, while building your Blazor app, you will encounter unexpected behavior from time to time. Debugging Blazor Server can be done just like any .NET project using Visual Studio or Code. But with Blazor WebAssembly, your code will be running in the browser. You will be happy to learn that the VS/VSC debugger works with Blazor, although limited. You can put breakpoints in your code, step through your code, and observe variables holding simple types like bool, int, and string. At the time of writing, debugging Blazor WebAssembly only works for Chrome or Edge, both Chromium-based browsers.
Debugging with Visual Studio
The launchSettings.json File for Debugging (Excerpt)
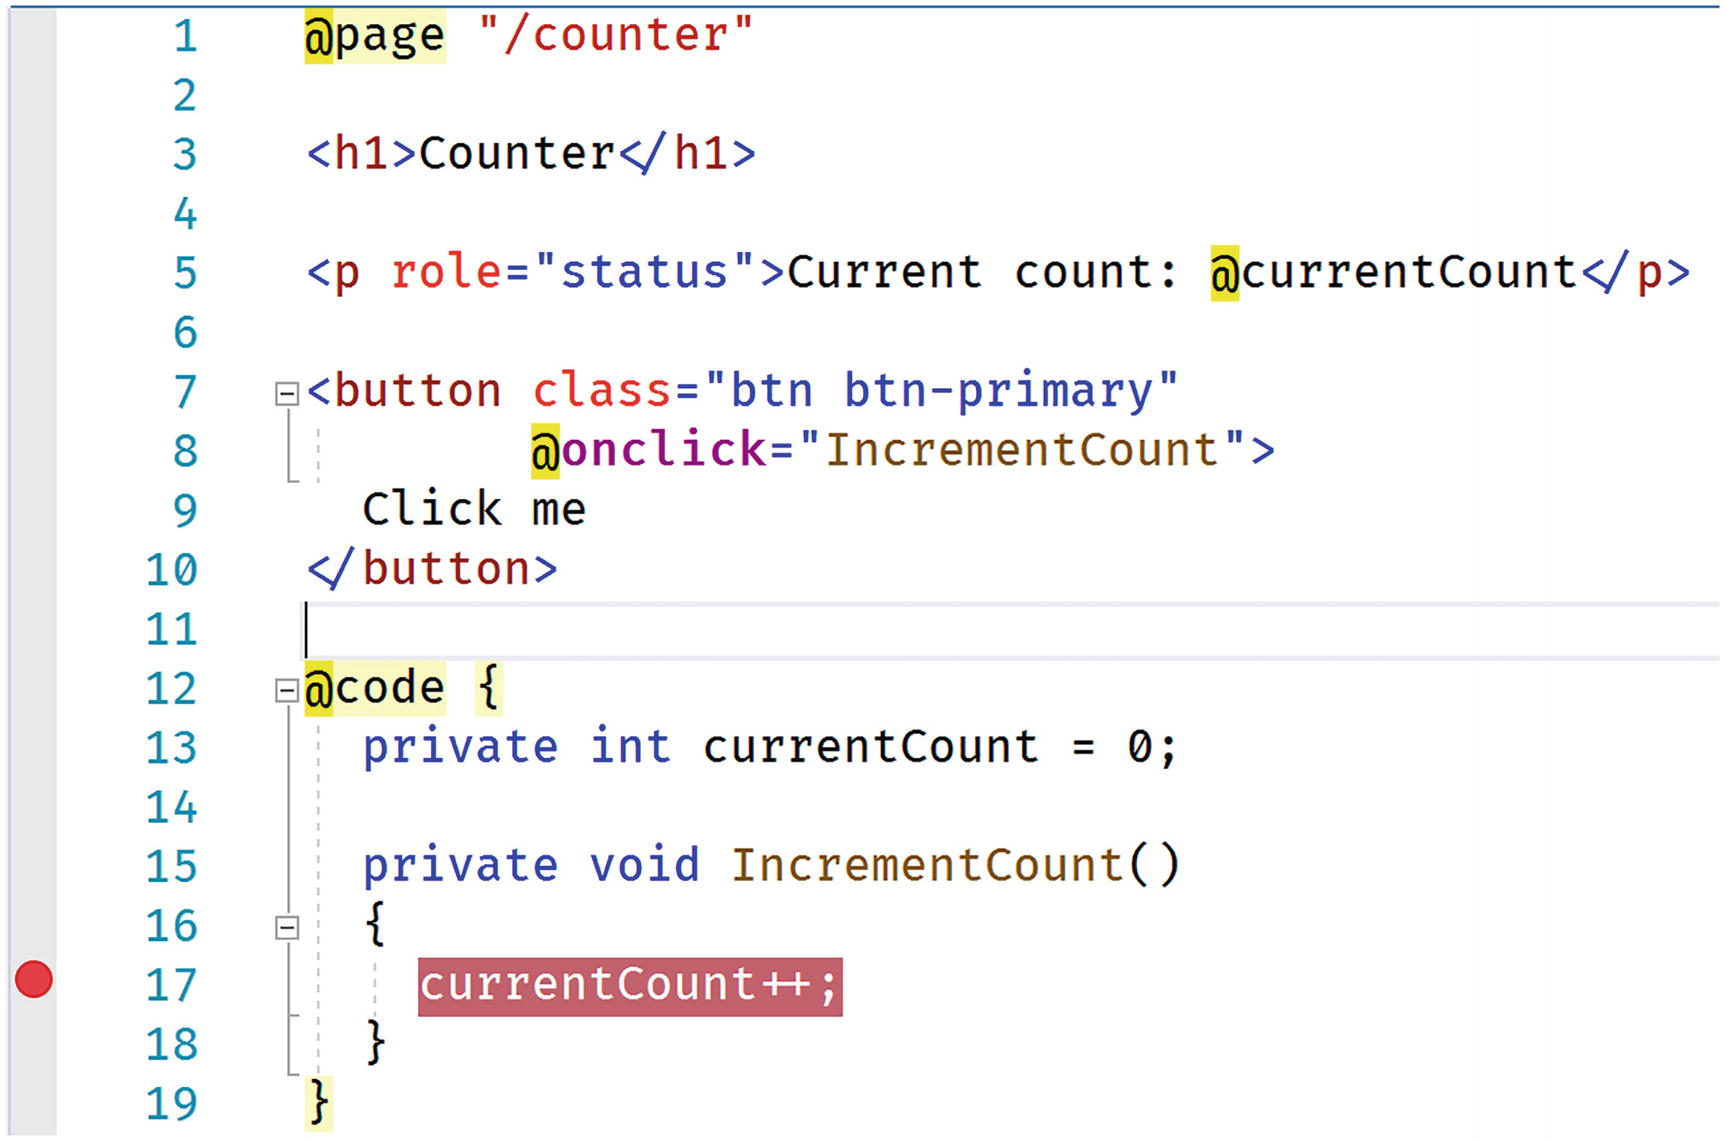
Setting a Breakpoint in the IncrementCount Method
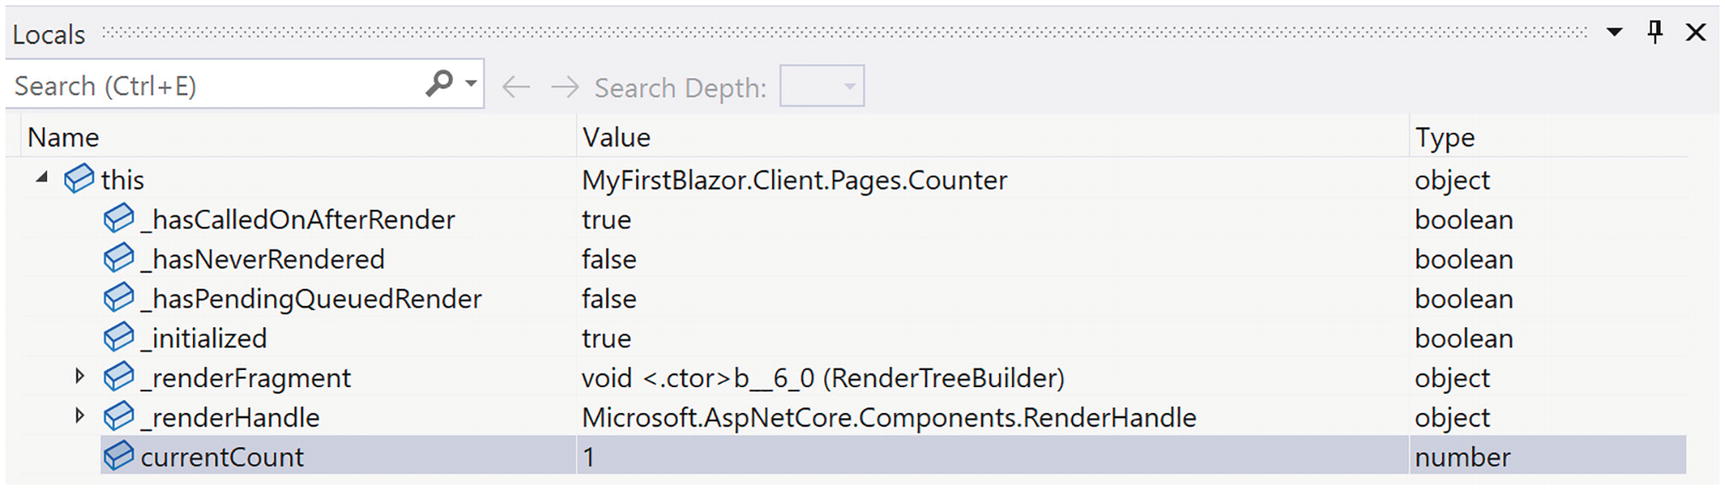
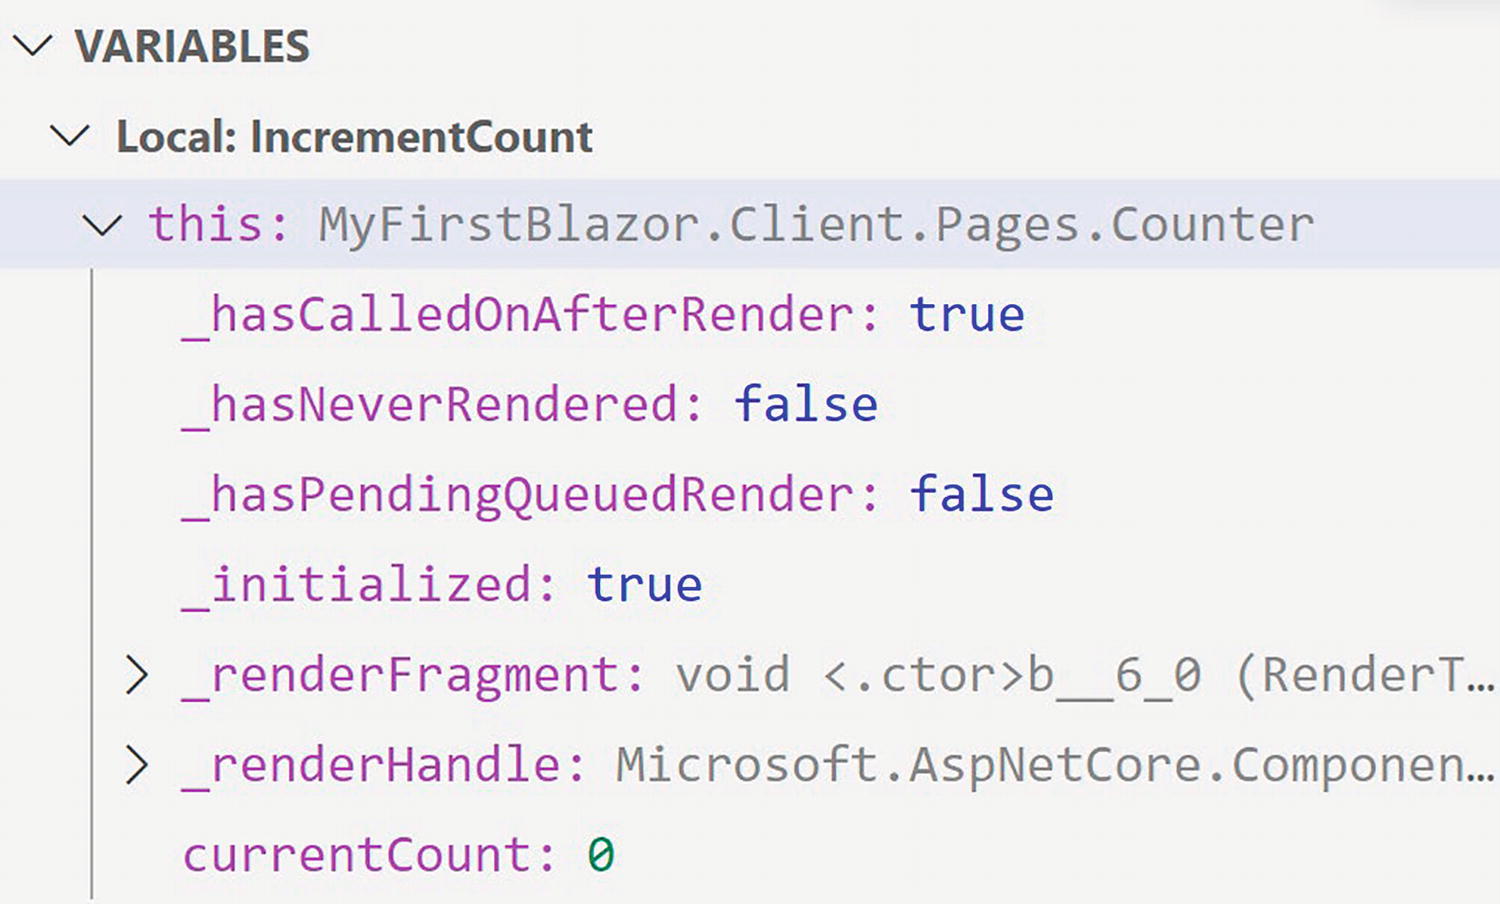
Using the Locals Debugger Window to Inspect Simple Variables
Debugging with Visual Studio Code

The Blazor WASM Debugging Extension

Enable the JavaScript Preview Debugger
Open the folder containing the solution file. If it is the first time you open this folder with VSC, be patient, after a while, Figure 1-14 will pop up. Answer Yes. Also ensure Listing 1-11 is set up correctly like Visual Studio (this is actually independent of your IDE).

Adding a Breakpoint in VSC
Inspecting Variables in VSC
Developing with Hot Reload
With .NET Core 6.0, Microsoft introduces a really nice feature called hot reload . This allows you to make changes to your code and markup while your application is running. As soon as you make the change, your application will update (hot reloads), even keeping the existing state of the application.
Hot Reload with .NET CLI
A Simple Change
As soon as you make the change, the browser will update itself, keeping the current count!
Another Simple Change
Save. Clicking the Increment button will not add 3 to the counter.
If you want to restart again, go back to the command line and press Ctrl-Shift-R.
Hot Reload with Visual Studio
At the time of writing this chapter, hot reload does not work yet for Blazor WebAssembly application with Visual Studio. But, by the time you are reading this, it should work.
The Blazor WASM Bootstrap Process
At the bottom of Listing 1-14, you will find the <script> element responsible for bootstrapping Blazor in the browser. Let’s look at this process in detail.
Listing 1-14. The index.html File
Run the Blazor application. Open the browser’s developer tools (most browsers will open the developer tools when you press F12). We will have a look at what happens at the network layer.
In all screenshots, I will be using the Edge browser which is very similar to Chrome. If you prefer to use another browser, go right ahead since all modern desktop browsers have debugging support.
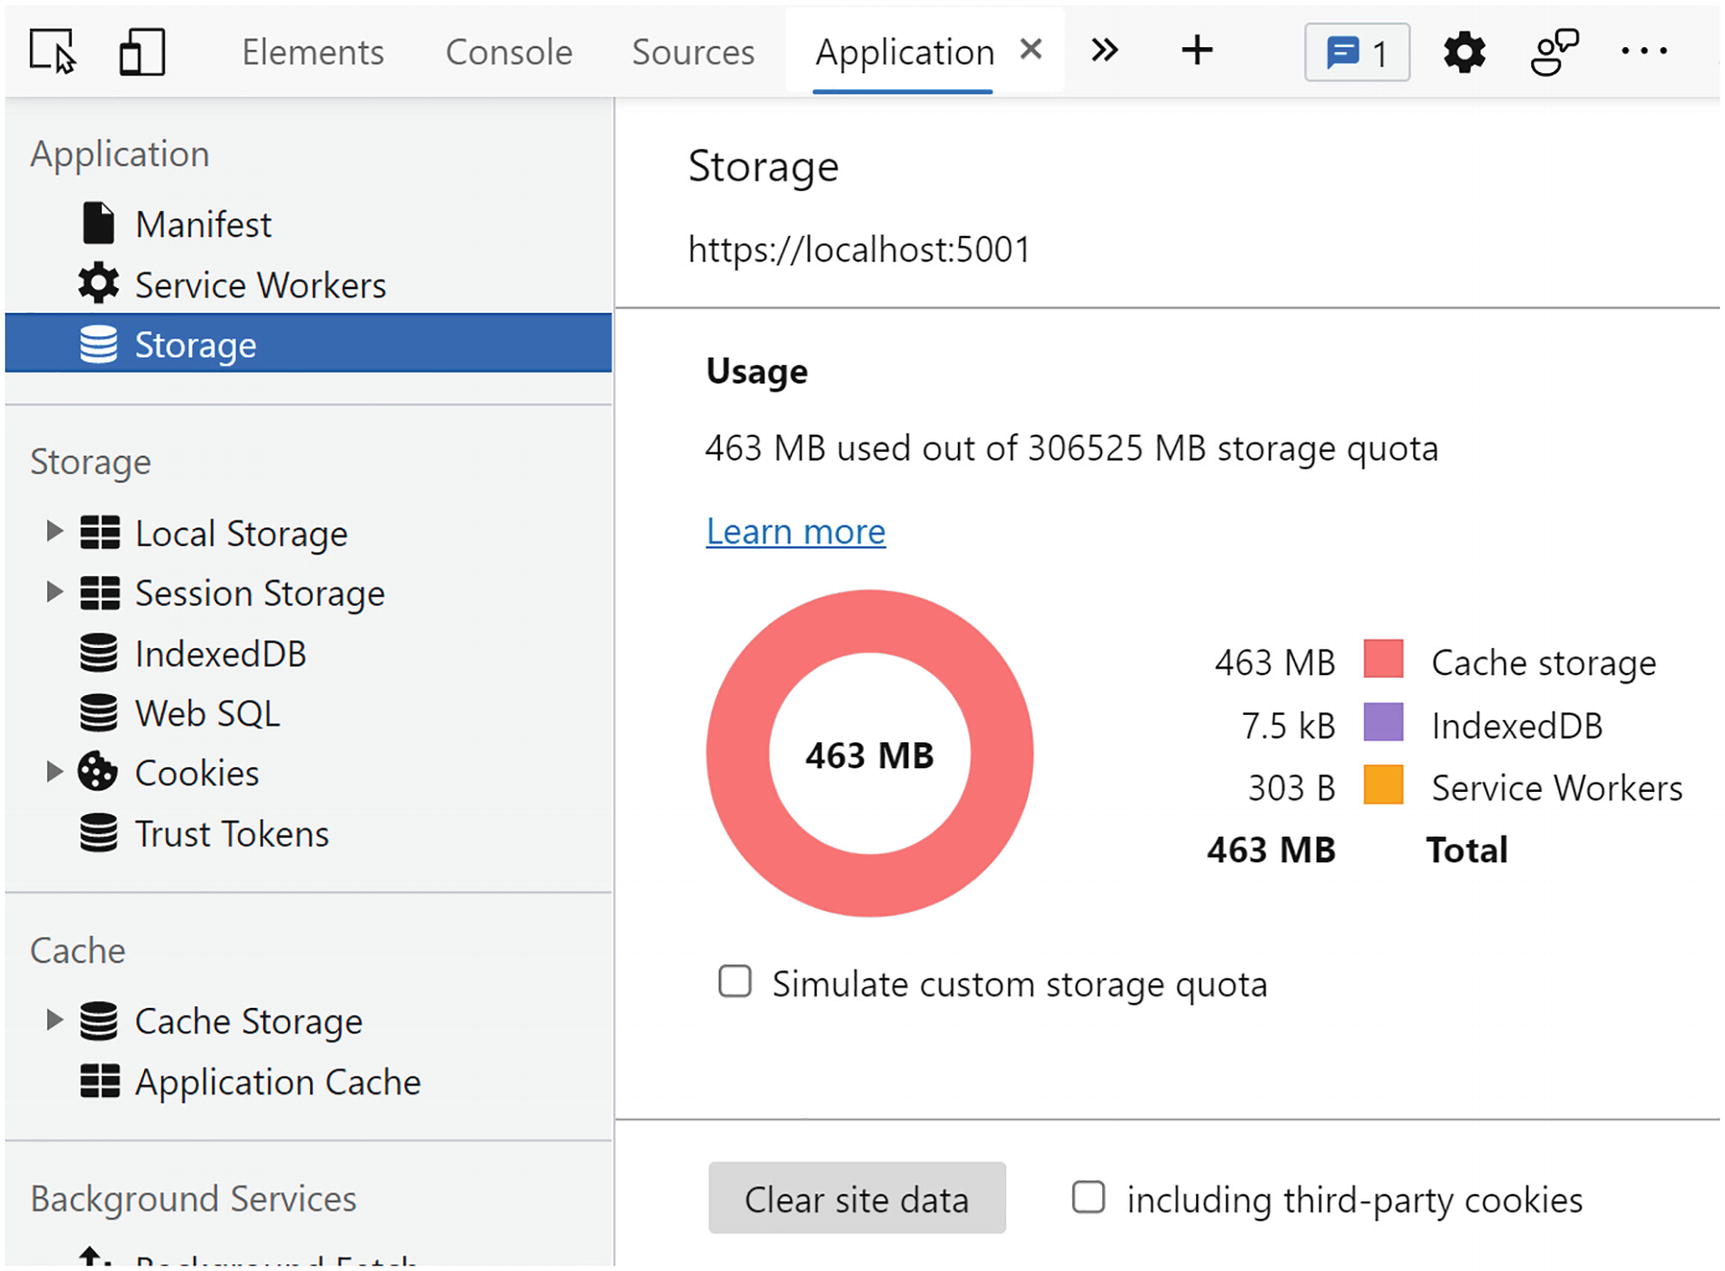
Clearing the Browser’s Storage
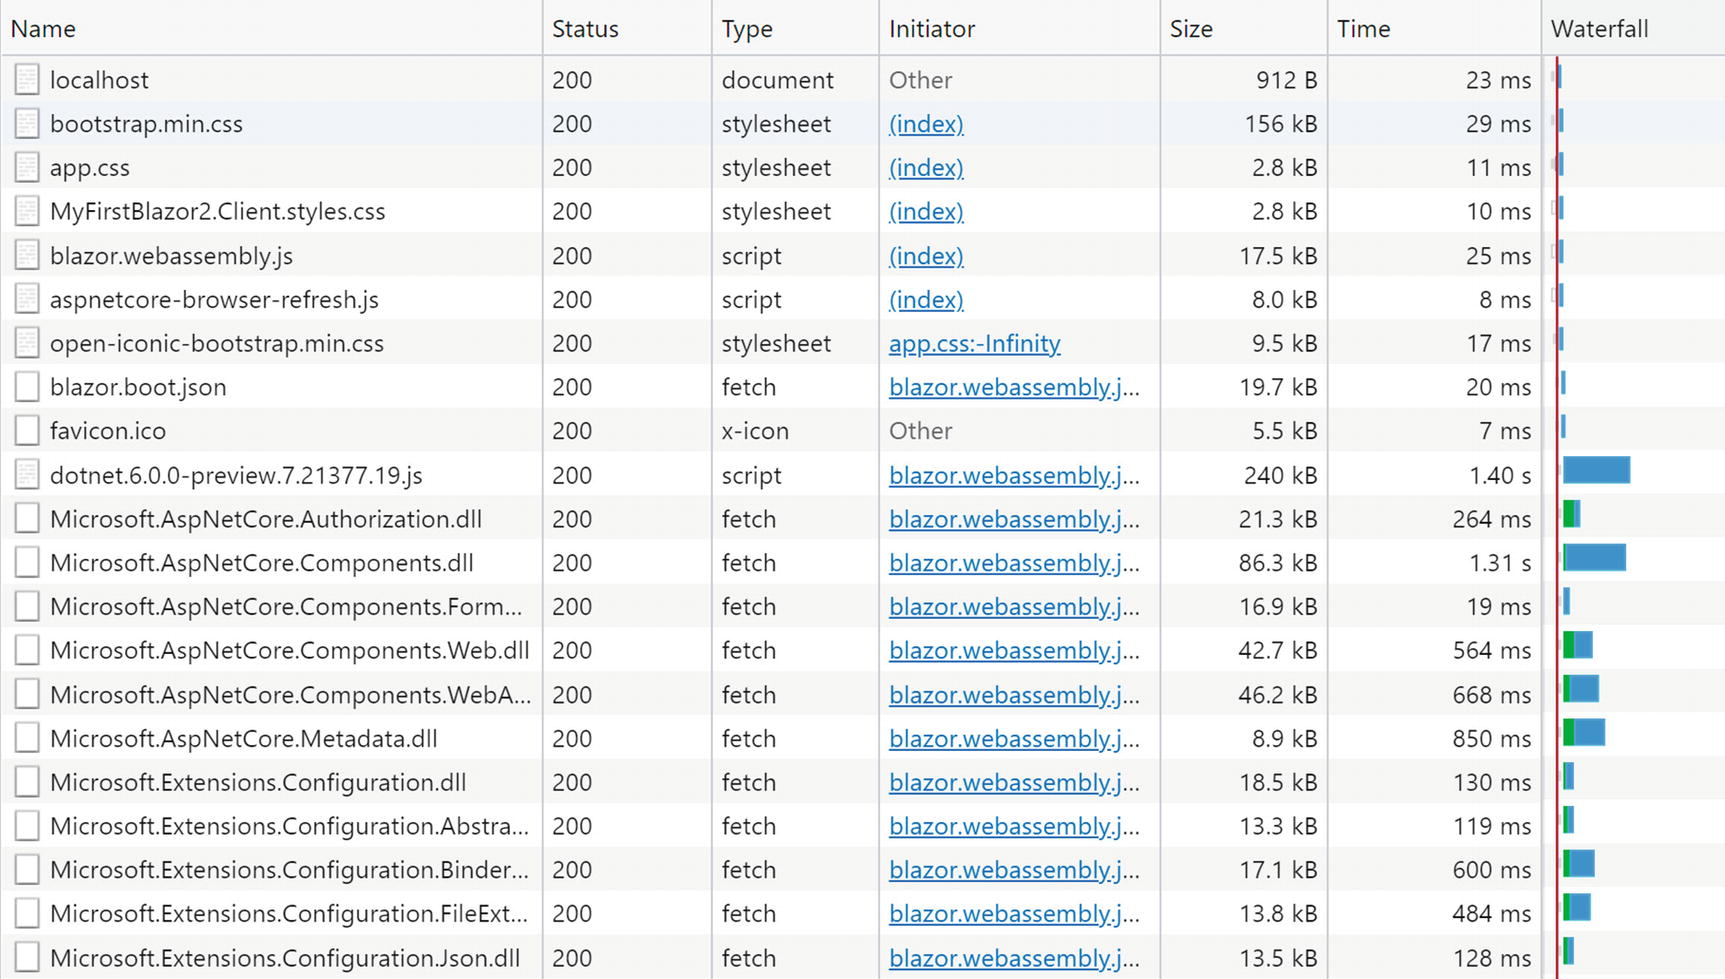
Examining the Bootstrap Process Using the Network Log
Now that the .NET runtime is running, you will see (scroll down?) that MyFirstBlazor.Client.dll gets downloaded, followed by all its dependencies, including mscorlib.dll and system.dll. These files contain the .NET libraries containing classes such as string used to execute all kinds of things, and they are the same libraries you use on the server. This is very powerful because you can reuse existing .NET libraries in Blazor you or others built before!

Total Download Size with Empty Cache

Total Download Size with Filled Cache
Let us now compare this with Blazor Server.
The Blazor Server Bootstrap Process
Let’s look at the bootstrapping process of a Blazor Server project.
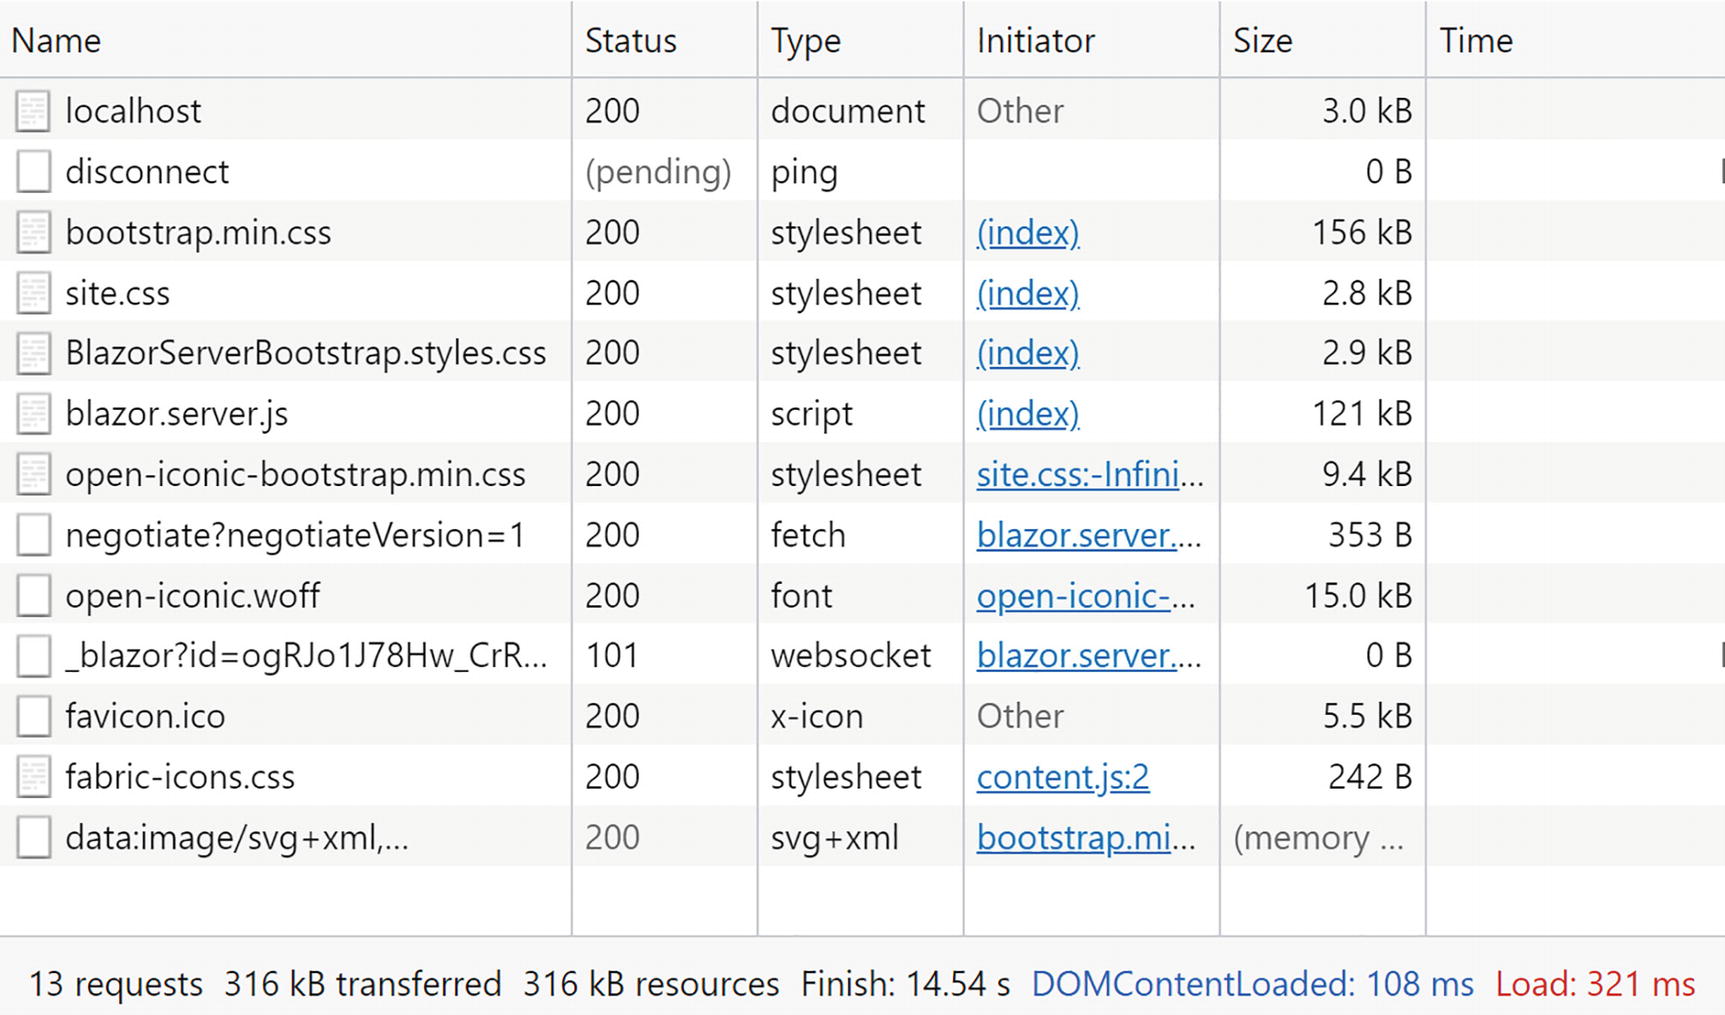
Looking at Server-Side Blazor Network Activity

The SignalR Messages
Nullable Reference Types
Throughout this book, I will be using modern C# with some of the latest features. But there is one C# feature I want to discuss right now. Every developer, from time to time, will encounter a NullReferenceException, which is a real bug because you can always avoid it. What if the compiler can help you with this and warn you about a possible NullReferenceException? This is what the section “Nullable Reference Types” is all about.
An Apology
Who invented the null pointer? Tony Hoare did, and he apologized in 2009 and denoted this as his billion-dollar mistake (www.infoq.com/presentations/Null-References-The-Billion-Dollar-Mistake-Tony-Hoare/):
I call it my billion-dollar mistake. It was the invention of the null reference in 1965. At that time, I was designing the first comprehensive type system for references in an object oriented language (ALGOL W). My goal was to ensure that all use of references should be absolutely safe, with checking performed automatically by the compiler. But I couldn't resist the temptation to put in a null reference, simply because it was so easy to implement. This has led to innumerable errors, vulnerabilities, and system crashes, which have probably caused a billion dollars of pain and damage in the last forty years.
Many object-oriented programming languages still use the null pointer , and C# is no exception. Some languages even treated null differently. For example, in Objective-C, when a pointer is null, the compiler would not invoke a method on it. And it would do this silently! Of course, you would not get a NullReferenceException, but it did skip an important piece of functionality.
Using Null in C#
A Nullable Value Type
Nullable Reference Types
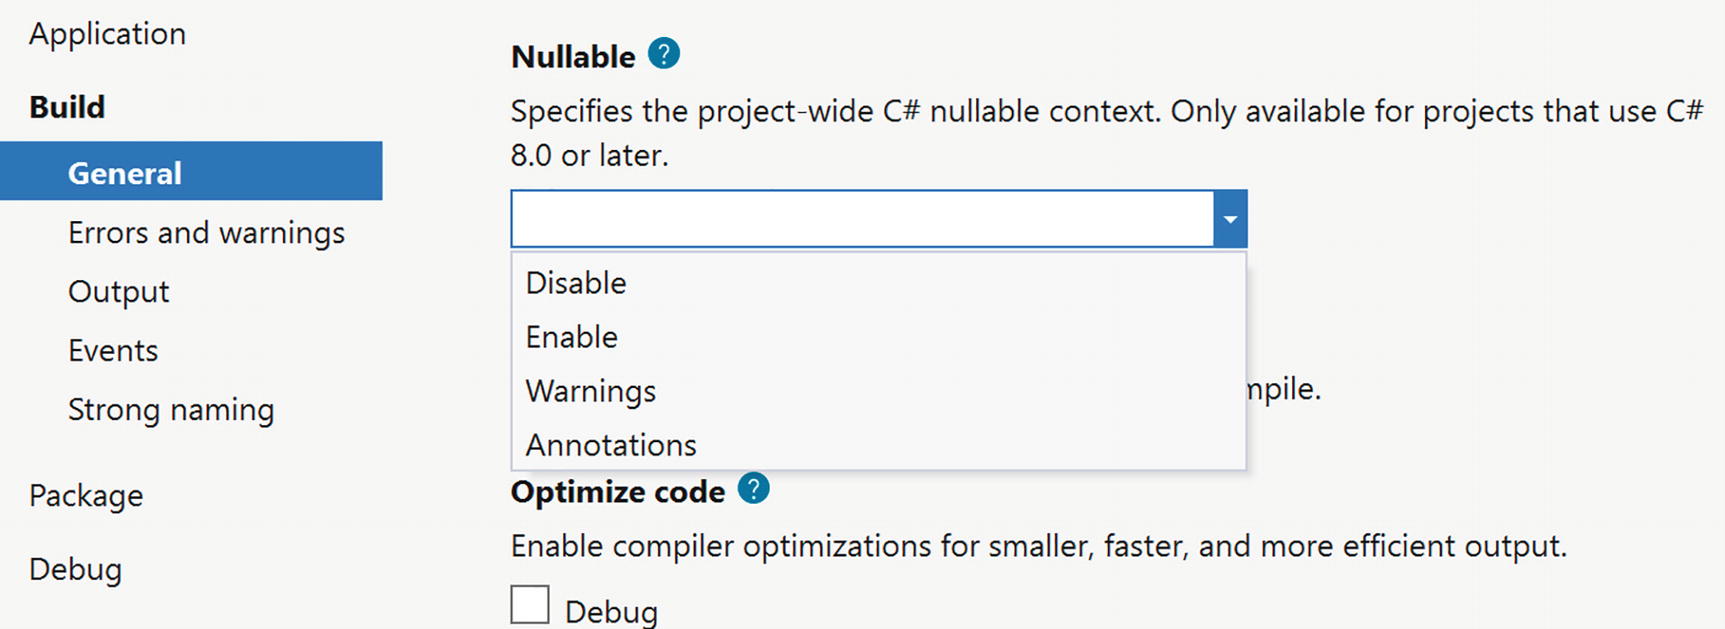
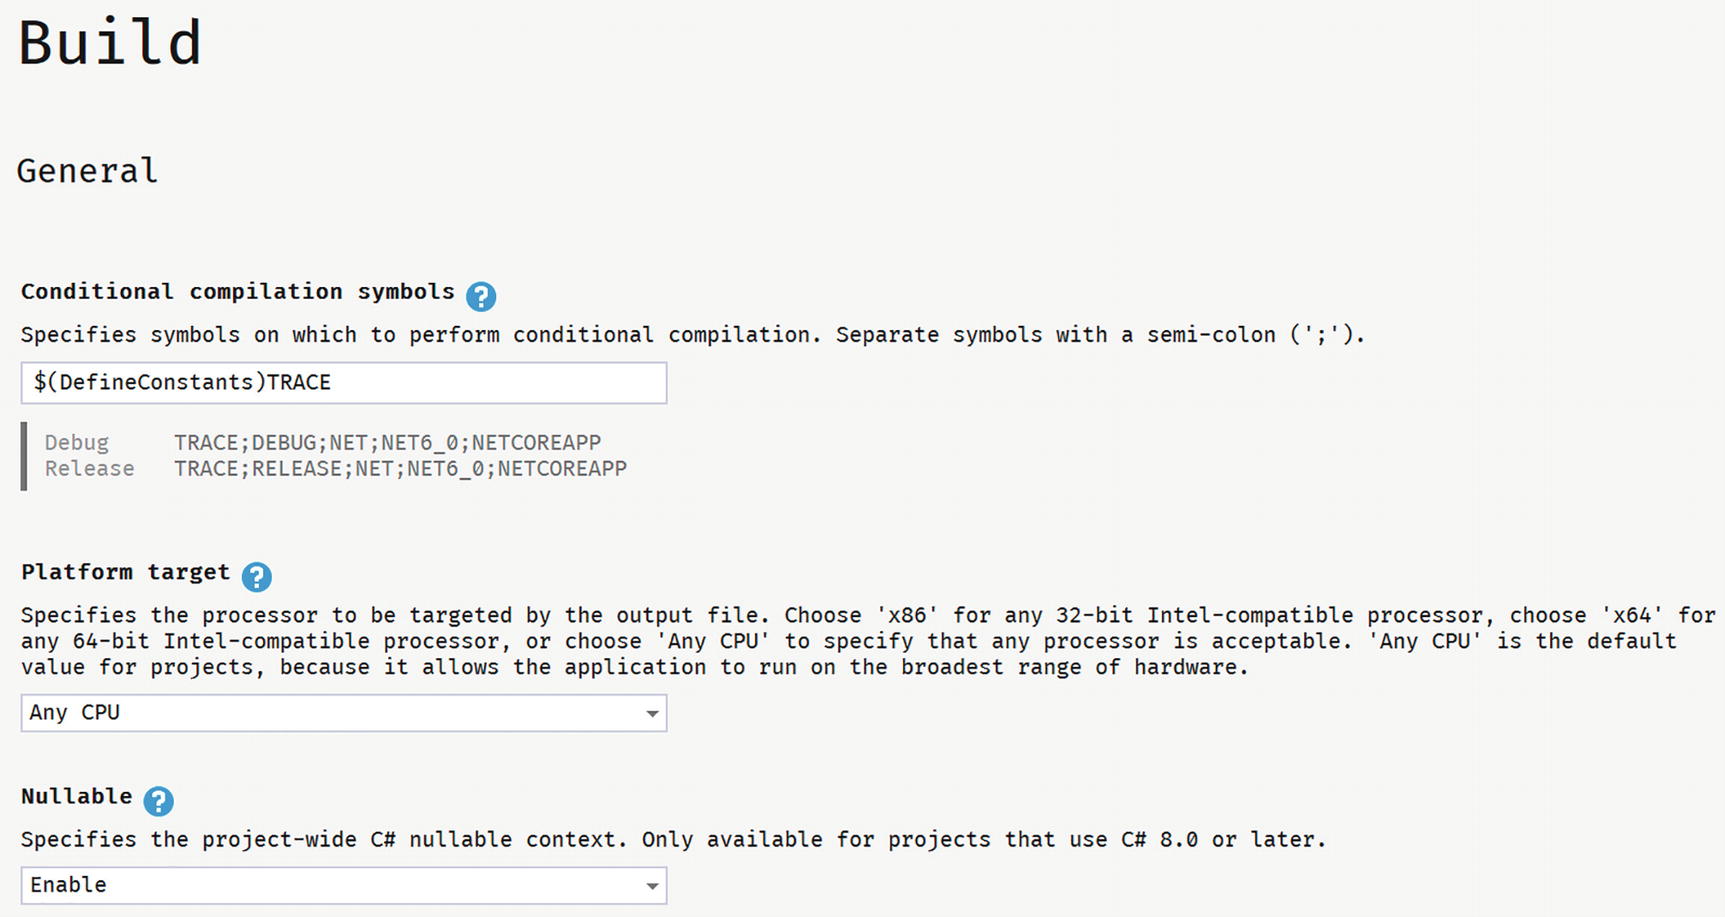
Setting the Nullable Compiler Option
Enabling Nullable Reference Types in the Project File

Inspecting the Nullable Flag
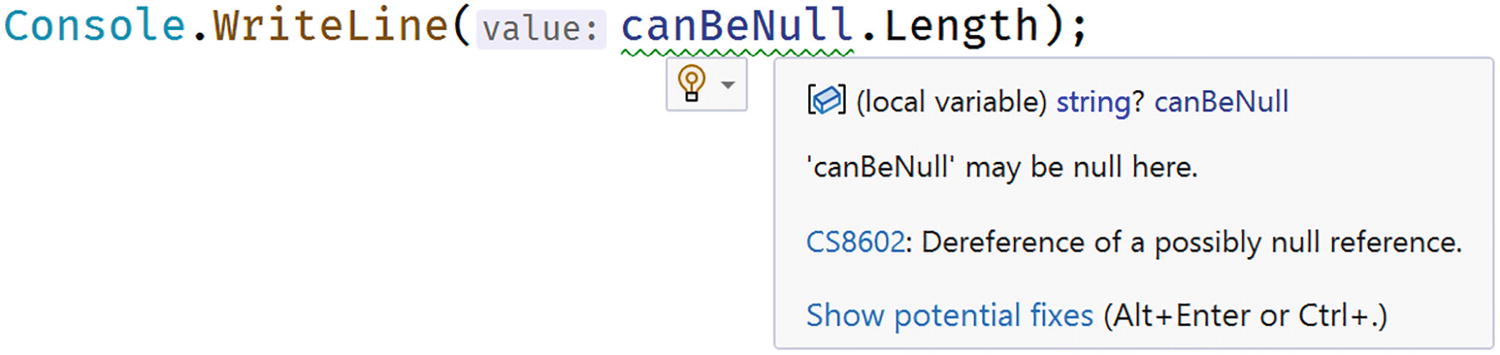
Possible Null Reference

No Possible Null Reference
So the whole idea of nullable reference types is to make the compiler do the analysis and to issue a warning when we can have a possible null being used which would result in a NullReferenceException.
Using References
A Person Class
Using a Constructor
Person with Nullable Name
However, this does not mimic real life. There is another technique we can use.
The Null-Forgiving Operator

The Null-Forgiving Operator
Using the Null-Forgiving Operator with Types
This is exactly the technique we will use to create Blazor components that have reference properties that we cannot initialize using a constructor.
The Person Class with Empty Name.
Nullable Reference Types and .NET Libraries
Microsoft has gone through a lot of effort to make all their libraries support nullable reference types. I want you to realize that this is all compiler meta-data, so you can use the new libraries supporting nullable reference types with older projects; the compiler will simply ignore this meta-data. You can also use libraries that do not support this meta-data, but you will need to use the null-forgiving operator with a lot of methods. But do yourself a favor – get to use nullable reference types and your code will be shipped with a lot less bugs! You can learn more at https://docs.microsoft.com/en-us/dotnet/csharp/nullable-references.
Summary
In this chapter, we looked at the history of the browser wars and how this resulted in the creation of WebAssembly. The .NET runtime allows you to run .NET assemblies, and because it can now also run on WebAssembly, we can now run .NET assemblies in the browser! All of this resulted in the creation of Blazor, where you build razor files containing .NET code which update the browser’s DOM, giving us the ability to build Single-Page Applications in .NET, instead of JavaScript.
First, we installed the prerequisites needed for developing and running Blazor applications. We then created our first Blazor project. This project will be used throughout this book to explain all the Blazor concepts you need to know about. We examined this solution, looking at the server-side project, the shared project, and the Blazor project, and compared the bootstrap process for both Blazor WebAssembly and Blazor Server.
Finally, we looked at using nullable reference types and how this can help writing better code with less bugs.
2. Data Binding
2. Data Binding
Imagine an application that needs to display data to the user, and capture changes made by that user to save the modified data. One way you could build an application like this is to, once you got the data, iterate over each item of data. For example, for every member of a list, you would generate the same repeating element, and then inside that element, you would generate text boxes, drop-downs, and other UI elements that present data. Later, after the user has made some changes, you would iterate over your generated elements, and for every element, you would inspect the child elements to see if their data was changed. If so, you copy the data back into your objects that will be used for saving that data.
This is an error-prone process and a lot of work if you want to do this with something like jQuery (jQuery is a very popular JavaScript framework which allows you to manipulate the browser’s Document Object Model (DOM)).
Modern frameworks like Angular and React have become popular because they simplify this process greatly through data binding . With data binding, most of this work for generating UI and copying data back into objects is done by the framework.
A Quick Look at Razor
Blazor is the combination of Browser + Razor (with a lot of artistic freedom). So, to understand Blazor, we need to understand browsers and the Razor language. I will assume you understand what a browser is since the Internet has been very popular for over more than a few decades. But Razor (as a computer language) might not be that clear (yet). Razor is a markup syntax that allows you to embed code in a template. Razor can be used to dynamically generate HTML, but you can also use it to generate code and other formats. For example, at the company I work, we generate emails using Razor.
Razor made its appearance in ASP.NET MVC. In ASP.NET Core MVC, razor is executed at the server side to generate HTML which is sent to the browser. But in Blazor, this code is executed inside your browser (with Blazor WebAssembly ) and will dynamically update the web page without having to go back to the server.
Examining SurveyPrompt.razor
As you can see, razor mainly consists of HTML markup. But if you want to have some C# properties or methods, you can embed them in the @code section of a razor file. This works because the razor file is used to generate a .NET class and everything in @code is embedded in that class.
Setting the SurveyPrompt’s Title (Excerpt from Index.razor)
Because the public Title property can be set in another component, the property becomes a parameter, and because of that, you need to apply the [Parameter] attribute, as in Listing 2-1. SurveyPrompt can then embed the contents of the Title property in its HTML markup using the @ syntax (third line in Listing 2-1). This syntax tells razor to switch to C#, and this will get the property as an expression and embed its value in the markup.
One-Way Data Binding
One-way data binding is where data flows from the component to the DOM or vice versa, but only in one direction. Data binding from the component to the DOM is where some data, like the customer’s name, needs to be displayed. Data binding from the DOM to the component is where a DOM event took place, like the user clicking a button, and we want some code to run.
One-Way Data Binding Syntax
Examining One-Way Data Binding with Counter.razor
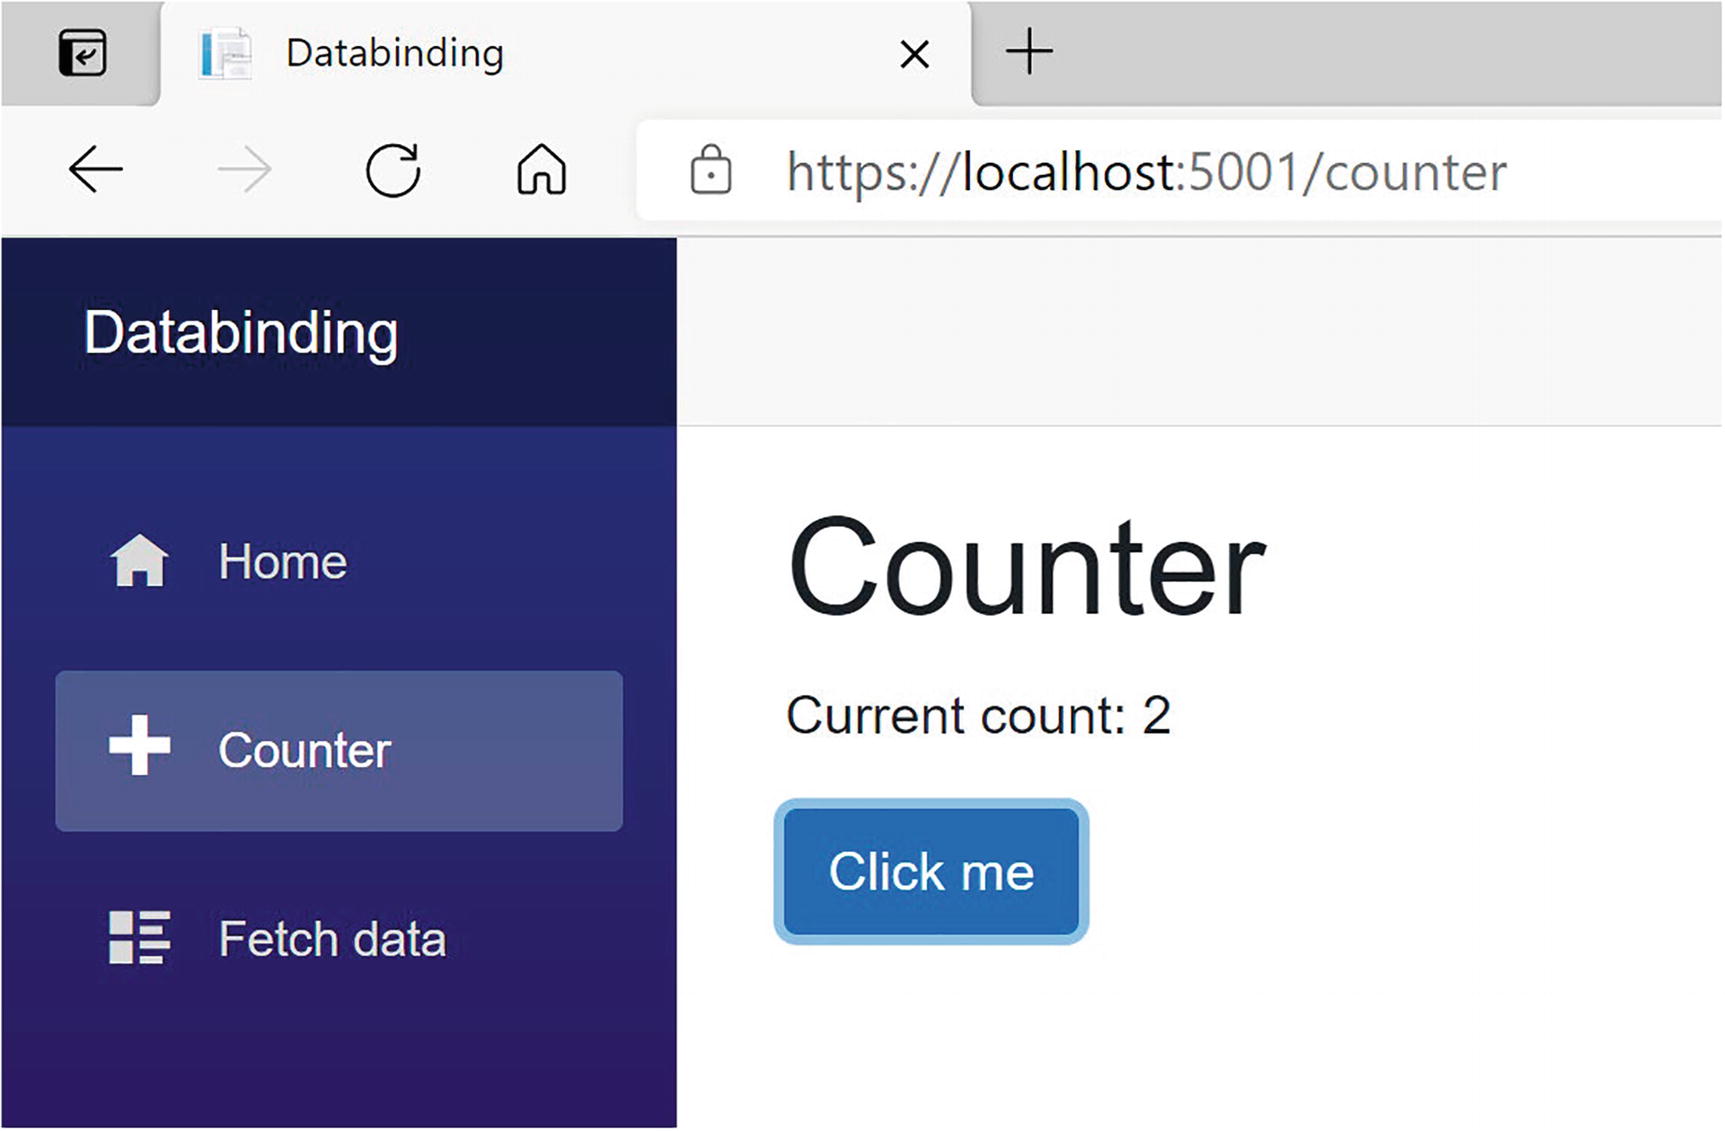
The Counter Page
Let’s look at the workings of this page. The currentCount field is defined in the @code section in Counter.razor. This is not a field that can be set from outside, so there is no need for the [Parameter] attribute, and we can keep it private.
Data Binding from the Component to the DOM
Any time you click the button, the Blazor runtime sees that currentCount may have been updated, and it will automatically update the DOM with the latest value of currentCount.
Attribute Binding
You can also use this same syntax to bind the value of an HTML attribute.
Some Simple Styles
Binding an HTML Attribute
Conditional Attributes
Disabling a Button Using the disabled Attribute
Disabling the Click Me Button
Try it. Clicking the button until the currentCount becomes 10 will disable the button by adding the disabled attribute to the button. As soon as currentCount falls below 10, the button will become enabled again (except there is no way you can do this for the moment).
Event Handling and Data Binding
We update currentCount using the IncrementCount() method from Listing 2-3. This method gets called by clicking the “Click Me” button. This again is a one-way data binding, but in the other direction, from the button to your component. Blazor allows you to react to DOM events (like the DOM’s click event) this way, instead of using JavaScript. You can also build your own components that have events, where you can use the same syntax to react to them. This will be discussed in Chapter 3.
Event Binding Syntax
Data Binding from the DOM to the Component
Clicking the button will trigger the DOM’s click event, which then will call the IncrementCount method , which will cause the UI to be updated with the new value of the currentCount field. Whenever the user interacts with the site, for example, by clicking a button, Blazor assumes that the event will have some side effect because a method gets called, so it will update the UI with the latest values. Simply calling a method will not cause Blazor to update the UI. We will discuss this later in this chapter.
Event Arguments
In regular .NET, event handlers of type EventHandler can find out more information about the event using the sender and EventArgs arguments. In Blazor, event handlers don’t follow the strict event pattern from .NET, but you can declare the event handler method to take an argument of some type derived from EventArgs, for example, MouseEventArgs, as shown in Listing 2-10. Here, we are using the MouseEventArgs instance to see if the Ctrl key is being pressed and, if so, to decrement the currentCount field.
A Blazor Event Handler Taking Arguments
Using C# Lambda Functions
Event Data Binding with Lambda Syntax
If you want to use a lambda function to handle an event, you need to wrap it in round braces.
Two-Way Data Binding
Sometimes you want to display some data to the user, and you want to allow the user to make changes to this data. This is common in data entry forms. Here, we will explore Blazor’s two-way data binding syntax.
Two-Way Data Binding Syntax
With two-way data binding, we will have the DOM update whenever the component changes, but the component will also update because of modifications in the DOM. The simplest example is with an <input> HTML element.
Adding an Increment and an Input
Build and run.
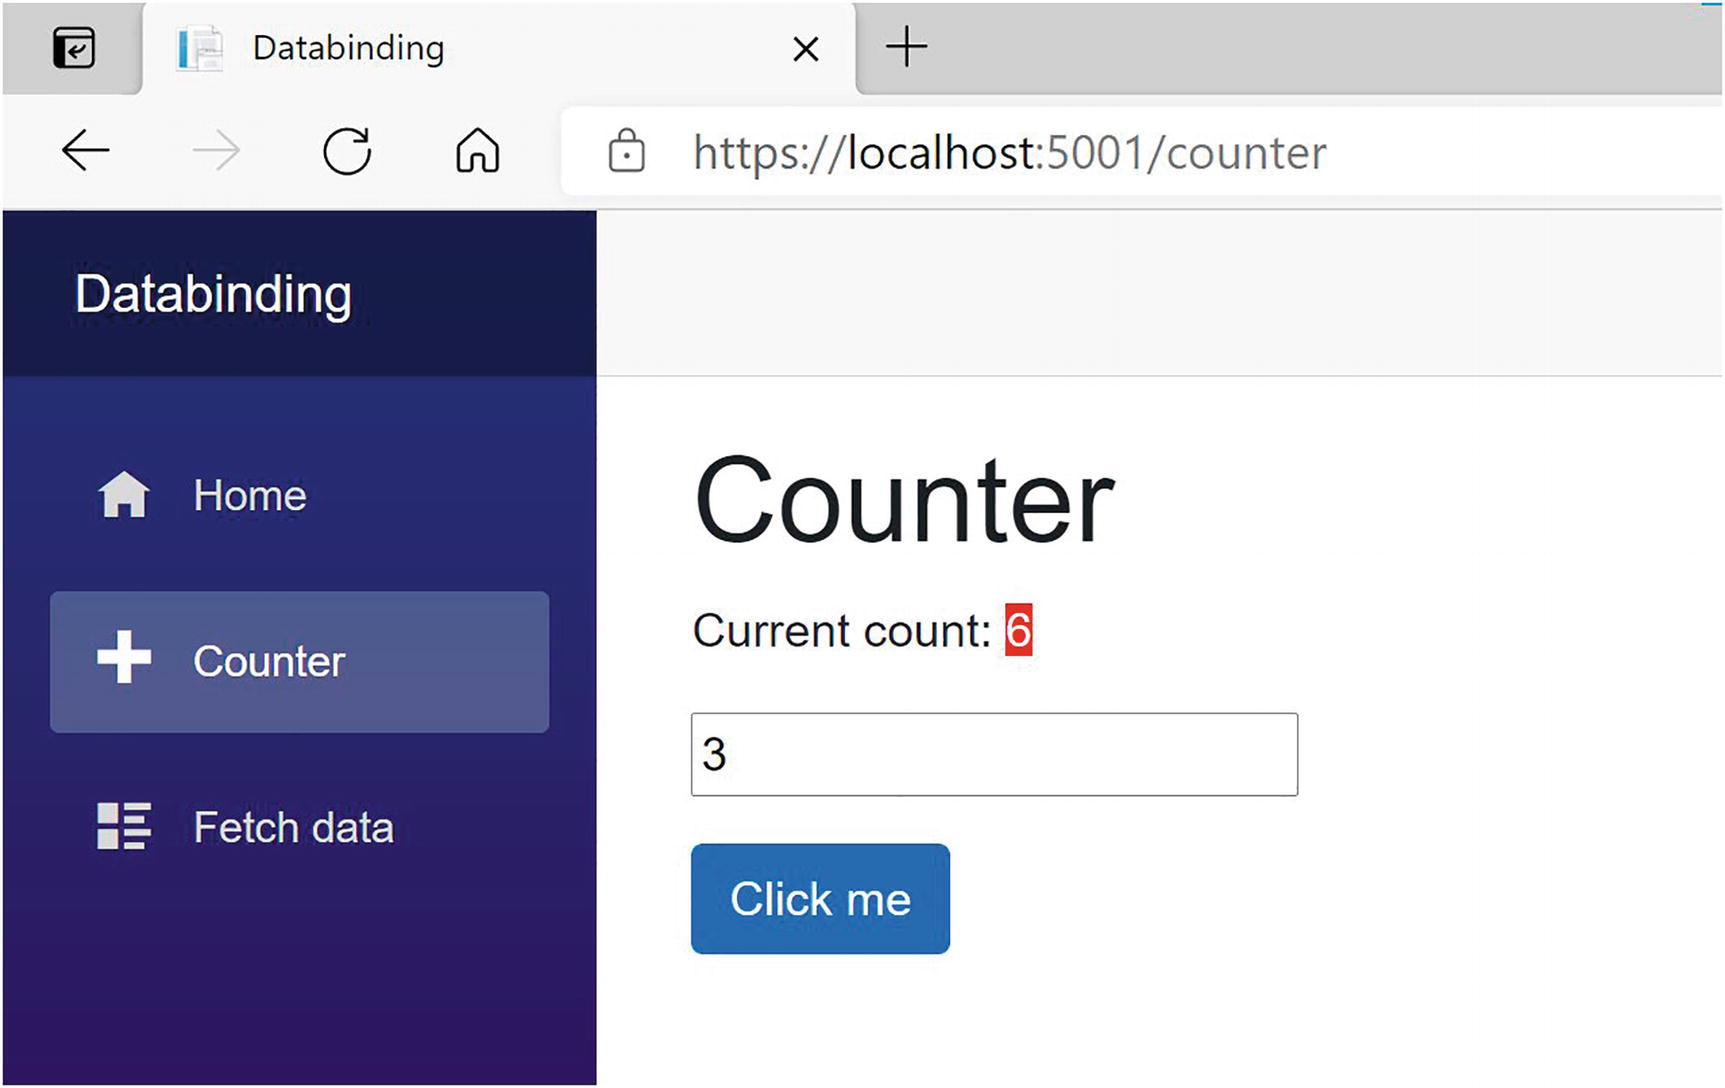
Adding an Increment with Two-Way Data Binding
Two-Way Data Binding with the @bind Syntax
Here, we are using the @bind syntax which is the equivalent of two different one-way bindings as shown in Listing 2-14.
Data Binding in Both Directions
This alternative syntax is very verbose and not that handy to use. Using @bind is way more practical. However, don’t forget about this technique; using the more verbose syntax can sometimes be a more elegant solution!
Binding to Other Events: @bind:{event}
Blazor will update the value in two-way data binding when the DOM’s onchange event occurs. This means that the increment field of the Counter component will be updated when the user changes the focus to another element, for example, the button. But maybe this is too late for you. Let’s look at how you can change the event that triggers data binding.
Explicit Binding to Events
Preventing Default Actions
In Blazor, you can react to events, and the browser will also react to these. For example, when you press a key with the focus on an <input> element, the browser will react by adding the keystroke to the <input>.
Handling keypress Events
The KeyHandler Method
Stopping the Default Behavior of the Input
Build and run again. Now pressing “+” will increment the input’s value as expected.
Shorter Notation
Stopping Event Propagation
In a browser, events propagate to the parent element, then to that parent element’s parent, etc. Again, generally this is desirable, but not always.
Event Propagation Example
The Event Handlers
Build and run.
Stopping the Event from Propagating to the Parent
If you want to be able to turn this on and off from code, assign a bool expression to this attribute, just like preventDefault.
Formatting Dates
Formatting a Date
Currently, DateTime values are the only ones supporting the @bind:format attribute.
Change Detection
The Blazor runtime will update the DOM whenever it thinks changes have been made to your data. One example is when an event executes some of your code, it assumes you’ve modified some values as a side effect and renders the UI. However, Blazor is not always capable of detecting all changes, and in this case, you will have to tell Blazor to apply the changes to the DOM. A typical example is with background threads, so let us look at an example of this.
Adding Another Button
You might find the lambda function argument in the Timer’s constructor a little strange. I use an underscore when I need to name an argument that is not used in the body of the lambda function. Call it anything you want, for example, ignore – it does not matter. I simply like to use underscore because then I don’t have to think of a good name for the argument. C# 7 made this official; it is called discards , and you can find more at https://docs.microsoft.com/dotnet/csharp/discards.
Run this page. Clicking the “Auto Increment” button will start the timer, but the currentCount will not update on the screen. Why? Try clicking the “Increment” button. The currentCount has been updated, so it is a UI problem. If you open the browser’s debugger, you will see in the console tab a ++ appear every second, so the timer works! That’s because I’ve added a Console.Writeline, which sends the output to the debugger’s console. Sometimes an easy way to see if things are working.
Blazor will re-render the page whenever an event occurs. It will also re-render the page in case of asynchronous operations. However, some changes cannot be detected automatically. In this case, because we are making some changes on a background thread, you need to tell Blazor to update the page by calling the StateHasChanged method which every Blazor component inherits from its base class.
Adding StateHasChanged
Run again. Now pressing “Auto Increment” will work.
As you can see, sometimes we will need to tell Blazor manually to update the DOM. In general, the Blazor runtime will detect when to update the UI. When the user interacts with your application, events get triggered which will make change detection happen. When an async method completes, change detection will occur. It is only when we go outside the Blazor runtime, for example, using a .NET Timer , that we need to trigger change detection ourselves. More on this when we look at building components in the next two chapters.
The PizzaPlace Single-Page Application
Let us apply this newfound knowledge and build a nice Pizza ordering website. Throughout the rest of this book, we will enhance this site with all kinds of features.
Creating the PizzaPlace Project
Create a new Blazor hosted project, either using Visual Studio or dotnet CLI. Refer to the explanation on creating a project in the first chapter if you don’t recall how. Call the project PizzaPlace. You get a similar project to the MyFirstBlazor project. Now let’s apply some changes!
Enable Nullable Reference Types
Out of the box, Blazor uses the popular Bootstrap 4 layout framework (https://getbootstrap.com/), including open-iconic fonts. Expect to see bootstrap and open-iconic (oi) CSS classes in the code samples. However, you can use any other layout framework, because Blazor uses standard HTML and CSS. This book is about Blazor, not fancy layouts, so we’re not going to spend a lot of time choosing nice colors and making the site look great. Focus!
In the server project, throw away WeatherForecastController.cs. We don’t need weather forecasts to order pizzas. In the shared project, delete WeatherForecast.cs. Same thing. In the client project, throw away the Counter.razor and FetchData.razor files from the Pages folder and SurveyPrompt.razor from the Shared folder.
Adding Shared Classes to Represent the Data
In Blazor, it is best to add classes holding data to the Shared project (unless you are building a Blazor application without a back-end server). These classes are used to send the data from the server to the client and later to send the data back. You might know these kinds of classes as models, or Data Transfer Objects (DTO).
What do we need? Since we will build a site around pizzas, creating a class to represent this makes sense.
The Spiciness Class
The Pizza Class
Our application is NOT about editing pizzas yet, so I’ve made this class immutable, that is, nothing can be changed once a pizza object has been created. In C#, this is easily done by creating properties with only a getter. You can still set these properties, but only in the constructor.
The Menu Class
As in real life, a restaurant’s menu is a list of meals, in this case, a pizza meal.
The Customer Class
The Basket Class, Representing the Customer’s Order
Please note that we just keep the pizza id in the Orders collection. You will learn why later.
The UI Options Class
The State Class
There is another good reason to put all these classes into the Shared project. There is limited debugging for Blazor. By putting these classes into the Shared project, we can apply unit testing best practices on the shared classes because it is a regular .NET project and even use the Visual Studio debugger to examine weird behavior. The Shared project can also be used by other projects since it is a .NET Standard project, for example, a Windows or MAUI client!
Building the UI to Show the Menu
With these classes in place to represent the data, the next step is to build the user interface that shows the menu. We will start by displaying the menu to the user, and then we will enhance the UI to allow the user to order one or more pizzas.
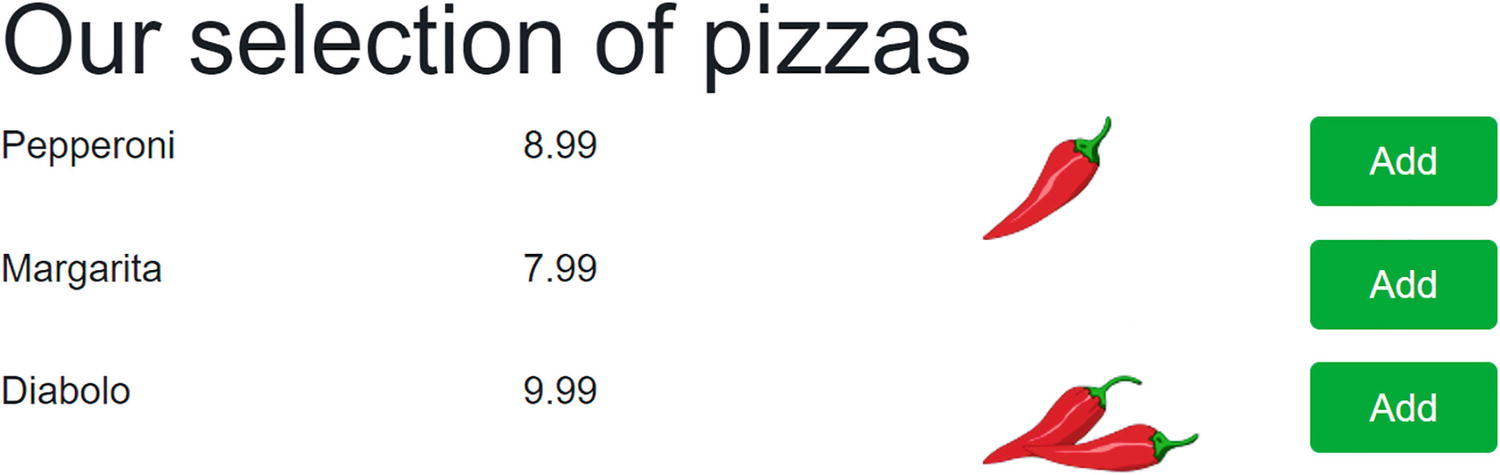
The problem of displaying the menu is twofold: first, you need to display a list of data. The menu can be thought of as a list, like any other list. Secondly, in our application, we’ll need to convert the spiciness choices from their numeric values into URLs leading to the icons used to indicate different levels of hotness.
Building Our Application’s Menu
Adding a using Statement to a Razor Component
However, with razor, we can do even better. We can add this using statement to all the components at once!
Add using Statements to _Imports.razor
The PizzaPlace menu is a list like any other list. You can display it by adding some razor markup in Index.razor to generate the menu as HTML as shown in Listing 2-36. I like to use comments to show the start and end of each section on my page. This makes it easier to find a certain part of my page when I come back to it later. In the next chapter, we will convert each section in its own Blazor component, making future maintenance a lot easier to do.
Generating the HTML with Razor
Converting Values
Converting a Value with a Converter Function
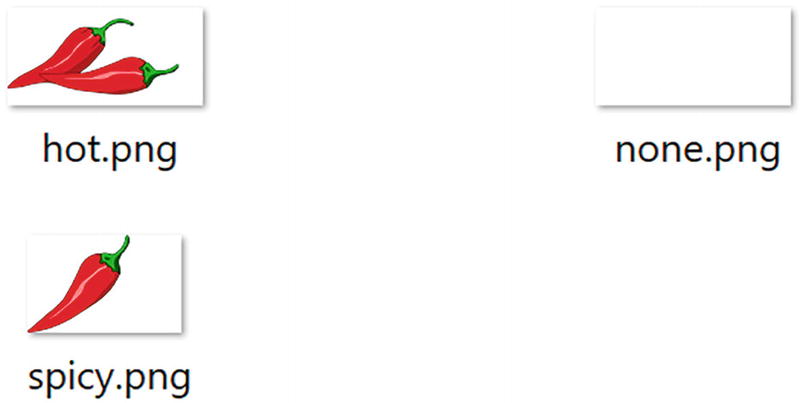
The Content of the Images Folder
Adding Pizzas to the Shopping Basket
Ordering a Pizza
The Basket’s Add Method
Look at the @onclick event handler (@onclick="@(() => AddToBasket(pizza))") for the button from Listing 2-36. Why is this event handler using a lambda? When you order a pizza, you want of course to have your chosen pizza added to the basket. So how can we pass the pizza to AddToBasket from Listing 2-38? By using a lambda function, we can simply pass the pizza variable used in the @foreach loop to it. Using a normal method wouldn’t work because there is no easy way to send the selected pizza. This is also known as a closure (very similar to JavaScript closures) and can be very practical!
When you click the Add button, you’re adding a pizza to the shopping basket. But how can we be sure (since we’re not displaying the shopping basket yet)?
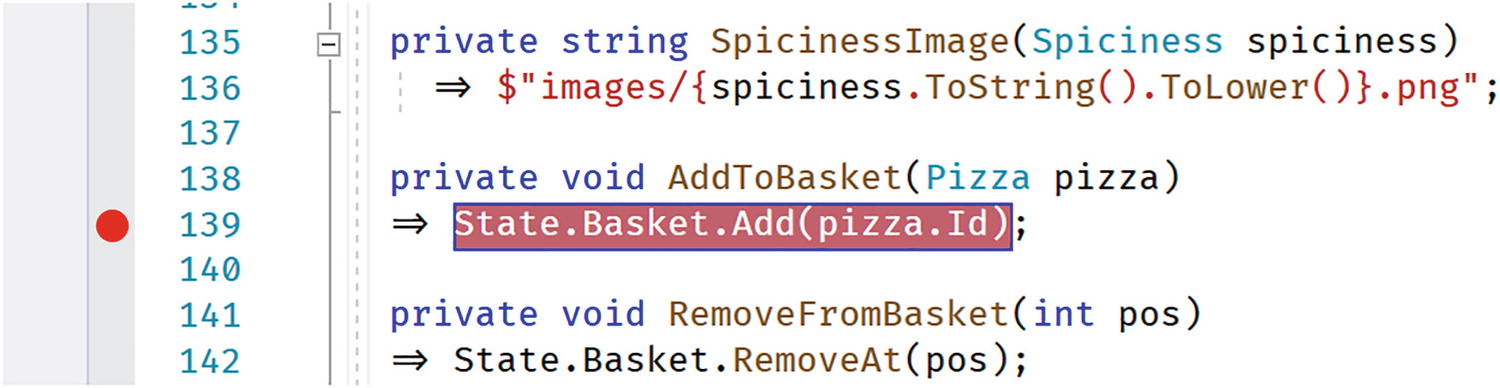
Adding a Breakpoint to Your Component
Displaying the Shopping Basket
The next thing on the menu (some pun intended) is displaying the shopping basket. We are going to use a feature from C# called tuples . I will explain tuples in a moment.
Displaying the Shopping Basket
Most of this stuff is very similar, but now we are iterating over a list of tuples (keep reading, a very handy new feature in C# https://docs.microsoft.com/dotnet/csharp/tuples).
Tuples are very similar to anonymous types from C#, in that they let you store and return intermediate multi-part results without you having to build a helper class.
We are using LINQ’s Select to iterate over the list of orders (which contain pizza ids). To display the pizza in the shopping basket, we need a pizza, so we convert the id to a pizza with the GetPizza method from the Menu.
The LINQ Select method has two overloads, and we’re using the overload taking an element from the collection (id) and the position in the collection (pos). We use these to create tuples. Each tuple represents a pizza from the basket and its position in the basket! We could have done the same, creating a little helper class with the pizza and position, but this is now done for us! And it is efficacious, using less memory than a class because it is a value type!
Removing Items from the Shopping Basket
The Basket Class’s RemoveAt Method
Calculating the Total Price in the State Class
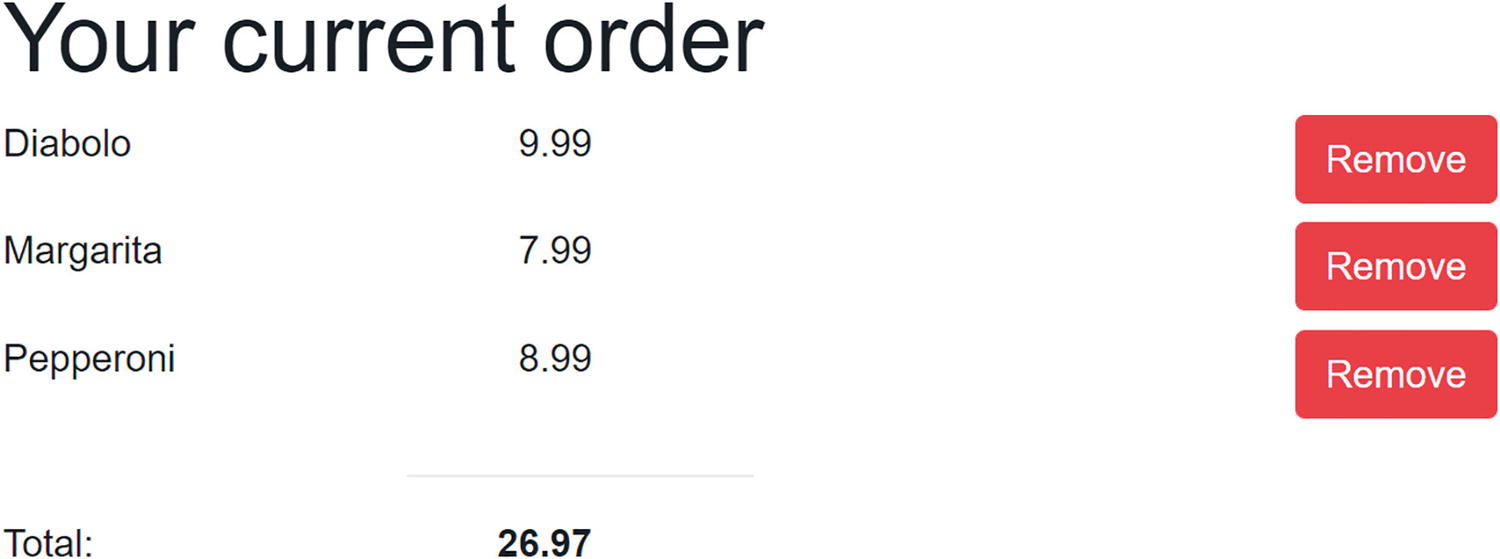
Your Shopping Basket with a Couple of Pizzas
Entering the Customer Information
Of course, to complete the order, we need to know a couple of things about the customer, especially we need to know the customer’s name and address because we need to deliver the order.
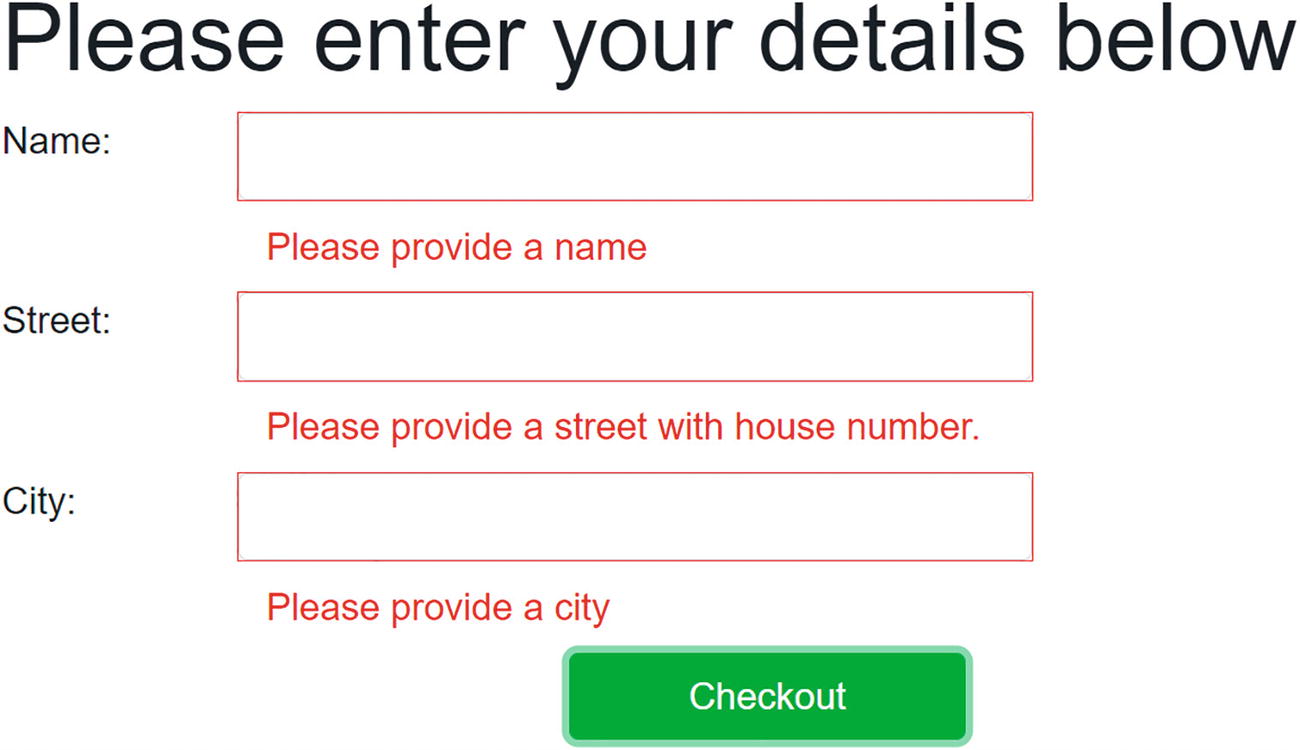
Adding Form Elements for Data Entry
This adds three <label>s and their respective <input>s for name, street, and city.
The PlaceOrder Method
The PlaceOrder method doesn’t do anything useful yet; we’ll send the order to the server later. This does however show a valid debugging technique in Blazor, where we place Console.WriteLine statements to see what gets executed.
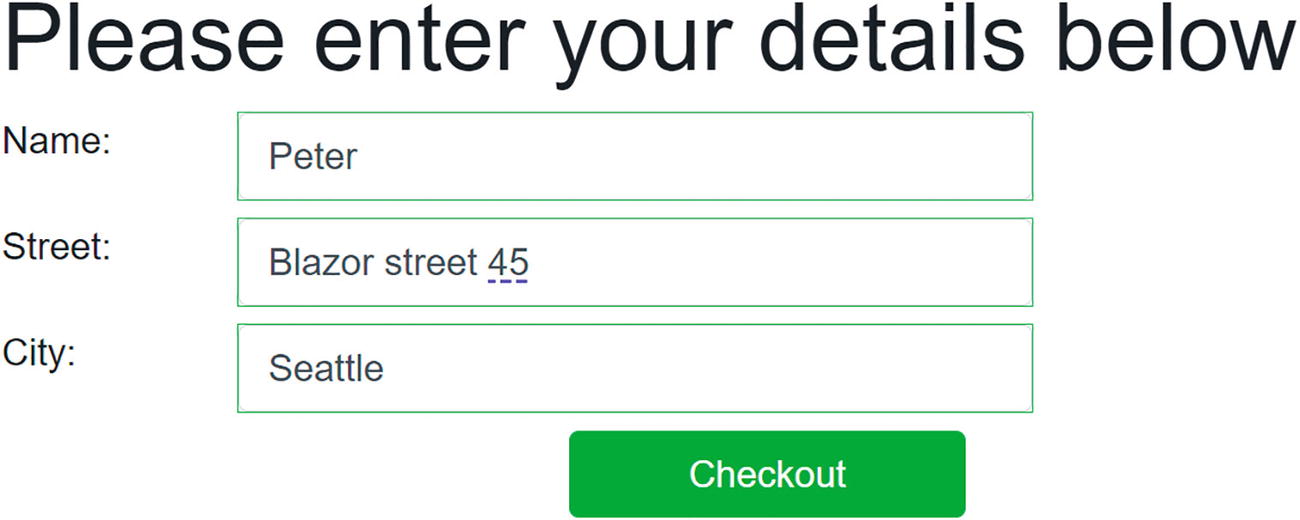
Filling Out the Customer Detail
Debugging Tip
Even with modern debuggers, you want to see the State object because it contains the customer’s details and order as you are interacting with the application. Will we send the correct information to the server when we press the Checkout button? For this, we’ll use a simple trick by displaying the State on our page, so you can review it at any time.
The DebuggingExtensions Class
Showing State

Watching State Changes
It should be obvious that we remove this debugging feature when the page is ready  . For example, you could add an #if DEBUG inside the ToJson method to only make it work outside release builds.
Blazor Validation
But wait! Clicking the Checkout button works, even while there is no customer name, address, or city! We need to do some validation! So, let’s start with an introduction to Blazor validation .
Letting Entities Validate Themselves
Classes like Customer should validate themselves because they have the best knowledge about the validity of their properties. .NET has a couple of built-in validation mechanisms, and here we are going to use the standard System.ComponentModel.DataAnnotations. In Chapter 3, we will look at using other validation mechanisms. With data annotations, you add attributes to your entity's properties, indicating what kind of validation is required.
Start by adding the System.ComponentModel.Annotations package to the PizzaPlace.Shared project.
Adding Annotations for Validation
Using FormField and InputText to Enable Validation
Blazor comes with some built-in components that will perform validation for you. Replace the customer entry UI with Listing 2-49. Here, we replace the <input> HTML elements with built-in editing components. The EditForm component wraps around all the InputText components and will render as the HTML <form> element. The EditForm component has a Model property which you set to the instance you need to validate. When the user clicks the Submit button, the EditForm component performs validation, and when there are no validation errors, it will call the OnValidSubmit event.
Use the InputText component for each field, binding one to each property of the model using the @bind-Value attribute. This is the syntax used to tell the component to use two-way data binding between the Value property of the InputText component and the property of the model. Listing 2-49 has three such InputText components, one for Name, Address, and City.
Using EditForm and InputText
Showing Validation Errors
Adding DataAnnotationsValidator
Run the application again, and click the Checkout button. You will see that the inputs now receive a red border, because of validation errors. As a user, you would now wonder what you did wrong. So we need to show some error as feedback.
Showing Validation Messages
Showing Validation Errors
Note that the Checkout button does not invoke the PlaceOrder method if there are validation errors.
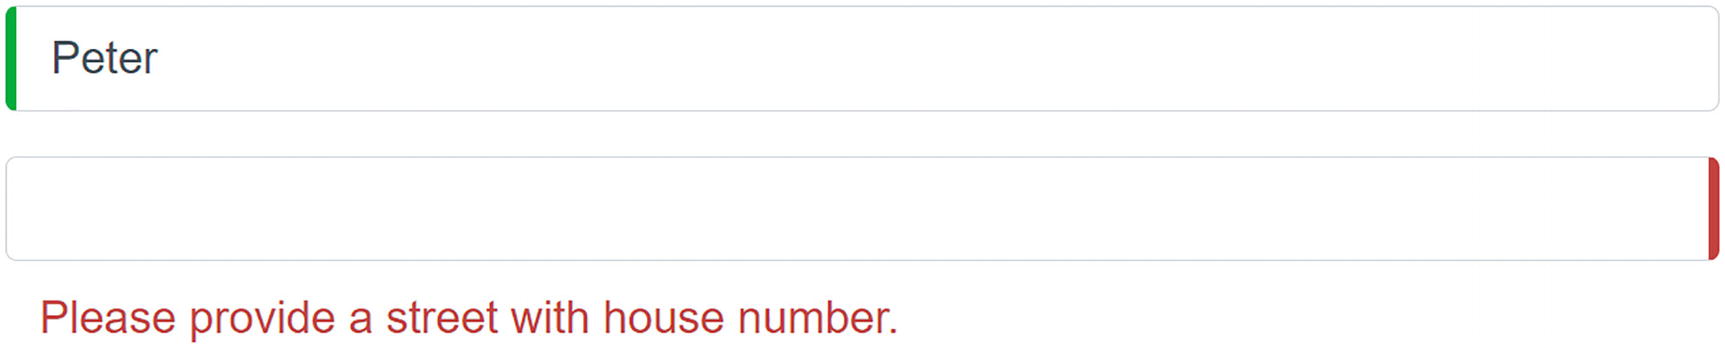
Now enter a name, street, and city. You should see the validation errors go away. You will also see green borders appear since the inputs are now valid.
Using the ValidationSummary Component
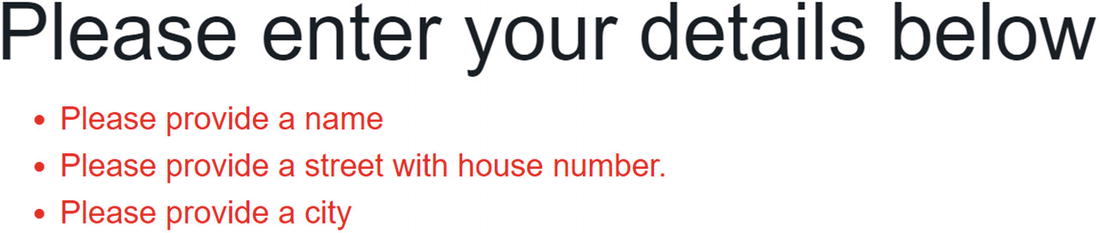
The ValidationSummary’s Output
Customizing the Validation Feedback
When you enter a value in an InputText element (or one of the other input components), Blazor validation gives you feedback about the validity of the value by adding certain CSS classes. Let us have a look at how this is implemented. Run the PizzaPlace project, right-click one of the inputs, and then select Inspect from the browser’s menu.
Validation Uses the Valid CSS Class
Validation Adds the Modified Class After a Change
Bad Input Uses the Invalid CSS Class
Validation Messages Use the validation-message Class
Blazor’s built-in CSS Validation Rules
Some Custom CSS Rules to Change Validation Feedback
Customized Validation Feedback
Summary
In this chapter, we looked at data binding in Blazor. We started with one-way data binding where we can embed the value of a property or a field in the UI using the @SomeProperty syntax. We then looked at event binding where you bind an element’s event to a method using the on<event>="@SomeMethod" syntax. Blazor also has support for two-way data binding where we can update the UI with the value of a property and vice versa using the @bind="SomeProperty" syntax. Finally, we examined validation where we can use standard .NET validation techniques.
3. Components and Structure for Blazor Applications
3. Components and Structure for Blazor Applications
In the previous chapter on data binding, you have built a single monolithic application called PizzaPlace with Blazor. After a while, this will become harder and harder to maintain because everything is in one place, resulting in one big razor file.
In modern web development, we build applications by constructing them from components, which typically are again built from smaller components. A Blazor component is a self-contained chunk of user interface. Blazor components are classes built from razor and C# with one specific purpose (also known as single responsibility principle ) and are easier to understand, debug, and maintain. And of course, you can reuse the same component in different pages, which can be a huge advantage.
In this chapter, we will explore how to build Blazor components.
What Is a Blazor Component?
To put it in a simple manner, each razor file in Blazor is a component. It’s that simple! A razor file in Blazor contains markup and has code in the @code section. Each page we have been using from the MyFirstBlazor project is a component! And components can be built by adding other components as children.
Any class that derives from the ComponentBase class becomes a Blazor component; a little later, we will build an example of this. When you use a razor file, the generated class will also derive from ComponentBase.
Remember the MyFirstBlazor project from the previous chapter? Create a new one just like it in Visual Studio (or Code), and let’s have a look at some of the components in there.
The Index Page
Examining the SurveyPrompt Component
The SurveyPrompt Component
 – this will show Microsoft that you’re interested in Blazor).
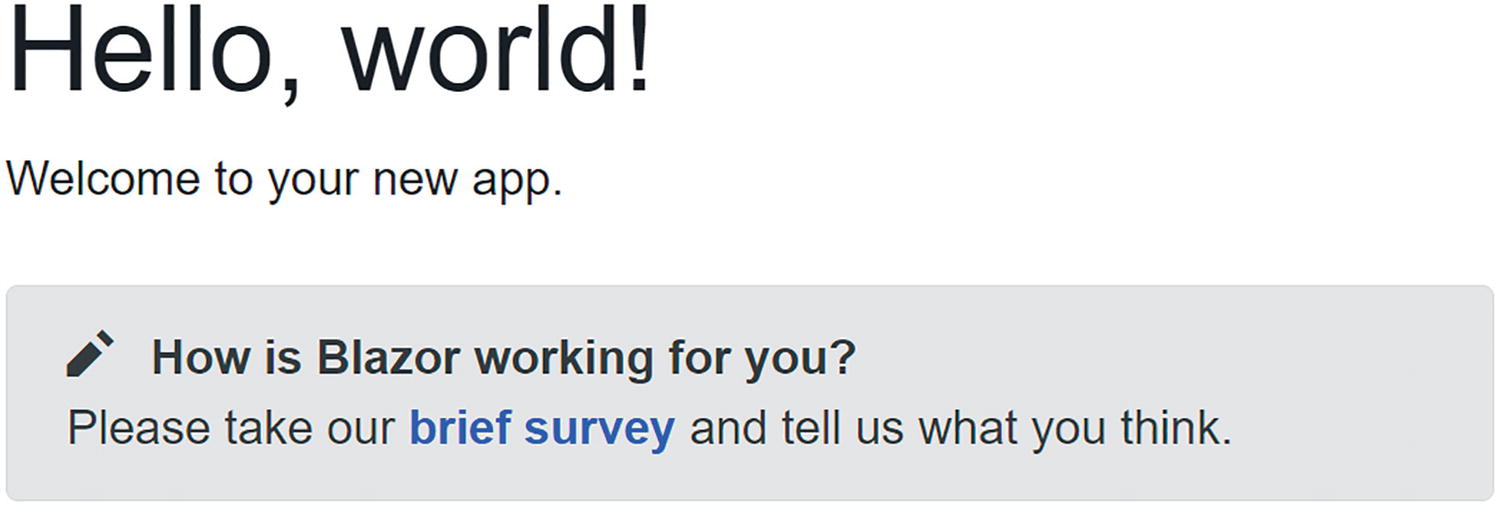
The SurveyPrompt Component
The @code section simply contains a property Title that uses one-way data binding for rendering in the component. Do note the [Parameter] attribute on the Title property. This is required for components that want to expose their public properties to the parent component. This way, we can pass data to nested components, for example, how the Index component passes the Title to the SurveyPrompt component.
Building a Simple Alert Component with Razor
Let us build our own Blazor component that will show a simple alert. Alerts are used to draw the attention of the user to some message, for example, a warning.
Creating a New Component with Visual Studio
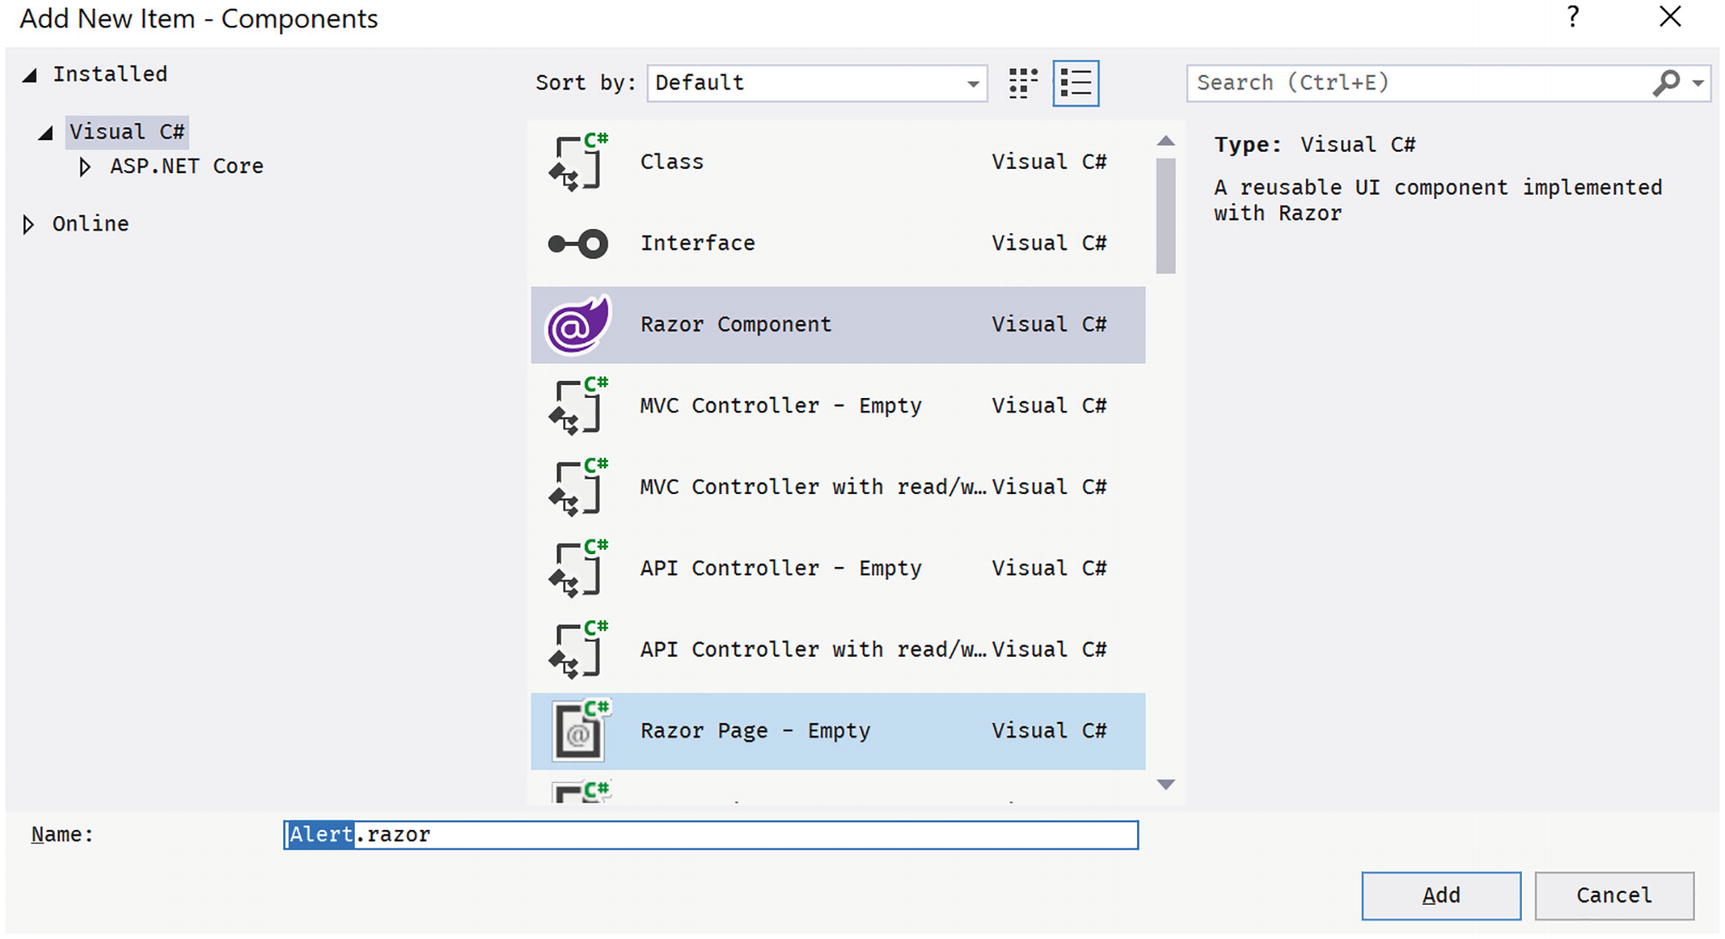
The Add New Item Window
Select Razor Component and name it Alert.razor. Click Add.
Creating a New Component with Code
Right-click the Pages folder of the client project and select New File. Name it Alert.razor. Unlike Visual Studio, this will not generate any code in this file. There are extensions available for creating Blazor components. I will let you explore which one you like best (e.g., https://visualstudiomagazine.com/articles/2020/04/08/vs-code-blazor.aspx).
Implementing the Alert Component
Remove all existing content from Alert.razor and replace it with Listing 3-3. Let us have a look at this component.
The first line in the Alert component uses an @if to hide or show its inner content. This is a common technique if you want to conditionally display content. So, if the Show public property (actually parameter) is false, the whole component is not shown. This allows us to “hide” the component until needed.
Our Alert component will show some content in a <div> element as an alert (using bootstrap styles), so how do we pass this content to the Alert component? Inside the @if, there is a <div> element with @ChildContent as its child. You use @ChildContent if you want to access the nested element in the Alert component, as you’ll see when we use the Alert component in Listing 3-4.
The Alert Component
The default Blazor templates use Bootstrap 4 for styling. Bootstrap (http://getbootstrap.com) is a very popular CSS framework, originally built for Twitter, giving an easy layout for web pages. However, Blazor does not require you to use bootstrap, so you can use whatever styling you prefer. In that case, you would have to update all the razor files in the solution using the other styles, just like in regular web development. In this book, we will use bootstrap, simply because it is there.
Go back to Index.razor to add the element.
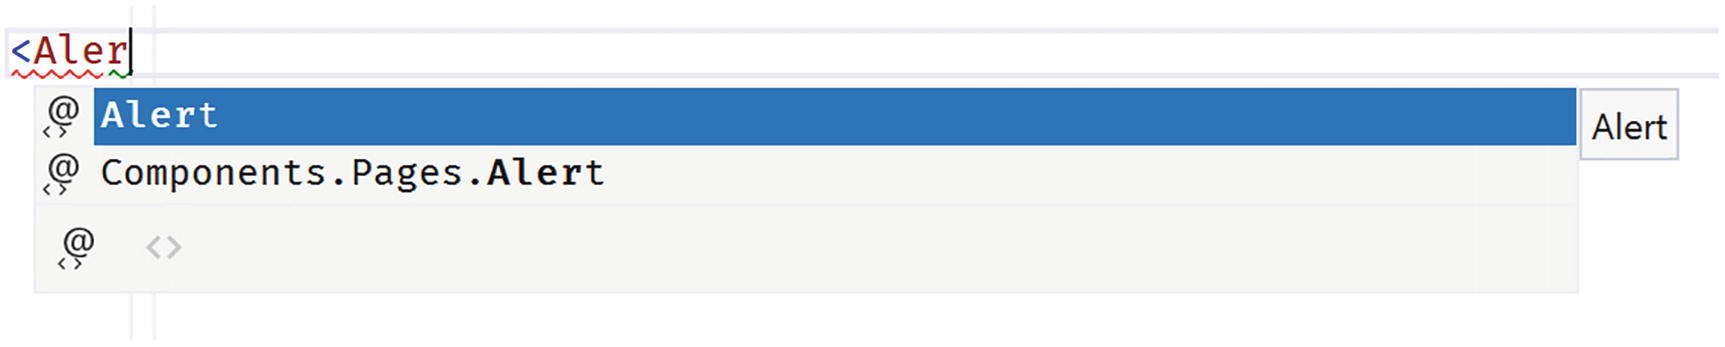
Visual Studio IntelliSense Support for Custom Blazor Components
Using Our Alert Component in Index.razor
Inside the <Alert> tag, there is a <span> displaying a checkmark icon using the open-iconic font and a <strong> element displaying a simple message. These will be set as the @ChildContent property of the Alert component.
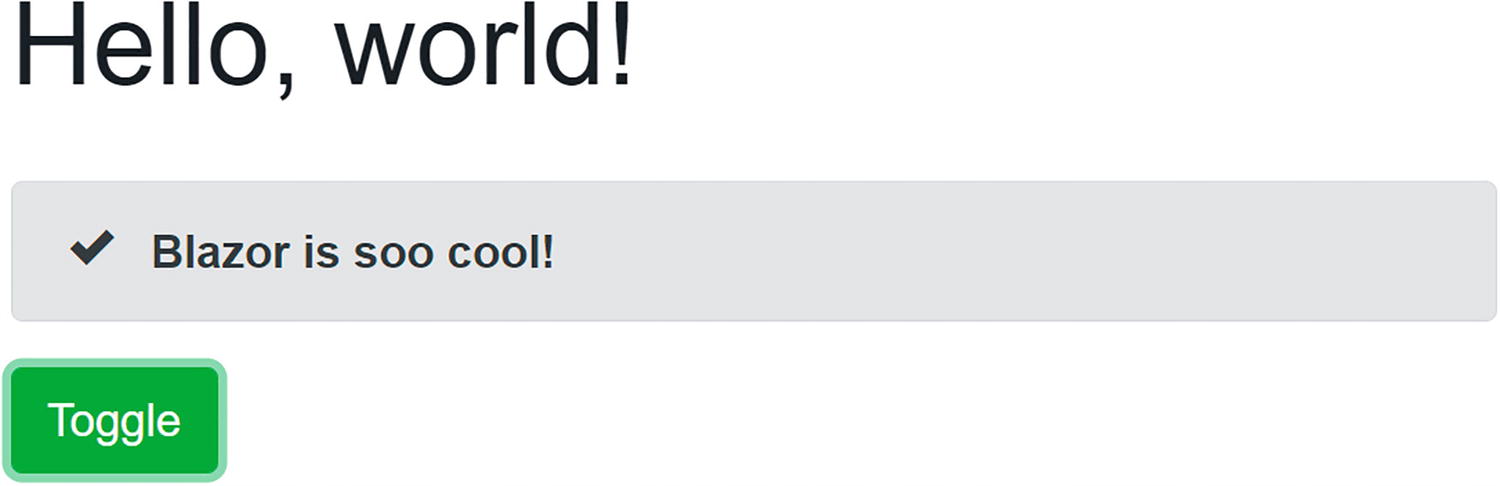
Our Simple Alert Component Before Clicking the Toggle Button
Separating View and View Model
You might not like this mixing of markup (view) and code (view model). If you like, you can use two separate files, one for the view using razor and another for the view model using C#. The view will display the data from the view model, and event handlers in the view will invoke methods from the view model.
Some people prefer this way of working because it’s more like the MVVM pattern.
Each Blazor razor file gets generated into a C# partial class. If you want to separate the code from the razor file, put the code in a partial class with the same name as the component. The C# compiler will merge code from both files into a single class. Let’s try this!
Creating a DismissibleAlert Component
If you haven’t done so yet, open the MyFirstBlazor solution. With Visual Studio, right-click the Pages folder and select Add ➤ New Item…. The Add New Item dialog should open as shown in Figure 3-2. This time, select Razor Component and name it DismissibleAlert.razor. Also, add a new C# class, and call the file DismissibleAlert.razor.cs.
With Visual Studio Code, right-click the Pages folder, select New File, and name it DismissibleAlert.razor. Do this again to create a new file called Dismissible.razor.cs.
The Markup for Dismissible.razor
There is no @code section, because you will write this in the .cs file.
The Code for Dismissible.razor.cs
Do note that this is a partial class with the same name as the Blazor component! So instead of putting your code in the @code section of a razor file, you can put the code in a partial class.
Which model is best? I don’t think either one is better than the other; it is more a matter of taste. Choose the one you like. I do like the code separation model a little more (my personal opinion) because I think the C# editor has better features for keeping my code maintainable and clean.
Understanding Parent-Child Communication
Using Dismissible
Adding a Timer Component
Start by adding a new class called Timer to the Pages folder as shown in Listing 3-8. The timer will not have any visual part, so we don’t even need a .razor file to build the view.
A Blazor component is a class that inherits the ComponentBase class. Since we want to use the Timer class as a Blazor component, we need to inherit from ComponentBase .
The Timer Class
Adding the Timer Component to Dismiss the Alert
Run the application and wait at least 5 seconds. The alert does not hide! Why?!
Look at the markup, which is in Listing 3-9, for Dismissible. It shows the component based on the Show parameter, and this one gets set through data binding. Does the ToggleAlert method get called? Run the Blazor website again, and immediately open the browser’s debugger on the console tab. After a little while, you should see the Console.WriteLine output appear. So the ToggleAlert method does get called.
Think about this. We invoke a method asynchronously using a Timer. When the timer fires, we set the Index component ShowAlert property to false. But we still need to update the UI. You can manually trigger the UI to update by calling the StateHasChanged method .
This is very important! The Blazor runtime updates the UI automatically when an event triggers, like the button click. The Blazor runtime also updates the UI for its own asynchronous methods, but not for other asynchronous methods like Timer.
Adding StateHasChanged
Run again and wait, and after 5 seconds, the alert disappears!
To be honest, I don’t like the previous solution to our problem. Because a child component calls the ToggleAlert method , we manually need to call StateHasChanged . Is there no better way? And we haven’t even solved another problem. When the user dismissed the alert before the timer triggered the Tick method, it should reappear after 5 seconds because it will set ShowAlert back to true!
We will fix both problems, but first, we need to understand two-way data binding between components.
Using Two-Way Data Binding Between Components
When the user clicks the Dismissible component’s close button, it sets its own Show property to false, as intended. The problem is that the parent Index component’s ShowAlert stays true. Changing the value of the Dismissible local Show property will not update the Index component’s ShowAlert property. What we need is two-way data binding between components, and Blazor has that.
With two-way data binding, changing the value of the Show parameter will update the value of the ShowAlert property of the parent and vice versa.
Using Two-Way Data Binding
Properties that support two-way data binding need a way to tell the parent that the property has changed. The child component uses for that a delegate, so the parent component through the Blazor runtime can install its own change handler (just like an event) when the property has changed. This change handler will then update the parent component’s data bound property. The child component is responsible for invoking the Changed delegate when the property changes.
Open the Dismissible class and its implementation to match Listing 3-12. There are two changes. First of all, the Show property now uses the “full” implementation of a property, because we need to implement the setter that it will call the ShowChanged delegate when its value changes.
The Dismissible Class with Two-Way Binding Support
Whenever someone or something changes the Show property’s value, the property’s setter triggers the ShowChanged delegate. This means the parent component can inject some code (which it does for you when you use two-way data binding) into the ShowChanged delegate property which will invoke when the property is changed (internally or externally).
The property setter checks if the value has changed. Only trigger the Changed delegate when there is an actual change. This will avoid a possible endless loop of Changed handling.
Now, when the Dismissible Show property changes, Blazor will update the parent's ShowAlert property because we are using two-way data binding.
We still need to fix the problem when the Timer fires.
Update the UI when ShowAlert Changes the Value
Run. Wait 5 seconds.
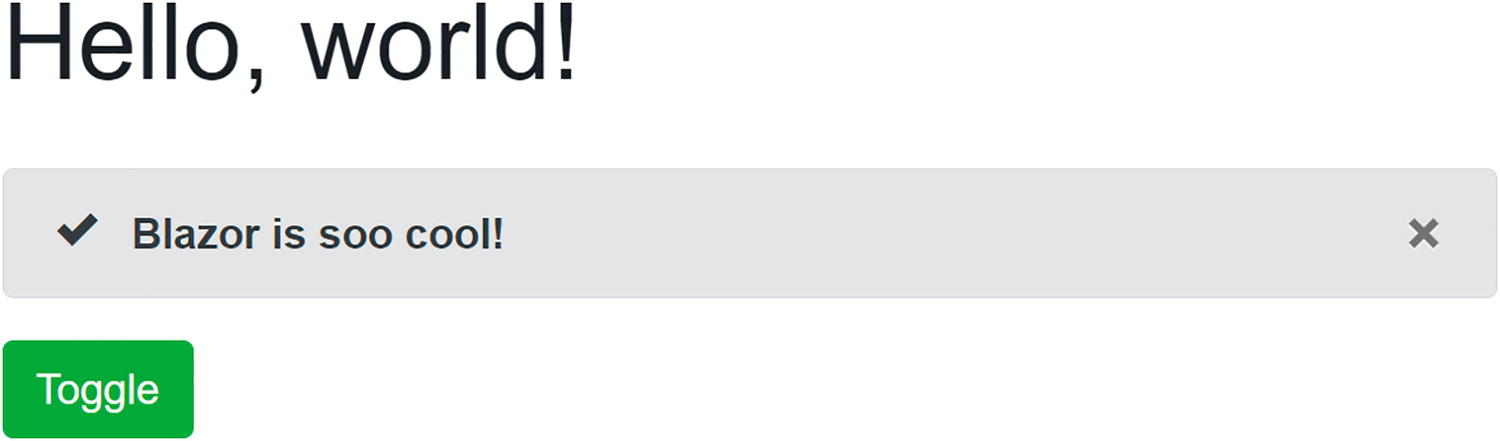
The Alert Being Shown

The Alert Automatically Hides After 5 Seconds
Should your project still not update, you can debug a client-side Blazor project by adding breakpoints or some Console.WriteLine statements. These will appear in the browser’s console window. You can see examples of this in the book’s code which you can download from the Apress site.
Using EventCallback<T>
Now, with the DismissibleAlert component from the previous section, we have been using two-way data binding between components with the @bind-Show syntax, and we used the ShowChanged callback to notify the parent component that the Show property has changed. To make the parent update its UI, we also added a call to StateHasChanged when the parent’s ShowAlert property gets modified. But there is a better way!
Blazor has the EventCallback type for this, which was added to Blazor in .NET Core 3.0 Preview 3 (https://github.com/aspnet/AspNetCore/issues/6351). The big difference between Action<T> and EventCallback<T> is that the latter will invoke StateHasChanged for you!
Using EventCallback<T>
So instead of using an Action<T> delegate, we use the EventCallback<T> type. First of all, this type is a value type, so we don’t need to check for null. And instead of an Invoke method, it has an InvokeAsync method which solves some special problems which are not important at this point in time.
If you want to learn more about these problems, open your browser on https://github.com/dotnet/aspnetcore/issues/6351.
The Improved Timer Component
Index with Simple ShowAlert Property
Build and run. Wait 5 seconds. The alert should hide!
In general, you should prefer EventCallback<T> over normal delegates for parent-child communication, such as events and two-way data binding. There are exceptions to the rule (e.g., the fact that EventCallback triggers component, re-rendering might be a problem, and then using a delegate can be the solution).
Referring to a Child Component
Generally, you should prefer data binding to have components communicate with one another. This way, one component does not need to know anything about another component, except the data bindings. It also makes the Blazor runtime take care of updating components with changes.
Referring to a Child Component
In this example, the Blazor runtime will put a reference to the DismissibleAlert component in the alert field. You can instruct Blazor to do this using the @ref syntax. When the timer calls its Tick parameter after 5 seconds, we use this reference to call the DismissibleAlert’s Dismiss method.
Communicating with Cascading Parameters
When a higher-level component wants to pass data to an immediate child, life is easy. Simply use data binding. But when a higher-level component needs to share some data with a deeper nested component, passing data using data binding requires each intermediate component to expose that data through a parameter and pass it down to the next level. Not only is this inconvenient when you have several levels of components, but who says that you are in control of these components? Blazor solves this problem with cascading values and parameters. Let us look at an example.
The CounterData Class
Using the CascadingValue Component
Use the CascadingValue Component to Pass Data to Descendants
Using the GrandMother Component
Receiving the Cascading Value
When you click the Inc button of GrandChild, the CounterData’s Count property increments. The GrandMother component wants to display this value every time it gets incremented, so CounterData notifies the GrandMother of changes. The GrandMother component subscribes to these changes and calls StateHasChanged to update itself. How the shared object handles this notification is up to you; for example, CounterData uses a delegate. You could also use INotifyPropertyChanged . If you’re not familiar with this interface, it is used in a lot of .NET applications to notify interested parties that a property has changed. For example, Windows Presentation Foundation (WPF) heavily relies on this interface. If you would like to learn more, any good book on WPF will explain this, or you can find more information at https://docs.microsoft.com/dotnet/api/system.componentmodel.inotifypropertychanged.
Resolving Ambiguities
Use a Named Cascading Value in GrandMother
Receive the Named Cascading Value
Component Life Cycle Hooks
A Blazor component has a life cycle just like any other .NET object. A component is born, goes through a couple of changes, and then dies. A Blazor component has a couple of methods you can override to capture the life cycle of the component. In this section, we will look at these life cycle hooks because it's very important to understand them well. Putting code in the wrong life cycle hook will likely break your component.
You should also remember that each life cycle method gets called at least once for every component. Even a component with no parameters will see methods like SetParametersAsync and OnParametersSetAsync called at least once.
Life Cycle Overview
The LifeCycle Component’s Code
The LifeCycle Component’s Markup
Using the LifeCycle Component
The LifeCycle component gets constructed (constructor called), and then Blazor calls the SetParametersAsync method . This method normally will result in the parameter setters being called, and that is why we see the Counter property’s output.
Then the Blazor runtime calls the OnInitialized method (and the asynchronous OnInitializedAsync which I left out for simplicity). After this, the OnParametersSet method is called (and also the asynchronous OnParametersSetAsync method). Now the component is ready to be rendered, and the Blazor runtime renders it. Finally, rendering the OnAfterRender method is called which gets passed a Boolean which is true on the first render.
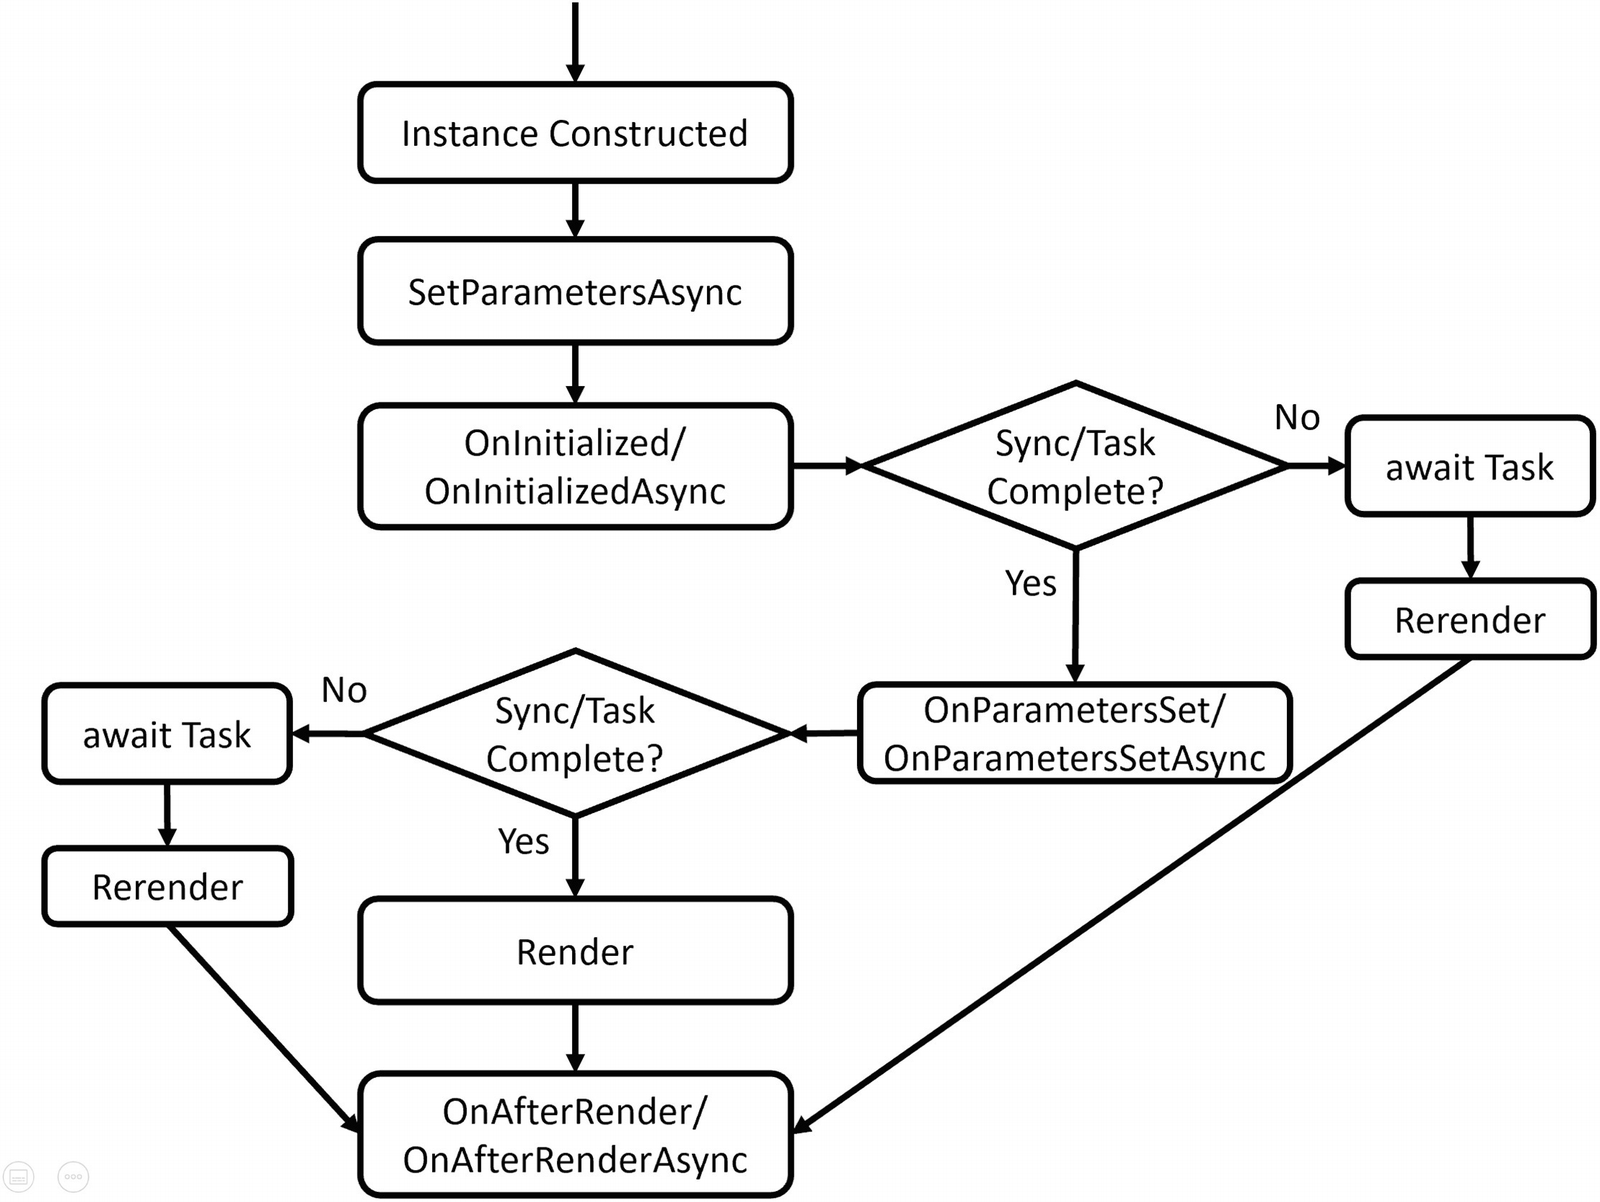
Because I clicked the Increment button of the Index component, it invokes the click handler and then re-renders itself. But first it sets the parameters on the LifeCycle component which results in the SetParametersAsync method being called again (which sets the Counter parameter). After this, it invokes the OnParametersSet method to indicate all parameters have been updated (and also the asynchronous OnParametersSetAsync method).
Now, should the Blazor runtime render the component? For this, it calls the ShouldRender method , and if this returns true, it will render the LifeCycle component (and then the OnAfterRender method).
Clicking the Increment button results in that sequence again.
Now let us look at each of these methods individually.
SetParametersAsync
If you need to execute some code before the parameters are set, you can override the SetParametersAsync method . The default implementation of the SetParametersAsync method will set each [Parameter] and [CascadingParameter] that has a value in the ParameterView argument. Other parameters (that don’t have a value in ParameterView) are left unchanged.
You can find the parameters in the ParameterView argument which behaves like a dictionary. Let’s look at an example in Listing 3-27. This example uses the SetParametersAsync method to inspect the parameters, looking for a “Counter” parameter. If this parameter is even, we call the base method; otherwise, we don’t do anything, resulting in an even valued Counter.
There is one snag; when you don’t call the base method, the UI doesn’t update, so you should call StateHasChanged if you want the component to update. Initially, our LifeCycle component could receive an odd value, and that is why we call StateHasChanged for the first time.
Overriding SetParametersAsync
OnInitialized and OnInitializedAsync
When your component has been created and the parameters have been set, the OnInitialized and OnInitializedAsync methods are called. Implement one of these methods if you want to do some one-time extra initialization after the component has been created, for example, fetching some data from a server like the FetchData component from the project. The OnInitialized methods are only called once, right after the creation of the component.
The OnInitialized Life Cycle Hook
The OnInitializedAsync Life Cycle Hook
OnParametersSet and OnParametersSetAsync
When you need one or more parameters to look up data after a change to the parameters, you use OnParametersSet or OnParametersSetAsync instead of the OnInitialized/OnInitializedAsync methods. Every time data binding updates one or more of your parameters, these methods get called again, so they are ideal for calculated properties, filtering, etc. For example, you could have a DepartmentSelector component that allows the user to select a department from a company and another EmployeeList component that takes the selected department as a parameter. The EmployeeList component can then fetch the employees for that department in its OnParametersSetAsync method.
The OnParametersSet Method
The OnParametersSetAsync Method
ShouldRender
The ShouldRender method returns a Boolean value, indicating if the component should be re-rendered. Do realize that the first render ignores this ShouldRender method, so a component will render at least once. The default implementation always returns true. You want to override this method to stop the component from re-rendering.
Implementing the ShouldRender Method
OnAfterRender and OnAfterRenderAsync
The OnAfterRender and OnAfterRenderAsync methods are called after Blazor has completely rendered the component. This means that the browser’s DOM has been updated with changes made to your Blazor component. Use these methods to invoke JavaScript code that needs access to elements from the DOM (which we will cover in the JavaScript chapter 10 ). This method takes a Boolean firstRender argument, which allows you to attach JavaScript event handlers only once.
Avoid calling StateHasChanged in this method, as it can cause an infinite loop.
The OnAfterRender Life Cycle Hook
The OnAfterRenderAsync Life Cycle Hook
IDisposable
If you need to run some cleanup code when your component is removed from the UI, implement the IDisposable interface. You can implement this interface in razor using the @implements syntax, for example, in Listing 3-25. Normally, you put the @implements at the top of the .razor file, but if you use code separation, you can also declare it on the partial class.
Most of the time, dependency injection will take care of calling Dispose, so generally, you won’t need to implement IDisposable if you only need to dispose of your dependencies.
Implementing the Dispose Method
A Word on Asynchronous Methods
When the Blazor runtime calls asynchronous methods like OnInitializedAsync and OnParametersSetAsync, it will await this method and will also render the component. The only exception to this is the OnAfterRenderAsync method, which will not trigger a render (otherwise, this will cause an infinite render loop).
Initializing forecasts
Checking forecasts for Null
Refactoring PizzaPlace into Components
In the previous chapter on data binding, we built a website for ordering pizzas. This used only one component with three different sections. Let us split up this component into smaller, easier to understand components and try to maximize reuse.
Creating a Component to Display a List of Pizzas
Open the PizzaPlace Blazor project from the previous chapter. You can also start with the code examples from this book; look for Chapter 2 which contains the finished version. Start by reviewing Index.razor. This is our main component, and you can say that it has three main sections: a menu, a shopping basket, and customer information.
The menu iterates over the list of pizzas and displays each one with a button to order. The shopping basket also displays a list of pizzas (but now from the shopping basket) with a button to remove it from the order. Looks like both have something in common; they need to display pizzas with an action you choose by clicking the button. So let’s create a component to display a list of pizzas, using a nested component to display a pizza’s details.
We have also seen that we can split components into a razor file with the markup and a C# file with the code. Let us do that here!
The Code for the PizzaItem Component
The PizzaItem Component
The PizzaItem component will display a pizza, so it should not come as a surprise that it has a Pizza parameter. This component also displays a button, but how this button looks and behaves will differ where we use it. And that is why it has a ButtonTitle and ButtonClass parameter to change the button’s look, and it also has a Selected event callback of type EventCallback<Pizza> which gets invoked when you click the button. Do you remember why we are using EventCallback<T> instead of Action<T>? Do note that this component does one thing well, and only one thing: display the pizza and allow an action on the pizza by clicking the button.
The PizzaList Component’s Code
The PizzaList Component’s Markup
First note the use of the @if. Here, we need to decide what to do should the Items property (which is an IEnumerable<Pizza>) be null of empty. In that case, we will display a loading UI, assuming the Items collection will be filled in later.
Otherwise, the PizzaList component displays a Title and all the pizzas from the Items collection, so it takes these as parameters. It also takes a Selected event callback which you invoke by clicking the button next to a pizza. Note that the PizzaList component reuses the PizzaItem component to display each pizza and that the PizzaList Selected event callback is passed directly to the PizzaItem Selected event callback. Same thing for the button parameters. The Index component will set this callback, and it will be executed by the PizzaItem component.
Using the PizzaList Component in Index.razor
Run the application and try to order a pizza. Your selected pizza should be added to the shopping basket. Thanks to the EventCallback<T> type, there is no need to call StateHasChanged. Had we used an Action<T> or Func<T>, the UI would not update, and you would need to call StateHasChanged whenever you receive events from a child component!
Showing the ShoppingBasket Component
The ShoppingBasket Component’s Code
The ShoppingBasket Component’s Markup
The ShoppingBasket component is similar to the PizzaList component , but there are some big differences (and that is why we are not reusing the PizzaList component. We will do this in the next chapter). The ShoppingBasket class (the one from the shared project) keeps track of the order using only ids of pizzas, so we need something to get the pizza object. This is done through the GetPizzaFromId delegate (again, we don’t want this component to know a lot about the other classes). Another change is the OnParametersSet method. The OnParametersSet method gets called when the component’s parameters have been set. Here, we override it to build a list of (pizza, position) tuples which we need during data binding and to calculate the total price of the order.
Tuples are just another type in C#. But with modern C#, we get this very convenient syntax; for example, IEnumerable<(Pizza pizza, int pos)> means we have a type that is a list of pizza and position pairs. Think of tuples as a nice replacement for anonymous types, which allow you to quickly have compiler-generated types.
Using the ShoppingBasket Component
Run your project again. Everything should still work (and look the same).
Adding the CustomerEntry Component
The CustomerEntry Component’s Code
The CustomerEntry Component’s Markup
The CustomerEntry component uses a <label>, InputText, and ValidationMessage for each customer property.
The Index Component
Build and run the PizzaPlace application. Things should work like before, except for one thing. Remember the debugging tip from the previous chapter? When you change the name of the customer, this tip does not update correctly. Only after pressing the button will this update. Let’s fix this.
Using Cascading Properties
The problem is as follows. Whenever the user edits properties from the customer, we want the CustomerEntry component to trigger a CustomerChanged event callback. This way, other components in the UI will update because of changes to the customer. But how can we detect these changes? If we were using <input> elements, we could use the onchanged event, but unfortunately, the InputText component does not have this event. It does have the ValueChanged event, but I don’t want to use that here (otherwise, I could not show you the use of a cascading property for this).
Look at the CustomerEntry component again. You see an EditForm with nested InputText components. The EditForm provides a cascading value of type EditContext, and the InputText components use this EditContext for things like validation.
If you like, all of the source code for the InputText and other components in Blazor is available on GitHub (https://github.com/dotnet/aspnetcore/tree/master/src/Components) since Blazor is open source. That is what I did to figure out the solution to the problem.
Whenever one of the Input components changes, it calls the EditContext.NotifyFieldChanged method . And here is where things get interesting because EditContext has an OnFieldChanged event, which triggers every time a model’s property changes.
Let us build a component that uses the EditContext’s OnFieldChanged event to notify us of changes. This way, we don’t have to implement the ValueChanged event for each Input.
The InputWatcher Component
When the EditContext property gets set, the InputWatcher simply registers for the FieldChanged event and calls its own FieldChanged event callback.
Make the Customer Parameter Two-Way Bindable
The CustomerEntry Component with CustomerChanged Callback
Use Two-Way Data Binding for the Customer
Build and run. When you make a change to the customer, you should see the customer update in the debugging tip when you tab out of a control. Hey, this was not hard at all!
Disabling the Submit Button
You might want to disable the Submit button as long as there are validation errors. Our freshly introduced InputWatcher allows us to do that. Look for the Validate method in Listing 3-49. This method calls the EditContext.Validate method. We are going to use this to enable/disable the Submit button.
Disabling the Submit Button
Disabling the Submit Button
Run your application, and leave some of the Customer properties invalid (that is to say blank). When you press the Submit button (a.k.a. Checkout), you will get validation errors and the button will disable itself. When you fix the validation errors, the Submit button will again be enabled. If you want the button to be enabled right away, change the initial value of isInvalid to false.
Summary
In this chapter, we covered building Blazor components. We discussed how components can communicate with each other through parameters and data binding. We look at how a component can reference a child component. Cascading values are a very nice way of sharing data between components in a hierarchy. Finally, we saw the life cycle hooks that Blazor components have and allow us to intercept the important events in a component’s life.
We applied this by dividing the monolithic Index component of the PizzaPlace application into smaller components.
4. Advanced Components
4. Advanced Components
In Chapter 3, we looked at building components for Blazor. But we are not done yet. There is still a lot more we need to discuss about components. One of the things we really need to look at is templated components and Razor templates. Then we will look at component libraries, virtualization, and dynamic components.
Using Templated Components
Components are Blazor’s building block for reuse. In C#, generics are heavily used for reuse; just think about all the collections like List<T> you use with generics. Would it not be cool if Blazor had something like generic components? Yes, Blazor does!
Blazor supports templated components where you can specify one or more UI templates as parameters, making templated components even more reusable! For example, your application could be using grids all over the place. You can now build a templated component for a Grid taking the type used in the grid as a parameter (very much like you can build a generic type in .NET) and specify the UI used for each item separately! Let’s look at an example.
Creating the Grid Templated Component
Create a new Blazor project; call it Components.Advanced. Now add a new razor component to the project’s Pages folder and name it Grid as in Listings 4-1 and 4-2.
The Templated Grid Component’s Code
The Templated Grid Component’s Markup
The Grid component has four parameters. The Header and Footer parameters are of type RenderFragment which represents some markup (HTML, Blazor components) which we can specify when we use the Grid component (we will look at an example right after explaining the Grid component further). Look for the <thead> element in Listing 4-2 in the Grid component. Here, we use the @Header razor syntax telling the Grid component to put the markup for the Header parameter here. Same thing for the Footer.
The Row parameter is of type RenderFragment<TItem> which is a generic version of RenderFragment. In this case, you can specify markup with access to the TItem instance allowing you access to properties and methods of the TItem. The Items parameter here is an IReadOnlyList<TItem> which can be data bound to any class with the IReadOnlyList<TItem> interface, for example, a List<T>. Look for the <tbody> element in Listing 4-2. We iterate over all the items (of type TItem) of the IReadOnlyList<TItem> using a foreach loop, and we use the @Row(item) razor syntax to apply the Row parameter, passing the current item as an argument.
Using the Grid Templated Component
Now let’s look at an example of using the Grid templated component. Open the FetchData component in the Components.Advanced project. Replace the <table> with the Grid component as in Listing 4-3.
The FetchData component uses a couple of things such as @page and @inject we will discuss in later chapters, so bear with the example.
Using the Grid Templated Component in the FetchData Component
Now look at the Header parameter of the Grid component in Listing 4-3. This syntax will bind whatever is inside the <Header> element to the Grid’s Header parameter which is of type RenderFragment. In this example, we specify some HTML table headers (<th>). The grid will put these inside the table row (<tr>) element from Listing 4-2. The Footer parameter is similar.
Examine the Row parameter in Listing 4-3. Inside the <Row> element, we want to use the current item from the iteration in Listing 4-2. But how should we access the current item? By default, Blazor will pass the item as the context argument (of type TItem), so you would access the date of the forecast instance as @context.Date.
Overriding the Context Argument

Showing Forecasts with the Grid Templated Component
Now we have a reusable Grid component that we can use to show any list of items passing the list to the Items parameters and specifying what should be shown in the Header, Row, and Footer parameters! But there is more!
Specifying the Type Parameter’s Type Explicitly
Explicitly Specifying the Type Parameter
Using Generic Type Constraints
Generics Using a Constraint
Using Constraints with a Templated Component
Razor Templates
In templated components, you can have parameters of type RenderFragment, which can then be given a value using markup. You can also give a RenderFragment or RenderFragment<TItem> a value using a Razor template.
A Razor template is a way to define a UI snippet, for example, @<span>Hello!</span>, which you can then pass into a RenderFragment. A Razor template generally uses the @<element>...</element> syntax. In the example’s case, we specify a RenderFragment without any arguments, for example, to use in the Grid’s Header parameter. But if you need to pass an argument to the RenderFragment<TItem>, you create a Razor template using a syntax that looks a lot like a lambda function.
Think of a Razor template as special C# syntax for creating a RenderFragment.
The Template ListView Component’s Code
The Templated ListView Component’s Markup
Now add the ListView to the FetchData component as in Listing 4-10 (I have left out most of the unchanged parts). The ItemTemplate parameter now uses the forecastTemplate RenderFragment which is specified in the @code section. Look at the forecastTemplate in Listing 4-10. This uses a syntax very similar to a C# lambda function taking the forecast as an argument and returns a RenderFragment<TItem> using the (forecast) => @<span>@forecast.Summary</span> razor syntax.
Using the ListView Component with a RenderFragment
Wig-Pig Syntax
Let’s go wild: can we have a RenderFragment<RenderFragment>? Currently, our ListView<TItem> is using an <ul> to wrap the items, but what if the user of the ListView<TItem> wants to use an <ol> or something different?
Looking at Listing 4-9, this means that we want to be able to replace the outer (<ul>) markup with a template, loop over the items, and use another template to render each item.
Using a RenderFragment<RenderFragment>
The ListView2 Component
The markup for ListView2 currently will use a default <ul> list in case the ListTemplate is not used (and that is why it is set as nullable). But now we need to talk about using the ListTemplate. What do we want? We want the ListTemplate to wrap the foreach loop which then calls the ItemTemplate. So we need to pass a RenderFragment to it that will contain the foreach loop. But how can we do this in our component?
Let me introduce you to the pig-wig syntax : @:@{. It is called like that because it looks like a grumpy pig with a wig (not my invention!).
Using the Pig-Wig Syntax
Using a Templated Component with ListTemplate
Using Blazor Error Boundaries
With reusable components like templated components, you allow the user of your component to inject their own logic. But what is that logic is flawed and starts throwing exceptions?
Blazor error boundaries allow you to handle exceptions within your component and to provide some nice UI indicating the problem, without the exception taking the rest of the page down with it.
Emulating Some Flawed Logic
Running the application and choosing the FetchData component will crash the whole page. Not a nice user experience.
Using an ErrorBoundary
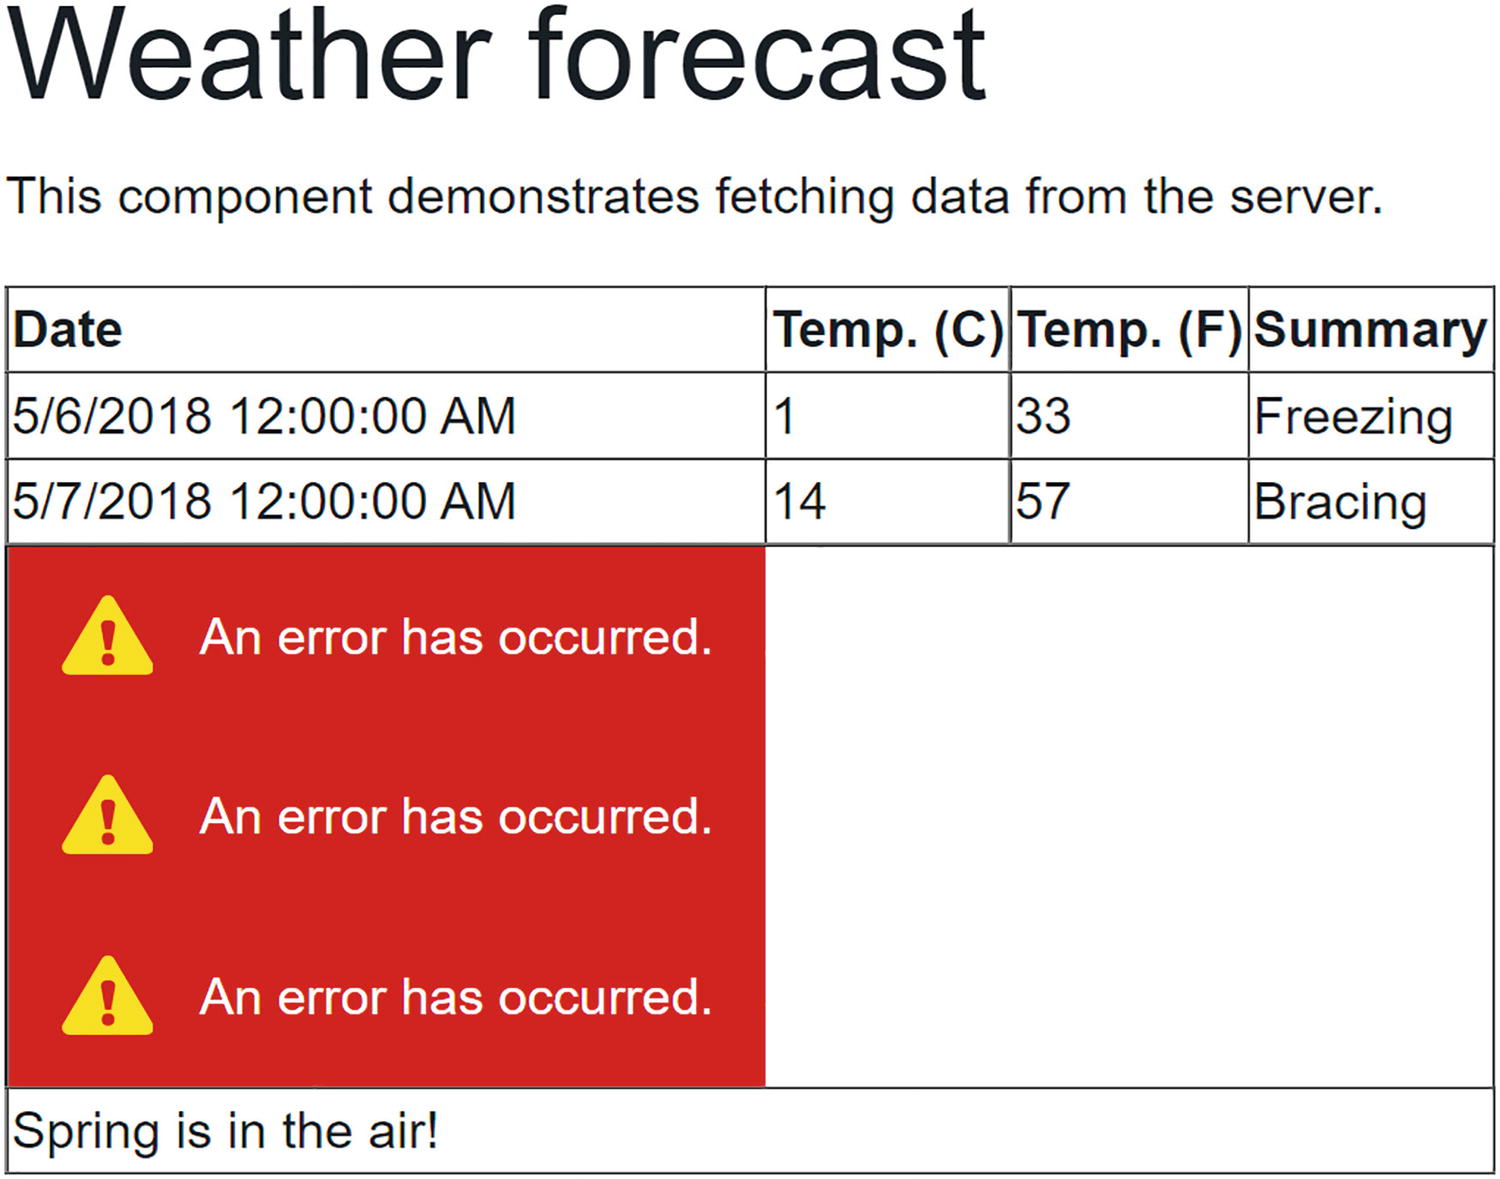
Using the ErrorBoundary
By default, the ErrorBoundary’s error UI uses an empty div with the blazor-error-boundary CSS class. You can customize this CSS class to change the error UI for the whole application.
Customizing an ErrorBoundary
Building a Component Library
Components should be reusable. But you don’t want to reuse a component between projects by copy-pasting the component between them. In this case, it is much better to build a component library , and as you will see, this is not hard at all! By putting your Blazor components into a component library, you can include it into different Blazor projects, use it both for client-side Blazor and server-side Blazor, and even publish it as a NuGet package!
What we will do now is to move the Grid and ListView2 component to a library, and then we will use this library in our Blazor project.
Creating the Component Library Project
Depending on your development environment, creating a component library is different. We will look at using Visual Studio and the dotnet CLI (which is development environment agnostic, so this works no matter your choice of IDE).
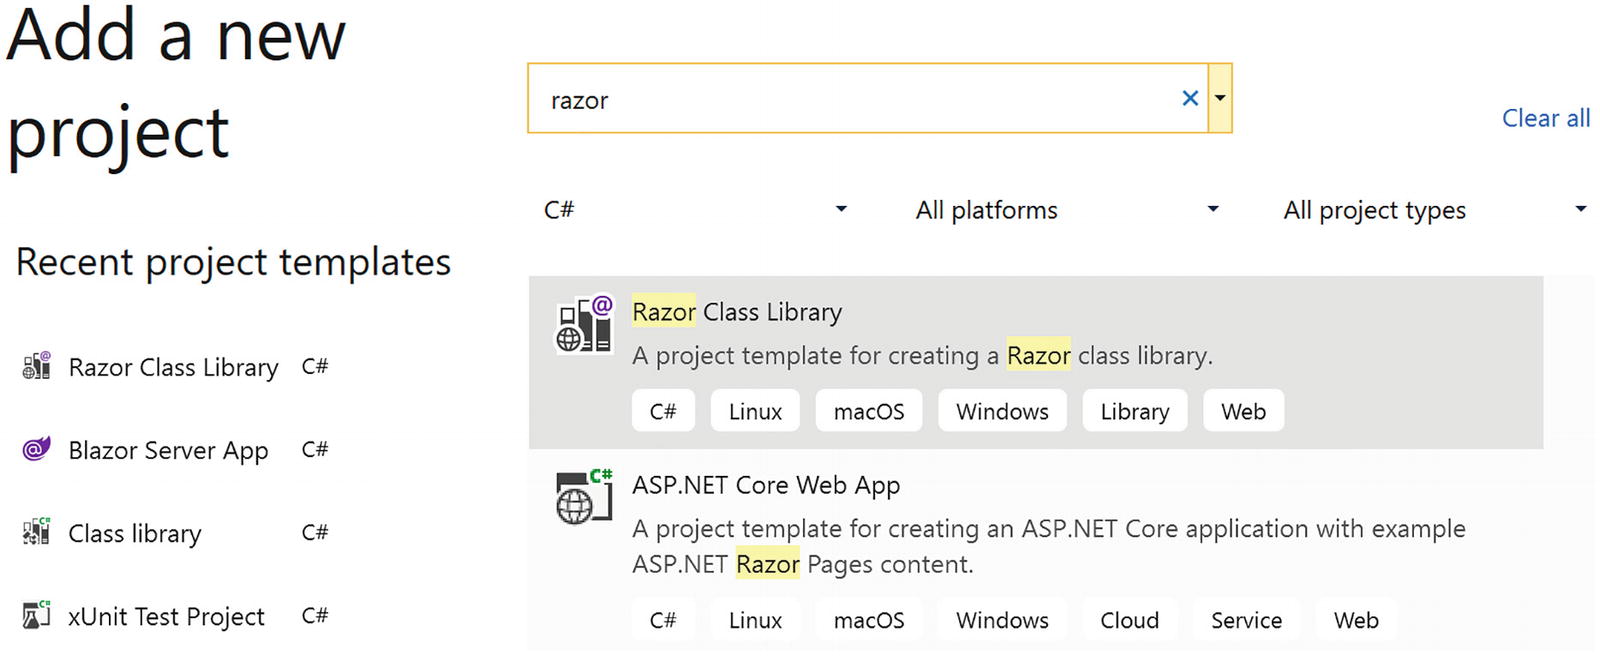
Add a New Component Library Project
Click Next. Name this project Components.Library, select the folder next to your other project, and click Next. In the next screen, click Create.
The dotnet new command will create a new project based on the razorclasslib template. If you want the project to be created in a subdirectory, you can specify it using the -o <<subdirectory>> parameter.
Adding Components to the Library
Also remove all existing files (except the _Imports.razor file and wwwroot folder) in the library project.
Previously, we built a couple of templated components. Some of these are very reusable, so we will move them to our library project. Start with Grid.
Move (you can use Shift-Drag-and-Drop) the Grid.razor and Grid.razor.cs files from your Components.Advanced project to the Components.Library project.
Do the same for ListView2 component. Both components are still using the client’s namespace, so update their namespace to Components. Library.
Building the library project should succeed. Building the solution will still get compiler errors from the client project because we need to add a reference from the client project to the component library, which we will fix in the next part.
Referring to the Library from Your Project
Now that our library is ready, we are going to use it in our project. The way the library works means we can also use it in other projects (just like any other library project in .NET). Hey, you could even make it into a NuGet package (if you want more information, look at https://docs.microsoft.com/dotnet/core/deploying/creating-nuget-packages) and let the rest of the world enjoy your work!
To use our component library in a project, we have two options.
Using Visual Studio, start by right-clicking the client project and select Add ➤ Project Reference. Make sure you check Components.Library and click OK. Blazor component libraries are just another kind of library/assembly.
Add a Reference to Another Project
Using the Library Components
Using the Fully Qualified Component Name
Add a @using Statement in Razor
Add a @using to _Imports.razor
Your solution should compile now and run just like before.
Why did we move our components into a component library? To make the components in the component library reusable for other projects. Simply add a reference to the library and its components can be used!
Static Resources in a Component Library
Maybe you want to use an image (or some other static file like CSS or JavaScript) in your component library. The Blazor runtime requires you to put static resources in the project’s wwwroot folder. If you want static resources in your application instead of the library, you should put these resources in the wwwroot folder of the application’s project. For both cases, you need to put these in the wwwroot folder; the only difference is that for library projects, you need to use a different URL.
Referring to a Static Resource in a Component Library
Run your project. You should see your image.
You can also refer to this static content inside the component library from your main project using the same URL.
Virtualization
Sometimes you need to display a lot of data, maybe thousands of rows. If you are going to use a simple foreach loop to create the UI for each row, you will get a noticeable delay between loading the data and the rendering of the data, because the Blazor runtime will have to create the UI for each row. Here, we will look at the built-in virtualization which will only render visible rows.
Displaying a Large Number of Rows
Let us start by building the class for the data and a class that will generate large number of instances of this data.
The Measurement Class
The MeasurementsService Class
Component Displaying Many Rows
Using the NonVirtualMeasurements Component
This is not so bad thinking about the number of rows being created.
Using the Virtualize Component
Replace the foreach with the Virtualize Component
Replace the NonVirtualMeasurements component in Index.razor with the VirtualMeasurements component.
This is way faster! Try scrolling. It scrolls smoothly! With the Virtualize component, you get a lot of features with almost no work. But that is not all of it!
Adding Paging
There is more we can do. Our component is loading all the data from the service, while we are only displaying a tiny fraction of rows. With the Virtualize component, we can change the service, so it only returns rows that are being displayed. We do this by setting the ItemsProvider parameter on the Virtualize component, which is an asynchronous delegate taking an ItemsProviderRequest and returns an ItemsProviderResult<T>.
Adding Paging to the MeasurementsService
Copy-paste the VirtualMeasurements.razor file and name it PagedVirtualMeasurements.razor. Update the Virtualize component with the ItemsProvider parameter as in Listing 4-29. Now the Virtualize component will ask the ItemsProvider to fetch several rows. Of course, it has to do an estimate on how many rows fit on the screen, and that is why I also provide the ItemSize parameter .
Using the ItemsProvider
Emulating a Slow Fetch with Task.Delay
Run this and start scrolling. Because of the delay, the Virtualize component might not have the row to render, so there is a Placeholder parameter which is displayed in its place. Of course, the moment the row is loaded, it gets replaced with the ItemContent.
Dynamic Components
An AnimalKind Enumeration
Different Kinds of Animals
The Base AnimalComponent
The CatComponent Code
The CatComponent Markup
The DogComponent’s Code
The DogComponent’s Markup
The AnimalSelector Markup
The AnimalSelector’s Code
The ComponentMetaData Class
The AnimalMetaData Class
Completing the AnimalSelector Component
The Index Component with AnimalSelector
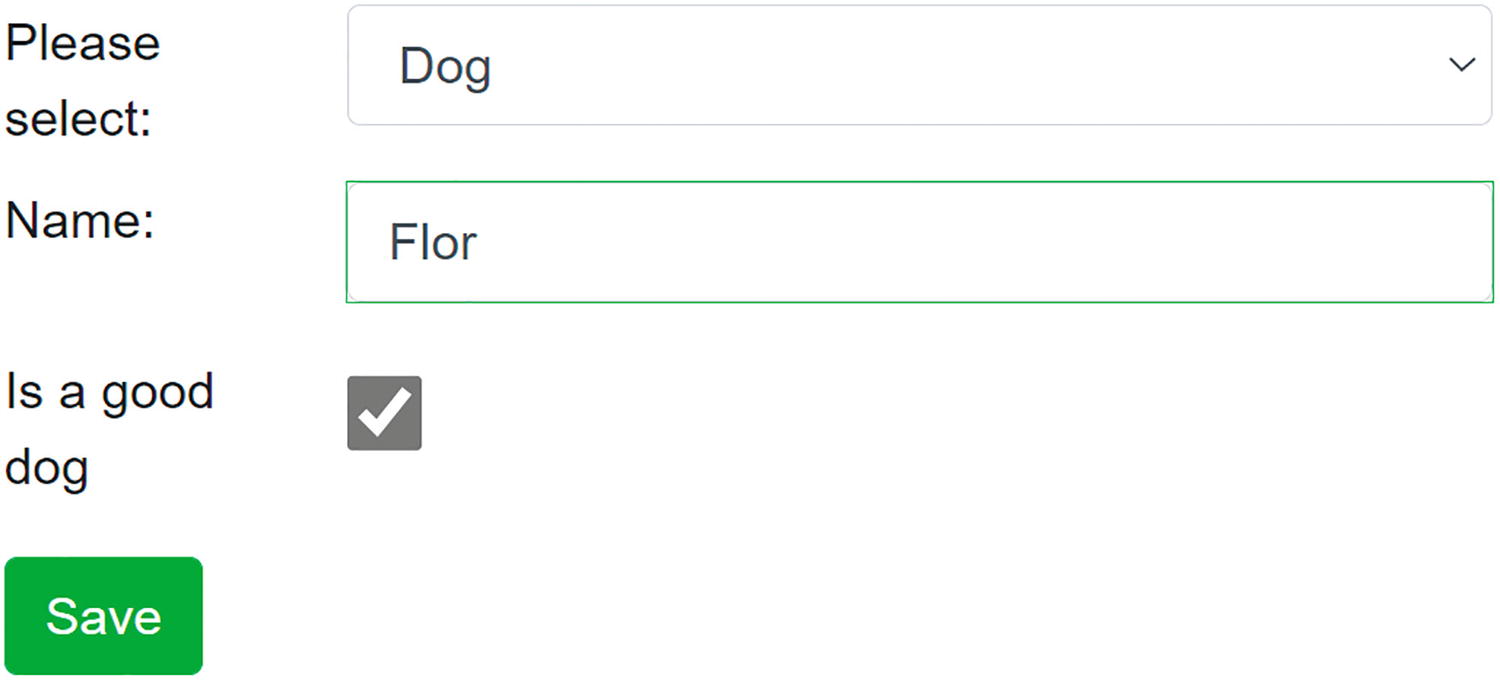
The AnimalSelector After Selecting a Dog
Component Reuse and PizzaPlace
In Chapter 3, we built a couple of components for the PizzaPlace application. There was an opportunity to have more reuse, and we are going to take that here. We will build a templated component for showing lists of pizza and then reuse it to show the menu and the shopping basket. Open the PizzaPlace solution from the previous chapter (or the sources that come with this book).
The ItemList Component’s Code
The ItemList Component’s Markup
Now that we have this templated component, we can use it for both the PizzaList and ShoppingBasket components .
The PizzaList Component Using the ItemList
The ShoppingBasket Component Using the ItemList
Now we have enhanced our PizzaPlace application by adding a templated component which we reuse for both the PizzaList and ShoppingBasket components. Compile and run. The PizzaPlace application should work as before.
Summary
In this chapter, we saw that in Blazor you can build templated components, which resemble generic classes. These templated components can be parameterized to render different UIs, which makes them quite reusable! We discussed Razor templates, which allows us to write markup in C# and had a look at the weird pig-wig syntax. We can build component libraries to maximize reuse of our components. Finally, we looked at virtualization which is a great way to work with large lists and how dynamic components give flexibility at runtime.
We applied this knowledge by building a simple templated component for showing lists of pizzas which we need in several places.
5. Services and Dependency Injection
5. Services and Dependency Injection
Dependency inversion is one of the basic principles of good object-oriented design. The big enabler is dependency injection . In this chapter, we will discuss dependency inversion and injection and why it is a fundamental part of Blazor. We will illustrate this by building a Service that encapsulates where the data gets retrieved and stored.
What Is Dependency Inversion?
Currently, our Blazor PizzaPlace app retrieves its data from hard-coded sample data. But in a real-life situation, this data will probably be stored in a database on the server. Retrieving and storing this data could be done in the component itself, but this is a bad idea. Why? Because technology changes quite often, and different customers for your application might want to use their specific technology, requiring you to update your app for every customer.
Instead, we will put this logic into a Service object . A Service object’s role is to encapsulate specific business rules or how data is communicated between the client and the server. A Service object is also a lot easier to test since we can write unit tests that run on their own, without requiring a user to interact with the application for testing.
But first, let’s talk about the dependency inversion principle and how dependency injection allows us to apply this principle.
Understanding Dependency Inversion
A Component Using a ProductsService

Tight Coupling
Now you want to test the ProductList component , and ProductsService requires a server on the network to talk to. In this case, you will need to set up a server just to run the test. And if the server is not ready yet (the developer in charge of the server hasn’t come around to it), you cannot test your component! Or you are using the ProductsService in several places in your location, and you need to replace it with another class. Now you will need to find every use of the ProductsService and replace the class. What a maintenance nightmare!
Using the Dependency Inversion Principle
The dependency inversion principle states:
A. High-level modules should not depend on low-level modules. Both should depend on abstractions.
B. Abstractions should not depend on details. Details should depend on abstractions.
What this means is that the ProductsList component (the higher-level module) should not directly depend on the ProductsService (the lower-level module). Instead, it should rely on an abstraction. Using C# terminology: it should rely on an interface describing what a ProductsService should be able to do, not a class describing how it should work.
The Abstraction As Described in an Interface
The ProductList Component Using the IProductsService Interface
Now the ProductList component (the high-level module from earlier) only relies on the IProductsService interface, an abstraction. And the abstraction does not reveal how we will implement the GetProducts method.
The ProductsService Implementing the IProductsService Interface
A Hard-Coded IProductsService Used for Testing
If you are using the IProductsService interface in different places in your application (instead of the ProductsService class), all you need to do to replace its implementation is to build another class that implements the IProductsService interface and tell your application to use the other class!
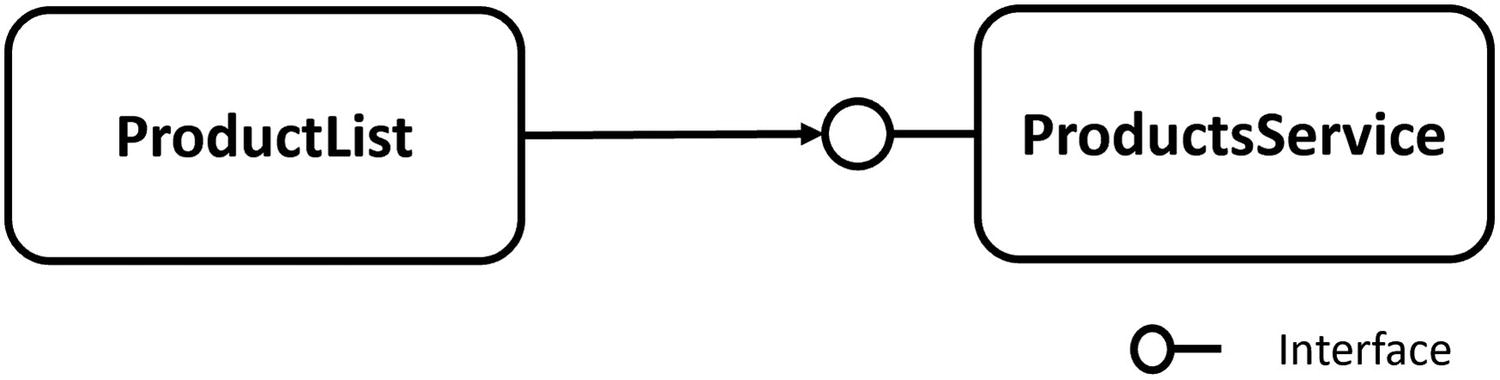
Loosely Coupled Objects Through Dependency Inversion
Adding Dependency Injection
Passing the ProductsService in the Constructor
Creating a Deep Chain of Dependencies Manually
Using an Inversion-of-Control Container
An Inversion-of-Control Container (IoCC) is just another object, which specializes in creating objects for you. You simply ask it to create for you an instance of a type, and it will take care of creating any dependencies it requires.
It is a little bit like in a movie where a surgeon, in the middle of an operation, needs a scalpel. The surgeon in the movie holds out his (or her) hand and asks for “Scalpel number 5!”. The nurse (the Inversion-of-Control Container) who is assisting simply hands the surgeon the scalpel. The surgeon doesn’t care where the scalpel comes from or how it was built.
So, how can the IoCC know which dependencies your component needs? There are a couple of ways, heavily depending on the IoCC.
Constructor Dependency Injection
The ProductsService’s Constructor with Arguments
Property Dependency Injection
Injecting a Dependency with the @inject Directive
Using the Inject Attribute for Property Injection
Using the ProductsService Property that Was Dependency Injected
Configuring Dependency Injection
There is one more thing we need to discuss. When your dependency is a class, then the IoCC can easily know that it needs to create an instance of the class with the class’s constructor. But if your dependency is an interface, which it generally needs to be if you are applying the principle of dependency inversion, then which class does it use to create the instance? Without your help, it cannot know.
The Program Class
The Program class creates a builder instance, which has a property Services of type IServiceCollection. It is this IServiceCollection we need to configure. If you are familiar with ASP.NET Core, it is the same type used in the ConfigureServices method from the Startup class.
To configure the mapping for the IoCC, you use extension methods on the IServiceCollection instance. Which extension method you call depends on the lifetime you want to give the dependency. There are three options for the lifetime of an instance which we will discuss next.
The lifetime of instances is different for Blazor WebAssembly and Blazor Server. It is even different from the lifetime you know from ASP.NET Core!
Singleton Dependencies
Singleton classes are classes that only have one instance (in the application’s scope). These are typically used to manage some global state. For example, you could have a class that keeps track of how many times people have clicked a certain product. Having multiple instances of this class would complicate things because they will have to start communicating with each other to keep track of the clicks. Singleton classes can also be classes that don’t have any state and that only have behavior (utility classes such as one that does conversions between imperial and metric units). In this case, you could have multiple instances, but this is just wasteful and will make the garbage collector work harder.
Adding a Singleton to Dependency Injection
Create the Singleton Yourself
Adding a Singleton to Dependency Injection
Why not use static methods instead of singletons you say? Static methods and properties are very hard to replace with fake implementations during testing (have you ever tried to test a method that uses a date with DateTime.Now, and you want to test it with February 29 of some quantum leap year?). During testing, you can easily replace the real class with a fake class because it implements an interface!
Now about the difference between Blazor WebAssembly and Blazor Server. In Blazor WebAssembly, your application is running in a browser’s tab. You can even have multiple copies of the same Blazor application running in different tabs of your browser (even different browsers). Each tab will have its own singleton instance, in the memory of that browser tab. So you cannot use singletons to share state between tabs with Blazor WASM. And when you refresh the tab, the application will re-initialize with a new instance for the singleton.
With Blazor Server, the application is running on the server. So here the singleton is actually shared among every user running the Blazor application on the same server! But even here your application can be hosted with several servers, and each server will have its own singleton!
Transient Dependencies
Transient means short lived. In .NET, there are a lot of objects which are short lived, which might not even survive beyond a single method call. For example, when you are concatenating a couple of strings, the intermediate strings are thrown away almost instantly after being created. Using transient objects makes a lot of sense when you don’t want to be affected by the previous state of an object. Instead, you start with a fresh slate by creating a new instance.
When you configure dependency injection to use a transient lifetime for a class, each time an instance is needed by the IoCC, it will create a fresh instance.
Adding a Transient Class to Dependency Injection
However, in Blazor we are working client side, and in that case, the UI stays put for the entire interaction. This means that you will have components that only have one created instance and only one instance of the dependency. You might think in that case transient and singleton will do the same thing. But there can be another component that needs the same type of dependency. If you are using a singleton, then both components will share the same instance of the dependency, while transient each gets a unique instance! You should be aware of this.
Scoped Dependencies
When you configure dependency injection to use a scoped dependency, the IoCC will reuse the same instance per scope but uses new instances between different scopes. But what does a scope mean?
Again there is a difference between Blazor WASM and Blazor Server. In Blazor WASM, the scope is the application (running in the browser) itself. With Blazor WASM, a scoped instance will have the same lifetime as a singleton.
Blazor Server uses a circuit which is the SignalR connection to keep track of a single user’s application (somewhat like a session). This circuit spans across HTTP requests but not across the SignalR connection used with Blazor Server.
Registering a Class to Use Scoped Lifetime
Understanding Blazor Dependency Lifetime
Let’s look at the lifetime of the injected dependencies in Blazor. For this, I have written a demo app which you can find in the included sources for this book.
The source code for this book is available on GitHub via the book’s product page, located at www.apress.com/ISBN.
One of the Dependencies Used for the Experiment
Adding the Dependencies for Blazor WASM
Adding the Dependencies for Blazor Server (Excerpt)
The Component Consuming the Dependencies
Blazor WebAssembly Experiment
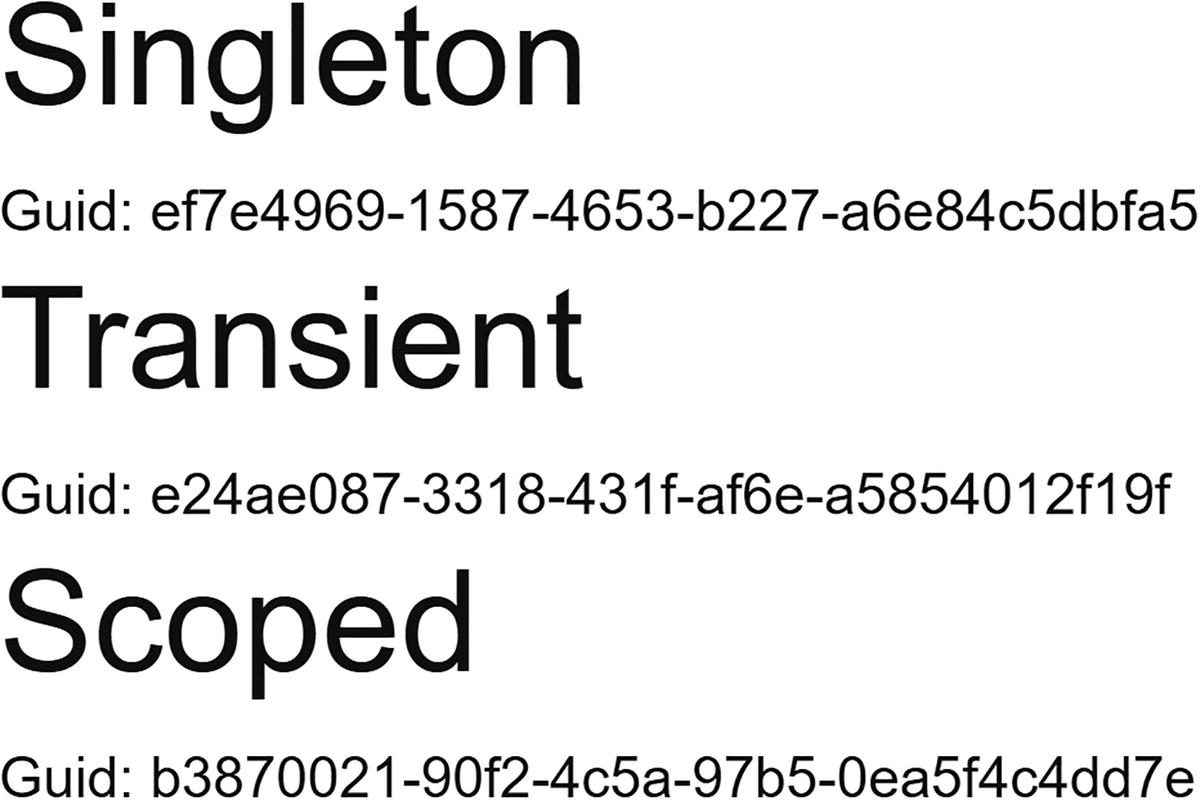
Displaying Client-Side Blazor Dependencies
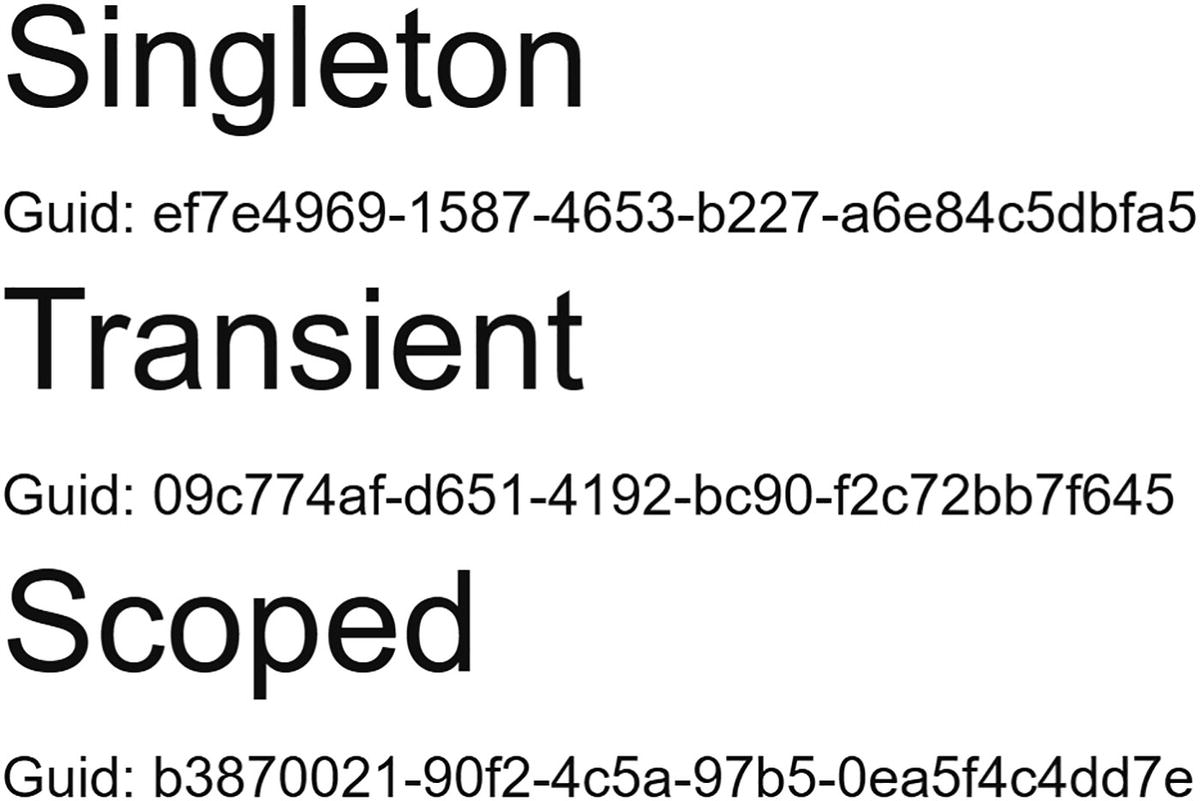
The Dependencies from the Other Page
Each time the Index component gets created, it will ask dependency injection for instances of the SingletonService, TransientService, and ScopedService. The SingletonService instance gets reused all the time because we see the same GUID. The TransientService instance gets replaced each time (because each time we get a different GUID). We also see the same instance for the ScopedService. In Blazor WebAssembly, scoped instances are scoped by default to the browser’s tab (the application); they behave like singletons, so there is no difference.
And what if we open another tab? Since we have a fresh copy of the Blazor application running in the other tab, we get a new instance for the singleton, and because the scope is the connection, we get another instance of the scoped instance. If you expected to see the same instance for the singleton in both tabs, please remember that here each tab holds another copy of the Blazor application.
Implementing IDisposable on a Component
Blazor Server Experiment
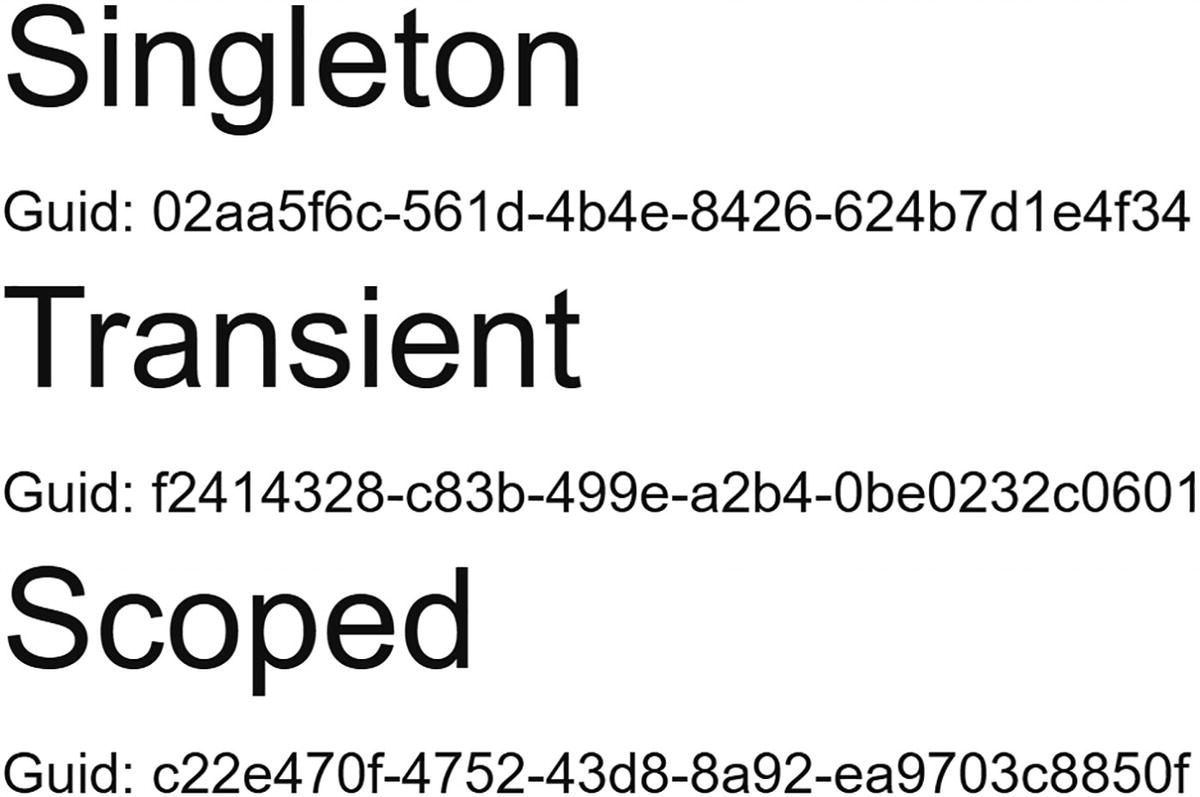
Displaying Server-Side Dependencies

After Clicking the Other Link
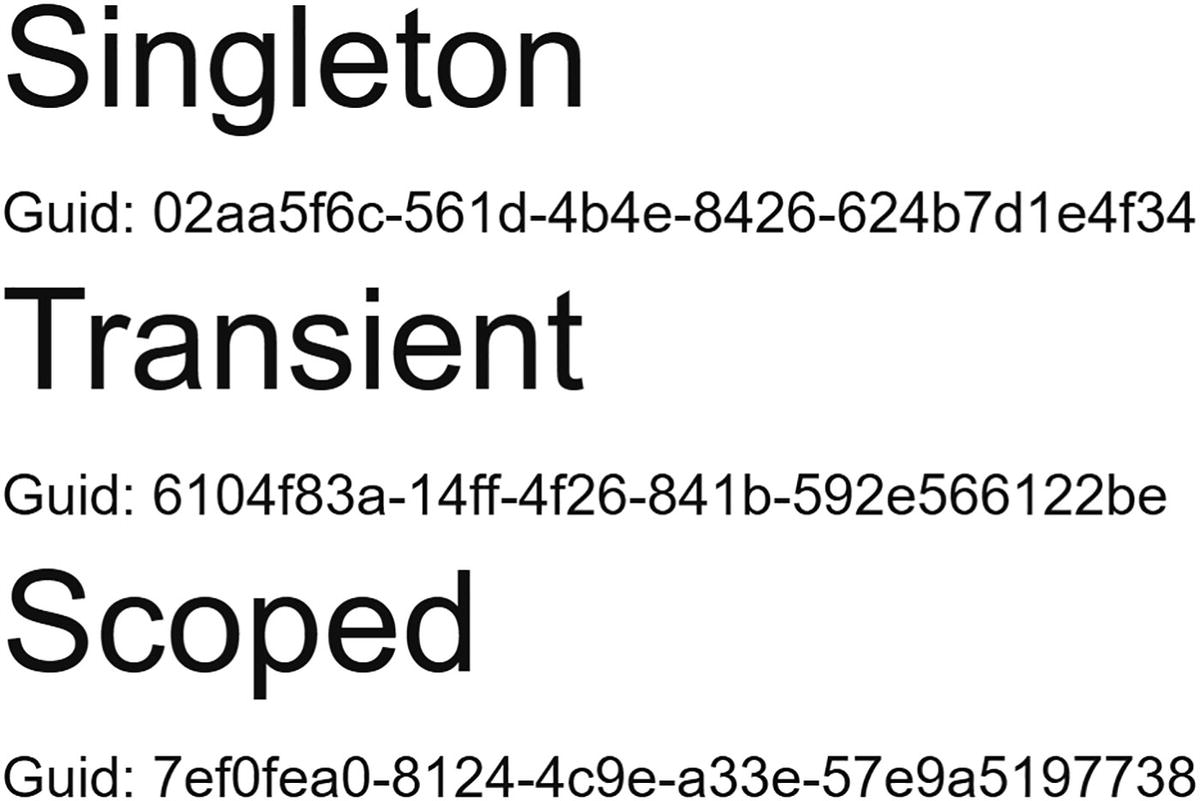
Opening Another Tab with Server-Side on the Home Page
Using OwningComponentBase
A Component Deriving from OwningComponentBase
Using OwningComponentBase<T>
Using OwningComponentBase Derived Components
Run your project and make sure you have the console open. Now click the Counter component. The console should show the ScopedService instances being disposed. Also note that each time the OwningComponent and OwningComponent2 get instantiated, they receive a new instance of the ScopedService.
Don’t implement IDisposable on components deriving from OwningComponentBase because this will cease the automatic disposal of the scoped instances!
The Result of the Experiment
Now the experiment is complete, let us draw some conclusions about the lifetime of the injected dependencies. Every time an instance gets created, it gets a new GUID. This makes it easy to see if a new instance gets created or the same instance gets reused.
Transient lifetime is easy. Transient lifetime means you get a new instance every time. This is the same for both Blazor WASM and Blazor Server.
Singleton lifetime means that in Blazor WASM you get one instance for the entire duration of the application. If you really need to share an instance between all the uses and tabs, you need to put this on the server and access it through calls to the server. But with Blazor Server, everyone uses the same instance. Please make sure you don’t put any user’s information in a singleton because this will bleed to other users (bad!).
Scoped lifetime with Blazor WASM means the same as singleton lifetime. But with Blazor Server, we need to be careful. Blazor Server uses a SignalR connection (called a circuit) between the browser and the server, and scoped instances are linked to the circuit. You can derive from the OwningComponentBase class if you need scoped behavior for a specific component.
For both Blazor WebAssembly and Blazor Server, if you need to have the same instance, no matter which tab the user is using, you cannot rely on dependency injection to do this for you. You will need to do some state handling yourself! More about this in Chapter 11.
Building Pizza Services
Let’s go back to our PizzaPlace project and introduce it to some services. I can think of at least two services, one to retrieve the menu and one to place the order when the user clicks the Order button. For the moment, these services will be very simple, but later we will use these to set up communication with a server.
The Index Component
Pay special attention to the State property. We will initialize the State.Menu property from the MenuService service (which we will build next), and we will use dependency injection to pass the service.
Adding the MenuService and IMenuService Abstraction
The IMenuService Interface
This interface allows us to retrieve a menu. Note that the GetMenu method returns a ValueTask<Menu>; that is because we expect the service to retrieve our menu from a server (we will build this in the following chapters) and we want the method to support an asynchronous call.
Let’s elaborate on this. First, update the Index component’s OnInitializedAsync method (don’t forget the @inject at the top) as in Listing 5-28. This is an asynchronous method using the async keyword in its declaration.
Never call asynchronous services in your Blazor component’s constructor; always use OnInitializedAsync or OnParametersSetAsync.
Using the IMenuService
Dependency injection could not provide an instance for IMenuService. Of course, it can’t! We did implement this interface.
The HardCodedMenuService Class
Now we are ready to use the IMenuService in our Index component.
Configuring Dependency Injection for the MenuService
Run your Blazor project. Everything should still work! In the next chapters, we will replace this with a service to retrieve everything from a database on the server.
Ordering Pizzas with a Service
The IOrderService Abstraction As a C# Interface
The ConsoleOrderService
The PlaceOrder method simply writes the basket to the console. However, this method implements the asynchronous pattern from .NET, so we need to return a new ValueTask instance.
Injecting the IOrderService
The Asynchronous PlaceOrder Method
Configuring Dependency Injection for the OrderService
Think about this. How hard will it be to replace the implementation of one of the services? There is only one place that says which class we will be using, and that is in Program (or Startup with Blazor Server). In a later chapter, we will build the server-side code needed to store the menu and the orders, and in the chapter after that, we will replace these services with the real deal!
Build and run your project again, open your browser’s debugger, and open the console tab. Order some pizzas and click the Order button. You should see some feedback being written to the console.
Summary
In this chapter, we discussed dependency inversion, which is a best practice for building easily maintainable and testable object-oriented applications. We also saw that dependency injection makes it very easy to create objects with dependencies, especially objects that use dependency inversion. Then we looked at the dependency injection that comes with Blazor. When you configure dependency injection, you need to be careful with the lifetime of your instances, so let’s repeat that.
Transient objects are always different; a new instance is provided to every component and every service.
Scoped objects are the same for a user’s connection, but different across different users and connections. You can derive from the OwningComponentBase class if you need scoped behavior for a specific component.
Singleton objects are the same for every object and every request, but still have different lifetime between Blazor WebAssembly and Blazor Server.
6. Data Storage and Microservices
6. Data Storage and Microservices
In general, client-side browser applications need to store some of their data. In some cases, such as games, the application can store its data in the browser itself, using browser local storage. But in most cases, storage will happen on the server, which has access to database engines such as SQL Server. In this chapter, you will learn the basics of storing data using Entity Framework Core and exposing that data using REST and microservices built on top of ASP.NET Core.
What Is REST?
Storing data on the Web is ubiquitous. But how can applications communicate with one another? Representational State Transfer (REST) is a protocol built on top of the HTTP protocol for invoking functionality on servers, such as retrieving and storing data from/in a database.
Understanding HTTP
Before talking about REST, you should have a good understanding of the Hypertext Transfer Protocol, better known as HTTP. HTTP was created by Tim Berners-Lee at CERN in 1989. CERN is a center for elementary physics research, and what do researchers do when they have completed their research? They publish papers with their research findings. Before the Internet, publishing a paper was done literally on paper (hence the name), and it took a lot of time between writing the paper and getting it published in a research magazine. Instead, Tim Berners-Lee devised a way to put papers on a server and allow users to read these papers using a program, now known as a browser.
Also, scientific papers contain a lot of references, and when you want to read a paper like this, it helps to be able to access the referenced papers. The Internet facilitates reading papers through the use of HyperText Markup Language (HTML). Hypertext is an electronic document format that can contain links to other documents. You simply click the link to read the other paper, and you can go back to the first paper simply by clicking the back button in your browser.
Universal Resource Identifiers and Methods
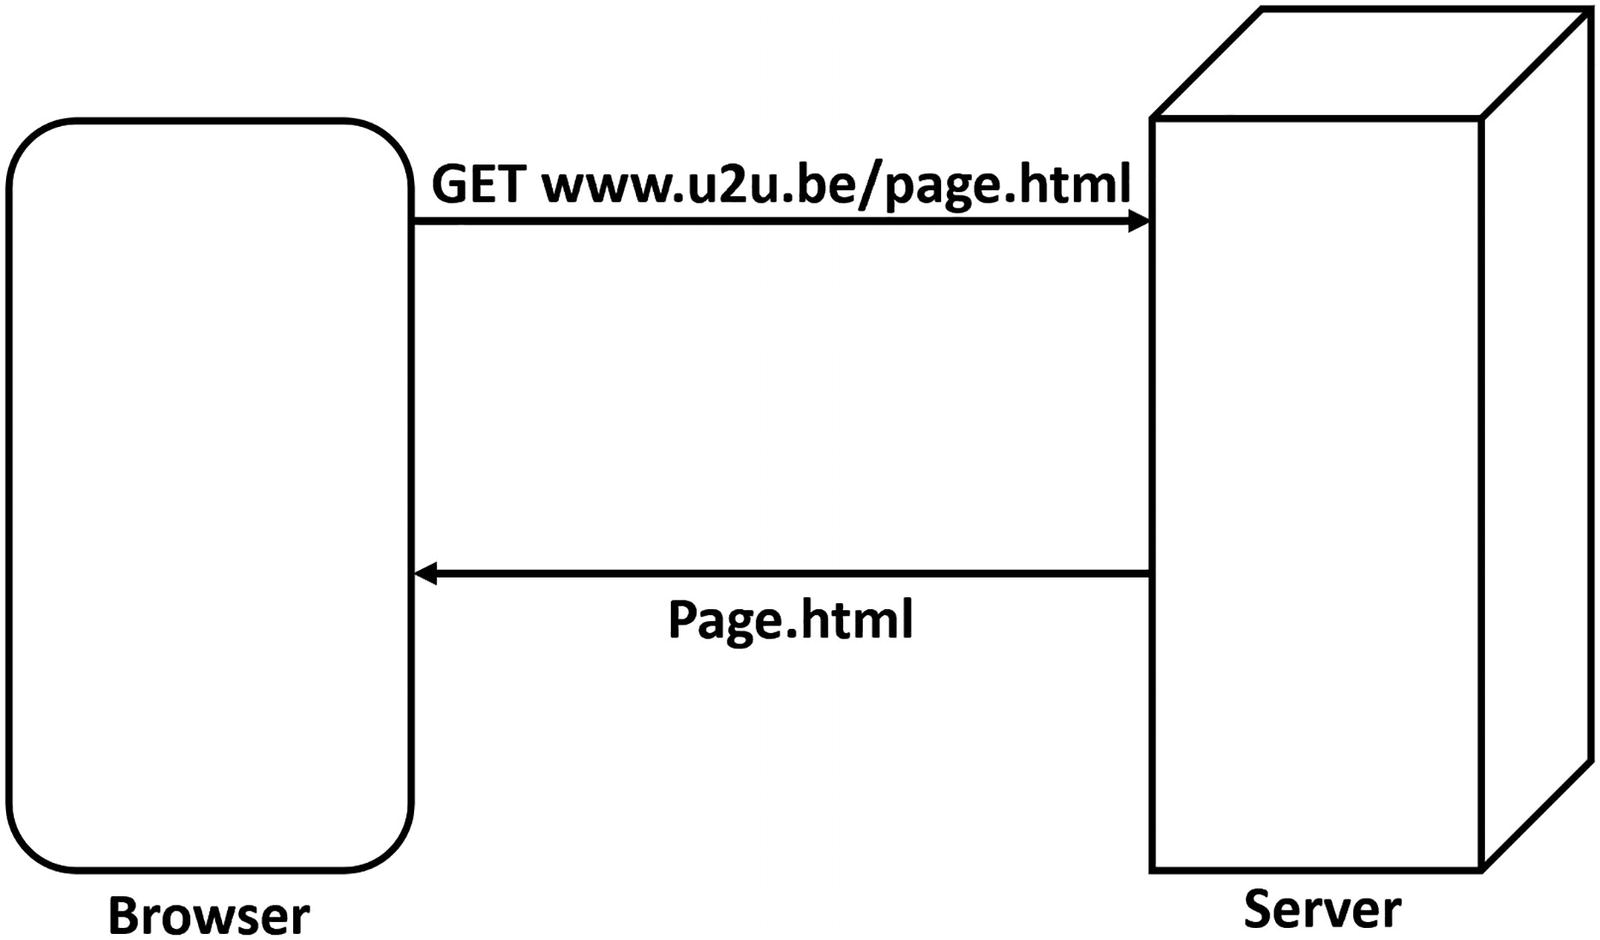
The Browser Uses the GET Method to Retrieve a Document
Each time you click a hyperlink in the HTML document, the browser repeats this process with another URI.
But there are other methods. If you want to publish a new paper, you can use the POST method to send the paper to the server, supplying it with a URI. In this case, the server will store the paper at the requested URI. If you want to make a change to your paper, for example, to correct a spelling mistake, you can use the PUT method. Now the server will overwrite the contents identified by the URI. And finally, you can delete the paper using the DELETE method and its URI.
Using the GET, POST, PUT, and DELETE methods like this is a convention. Nothing states that you have to do things like this, and there are REST services out there that use different methods and status codes.
HTTP Status Codes
What happens when you ask a server about something it doesn’t have? What should the server return? Servers not only return HTML, but they also return a status code about the result. When the server can process the request successfully, it will in general return status code 200 (other successful status codes exist – you can find the full list at https://en.wikipedia.org/wiki/List_of_HTTP_status_codes). When the server can’t find the resource, it will return a status code 404. Status code 404 simply means “Not Found”. The client will receive this status code and can react appropriately. When the browser receives a status code 200 (“OK”), it displays the HTML; when it receives a 404, it displays a not found screen; etc.
Invoking Server Functionality Using REST
Think about these methods we just talked about. With POST, you can CREATE something on a server; with GET, you can READ it back; with PUT, you can UPDATE something on the server; and with DELETE, you can DELETE things on the server. They are also known as CRUD operations (CREATE-READ-UPDATE-DELETE). Roy Fielding, the inventor of REST, realized that using the HTTP protocol you can also use HTTP to work with data stored in a database. For example, if you use the GET method with a URI http://someserver/categories, the server can execute some code to retrieve data from the categories relational table and return it. Of course, the server would use a format more appropriate for transferring data, such as XML or JSON. Because there are many different formats for data, the server also needs a way to convey which format it is sending. (At the beginning of the Web, only HTML was used as the format.) This is done through HTTP headers.
HTTP Headers
HTTP headers are instructions exchanged between the client and the server. Headers are key/value pairs, where the client and server agree on the key. Many standard HTTP headers exist which you can find at https://en.wikipedia.org/wiki/List_of_HTTP_header_fields. For example, a server can use the Content-Type header to tell the client to expect a specific format. Another header is the Accept header, which is sent by the client to the server to politely ask the server to send the content in that format; this is also known as content negotiation . Currently, the most popular format is JavaScript Object Notation (JSON). And this is the exchange format you will use with Blazor.
JavaScript Object Notation
An Example of JSON
This JSON format describes a book, which can easily be transformed into an object in memory. The simplest JSON object is a string, for example, “Hello world!”, but we can also create complex objects and arrays of JSON objects.
Objects are denoted using curly braces, and inside the curly braces, you will see a comma-separated list of properties. Each property uses a key : value notation. Listing 6-1 contains a single book object with as value another nested JSON object. This nested JSON object contains two properties: title and chapters. The title is a string "Microsoft Blazor". Note that the property name is also transferred as a string. And finally, the chapters property is an array of strings, where you use square brackets to indicate an array.
The JSON format is used for transferring data between two machines but today is also heavily used for configuring tools, such as ASP.NET Core (just look at appsettings.json in an ASP.NET server project). JSON today is way more popular on the Web than XML, probably because of its simplicity.
Some Examples of REST Calls
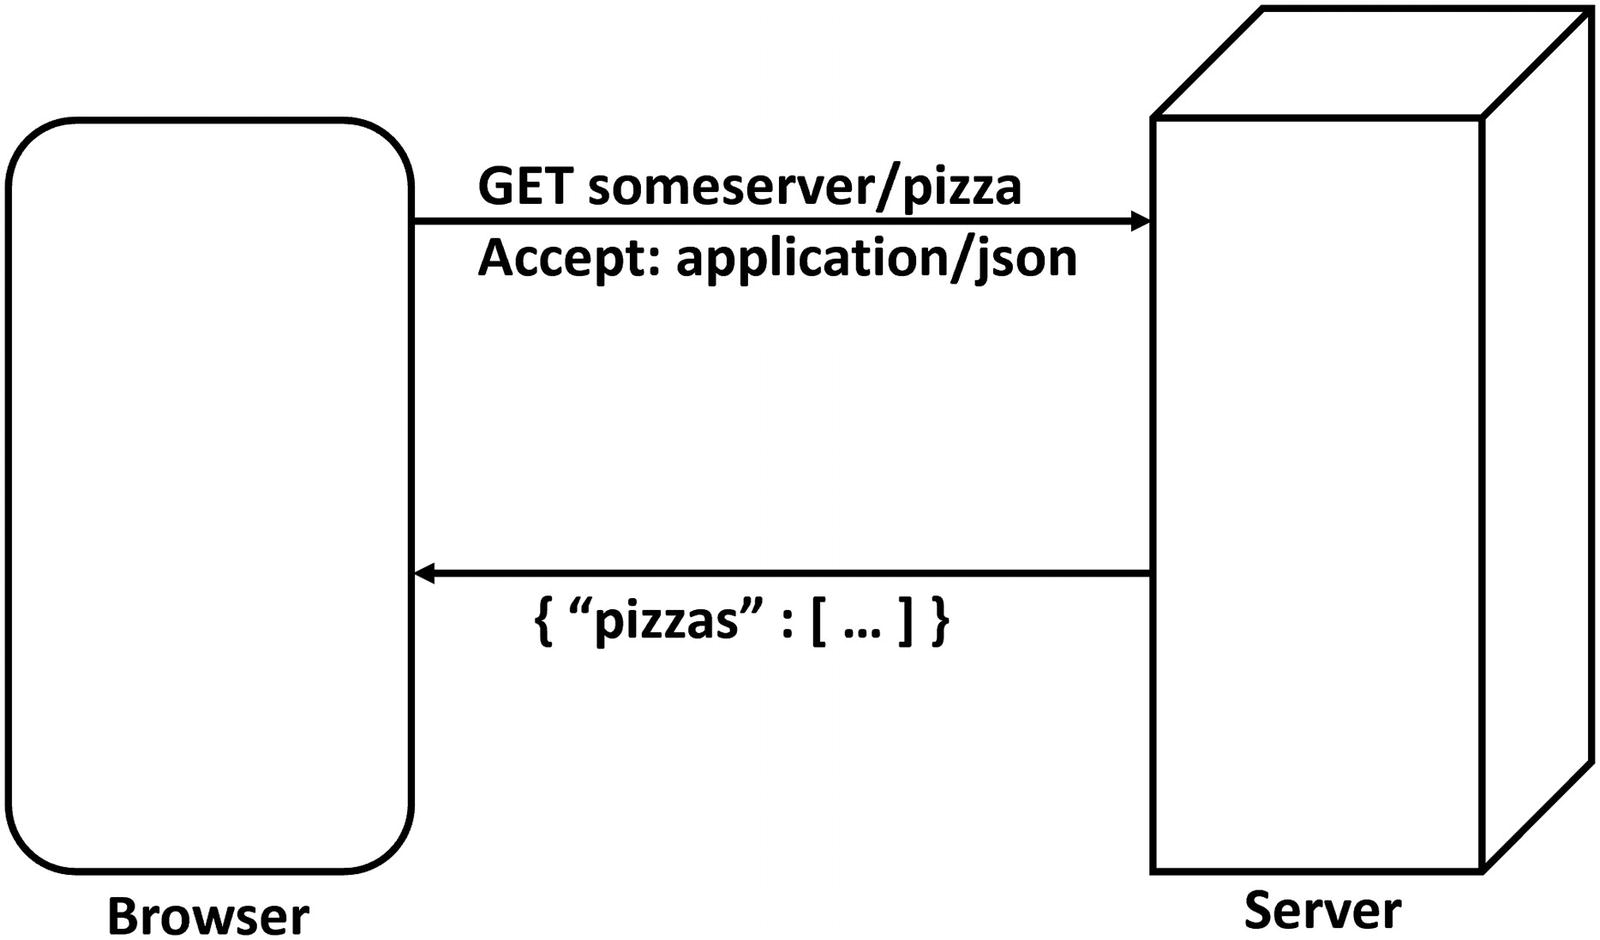
Using REST to Retrieve a List of Pizzas
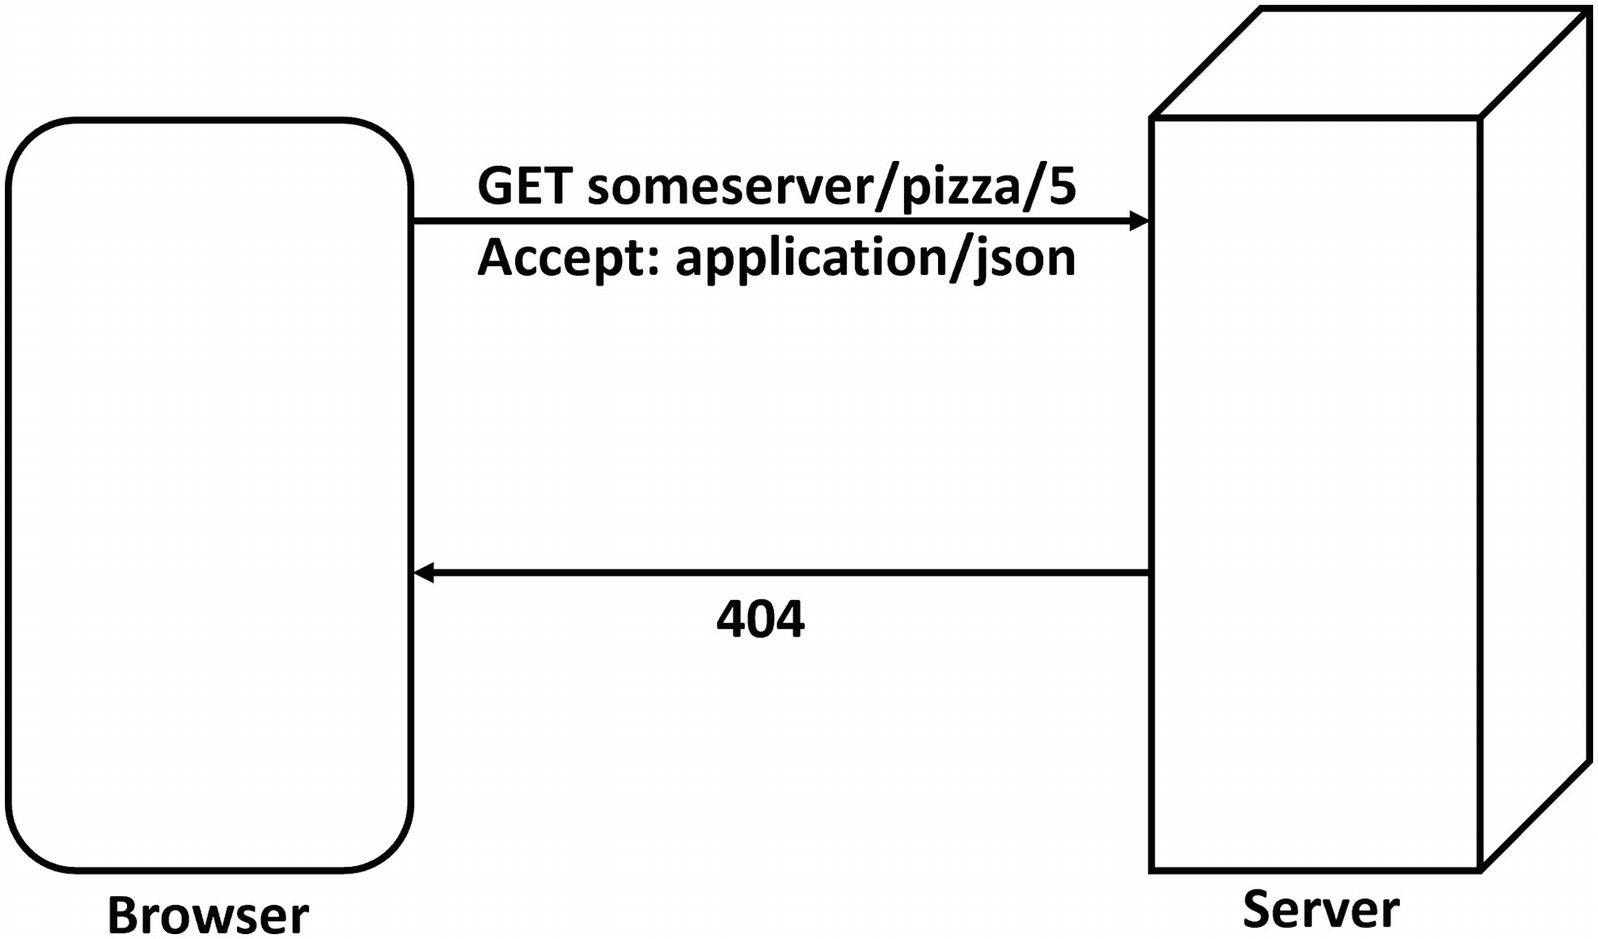
Using REST to Retrieve a Specific Pizza Through Its Unique Id
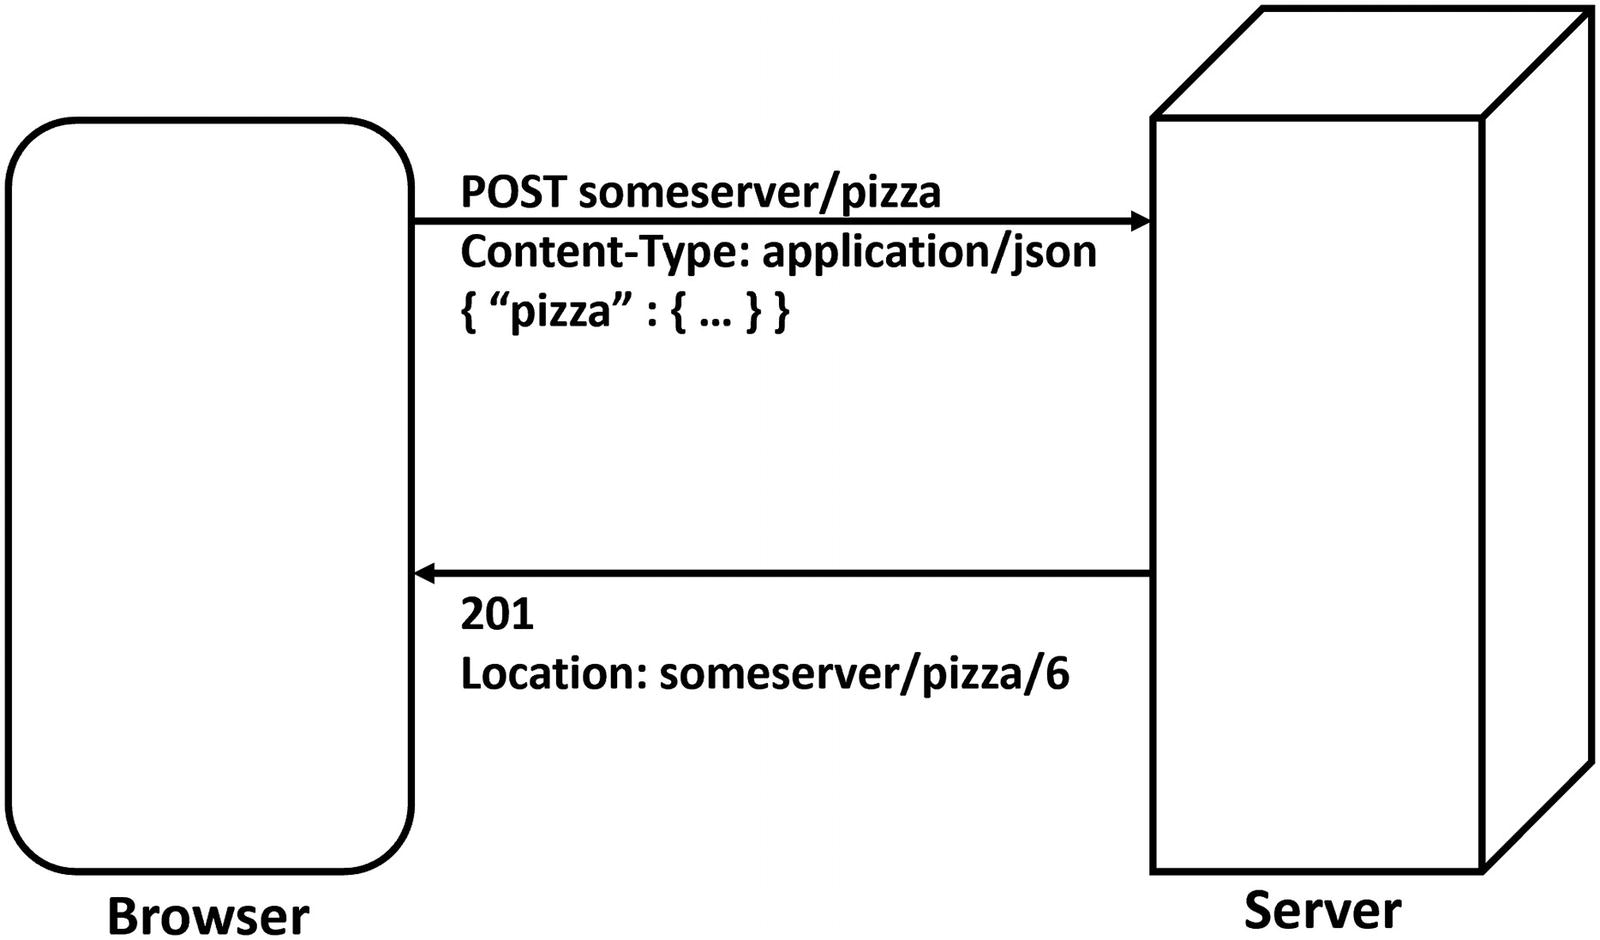
POSTing an Order to the Server
Building a Simple Microservice Using ASP.NET Core
So, how do you build a REST service? Your (hosted) Blazor project uses ASP.NET Core for hosting the Blazor client, and adding a REST service to your server project is easy. But first, let’s do a little intro to microservices.
Services and Single Responsibility
A service is something (here, it will be a piece of software) that listens for requests; when it receives a request, the service handles the request and returns with a response. In Chapter 5, we built a menu service which can return a list of pizzas. In real life, you also encounter services, and they are very similar. Consider a bank. You step into a bank, and you give the teller your account number, some ID, and request $100. The teller will check your account; if you have enough money in your account, the teller will deduct the money and give you the cash. Should your account be too low, the teller will refuse. In both cases, you got a response.
Services should also adhere to the principle of single responsibility. They should do one thing very well, and that’s it. For example, the pizza service will allow clients to retrieve, add, update, and delete pizzas. That’s it. A single responsibility, in this case, PIZZAS.
You can have other services too, each with their own responsibility. Services that take care of one thing are known as microservices.
The Pizza Service
Open the PizzaPlace solution you worked on in previous chapters. In this chapter, you will focus on the PizzaPlace.Server project. The only role this project currently has is to host your Blazor client application, but now you will enhance this role by adding some microservices.
With .NET 6, you can also choose the minimal API approach, which uses a terse C# syntax to accomplish the same thing. In this case, you will need to look inside the Program.cs file instead of Startup.cs.
The Startup Class’s Configure Method
The last line with the endpoints.MapFallbackToFile("index.html") method takes care of your Blazor client project. But right before it, you see the endpoints.MapControllers() method that is used for hosting your services.
How the MapControllers method works is not the topic of this book, but I will cover what you need to know. If you want to learn more about ASP.NET Core, there are many good books about this topic, such as Pro ASP.NET Core MVC by Adam Freeman (www.apress.com/gp/book/9781430265290).
In a nutshell, ASP.NET MVC will give the HTTP request to a controller class which should inherit the ControllerBase class, and then the controller will execute one of its methods. How does it decide? The MapControllers method will take the request’s URL, for example, /pizzas, and use the first segment of the URL to search for a controller with a matching name, for example, PizzasController. Because we are using REST, the chosen controller will pick the method that matches the verb, for example, GET. If your method is called Get(), it will be invoked, but you can also use the HttpGet attribute on a method. In that case, the method’s name is not important. With the HttpGet attribute, you can specify what the URL should look like, which allows you to pass arguments in the URL to the method. We will look at an example shortly.
Next in line is the Controllers folder of the server project. Initially, this folder is empty, and the idea is that you put your service classes here. In ASP.NET, service classes are known as controllers, hence the name of the folder.
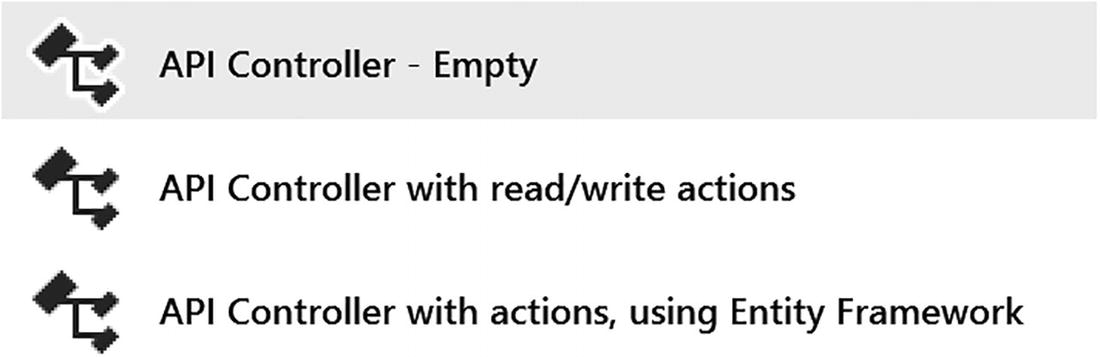
Adding a New Controller
Type PizzasController and click Add again.
If you are using Code, simply right-click the Controllers folder and select Add File. Name it PizzasController.cs. Now complete the class as in Listing 6-3.
The Empty PizzasController
Adding a Method to the PizzaController to Retrieve a List of Pizzas
Let’s walk through this implementation. First, you declare a hard-coded static list of pizzas. Next is the GetPizzas method , which has attribute HttpGet("/pizzas"). This attribute says that when you perform a GET HTTP method on the server with the /pizzas URI, the server should call the GetPizzas method. This attribute overrides the Route attribute on the class, so the default api/pizzas will not invoke the GetPizzas method.
The GetPizzas method returns an IQueryable<Pizza>, and ASP.NET Core will send this result back to the client as a list of pizzas. The IQueryable<Pizza> interface is used in .NET to represent data that can be queried, such as database data, and is returned by LINQ queries. Why IQueryable<Pizza>? Because later in this chapter, we will return data from a database which is exposed as this type.
Note that the GetPizzas method contains nothing about HOW the data will be transferred to the client. This is all taken care of for you by ASP.NET Core! By default, your implementation in ASP.NET Core will use JSON, which is what you want. ASP.NET Core allows you to pick other formats, including your custom format. The client can request a certain format, such as XML or JSON using the Accept header in the request. Here, we will be using the default JSON format.
Time to see if it works. First, ensure that the PizzaPlace.Server project is the startup project (with Visual Studio, right-click the PizzaPlace.Server project and select Set as Startup Project from the drop-down menu. The PizzaPlace.Server project should be shown as bold).
Now run your project and wait for the browser to open because you will perform a GET; you can use the browser for the GET method, but for other methods, you will use a nice tool called Postman.

The Results of Getting a List of Pizzas from the Pizza Service
A JSON-encoded list of pizzas! It works! So here we see an array of objects, and each object has the properties of our Pizza class (except the properties use lowercase which is the convention with JSON).
Now you are ready to retrieve the data from a real database using Entity Framework Core.
What Is Entity Framework Core?
Entity Framework Core is the framework Microsoft recommends for working with databases. Entity Framework Core (EF) is an Object-Relational Mapper which allows you to write classes as normal C# classes and then store and retrieve .NET objects from a database without having to be an SQL expert. It will take care of querying, inserting, updating, and deleting objects in the database for you. This is also known as persistence ignorance , where your code does not need to know how and where data gets stored! Entity Framework Core has support for SQL Server, SQLite, and more.
Using the Code-First Approach
But of course, you need to explain to Entity Framework Core what kind of data you want to store. Entity Framework Core uses a technique called Code First , where you write code to describe the data and how it should be stored in the database. Then, you can use this to generate the database, the tables, and the constraints. If you want to make changes to the database, you can update the database schema with code-first migrations .
If you already have a database, you can also generate the code from the database, also known as EF Database First , but this is not the target of this book.
With code-first approach, you describe the classes (also known as entities ) that will map to database tables. You already have the Pizza class (which you can find in the PizzaPlace.Shared project) to describe the Pizza table in the database. But you need to do more.
In this part, you will be using SQL Server , or SQLite if you don’t have access to SQL Server. If you installed Visual Studio on your Windows machine, SQL Server was installed too.
You can check if SQL Server was installed as follows: start Visual Studio and select View ➤ SQL Server Object Explorer from the menu. Now click Add SQL Server. Expand the local node. If you have SQL Server, locally it should be listed.
If you don’t have SQL Server on your machine, you can install a free version of SQL Server or use a SQL Server instance in the cloud, for example, SQL Server on Azure (https://azure.microsoft.com/get-started). You can even install SQL Server on Linux and OSX! There are some nice articles on the Web (e.g., https://database.guide/how-to-install-sql-server-on-a-mac/) that explain how. And if you don’t want to bother installing SQL Server, you can also use SQLite , which is available out of box with .NET Core, so you don’t need to install anything for SQLite.
Let us start by adding Entity Framework Core to the PizzaPlace.Server project. If you are using Visual Studio, right-click the server project and select Manage NuGet Packages. The NuGet window will open in Visual Studio. NuGet is a very practical way for installing dependencies such as Entity Framework Core to your project. It will not only install the Microsoft.EntityFrameworkCore.SqlServer library but also all its dependencies.
Select the Browse tab and type Microsoft.EntityFrameworkCore.SqlServer in the search box (or Microsoft.EntityFrameworkCore.Sqlite if you are using that). You should see this library as the top search result (if not, look at the top right corner of the NuGet window where you will see Package Source; select nuget.org as the source). Select it, then select the Latest stable version from the Version drop-down, and click the Install button.
Add a new class called PizzaPlaceDbContext to the PizzaPlace.Server project, as shown in Listing 6-5. This class represents the database, and you do need to give a couple of hints about how you want your data to be stored in SQL Server (or some other database engine; this uses the same code).
The whole idea of using Entity Framework is to abstract away the underlying database. In general, to switch to a different database engine, you install a different NuGet package which will take care of communicating with the database. The code stays the same and EF is really efficient!
The PizzaPlaceDbContext Class
First, you need to create a constructor for the PizzaPlaceDbContext class taking a DbContextOptions<PizzaPlaceDbContext> argument. This is used to pass some options and the connection to the database server, which you will do later in this section.
Next, you add a table to the database to represent your pizzas using a public property of type DbSet<Pizza>. DbSet<T> is the collection class used by Entity Framework Core to represent a table in the database, but you can think of it as a List<T> (one of the cool things with Entity Framework Core is that you work with collections instead of using SQL to talk to the database). Entity Framework Core will use the DbSet<T> to interact with a database table, in this case, the Pizzas table.
Finally, you override the OnModelCreating method , which takes a modelBuilder argument. In the OnModelCreating method, you describe how each DbSet<T> should be mapped to the database; for example, you can tell it which table to use, how each column should be called, which type to use in the database, etc. In this case, you tell the modelBuilder that the Pizza table should have a primary key, the Id property of the Pizza class. We tell it to make the Name maximum 80 characters and how the Price property should be mapped to a SQL type. You will use the MONEY type for that. Finally, we tell EF that the Spiciness enumeration should be mapped to a string using the HasConversion<string>() method . This way, we end up with nice readable entries for spiciness, instead of a number. For the moment, this is enough for your current implementation. You don’t have to explain everything about every property because there are a lot of defaults available. For example, the string type from .NET will be mapped to a type used for strings in the database.
Preparing Your Project for Code-First Migrations
The Startup.ConfigureServices Method
Remember IServiceCollection from Chapter 5? Here, dependencies for ASP.NET Core are added, such as dependencies for Controllers and razor pages, which are required for your service.
The Startup Class’s Constructor
You need this constructor to have access to the project's configuration file. The configuration will contain the connection string for the database to talk to.
Adding Entity Framework Dependencies
This single statement tells ASP.NET Core that you will be using the PizzaPlaceDbContext and that you will be storing it in SQL Server. This code also looks up the connection string for the database in configuration, which you still need to add.
Using SQLite As the Database
ASP.NET Core allows you to place your configuration settings in many different places, such as a JSON configuration file, environment variables, etc. Our server project already has a configuration file called appsettings.json, so open it.
The appsettings.json Configuration File
Finding Your Database Server’s Connection String
If you are not sure which connection string to use, you can find the connection string for SQL Server in Visual Studio by selecting View ➤ SQL Server Object Explorer.
SQL Server Object Explorer
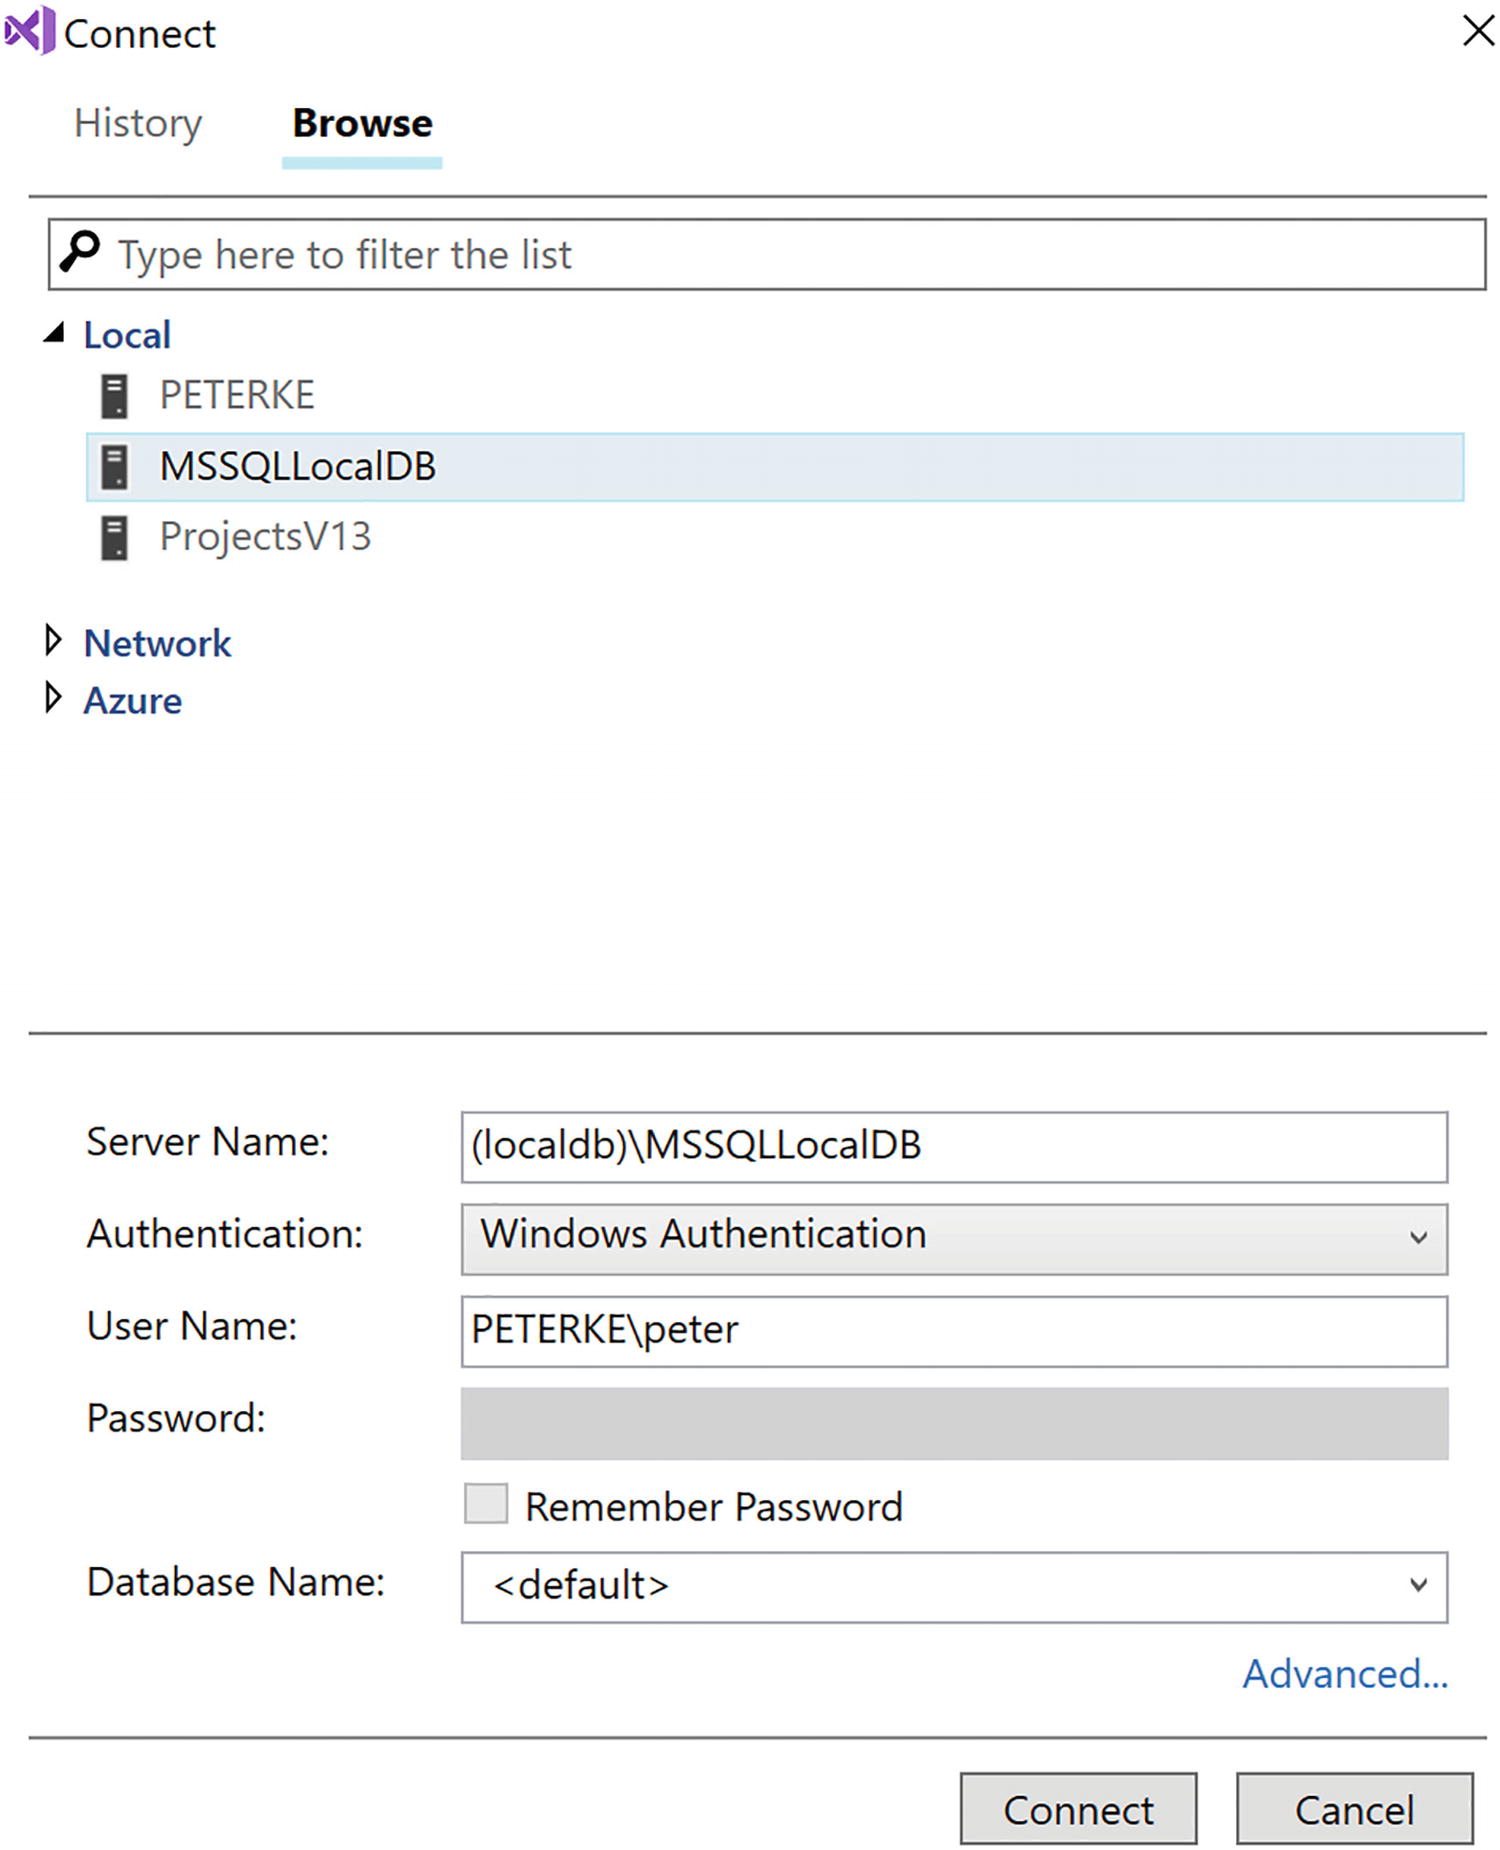
Finding the Connection String for a Database
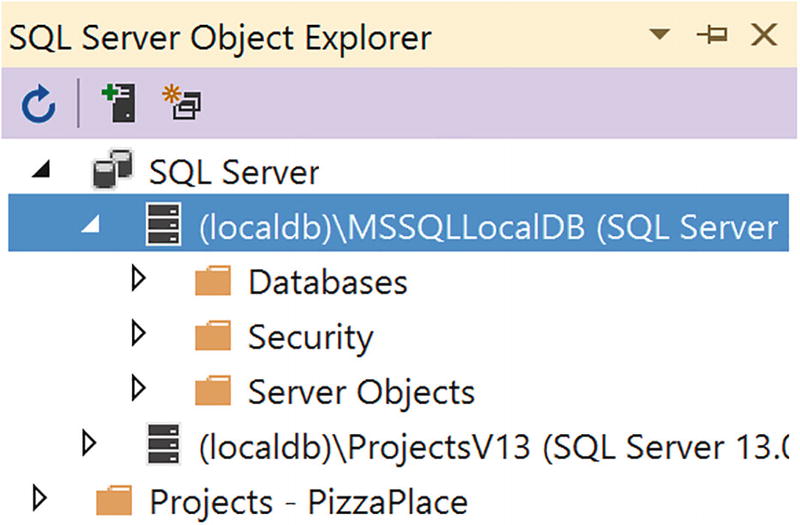
Getting the Database’s Properties
Creating Your First Code-First Migration
You are almost ready to generate the database from the code. Start by adding the Microsoft.EntityFrameworkCore.Design NuGet package to the PizzaPlace.Server project. You need this package to perform code-first migrations.
Now you need to create a code-first migration . A migration is a C# class that contains the changes that need to be made to the database to bring it up (or down) to the database schema your application needs. This is done through a tool called dotnet-ef .
Start by selecting from the Visual Studio menu View ➤ Other Windows ➤ Package Manager Console. Or use the command line (cmd.exe) if you prefer. If you are using Code, use the integrated terminal or open a command prompt.
You must run the next command in the PizzaPlace.Server directory, so make sure you are in the correct directory (the one with the PizzaPlace.Server.csproj file).
You might need to install the global dotnet-ef command-line tool as well. This is the tool you use to generate the migration from your code and to update the database once you are happy with the generated migration. Run the following command to install the migration tool. You only need to install this tool once.
dotnet tool install --global dotnet-ef
Should you get an error or warnings, please review the code for the Pizza and the PizzaPlaceDbContext classes (and maybe compare with the provided sources for the book), ensure that all the Entity Framework packages are using the same version, and try again.
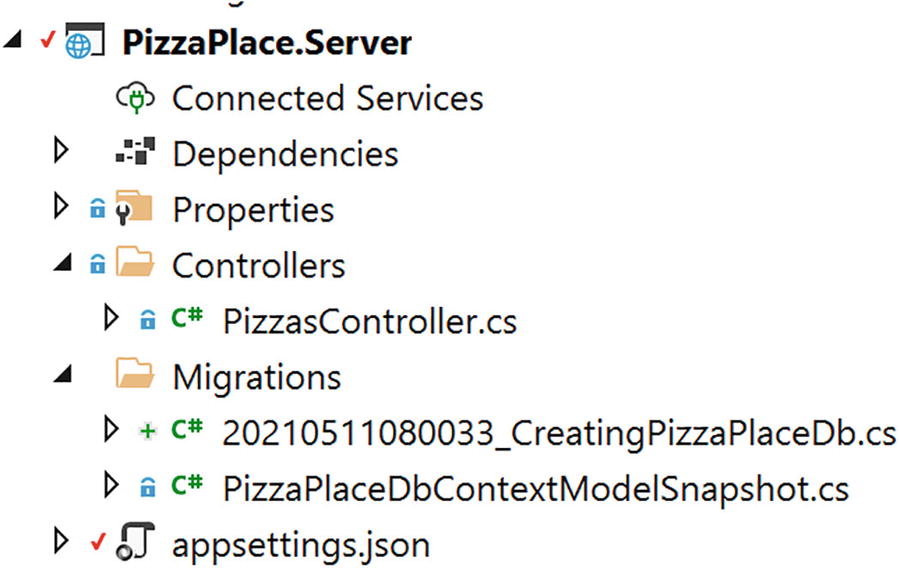
The Result of Adding the First Migration
The CreatingPizzaDb.cs File for SQL Server
A migration class has two methods: Up and Down. The Up method will upgrade the database schema. In this case, it will create a new table called Pizzas with Id, Name, Price, and Spiciness columns.
The Migration Class for SQLite
Generating the Database
This just created the database for you! Let’s have a look at the database. First, let’s look at SQL Server.
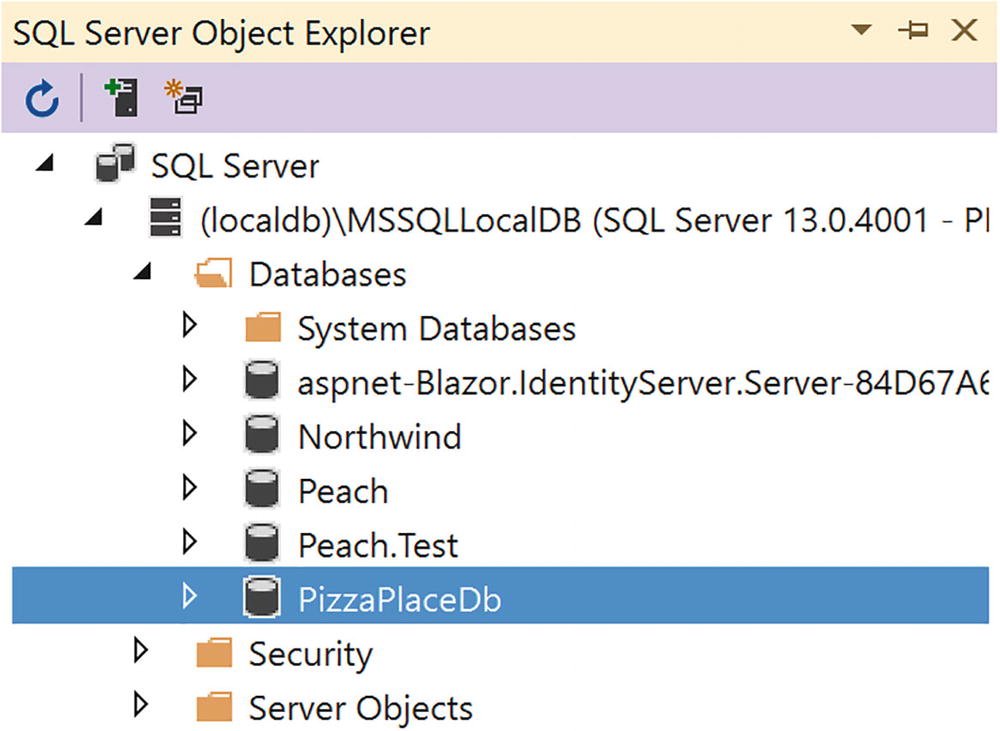
SQL Server Object Explorer Showing the PizzaPlaceDb Database
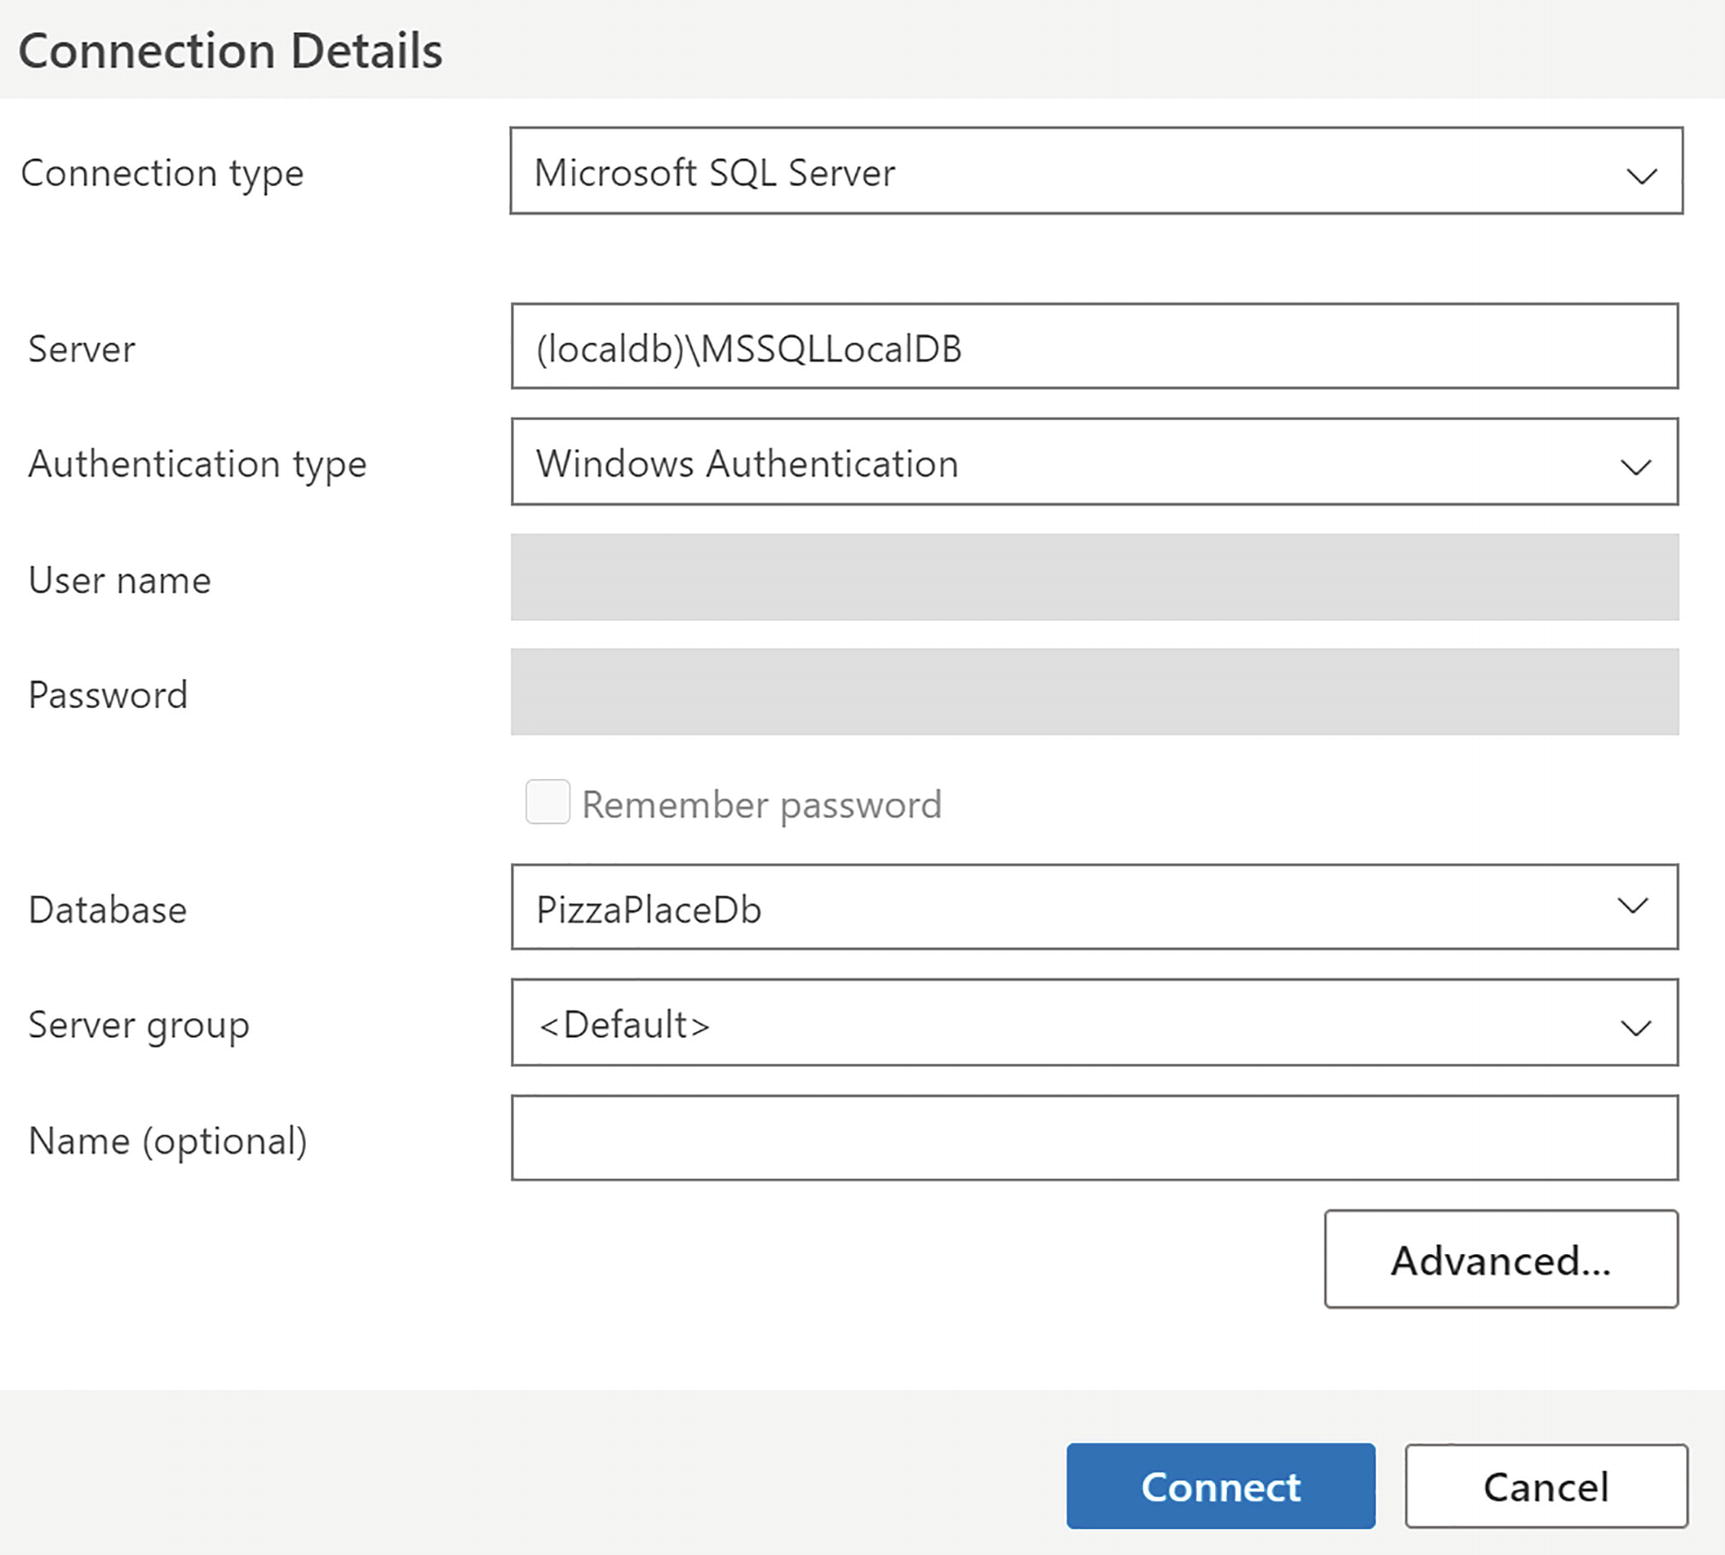
Connection with SQL Operations Studio
To look at the SQLite database, you will need to download and install the SQLite database browser from https://sqlitebrowser.org/.
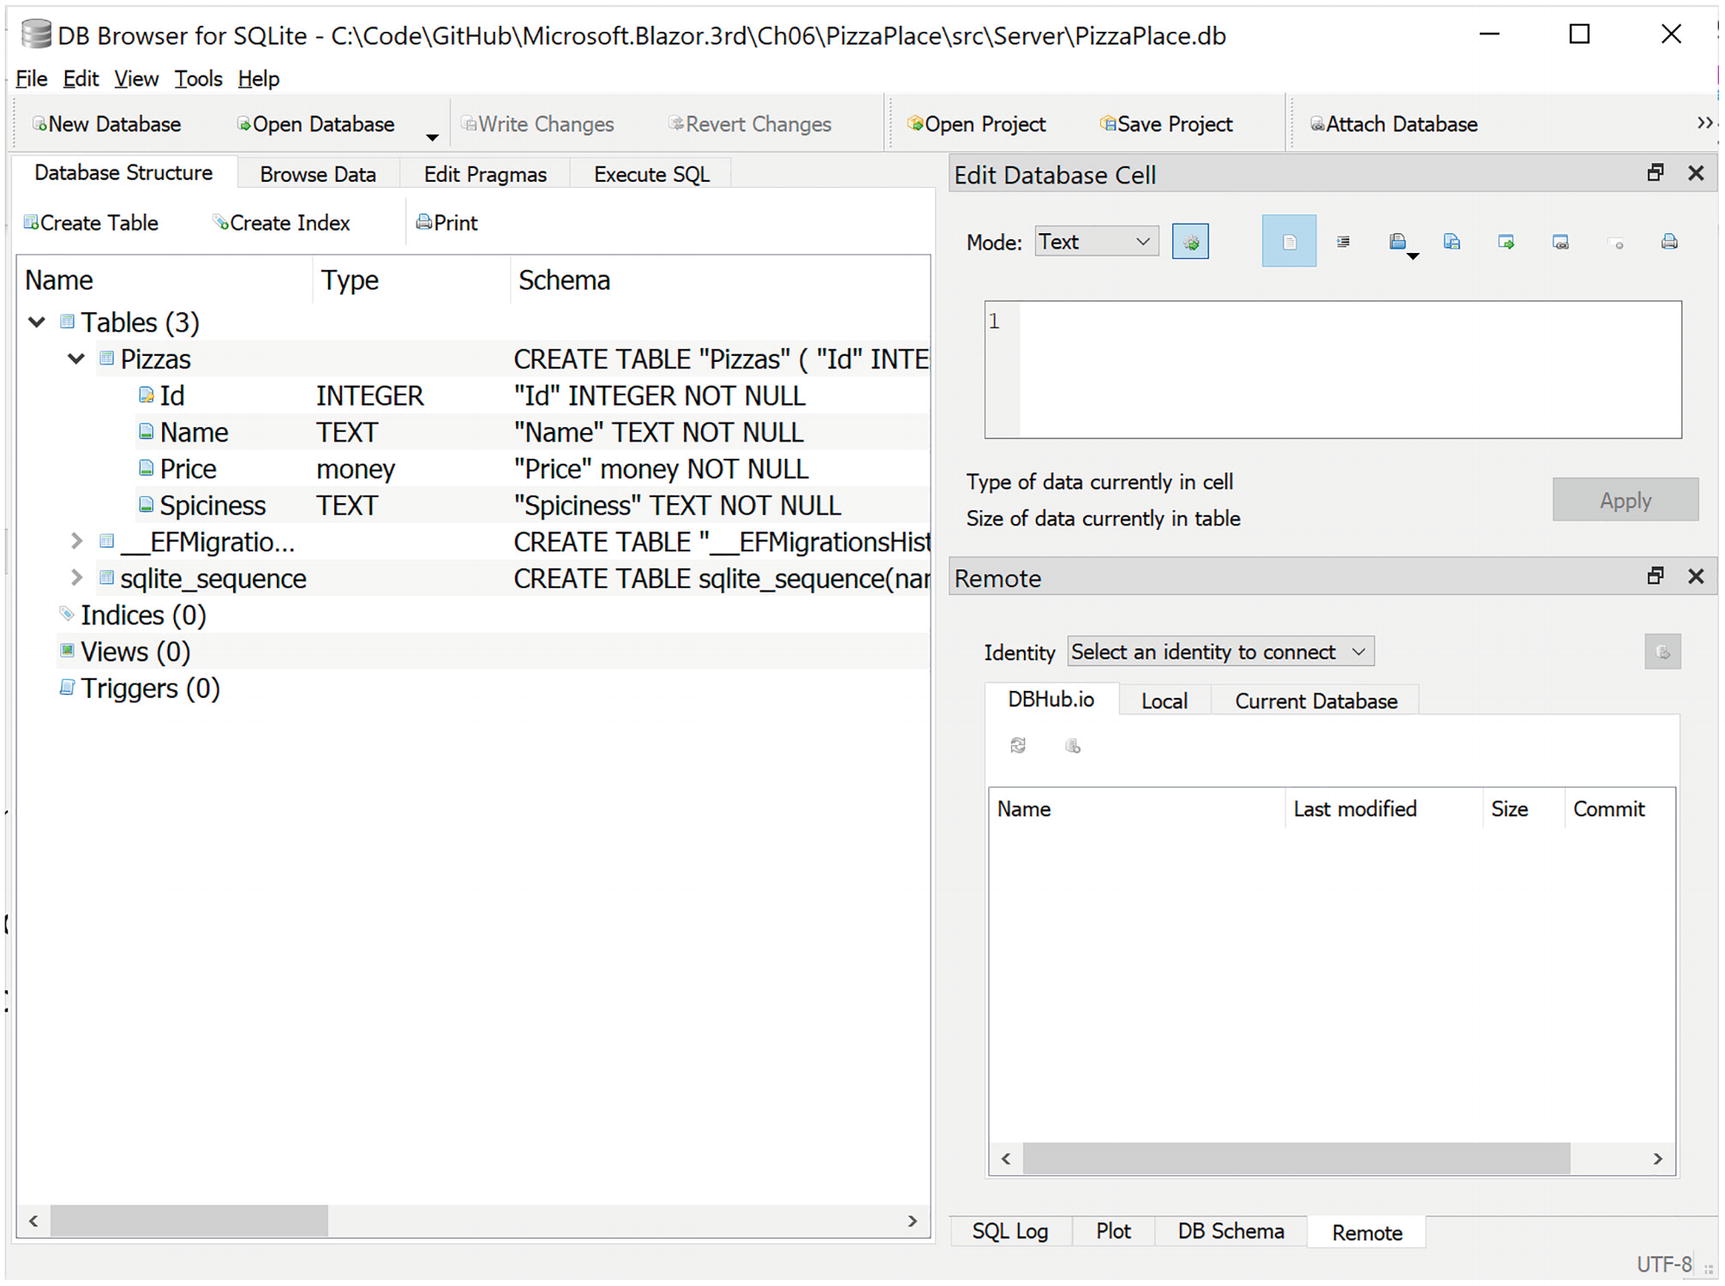
Using DB Browser for SQLite
Enhancing the Pizza Microservice
Let’s add some functionality to the Pizza microservice so it uses the database instead of hard-coded data and add a method to insert a pizza in your database.
Injecting a PizzaPlaceDbContext Instance into the Controller
To talk to the database, the PizzasController needs a PizzaPlaceDbContext instance, and as you learned in Chapter 5, you can use a constructor to do this. The constructor only needs to save the reference in a local field (for now).
Retrieving the Pizzas from the Database
The InsertPizza Method
This is an introduction to REST services. Building real services with all the different approaches and best practices can take up a whole book. The idea of this chapter is to get you up and running.
Testing Your Microservice Using Postman
So now you have your first microservice. But how do you test it? Previously, you used the browser to test the GetPizzas method , which uses the GET method. For other methods, such as POST, PUT, and DELETE, you need a better tool. Here, you will use Postman, which is a tool specifically for testing REST services.
Open your favorite browser and go to www.getpostman.com. Download the application and install it. By the time you read this book, the installation procedure may have changed a bit, so please follow the instructions from the installer.
After it has installed, run Postman.
Select Create New to Get Started with Postman
Create a Request with Postman

Making a GET Request with Postman

Adding Headers to the Request in Postman

Receiving an Empty List of Pizzas from the Server

Starting with the POST Request

Adding the Content-Type Header for the POST Request
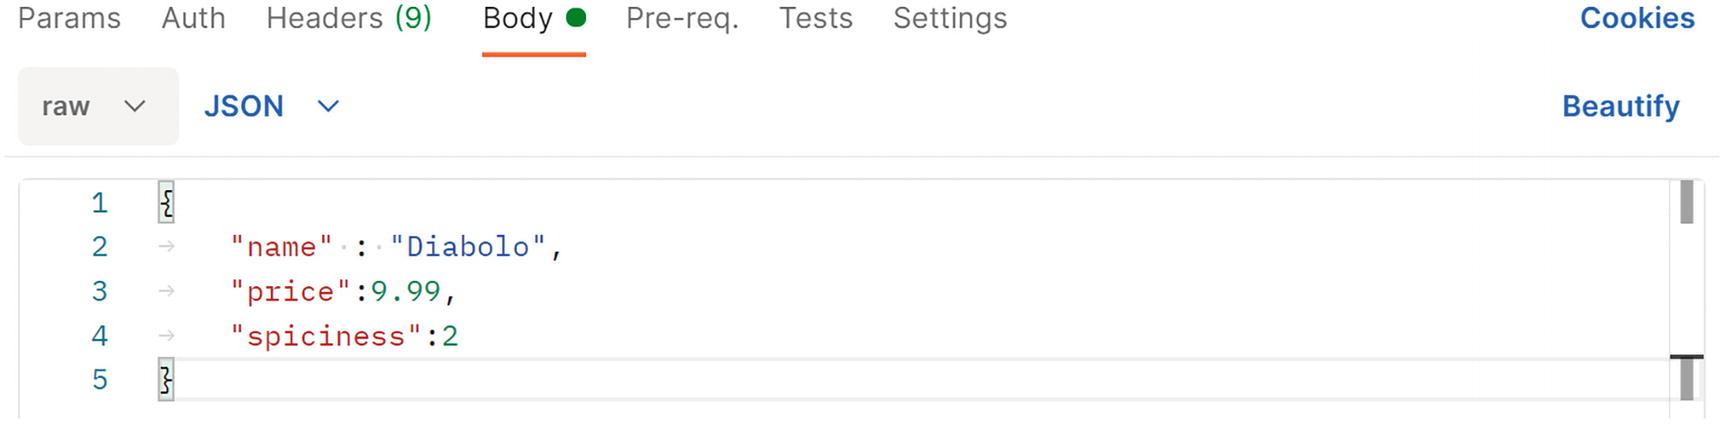
Entering a Pizza Using JSON
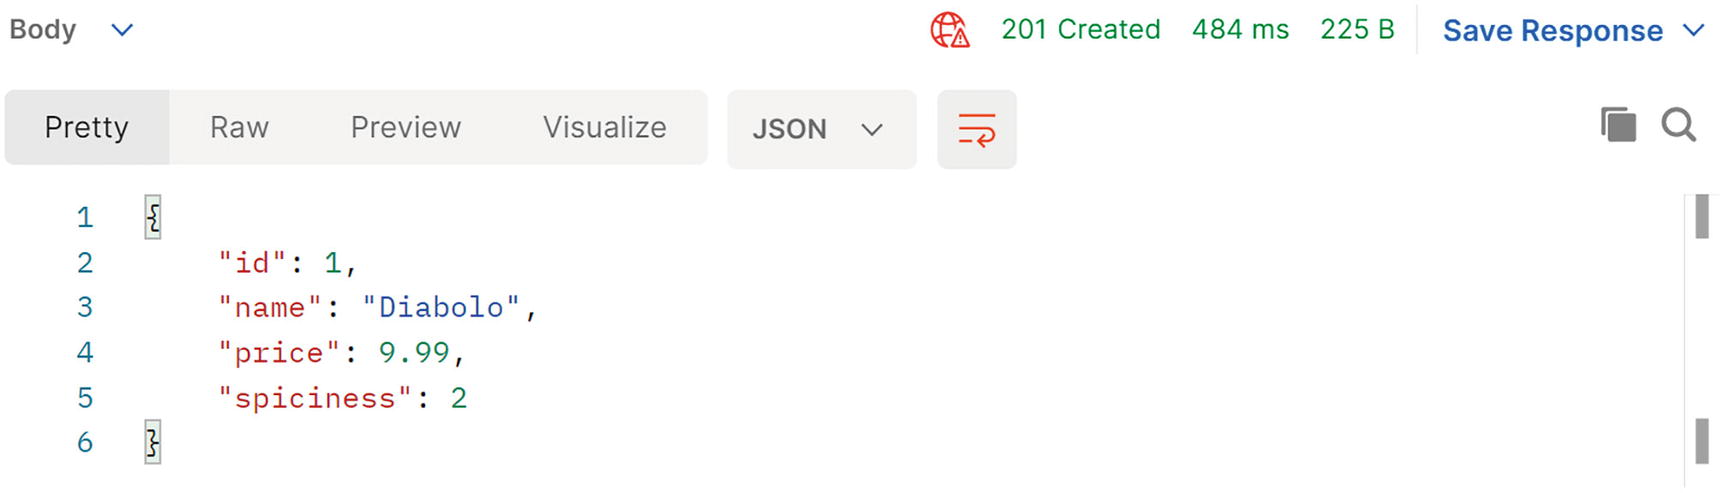
The POST Response in Postman
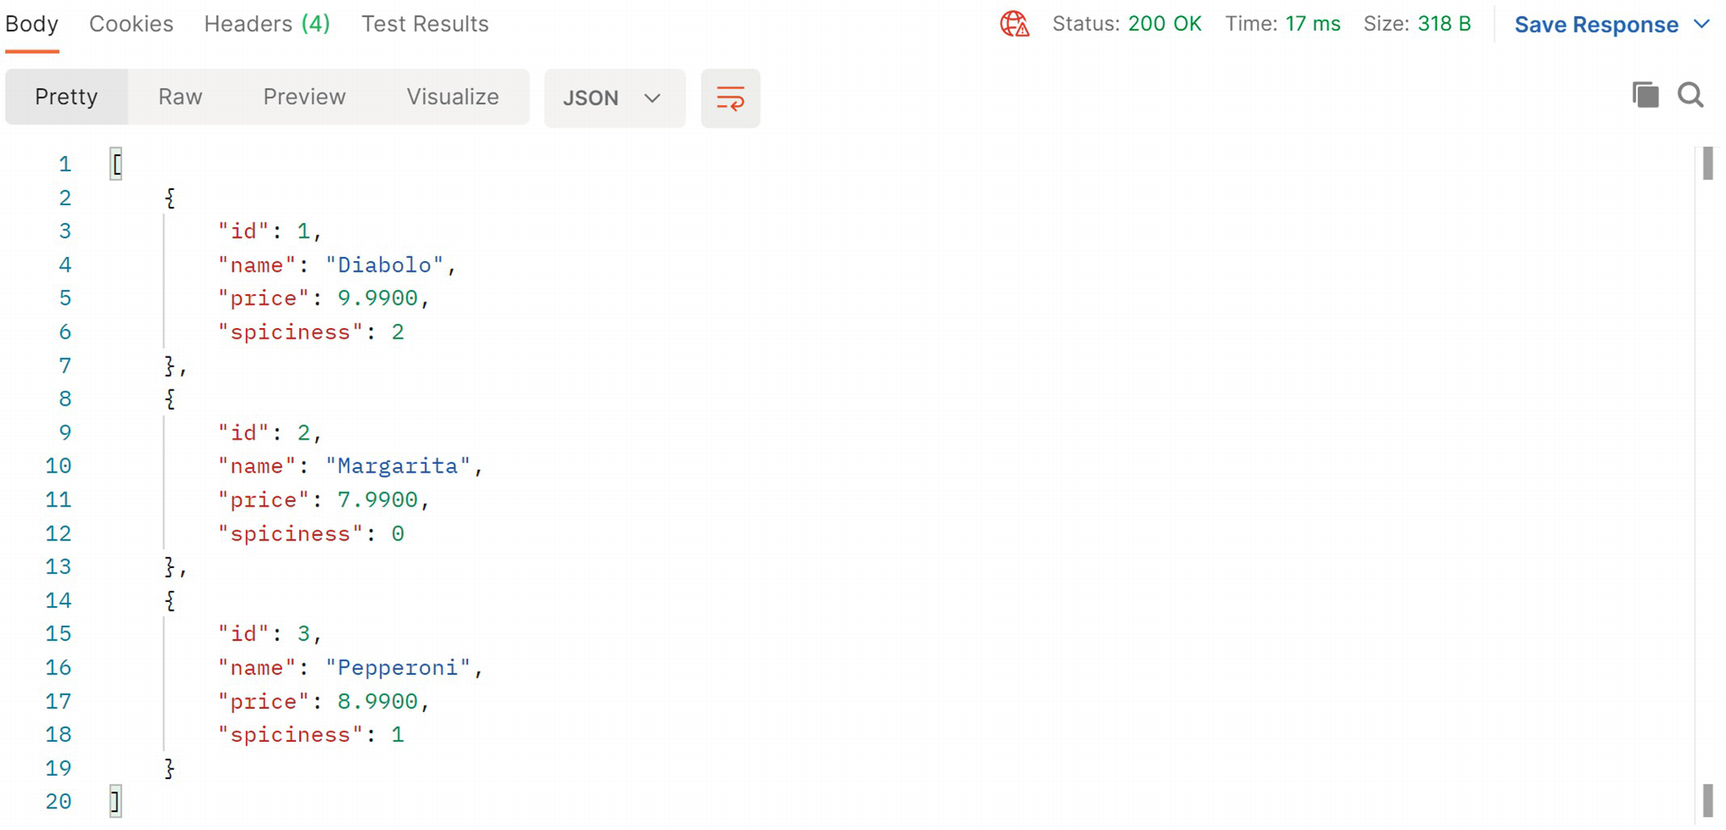
A List of Pizzas Stored in the Database
Summary
In this chapter, you had a look at how to store data on the server using Entity Framework Core and how to expose that data using Web API, REST, and microservices. You added a pizza service to the PizzaPlace application and then went on testing it with Postman.
In the next chapter, you will learn how to talk to your service(s) from Blazor.
7. Communication with Microservices
7. Communication with Microservices
In the previous chapter, you built a microservice using ASP.NET Core and Entity Framework Core to retrieve the menu of pizzas from the server. In this chapter, you will add support to the Blazor client to talk to that microservice. You will also complete the project by adding support for completing the order.
Using the HttpClient Class
Start by creating a fresh Blazor WASM project (with hosting enabled) just like you created in the first chapter (call it Blazor.Communication). You will use this project to examine the template that was created for you. You will start by looking at the server side of the solution, then the shared project’s code, and then the client side.
Examining the Server Project
The WeatherForecastController Class
Does this look somewhat familiar? Of course, it does; this is an API controller like we saw in the previous chapter. What URL you should use to access the list of WeatherForecasts?
The WeatherForecastController class exposes one REST endpoint at URI /WeatherForecast to retrieve a list of WeatherForecast objects. This time, the WeatherForecastController uses the [Route("[controller]")] attribute to set up the endpoint to generically listen to an URI that contains the name of the controller (without the suffix “Controller”) and then uses the [HttpGet] attribute to expect the GET method.
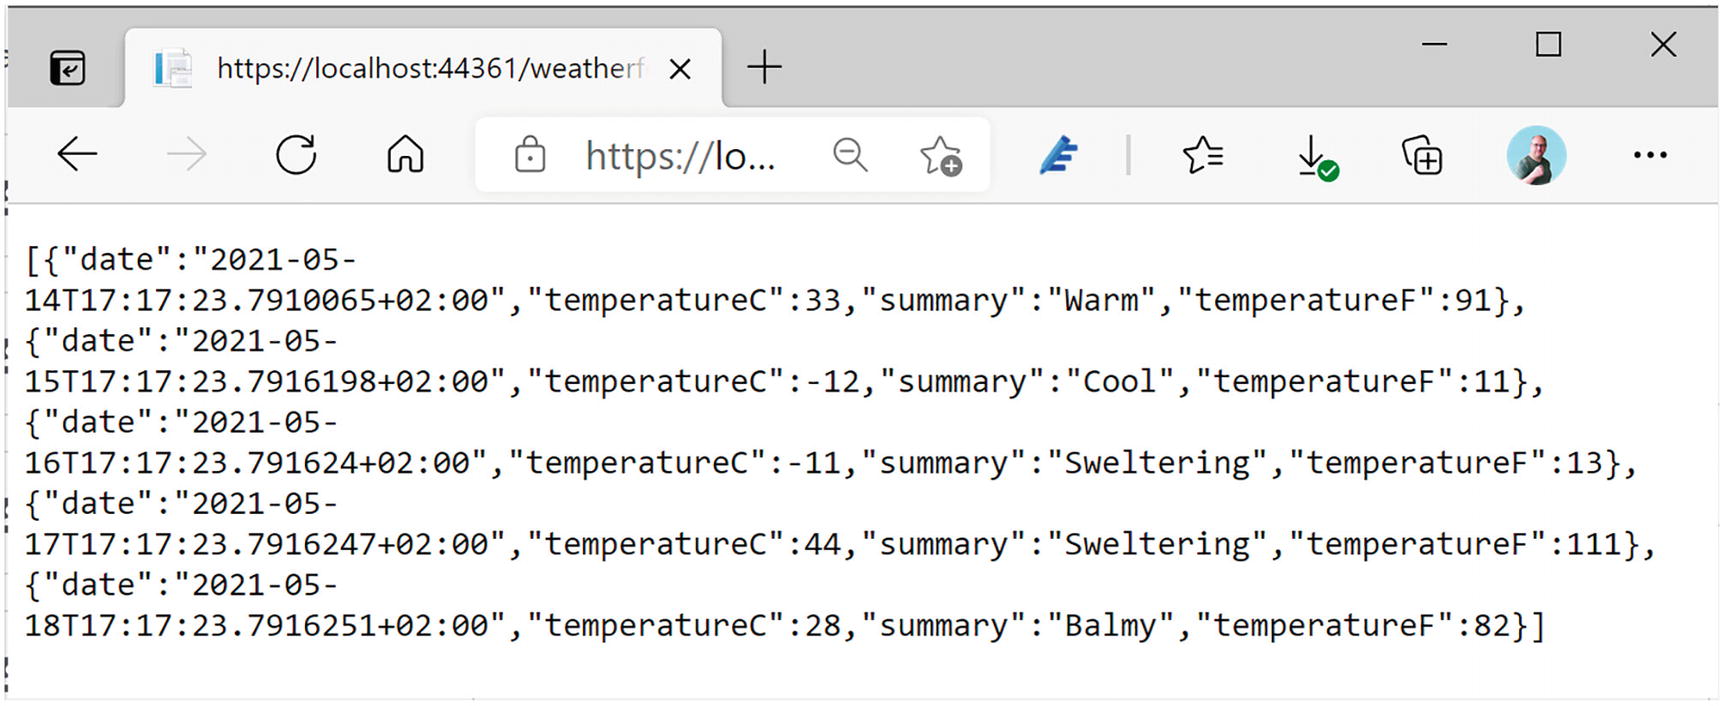
Invoking the Service Using the Browser
The Get method from Listing 7-1 uses a random choice of temperatures and summaries to generate these forecasts, which is great for a demo.
Using a Shared Project. Why?
The Shared WeatherForecast Class
This WeatherForecast class is straightforward, containing the Date of the forecast, the temperature in Celsius and Fahrenheit, and a Summary, but I want to draw your attention to the fact that this class lives in the Shared project. This shared project is used both by the server and the client project.
If you ever created a web app with JavaScript, you should be familiar with the experience of building a data exchange class for the server project, for example, in C#, and building another class in JavaScript (or TypeScript) for the client. You must make sure that both classes serialize to the same JSON format; otherwise, you will get runtime errors or, even worse, lose data! If the model grows, you must update both classes again. This is a HUGE maintenance problem in these kinds of projects, because you run the risk of updating only one side on a busy workday.
With Blazor, you don’t suffer from this because both server and client use C#. And that is why there is a Shared project. You put your classes here, and they are shared between the server and client, and then you use them by simply adding a reference to the Shared project. Adding another piece of data means updating a shared class, which works easily! No longer must you update two pieces of code.
Looking at the Client Project
The FetchData Component
Let’s look at this line by line. The first line adds the path for routing. You will look at routing in a later chapter. For the moment, you should know that when the URI is /fetchdata, the FetchData component will be shown in the browser.
The second line in Listing 7-3 adds a Razor @using statement for the Shared project’s namespace to the component. You need this because you use the WeatherForecast class from the Shared project. Just like in C#, you use using statements in Razor to refer to classes from another namespace.
On the third line, you inject the HttpClient instance using the @inject syntax from Razor. The HttpClient class is the one you will use to talk to the server. You will learn about the HttpClient class in more detail later in this chapter.
I do want to point out that you should never instantiate an instance of the HttpClient class yourself. Blazor sets up the HttpClient class in a special way, and if you create an instance yourself, it simply will not work as expected! Another reason not to create an instance yourself is that this is a dependency of the FetchData component, and we learned in Chapter 5 that classes and components should never create dependencies themselves!
A little lower down in Listing 7-3, you will find an @if statement. Because you fetch the data from the server using an asynchronous way, the forecasts field will initially hold a null reference. So, if the forecasts field has not been set, you tell the user to wait. If you have a slow network, you can see this happening. When you test your Blazor application on your own machine, the network is fast, but you can emulate a slow network using the browser (in this case, using Google Chrome).
Emulating a Slow Network in Chrome
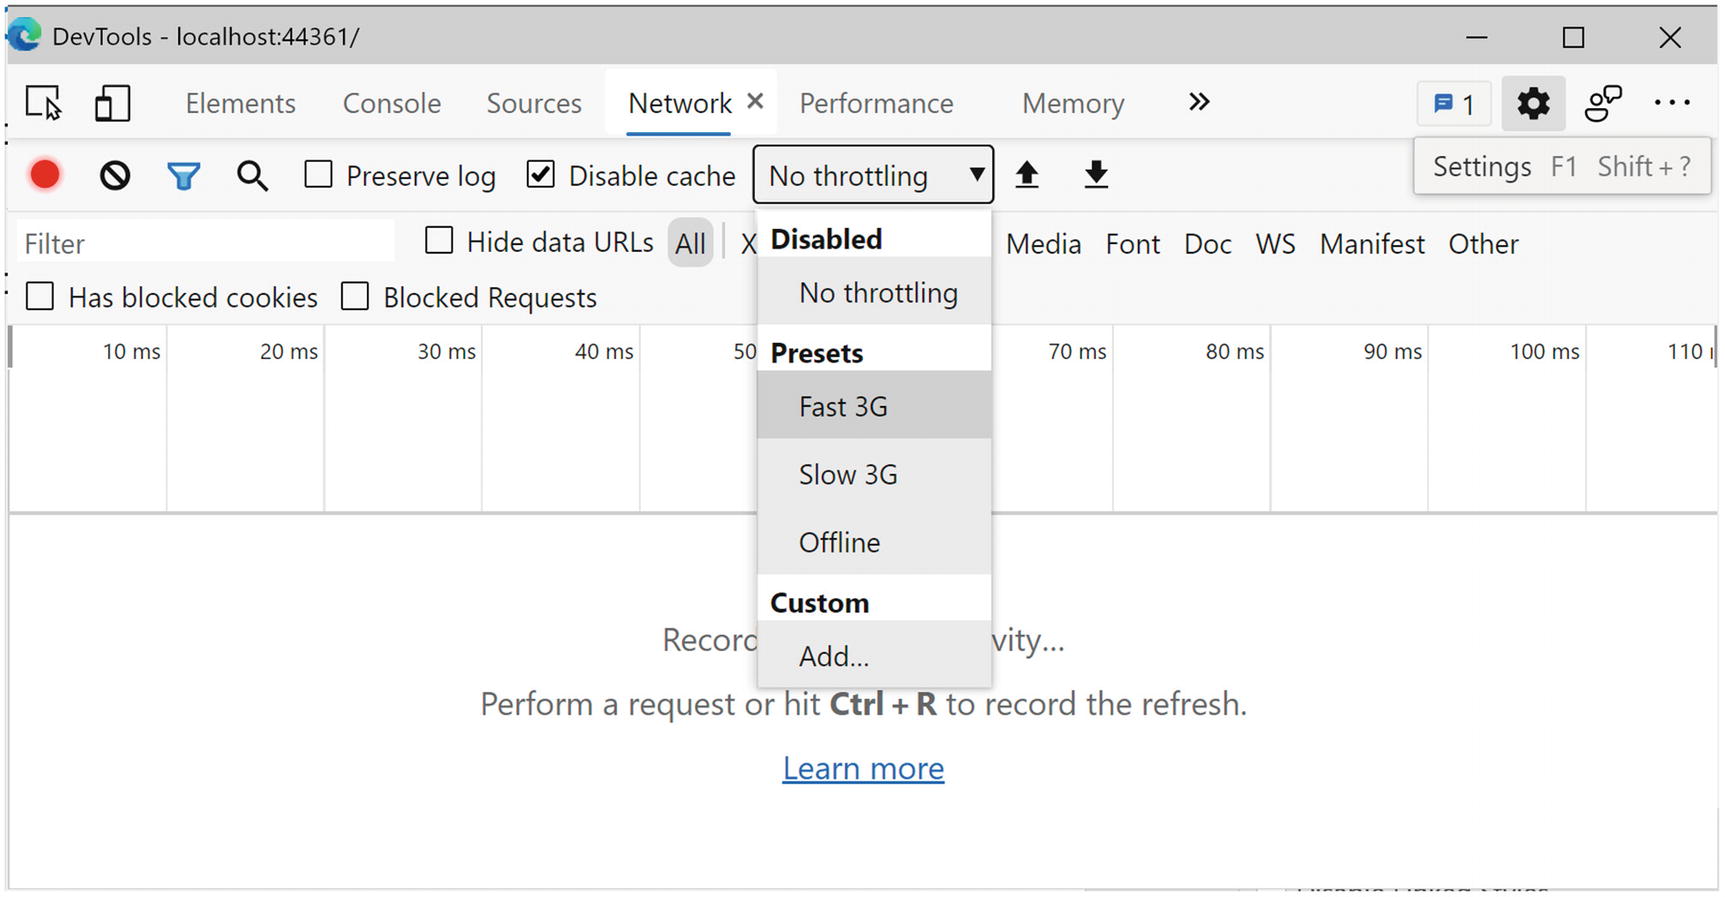
Using the Chrome Browser Debugger to Emulate a Slow Network
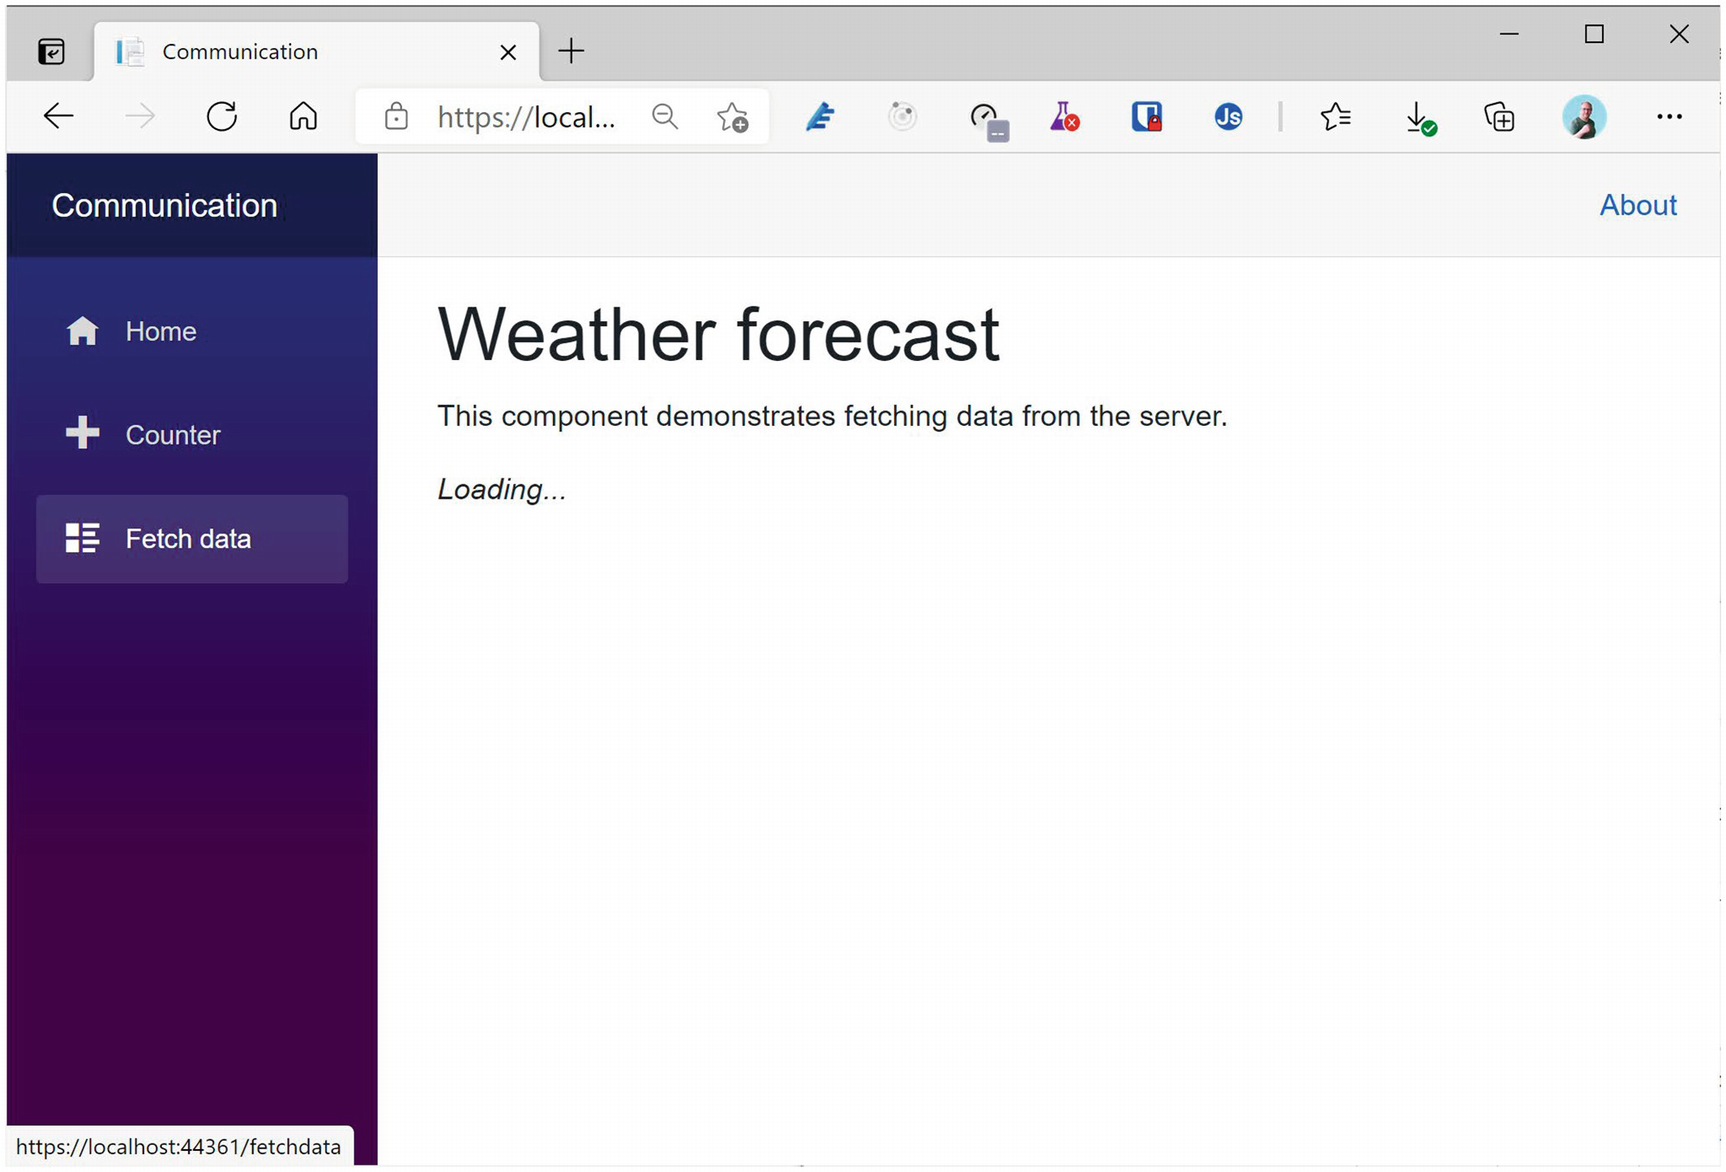
The Loading… Feedback with a Slow Network
When the OnInitializedAsync method finished, the forecasts field holds data, and your razor file will show a table with the forecasts by iterating over them, as you can see in the else part of Listing 7-3.
Onto the @code section of the FetchData razor file. First, you declare a field called forecasts to hold an array of WeatherForecast instances. You then override the OnInitializedAsync life cycle method. Because you fetch the data from the server using an asynchronous API, you need to put your code in OnInitializedAsync. The OnInitializedAsync method is prefixed with C#’s async keyword, which makes it a breeze to call async APIs with the await keyword.
Asynchronous communication means that the client might need to wait a fair amount (for a computer) for the result to be returned. Asynchronous calls might take a long time, and we don’t want to block the application so we use an asynchronous call. Instead of using a call that will stop Blazor from completing other request (freezing the user interface), you use the OnInitializedAsync method , which will wait in the background for the result.
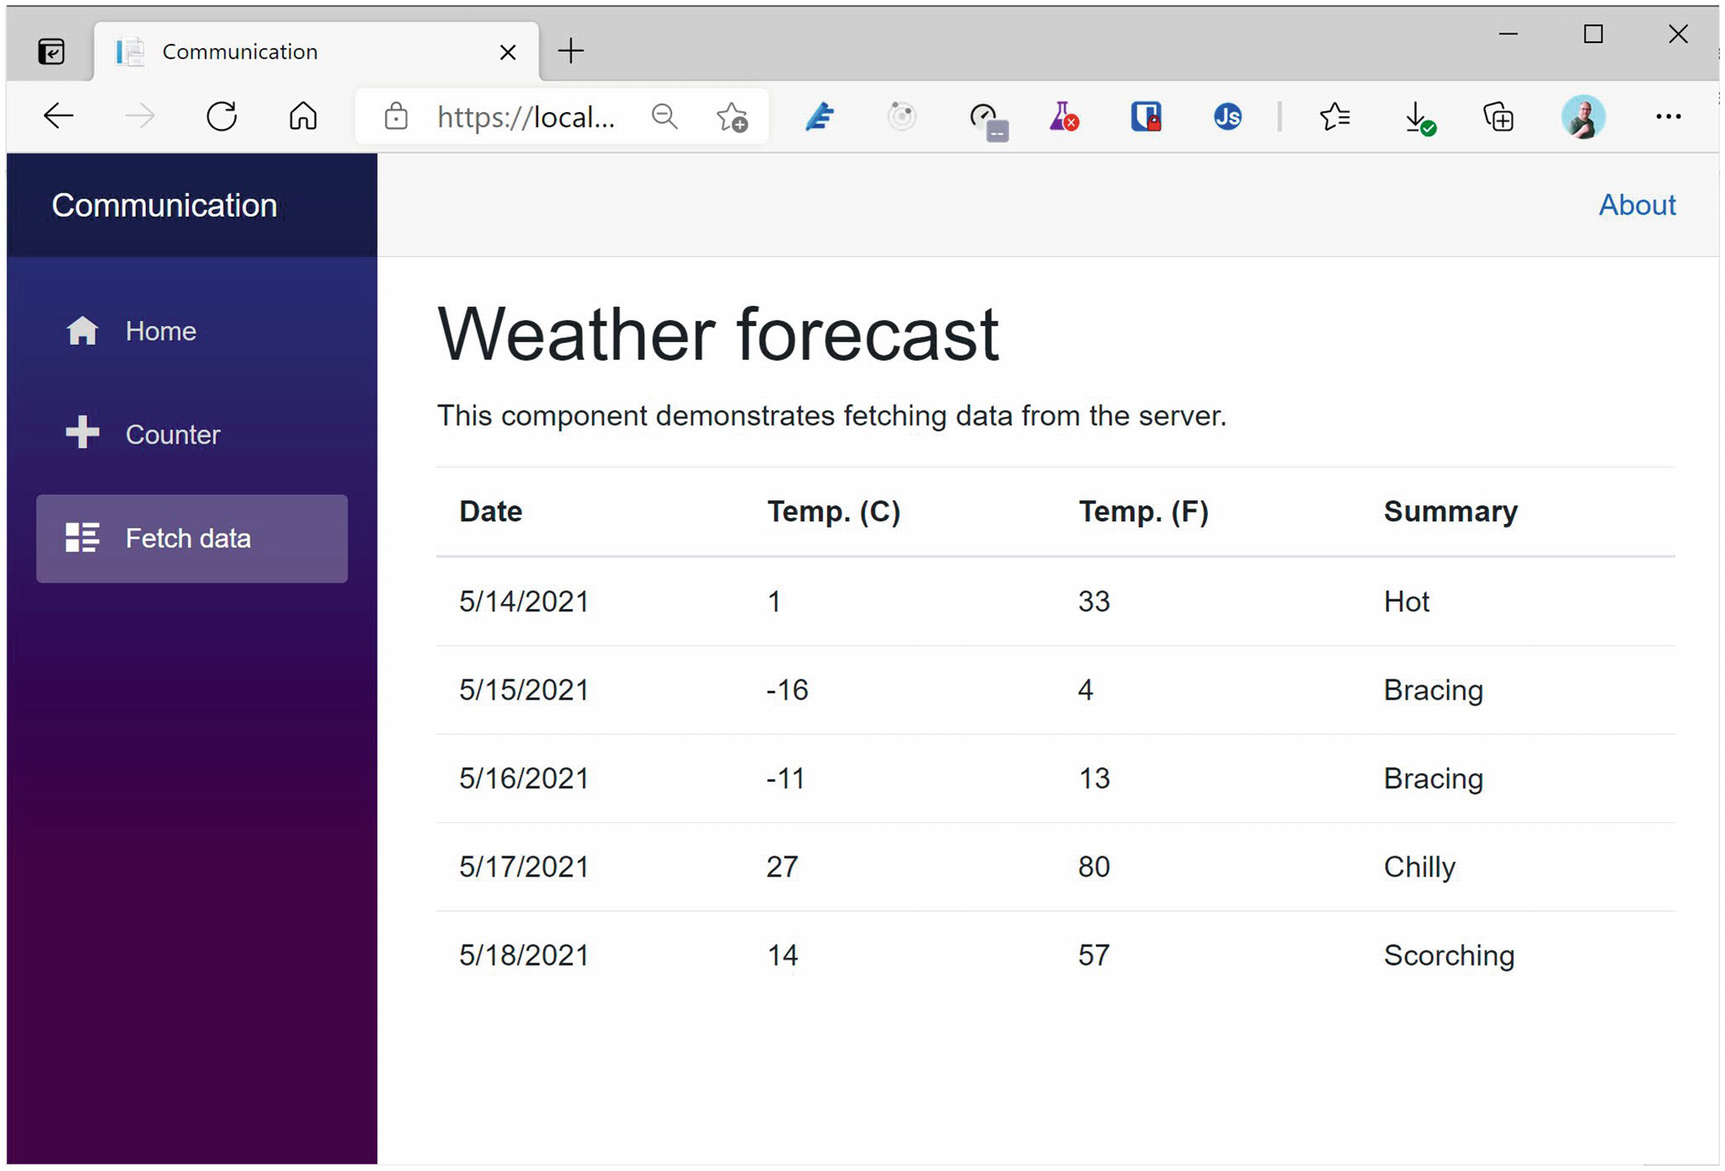
Displaying the WeatherForecast Objects
Understanding the HttpClient Class
All communication between the client and server passes through the HttpClient class . This is the same class other applications in .NET use, and its role is to make the HTTP request to the server and to expose the result from the server. It also allows you to exchange binary or other formatted data, but in Blazor, we normally use JSON. With Blazor WASM, the HttpClient class uses the browser’s network stack to talk on the network.
The HttpClientJsonExtensions Methods
To make it a lot easier to talk to JSON microservices, .NET provides you with a bunch of handy extension methods that take care of converting between .NET objects and JSON, which you can find in the HttpClientJsonExtensions class . This class lives in the System.Net.Http.Json namespace. I advise you use these methods, so you don’t have to worry about serializing and deserializing JSON.
The GetFromJsonAsync Extension Method Signature
Because it is an extension method, you call it as a normal instance method on the HttpClient class, as shown in Listing 7-5.
Using the GetJsonAsync Extension Method
GetFromJsonAsync<T> will expect the response to contain JSON as specified by the generic argument. For example, in Listing 7-5, it expects an array of WeatherForecast instances. You normally invoke the GetFromJsonAsync method by prefixing it with the await keyword. Don’t forget that you can only use the await keyword in methods and lambda functions that are async.
As you can see in Listing 7-4, there are additional arguments which we discuss later in this section.
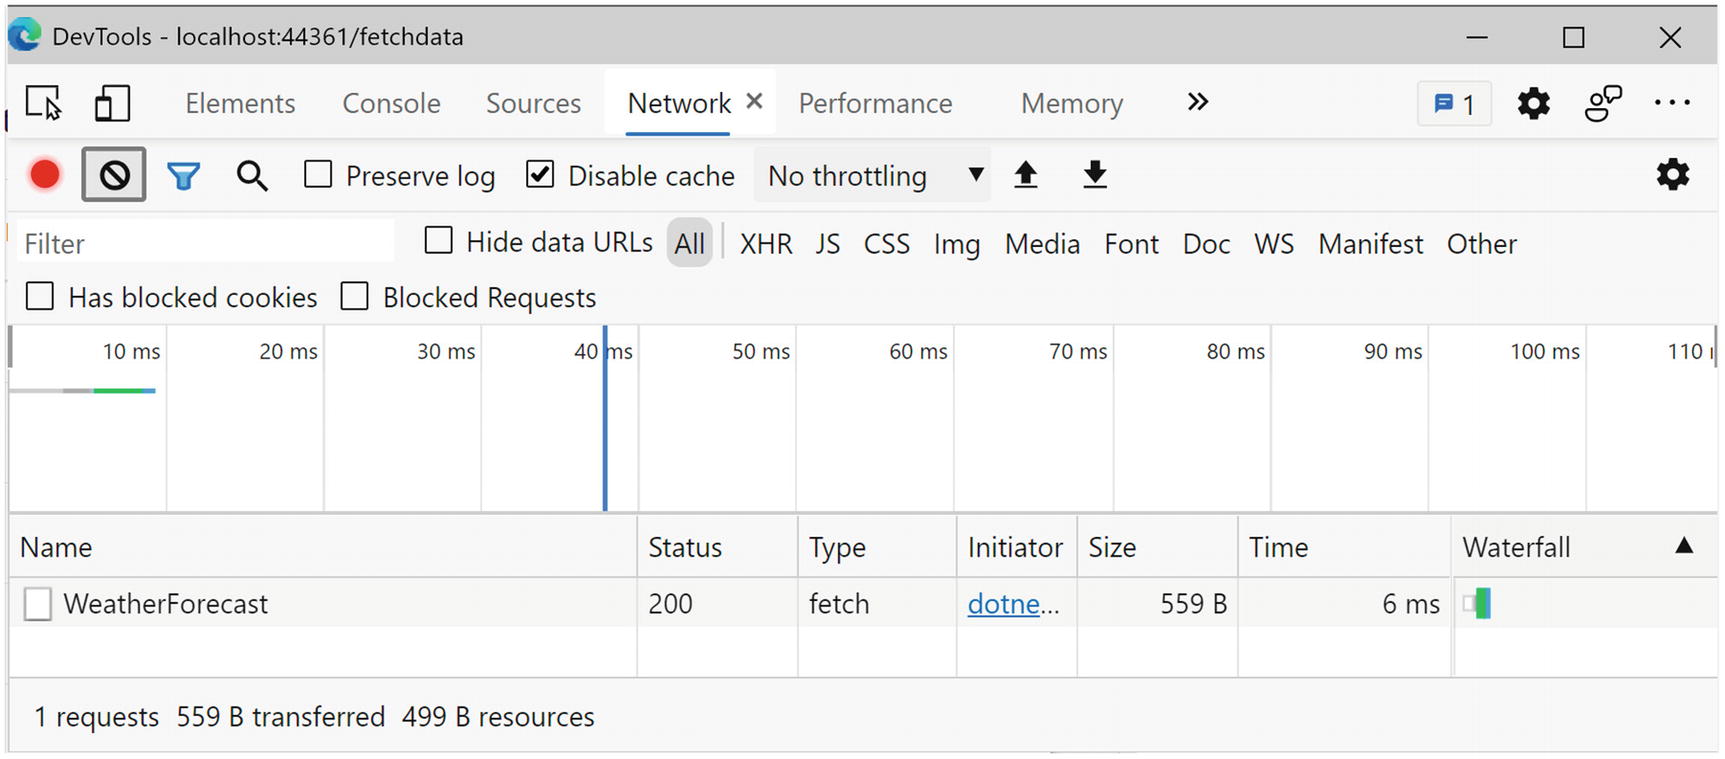
Inspecting the Network Using the Browser’s Debugger

Using the Preview Tab to Look at the Response
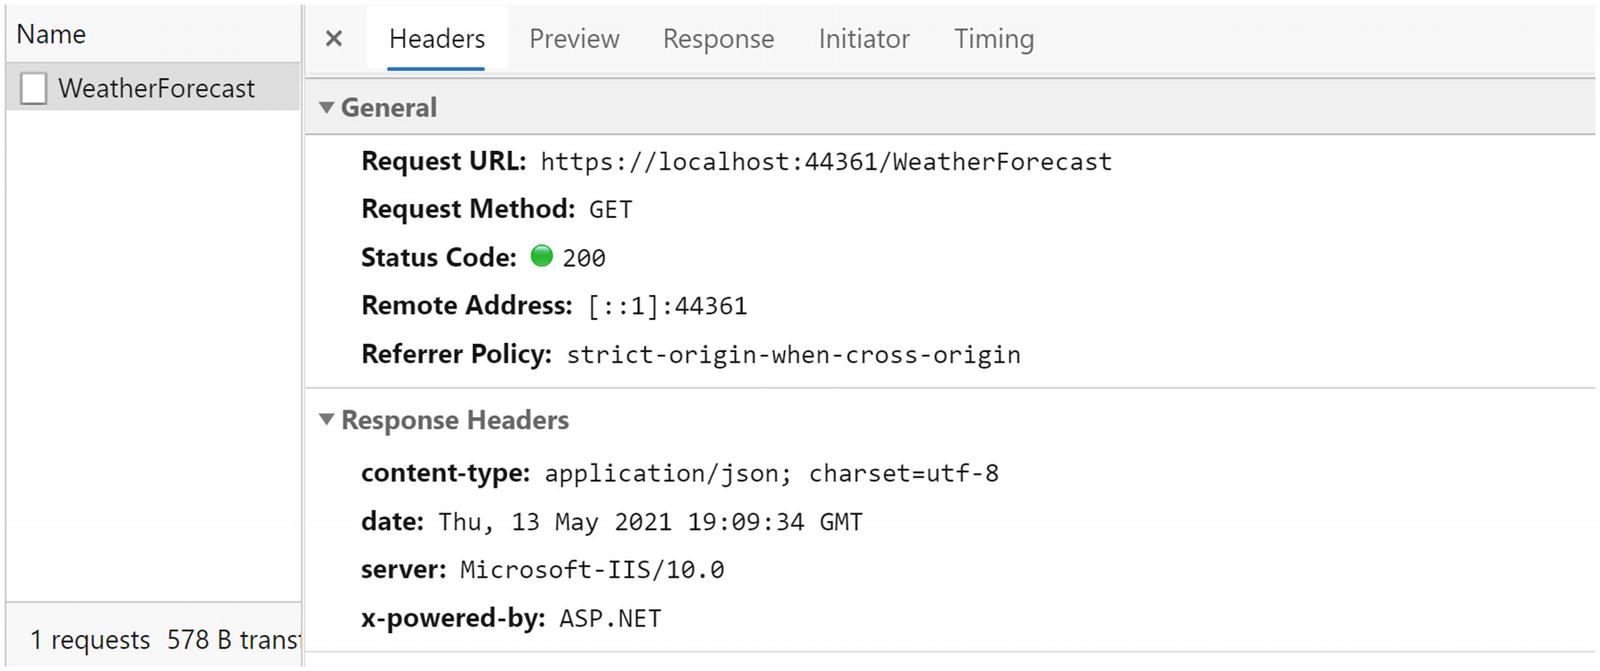
Using the Headers Tab to Look at the Request and the Request/Response Headers
Here, you can see the request’s URL and GET verb (the request method). It also shows the HTTP status code 200 OK. Scroll down to look at the headers. One of the response headers is Content-Type with a value of application/json, which was set by the server telling the client to expect JSON.
The PostAsJsonAsync Method’s Signature
The PutAsJsonAsync Method’s Signature
Customizing Serialization with JsonSerializerOptions
Controlling Casing with JsonSerializerOptions
Retrieving Data from the Server
Your Blazor Project’s Program Class
I would like to point out the third line of the Main method. Previously, I told you that you should never create the HttpClient instance yourself. But here we do! This method makes it very easy to configure your HttpClient instance so the service does not have to set the BaseAddress property. This works for other HttpClient properties too.
In the Main method, you added two services, HardCodedMenuService and ConsoleOrderService. Let’s replace these fake implementations with real services that talk to the server.
Implementing the MenuService
With Visual Studio, right-click the PizzaPlace.Client project and select Add ➤ New Folder from the drop-down menu. With Code, right-click the PizzaPlace.Client project and select New Folder. Name this folder Services. Now add a new class to this folder called MenuService, which can be found in Listing 7-10.
The MenuService Class
You start by adding a constructor to this class taking the MenuService’s dependency on HttpClient, and you store it in a field named httpClient. Then you implement the IMenuService interface’s GetMenu method where you talk to the server calling the GetFromJsonAsync on the server’s /pizza endpoint. Note that the /pizza endpoint is relative to the site’s base (<base href="/" />), which can be found in the index.html file. You can change this base address in Program.cs (see Listing 7-11). Because the MenuService service returns a menu and not a list of pizzas, you wrap the list of pizzas you got from the server into a Menu object. That’s it!
Using the principle of single responsibility results in many small classes, which are easier to understand, maintain, and test.
Replacing the HardCodedMenuService with the MenuService

The PizzaPlace App Showing the Pizzas from the Database
Showing a Loading UI
Adding a Loading UI to the Index Component

Showing a Loading Progress Bar While Loading the Menu
Storing Changes
Now onto storing the order from the customer. Because you don’t have a microservice yet for storing the order, you will build this first, and then you will implement the client service to send the order to the server.
Updating the Database with Orders
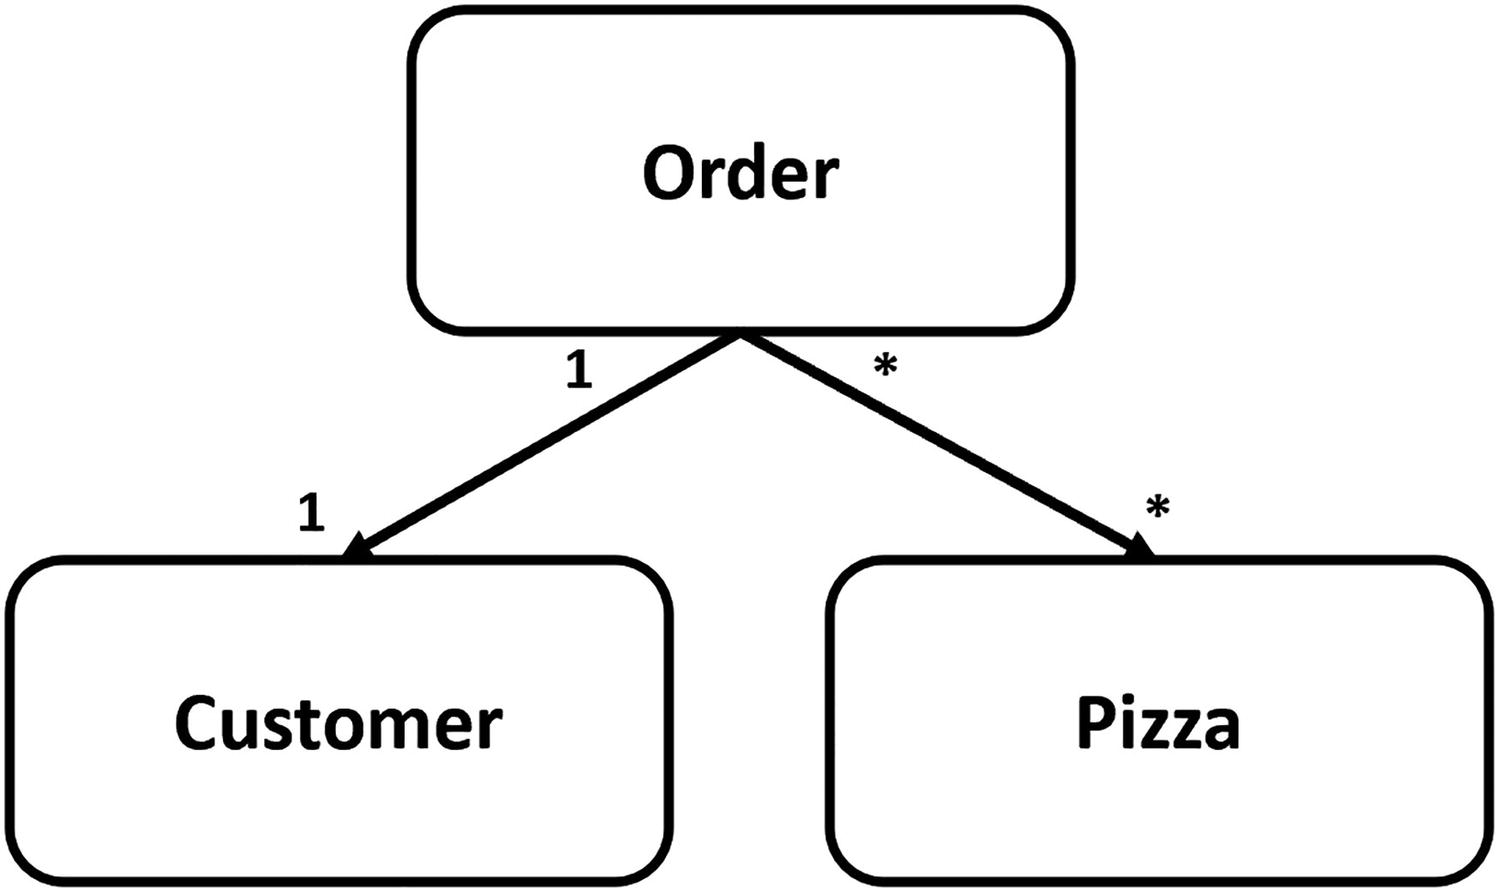
Modeling the Relationships
The PizzaOrder Class
The Pizza Class
The Updated PizzaPlaceDbContext Class
Here you have added the Customers and Orders tables, and in the OnModelCreating method , you explain to Entity Framework Core how things should be mapped.
A Customer has a primary key Id and its string properties which we limit in length. An Order has a primary key Id and a single Customer, and it has a many-to-one relationship with Pizza (one Order can have many Pizzas, and each Pizza can belong to many Orders).
Build your project and fix any compiler error(s) you might have.
Now it is time to create another migration. This migration will update your database with your new tables. In Visual Studio, open the Package Manager Console (which you can find via View ➤ Other Windows ➤ Package Manager Console). With Code, open the integrated terminal. Or use the command line if you prefer (I really like the new terminal in Windows 10). Change the directory to the PizzaPlace.Server project.
This will create a migration for your new database schema.
Apply the migration to your database by typing the following command:
dotnet-ef database update
This concludes the database part.
Building the Order Microservice
The OrdersController Class
The OrdersController needs a PizzaPlaceDbContext, so you add a constructor taking the instance and you let dependency injection take care of the rest. To create a new order, you use the POST verb for the InsertOrder method taking a ShoppingBasket instance in the request body.
Upon receipt of a basket instance, you create the order, and then set the order’s customer. Next, you fill up the order’s Pizzas collection with pizzas. We receive the Ids for the Pizzas, so we look them up with it. Then we add the new order instance to the PizzaPlaceDbContext Orders collection. Now when we call SaveChanges, Entity Framework will INSERT it in the Orders table. That’s it. Entity Framework Core does all the work of storing the data!
Talking to the Order Microservice
The OrderService Class
First, you add a constructor to the OrderService class , taking the HttpClient dependency, which you store in the httpClient field of the OrderService class. Next, you implement the IOrderService interface by adding the PlaceOrder method, taking a ShoppingBasket as a parameter. Finally, you invoke the asynchronous PostAsJsonAsync method using the await keyword.
Configuring Dependency Injection to Use the OrderService Class
Run your PizzaPlace application and place an order for a couple of pizzas. Now open SQL Server Object Explorer in Visual Studio (or SQL Operations Studio) and examine the Customers and Orders tables. They should contain your new order. You will also see another table in the database, the OrderPizza table. This table was generated by Entity Framework to store the many-to-many relationship between Orders and Pizzas.
Summary
In this chapter, you learned that in Blazor you talk to the server using the HttpClient class, calling the GetFromJsonAsync and PostAsJsonAsync extension methods. You also learned that you should encapsulate calling the server using a client-side service class so you can easily change the implementation by switching the service type using dependency injection.
8. Unit Testing
8. Unit Testing
In previous chapters, we have been building a PizzaPlace application, which contains a number of components. We have tested these components by running the application and interacting with it. Here, we will look at writing unit tests for Blazor components using bUnit and MOQ.
Where Can We Find Bugs?
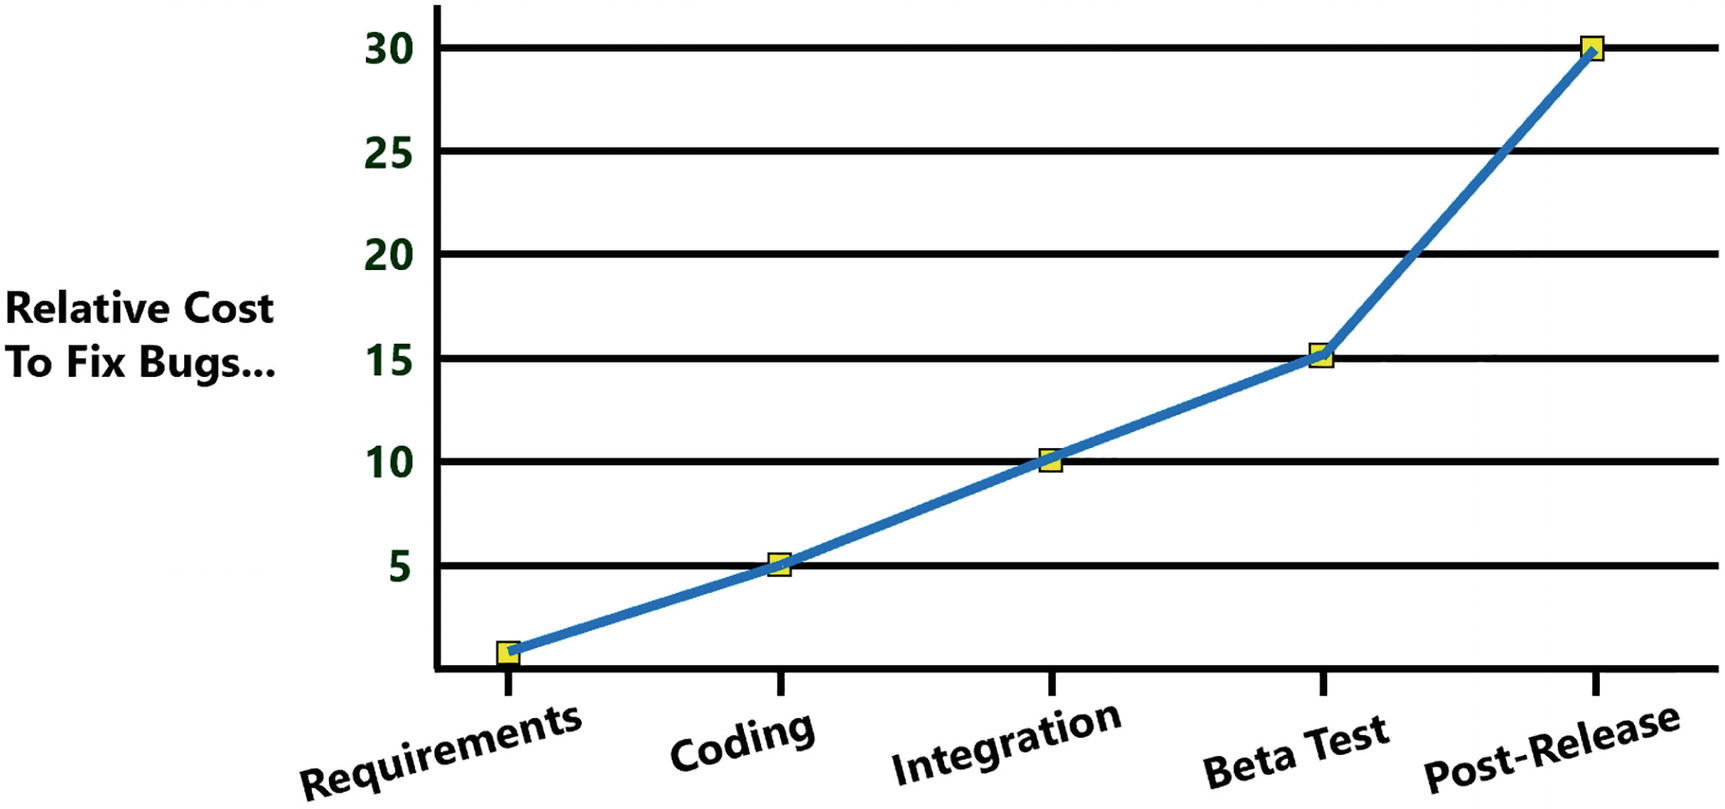
The Cost of Fixing Bugs
Requirements
Sometimes bugs are introduced even before a single line of code is written. Writing good requirements is hard, because these need to explain business concepts to developers who are typically not well versed in this domain. The same thing counts for advanced engineering concepts, like rocket building. Let’s look at an example. NASA lost its $125,000,000 Mars Climate Orbiter because of a simple missing piece of information in the requirements: which units to use. One team was using metric units (meters, kilogram), while another team was using imperial units (inch, pounds), and there was no conversion in place because each team thought the other team was using the same units! You can read more about it here: www.latimes.com/archives/la-xpm-1999-oct-01-mn-17288-story.html.
This bug could easily be averted! Since the specifications never mentioned the units, if someone had asked which units to use and add this to the specifications, this Mars Climate Orbiter would probably be spinning around Mars right now! So as a developer, if you think something is confusing or ambiguous, ask! Never assume anything!
Coding
It is easy to introduce bugs during coding. That is part of developing software. Code that was working very well can become buggy by a benign change. So how can we discover these bugs? We should automate our testing. By writing a piece of code (a unit test) that checks if another piece of code is behaving as expected, we can run this test every day and discover the bug hours after it was written. Have you ever received a bug report about some functionality you wrote three months ago? You will probably rub your head wondering what you were trying to do (and you write this code!). After studying your code for a while, understanding kicks in and you fix the bug (let us say a simple one-off bug). Now imagine the bug is discovered an hour after you made the change. Do you need to figure out what your code was doing? No, it is still fresh in your memory. That makes unit testing so efficient. And when you finish your code and all your unit tests are green (meaning check out OK), you can go home and sleep soundly!
Same thing counts for refactoring code. I mean, cleaning up some code and keeping the same functionality. How do you know if you introduced bugs while refactoring when there are no unit tests? If there are unit tests and they all pass before refactoring, it is easy to see after refactoring if you broke something. Just run the unit tests, and if they all pass, you did not break anything that was known to be working! Again, you can go home and sleep knowing you made your code more maintainable and did not introduce any new bugs!
Integration
Your code works on your machine. And your colleague’s code also works on their machine. But will your code work together with your colleague’s code? That is what integration is all about. A long time ago, teams would integrate code from different teams at the end of the project. Guess what!? This never went well, resulting in project overruns, sometimes by months. So development teams started to integrate at the end of each month and then at the end of the week. Integrations started to become automated using build systems. Now we can do continuous integration where we integrate changes to the code after each commit in source code. And when we have unit tests, we can run these after the compilation ends and use that to catch breaking changes. Again, this should illustrate the role of good unit tests. You use them to see if your code is working and also to see if everyone’s code keeps on working.
Beta Testing
At a certain point in time, you should expose end users to your application. Why? Because developers are not normal people. End users want things to be as simple as possible. For example, look at google.com. This site only has one text box where you type your question and a button to do the search. This simplicity made Google the most used search engine (sorry Microsoft). Developers are control freaks; they want power, not simplicity! Just open the options screen in Visual Studio. You can tweak just about anything! And most end users are not as proficient using computers as developers, sometimes resulting in surprises. Let me tell you about a personal experience I once had. We had built software that runs in a factory, and on a Sunday (they work in that factory continuously), I get a call from an end user. He told me “The button does not work!”. After half an hour on the phone, I decided to drive over there and see for myself. I get there and I click the button, and it works! So what was the problem? The button was small because we needed to cram a lot on the screen, and the end user has a bit of a tremor and moved the mouse when clicking, resulting in a click outside of the button. So we fixed the bug by making the button bigger. This is a nice example of a usability problem, where we as developers are not always aware of. So expose your software to your users often, and gain their feedback. We are building it for our end users, right?
Post-release
Perfect software does not exist. Have you ever writing an application that is bug-free? No? I have! It is called “Hello World!”. Anything beyond that is impossible. But having an end user discover a bug is bad news. It will lower the trust in the development team and in the quality of the software. So how do we stop bugs from making it into production? You can’t! The only thing you can do is to test as much as possible and warn the users that they may encounter bugs, especially early after release.
Why Should We Use Unit Tests?
So how do you test your Blazor application? Hit run and interact with the UI? No problem there, except every time you make a change to your application, you should test everything again. Who has time for that? Can’t someone else do it? Yes, that machine in front of you can! With unit testing, we automate this unit testing process.
What Makes a Good Unit Test?
When you practice unit testing, your development life cycle looks like this: make some change to the code, build, fix compiler errors, build again, and then run all your tests. Then fix the bugs discovered by your tests. And then you start again. How long does building your application take? A couple of seconds? Now imagine that your unit tests take 5 minutes. Would you want to wait for that? Would you be tempted to disable running the unit tests? A good unit test should be fast so we don’t have to wait very long. What makes unit tests slow? Typically, this is caused by accessing slow resources, like databases, disks, and the network. So with a unit test, we will avoid using slow resources. What if your unit tests need some setup? Every time you need to run the tests, you would have to prepare some things manually. Again, we don’t have time for that. A good unit test should also be automatic and repeatable , meaning that the test should report on success or failure and that again we avoid things that need some manual setup. What could that be? Again databases, files on disk, and the network! Another aspect of a good unit test is consistency . If your unit test fails, this should be because of a bug in your code, not because someone tripped over a network cable making the database or network inaccessible! So again, we should avoid things like databases, file shares, and networks.
Tests which do not have all the aspects from earlier do exist. You will have to write a test to interact with the database (but don’t start testing the framework used to access the database; that is the framework’s author’s job!). Their tests are known as integration tests , because we will run them during the build, not during the development life cycle.
Unit Testing Blazor Components
Let us create a couple of tests for a Blazor application. In the code download for this chapter, you can find the testing solution. Open it with your favorite editor. Everything in the project should look familiar. There is the Counter component and the FetchData component which uses an IWeatherService to retrieve the weather forecasts from a server.
Adding a Unit Test Project
Let us look at an example using xUnit , which is a popular testing library for .NET which we will also use for testing our Blazor components.
When you are using Visual Studio, right-click the test folder and select Add new project. In the Add New Project dialog, search for the xUnit Test Project template. Now click Next. Set the Location to the test folder and name it Testing.ComponentTests.
The Testing.ComponentTests Project
Adding bUnit to the Test Project
With the current unit test project, we can test our services and other non-Blazor classes. In order to test Blazor components, we need to add bUnit . So use your favorite method to add the bUnit package (choose latest stable version).
bUnit Projects
Write Your First Unit Test
Now that we have everything in place, we can write our first unit test. We will start by writing a simple unit test and see how this works with Visual Studio and Code.
Writing Good Unit Test Methods
Every unit test will consist of three phases: Arrange, Act, and Assert, also known as the triple A of unit testing . The Arrange phase will set up the unit test by creating the subject under test (SUT), by which I mean the class we want to test and its dependencies. The Act phase will perform the call on the method we want to test, and the Assert will verify if the outcome is successful.
A Simple Utils Class
Testing the Square Method
Running Your Tests

The Test Explorer
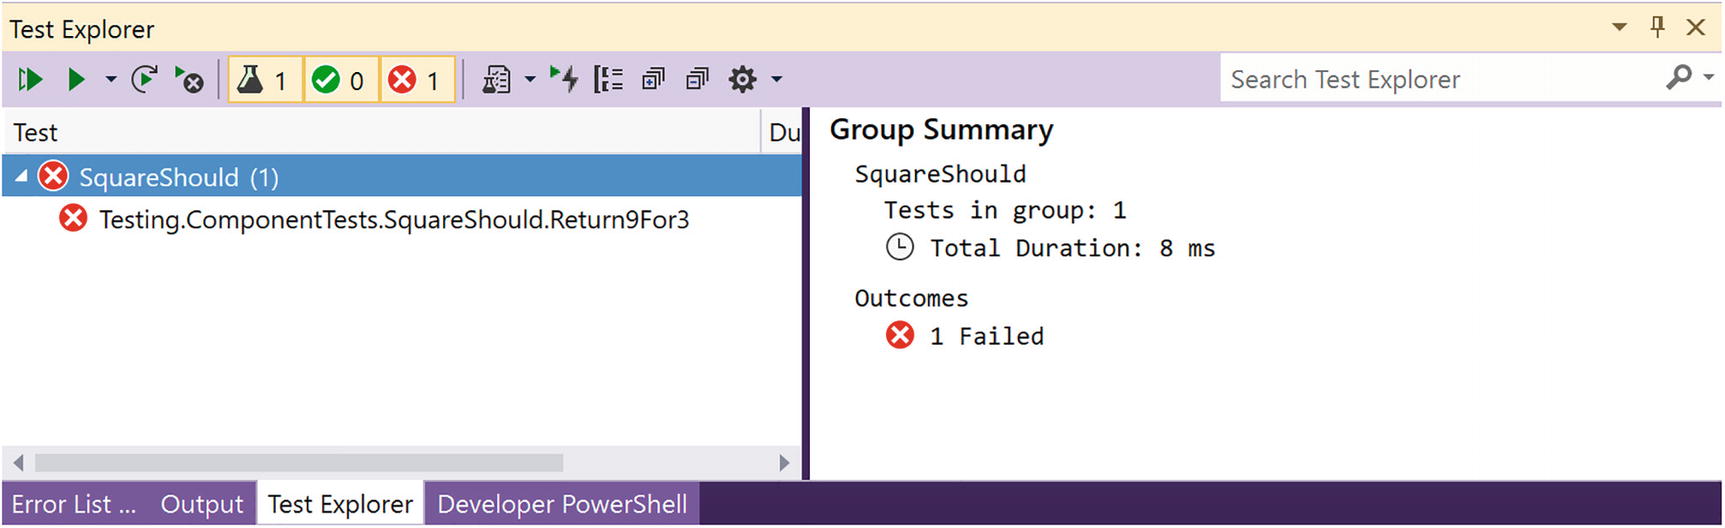

The .NET Core Test Explorer Extension

Test Explorer in VSC

The VSC Test Explorer Controls
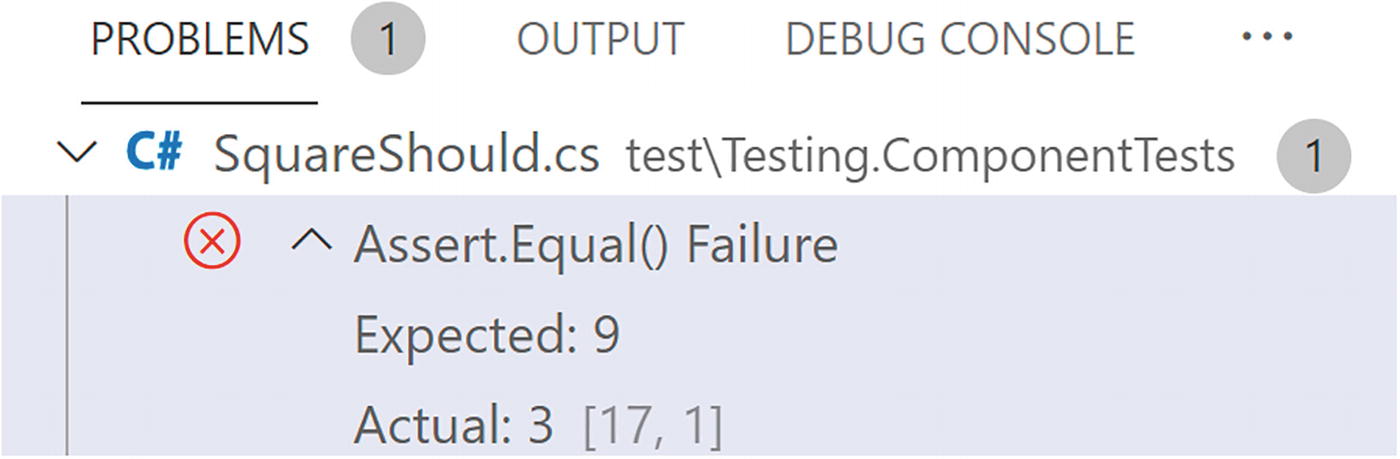
Reviewing Failed Tests
Making Your Test Pass
The Corrected Square Method
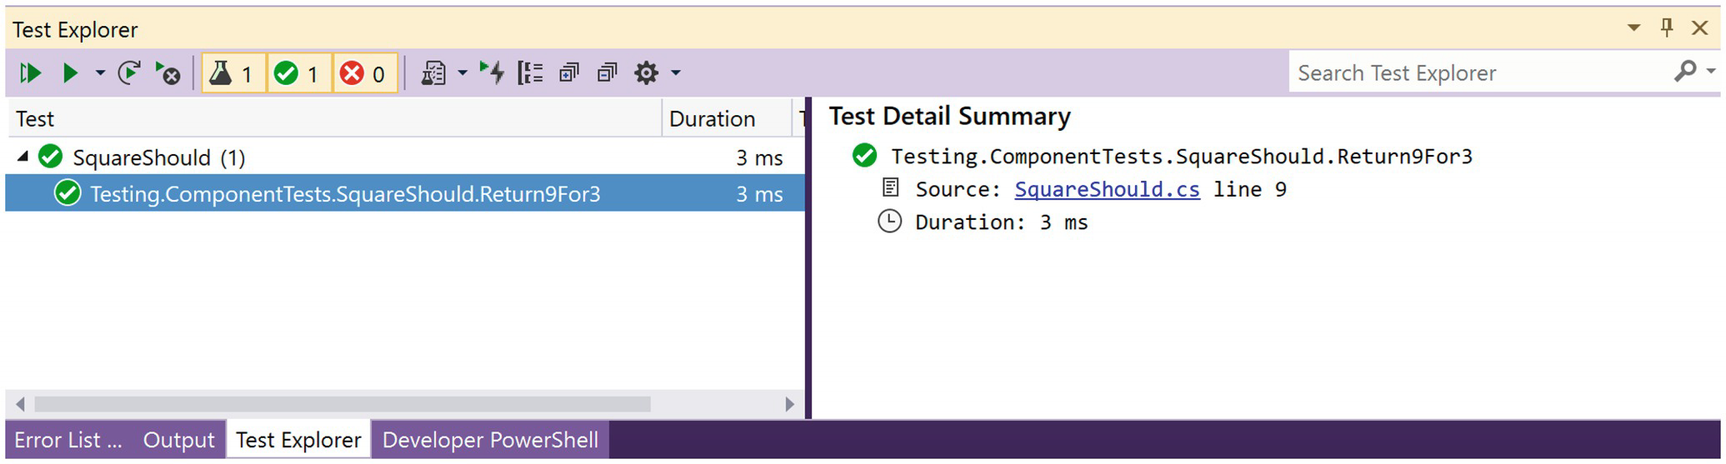
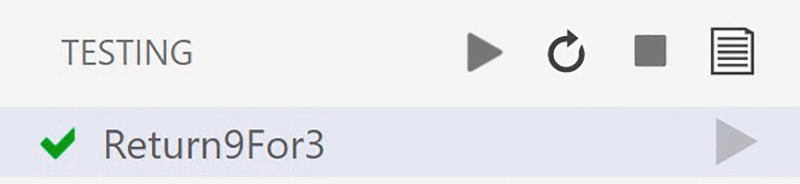
Using Facts and Theories
Using Theories
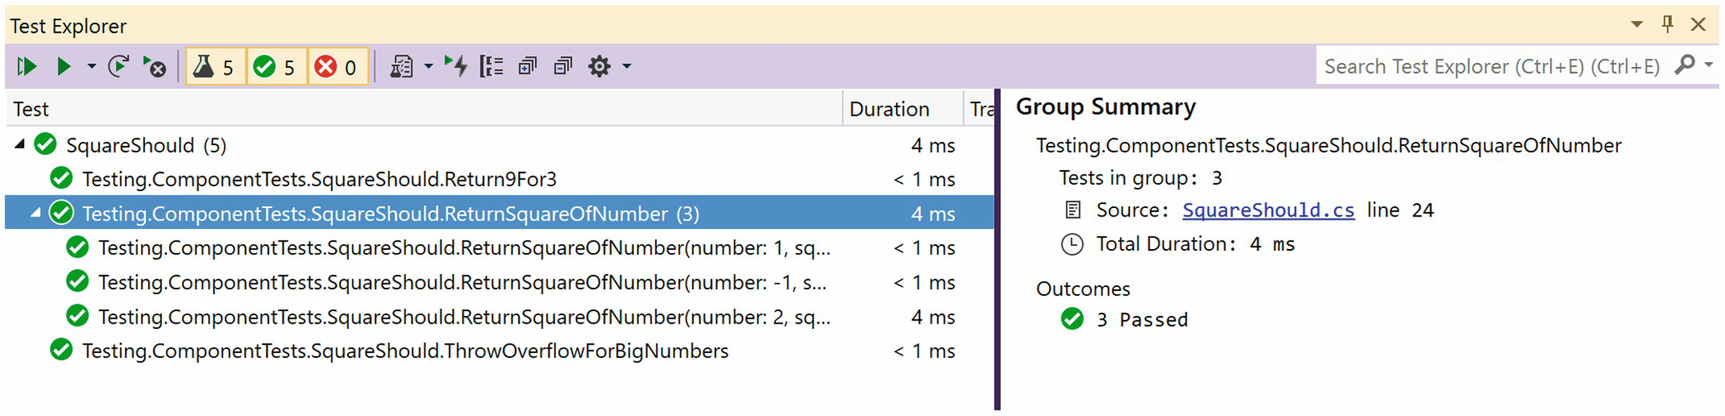
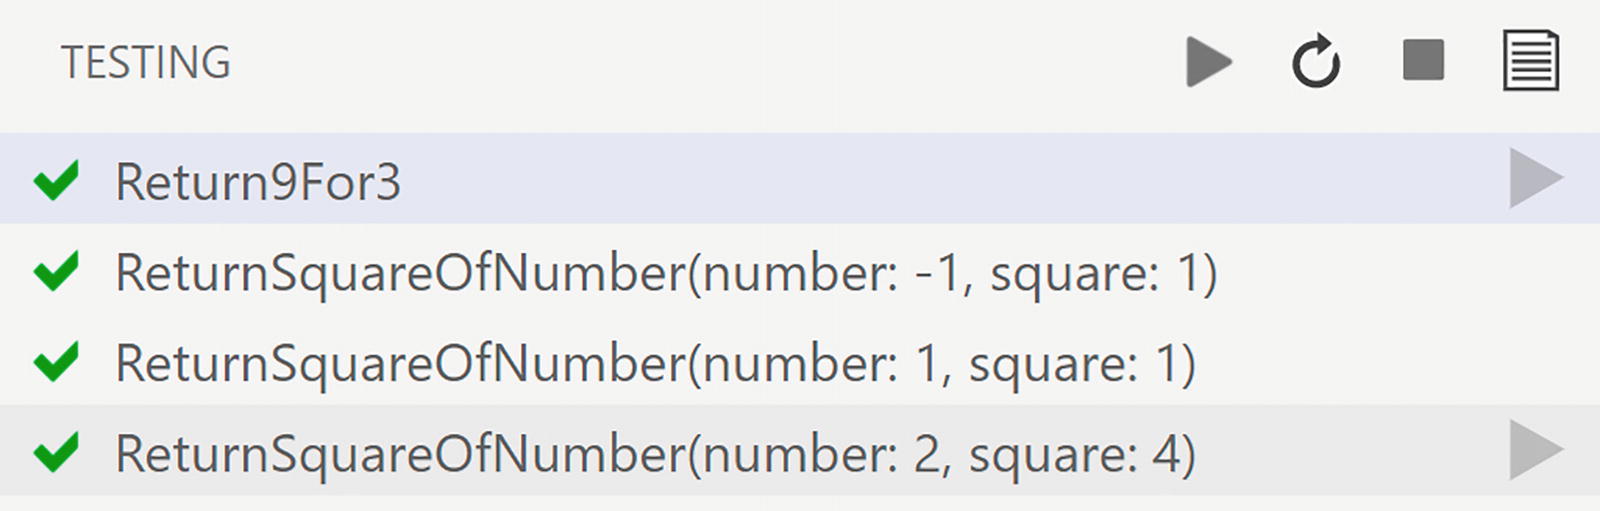
Checking Your Sanity
Testing Exceptional Cases
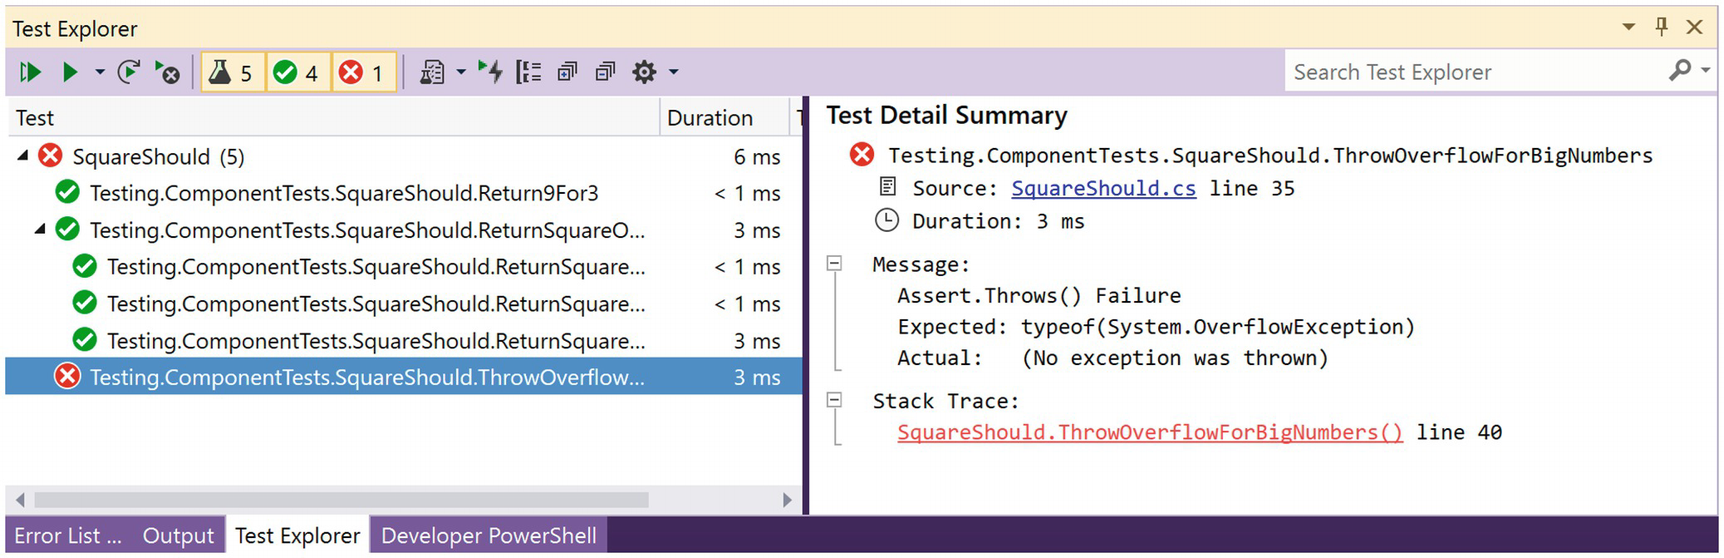
Sanity Check Please?
Enabling Overflow Checking
Run your test again. Now it passes. Whew! This was actually normal behavior.
Unit testing is great to discover these weird behaviors and allows you to catch modifications that cause bugs later.
Write a bUnit Tests with C#
We have seen how we can write unit tests for .NET classes and their methods. Here, we will look at how we can write tests for Blazor components on top of xUnit.
All tests written here use xUnit, but you can also use NUnit or MSTest. All of these are test frameworks that apply the same principles. You can even mix these frameworks so you don’t have to rewrite old tests when moving to another test framework.
Understanding bUnit?
bUnit is a testing library for Blazor components, written by Egil Hansen, and the sources can be found in GitHub at https://github.com/bUnit-dev/bUnit. With bUnit, you can easily write unit tests for Blazor components. Why should we write unit tests for Blazor components? Same reason you write unit tests for regular classes: to ensure they work as expected and that they keep on working in case some dependency gets updated. Of course, most of your testing should be on the service classes that implement business logic. For example, you want to make sure your Blazor component calls a certain method on a service when the user interacts with that component. With bUnit, we can automate that so no user has to actually click a button! And we can run these tests continuously so we will know when we break a component minutes after the change.
Part of testing a Blazor component is to render and examine the output of a component. But it goes way beyond this. You can interact with the component and see the changes, replace dependencies, etc.
The Counter Component
The CounterShould Class
Here, we are using xUnit together with bUnit, so our unit test has the [Fact] attribute. First, we do the Arrange phase, where we create the component under test (which I name cut, similar to sut) by calling the RenderComponent<Counter> method. This will create the component and render it in one go. So this also takes care of the Act phase. Next, we do the Assert phase, where we want to see if the component generated the right kind of output.
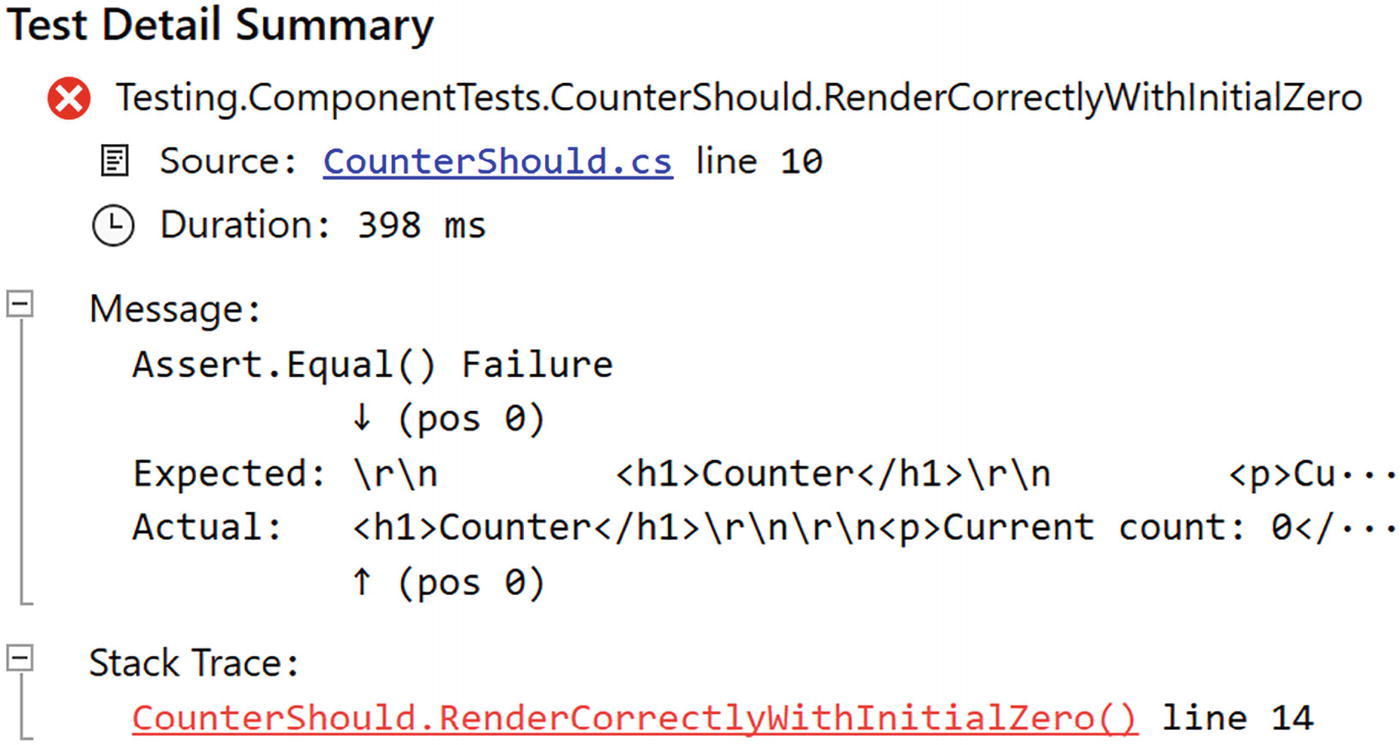
Our Test Fails
Improving Our Unit Test with Semantic Comparison
Using the Find Method
Run your tests and see if they pass, which they should.
What happens when the test fails?
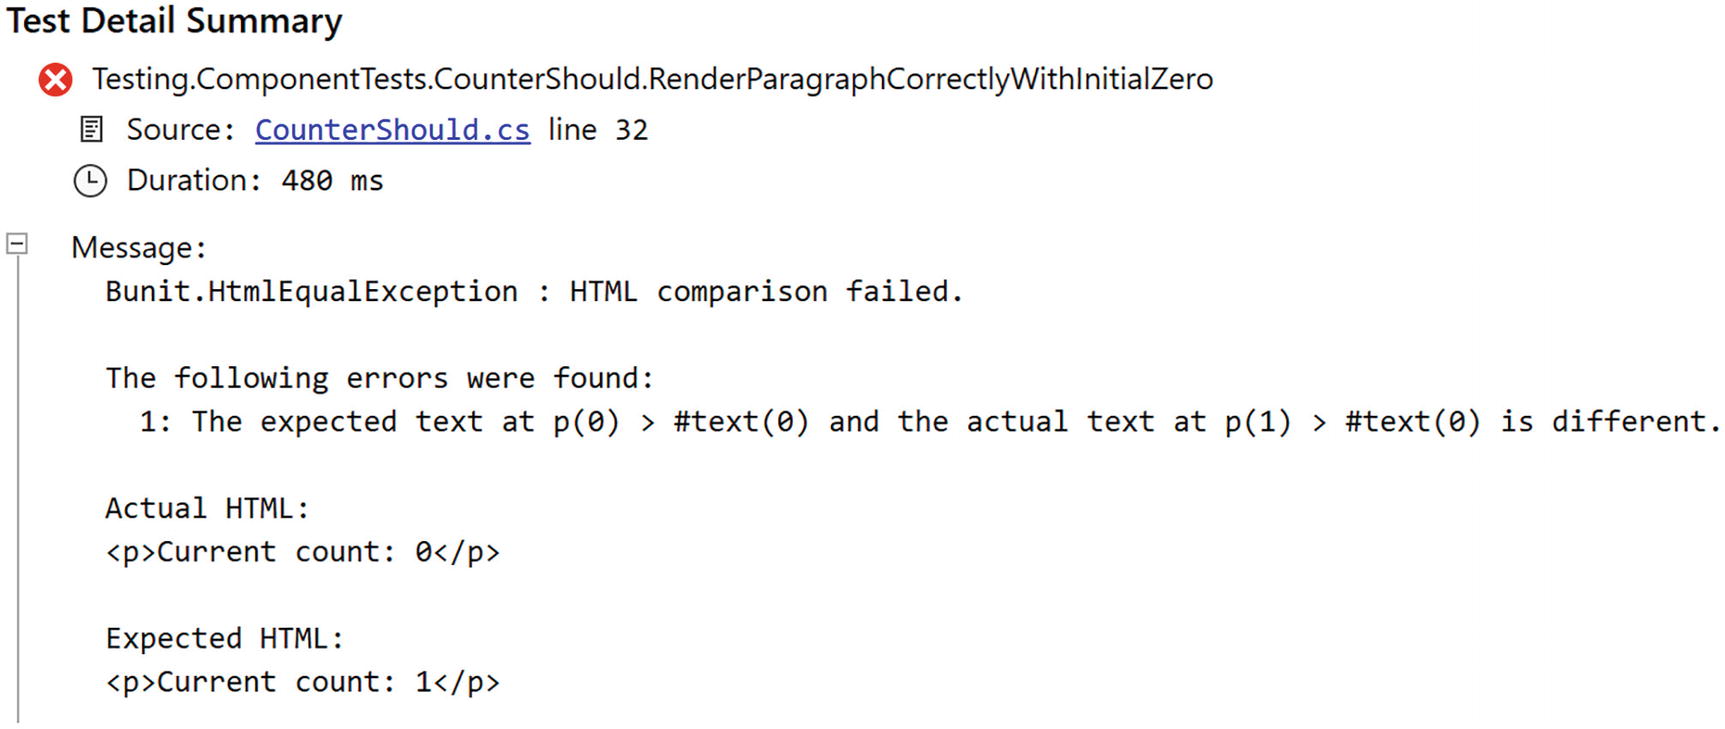
Our bUnit Test Fails
Testing Component Interaction
Interacting with the Counter Component
The bUnit library comes with many dispatch methods that make it possible to trigger events on your component. Retrieve the element in the component using the Find method, and then call the appropriate dispatch method on it, for example, Click. These dispatch methods also allow you to pass event arguments. So let us look at an example.
The MouseTracker Component’s Markup
The MouseTracker Component’s Code
In the unit test project, add a new class called MouseTrackerShould with a single unit test as in Listing 8-16. During the Arrange phase of the bUnit test, we create an instance of MouseEventArgs with ClientX and ClientY set to some value. We then create an instance of the MouseTracker component using the TestContext’s RenderComponent method. Now we Find the div from the component and store it in the theDiv reference.
The MouseTrackerShould Unit Test
Run the test; it should pass.
Passing Parameters to Our Component
The TwoWayCounter Component
The TwoWayCounterShould Test Class
This way of passing parameters to a component is very convenient, since we can use IntelliSense to choose the parameter’s name. There are other ways to pass the parameters, as shown in Listing 8-19. Here, we use xUnit’s Theory to pass different parameters to the component, and each parameter is passed as a ValueTuple, containing the name and value of each parameter (that is why these are wrapped in an opening and closing parenthesis).
Using a Theory to Test Different Cases
Using nameof to Pass Property Names
Testing Two-Way Data Binding and Events
Our TwoWayCounter has parameters to implement two-way data binding. Let us see if this component implements this correctly. We can use the same technique as before to pass handlers to the CurrentCountChanged and IncrementChanged parameters. But before we do this, add the FluentAssertions package to your test project. FluentAssertions allows you to write your assert statements in a more readable and concise way, and we will use it here (although this is not required). You can find out more about fluent assertions at https://fluentassertions.com.
Look at the bUnit test from Listing 8-21. We are adding four parameters, where two of them are of type EventCallback<int>. We assign a value to the EventCallback<int> using a delegate, and this delegate increments a local variable. This way, we count the number of invocations of the CurrentCountChanged and IncrementChanged event callback.
You can also use this technique to test regular delegates like Action and Func.
Testing Two-Way Changed Handlers
Modifying the Value of a Parameter
Testing Components that Use RenderFragment
The Alert Component
The AlertShould Test Class
Should the Alert component have additional parameters, we can pass the just like in Listing 8-18.
Passing a Counter As ChildContent
Passing the TwoWayCounter As ChildContent
Calling AddChildContent Multiple Times
The TemplatedList Component’s Markup
The TemplatedList Component’s Code
Using a RenderFragment in a Test
But what about the ItemContent parameter which uses the more complex RenderFragment<TItem>? Add a new unit test as in Listing 8-31. Here, we will pass five strings using the loader Func<ValueTask<IEnumerable<string>>>. Do note the use of the Enumerable.Repeat method to create a collection of elements. We pass the loader as a parameter to the TemplatedList<string> component, and we also pass the ItemContent, which is a RenderFragment<string>. Since this takes an argument, we use a Func<string, string> delegate which will return a RenderFragment<string> (because the Add method takes care of this).
Passing a RenderFragment<T>
Run this test; it should normally pass. And if it does not, we will discuss this in the section “Handling Asynchronous Re-renders,” so keep reading.
The ListItem Component
Passing a Component As a RenderFragment<TItem>
So the first argument is tl => tl.ItemContent which returns the parameter to set. The second argument is a lambda function, which takes the value for TItem (so in our case, a string), and returns another lambda function which takes a ComponentParameterCollectionBuilder<TComponent>. Does this sound familiar? Yes. It is the same type we have used to pass parameters to a component from the beginning of this section (Listing 8-18 example). Here, we add parameters to the ListItem component by calling Add.
Run this test (and the others if you like). All tests should pass. Phew!
Using Cascading Parameters
The CounterWithVC Component
Testing a Component with a Cascading Parameter
Using a Named Cascading Parameter
Passing a Named Cascading Parameter
Using MOQ to Create Fake Implementations
We have seen that components should do one thing very well (the single responsibility principle) and that we should use services to implement logic, such as retrieving data using REST, or to implement business logic. We pass these services to the component using dependency injection. Here, we will look at how to pass dependencies to components using bUnit and how to replace your services with fake implementations to better drive your unit tests.
Injecting Dependencies with bUnit
The FetchData Component
When you use this component in a Blazor application, the Blazor runtime will take care of injecting this dependency. When you use the component in a bUnit test, the bUnit runtime will take care of injecting the dependency. The only thing we need to tell is which class to use to instantiate the instance.
Testing the FetchData Component
Replacing Dependencies with Fake Objects
When you are testing a component, you want full control over dependencies. This means in many cases that you cannot use the real dependency. First of all, remember that tests should be fast and automatic? If the real dependency uses a database or a REST call to fetch data, this will make your test slow. Networks, disks, and databases are several factors slower than accessing data from memory. So we want to avoid these things. Also, databases and disks have memory, so when a test makes modifications to the data, the next time the test runs, it is using different data and will probably fail. So we don’t want to use the real dependency (we are testing the component, not the dependency!). So we will use a fake implementation of the dependency, and that is why it is so important to have your dependencies implement an interface. Building another class with the same interface is easy and practical.
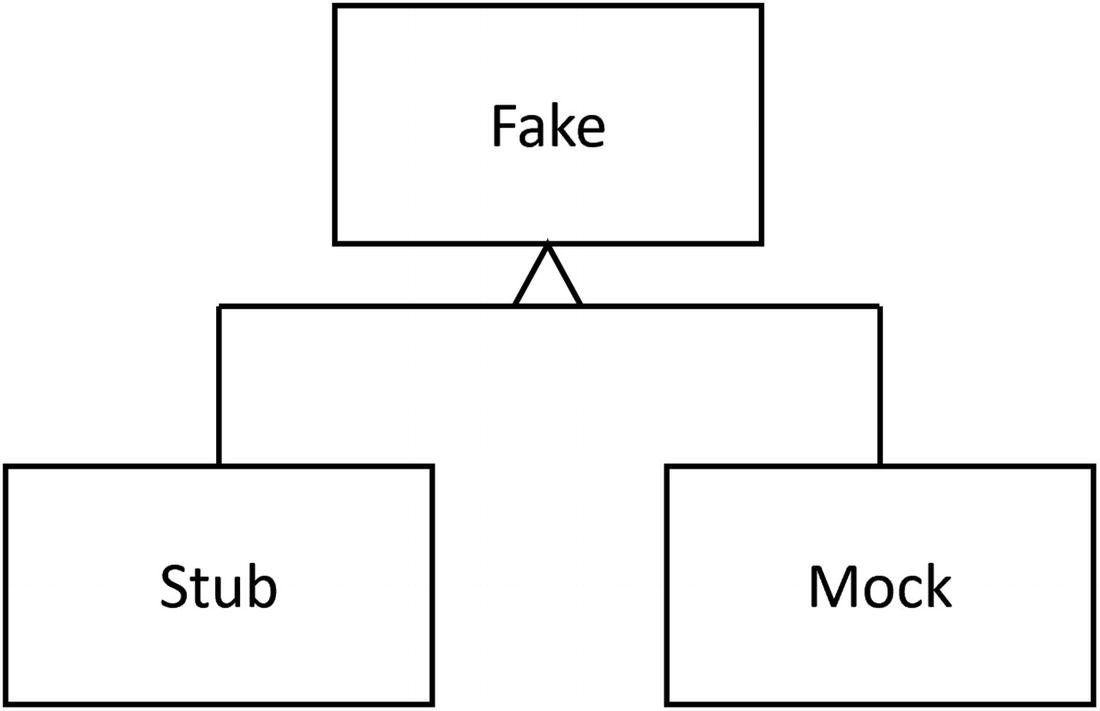
Fake, Stub, and Mock Objects for Testing
Using Stubs
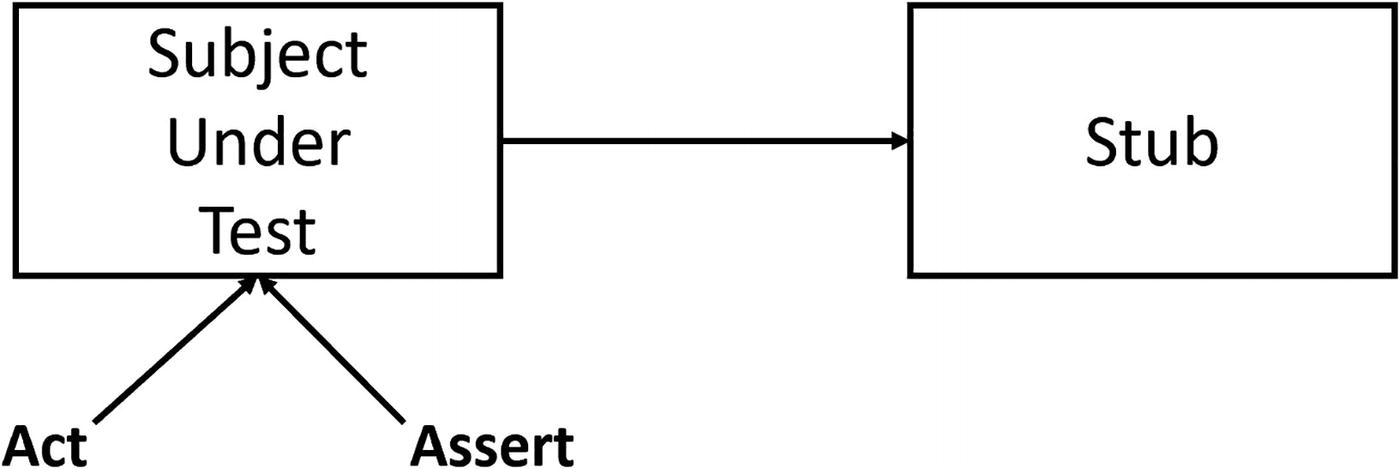
Using a Stub During a Test
Tests that use stubs are also known as state verification tests .
Let us build a stub for the IWeatherService . Start by adding a new class called WeatherServiceStub to the test project.
Implementing an IWeatherService Stub
Testing the FetchData Component with a Stub
Run the test. It should pass.
Using Mocks
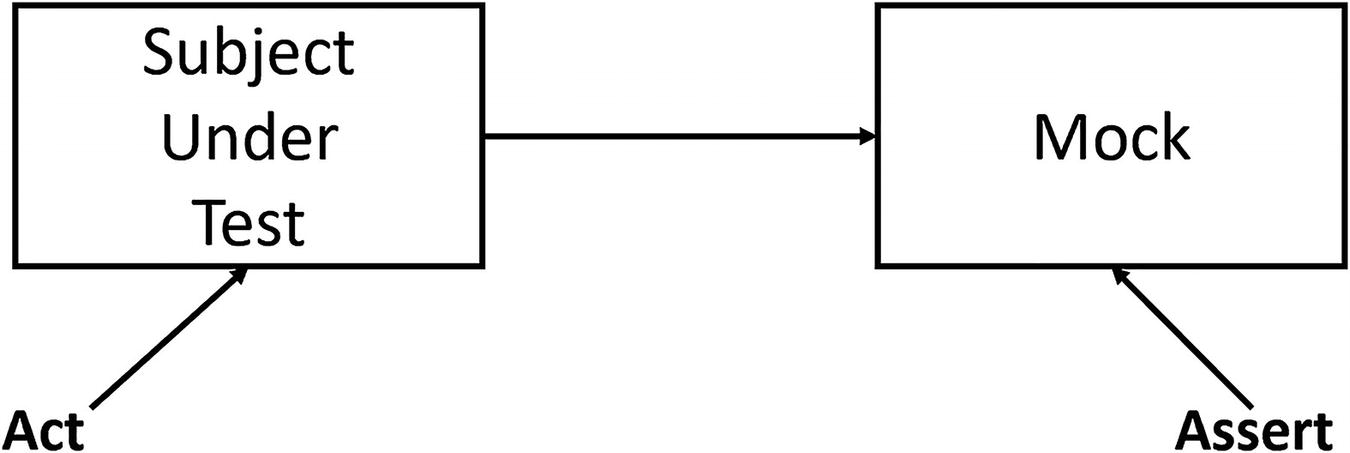
Using a Mock During Testing
Tests like these are known as object interaction tests .
Update the FetchData Component to Use Logging
Implementing an ILogger Mock
Testing the FetchData Component Using a Mock
So we create a stub for the IWeatherService , a mock for the ILogger, and then we render the component. Now we want to check the Journal of the LoggerMock. There should be one call to the logger, so we check the length of the Journal. Then we check the entry’s state to see if it contains the message. All straight forward but a lot of work!
Run all your tests. The UseWeatherService test breaks! Why? Because we introduced another dependency, so we need to dependency inject a logger in this test too. I will leave the fixing in your capable hands.
Implementing Stubs and Mocks with MOQ
How can we implement stubs and mocks with a lot less work? Other people have been asking the same question, and some of them built libraries that make this possible. Generally, these libraries are known as isolation frameworks . Isolation frameworks allow you to quickly generate stubs and mocks for classes and interfaces, where you implement just the methods you need for the test, and verify if the subject under test invoked methods with certain arguments a certain number of times. Here, we will look at MOQ which is currently one of the most popular in the testing community. We will cover a lot of features of MOQ here, but if you want to learn more, you can visit https://documentation.help/Moq.
Start by adding the MOQ NuGet package to the test project. Now copy the UseWeatherServices method and rename it to UseWeatherServicesMOQ. Change its implementation like Listing 8-45. First, we create the forecasts data we want the IWeatherService to return. Next, we create an instance of Mock<IWeatherService> which is a class from MOQ. This class allows us to Setup methods from the interface and Returns a certain result. It is that simple to provide a stub implementation. But MOQ allows you to go further and makes the method return different results, depending on the arguments, for example.
Next, we configure bUnit’s dependency injection to inject a singleton instance, passing the stub.Object, which is an instance implementing the IWeatherService interface. No need to build our own class to create a stub.
Implementing a Stub with MOQ
Run the test; it should pass.
Implementing a Mock Using MOQ
Run the test. It should pass.
Writing bUnit Tests in Razor
The _Imports.razor File for Test Projects
I do advise to add your project’s namespaces here too.
The First Razor Test
In your test project, add a new razor component called RCounterShould as in Listing 8-48. Here, I will prefix the razor unit tests with an R, so we don’t get a name conflict with our other CounterShould test class. We will make the test inherit from TestContext, just like our test classes written in C#. Then we add a @code section and put our xUnit test method in there. Because this is a razor file, we can write the test’s markup using razor inside the Render method.
Writing a Simple Unit Test with Razor
Passing Parameters in a Razor Test
Testing a Component with ChildContent
Using a Razor Test for a Templated Component
Handling Asynchronous Re-renders
When you build a component that overrides OnInitializedAsync or OnParametersSetAsync, your component will at least render itself twice – first, when the component gets created and after completion of the OnInitializedAsync and again after completion of each OnParametersSetAsync.
Inside a bUnit test, this can give you issues. Let us look at an example.
Testing Asynchronous Re-renders
Testing Asynchronous Re-renders
Configuring Semantic Comparison
The bUnit testing library uses the AngleSharp Diffing library to compare the generated markup with the expected markup in the MarkupMatches method. You can find AngleSharp on GitHub at https://github.com/AngleSharp/AngleSharp.Diffing. To make your tests more robust, you can configure how the semantic comparison works; for example, we can tell it to ignore certain HTML attributes and elements.
Why Do We Need Semantic Comparison?
Using strings to compare markup is too sensitive to small changes in the markup. For example, formatting your code might add some whitespace, and since string comparison will compare each character, a working test will suddenly fail. And there are many more innocent changes that will break a test, for example, changing the order of attributes, or reordering the classes in the class attribute, or adding comments. Semantic comparison will ignore all of these changes, resulting in tests that will not break because of a simple change.
Customizing Semantic Comparison
Ignoring an Element with Semantic Comparison
Ignoring an Element with a Razor Test
By default, semantic comparison will ignore whitespace, but in some cases, you want to verify if the component actually renders some whitespace. Do this with diff:whitespace="preserve".
You can also tell semantic comparison to ignore case or use a regular expression for your comparison.
Regular expressions allow you to test for complex patterns in strings with a concise syntax. Regular expressions were invented in 1951, and we are still using them. What else was invented more than half a century ago that we are still using in IT? Learning regular expressions is something worthwhile investing in for your future in IT!
A Simple Card Component
Ignore Casing and Using Regular Expressions
Summary
In this chapter, we had a look at unit testing. With unit testing, you can see if your code and components behave as expected, and also it allows you to test if they continue behaving, so small changes that cause bugs are found as fast as possible. Good unit tests are fast, consistent, repeatable, and automatic. We have seen that testing Blazor components becomes very practical with bUnit, and we can author tests using C# or Razor. And with MOQ, we can quickly generate stubs and mocks to replace dependencies in our tests.
9. Single-Page Applications and Routing
9. Single-Page Applications and Routing
Blazor is a .NET framework you use for building Single-Page Applications (SPA), just like you can use popular JavaScript frameworks, such as Angular, React, and Vue.js. But what is a SPA? In this chapter, you will use routing to jump between different sections of a SPA and send data between different components.
What Is a Single-Page Application?
At the beginning of the Web, there were only static pages. A static page is an HTML file somewhere on the server that gets sent back to the browser upon request. Here, the server is really nothing but a file server, returning HTML pages to the browser. The browser renders the HTML. The only interaction with the browser then was that you could click a link (the anchor <a> HTML element) to get another page from the server.
Later came the rise of dynamic pages. When a browser requests a dynamic page , the server runs a program to build the HTML in memory and sends the HTML back to the browser (this HTML never gets stored to disk; of course, the server can store the generated HTML in its cache for fast retrieval later, also known as output caching ). Dynamic pages are flexible in the way that the same code can generate thousands of different pages by retrieving data from a database and using it to construct the page. Lots of commercial websites like amazon.com use this. But there is still a usability problem. Every time your user clicks a link, the server must generate the next page from scratch and send it to the browser for rendering. This results in a noticeable wait period, and of course, the browser re-renders the whole page.
In 1995, Brendan Eich invented JavaScript (today known as ECMAScript) to allow simple interactions in the browser. Web pages started to use JavaScript to retrieve parts of the page when the user interacts with the UI. One of the first examples of this technique was Microsoft’s Outlook Web Application . This web application looks and feels like Outlook, a desktop application, with support for all user interactions you expect from a desktop application. Google’s Gmail is another example. They are now known as Single-Page Applications. SPAs contain sections of the web page that are replaced at runtime depending on the user’s interaction. If you click an email, the main section of the page is replaced by the email’s view. If you click your inbox, the main section gets replaced by a list of emails; etc.
Single-Page Applications
A SPA is a web application that replaces certain parts of the UI without reloading the complete page. SPAs use JavaScript to implement this manipulation of the browser’s control tree, also known as the Document Object Model (DOM), and most of them consist of a fixed UI and a placeholder element where the contents are overwritten depending on where the user clicks. One of the main advantages of using a SPA is that you can make a SPA stateful. This means that you can keep information loaded by the application in memory, just like when you build a desktop application. You will look at an example of a SPA, built with Blazor, in this chapter.
Layout Components
Let’s start with the fixed part of a SPA. Every web application contains UI elements that you can find on every page, such as a header, footer, copyright, menu, etc. Copy-pasting these elements to every page would be a lot of work and would require updating every page if one of these elements needed to change. Developers don’t like to do that, so every framework for building websites has had a solution for this. For example, ASP.NET WebForms uses master pages, and ASP.NET MVC has layout pages. Blazor also has a mechanism for this called layout components .
Using Blazor Layout Components
Layout components are Blazor components. Anything you can do with a regular component you can do with a layout component, like dependency injection, data binding, and nesting other components. The only difference is that they must inherit from the LayoutComponentBase class.
The LayoutComponentBase Class (Simplified)
As you can see from Listing 9-1, the LayoutComponentBase class inherits from the ComponentBase class. This is why you can do the same thing as with normal components.
MainLayout.razor from the Template
On the first line, the MainLayout component declares that it inherits from LayoutComponentBase. Then you see a sidebar and main <div> element, with the main element data binding to the inherited Body property. Any component that uses this layout component will end up where the @Body property is, so inside the <div>.
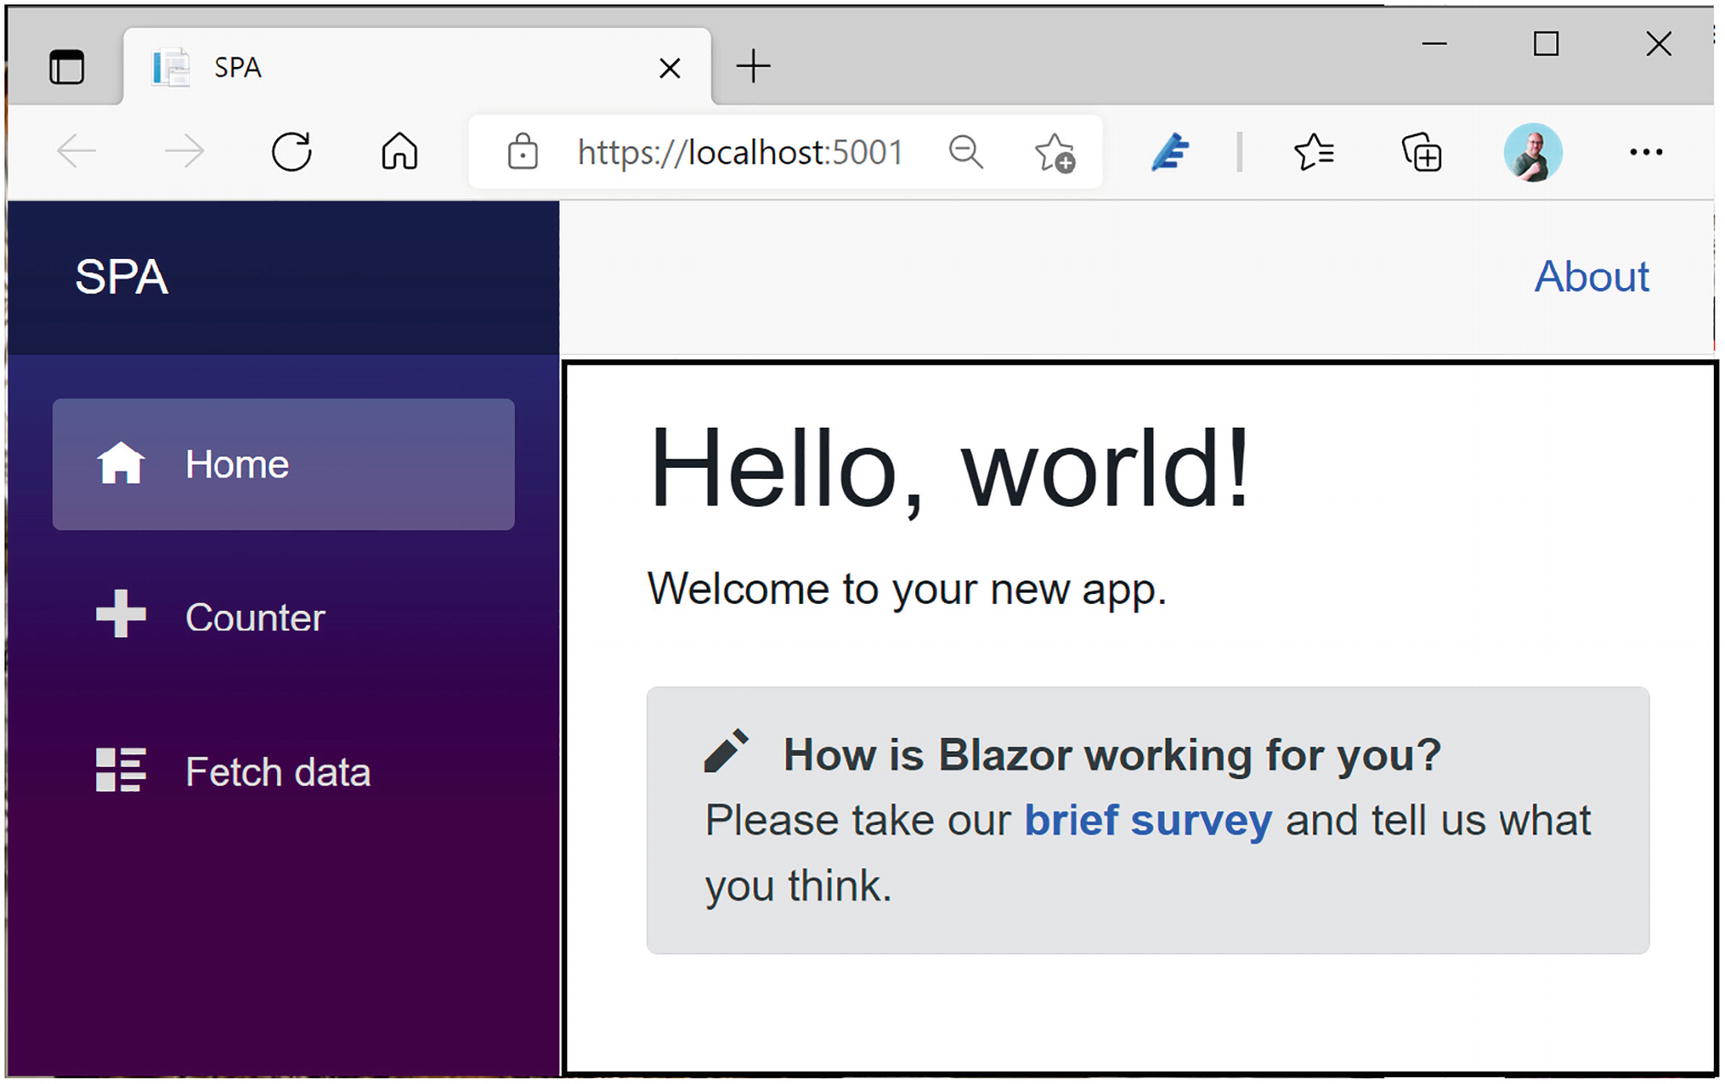
The MainLayout Component
You can find the CSS style used by this layout component in the MainLayout.razor.css file.
Configuring the Default Layout Component
The App.razor Component
Internally, the RouteView component uses the LayoutView component to select the appropriate layout component. LayoutView allows you to change the layout component for any part of your component.
The ErrorLayout Component
The ErrorLayout Style
The Updated App.razor File
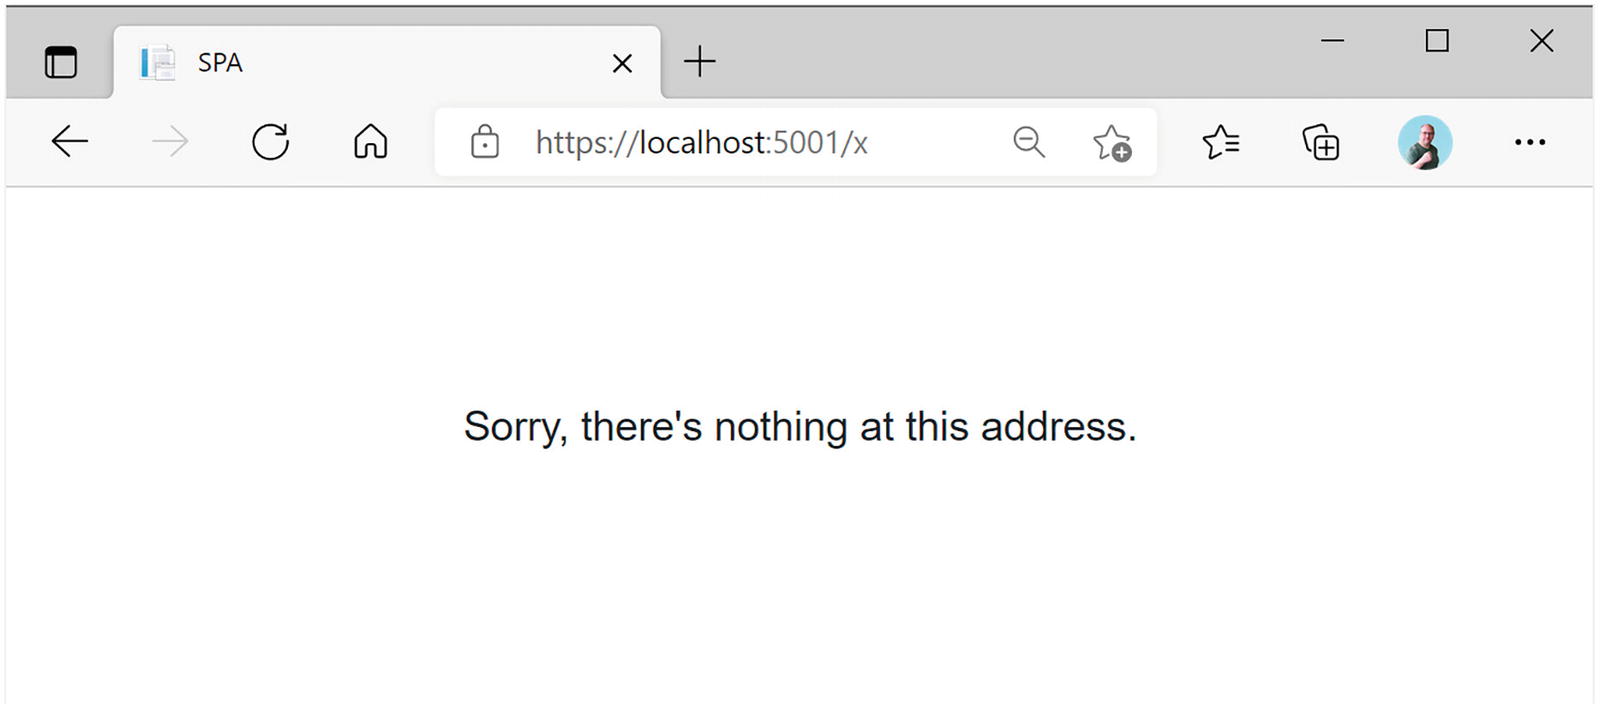
The ErrorLayout in Action
Selecting a Layout Component
A Second Layout Component
Choosing a Different Layout with @layout
Run the application and watch the layout change as you alternate between Home and Counter.
You can also use the LayoutAttribute if you’re building your component completely in code.
_Imports.razor
Any component in this folder (or subfolder) that does not explicitly declare a @layout component will use the MainLayoutRight layout component.
Nesting Layouts
A Simple Nested Layout
The NestedLayout Component’s Style
This style uses the paper.jpg background from the images folder.
Nested Layout
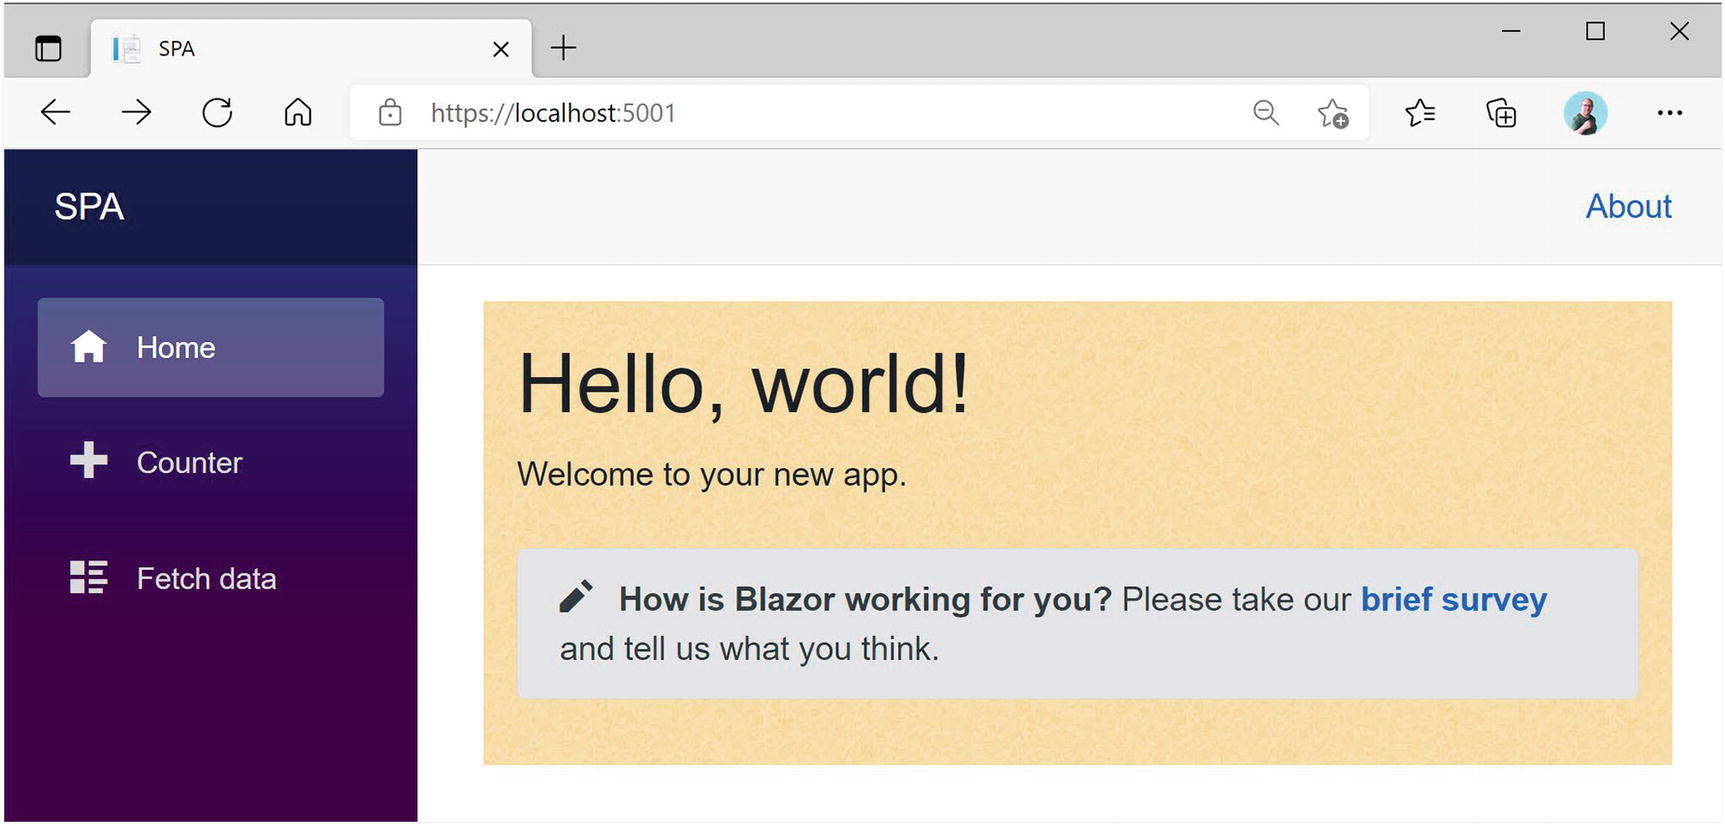
The Index Component Using the Nested Layout
Blazor Routing
Single-Page Applications use routing to select which component gets picked to fill in the layout component’s Body property. Routing is the process of matching the browser’s URI to a collection of route templates and is used to select the component to be shown on screen. That is why every component in as Blazor SPA uses a @page directive to define the route template to tell the router which component to pick.
Installing the Router
The App Component Containing the Router
The Router component is a templated component with two templates. The Found template is used for known routes, and the NotFound is shown when the URI does not match any of the known routes. You can replace the contents of the last to show a nice error page to the user.
The Found template uses a RouteView component which will render the selected component with its layout (or default layout). When the Router component gets instantiated, it will search its AppAssembly property for all components that have the RouteAttribute (the @page razor directive gets compiled into a RouteAttribute) and pick the component that matches the current browser’s URI. For example, the Counter component has the @page "/counter" razor directive, and when the URL in the browser matches /counter, it will display the Counter component in the MainLayout component.
The NavMenu Component
The NavMenu Component

Your Application on a Narrow Display Shows the Toggle Button
The remaining markup contains the navigation menu, which consists of NavLink components. Let’s look at the NavLink component.
The Counter Route’s NavLink
The Default Route’s NavLink
When the browser’s URI is empty (except for the site’s URL), the NavLink from Listing 9-16 will be active. But here you have a special case. Normally, NavLink components only match the end of the URI. For example, /counter matches the NavLink from Listing 9-15. But with an empty URI, this would match everything! This is why in the special case of an empty URI you need to tell the NavLink to match the whole URI. You do this with the Match property, which by default is set to NavLinkMatch.Prefix . If you want to match the whole URI, use NavLinkMatch.All as in Listing 9-16.
Setting the Route Template
The Routing component from Blazor examines the browser’s URI and searches for a component’s route template to match. But how do you set a component’s route template? Open the Counter component shown in Listing 9-8. At the top of this file is the @page "/counter" razor directive. It defines the route template. A route template is a string matching a URI, and that can contain parameters, which you can then use in your component.
Defining a Route Template with a Parameter
Just like routes in ASP.NET MVC Core, you can use route constraints to limit the type of parameter to match. For example, if you were to use the /counter/Blazor URI, the route template would not match because the parameter does not hold an integer value and the router would not find any component to match.
Constraints are even mandatory if you’re not using string typed parameters; otherwise, the router does not cast the parameter to the proper type. You specify the constraint by appending it using a colon, for example, @page "/counter/{currentCount:int}". You can also make the parameter optional by appending a question mark after the constraint as shown in Listing 9-17.
Routing Constraints
Route Constraints |
|---|
bool |
datetime |
decimal |
double |
float |
guid |
int |
long |
If you are building your components as pure C# components, apply the RouteAttribute to your class with the route template as an argument. This is what the @page directive gets compiled into.
Redirecting to Other Pages
How do you navigate to another component using routing? You have three choices: use a standard anchor element, use the NavLink component, and use code. Let’s start with the normal anchor tag.
Navigation Using an Anchor Tag
This link has been styled as a button using Bootstrap 4. Run your application and navigate to the Counter component. Click the Home button to navigate to the Index component whose route template matches “/”.
The NavLink component uses an underlying anchor, so its usage is similar. The only difference is that a NavLink component applies the active class when it matches the route. Generally, you only use a NavLink in the NavMenu component, but you are free to use it instead of anchors.
Navigating in code is also possible, but you will need an instance of the NavigationManager class through dependency injection. This instance allows you to examine the page’s URI and has a helpful NavigateTo method. This method takes a string that will become the browser’s new URI.
Using the NavigationManager
You tell dependency injection with the @inject razor directive to give you an instance of the NavigationManager and put it in the navigationManager field. The NavigationManager is one of the types that Blazor provides out of the box through dependency injection. Then you add a button that calls the StartFrom50 method when clicked. This method uses the NavigationManager to navigate to another URI by calling the NavigateTo method. Run your application and click the “Start from 50” button. You should navigate to /counter/50.
Understanding the Base Tag
Please don’t use absolute URIs when navigating. Why? Because when you deploy your application on the Internet, the base URI will change. Instead, Blazor uses the <base/> HTML element and all relative URIs will be combined with this <base/> tag. Where is the <base/> tag? With Blazor WebAssembly, open the wwwroot folder of your Blazor project and open index.html, shown in Listing 9-20.
Listing 9-20. index.html

If you are using Blazor Server, the base tag can be found in _Host.cshtml.
When you deploy in production, all you need to do is to update the base tag. For example, you might deploy your application to https://online.u2u.be/selfassessment. In this case, you would update the base element to <base href="/selfassessment" />. So why do you need to do this? If you deploy to https://online.u2u.be/selfassement, the Counter component’s URI becomes https://online.u2u.be/selfassessment/counter. Routing will ignore the base URI so it will match the counter as expected. You only need to specify the base URI once, as shown in Listing 9-20.
You can also access the base URI (with a trailing slash) using the NavigationManager BaseUri property. This can be useful for passing absolute URIs, for example, to certain JavaScript libraries. We will discuss JavaScript interoperability in the next chapter.
Lazy Loading with Routing
Some components in your Blazor application might not be used frequently. But even then, Blazor will need to load these components into the browser before running your application. For large applications, this can mean that your application will take even longer to load. However, with Blazor, we can load components the moment we need them. This is called lazy loading.
Lazy Loading Component Libraries
Lazy loading works by moving your infrequently used components into one or more component libraries, and then download right before you need them. We discussed building component libraries in Chapters 3 and 4. But let us start with a project, move these components and their dependencies into libraries, and then lazy load them. In the book’s download, you should find a solution called lazy loading. Open it. This project should look familiar. You should be able to build and run this application. Now, for the sake of the example, assume that the Counter and FetchData components are components we want to lazy load.
Let us start with the Counter component. Create a Razor Class Library project called LazyLoading.Library. Move the Counter component to this library. Now add a project reference to this library in the client project, and add a @using directive to the _Imports.razor (the one in the client project).
Build and run your solution. Click the Counter link. Hmm. No Counter has been found. Why?
Using AdditionalAssemblies
We moved the Counter component to a razor library, but we still load the Counter component when the application is loaded. Time to enable lazy loading for the razor library.
First, we will tell the runtime not to load the assembly automatically, and then we will load it when needed.
Marking an Assembly for Lazy Loading
Turning on Lazy Loading
Dynamically Loading an Assembly
Now we need to load this assembly when needed. When do we load this assembly? When we navigate to a component that needs components from this assembly. How do we know we are navigating? The Router component has an event for this called OnNavigateAsync , and we will use it to detect when we navigate to a component that uses a lazy loaded component. Then we will download the assembly using the LazyAssemblyLoader so it is ready for use.
Loading an Assembly when Needed
Build and run the application. It should start, and when we click Counter, the browser will download it and then render it.
Showing a Navigating UI
Lazy Loading and Dependencies
Let us now try to lazy load the FetchData component. This component uses an IWeatherService instance, implemented by the WeatherService class (the one in the Blazor project). We will move both into the component library.
Start moving the FetchData component and WeatherService class to the component library. Add a project reference to the library project for the shared project since the WeatherService uses the Shared project’s IWeatherService.
Your library project should compile now.
The OnNavigate Method for FetchData
After fixing a couple of namespaces in C#, the project should build. But running will fail. Why? In Program.cs, you are adding the WeatherService class from the lazy loaded library, but that has not been loaded (because you told the runtime not to load it).
Maybe we could postpone registering the WeatherService ? Sorry, that will not work. After initialization, dependency injection becomes immutable so you cannot add dependencies later. Of course, we could keep the WeatherService in the Blazor client project, but let us pretend it is worth our while to lazy load it. Time to introduce a little layer. We will use a factory method to create the dependency, and we will use dependency injection to inject the factory method. This will require a couple of changes.
A factory is a class that has a method that will create an instance of some class, hiding the creation process. For example, a factory could create an instance, where the class of the instance depends on some business rule. Of course, all instances returned should have some common base class or interface. Actually, IServiceProvider used by dependency injection is also a factory, but we cannot use it here because it does not know about the existence of the WeatherService. Use your favorite search engine and search “Factory Pattern in C#” to learn more about this.
The IWeatherServiceFactory Interface
Update the FetchData Component
Implementing the IWeatherServiceFactory
Adding Another Page to PizzaPlace
Let us add a detail page to the PizzaPlace application. This will allow the customer to check the ingredients and nutritional information about pizzas.
When you navigate between different Blazor components with routing, you will probably encounter the need to send information from one component to another. One way to accomplish this is by setting a parameter in the destination component by passing it in the URI. For example, you could navigate to /pizzadetail/5 to tell the destination component to display information about the pizza with id 5. The destination component can then use a service to load the information about pizza #5 and then display this information. But in Blazor, there are other ways to pass information from one component to another. If both components share a common parent component, we can use data binding. Otherwise, we can use a State class (most developers call this State , but this is just a convention and you can call it anything you want; State just makes sense) and then use dependency injection to give every component the same instance of this class. This single State class contains the information that components need. We have seen this before in Chapter 5: this is known as the singleton pattern . Our PizzaPlace application is already using a State class, so it should not be too much work to use this pattern.
Using Dependency Injection to Get the State Singleton Instance
Configuring Dependency Injection for the State Singleton
Run the application. Everything should still work! What you’ve done is to use the singleton pattern to inject the State singleton into the Index component. Let’s add another component that will use the same State instance.
Adding a CurrentPizza Property to the State Class
Adding an Anchor to Display the Pizza’s Information
Add the ShowPizzaInformation Parameter
Update the PizzaList component to set the PizzaItem component’s ShowPizzaInformation parameter as in Listings 9-34 and 9-35.
When someone clicks this link, it should set the State instance’s CurrentPizza property. But you don’t have access to the State object. One way to solve this would be by injecting the State instance in the PizzaItem component. But you don’t want to overburden this component, so you add a ShowPizzaInformation callback delegate to tell the containing PizzaList component that you want to display more information about the pizza. Clicking the pizza name link simply invokes this callback without knowing what should happen.
Adding a PizzaInformation Callback to the PizzaList Component
Add the ShowPizzaInformation Callback Parameter
You added a ShowPizzaInformation callback to the PizzaList component, and you simply pass it to the PizzaItem component. The Index component will set this callback, and the PizzaList will pass it to the PizzaItem component.
Update the Index component to set the State instance’s CurrentPizza and navigate to the PizzaInfo component, as shown in Listing 9-36. The Index component tells the PizzaList component to call the ShowPizzaInformation method when someone clicks the information link from the PizzaItem component. The ShowPizzaInformation method then sets the State’s CurrentPizza property (which we need in the PizzaInfo component) and navigates using the NavigationManager’s NavigateTo method to the /PizzaInfo route.
The Index Component Navigates to the PizzaInfo Component
Adding a PizzaInfo Component
The PizzaInfo Class
At the bottom of the markup, you add an anchor (and made it look like a button using bootstrap styling) to return to the menu. It’s an example of changing the route with anchors. Of course, in a real-life application, you would show the ingredients of the pizza, a nice picture, and nutritional information. I leave this as an exercise for you.
Summary
In this chapter, we looked at Single-Page Applications, layouts, routing, and lazy loading components. Single-Page Applications avoid navigating to another URLs because the browser will wipe its memory before loading the next page. By staying on the same page, we can keep data in memory, and to update the UI, we use code to replace part of the page. Layouts allow you to avoid replicating markup in your application and help keep your applications look consistent. We also saw that layouts can be nested. Routing is an important part of building Single-Page Applications and takes care of picking the component to show based on the browser’s URI. You define route templates using the @page syntax where you use route parameters and constraints. Navigation in your Single-Page Application can be done using anchor tags and from code using the NavigationManager class. We also saw that you can lazy load components by moving them into a component library and then dynamically load the library just when you need it. Finally, we modified the PizzaPlace application to show how to share information between different routes in a Blazor application.
10. JavaScript Interoperability
10. JavaScript Interoperability
Sometimes there is just no escape from using JavaScript . For example, Blazor itself uses JavaScript to update the browser’s DOM from your Blazor components. In this chapter, you will look at interoperability with JavaScript and, as an example, you will build a Blazor component library to display a map using a popular open source JavaScript library. This chapter does require you to have some basic JavaScript knowledge.
Calling JavaScript from C#
Browsers have a lot of capabilities you might want to use in your Blazor website. For example, you might want to use the Browser’s local storage to keep track of some data. Thanks to Blazor’s JavaScript interoperability, this is easy.
Providing a Glue Function
To call JavaScript functionality, you start by building a glue function in JavaScript. I like to call these functions glue functions (my own naming convention) because they become the glue between .NET and JavaScript.
Glue functions are regular JavaScript functions. A JavaScript glue function can take any number of arguments, on the condition that they are JSON serializable (meaning that you can only use types that are convertible to JSON, including classes whose properties are JSON serializable). This is required because the arguments and return type are sent as JSON between .NET and JavaScript runtimes.
You then add this function to the JavaScript global scope object, which in the browser is the window object. You will look at an example a little later, so keep reading. You can then call this JavaScript glue function from your Blazor component.
Using IJSRuntime to Call the Glue Function
Back to .NET land. To invoke your JavaScript glue function from C#, you use the .NET IJSRuntime instance provided through dependency injection. This instance has the InvokeAsync<T> generic method, which takes the name of the glue function and its arguments and returns a value of type T , which is the .NET return type of the glue function. If your JavaScript method returns nothing, there is also the InvokeVoidAsync method. If this sounds confusing, you will look at an example right away.
The InvokeAsync method is asynchronous to support all asynchronous scenarios, and this is the recommended way of calling JavaScript. If you need to call the glue function synchronously, you can downcast the IJSRuntime instance to IJSInProcessRuntime and call its synchronous Invoke<T> method. This method takes the same arguments as InvokeAsync<T> with the same constraints.
Using synchronous calls for JavaScript interop is not recommended! Server-side Blazor requires the use of asynchronous calls because the calls will be serialized over SignalR to the client.
Storing Data in the Browser with Interop
The blazorLocalStorage Glue Functions
Your Blazor website needs to include this script, so open the index.html file from the wwwroot folder and add a script reference after the Blazor script, as shown in Listing 10-2.
You can drag and drop the interop.js file from Solution Explorer into the index.html file, and Visual Studio will do the rest.
Listing 10-2. Including the Script Reference in Your HTML Page
Invoking the Glue Functions from a Blazor Component
Run the solution and modify the Counter’s value. Now when you refresh your browser, you will see the last value of Counter. The Counter is now persisted between sessions! You can exit your browser and open it again, and you will see the Counter again with the last value.
Passing a Reference to JavaScript
Sometimes your JavaScript needs to access one of your HTML elements. You can do this by storing the element in an ElementReference and then pass this ElementReference to the glue function.
Never use JavaScript interop to modify the DOM because this will interfere with the Blazor rendering process! If you need to modify the browser’s DOM, use a Blazor component.
You should use this ElementReference as an opaque handle, meaning you can only pass it to a JavaScript glue function, which will receive it as a JavaScript reference to the element. You cannot even pass the ElementReference to another component. This is by design, because each component gets rendered independently, and this might make the ElementReference point to a DOM element that is no longer there.
Let’s look at an example by setting the focus on an input element using interop. To be honest, there is a built-in method in Blazor to do this, but I want to use this as a simple example. Keep on reading; I will show you how to focus an input element without interop.
Adding an ElementReference Property
Setting the inputElement
Adding the blazorFocus.set Glue Function
Now comes the “tricky” part. Blazor will create your component and then call the life cycle methods, such as OnInitializedAsync. If you invoke the blazorFocus.set glue function in OnInitializedAsync, the DOM has not been updated with the input element so this will result in a runtime error because the glue function will receive a null reference. You need to wait for the DOM to be updated, which means that you should only pass the ElementReference to your glue function in the OnAfterRender /OnAfterRenderAsync method!
Passing the ElementReference in OnAfterRenderAsync
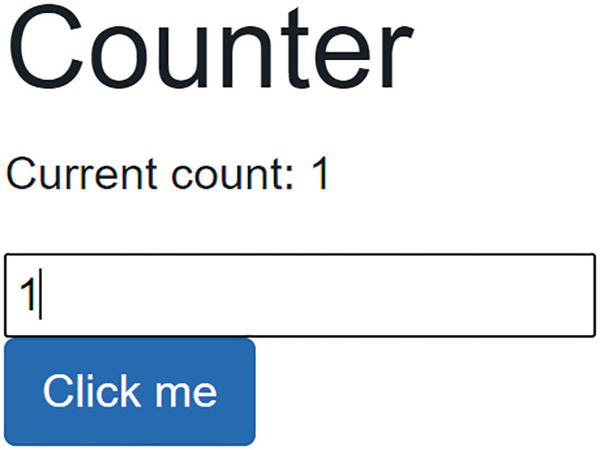
The Counter Input Element Receives Focus Automatically
Calling .NET Methods from JavaScript
You can also call .NET methods from JavaScript. For example, your JavaScript might want to tell your component that something interesting has happened, like the user clicking something in the browser. Or your JavaScript might want to ask the Blazor component about some data it needs. You can call a .NET method, but with a couple of conditions. First, your .NET method’s arguments and return value need to be JSON serializable , the method must be public, and you need to add the JSInvokable attribute to the method. The method can be a static or instance method.
To invoke a static method, you use the JavaScript DotNet.invokeMethodAsync or DotNet.invokeMethod function, passing the name of the assembly, the name of the method, and its arguments. To call an instance method, you pass the instance wrapped as a DotNetObjectRef to a JavaScript glue function, which can then invoke the .NET method using the DotNetObjectRef’s invokeMethodAsync or invokeMethod function, passing the name of the .NET method and its arguments. If you want your component to work in Blazor Server, you need to use the asynchronous functions.
Adding a Glue Function Taking a .NET Instance
Let’s continue with the previous example. When you make a change to local storage, the storage triggers a JavaScript storage event, passing the old and new value (and more). This allows you to register for changes in other browser tabs or windows and use it to update the page with the latest data in localStorage.
The watch Function Allows You to Register for Local Storage Changes
When anyone or anything changes the local storage for this web page, the browser will trigger the storage event, and our JavaScript interop will invoke the UpdateCounter method (which we will implement next) in our C# Blazor component.
The UpdateCounter Method
The OnAfterRenderAsync Method
To see this in action, open two browser tabs side by side on your website. When you change the value in one tab, you should see the other tab update to the same value automatically! You can use this to communicate between two tabs in the same browser like we do here.
Using Services for Interop
The previous example is not the way I would recommend doing interop with JavaScript because our components are tightly coupled to the IJSRuntime. There is a better way, and that is encapsulating the IJSRuntime code in a service . This will hide all the dirty details of interacting with JavaScript and allow for easier maintenance. In future generations of Blazor, some of this functionality might just be included, and then we only need to update the service implementation. Services can also easily be replaced during unit testing.
Building the LocalStorage Service
Building the ILocalStorage Service Interface
These methods correspond with the glue functions from interop.js.
Implementing the LocalStorage Service Class
Registering the LocalStorage Service in Dependency Injection
Injecting the ILocalStorage Service into the Counter Component
Implementing OnInitializedAsync
The UpdateCounter Method Using the LocalStorage Service
Remembering the Counter’s Value
The Counter’s OnAfterRenderAsync Method
This was not so hard, was it?
Dynamically Loading JavaScript with Modules
Our application has added some JavaScript to the application, and we have added this to the index.html page. This means that our JavaScript gets downloaded, even if we don’t use it (because no one clicked the Counter link). This is not so good. Also, our JavaScript is adding yet another identifier to the JavaScript window object. Again not so good, because another component might accidentally pick the same name. Here, we will examine how we can download JavaScript dynamically using modules, so only when we need it.
Using JavaScript Modules
The localStorage JavaScript Module
Loading the Module into a Blazor Service
Once the module is ready, we can import it into a Blazor component or a service using the IJSRuntime instance . It works just like any other JavaScript interop by using the InvokeAsync<T> method , but now we use the IJSObjectReference type for T, calling the import function which is provided by Blazor.
The Updated ILocalStorage Interface
LocalStorage’s Init Method
Loading a JavaScript Module
The Counter Component Using the JavaScript Module
Build and run; everything should still work. The big advantage is that we don’t need to add the JavaScript to the index.html page. This becomes even more interesting for component libraries.
Adding a Map to PizzaPlace
Many physical businesses use a map to show to people where they are located. Wouldn’t it be nice to embellish the PizzaPlace application with a map, showing where you are and where the PizzaPlace restaurant is? That is what we will do next.
Choosing the Map JavaScript Library
Which map library will we use? There are many JavaScript libraries to choose from, for example, Google maps, Bing maps, etc. Author’s prerogative is to choose the maps library, and I have chosen the Leaflet open source library, which is lightweight, has many customization options, and is used by some of the leading companies such as GitHub, Flickr, Etsy, and Facebook. You can find the library’s website at https://leafletjs.com.
Adding the Leaflet Library
Open the index.html page, and add the Leaflet styling and JavaScript script to it as in Listing 10-24. The easiest way to do this is by copying this from the Leaflet QuickStart page at https://leafletjs.com/examples/quick-start/. This will also ensure you use the latest version (at the risk of breaking changes).
Listing 10-24. Adding the Leaflet Library

We use SubResource Integrity (SRI) Checking to download this library to ensure we are using the correct library. Recently, British Airways (BA) got hacked (https://gbhackers.com/british-airways-hacked/), and more than 380,000 payment cards got compromised. So how could this have happened? Imagine that BA uses some external JavaScript library. If a hacker can change this external source and add his/her own code to the library, it is a piece of cake to steal any information that the user enters on the website. So how can you avoid this hack? SubResource Integrity (SRI) Checking adds a hash value (a checksum of the file) to the <script> tag, so if the external source gets modified, the browser will refuse to load and execute it.
Building the Leaflet Map Razor Library
You can use a map in many applications, so I think it makes a lot of sense to build this as a razor library. You can find Blazor component libraries that give you a Map component (e.g., https://github.com/fis-sst/BlazorMaps), but here we will build one as an exercise. Add a new Razor Class Library to your solution and name it Leaflet.Map.
The Map JavaScript Module
There is one more thing we need to do to complete Listing 10-25. This is the ***ACCESSTOKEN*** placeholder which you need to replace with your own token, which we will do next.
Registering with the Map Provider
Leaflet will download its maps from a map provider, and here, we will use MapBox which you can use for free for development. You can find their site at www.mapbox.com/maps. You will need to sign up with this site to get your access token. So after signing up, you should go to your account and create an access token. Copy this token and replace ***ACCESSTOKEN*** with your token in Listing 10-25 (twice).
Creating the Map Component
The Map component then loads the map.js module using a path to the static map.js resource from wwwroot. We only need to do this once, so we do this in the OnInitializedAsync method .
The Map Component
Consuming the Map Component
In the PizzaPlace.Client project, add a project reference to the Leaflet.Map component library.
Add a @using to _Imports.razor
Adding the Map Component
Styling the map Container

Adding Markers to the Map
The Marker Class
The Map’s Markers Parameter
Passing the Markers Parameter to JavaScript
The Updated map.js Module
Adding Some Markers
Passing the Markers to the Map Component

The Map Showing Markers
Summary
In this chapter, you saw how you can call JavaScript from your Blazor components using the IJSRuntime.InvokeAsync<T> method. This requires you to register a JavaScript glue function by adding this function to the browser’s window global object. Or you can expose a JavaScript module and then load this module dynamically.
You can call your .NET static or instance method from JavaScript. Start by adding the JSInvokable attribute to the .NET method. If the method is static, you use the JavaScript DotNet.invokeMethodAsync function (or DotNet.invokeMethod if the call is synchronous), passing the name of the assembly, the name of the method, and its arguments. If the method is an instance method, you pass the .NET instance wrapped in a DotNetObjectRef to the glue function, which can then use the invokeMethodAsync function to call the method, passing the name of the method and its arguments.
Finally, you applied this knowledge by adding a map to the PizzaPlace application. You built a Blazor component library which uses a JavaScript module to call the Leaflet library and added a class to pass markers to the map.
When should we use JavaScript interop? Whenever you need to use a feature of the browser, such as local storage or the geolocation API, which is not supported by WebAssembly, you will have to resort to JavaScript interop. There are a lot of nice people out there who already did the work and provide their implementation as a Blazor component library, saving you a lot of time. So google around a bit first!
11. Blazor State Management
11. Blazor State Management
Blazor is used to build Single-Page Applications and has a stateful programming model, meaning that a Blazor application keeps its state in memory, as long as the user does not refresh the browser. Refreshing the browser will restart your Blazor application, losing all state in memory. How can you keep the application’s state? In this chapter, we will look at how your application can manage its state and pass data between pages, browser tabs, and even different browsers. Some of these techniques we have been using before, and we will also look at building complex Blazor applications using the redux pattern.
Examining Component State
This chapter comes with a prepared demo, because it reviews some of the techniques we have seen before. So start Visual Studio and open the StateManagement demo solution. Now start the StateManagementWASM project. Your browser should open. Navigate to the Counter page by clicking the Counter link in the navigation column of the application. A familiar component should render.
Click the button a couple of times and then refresh your browser. The Counter goes back to 0! The same thing happens when you click another link in the navigation menu. Imagine that this is your application and the user just spent a couple of minutes entering their data. Your user clicks another page, maybe to look at some references the user needs, the user comes back, and all the painstakingly entered data is gone! Should I encounter an application like this, I will most likely vow to never use this application again!
In a Blazor WebAssembly application, your component is running in the browser, and data gets stored in the memory of the browser. With Blazor Server, all the work is done on the server with a thin SignalR connection to update the DOM. The application’s data gets stored in a circuit, which is the way Blazor Server differentiates between data of different users. Data in a circuit gets stored in the server’s memory. But when the browser refreshed, the Blazor runtime creates a new circuit, losing all data stored in the original circuit.
All of this means that you should do some extra things to keep your user’s data.
Render tree: Each time Blazor renders your components, it stores this in the render tree, which is an in-memory representation of all the HTML markup. This allows Blazor to calculate the difference between the previous render tree, so it only updates the DOM with the changes.
Component’s fields and properties.
Dependency injection instances.
JavaScript interop data.
Where can we store data so it does not get lost, even after a browser refresh?
Options are not to store the data, use local storage, use a server, or use the URL.
What Not to Store
First of all, I would like to note that you only need to save the data that is being created by the user. All other data can easily be reconstructed; for example, it is useless to store the render tree yourself. Blazor can always recreate this from scratch, provided your components still have their state. Data retrieved using a service, for example, the weather forecasts, can also be retrieved by revisiting the server. You only need to store changes made by the application user, for example, shopping carts, registration information for new users, etc.
Local Storage
All modern browsers allow you to persist data in the browser. You can choose between local storage and session storage, and their use is similar. The main difference is that local storage is kept even when you shut down your machine, while session storage will be lost when you close the application’s browser tab or the browser. Another advantage of local storage is that you can easily share data between browser tabs.
With the StateManagementWASM application running, click the Local Storage link in the navigation menu. Click the button to increment the counter. Now navigate to the Counter page, and back to the Local Storage page. Your counter keeps its value! Refresh your browser. Again, the counter keeps its value. You can even restart the browser.
How does this work? In Chapter 10, we built a local storage service which uses JavaScript interop to store values in local storage. Let us review this again.
The LocalStorage Service
The JavaScript LocalStorage Module
The CounterLocalStorage Component
You do need to be careful with the value retrieved from local storage. When this value gets corrupted, it might crash the component, and since this value is persisted, the user cannot simply restart the application to fix the problem. That is why there is a try-catch block around this code. Worst case, the counter will start from 0 again. That is why in some cases using session storage is a better alternative, because this will clear once the user closes the tab in the browser.
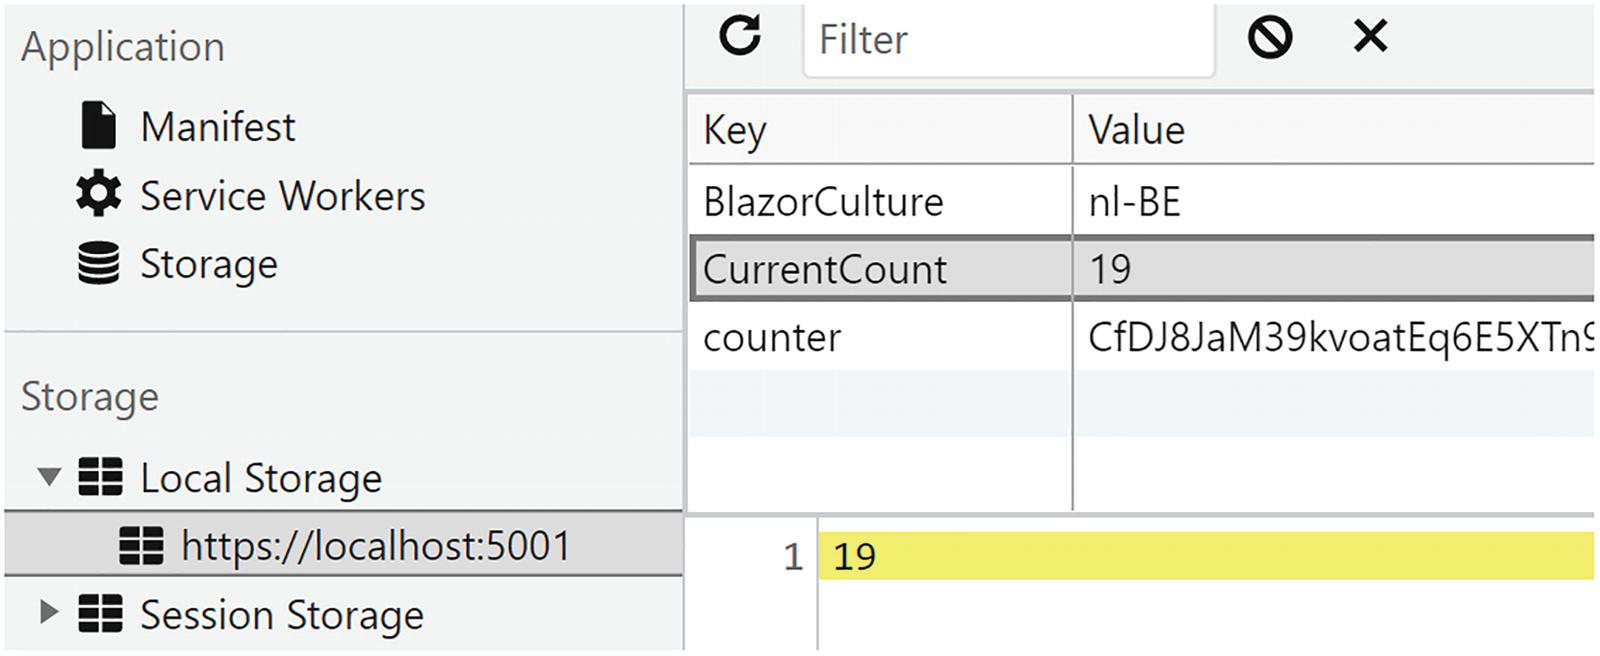
The Browser’s Local Storage
One disadvantage of this is that tech savvy users can open local storage in the browser debugger and see or modify the value. So do not store secrets here! With Blazor Server, you can use protected storage, which we discuss later in this chapter.
Local storage can also be used to communicate between two or more tabs in your browser. With the Local Storage page open, copy the URL and open a new tab to it. Select the Local Storage page, and increment the counter. You will see the counter update in the other tab! Every time a value in local storage is modified, the browser will trigger the storage event, and you can register for this using the WatchAsync method from the local storage service. This will invoke the UpdateCounter method from the component, as in Listing 11-3.
The Server
What if the user decides to switch to another browser? Local storage does not work across browsers, so in that case, you will need to store your state on a server. The server can then decide where to persist this data, for example, in a database.
The demo solution has a StateService project, which you will need to run before running the StateManagementWASM project. Use the command line and set your current folder to the StateService project’s folder. Then type dotnet run. This should start the server (I have kept this server as minimal as possible, so it only keeps the data in memory, but with a little work, you can store the data wherever you want). It does mean that restarting the server will reset all of its data.
Start the StateManagementWASM project and now select the State Service page from the navigation menu. Increment the counter a couple of times. Now open the page from another browser (or use another tab). You will now see that this other application will use the counter’s value you set in the first browser!
The StateService Class
The StateController Class
One more thing, our service will run on another URL than the application (we could host the state service and our application using the same ASP.NET project, but I want to show you something important), and in that case, we need to configure Cross-Origin Requests (CORS). Browsers do not allow you to access services that run on another URL (Cross-Origin) without some extra work. This is a security feature, known as same-origin policy , and prevents a malicious site from reading data from another site.
Servers can enable browsers to access their data from another origin (so from another URL), but then we need to enable this explicitly on the server using CORS. You can learn more about CORS at https://docs.microsoft.com/aspnet/core/security/cors.
The ConfigureServices Method
The Configure Method
This concludes our discussion about the state service. Time to look at the implementation in the Blazor application.
The Client’s StateService Class
The CounterState Component
URL
In some cases, it might make a lot of sense to store your navigation data, for example, the step count in a wizard, or the product ID being shown, in the URL of the page. This has the advantage that users can add this page to their favorites, and data stored in the URL will survive a browser refresh and work across different browsers. Let us look at an example.
Using the StateManagementWASM demo, click the URL link in the navigation column. This will show the counterURL component. Now increment the counter using the button and watch the URL. This is where we store the current value of the counter.
The counterURL Component
Using Protected Browser Storage
You can use the same techniques to store your state with Blazor Server, but there is one more possibility. We can have our data stored in local or session storage, but now using encryption. This uses the ASP.NET Core Data Protection API which will encrypt your data on the server which will then store the encrypted data in the browser’s local storage (or session storage). This only works with Blazor Server because the data protection API requires the server to provide encryption.
In the demo solution, you can find the StateManagementServer project. Run this project and click the Local Storage navigation link. Increment the counter and now open the browser’s debugger. Choose the application tab, and click the application’s URL in local storage. Look at the counter key (again, other keys might show up from other projects since every project uses localhost:5001 by default). The counter key is clearly encrypted here (containing some integer value).
Let us look at the CounterProtectedStorage component as in Listing 11-11. To use protected storage, you use the ProtectedLocalStorage (or ProtectedSessionStorage) instance which you request using dependency injection. This instance allows you to get, set, and delete a key asynchronously.
In the OnInitializedAsync method , use the GetAsync method to retrieve the value. This might not succeed, so this method returns a ProtectedBrowserStorageResult, which has a Success property . When this property is true, you can access the value using the Value property .
The CounterProtectedStorage Component
The Redux Pattern
Building complex applications with Blazor can become challenging. Single-Page Applications have to manage a lot more state than traditional web pages because some of this state is shared among different pages. Sometimes customers might also want advanced features, such as undo/redo functionality. Redux is a pattern used to reduce an application’s complexity. With redux, we will apply a couple of principles which are based on a minimal API and giving us predictable behavior using immutability. With redux, state mutability becomes predictable. Let us start with a couple of building blocks in redux.
The Big Picture
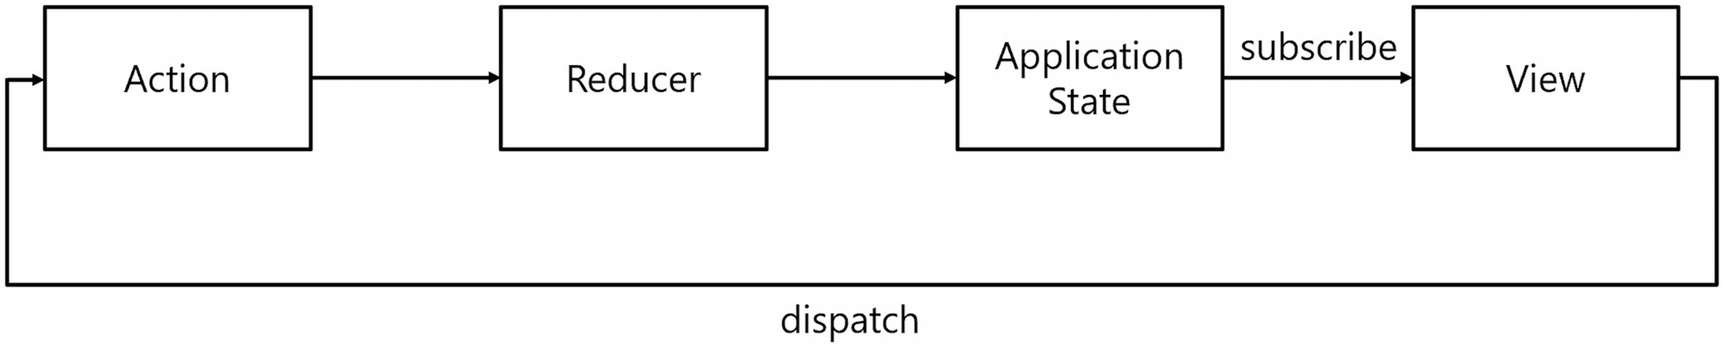
Redux Overview
The Application Store
With redux, we will store all our state in a single object hierarchy, known as the application store. We will consider this store to be the “Single Source of Truth.” To keep things manageable, the store is immutable, meaning that every change to the store will result in a new instance. Please realize that this does not mean that we will create a deep clone of the store instance after every change; no, a single object in the hierarchy will be replaced with a new instance when it needs a change. For example, with the PizzaPlace application, the store would contain three pieces of data, the menu, the shopping basket, and the customer information. When we add something to the shopping basket, we will get a new store instance, with the same menu and customer; only the shopping basket will be replaced with a new instance. Note that this allows us to keep track of each state change and easily undo this, opening up features like undo/redo. To undo a change, we simply restore the previous state from our tracked states! The application store allows the views (Blazor components) to access its data and uses reducers to modify it (by creating new immutable fragments).
There is another pattern called flux ; the only difference between these two is that with flux we have multiple stores, while redux chooses to put everything in a single store.
Actions
Whenever the application wants to trigger a state change, for example, because of the user clicking a button, a timer expiring, etc., we dispatch an action. The action contains the data needed so the dispatcher knows what to do. For example, with the Counter component, we can have an IncrementCounterAction class, which does not contain any data because the Type of the instance is enough for the dispatcher to handle it. Should we want to set the Counter to a specific value, we can have the UpdateCounterAction which would contain the desired value. Actions describe what happened in the application and are used by the dispatcher to apply the desired change.
Reducers
The responsibility of a reducer is to apply an action to the store. Reducers must be pure functions. A pure function is a function that always returns the same result for its parameters. For example, adding two numbers together is a pure function, calling add on 2 and 3 will always return 5. Getting the time is not, since calling this function returns a different value at different points in time.
Views
Views (in our case, Blazor components) access the store to render the data and subscribe for changes in the store so they can update themselves when the data has been changed through a reducer.
Using Fluxor
Time to look at an actual implementation using the redux pattern. We will use Fluxor , which was written by Peter Morris and the GitHub community and which is an amazing implementation of the flux pattern (of which redux is a special case).
Enabling Nullable Reference Types
Let us first implement the Counter component using the Fluxor library, so add the NuGet package Fluxor to the UsingRedux.Shared project. I like putting the store, actions, and reducers in a shared library, which makes it easy to use with other application types.
Creating the Store
Add a new folder called Stores to the shared project.
Our Application’s Store
The AppFeature Class
Using the Store in Our Blazor Application
The Fluxor Script
Enabling Fluxor in Blazor
Adding the Store Initializer
The Counter’s Code
The Counter’s Markup
Build and run the application. Select the Counter link. You get a Counter with initial value 0, but the button does not do anything yet. Time to add an action and reducer.
Adding an Action
The IncrementCounterAction
We will add more actions later in this chapter, so let us proceed to the reducer.
Implementing the Reducer
The AppReducer Static Class
We have an action and a reducer, so now we can update the Counter component to make the button work.
The Counter’s Code with Action and Dispatch
Making the Counter Button Work
Run the application and click the button on the Counter component. It should increment!
Redux Effects
What if we need to call an asynchronous method? Do we call it in the reducer? No! Since reducers are synchronous, calling the asynchronous method would either block the reducer or return without the required result. To solve this, redux uses effects, which are asynchronous and function through use of actions and reducers. With effects, we will use two actions, one to start the effect asynchronously, and when the effect is done, it uses another action to dispatch the result. The best way to understand effects is with an example, so let us implement the FetchData component with redux.
Adding the First Action
The FetchDataAction Record
The FetchData Component’s Code
The FetchData Component’s Markup
The ReduceFetchDataAction Reducer Method
Adding the Second Action and Effect
The FetchDataResultAction Record
Add a new Effects folder to the Shared project and also add the System.Net.Http.Json package. We need this package to access the HttpClient class and its extension methods.
The FetchDataActionEffect Class
The ReduceFetchDataResultAction Reducer
Build and run. You should be able to fetch the forecasts now!
Think of effects as an interception mechanism that gets triggered by dispatching a certain action.
Summary
In this chapter, we looked at state management, so how do we keep state around even when the user refreshes the browser? We can store our application state in local storage, the server, and the URL. Then we looked at the redux pattern, which is used to build complex applications. Redux makes this easier by applying a couple of principles. Components data bind to the Store object, which you mutate by dispatching actions that contain the required change. Then a reducer applies this change to the store which will trigger an update of your components, completing the circle. Redux and flux have the advantage that you end up with a lot of little classes which are easier to maintain, applying the single responsibility principle.
12. Building Real-Time Applications with Blazor and SignalR
12. Building Real-Time Applications with Blazor and SignalR
What if your application needs some real-time communication between client and server and even between clients? In this case, you can use SignalR. In this chapter, we will explore how we can use SignalR in Blazor to build real-time applications.
What Is SignalR?
SignalR is a library that allows you to build real-time applications and allows the server and clients to send messages to each other. You can use SignalR in desktop applications, mobile applications, and of course websites. There is an implementation for .NET and also one for JavaScript. A typical application that should use SignalR is a chat application, where clients communicate with each other over a server. When the server receives a chat message from the client, it can send this message back to the other clients. SignalR is especially useful for applications that need high-frequency updates, such as multi-player games, social networks, auctions, etc.
How Does SignalR Work?
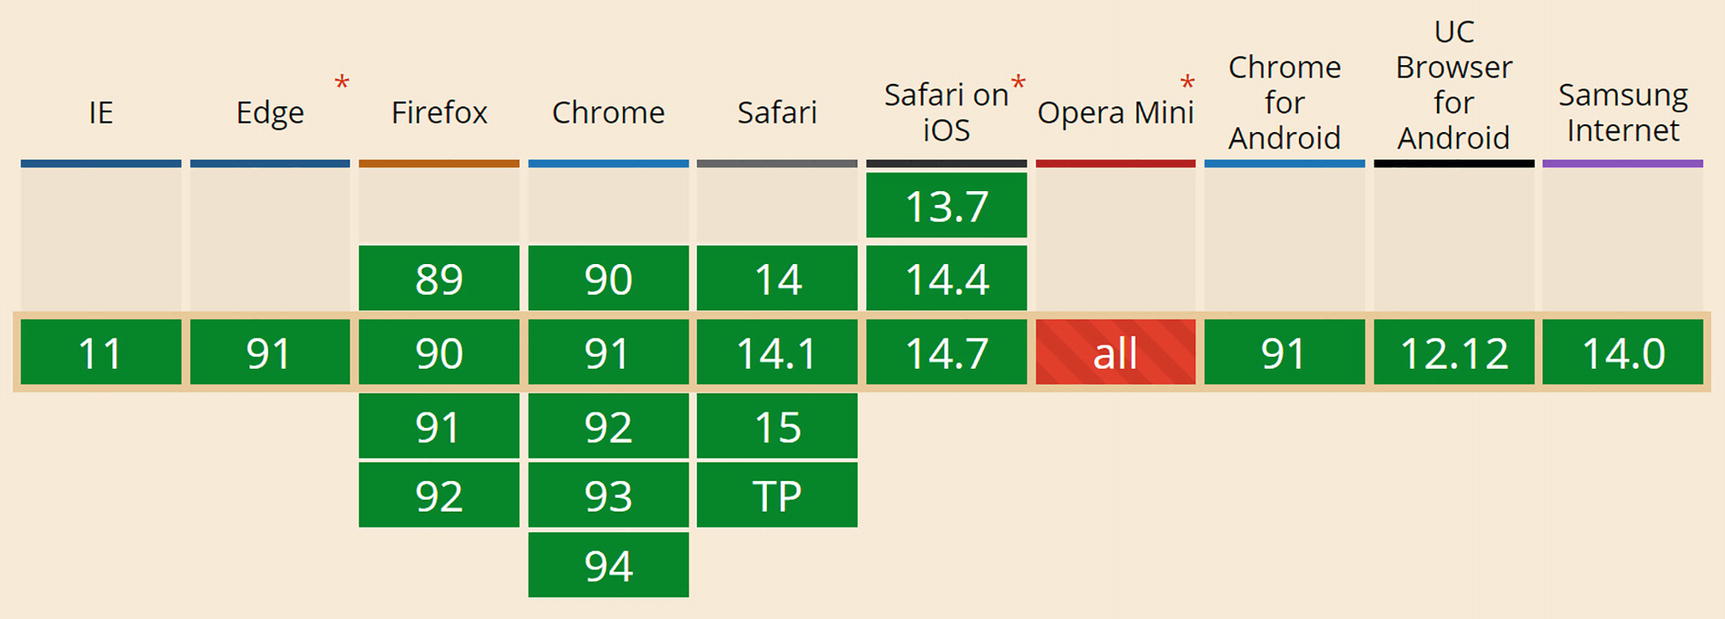
Supporting Browsers
SignalR takes care of the connection and allows you to send messages to all clients simultaneously or to specific groups of clients or even to a single specific client.
Building a WhiteBoard Application
Let us build a WhiteBoard application, in which you will have a white board (such as you can find in many offices) on which you can draw. After this, we will add SignalR so all users can interact with the white board and can see what others are drawing in real time.
Creating the WhiteBoard Solution
Start by creating a new server-hosted Blazor WebAssembly solution , and name it WhiteBoard. Remove all Blazor components from the Pages and Shared folder. We don’t need these. Also remove all contents of the App component. Finally, remove the @using WhiteBoard.Client statement from _Imports.razor.
The LineSegment Class
The Board Component
The Board Component’s Implementation
The App Component
The App Component’s Implementation
Implementing the Mouse Handling Logic
The MouseButton Enumeration
Now update the Board’s mouse handling methods as in Listing 12-7. The trackMouse field is used to track whether the left mouse button is down. It is set to true in the MouseDown event handling method and back to false in the MouseUp event handling method.
Implementing Mouse Tracking
Painting the Segments on the Board
Running the application will not yield the proper result. We need to paint the segments. And since we are using a <canvas> element, we need some JavaScript.
Add a new scripts folder below the wwwroot folder, and add a new JavaScript file called canvas.js as in Listing 12-8. This JavaScript module exports a single drawLines function, which draws each line segment on the canvas.
JavaScript to Draw on Canvas
Use the Inject Attribute to Inject the JSRuntime
Importing the JavaScript Module
Calling the drawLines JavaScript Function

The WhiteBoard Application in Action
Adding a SignalR Hub on the Server
Our WhiteBoard application is currently single user. Let us make this an application where everyone can draw on the same white board using SignalR.
With SignalR, we need to create a Hub on the server, which will have methods we can call from the clients. On the client, we will implement methods that we will invoke from the hub. A hub sits at the heart of SignalR and runs on the server. The clients will send messages to the central hub, which can then notify the other clients. So we need a hub.
Implementing the BoardHub Class
The BoardHub Class
The BoardHub’s GetAllSegments Method
The SendSegments Method
Configuring the Server
Adding the Required SignalR Dependencies
Adding SignalR Middleware
Implementing the SignalR Client
Start by adding the Microsoft.AspNetCore.SignalR.Client package to the client project.
Our Board component does not need to know we are using SignalR, so we will add the SignalR logic to the App component.
Making the SignalR Hub Connection
Adding Some Dependencies
We need to create the HubConnection in the OnInitializedAsync method as in Listing 12-18. First, we use the HubConnectionBuilder to create the HubConnection, passing the URL of our server’s SignalR endpoint. To retrieve the SignalR server’s URL, we use the navigationManager.ToAbsoluteUri method .
Then we define the AddSegments method (which the server will call) which simply adds the segments to the App component’s segments. Since this call is asynchronous, we need to call StateHasChanged so the App component will perform change detection and render itself.
We also add the InitSegments method , which by some weird coincidence does the same as the AddSegments method (but this may change in the future).
Creating the HubConnection
Notifying the Hub from the Client
Updated AddLineSegment Method
Cleaning Up the Hub Connection
Finally, we should not forget to notify the server that we are not interested in other messages.
Declaring the IAsyncDisposable Interface
Implementing IAsyncDisposable
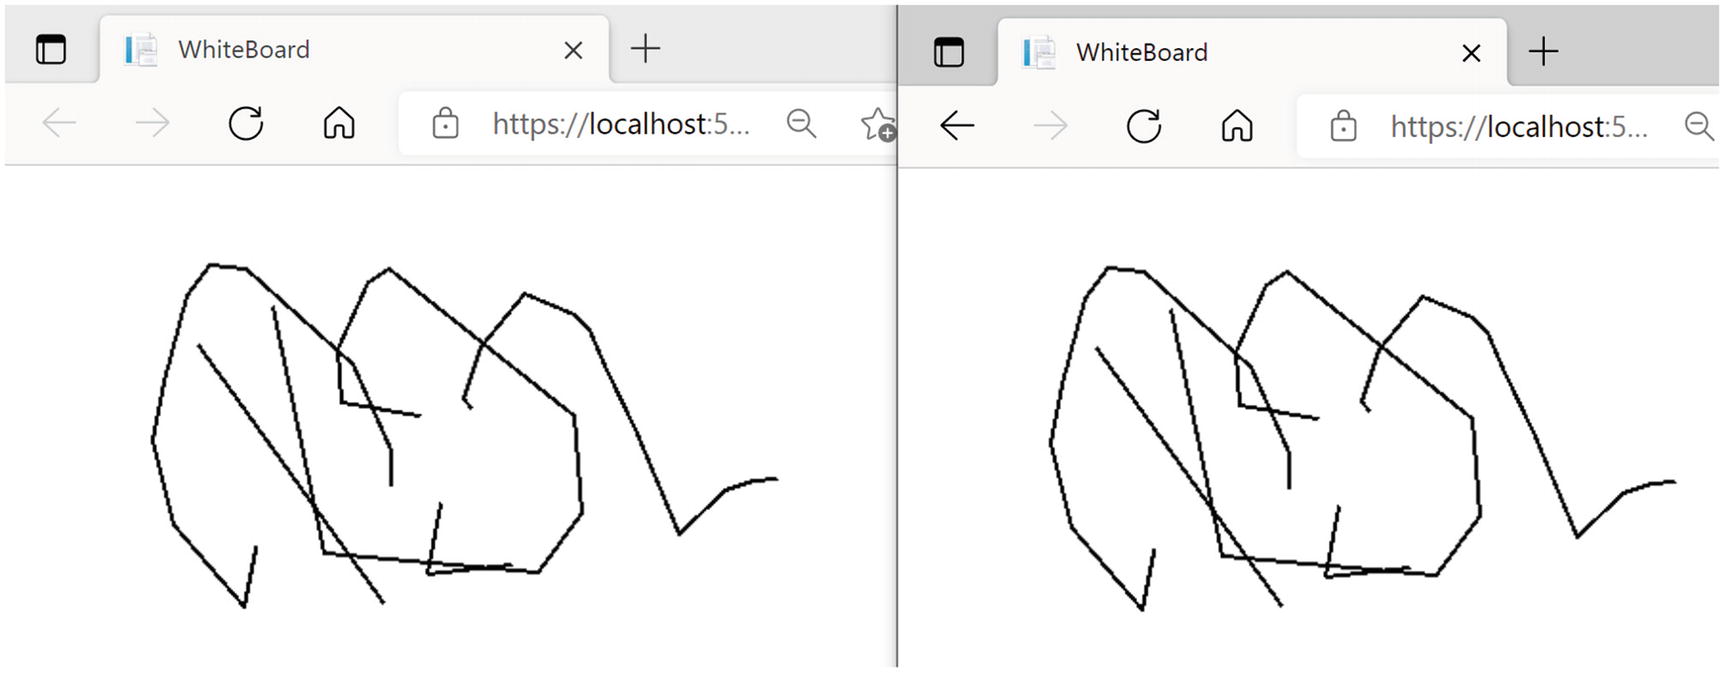
The WhiteBoard Application in Action
Summary
In this chapter, we looked at using SignalR for building real-time applications. Who is using SignalR out there? First of all, Blazor Server uses SignalR to set up the two-way communication between the server and the browser. Microsoft Azure also uses SignalR. It is also used by lots of companies. Any time you need real-time communication, SignalR is the choice to make. We could integrate SignalR in our PizzaPlace application to notify the customers when their pizza enters the oven, then when it is put in the pizza box, and when delivery is estimated to arrive. They could even see where delivery is in traffic!
You start by adding a Hub to the server, and then you make clients connected to this hub using a HubConnection. Once this connection has been established, both client and server can send messages to each other. We only scratched the surface of what is possible with SignalR, but as we have seen, using SignalR is easy!
13. Efficient Communication with gRPC
13. Efficient Communication with gRPC
Blazor WebAssembly applications that have the need to exchange large amounts of data will probably run into communication overhead when using REST. With gRPC, you can use a more efficient way to exchange data with the back end.
What Is gRPC?
Before we were using SOAP and REST, developers were using Remote Procedure Calls (RPC) to invoke methods in another process. We've seen how to communicate with REST APIs between two applications, but the serialization to and from JSON causes some overhead. This is mostly done to make messages human-readable. If the communication only needs to happen between applications and there is no need to have a human-readable form, we can use gRPC. Because the serialized data does not have to be readable by humans, it can be more compact and efficient and thus more performant.
Pros and Cons of RPC
With RPC, you can expose a method in another process and call it just like a normal method, using the same syntax. Behind the scenes, the client method serializes the method call itself with its arguments and sends it to another process, for example, using a network stack. The other process would then call the actual server method and return the return value back over the network, after which the client method deserializes the return value and returns it. With RPC, developers at the client end do not see the difference between a normal method call and a remote call. This is of course quite convenient but comes at a price. Imagine you are talking to some other person directly, or you would have to talk to someone using a fax machine (remember?) or good old mail. Talking directly to another person allows for a chatty interface where small messages get exchanged, like “How are you?” and “Good, and you?”, while using a letter over mail or fax would use a chunky interface, where you would write down everything at once because you know the answer will take a long time. Just ask your parents  . The dream of RPC was that you would not be able to see the difference. But making calls over a network for a computer has the same efficiency as using a fax machine or mail for us. So designing RPC calls requires some thought and should use chunky interfaces.
Understanding gRPC
What is gRPC? This framework gives us a modern and highly efficient way to communicate with the same principles of RPC. It works for languages, such as C#, Java, JavaScript, Go, Swift, C++, Python, Node.js, and other languages. It provides interoperability between different languages through the use of an Interface Definition Language (IDL) described in .proto files. These files are then used to generate the necessary code used by both server and client.
Using gRPC is highly performant and very lightweight. A gRPC call can be up to eight times faster than the equivalent REST call. Because it uses binary serialization, messages can be 60 to 80 percent smaller than JSON. Some of you might be familiar with Windows Communication Foundation (WCF). In that case, think of gRPC as the equivalent of using the NetTcpBinding in WCF.
Protocol Buffers
The gRPC framework uses an open source technology called Protocol Buffers which was created by Google. With Protocol Buffers, we use an IDL specified in a text-based .proto file to allow us to communicate with other languages. With this IDL, you create service contracts, each containing one or more RPC methods, and each method takes a request and a response message.
Describing Your Network Interchange with Proto Files
Let us update an existing application that currently uses REST to use gRPC. The source code that comes with this book contains a starter solution called BlazorWithgRPC.Starter. Open this solution. You can run it if you like, but to keep things simple and familiar, it uses the same components from before. Here, the FetchData component uses a WeatherService to request a list of WeatherForecast instances using REST. We will make this use gRPC now.
Let us now describe the contract between the server and client. Since we are using Blazor, we can use the Shared project to generate the code for both.
Installing the gRPC Tooling
Google.Protobuf
Grpc.Net.Client
Grpc.Net.Client.Web
Grpc.Tools
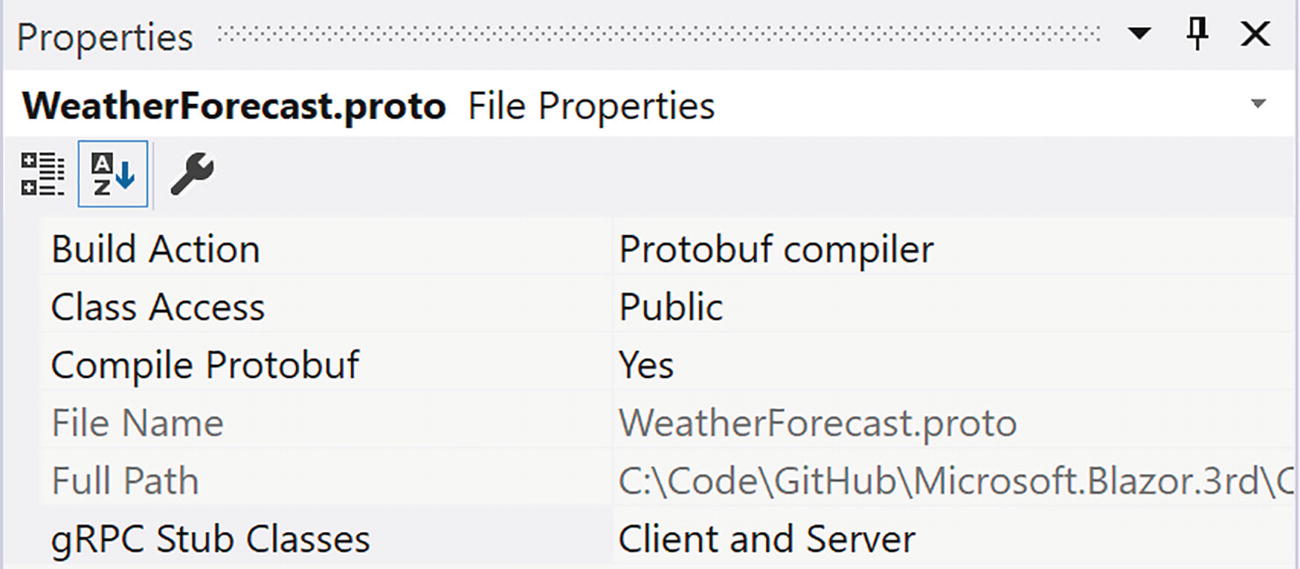
Proto File Settings
Setting the Build Action in the Project File
When you build, the .proto file will generate C# code for the service contract.
Adding the Service Contract
The Initial Proto File
Declaring the Request Message
The WeatherForecast Message IDL
Using the Timestamp Type
As Listing 13-4 illustrates, each field also has a unique number which is used to identify the field during serialization and deserialization. With JSON and REST, each field is identified through its name; with Protobuf, the unique number is used which results in faster and more compact serialization.
The getForecastResponse Message
The Service Contract
The Whole Proto File
Build the Shared project; this should compile without errors.
If you are interested, you can look at the generated C# code inside the obj/Debug/net6.0 folder. Look for the protoWeatherForecastsBase and protoWeatherForecastsClient classes inside the WeatherForecastGrpc.cs file.
Implementing gRPC on the Server
Grpc.AspNetCore
Grpc.AspNetCore.Web
Implementing the Service
The WeatherForecastProtoService Class
Adding Dependencies
Implementing the getForecasts Service Method
A couple of remarks about this implementation. Protobuf uses the Timestamp type, so we need to convert our DateTime using the FromDateTime method . The Timestamp type is provided through the Google.Protobuf.WellKnownTypes namespace from the Google.Protobuf NuGet package. The Image property is of type ByteString, and we can use the ByteString.CopyFrom method to convert from a byte[]. The base class’s getForecasts method is asynchronous, so we need to return the result as a Task using the Task.FromResult method . In real life, this service would read the data from a database, so it makes a lot of sense that this method is asynchronous.
Adding gRPC
Configuring Dependency Injection in Startup
Adding the gRPC Middleware
Build the server project.
Think about this. What you had to do was quite simple: inherit from a base class, override the base method, and use Protobuf types with some conversions. No need to think about headers, deserialization, etc.
Building a gRPC Client in Blazor
Google.Protobuf
Grpc.Net.Client
Grpc.Net.Client.Web
Grpc.Tools
Creating the ForecastGrpcService
The ForecastGrpcService Class
Enabling gRPC on the Client
The GrpcChannel Configuration
Configuring Dependency Injection
Updating the FetchData Component
Updating the FetchData Component
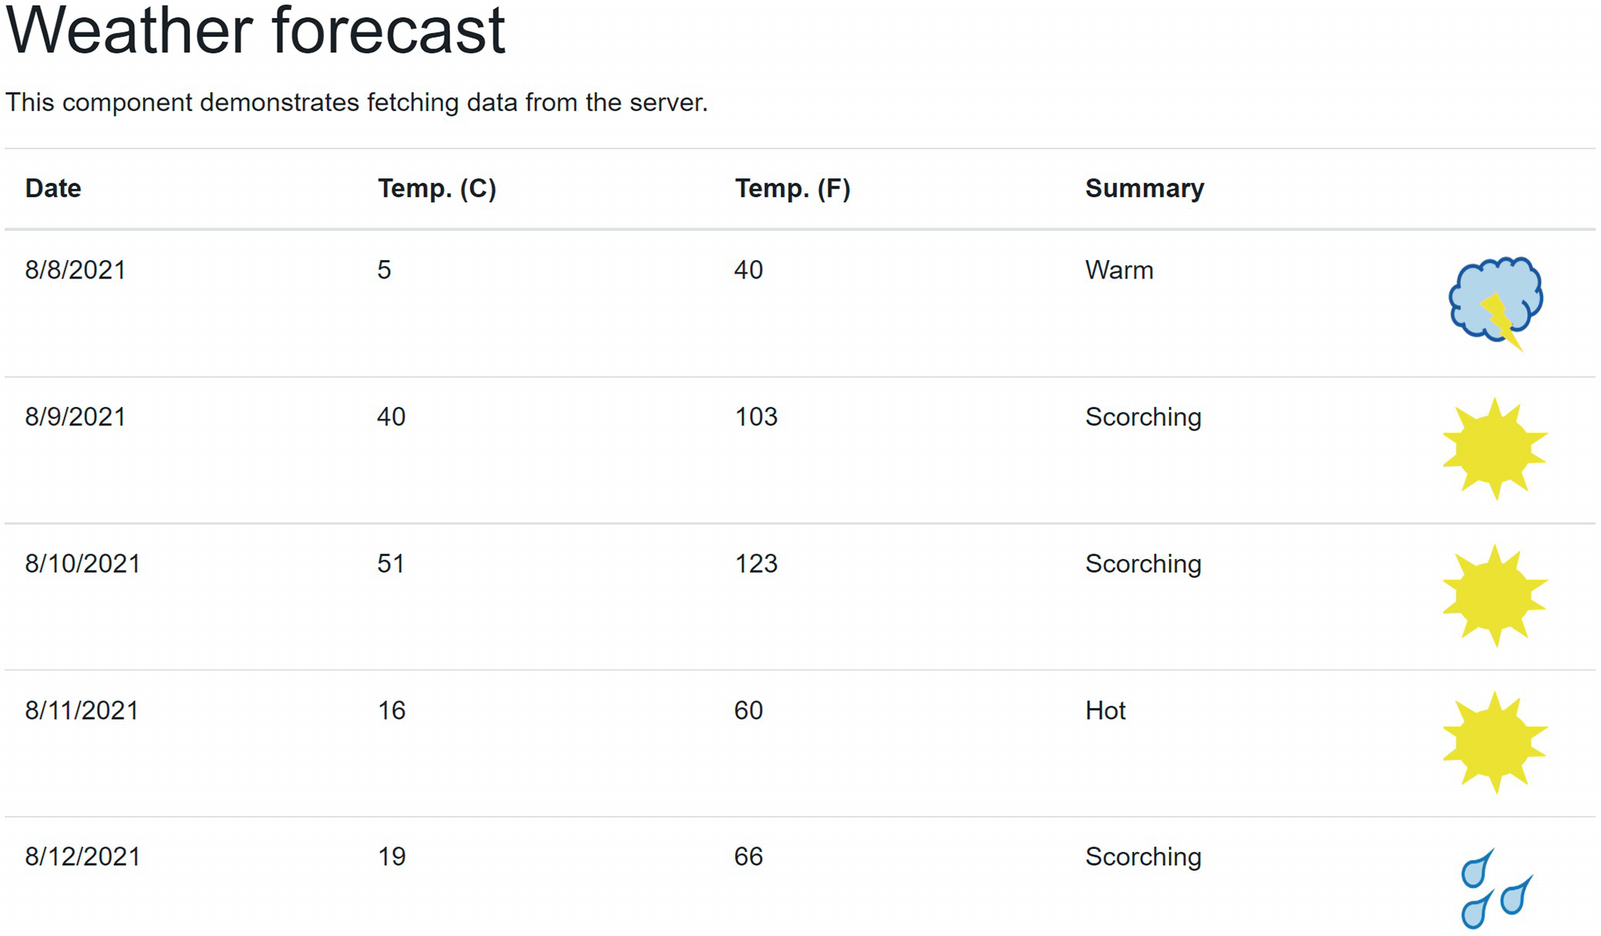
Displaying Forecasts
Comparing REST with gRPC
Updating the FetchData Component
Returning 250 Forecasts

Using a REST Call

REST Using JSON
Returning 250 Rows Using gRPC

Using gRPC with Text Encoding

The Base-64 Encoded Response
Using Binary Encoding

Using gRPC with Binary Encoding

The Binary Encoded Response
Summary
In this chapter, we looked at using gRPC with Blazor. We started with a discussion what RPC means and that gRPC is a modern implementation of RPC. We then created our service contract using a .proto file and generated the code for the messages and service contract. Implementation of the server is easy because we can derive from the generated server base class and override the service contract method. Client side allows us to call the server using again the generated code; we only need to supply the configured GrpcChannel. We then verified if performance was actually better, and we changed encoding to use binary encoding getting the promised performance increase.
14. Supporting Multiple Languages in Your Blazor Application
14. Supporting Multiple Languages in Your Blazor Application
The Web is a big place. So your Blazor application will probably be used by people who speak different languages. I live in Belgium, where people speak Dutch, French, and German, and even if you live in a country where there is one official language, there are no borders on the Web. So if you want to enlarge your application’s reach and be more inclusive, you should consider supporting multiple languages. So how do you do this?
Understanding Internationalization, Globalization, and Localization
Let us first get a couple of definitions cleared out. Internationalization is the process of making an application support a range of languages. This means changing your application to support different languages but also taking into consideration things like decimal points and data formats. When users enter numbers and dates, you will have to take special support, for example, giving people a data picker. Internationalization is often abbreviated as I18n. Expect internalization to take a certain amount of time and effort. It is actually better to implement this as soon as possible.
After internationalizing your application, you can start localization. Localization is the process (probably repeated several times) to make the application support a specific language or locale. Localization is often abbreviated as L10n. The difference between a language and a locale is the country where a certain language is spoken. For example, in French as spoken in France, people use “petit déjeuner” to mean breakfast, while in French-speaking Belgium, the same word “déjeuner” is used. You have to take this into account, because some words have a completely different meaning. Dutch-speaking people may know what I am talking about!
Globalization , abbreviated as g11n, is the combination of internationalization and localization.
If you have experience with globalization in ASP.NET Core, you will see that the concepts and implementation are very similar.
Representing the User’s Locale
In .NET programs, the user’s locale is stored in an instance of the CultureInfo class. You can create a CultureInfo instance passing the locale string in the constructor. A locale string uses two lowercase characters to represent the language, a hyphen, and two/three uppercase characters to represent the country. For example, American English uses “en-US”, while Canadian English used “en-CA”. You can also create a CultureInfo instance by just passing the two-character language as a string. CultureInfo has all kinds of capabilities; for example, you can ask what Monday means in the current locale or what the decimal separator is.
Using CultureInfo
Print the Localized Date
Using String Interpolation with Another CultureInfo
You can set the current CultureInfo explicitly, but you can have your Blazor application automatically detect the user’s language as we will see shortly.
CurrentCulture vs. CurrentUICulture
You will see that the CultureInfo class has two static properties, CurrentCulture and CurrentUICulture, to represent the current CultureInfo. What is the difference between these? The CurrentCulture property is used as the default for formatting values as we just saw in Listing 14-3. The CurrentUICulture is used by the runtime to look up the values from resource files which we will discuss in depth when we look at localization. Most of the time, you will keep both properties set to the same CultureInfo. But when you want to display numbers and dates in a different language than the UI, you would set these to different cultures.
Enabling Multiple Languages
Internationalizing your Blazor application is different between using Blazor WebAssembly and Blazor Server. Luckily, most concepts stay the same, so we will start with Blazor Server and continue with Blazor WebAssembly by internationalizing the PizzaPlace application.
Using Request Localization
Create a new Blazor Server application and name it L10nBlazorServer.
Configuring the Supported Languages
The ConfigurationExtensions Class
Retrieving the RequestLocalizationOptions
I prefer English (I am a developer), and I configured my browser to also support Dutch and French because I am from Belgium, so this header lists these locales in order of preference. This means we can simply look at this header to figure out the user’s preferred language. And in .NET, there is the request localization middleware that does exactly this!
To choose the Accept-Language header for localization, we need to configure the RequestCultureProviders. Initially, there will be three configured providers, one using the query string from the URL, one using cookies, and one using the Accept-Language header. As shown at the end of Listing 14-6, since we only want to use the last, we clear the list of providers and add the required AcceptLanguageHeaderRequestCultureProvider provider.
Enabling Request Localization
Enable the Request Localization Middleware
Displaying the Current Culture
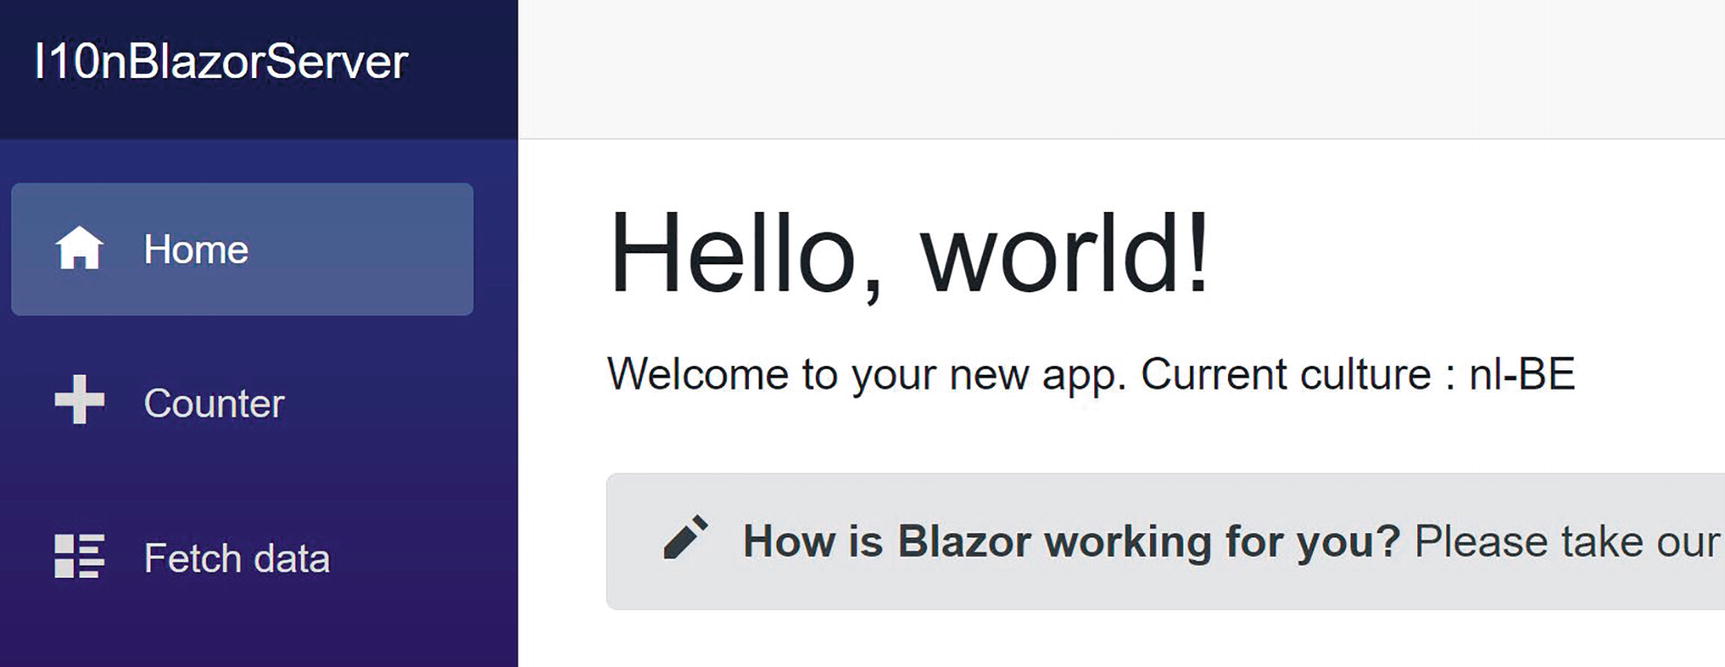
Testing Request Localization
When I want to test my application’s localization, I change the Accept-Language header from the browser. I want to show you how to do this using Edge; other browsers like Chrome and Firefox have similar settings.
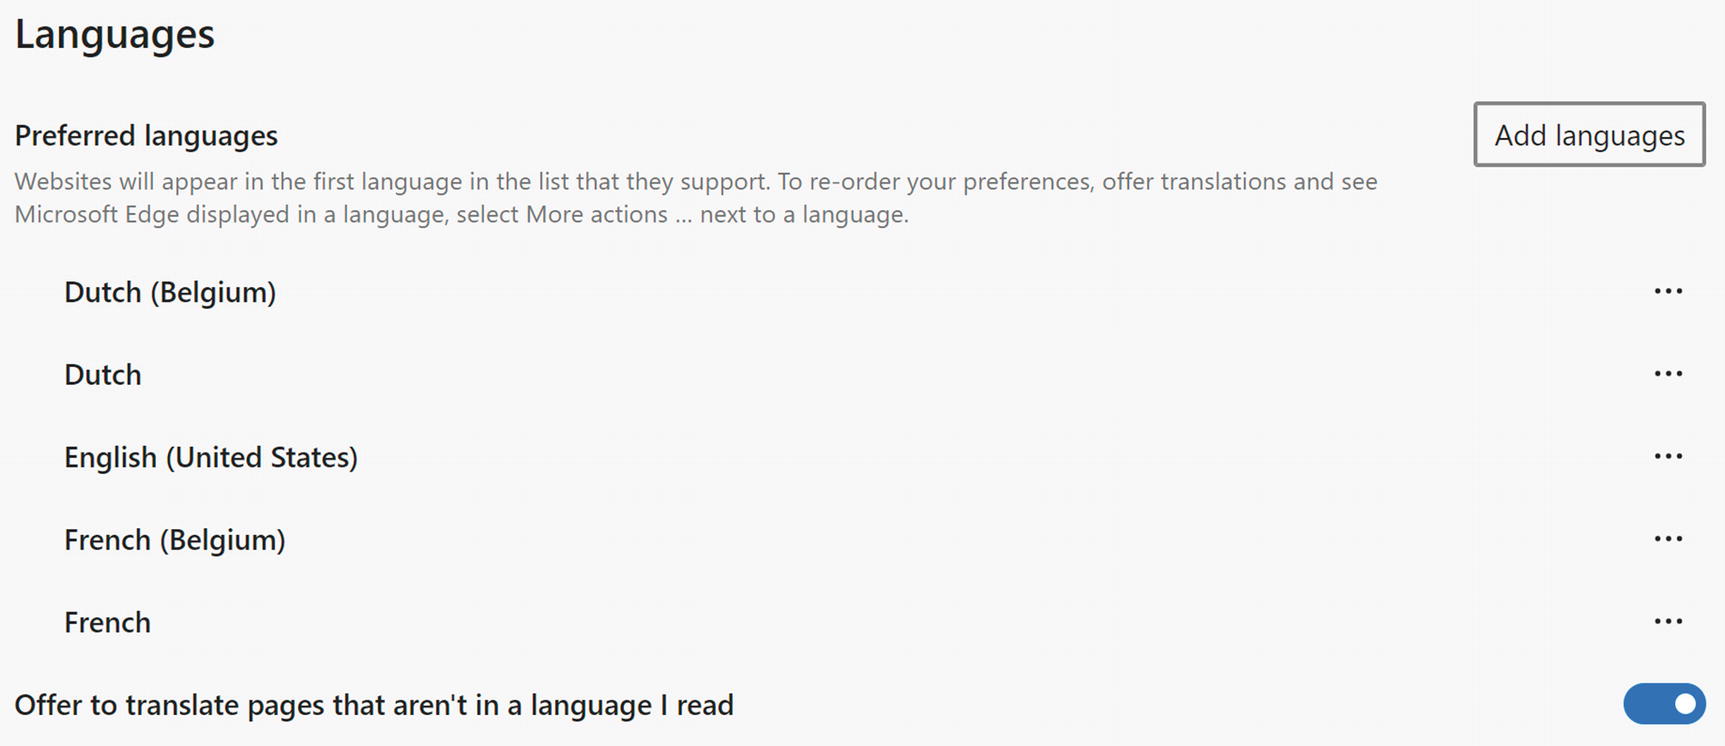
Changing the Preferred Languages in Edge
Internationalizing Your App
Now that we have the proper CultureInfo in place, we can start to internationalize our application. You should start examining each Blazor component and determine which output might vary by language; this means strings, numbers, and dates. Generally, numbers and dates will automatically format correctly when you use APIs such as string interpolation that uses the CurrentCulture. But what about strings? In this case, we need to replace these with a call to the IStringLocalizer<T> interface’s GetString method.
Enabling the Microsoft.Extensions.Localization Namespace
Using the IStringLocalizer<T> Interface
The IStringLocalizer<T> interface allows you to internationalize your application without any translation effort on your parts. Hey, you are still busy developing things, so putting effort in translations is way too early. This interface will simply return the string passed as an argument when there is no translation available yet!
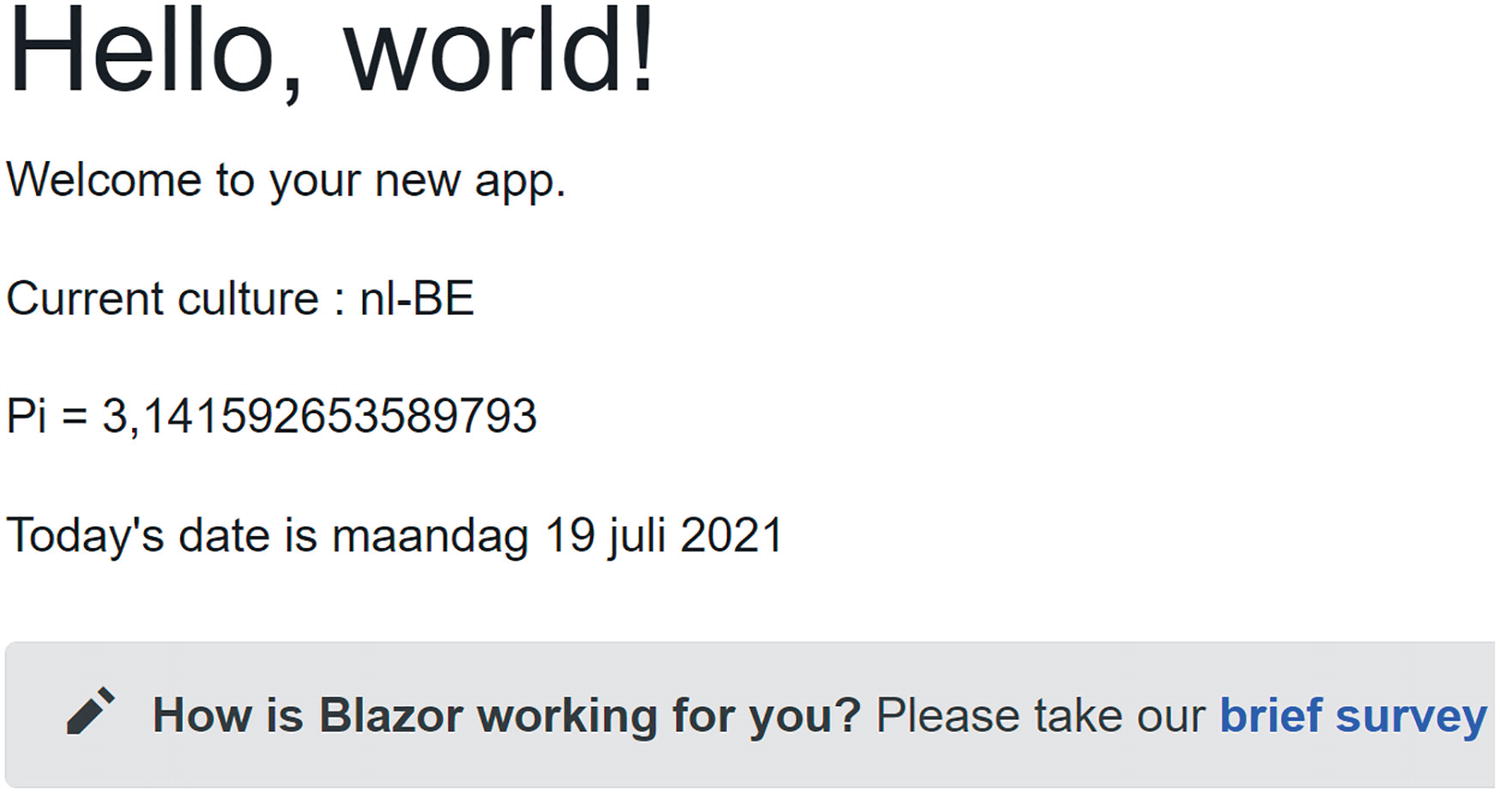
The Index Component with the nl-BE Culture
Localizing Your App
The IStringLocalizer<T> interface will try to find a localized version of each string by searching the resources for that component. Resources are stored in a .resx file, and if you have localized other applications, this will be familiar because Blazor uses the same mechanism used in .NET.
Adding Your First Resource File
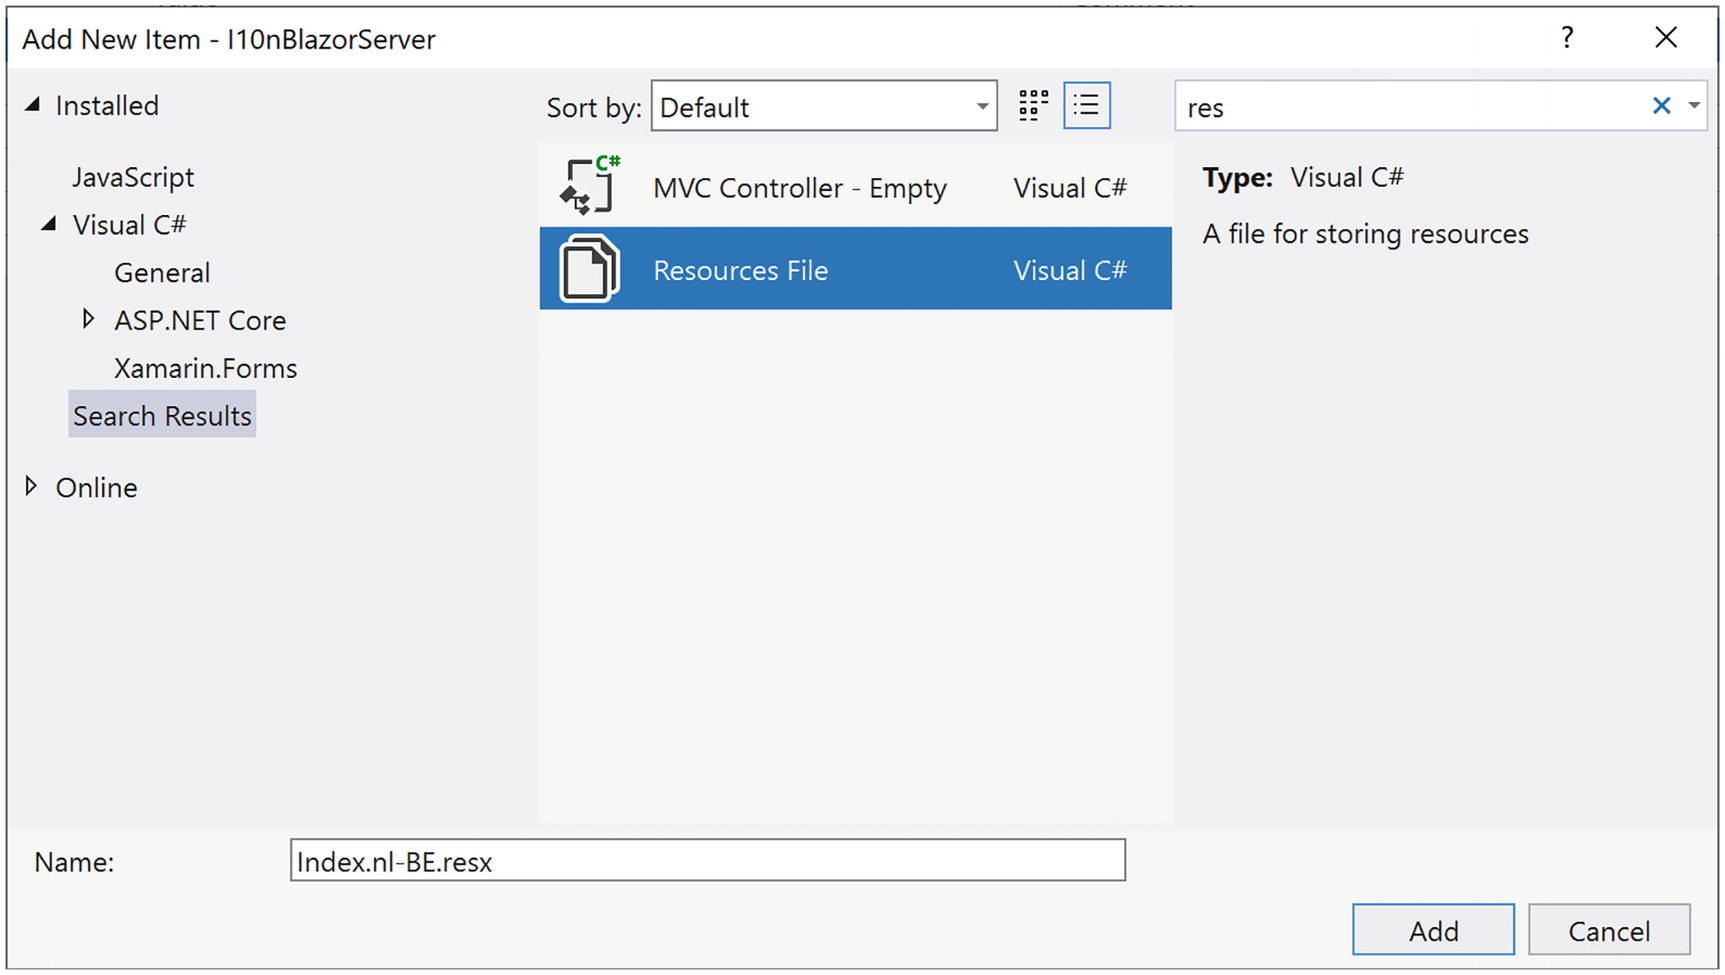
Add a New Resource
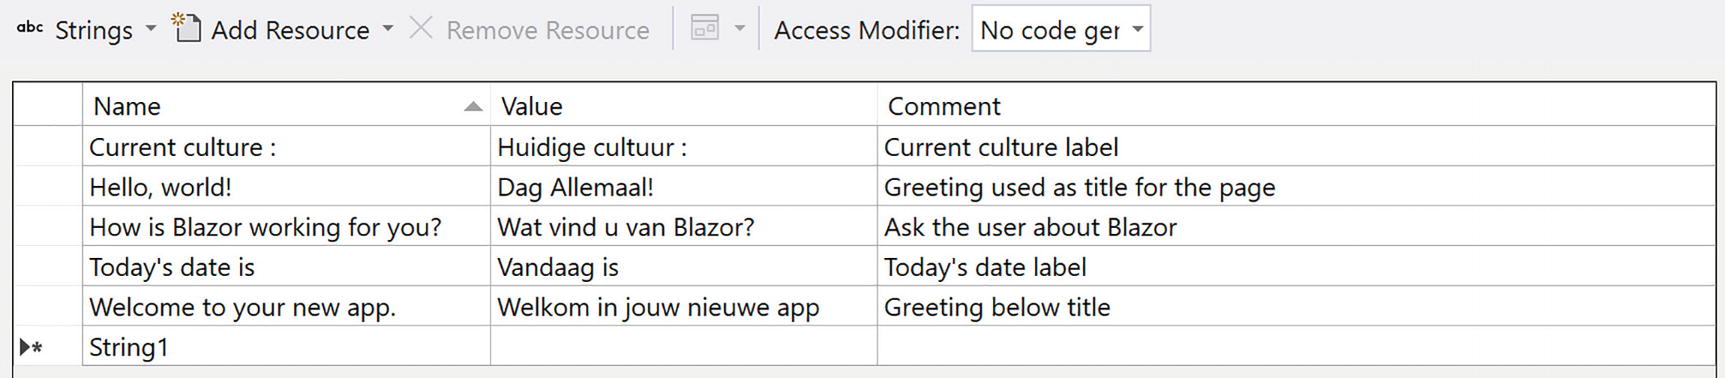
The Localized Resource for nl-BE
Modern Windows allows you to copy a series of strings which it puts on a clipboard ring. You can then paste items from this clipboard ring using Windows key-V, instead of Ctrl-V.

The Localized Index Page
Localizing SurveyPrompt
Why does the survey from Figure 14-6 still contain English? Because this is a different component of course! You should also internationalize and then localize this component too! However, the SurveyPrompt brings some challenges: It uses a couple of strings to build the prompt. Do not be tempted to internationalize each string individually because the structure of sentences (grammar) is different for different languages, and you don’t want to end up using Yoda (assuming you know Star Wars here) sentences!
First, we need to update the SurveyPrompt component as in Listing 14-12. Instead of using two string segments with an anchor in the middle, we should use a single string with a placeholder for the anchor. That is why we use a Prompt property, which will use string.Format to place the anchor somewhere as our translation will require. And the anchor also contains some text, so we should also internationalize the anchor, again using the same technique.
The Internationalized SurveyPrompt

Localizing the SurveyPrompt Component
Running the application should now give you a completely localized Index component. The other components are left as an exercise because this is just repeating what we have learned.
Understanding Resource Lookup

The nl-BE Resource File

The nl Resource File
Running the app in Edge will now give me the Belgian greeting, and running it in Firefox will give me the greeting for the Netherlands. Mission accomplished!
Adding a Language Picker in Blazor Server
Many professional applications allow the user to pick the language for the UI in case the Accept-Language header is wrong, so let us do that. Of course, we will also need a way for the browser to remember that choice, and since all our logic is running on the server (we are still discussing Blazor Server), we will use a cookie to store the culture. This requires us to add another localization provider: the CookieRequestCultureProvider.
Adding the CookieRequestCultureProvider
The LanguagePicker Component’s Markup
The LanguagePicker Class
The CultureController Class
Enabling Support for Controllers
Adding Endpoint Routing for Controllers
Adding the LanguagePicker to the Layout Page
 ).
).
The MainLayout Resource

The LanguagePicker Resource
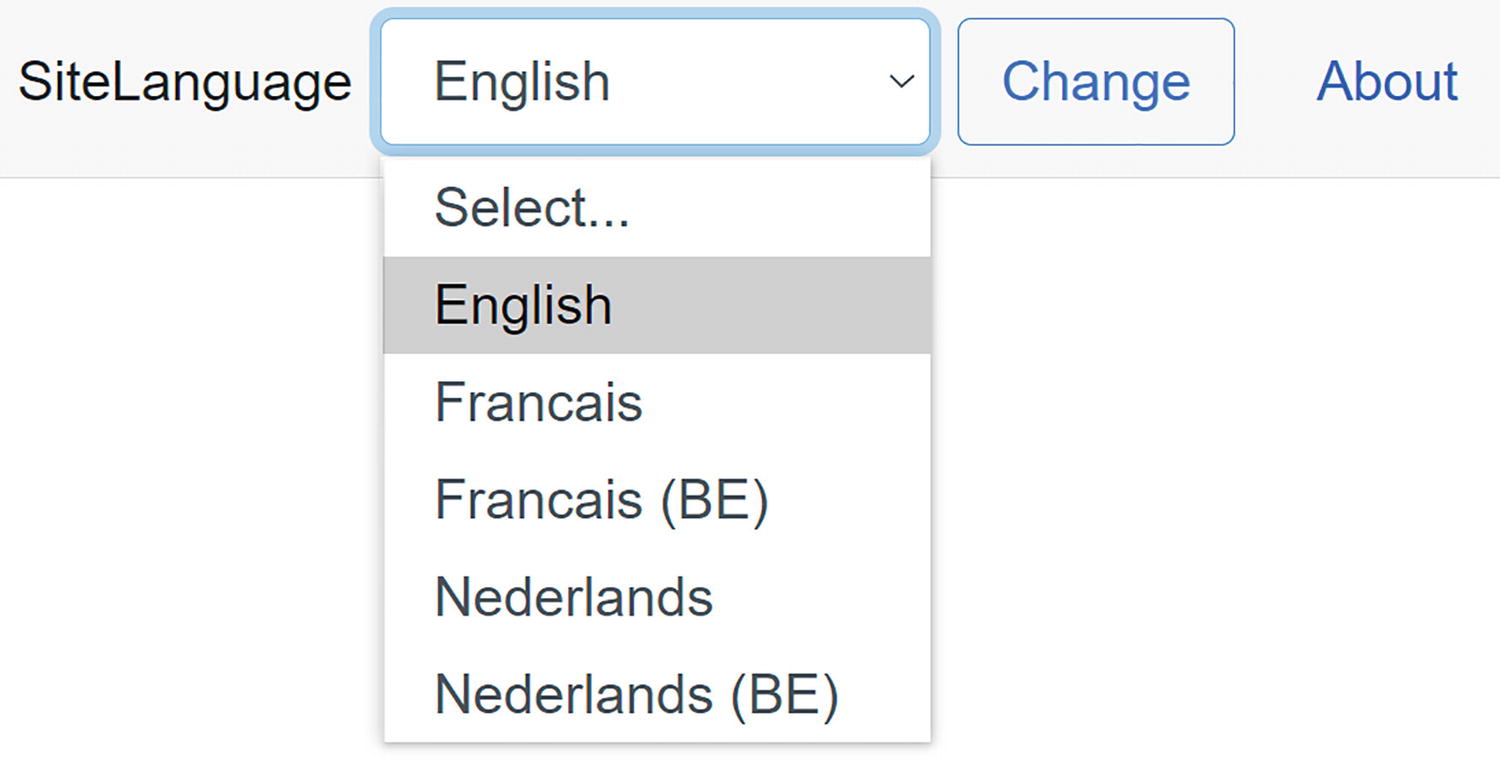
The LanguagePicker in Action
Making PizzaPlace International
Now it is time to look at Blazor WebAssembly. Most of the things we have seen will still work, but we do need to change our approach. For example, we can read the CultureInfo directly from the browser, and this is actually automatically done by the Blazor runtime.
This chapter’s accompanying code contains a starter solution, but you can continue if you want with the solution you got at the end of Chapter 10.
Enabling Globalization Data
To keep things small during the initial loading of your application, Blazor does not fully support globalization. But with a globalized application, we need these additional resources. Please add the BlazorWebAssemblyLoadAllGlobalizationData element from Listing 14-20 to the client project.
Enabling Globalization Data
You also need to add the Microsoft.Extensions.Localization package to the client project. This adds about 0.2 MB to the initial download.
Globalizing Your Components
The PizzaItem Component
The ItemList Component
The PizzaList Component
Updating _Imports.razor
Internationalizing the PizzaList Component
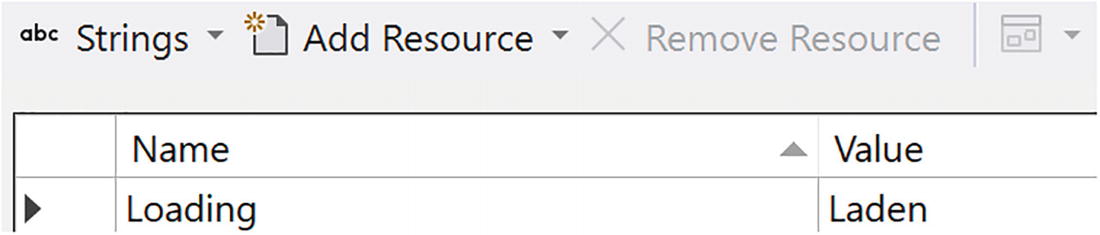
The PizzaList Resource
Configure Dependency Injection
The ShoppingBasket Component
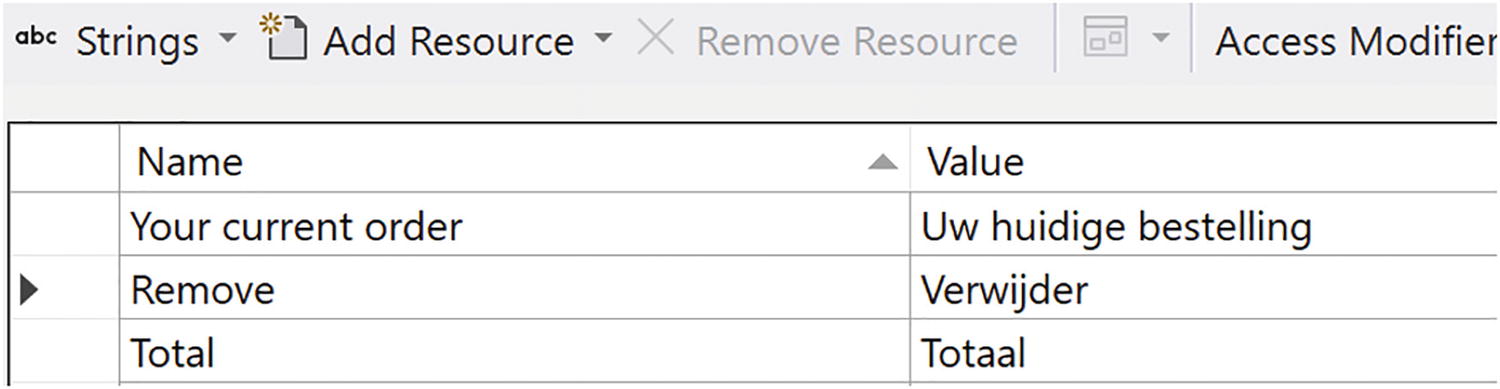
The ShoppingBasket Resource
For the other components, you are on your own. Update the three labels in the CustomerEntry component to use the localizer and build a resource file for these. The Index component has a couple of titles in it, so replace this with the localizer. Again, provide a resource file.
You should be ready to run the application, but first ensure your browser has been set to the language you have been using for the resource files before running. Your PizzaPlace should now support another language!
Adding a Language Picker in Blazor WebAssembly
Just like in the “Enabling Globalization Data” section, we will add a language picker so users can select the language they prefer. Except now we will not use a cookie to store the user’s choice. Instead, we will store it in local storage.
The appsettings.json File
The ConfigurationExtensions Class
Storing the CultureInfo in localStorage
Reading the Culture from Local Storage
Modifying Program
The LanguagePicker Component’s Markup
The LanguagePicker Class
The MainLayout Component

The MainLayout Resource
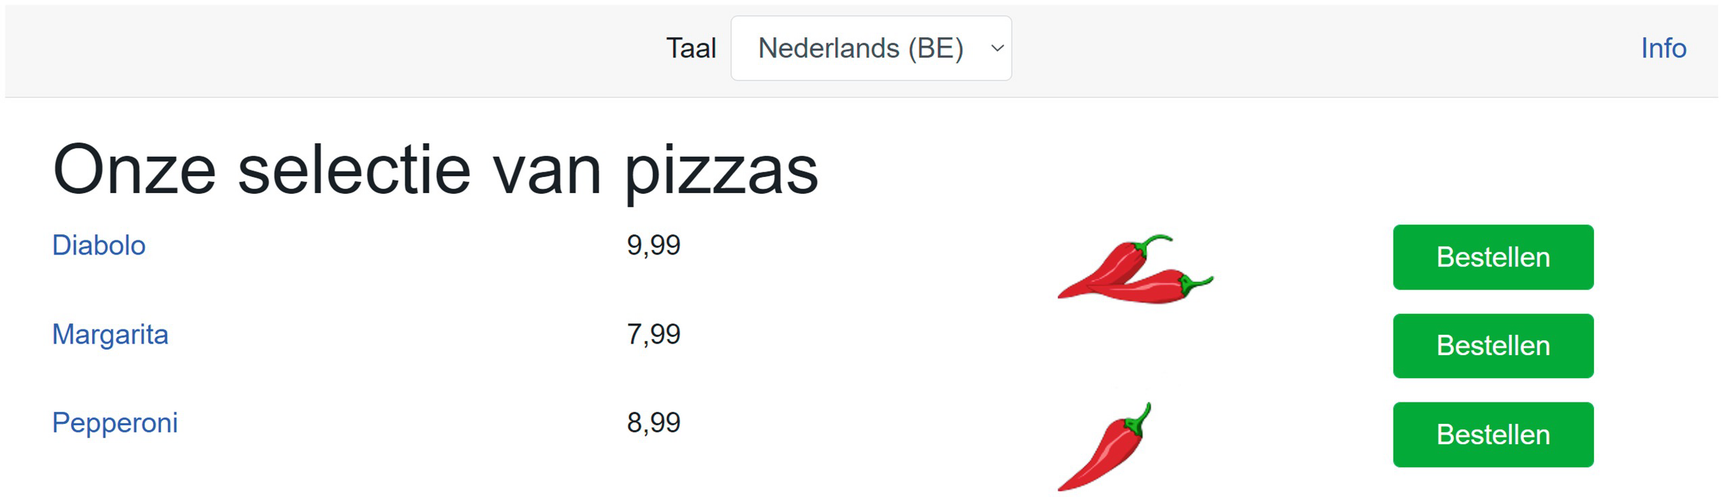
Running the PizzaPlace Application in Dutch
Using Global Resources
You might have noticed something: can we reuse resources? Both Index and PizzaList components need a resource for the loading UI. Could we put this somewhere as a common resource? Yes, we can!
The PizzaList Component Using Common Resources
Summary
In this chapter, we reviewed terms like internationalization (I18n) and localization (L10n). Then we looked at internationalizing a Blazor Server application using the IStringLocalizer<T> interface, and we added the proper resource files (.resx) to localize this application to another language. After this, we proceeded to support multiple languages for our PizzaPlace application, and we built a LanguagePicker so users can choose the language from a menu. We also looked at using the same resources in multiple components.
15. Deploying Your Blazor Application
15. Deploying Your Blazor Application
At a certain point in time, your Blazor application will be ready for the big public. Yeah! But the work is not yet done. We need to take our application and copy it to a server connected to the network so other people can use their browser to admire your work! Let us look at how we can deploy our Blazor application.
Deploying Standalone Blazor WebAssembly
When your Blazor application does not require any server support, you can host the application just like any other static website. In this case, the host just needs to serve the files to the browser since everything is executed on the browser.
Hosting on GitHub
GitHub is a free service that allows you to collaborate with others on a development project. It has support for git source control, builds automation, and allows you to host static websites, all free of charge.
If you are not familiar with git source control, there is an excellent book available for free digitally at https://git-scm.com/book/en/v2.
Here, we will host our Blazor application on GitHub, and the process is similar for other static hosting platforms. There are many other excellent hosting solutions out there, but I had to pick one, and GitHub is widely known in the developer community.
Using GitHub requires some knowledge about git. If all of this is familiar, great. If not, the walk-through gives you the git commands you need to execute.
If you don’t have a GitHub account, you will need to create one on https://github.com/. Because modern websites have the tendency to change how they look, I won’t be using screenshots here, but the process should explain itself.
Once you have an account, you should create an organization at https://github.com/settings/organizations. GitHub allows you to have multiple organizations, and each can host a static website. Select a unique name for your organization; here, I will use the MicrosoftBlazorBook organization. After creating the organization, select it. Your browser will show the organization’s page, for example, https://github.com/MicrosoftBlazorBook.
Here, you can find a list of repositories. A repository will host all your sources and their history as you make changes to files using git source control. Since you just created the organization, you will have to create a new repository. Click the New button; give your repository a nice name and description. You should also choose if you want the repository to be public (anyone can see your code) or private. The deployment process is the same for either, so pick one. Complete creating the repository, but don’t add any files like README.
After completion, GitHub will show you a page that displays the command-line commands you can use to create the repository locally.
I will be using Windows Terminal here, which has built-in support for PowerShell commands. All commands should work well with Linux and OSX command line.
First, this will create a README.md file in the current folder, and then this will create a git repository in the current folder. Next, this adds the README.md file to the repository, creates a new commit with a comment, and finally pushes the repository to the GitHub server. Now we are ready to deploy a static website.
Creating a Simple Website
A Basic HTML File
Since we made a change to your site, we will upload these changes into GitHub using git in the command line.
When you refresh the GitHub repository page, you should see index.html.
Deploying a Simple Site in GitHub
After executing these commands, the deployment process will start, and by refreshing the pages page (the preceding URL), you can see the status. Refresh until GitHub tells you it is ready.
Click the link (e.g., https://microsoftblazorbook.github.io/StandAloneWASM/), and you should see your static website in action!
Deploying a Blazor WASM Project
When we compile our Blazor project, two new folders will be created: obj and bin. We don’t need to keep these folders in source control, and an easy way to do this is by telling git to ignore these. Since this is a common scenario, we can use
dotnet new gitignore
Now you can reload the site (which will not work yet); for example, in my case, this would be https://microsoftblazorbook.github.io/StandAloneWASM/.

Our Blazor Site Does Not Load Correctly (Yet)
Fix the Base Tag
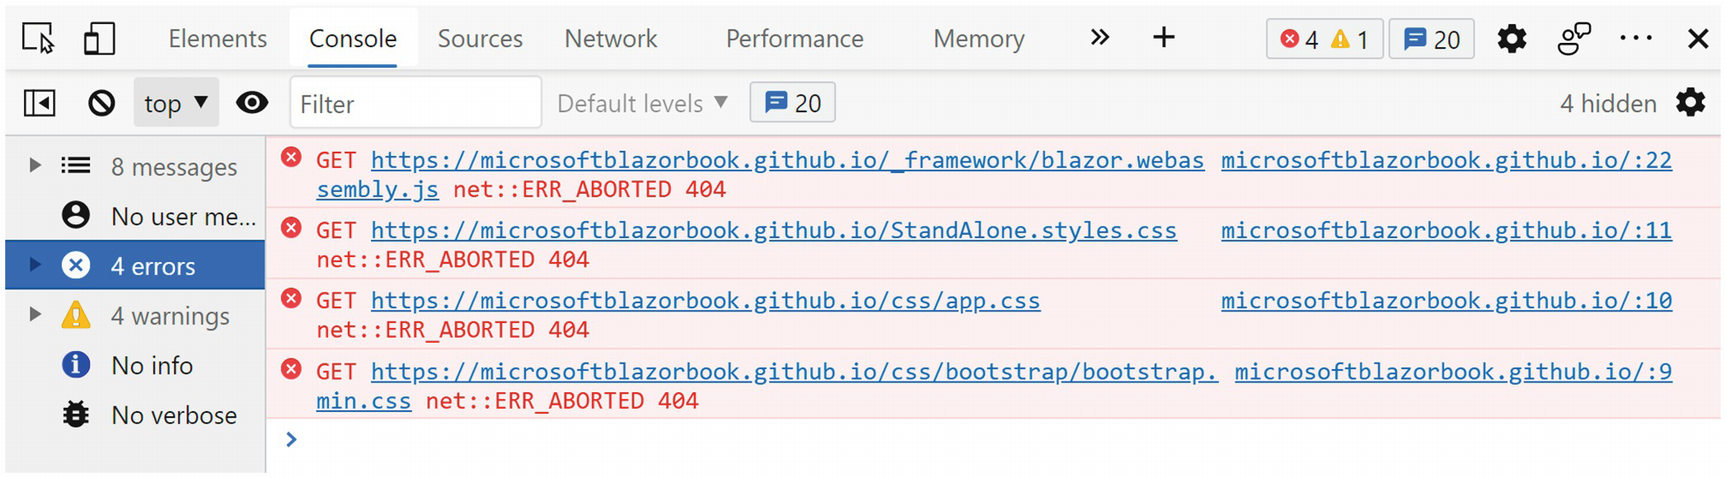
The Browser Debugger’s Console
As you can see, the browser is trying to load the JavaScript and CSS files from the root of https://microsoftblazorbook.github.io, but our files are hosted at https://microsoftblazorbook.github.io/StandAloneWASM/. What we need to do is to instruct the browser to prefix each file’s URL with StandAloneWASM. This is done through the index.html’s base tag. And if you remember from Chapter 9, routing also used this base tag to figure out which component to show! So use your favorite editor to update the base tag in index.html to use your repository’s name as in Listing 15-2.
Listing 15-2. Update the index.html’s Base Tag
Wait for the deployment to complete and refresh your site’s page. You can review the deployment process at https://github.com/MicrosoftBlazorBook/StandAloneWASM/deployments/activity_log?environment=github-pages, replacing your organization and repository name in the URL.
Disabling Jekyll

Blazor Does Not Find the _framework Files
Wait for the deployment to complete and refresh your site’s page. Your Blazor site should work! Great!
Fixing GitHub 404s
There is still one problem we need to fix. Navigate in your Blazor site to the Counter route and make the browser refresh by hitting F5. It will display a 404 page! This is because GitHub will try to load the Counter file from the URL. We can fix this by copying our root index.html file to a 404.html file, which GitHub will then send back to the browser.
Now refreshing the counter route will work.
Here, we have been deploying our standalone Blazor WebAssembly application by pushing changes in source control to GitHub. Some other hosts also allow you to do this too; for example, you can deploy your application using Azure DevOps. If you want to host your Blazor application on a host that does not have source control integration, you will have to upload the publish folder using the host its own tools; this might even be with FTP!
Alternatives for GitHub
There are many alternatives to deploy your Blazor Standalone WebAssembly project; each will have its own little quirks to make it work, but everyone will require you to set the base tag in index.html correctly. For example, you could also deploy your project as an Azure Static Website. For more information about deploying your project as an Azure Static Website, visit https://docs.microsoft.com/azure/static-web-apps/deploy-blazor.
Deploying Your Site As WebAssembly
With .NET 6, we can now compile our complete solution as a WASM file and run everything as WebAssembly. By default, you will run .NET assemblies in the browser where the WASM .NET runtime will interpret IL instructions. By compiling everything into WASM, you can get significant performance improvements! However, the WASM file is larger than the .NET assembly equivalent, so compiling everything as WASM will come at the cost of a longer initial download. This is also known as Ahead-Of-Time (AOT ) compilation . AOT mainly benefits applications that are CPU intensive, so you might not even need this for your application.
Enabling AOT Compilation
This will take some time, so grab something to drink. While you are developing, AOT is not used because compiling takes so much longer.
Once deployment is ready, look inside the release/_framework folder and search for dotnet.wasm. This file on my machine is around 12 MB! Without OAT, this file is around 2 MB. Do note that the actual download is a lot smaller due to the compression used by Blazor. You will also find the original .dll files in the release folder. Sometimes your application might use reflection; in that case, the necessary .dll files are still downloaded. So we still need to deploy these.
We can now deploy our AOT compiled release just like before.
Deploying Hosted Applications
For both the hosted Blazor WebAssembly and Blazor Server applications, you will need to deploy to a host that supports executing .NET on the server. You can deploy this to Windows Internet Information Services (IIS) or to Linux Apache.
Understanding the Deployment Models
With ASP.NET Core hosted applications, we have a number of choices for deploying our application.
One option is to use a framework-dependent deployment . In this case, the deployment files only contain your application files with their dependencies. No runtime is deployed, so this will only work on a server where the .NET runtime has been deployed before. One advantage of using framework-dependent deployment is that your deployment will work everywhere since portable .NET assemblies are used.
The other option is to use a self-contained deployment . In this case, the deployment contains all the files that are needed to run the application, including the runtime. Because of this, you need to specify which platform you want to target, for example, 64-bit Windows, and it will only deploy to that platform. The main advantage of this is that there is no dependency on what has been installed on the server, except for the platform of course. Another advantage is that you can use any version of .NET, even previews. Most commercial hosts will only give you long-term support versions of the .NET runtime.
Deploying to Microsoft Azure
Most of us don’t have a server lying around to deploy to, so here we will deploy to an Azure web app. If you don’t have an Azure account, you can get one for free. Open your browser and visit https://azure.microsoft.com/. Here, you can create a free account, and you even get $200 credit.
An Azure web app is a hosting service that makes it very easy to deploy and run your Blazor application.
Add Your Azure Account
Creating the Publishing Profile
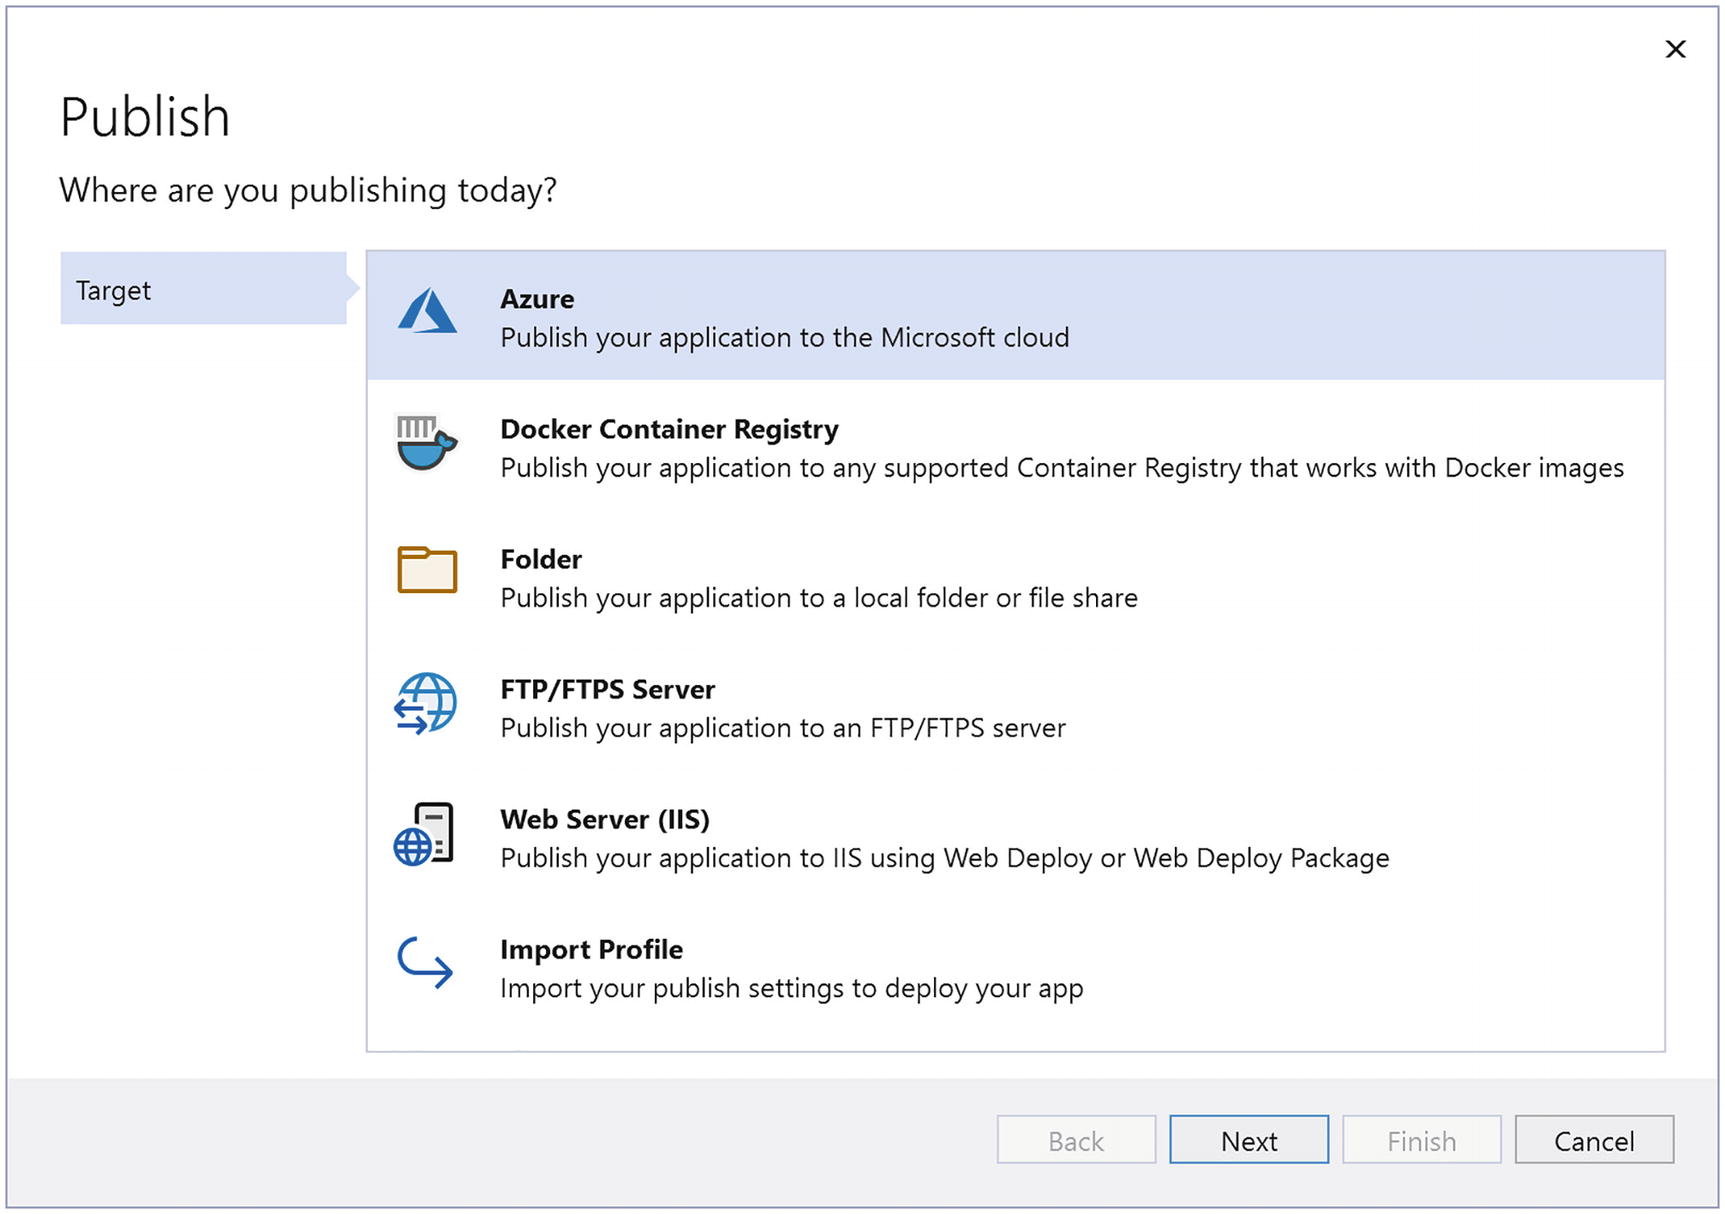
Deploy to Azure
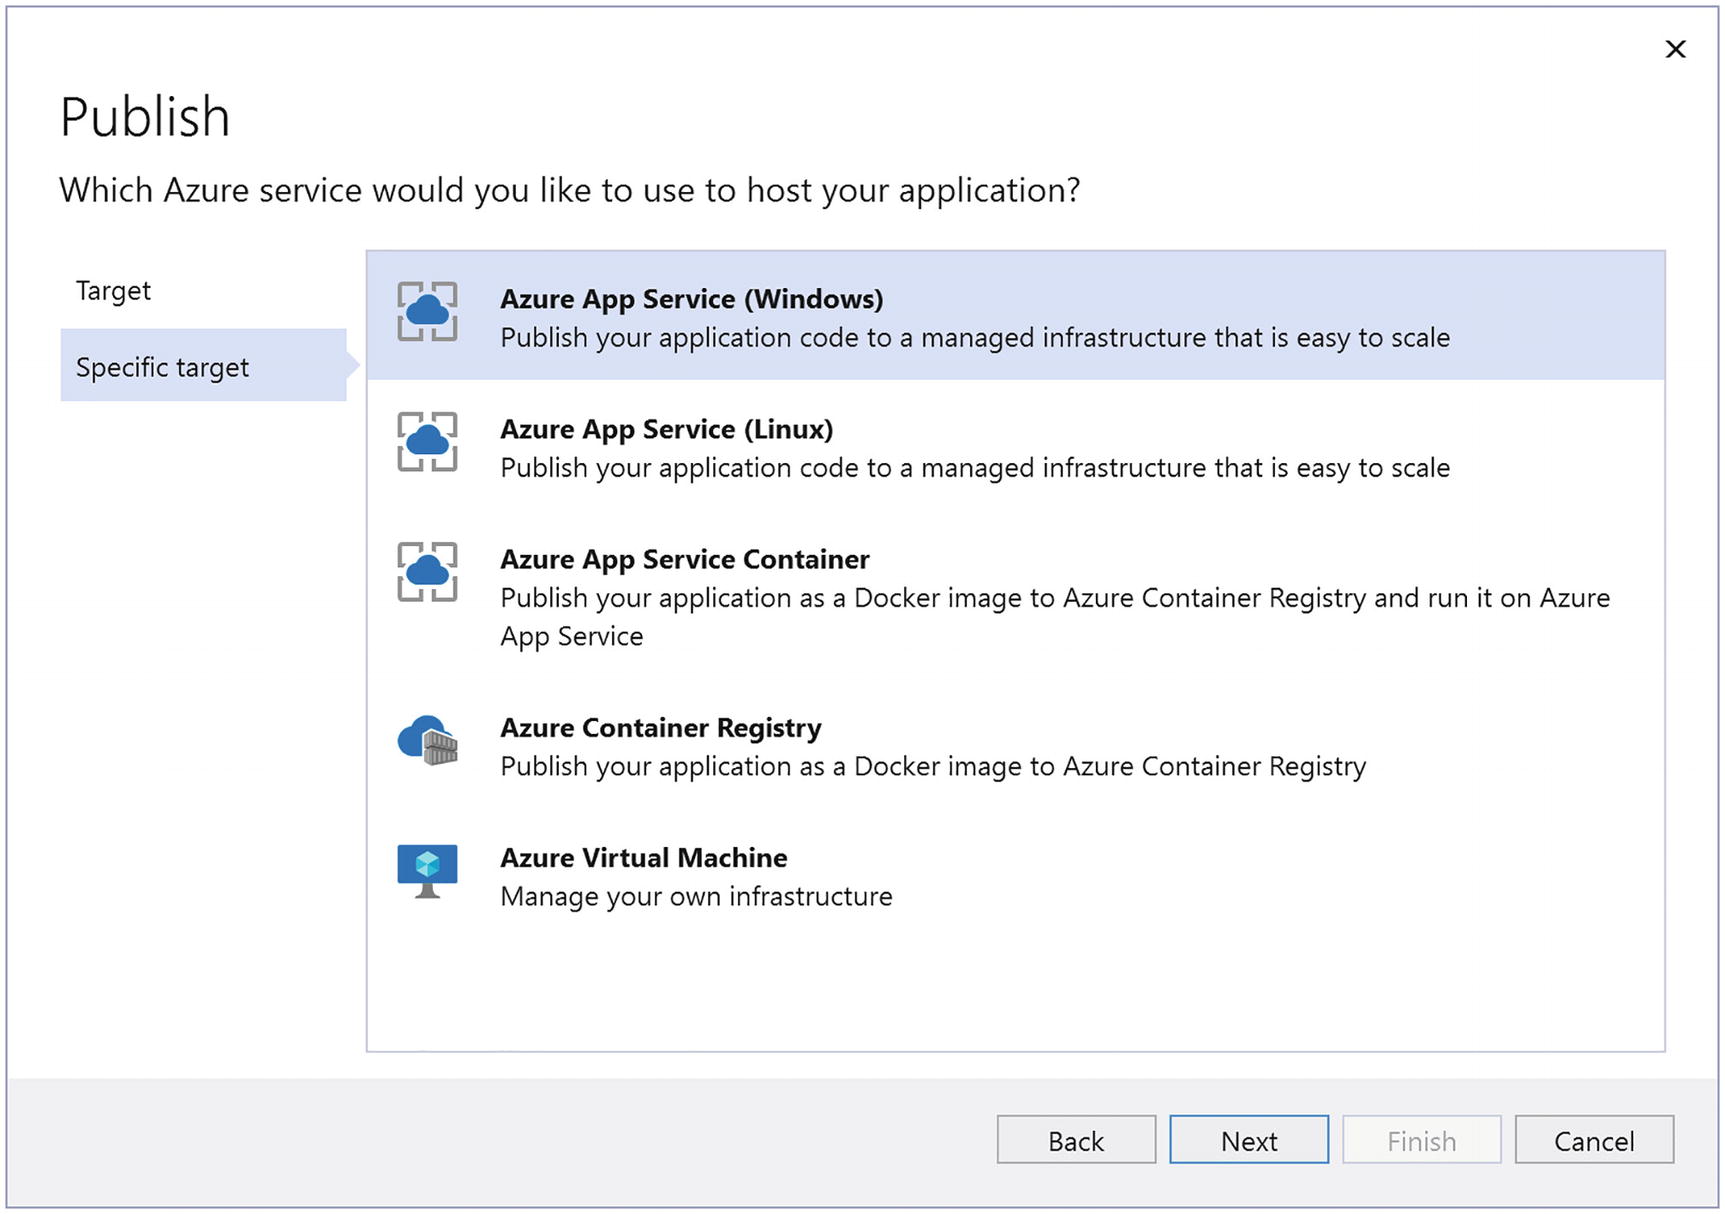
Azure Deployment Choices
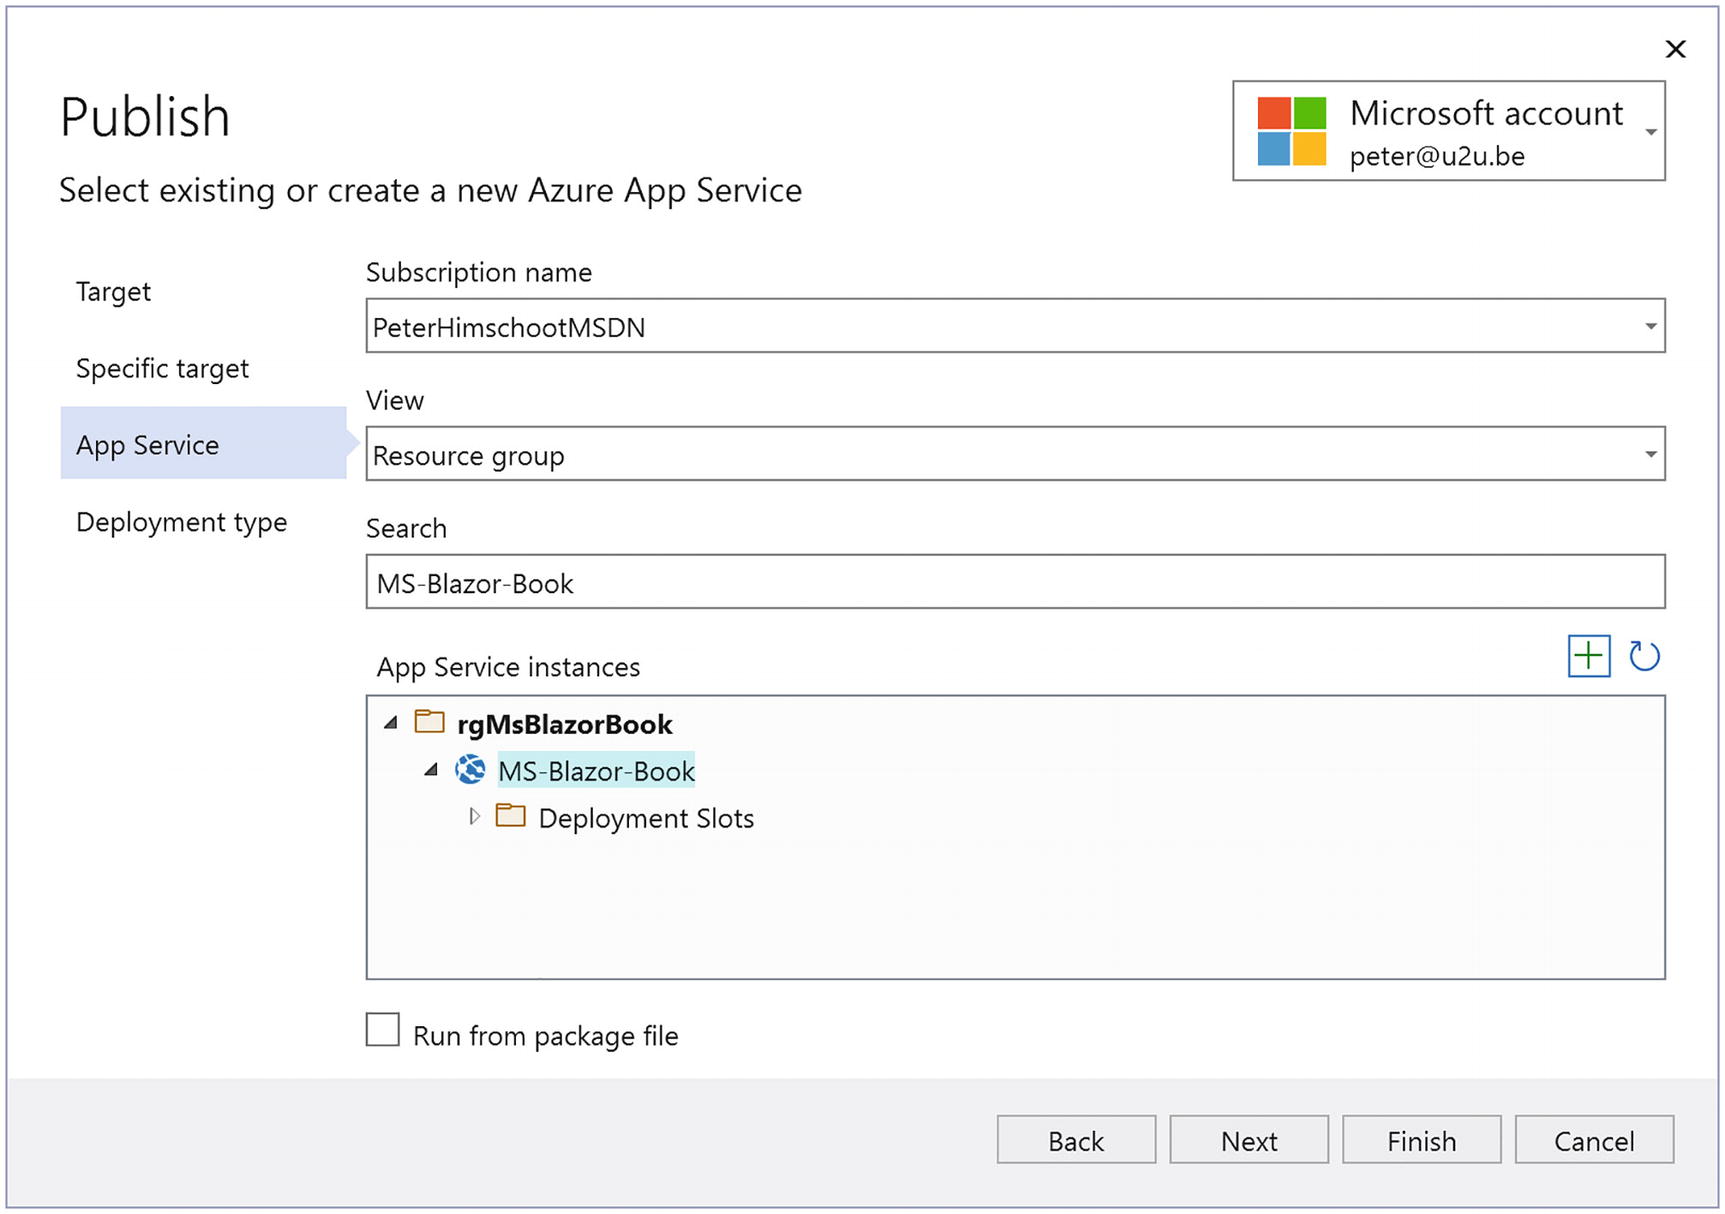
Select Azure App Service
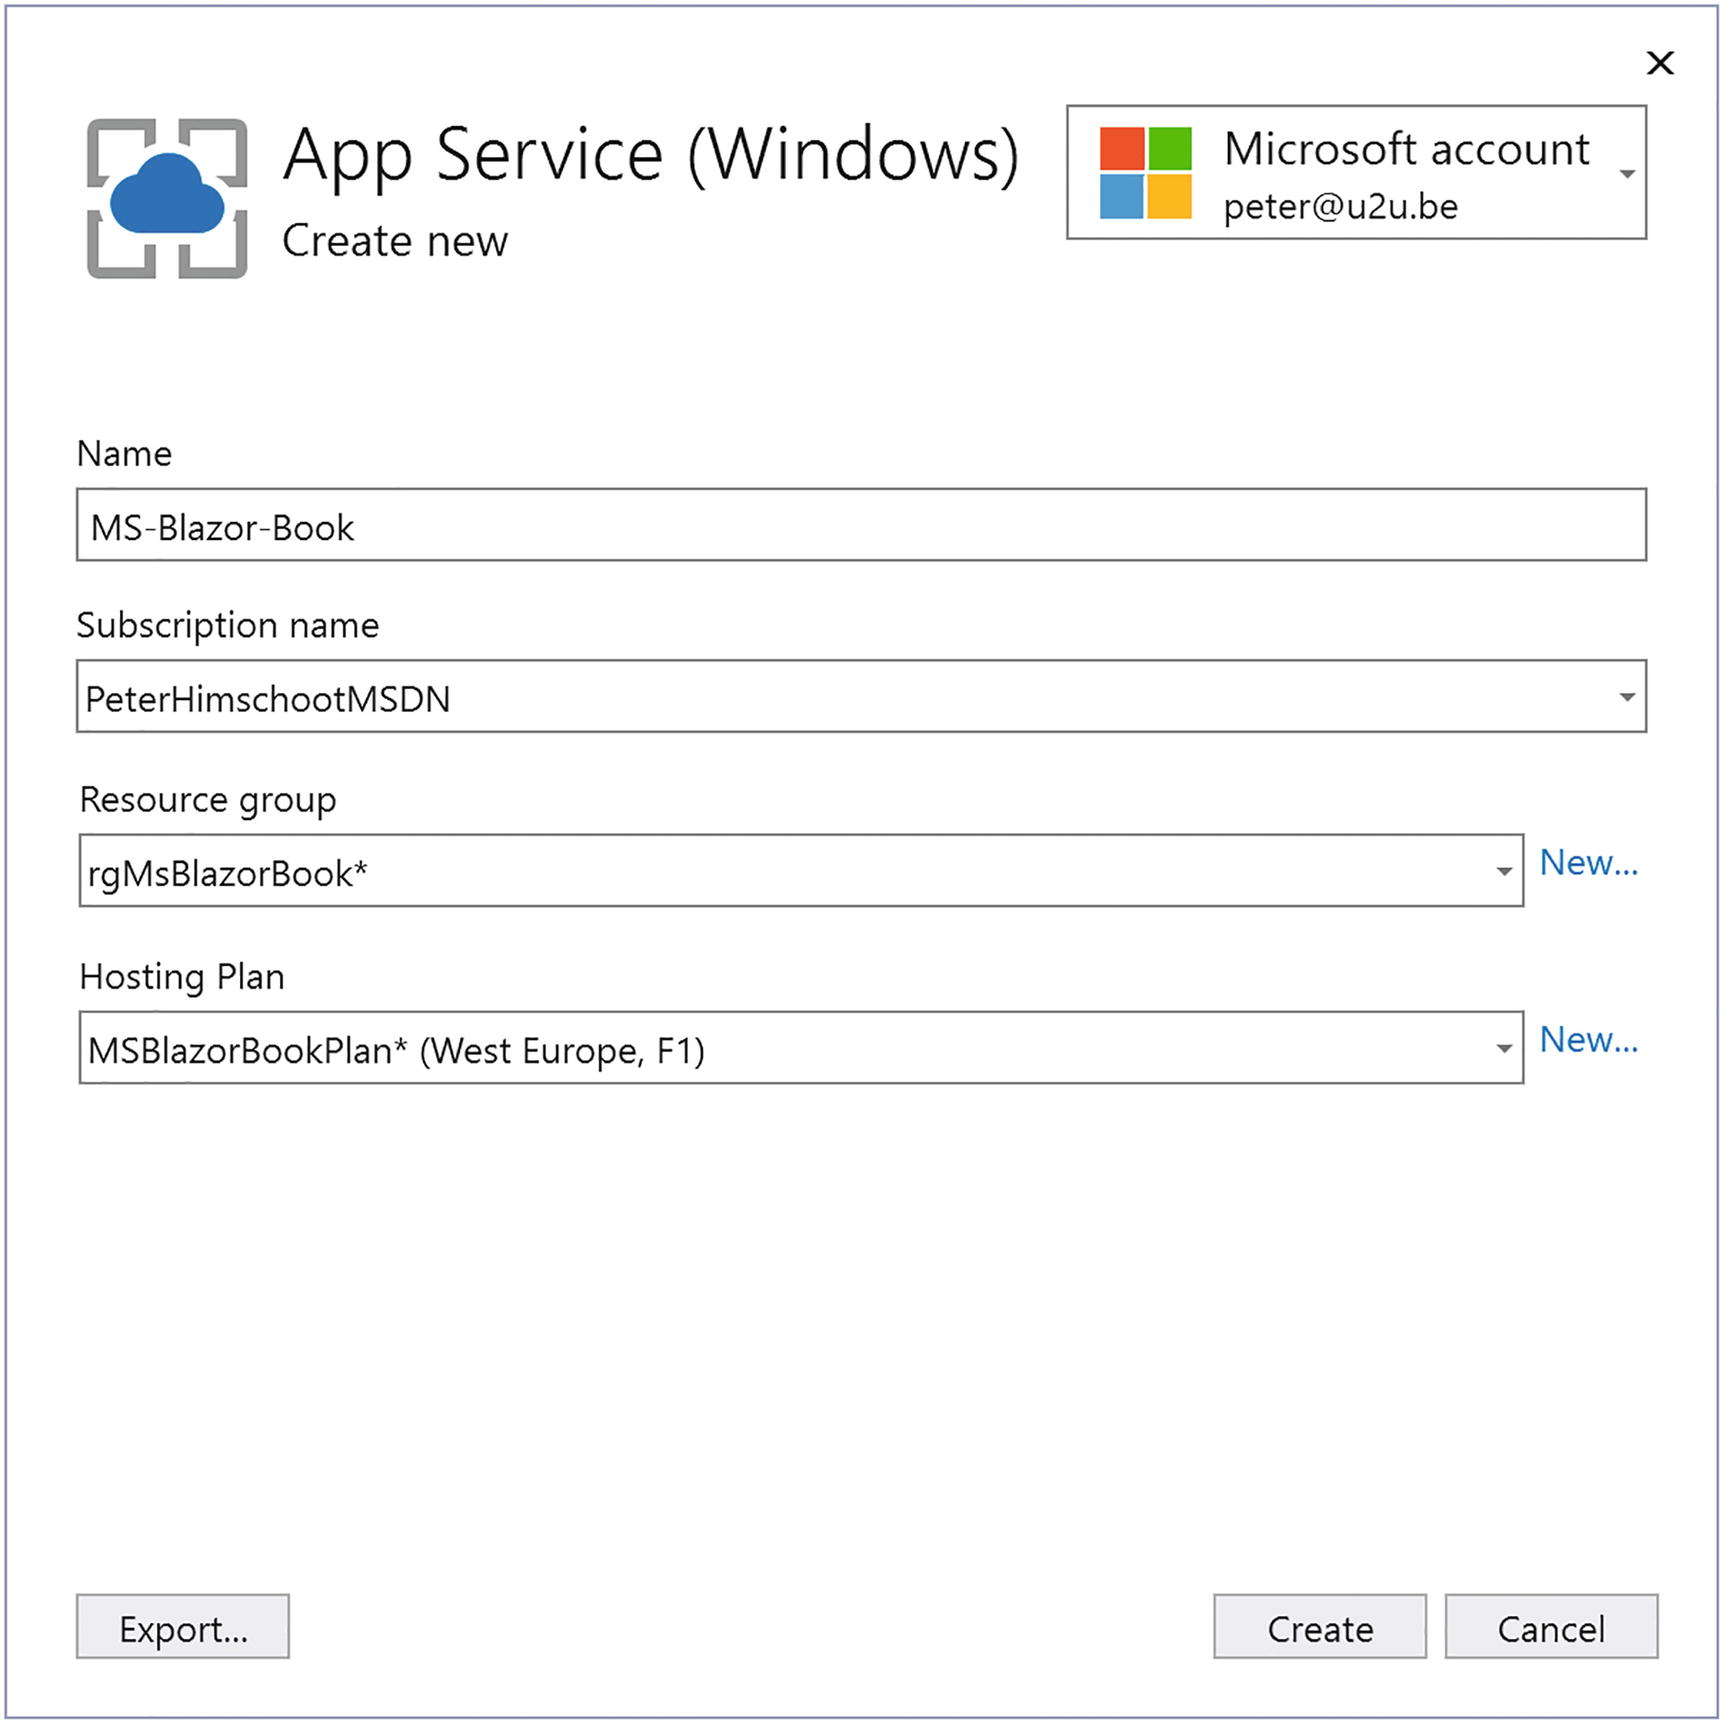
Create an App Service Dialog
A resource group groups together a bunch of Azure resources, such as a web app and its database, and allows you to manage and delete all of them as one. To create a new resource group, click New… and enter a new resource group name.

Create a Hosting Plan
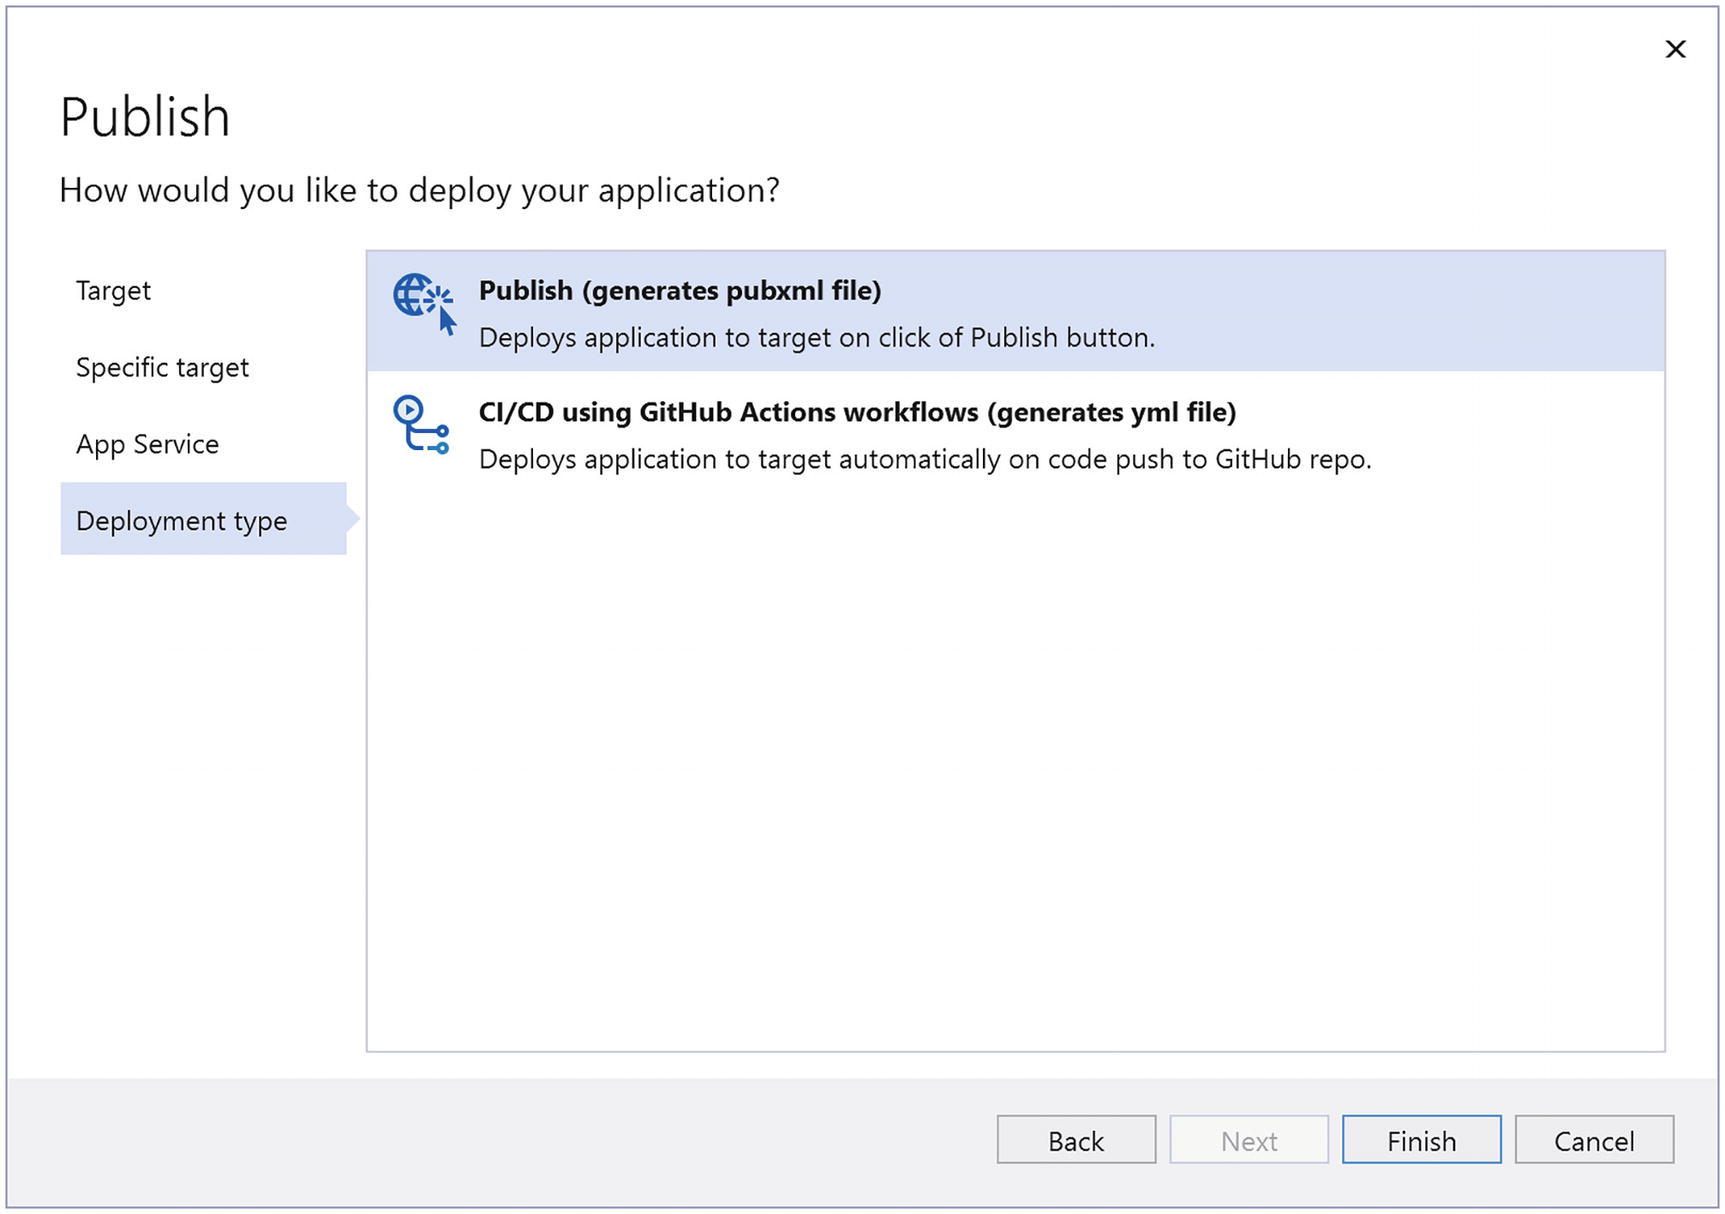
Publish or Use CI/CD
Select Finish.
Selecting Publishing Options
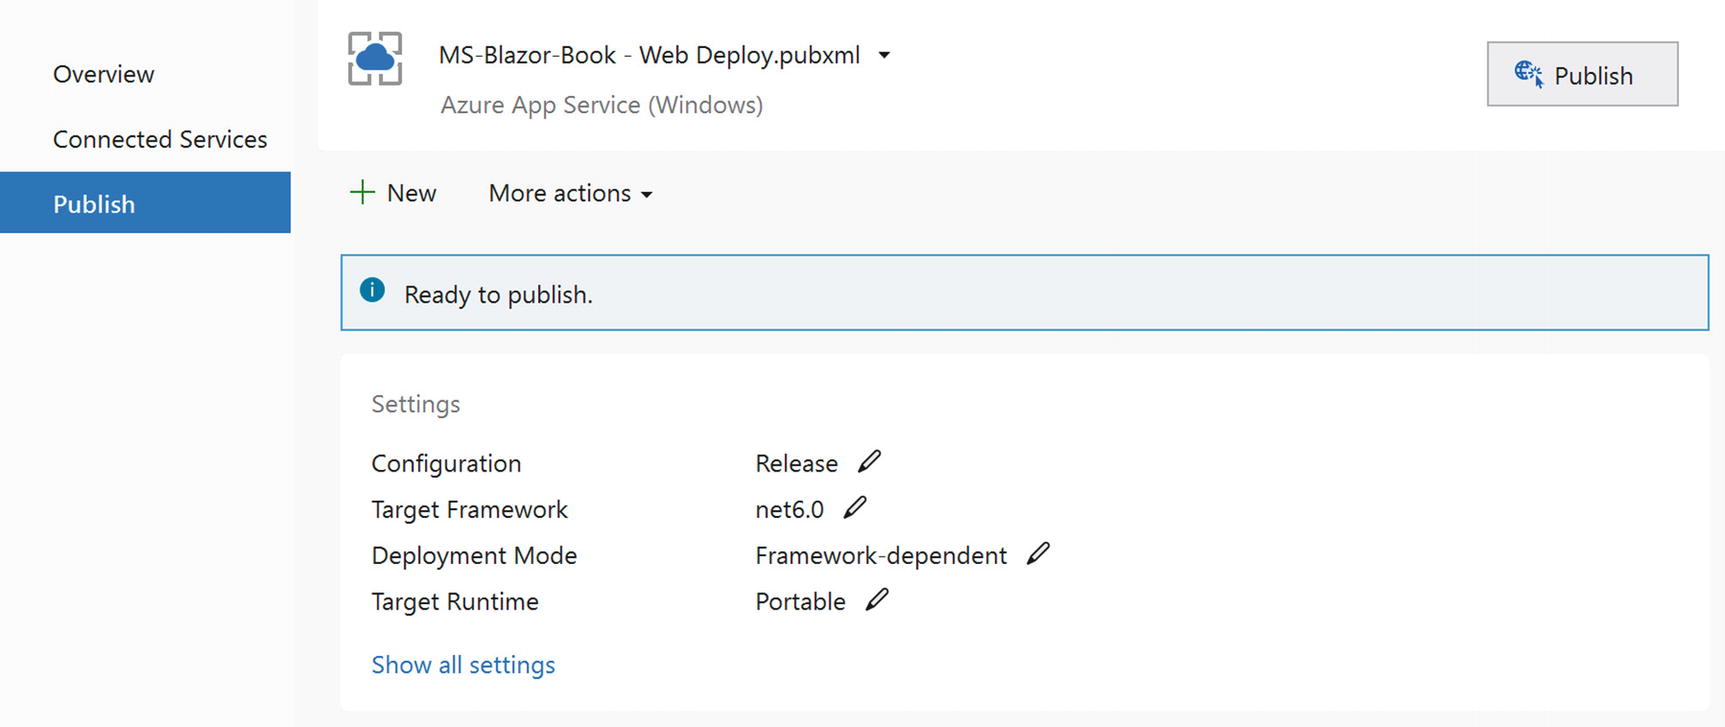
The Publish Profile
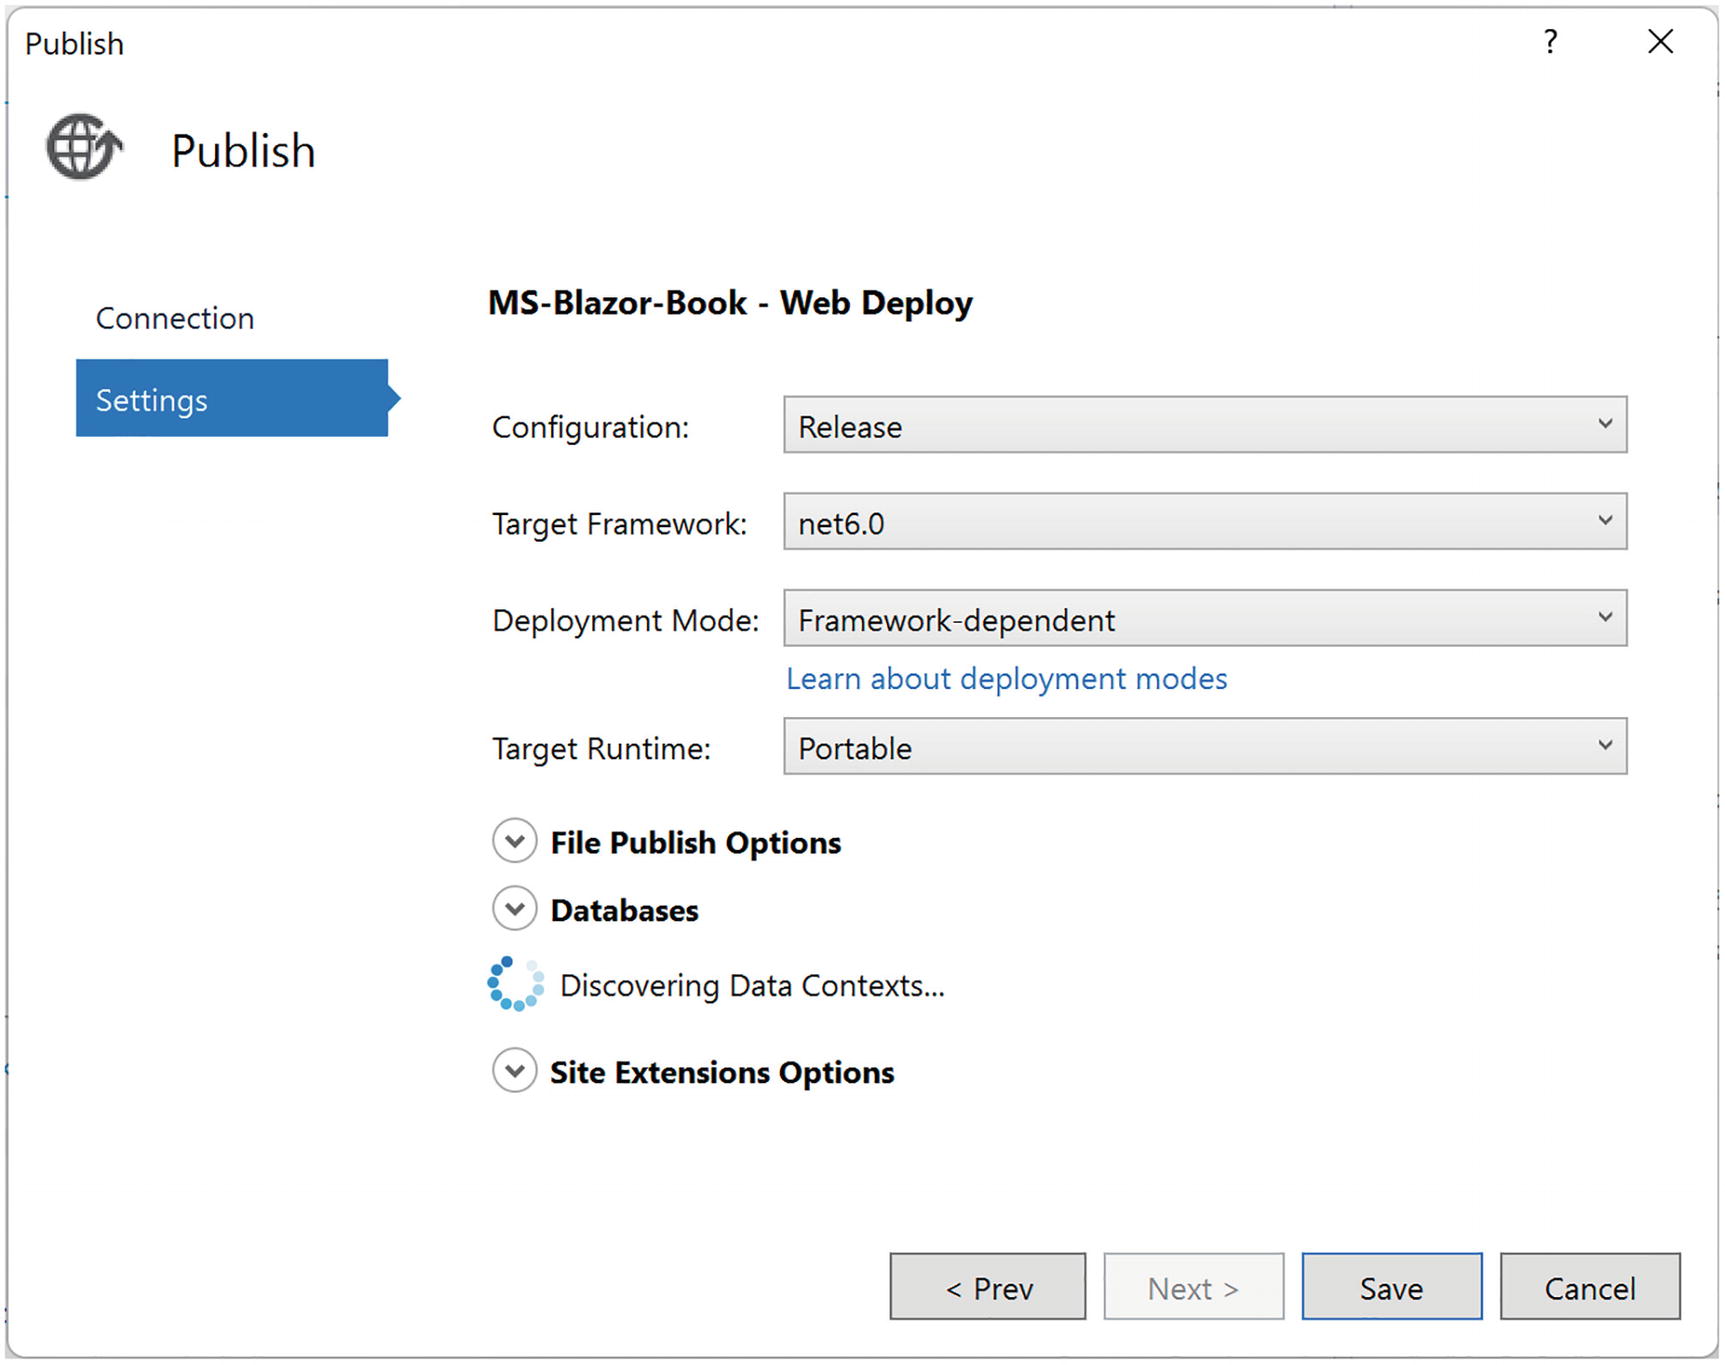
Publish Options
Publishing the Application
Now you can click the Publish button as shown in the top right corner of Figure 15-11. Visual Studio will build a release version and deploy it to Azure.
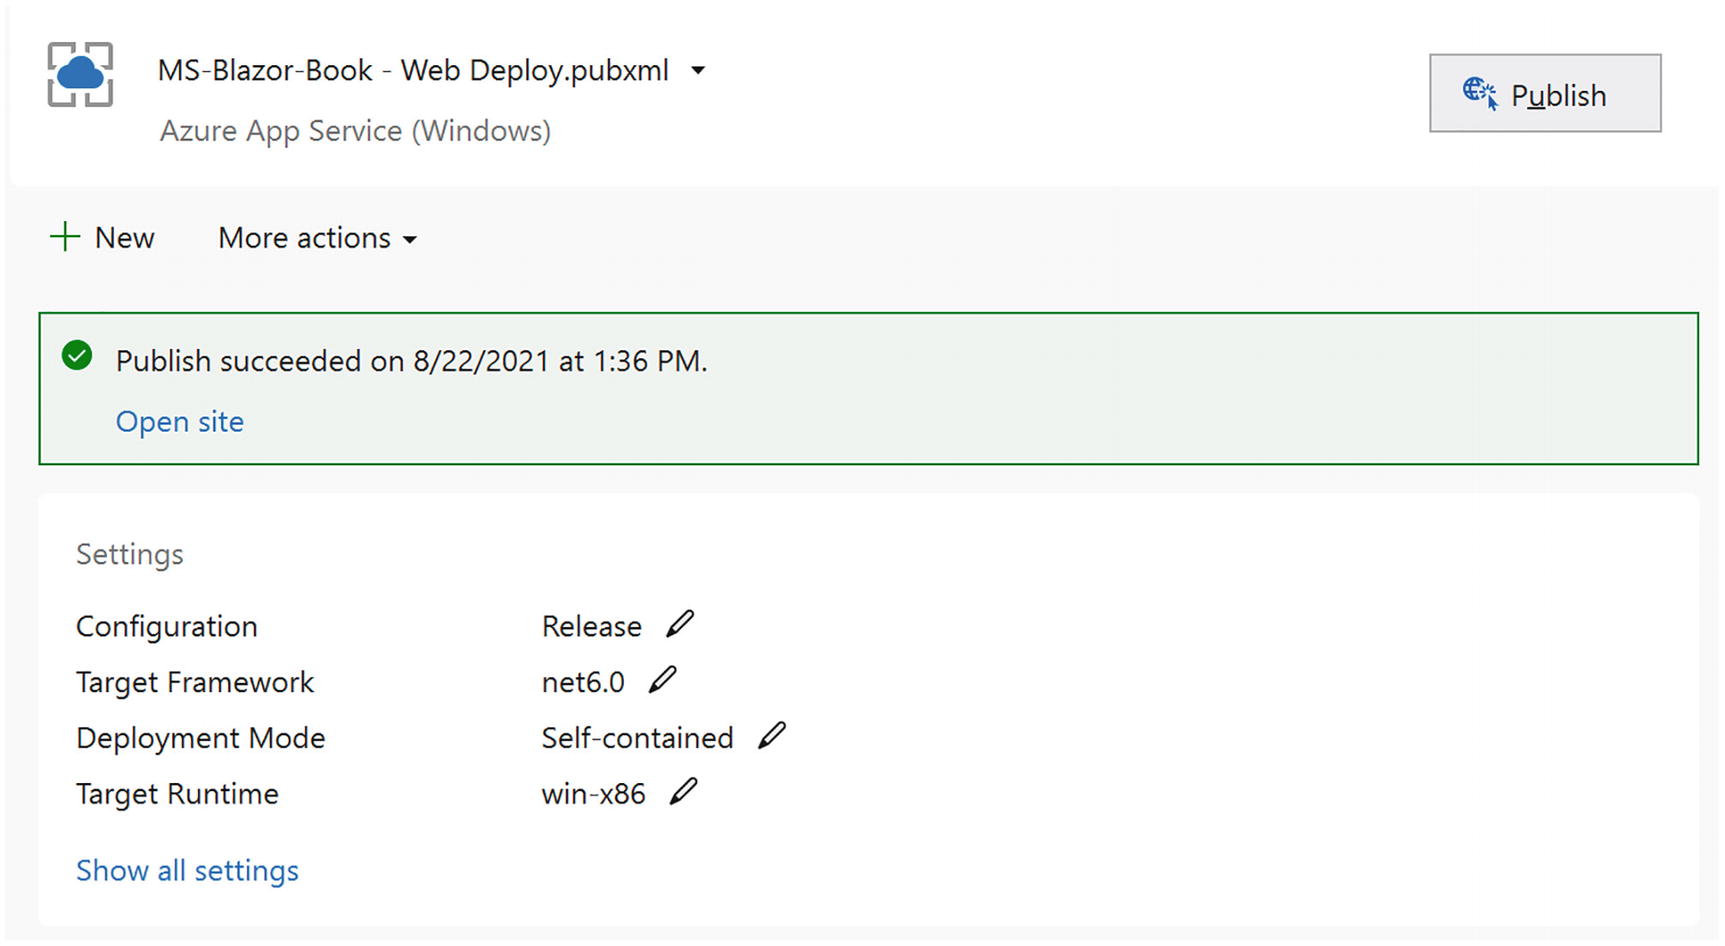
Publish Complete
Summary
In this chapter, we looked at deploying a Blazor application. With a standalone Blazor WebAssembly application, all we need is a file server so the browser can download the html, CSS, JavaScript, and DLL files. As an example, we used GitHub to deploy to. Remember to set the base tag in the html page to match the location where the files are downloaded from.
Deploying a Blazor Server or Blazor WebAssembly hosted project is just like deploying an ASP.NET Core site. As an example, we deployed our application to Azure as a web app. Visual Studio takes care of most of the work. Without Visual Studio, we can still create a deployment using the command line, and then we would need to upload the files onto the server. Each hosting provider has their own specific way of doing this.
16. Security with OpenId Connect
16. Security with OpenId Connect
Many web applications need some way to identify the user, also known as authentication . Sometimes this is only to show the user what they were looking at before, so we need an identity to retrieve the user’s state from the server. Sometimes we need to protect certain resources, also known as authorization , which can be personal information, or contents that the user has paid for, or because of some legal requirement. In this chapter, we will look at OpenId Connect and how we can use this to identify the user and decide what the current user can do.
Representing the User
Let us first discuss how we can represent users. You might think that we just need to know the user’s name, but this is not true. We will represent the user as a collection of properties about the user, which can include the user’s name and also information like age and which department the user works for. We call this claims-based security . Some claims can represent things the user can do; these are known as roles. For example, one claim could state that the user has the admin role, allowing our software to check the role instead of the name. Users can move around in an organization, and then you simply change the role claims to give users more or less things they can do with the software.
Using Claims-Based Security
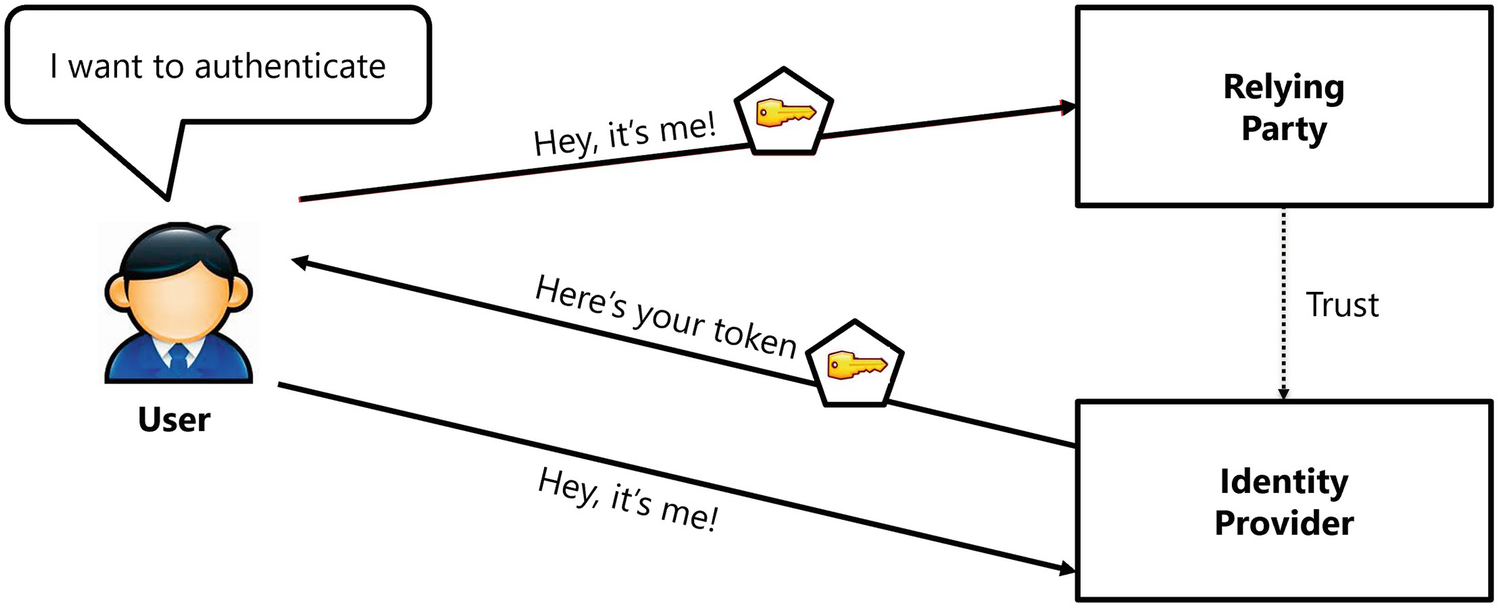
The Authentication Process
One more aspect about tokens is that once a user has received a token, the user can use it again and again without the need to go back to the identity provider. Of course, there needs to be a limit to this, and that is why tokens have a valid period, and after this period, the user will need to get a new token. My passport was issued to me a couple of years ago, but I can still use it until it expires. Then I will have to go back to city hall and get a new one. Of course, software tokens will not last that long, because it is easy to get a new one over the network.
Understanding Token Serialization
How are tokens serialized over a network? Modern applications using REST use the JSON Web Token (JWT) open standard. This allows us to transmit tokens in a secure way in the form of a JSON object.
A Serialized Token
The issuer claim (iss) states that this token was issued by my development identity provider with URL https://localhost:5000, and the not before claim (nbf) together with the expiry claim (exp) gives this token a validity period. The audience claim (aud) states that this token is intended for the application called Blazor. Finally, the subject claim (sub) contains a unique identifier for the current user. There are a lot of other official claims you can find in a token, and you can find their meaning on the IANA JSON Web Token Registry’s site at www.iana.org/assignments/jwt/jwt.xhtml.
The payload of the token is not encrypted, so never include sensitive information in here!
The signature allows our software to check if the token has been modified, and again you should ignore this (but not our software!).
Representing Claims in .NET
So how are claims represented in .NET? From the start, Microsoft has provided us with two interfaces to represent the user, IPrincipal and IIdentity.
Retrieving the Name of the User from ClaimsPrincipal
OpenId Connect
OpenId Connect is a standard protocol that allows us to secure our applications, including websites, mobile applications, server, and desktop applications. Because of differences in application types, OpenId Connect describes a number of flows, such as Resource Owner Password Credential, Client Credential, Implicit, Authorization Code, and Hybrid flows. With Blazor, we will use the Hybrid and Authorization Code flows.
Understanding OpenId Connect Hybrid Flow
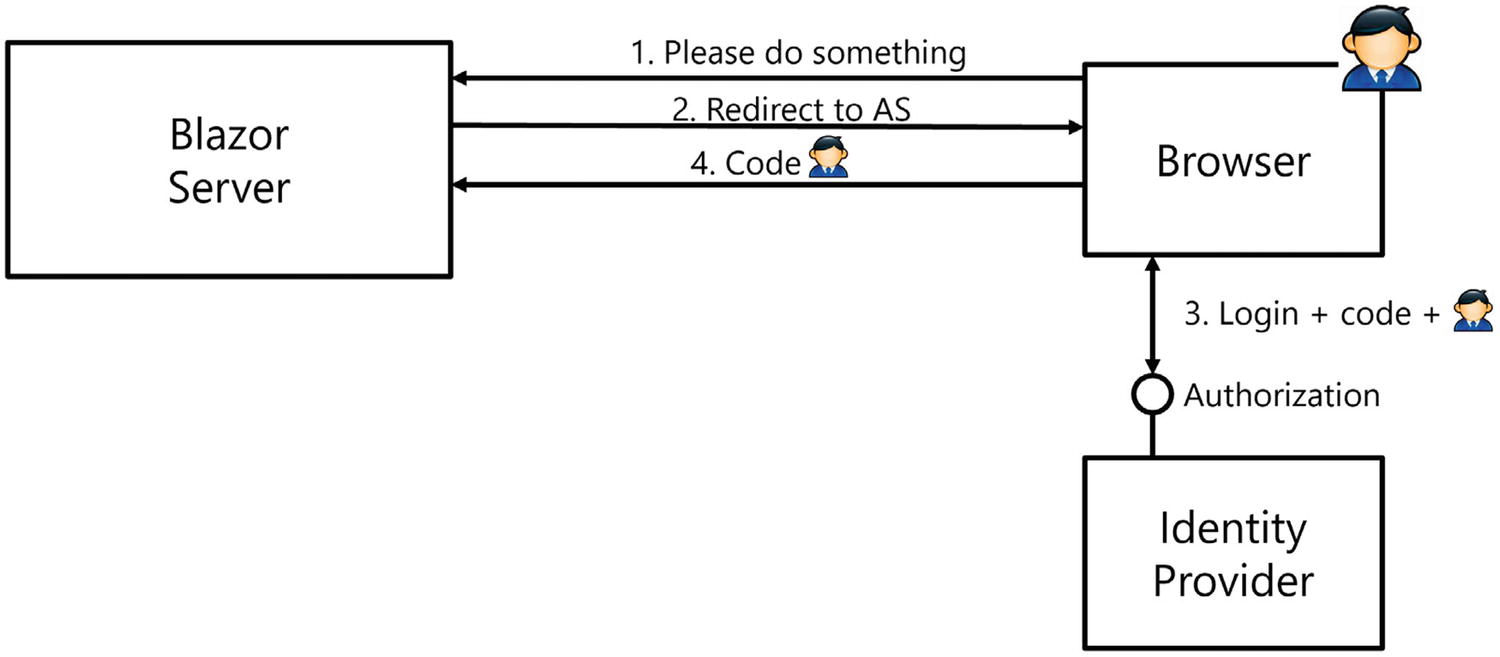
The OpenId Connect Hybrid Flow
When the not yet authenticated user visits a protected resource (Step 1), the Blazor Server will return an HTTP redirect result (Step 2) which will make the browser visit the identity provider, also known as an authorization server (AS). The URL contains credential information about the client (the ClientId and ClientSecret) together with a redirect URI. The identity provider identifies the client application through its ClientId and verifies if the redirect URI matches its list of registered client redirect URIs. The identity provider will then present the user with some kind of login UI (Step 3), for example, to enter the username and password. The identity provider is free how this login process works, and after a successful login, the identity provider will return an HTTP redirect to the browser (Step 4) so the browser will visit the redirect URI (the Blazor Server application) with the request containing a code and identity token. The redirect URI is then processed by the Blazor application, the identity token is turned into a ClaimsPrincipal, and the user has been authenticated. The Blazor application is also responsible for storing the ClaimsPrincipal, and with Blazor Server, this is done by storing the ClaimsPrincipal in a cookie, so the next request containing that cookie can deserialize it again. For the moment, we don’t need the code, but we will use it later.
A couple of remarks: an identity provider will only send tokens to known redirect URIs, so these have to be registered with the identity provider. This prevents unknown parties (hackers!) from hijacking requests. When you deploy your application, you should not forget to register the new redirect URI in the identity provider. There can be several registered redirect URIs, so you can keep developing locally and run the application in production using the same identity provider.
Identity Providers
There are many identity providers out there. For example, there is Microsoft Azure Active Directory, Google, Facebook, etc. Each of these identity providers comes with their own UI, but as long as they use OpenID Connect, the implementation works on the same principles.
Here, I want to use IdentityServer4 (www.identityserver.com/) which allows you to build your own identity provider for free (however, identity server is not free for commercial use). These people need to eat too!
Implementing the Identity Provider with IdentityServer4
Let us start by creating the project that we will use as our identity provider, using IdentityServer4. Create a new AspNet .NET Core Web App project and name it IdentityProvider.
Changing the Port
Use NuGet to Add IdentityServer4
Configuring Dependency Injection
Adding IdentityServer to the Pipeline
IdentityServer4 can be configured using a database or an in-memory configuration. We will use the latter because it is easier for learning and experimentation. Add a new class called Config to the project next to Program.cs. This Config class will contain the configuration for IdentityServer4.
Adding Users to IdentityServer
Adding Identity Resources
Adding Clients
Adding Users, Identity Resources, and Clients
Adding the Login UI to Our Identity Provider
When our users want to log in to the identity provider, the identity provider will present a login screen to the user. IdentityServer4 comes with a built-in UI, so here we will add this to the IdentityProvider project.
Getting everything installed is pretty easy with dotnet CLI.
This will install two new folders called QuickStart and Views and will also install some CSS and scripts in the wwwroot folder.
Configure Services for MVC
Adding MVC Middleware
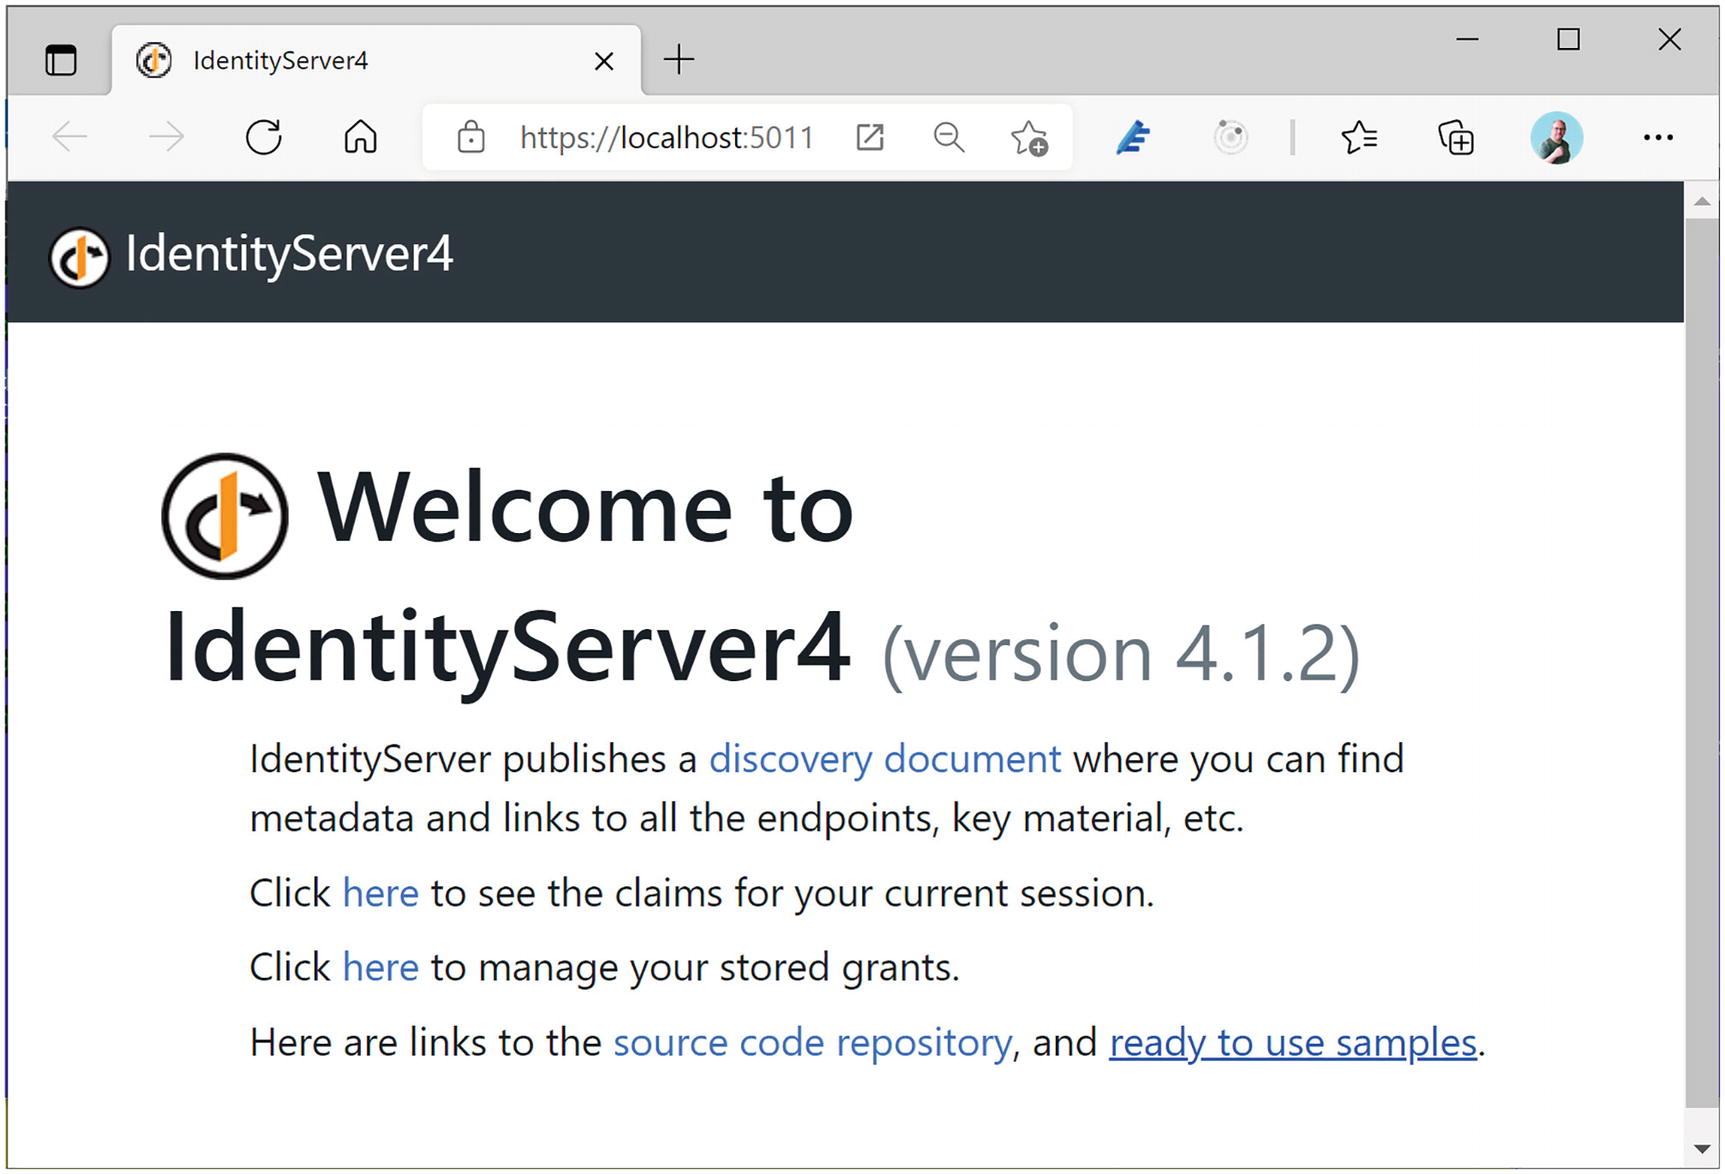
The Identity Server Home Page
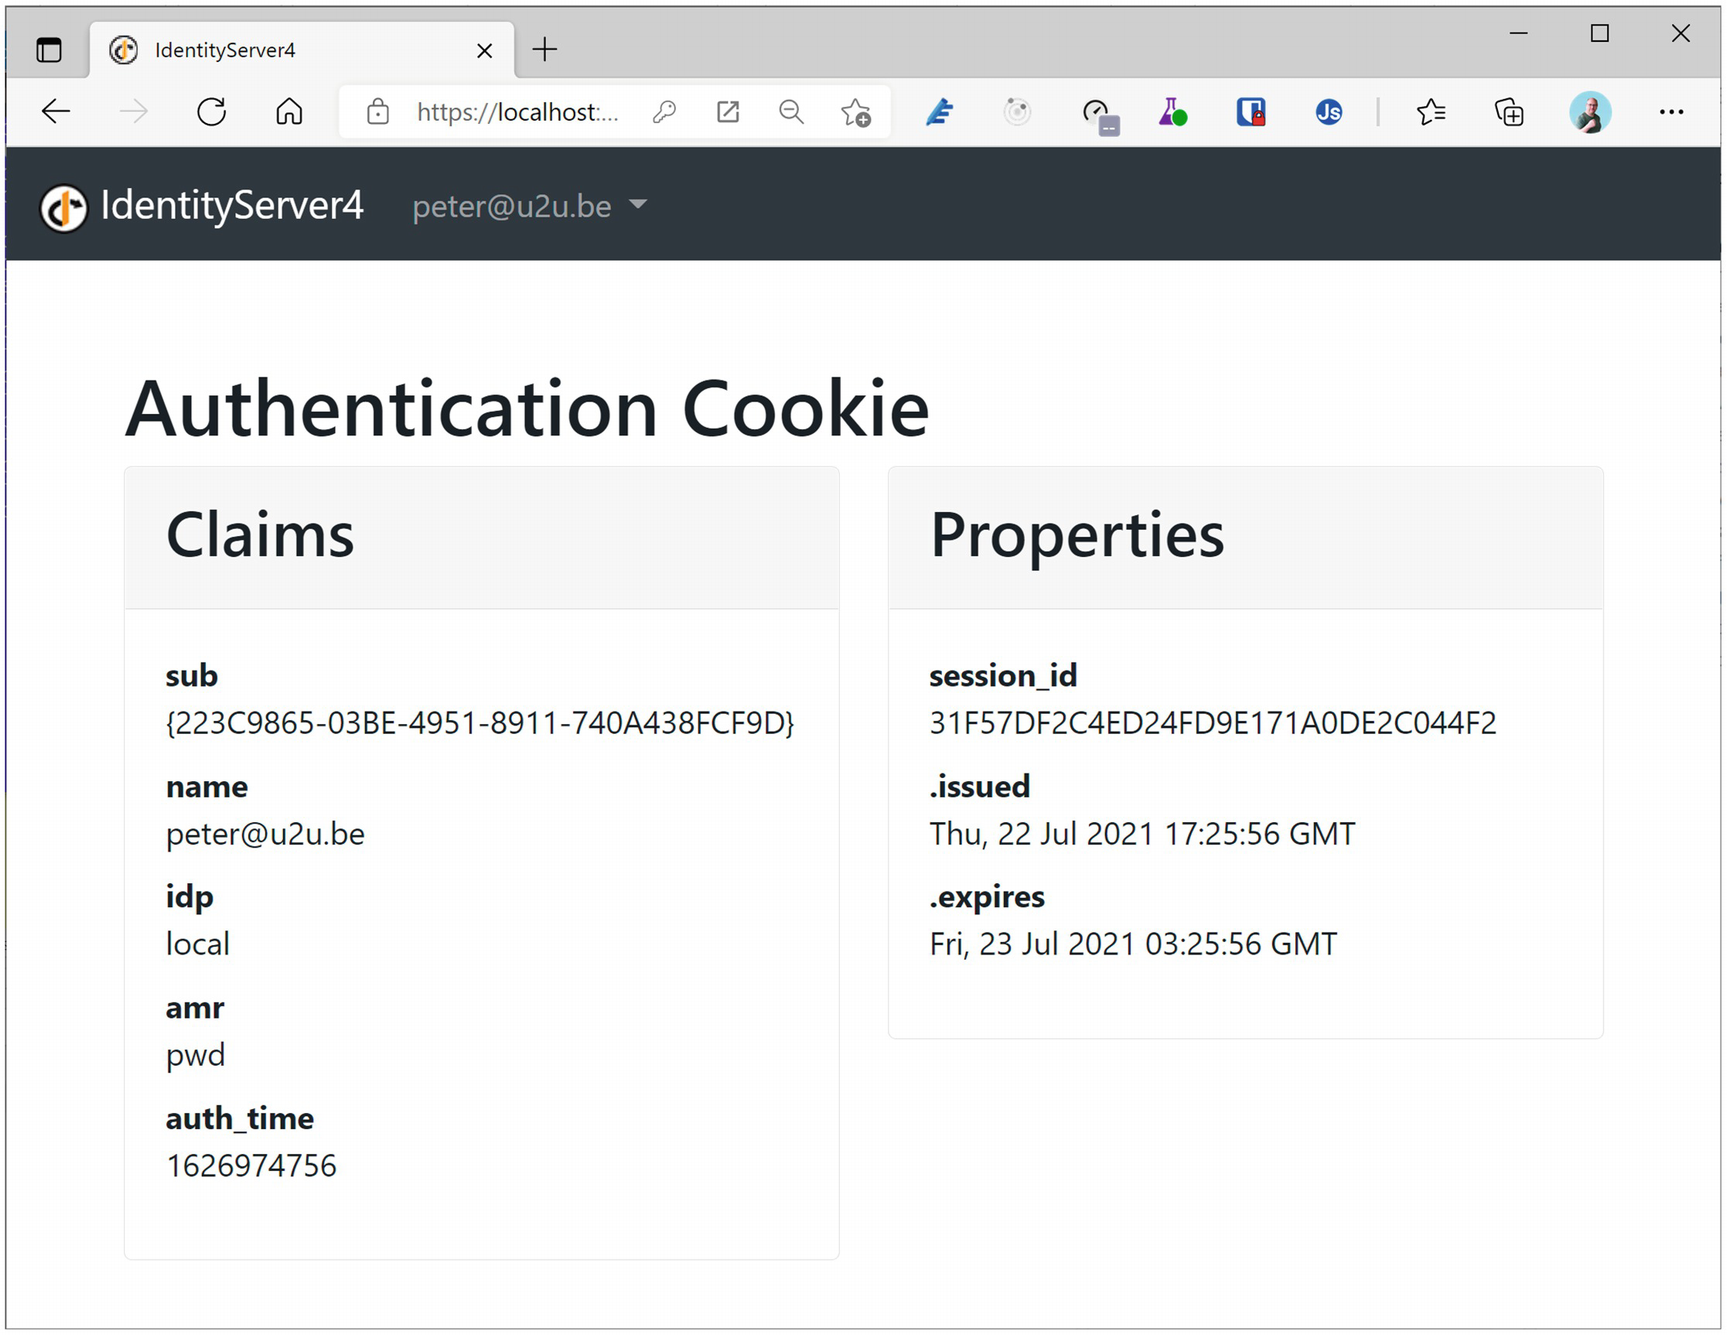
Understanding User Consent

The User Consent Screen
Protecting a Blazor Server Application with Hybrid Flow
Now that we have our own identity provider, we can build a Blazor Server application and secure it. Later, we will do the same for Blazor WebAssembly.
Add a new Blazor Server application to the existing solution and name it Blazor.Server.OpenIdConnect. If you are using Visual Studio, leave the Authentication Type set to None. This will generate the project without any authentication components. In the next chapter on using OpenId Connect with Blazor WebAssembly, you will use a more practical approach that will generate the authentication components for you using the Authentication Type set to Individual Accounts.
Adding OpenId Connect to Blazor Server
Add the Microsoft.AspNetCore.Authentication.OpenIdConnect package to the Blazor.Server.OpenIdConnect project.
Configuring Authentication
Add Authentication Middleware
Configuring OpenId Connect
Implementing Authorization in Blazor Server
Before running the application, we should also protect one of our resources; otherwise, there is no need to authenticate using the identity provider. But first we need to understand how authentication works in Blazor using the AuthenticationState and AuthenticationStateProvider classes . The AuthenticationState class allows access to the current user’s claims with the User property of type ClaimsPrincipal, and the AuthenticationStateProvider abstracts away how we retrieve the current AuthenticationState, because the process is different in Blazor Server and Blazor WebAssembly. So you should always use the AuthenticationStateProvider in your Blazor components if you want these to work in both Blazor Server and Blazor WebAssembly. Listing 16-16 contains a nice example of how you do this.
In Blazor Server, the user’s ClaimsPrincipal is stored in the HttpContext.User property so AuthenticationStateProvider retrieves it there.
Using the AuthenticationState in a Component
The Index Component
Update App Component
Add RedirectToLogin
Add the Login.cshtml Razor Page
The Login Page’s Model
Let us walk through the authentication process step by step. First, start the IdentityProvider project; next, start the Blazor.Server.OpenIdConnect project.
Please do not forget to always start the IdentityProvider project; the easiest way with Visual Studio is to set up multiple startup projects.
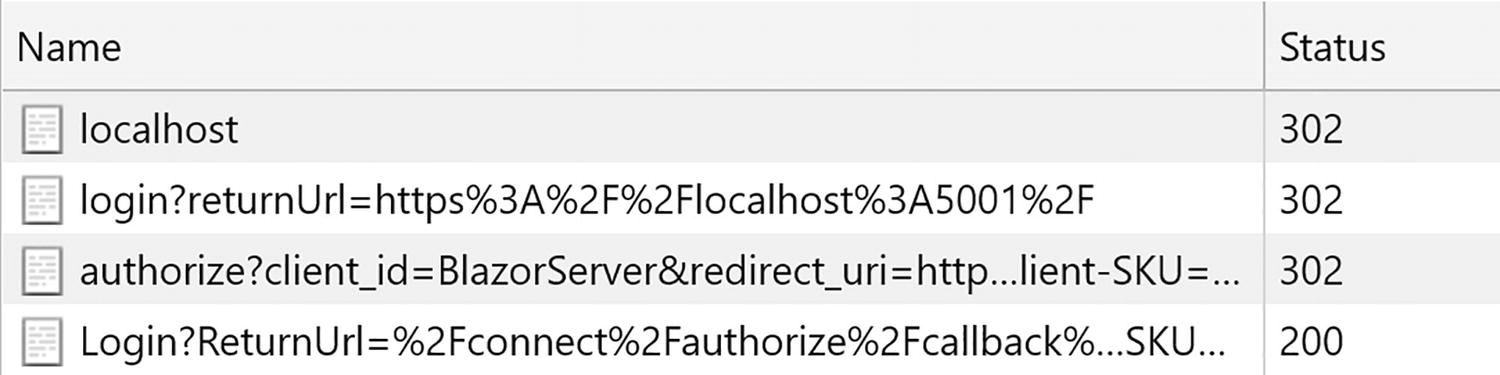
Redirecting to the Identity Provider
After completing the login process, you will be redirected to the Blazor Server’s signin-oidc URL which will be handled by the OpenId Connect middleware. This middleware will convert the identity token into a ClaimsPrincipal and redirect to the original URI that initiated the login process. The Cookie middleware will serialize the ClaimsPrincipal into a cookie (actually, it might use multiple cookies because of the limited length of cookies). The browser then will process the original URI and convert the cookie into the ClaimsPrincipal and because now the user is authenticated will give access to the Index component.
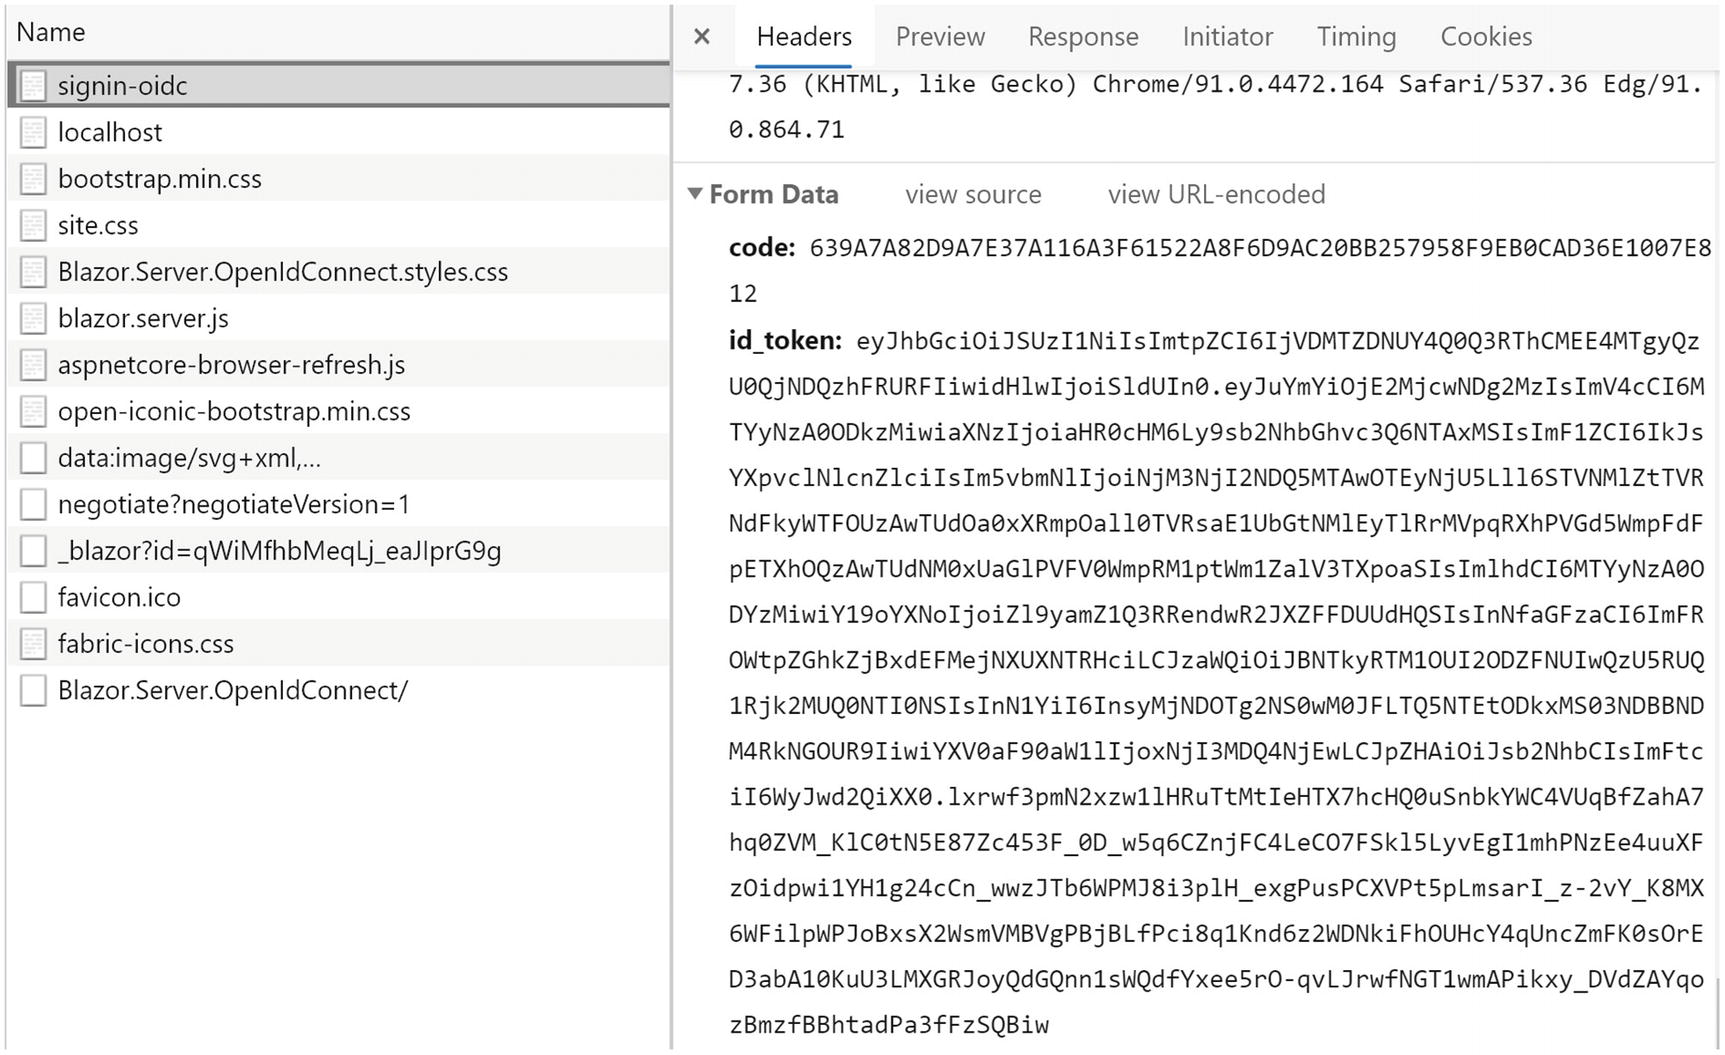
Receiving the Code and Id Token

Using jwt.io to Inspect a Token
Congratulations. You have just added authentication to your Blazor Server application!
Using AuthorizeView
Modifying the NavMenu Component
The LogoutModel Class
Remove the Authorize Attribute
The Logout Page
Setting the PostLogoutRedirectUris Property
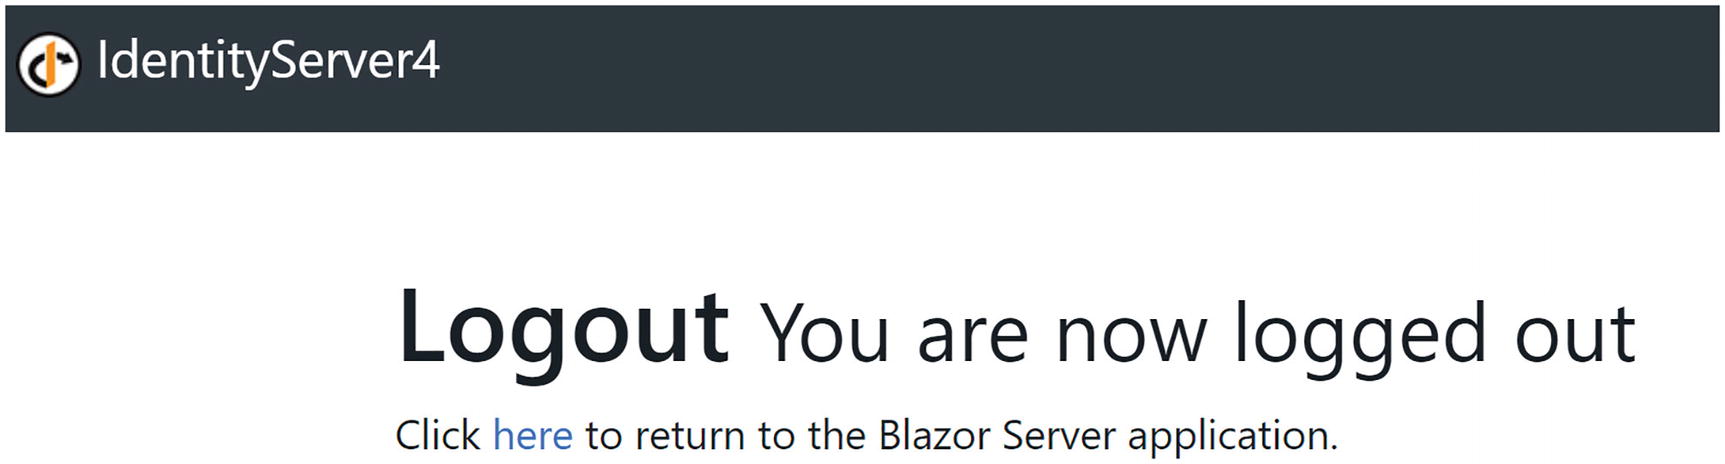
IdentityServer4 Showing the LogoutRedirectUri
Enable Automatic Redirect After Signing Out
Adding and Removing Claims
Adding an Additional Claim to the Users
Adding an IdentityResource for Address
Allowing the Address Scope for a Client
Requesting the Address Scope
However, we will not find the address claim in the Index component. Why? Because we need to explicitly map this additional claim using ClaimActions.
Add and Remove Claims with ClaimActions
Running the application and logging in again (!) will show the address claim.
Enabling Role-Based Security
Currently, we have claims that allow us to identify the user. We have the user’s name and address. But what if we would like to protect certain parts of our application so only certain users can access it? Should we check a long list of user names? No, in this case, we will define a number of roles, assign these roles to some of our users, and only allow access when the user has a specific role. This is known as role-based access control (RBAC).
Adding User Roles
Adding a Roles Scope
Adding the Roles Scope
Declaring the Roles Scope and Role Claim
Run the application, and log in again; the user’s role should be shown.
Using the Authorize Attribute for RBAC
Using AuthorizeView to Show Additional Content
Hiding NavLinks in the NavMenu
Run and log in with a user who has the admin role; you should see the Counter link in the navigation bar, and it should appear when you click it. Do the same for a user without the admin role; now there should be no Counter link in the navigation bar, and even manually modifying the browser’s URL to /counter will show a not authorized screen.
Accessing a Secured API
Where are we? We can use OpenId Connect to implement the authentication for our Blazor Server site, and we can use roles to protect certain sections of our application, either by writing code using the AuthenticationState or declaratively using the Authorize and AuthorizeView classes. This is enough when your Blazor Server accesses data itself. There is one more thing. Your Blazor application might need to access a protected API running in another application. How do we do this? The answer is of course more claims!
Using an Access Token
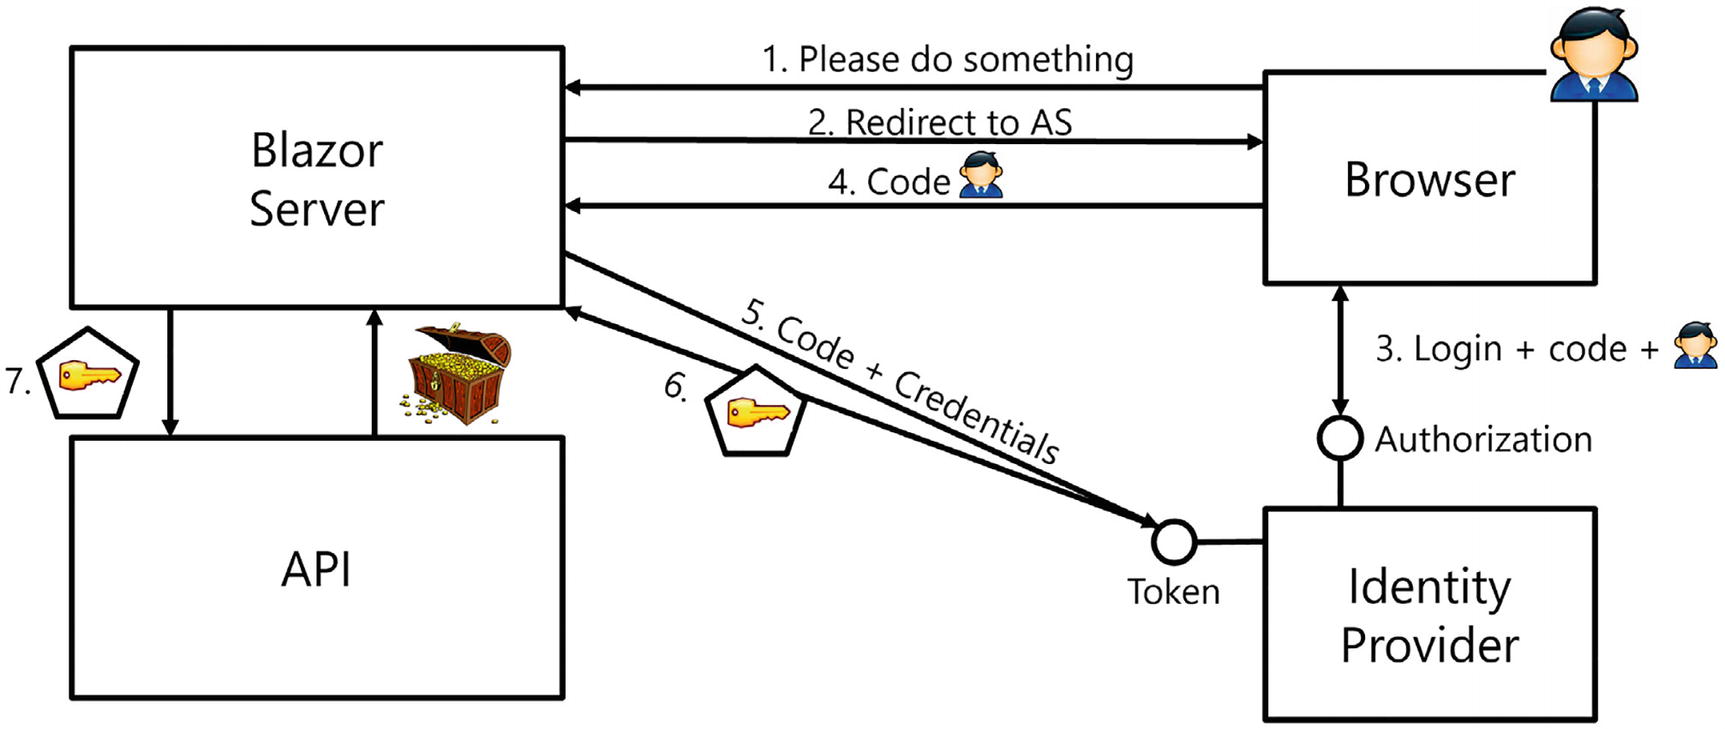
API Authorization with OpenId Connect Hybrid Flow
Steps 1–4 are the same as before, and our Blazor Server application receives an identity token and a code (which we ignored until now). This code can then be used together with the Blazor Server application’s identifying information to retrieve an access token (Step 5) from the identity provider. The identity provider will then use the code to verify which claims it should give to the Blazor Server application (Step 6). Once our application has an access token, it can send it along with the API request (Step 7) using a header to the API application, which can then use the claims in the access token to determine how is should behave.
Change the API Project’s Port
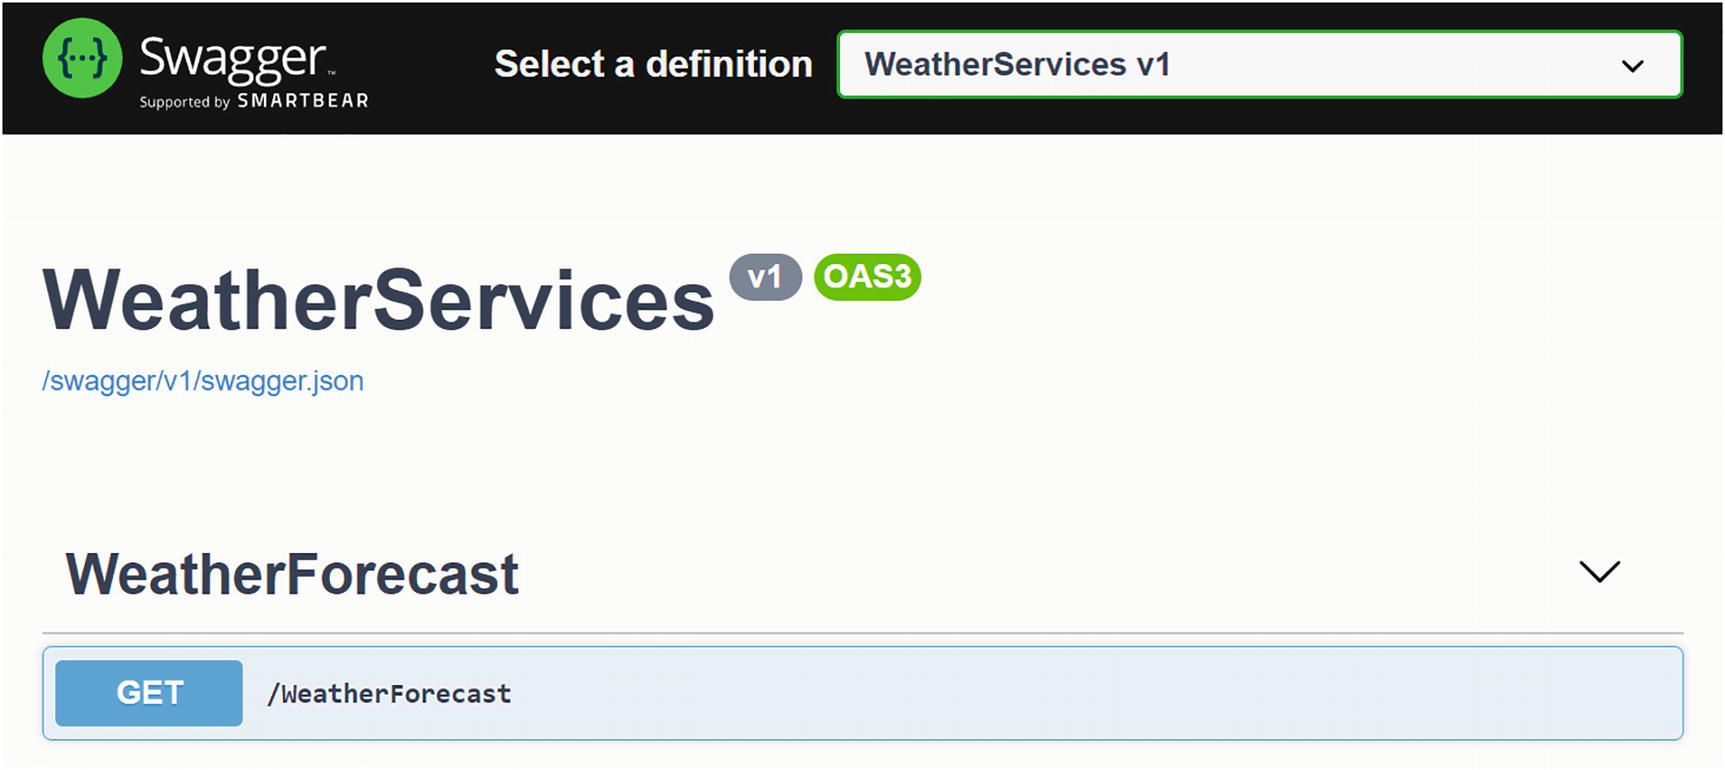
The Swagger UI
Click the GET button, then click Try It Out, and then Execute. You should see some forecasts.
Creating the CORS Policy
Adding the CORS Middleware
Registering the API Project with the Identity Provider
Adding an APIScope
Creating an ApiResource
Allowing the Client to Access an API
Registering the ApiScopes and ApiResources
Adding JWT Bearer Token Middleware
A client application will send the access token using an HTTP Authorization Bearer header, and we need our API project to look for this header and install the ClaimsPrincipal from the access token. Use NuGet to install the Microsoft.AspNetCore.Authentication.JwtBearer package in the WeatherServices project.
Adding JWT Authentication
Adding the Authentication Middleware
That’s all for the moment for our API.
Enabling the Bearer Token in the Client
Our client application should now use the received code to request an access token from the identity provider and use it in its API requests.
The WeatherForecastService
We also need to configure dependency injection in the Blazor Server project to give us an instance of the IHttpClientFactory. The IHttpClientFactory will give us an HttpClient that will be configured for us to include the access token and which will send it as a Bearer token to the API.
Adding the API Scope to the Client
Add Token Management
Start the IdentityProvider project, next the WeatherServices project, and finally the Blazor.Server.OpenIdConnect project. Log out (if you’re still logged in) and log in again. This will refresh our tokens.
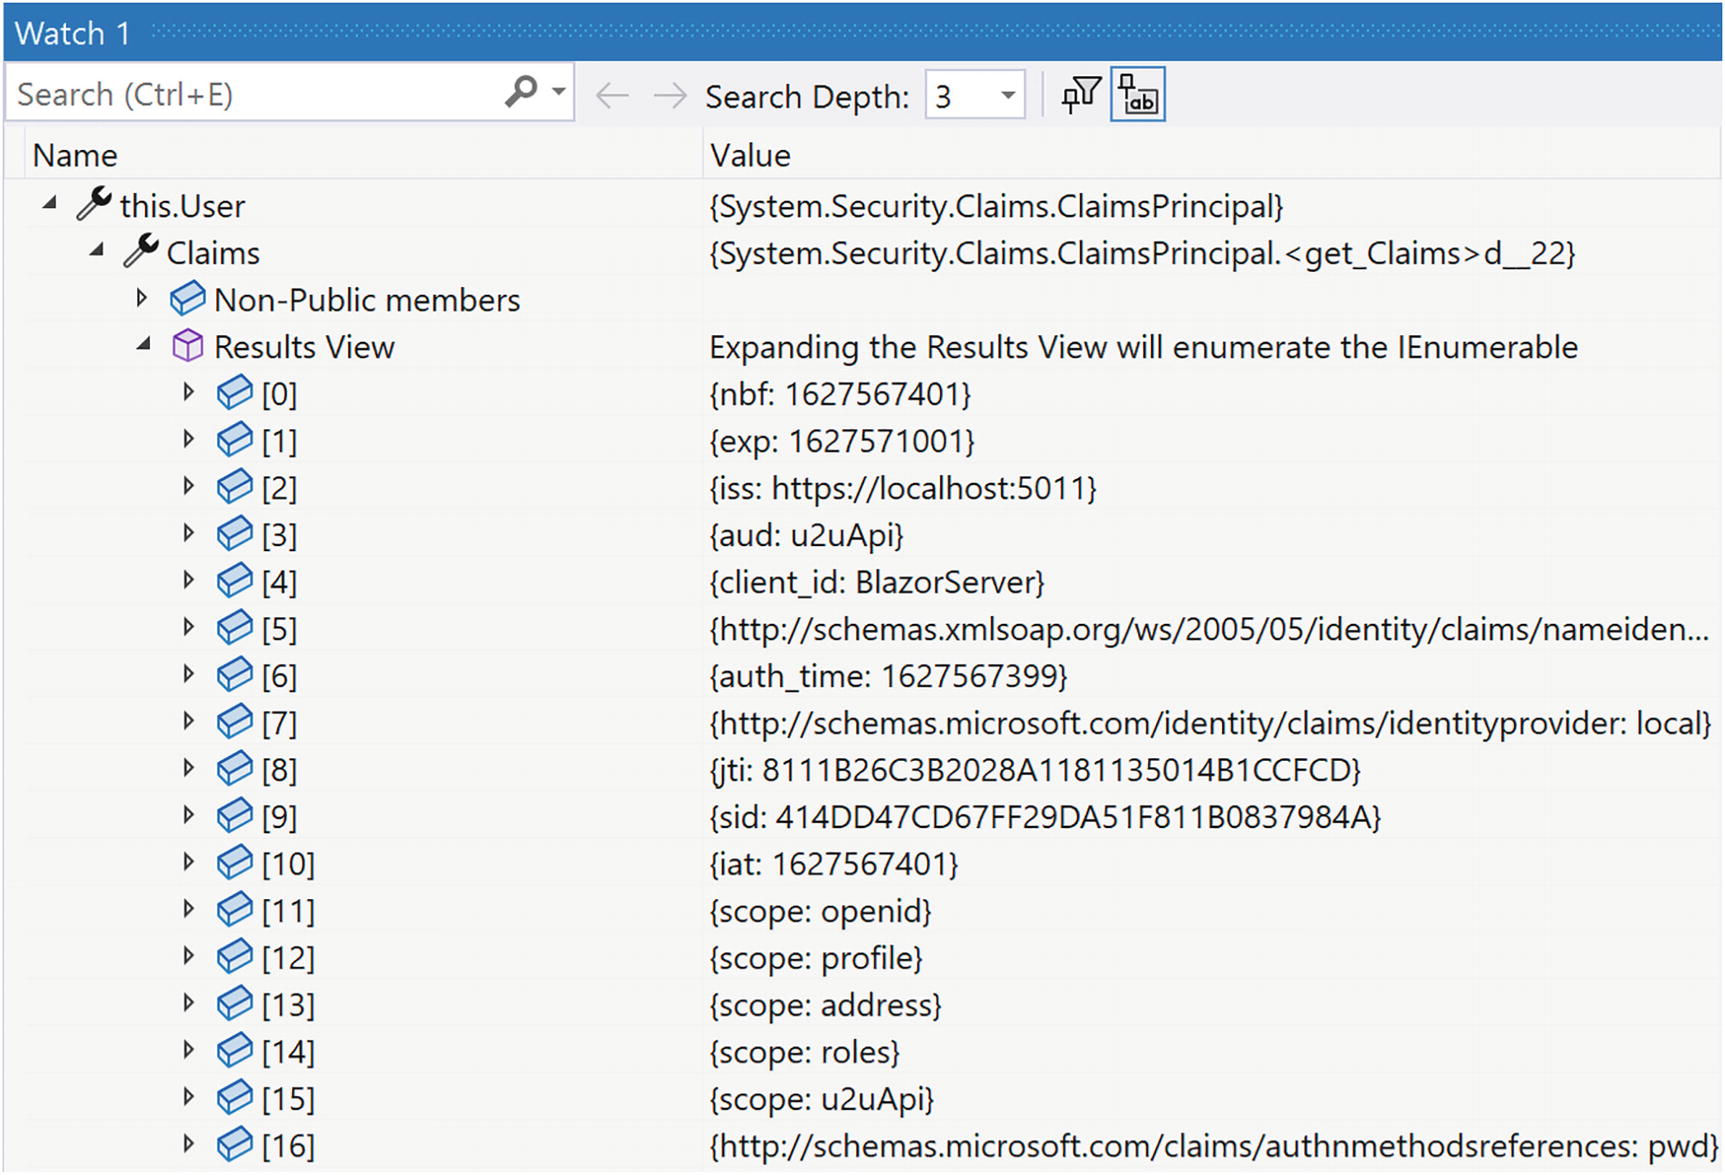
The WeatherServices ClaimsPrincipal
If the results view is empty, you will need to review your code because you forgot something. You should see the scope: u2uApi claim.
Protecting the WeatherForecastController
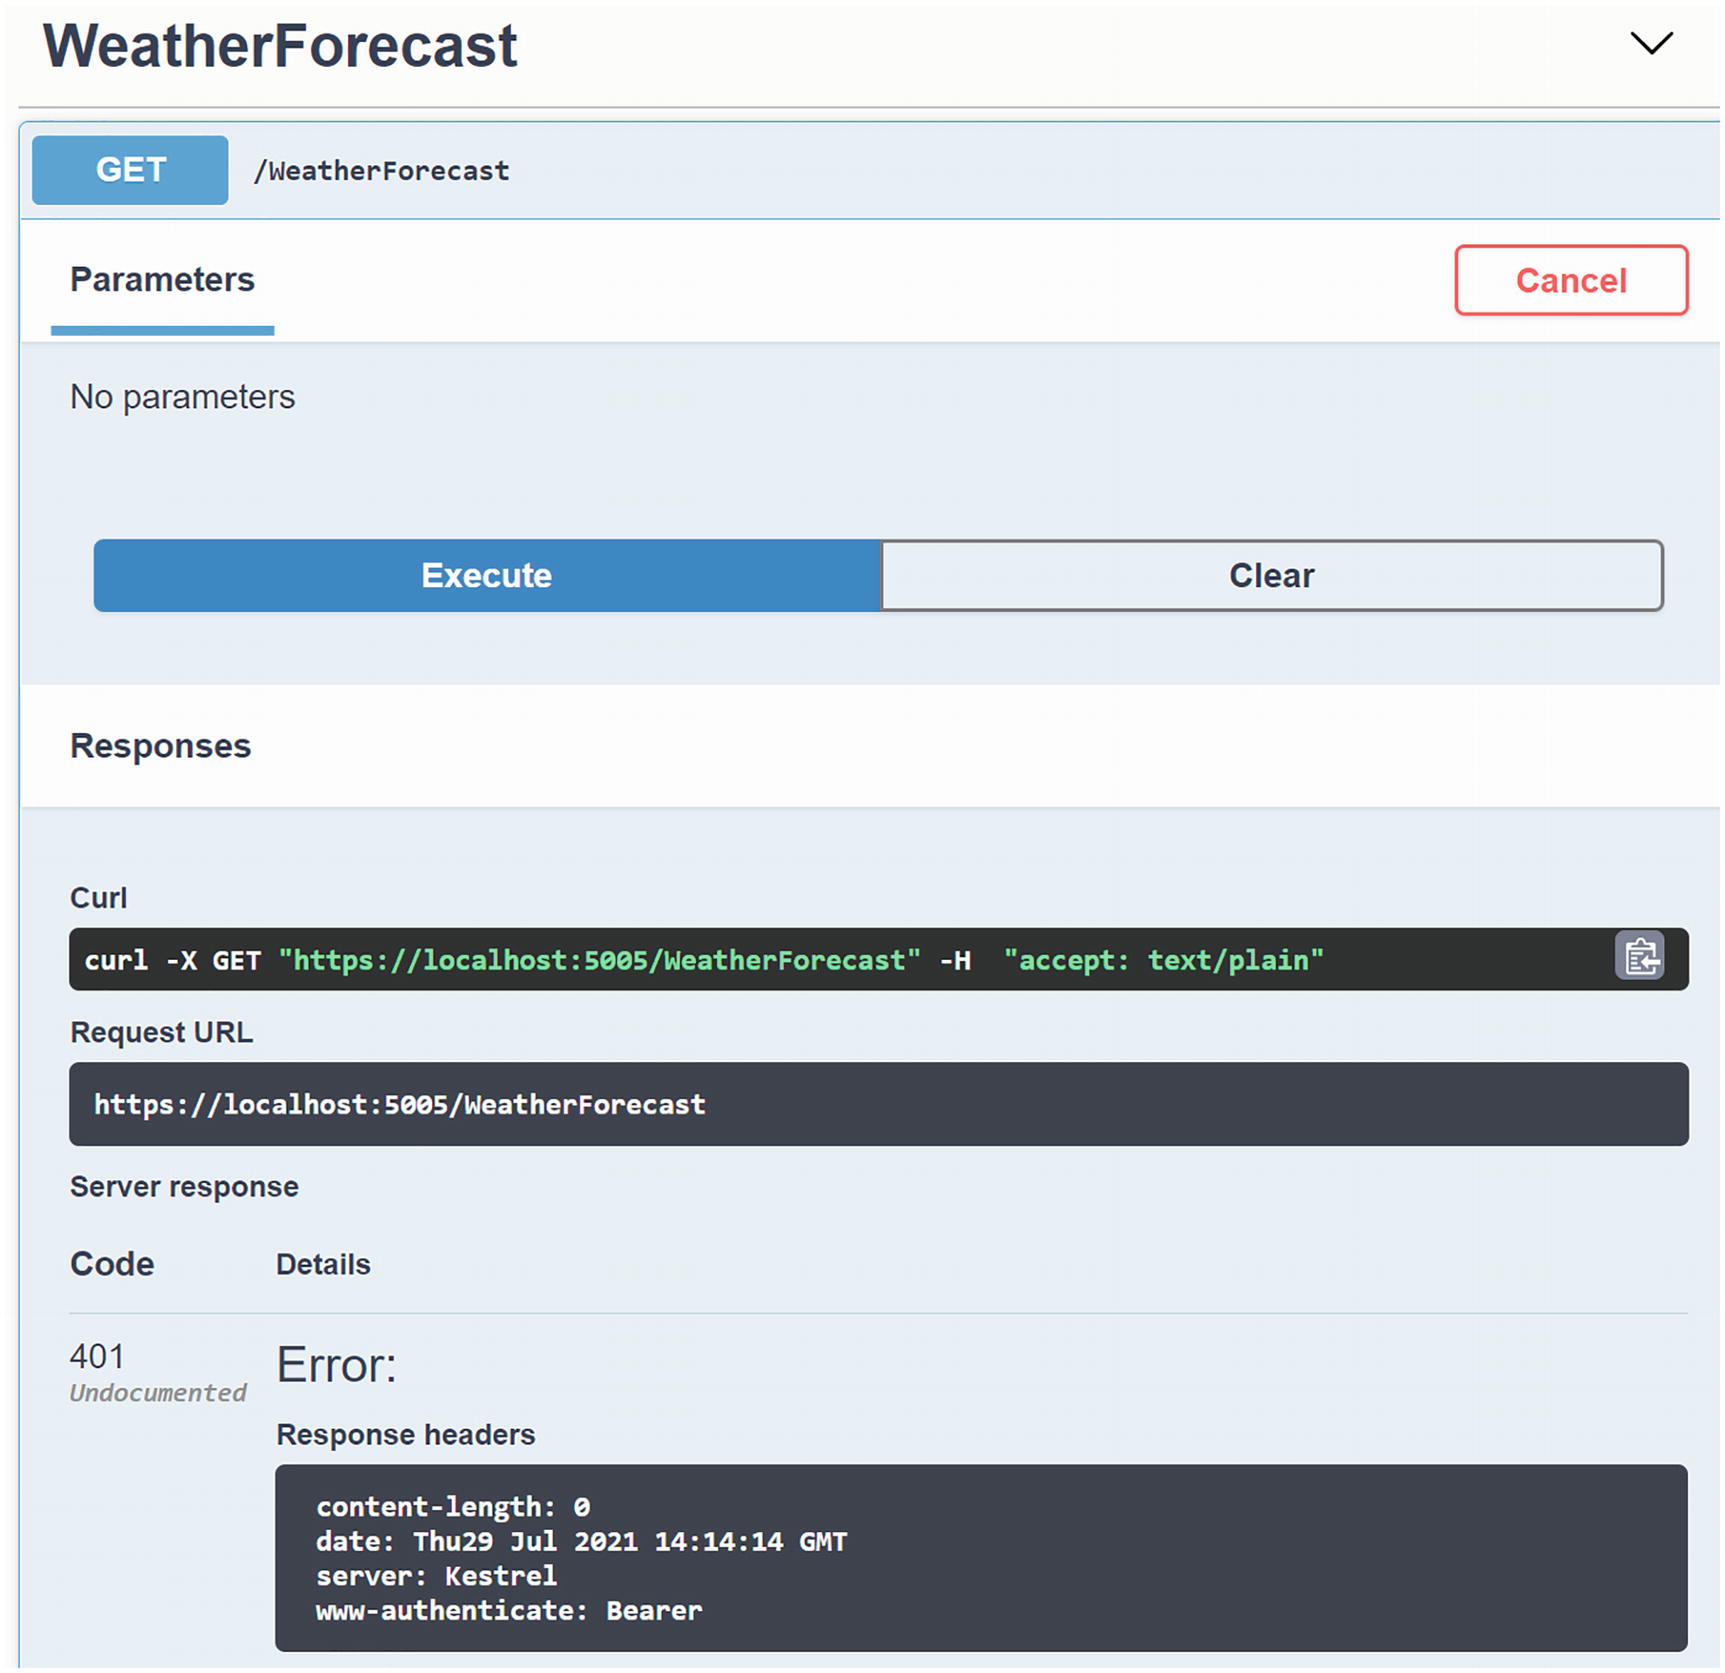
Accessing a Protected API with Swagger
Using Policy-Based Access Control
What if we want to use one or more claims to determine if the user can access a certain resource? For example, we might only want to allow authenticated users that live in Belgium to access the forecasts. In that case, we can use policy-based access control (PBAC).
Adding the Country Claim
Adding the Country IdentityResource
Allowing the Country Scope
Requesting the Country Scope in the Client
Adding the FromBelgium Policy
Using Policies with the AuthorizeView
Running the application and logging in as [email protected] will not show the link because this user is from France, while logging in as [email protected] will show the link since the FromBelgium policy passed. This completes the client.
We want to use this policy with the API project as well, so we could copy this code. Let us do the proper thing and move the policy into a library project so we can use the same policy in our Blazor and API projects.
The Policies Class
Enabling the FromBelgium Policy in the API Project
Using a Policy to Protect an API
Including the Country Claim in the Access Token
Run all three projects, and log in with the [email protected] user; the Fetch data link should be shown, and when you click the link, you should get a list of forecasts.
Congratulations. You just completed authentication and authorization for Blazor Server applications! Now let us look at Blazor WebAssembly in the next chapter.
Summary
In this chapter, we looked at protecting a Blazor Server application using OpenId Connect. In our modern world, applications use claims to allow applications to identify the current user and to protect resources. We then learned about the OpenId Connect Hybrid flow and used it for authentication, getting an identity token containing user’s claims. We then used the AuthenticationState class to access these claims. We updated routing to check the Authorize attribute and used the AuthorizeView component to conditionally render a UI according to the user’s claims. After this, we looked at retrieving an access token and used it to protect an API. This allows us to use different applications with the same Web API, each given different levels of access to our API. All of this using IdentityServer4 as the identity provider.
17. Securing Blazor WebAssembly
17. Securing Blazor WebAssembly
In the previous chapter, we looked at securing a Blazor Server application using OpenId Connect with identity and access tokens. Here, we will do the same but for Blazor WebAssembly. This time, we will use another OpenId Connect flow: Authorization Code flow with PKCE (pronounced pixie). I do recommend that you read the previous chapter before this one because it builds on top of some of the topics we saw there, and it continues with the code example from that chapter.
Authorization Code Flow with PKCE
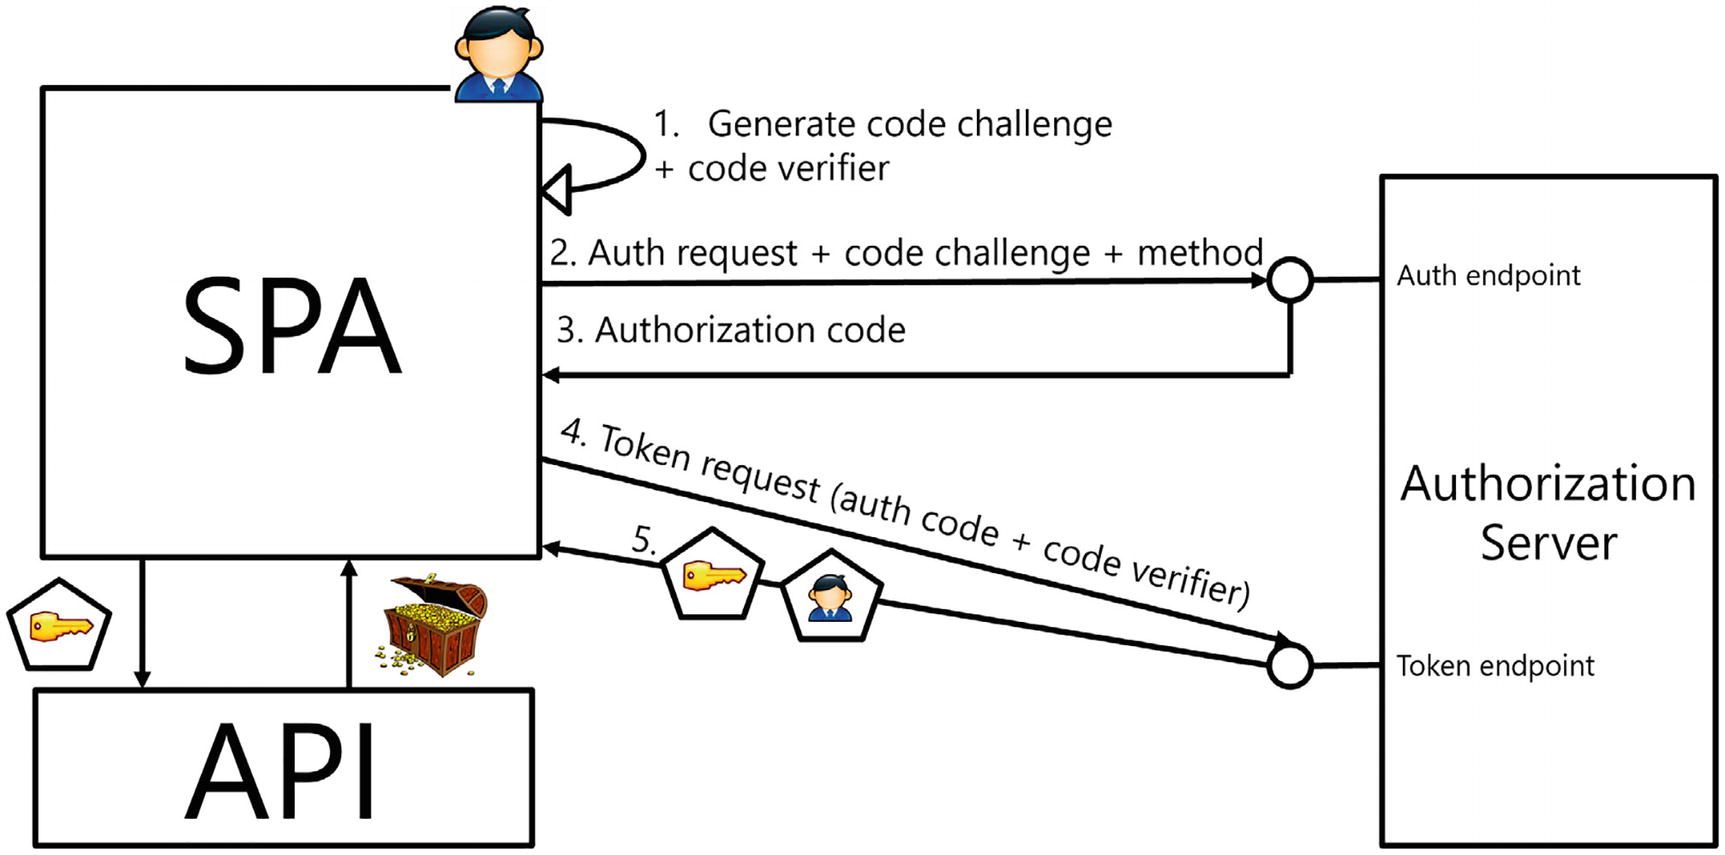
Authorization Code Flow with PKCE
Understanding PKCE
How does PKCE work? It is all about proving ownership. Imagine the user wants to log in. The browser will generate a cryptographically random code verifier and then use a code challenge method to turn the code verifier into a code challenge (Step 1). The code challenge is then sent to the identity provider together with the code challenge method (Step 2). The identity provider will then make the user log in (with optional consent), save the code challenge with code challenge method, and return the code that allows the token retrieval back to the application (Step 3). The application can then use the code with the code verifier (Step 4) to prove that it was the client requesting the code (assuming a third party is unable to retrieve the code verifier from the code challenge – that is why generally a cryptographic hash method is used because it is practically impossible to retrieve reverse a hash). After the identity provider checks that the code verifier and code challenge match by applying the code challenge method to the code verifier and then comparing the results, it returns the requested tokens. Of course, this only works over HTTPS; otherwise, figuring out the code verifier is a piece of cake.
Registering the WASM Client Application
Let’s start by adding authentication to a Blazor WebAssembly application. Start with the solution from the previous chapter (which you can find in the provided sources should you want).
Creating and Examining the Application
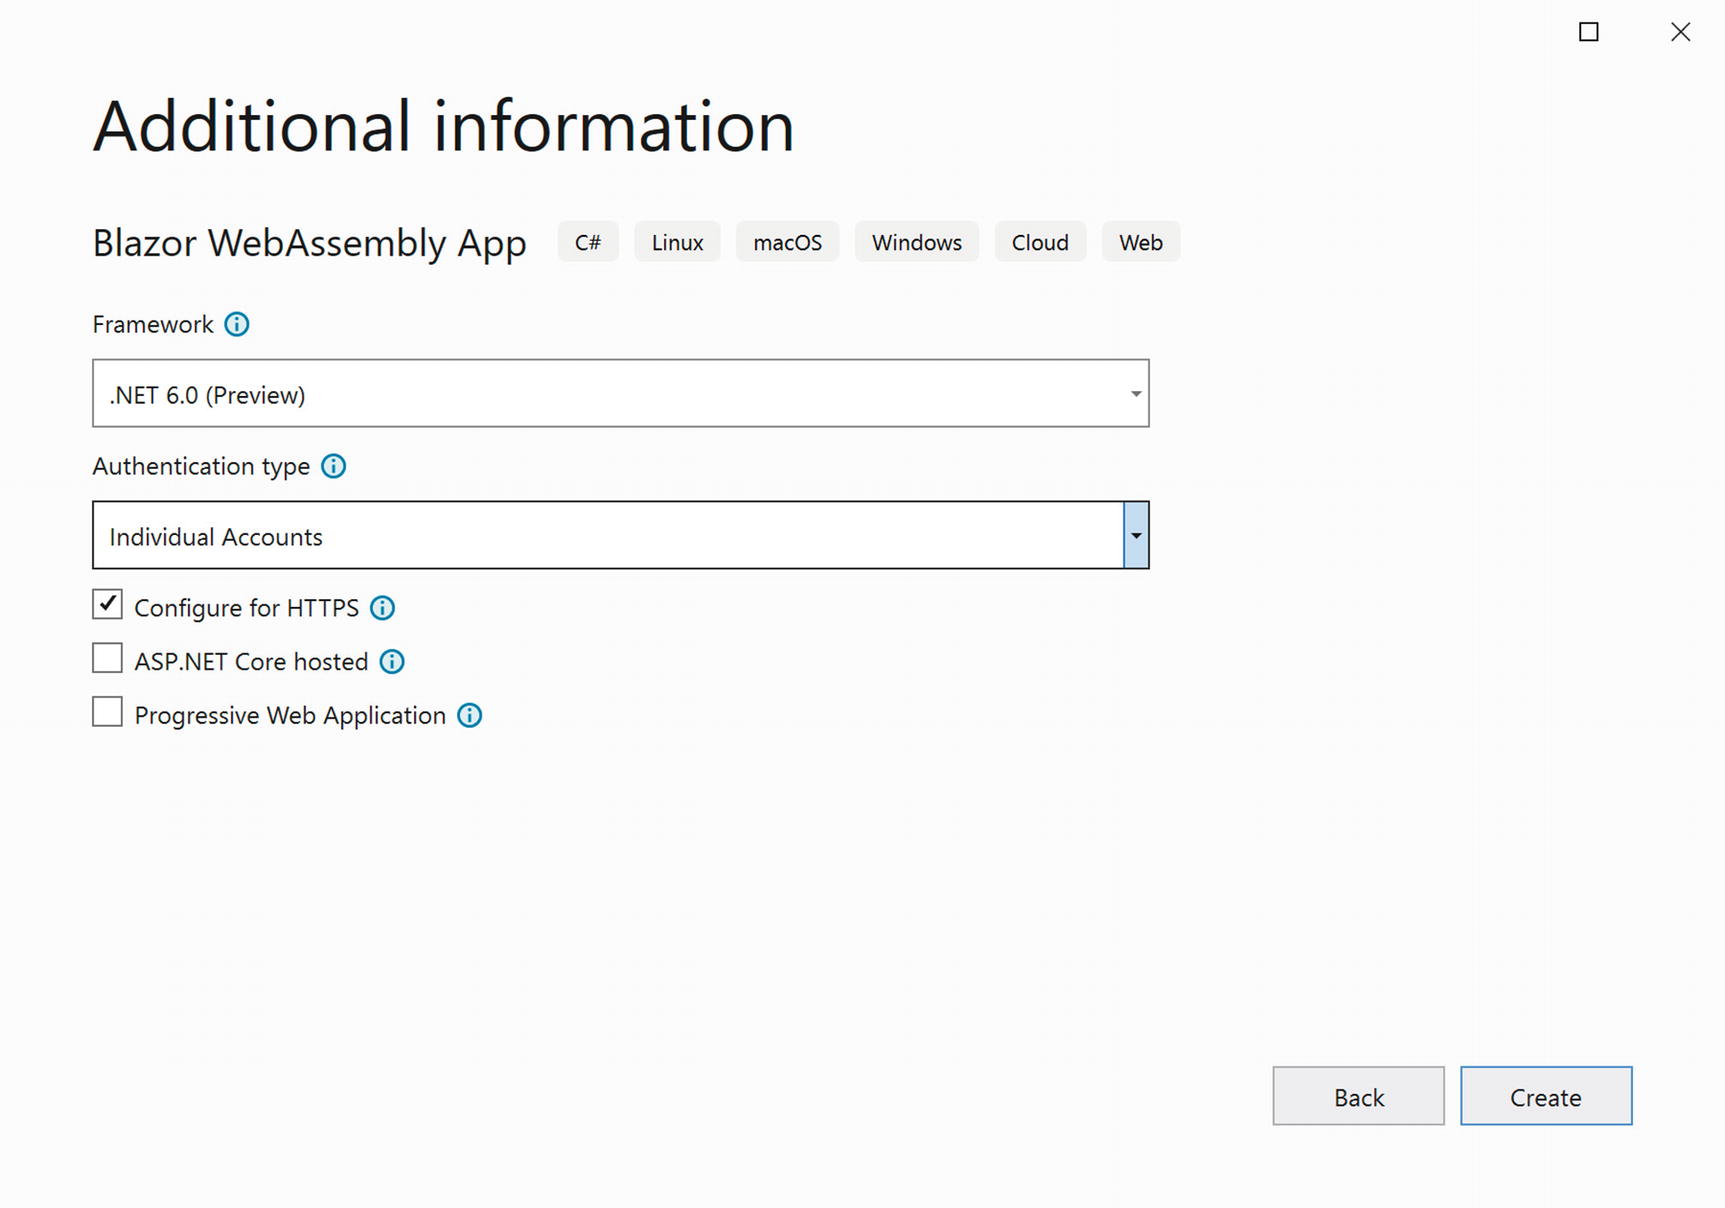
Creating the Blazor WebAssembly Project
The Authentication JavaScript Library
The Authentication Component
The LoginDisplay Component
The App component is the same as the one in the Blazor Server component which will redirect us to the login page when the user is not yet authenticated.
launchSettings for Blazor.Wasm.OpenIdConnect
Now we are ready to register this Blazor WASM application in our identity provider.
Registering the Client Application
Registering the Blazor WASM Client
Implementing Authentication
The Application Settings
Binding to the OIDC Configuration

The Blazor Application Before Logging In
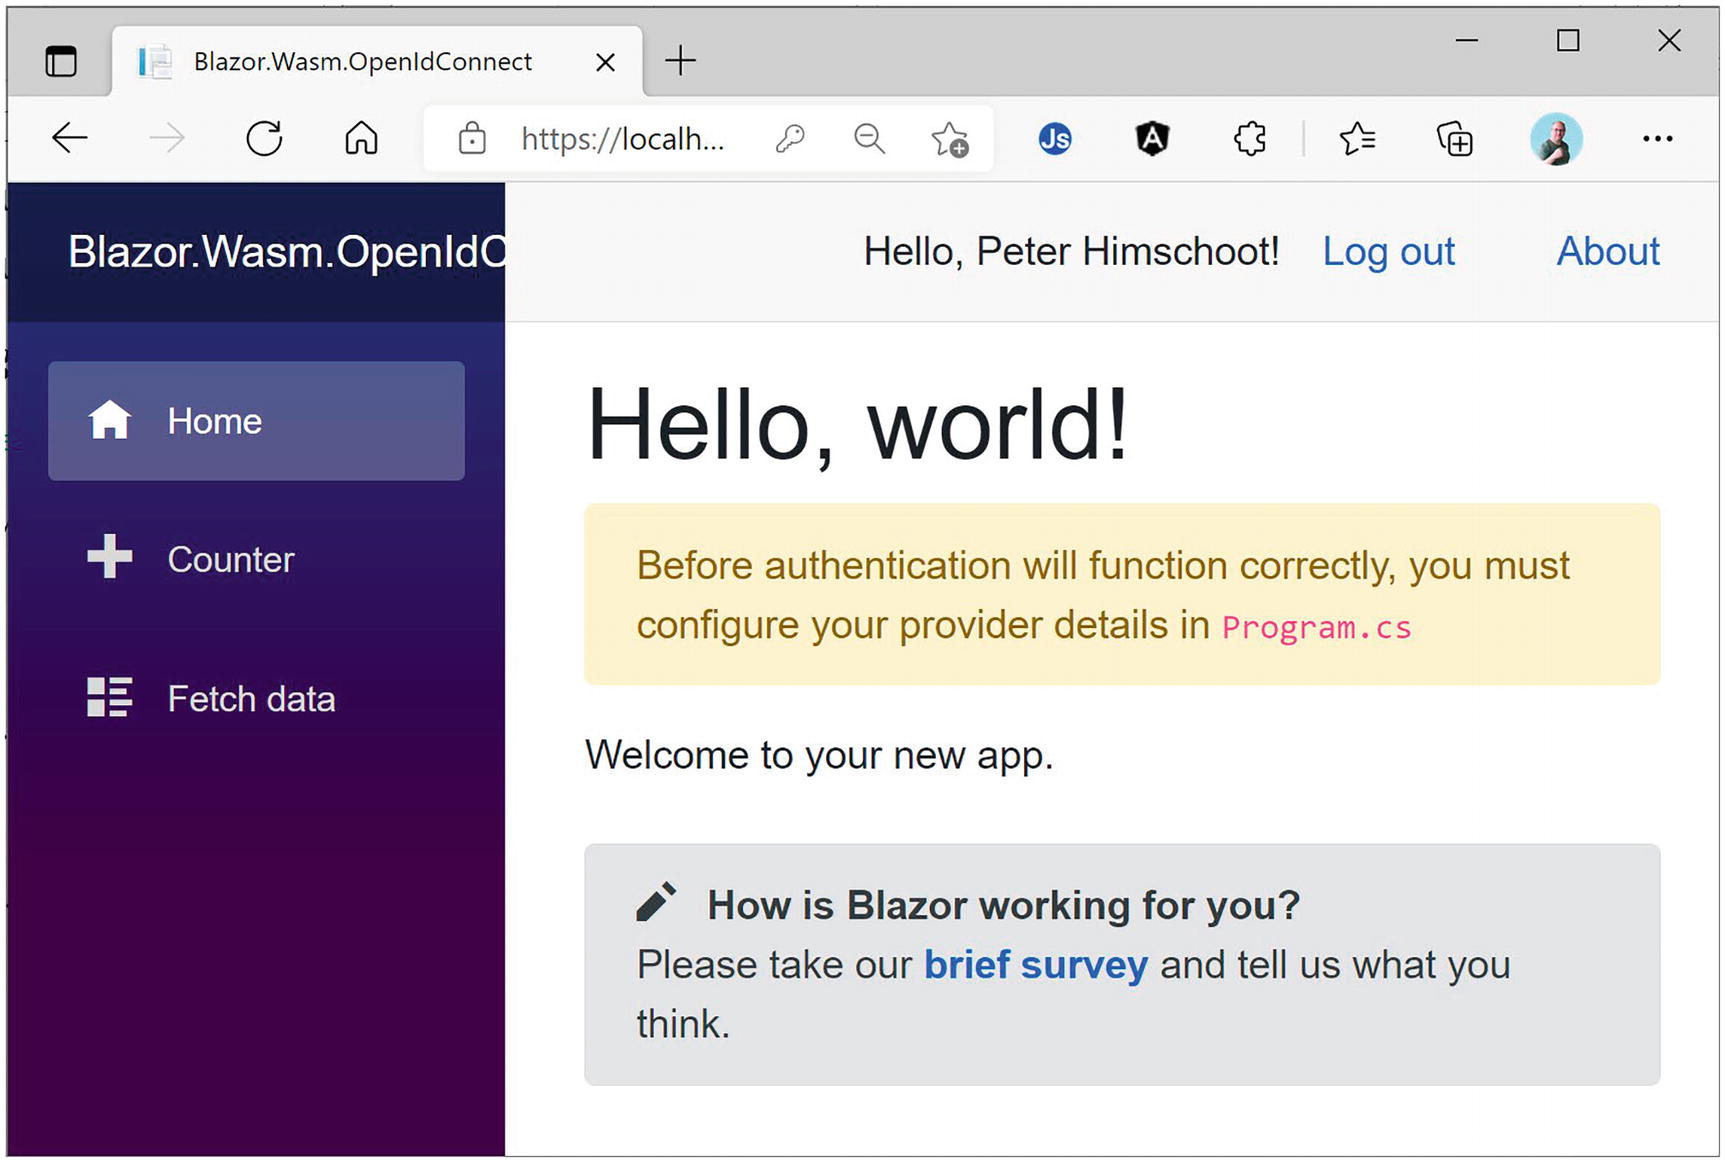
The Blazor Application After Logging In
Customizing the Login Experience
Remove the Provider Details Alert
Customizing the Login and Logout Process
Congratulations! You have just completed the process of authentication with Blazor WASM. Here, most of the code was generated by the application’s template, so this was not a lot of work!
Accessing a Protected API
Time to implement the Fetch data link. Currently, this uses some sample data, and of course, we want to access this data from the WeatherService API just like in the previous chapter.
Fetching Data from the WeatherService API
The WeatherService Class
Configuring Dependency Injection
Adding the Services Namespace
The FetchData Component Using the WeatherForecastService
First, let us see if all of this works by first removing the Authorize attribute from the WeatherForecastController.Get method . Run the IdentityProvider, WeatherService, and Blazor.Wasm.OpenIdConnect projects. Click the Fetch data link, and you should get the forecasts from the WeatherService. Nice!
Using the AuthorizationMessageHandler
Protecting the WeatherService API
Adding the Scope to the Client Configuration
Requesting the u2uApi Scope in Configuration
Adding the AuthorizationMessageHandler
Run your solution again. Now you should be able to access the WeatherService API. Whohoo!
Adding Client-Side Authorization
Using Microsoft.AspNetCore.Authorization
Protecting the FetchData Component
Hiding the Fetch data Link
Run the solution again. When you’re not logged in, the Fetch data link should be hidden, and then when you log in, it will show.
Again, congratulations are in order. You added support for calling a protected API. The next thing we will do is to use roles to protect our API even further.
Using Role-Based Security
Time to add some role-based access control. We can assign role claims to users and then use a role to give certain users access to components and resources, and others will be denied access although they have been authenticated. Here, we will add a component to review the user’s claims, and then we will use the user’s role to protect it.
Creating the Claims Component
Using System.Security.Claims
Listing the User’s Claims
Adding the Claims Link to the NavMenu
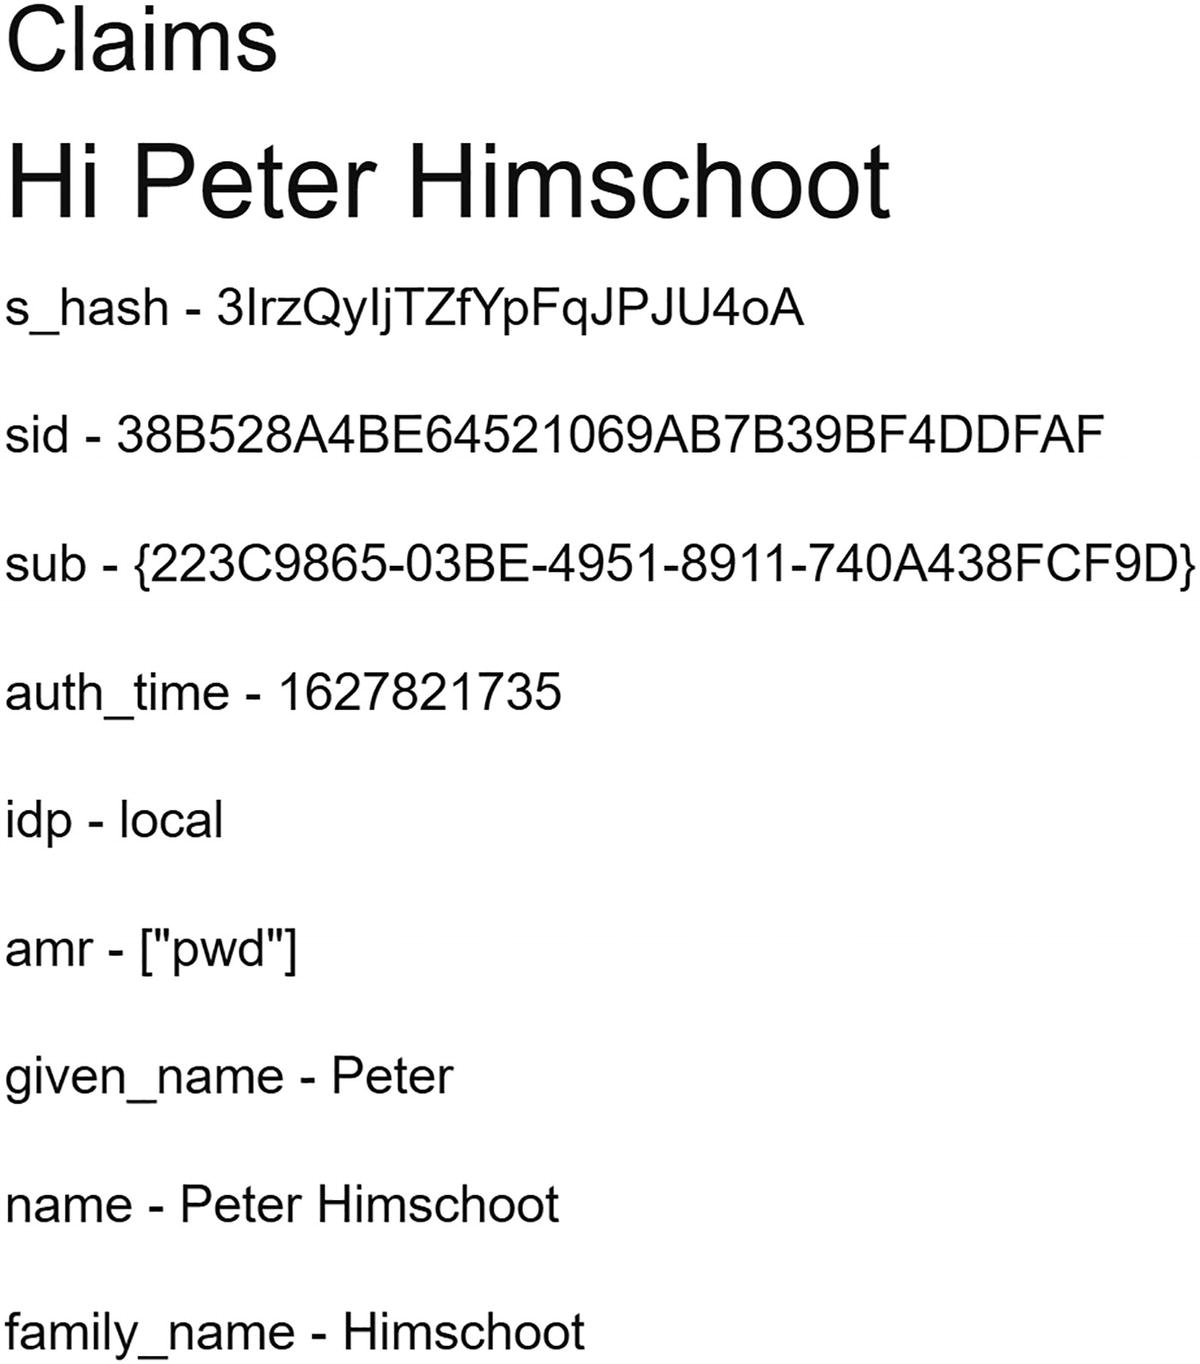
The User’s Claims
Hmm. No roles claim. Let us fix this.
Enabling RBAC
Adding the Roles Scopes to the Client
Updating the appsettings.json File
Run again. Now you should see the role claim (if not, try logging out and then log in again since the claims are stored in a cookie and you need to refresh that cookie).
Requiring the Admin Role
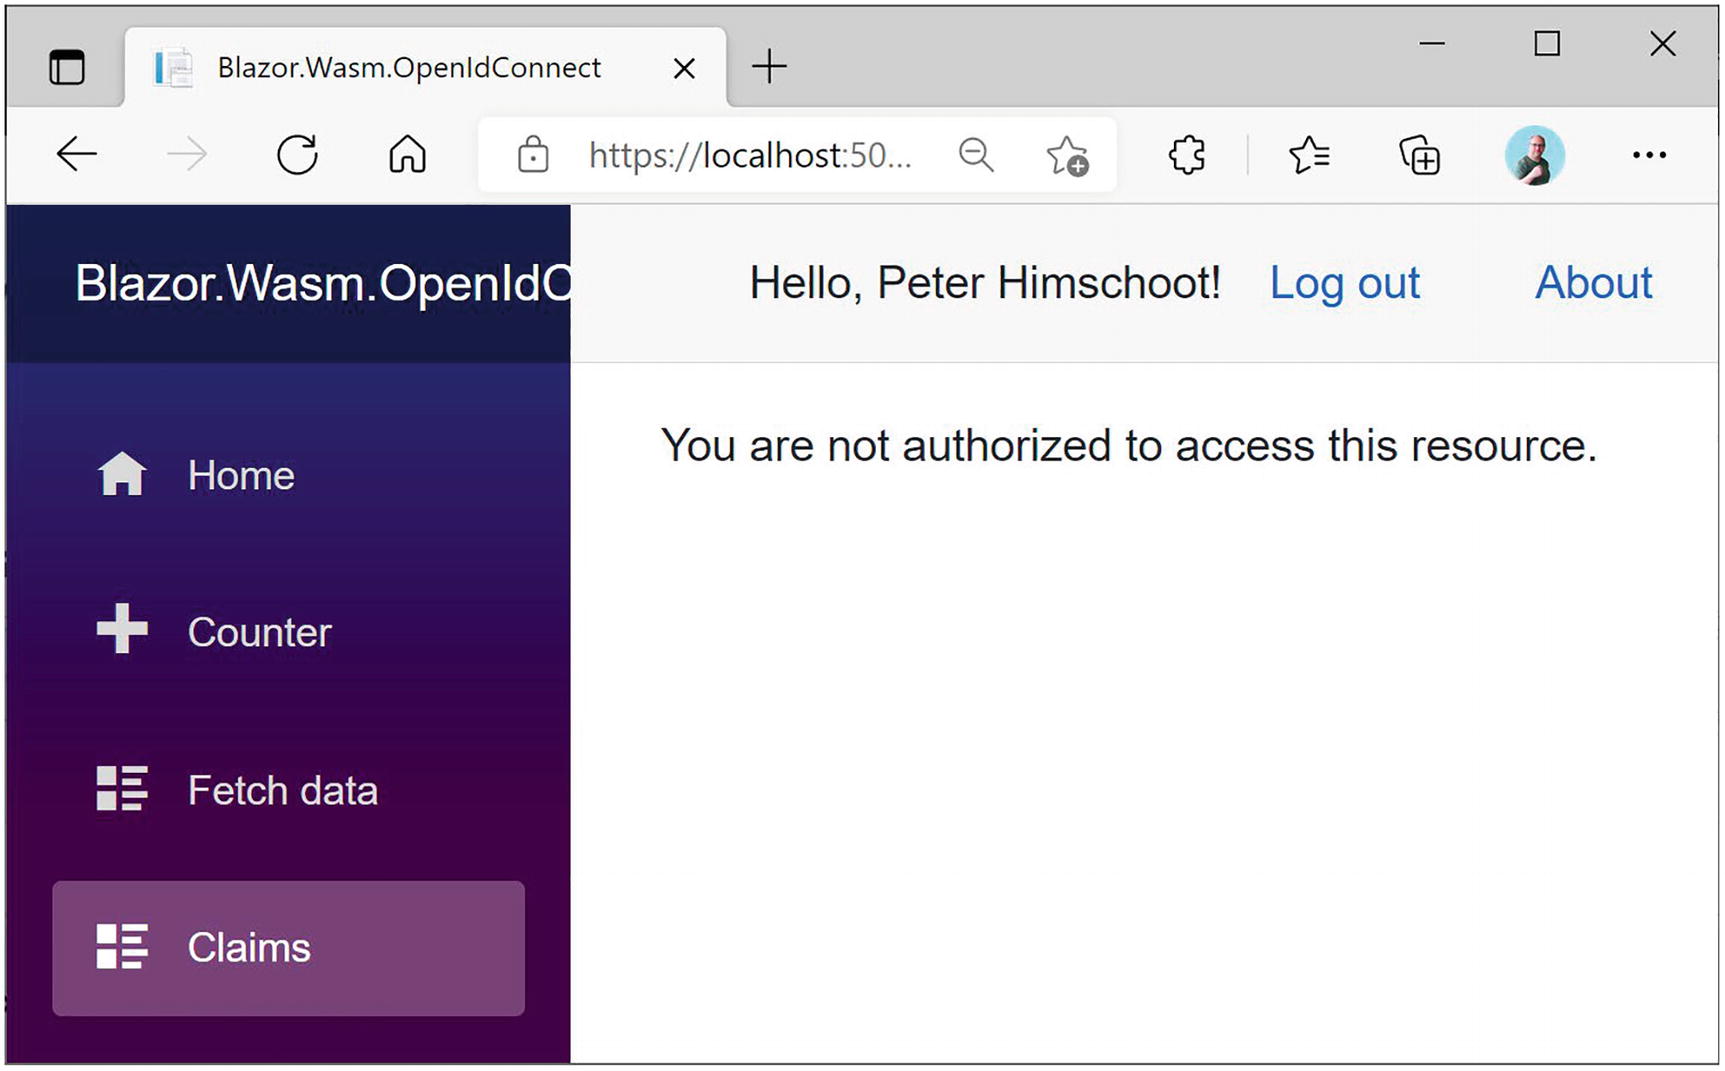
Unauthorized User
Promoting the Role Claim
Specifying the Role Claim
Using AuthorizeView with Roles
Using Policy-Based Access Control
Let us change our mind a little and decide that forecasts can only be seen by users with the country claim set to Belgium. For this, we will reuse the FromBelgium policy we created in the previous chapter. First, we need to enable the country scope in both the identity provider project and the Blazor project.
Updating Scopes
Adding the Country Scope to the Identity Provider
Adding the Country Scope to the Blazor Client.
If you like, you can run the solution again to verify that you got the country claim.
Adding Policies
Enabling Policy Authorization
Using a Policy to Protect an API

Accessing the API with the Wrong Claims
Hiding the NavLink
Summary
In this chapter, we used OpenId Connect to protect a Blazor WebAssembly project. We configured our identity provider for this application and then went on to use authentication. Then we used the AuthorizationMessageHandler to attach an access token so we can invoke a protected API. We also used role-based access control and policy-based access control to protect some of our components and resources.
Back Matter
Body Matter
1. Introduction to WebAssembly and Blazor
I was attending the Microsoft Most Valued Professional and Regional Directors summit 2018 where we were introduced to Blazor for the first time by Steve Sanderson and Daniel Roth. And I must admit I was super excited about Blazor! Blazor is a framework that allows you to build Single-Page Applications (SPAs) using C# and allows you to run any standard .NET library in the browser. Before Blazor, your options for building a SPA were Angular, React, Vue.js (and others) using JavaScript, or one of the other higher-level languages like TypeScript (which gets compiled into JavaScript anyway). In this introduction, we will look at how browsers are now capable of running .NET assemblies in the browser using WebAssembly and Blazor.
A Tale of Two Wars
Think about it. The browser is one of the primary applications on your computer. You use it every day. Companies that build browsers know that very well and are bidding for you to use their browser. At the beginning of mainstream Internet, everyone was using Netscape, and Microsoft wanted a share of the market, so in 1995, they built Internet Explorer 1.0, released as part of Windows 95 Plus! pack.
The First Browser War
Newer versions were released rapidly, and browsers started to add new features such as <blink> and <marquee> elements. This was the beginning of the first browser war, giving people (especially designers) headaches because some developers were building pages with blinking marquee controls . But developers were also getting sore heads because of incompatibilities between browsers. The first browser war was about having more HTML capabilities than the competition.
But all of this is now behind us with the introduction of HTML5 and modern browsers like Google Chrome, Microsoft Edge, Firefox, Safari, and Opera. HTML5 not only defines a series of standard HTML elements but also rules on how these should render, making it a lot easier to build a website that looks the same in all modern browsers. Then, in 1995, Brendan Eich wrote a little programming language known as ECMAScript (initially called LiveScript) in ten days (What!?). It was quickly dubbed JavaScript because its syntax was very similar to Java. I will be using the name JavaScript here because that is what most people call it.
JavaScript and Java are not related. Java and JavaScript have as much in common as ham and hamster (I don’t know who formulated this first, but I love this phrasing).
Little did Mr. Eich know how this language would impact the modern Web and even desktop application development. In 1995, Jesse James Garrett wrote a white paper called Ajax (Asynchronous JavaScript and XML), describing a set of technologies where JavaScript is used to load data from the server and that data is used to update the browser’s HTML. This avoids full page reloads and allows for client-side web applications, which are applications written in JavaScript that run completely in the browser. One of the first companies to apply Ajax was Microsoft when they built Outlook Web Access (OWA). OWA is a web application almost identical to the Outlook desktop application proving the power of Ajax. Soon other Ajax applications started to appear, with Google Maps stuck in my memory as one of the other keystone applications. Google Maps would download maps asynchronously and with some simple mouse interactions allowed you to zoom and pan the map. Before Google Maps, the server would do the map rendering and a browser displayed the map like any other image by downloading a bitmap from a server.
Building an Ajax website was a major undertaking that only big companies like Microsoft and Google could afford. This soon changed with the introduction of JavaScript libraries like jQuery and knockout.js (knockout was also written by Steve Sanderson, the author of Blazor!). Today, we build rich web apps with Angular, React, and Vue.js. All of them are using JavaScript or higher-level languages like TypeScript which gets transpiled into JavaScript.
Transpiling will take one language and convert it into another language. This is very popular with TypeScript which gives you a modern high-level typed language. You need JavaScript to run it in a browser, so TypeScript gets “transpiled” into JavaScript.
The Second Browser War
The JavaScript Execution Process
This process takes a lot of effort because JavaScript needs to be downloaded into the browser, where it gets parsed, then compiled into bytecode, and then Just-In-Time converted into native code. So how can we make this process even faster?
The second browser war is all about JavaScript performance.
Introducing WebAssembly
The WebAssembly Execution Process
Google Earth in WebAssembly
What is WebAssembly? From the official site webassembly.org:
WebAssembly (abbreviated Wasm) is a binary instruction format for a stack-based virtual machine. Wasm is designed as a portable target for compilation of high-level languages like C/C++/Rust, enabling deployment on the web for client and server applications.
So WebAssembly as a new binary format optimized for browser execution, it is NOT JavaScript. It uses a stack-based virtual machine, just like .NET does. There are compilers for languages like C++ and Rust which compile to WASM. Some people have compiled C++ applications to WASM, allowing to run them in the browser. There is even a Windows 2000 operating system (https://bellard.org/jslinux/vm.html?url=https://bellard.org/jslinux/win2k.cfg&mem=192&graphic=1&w=1024&h=768) compiled to WASM so you can play minesweeper as shown in Figure 1-4!
Windows 2000 Running in the Browser
Which Browsers Support WebAssembly?
WebAssembly Support
As WebAssembly will become more and more important, we will see other browsers follow suit, but don’t expect Internet Explorer to support WASM.
WebAssembly and Mono
Mono is an open source implementation of the .NET CLI specification, meaning that Mono is a platform for running .NET assemblies. Mono is used in Xamarin (now called Multi-platform App UI, or MAUI for short) for building mobile applications that run on the Windows, Android, and iOS mobile operating systems. You can also use it to build applications for macOS, Linux, Tizen, and others. Mono also allows you to run .NET on Linux (its original purpose) and is written in C++. This last part is important because we saw that you can compile C++ to WebAssembly. So, what happened is that the Mono team decided to try to compile Mono to WebAssembly, which they did successfully. There are two approaches. One is where you take your .NET code and you compile it together with the Mono runtime into one big WASM application. However, this approach takes a lot of time because you need to take several steps to compile everything into WASM, not so practical for day-to-day development. The other approach takes the Mono runtime and compiles it into WASM, and this runs in the browser where it will execute .NET Intermediate Language just like normal .NET does. The big advantage is that you can simply run .NET assemblies without having to compile them first into WASM.
This is the approach currently taken by Blazor. In the beginning, Blazor used the Mono runtime, but they have now built their own .NET Core runtime for WebAssembly. But Blazor is not the only one taking this approach. For example, there is the Ooui project which allows you to run Xamarin.Forms applications in the browser. The disadvantage of this is that it needs to download a lot of .NET assemblies . This can be solved by using tree shaking algorithms which remove all unused code from assemblies. We will look at this in Chapter 15.
Interacting with the Browser with Blazor
WebAssembly with the .NET runtime allows you to run .NET code in the browser. Steve Sanderson used this to build Blazor. Blazor uses the popular ASP.NET MVC approach for building applications that run in the browser. MVC uses the razor syntax to generate HTML on the server. With Blazor, you build razor files (Blazor = Browser + Razor) which execute inside to browser to dynamically build a web page. With Blazor, you don’t need JavaScript to build a web app, which is good news for thousands of .NET developers who want to continue using C# (or F#). To use some browser features, you will still need JavaScript, and we will discuss this in Chapter 10.
How Does It Work?
Let’s start with a simple razor file in Listing 1-1 which you can find when you create a new Blazor project (which we will do further on in this chapter, no need to type anything yet).
Each code sample has been formatted for readability, sometimes splitting lines where this is not necessary and using less indentation. I leave it to you how you decide to format your code.
The Counter Razor File
The Blazor WebAssembly DOM Generation Process
This model is very flexible. It allows you to build Progressive Web Apps, and your app can be embedded in Electron desktop applications of which Visual Studio Code is a prime example.
Blazor Server
At the August 7, 2018, ASP.NET community standup (www.youtube.com/watch?v=7Eh_l7jEcCo), Daniel Roth introduced a new execution model for Blazor now called Blazor Server. In this model, your Blazor site is running on the server resulting in a way smaller download for the browser.
Blazor Server Runtime Model
Pros and Cons of the Blazor Server
Smaller downloads: With Blazor Server, your application does not need to download dotnet.wasm (the .NET runtime) nor all your .NET assemblies. The browser downloads a small JavaScript library which sets up the SignalR connection to the server. This means that the application will start a lot faster, especially on slower connections, but at the price that we continuously need a connection to the server to exchange small messages.
Development process: Blazor WebAssembly does not support all modern debugging capabilities, resulting in added logging. Because your .NET code is running on the server, you can use the regular .NET debugger with all of its advanced features. You could start building your Blazor application using the server-side model, and when it is finished, switch to the client-side model by switching the hosting model.
.NET APIs: Because you are running your .NET code on the server, you can use all the .NET APIs you would use with regular ASP.NET Core MVC applications, for example, accessing the database directly. Do note that doing this will stop you from quickly converting it into a client-side application. You can limit this by writing service classes and using dependency injection to inject different implementations depending on the environment your components are hosted in.
Online only: Running the Blazor application on the server does mean that your users will always need access to the server. This will prevent the application from running in Electron, nor will you be able to run it as a Progressive Web Application (PWA). And if the connection drops between the browser and server, your user could lose some work because the application will stop functioning. Blazor will try to reconnect to the server without losing any data, so most of the time, users will not lose any work done.
Server scalability: All your .NET code runs on the server, so if you have thousands of clients, your server(s) will have to handle all the work. Not only that, Blazor uses a stateful model which will require you to keep track of every user’s state on the server. So your server will need more resources than with Blazor WebAssembly which can use a stateless model.
Your First Blazor Project
Getting hands-on is the best way to learn. You will first install the prerequisites to developing with Blazor. Then you will create your first Blazor project, run the project to see it work, and finally inspect the different aspects of the project to get a “lay of the land” view for how Blazor applications are developed.
I learned an important lesson from the first edition of this book: never underestimate the speed at which Microsoft innovates! All code samples in the first edition of Blazor Revealed became invalid quite rapidly. I do not expect this to happen again with this edition since it is based on the Release To Manufacture (RTM) version of Blazor. If something does not work, simply consult the sources that come with this book. I will keep these up to date. Promise!
The source code for this book is available on GitHub via the book’s product page, located at www.apress.com/ISBN.
Installing Blazor Prerequisites
Working with Blazor requires you to install some prerequisites, so in this section, you will install what is needed to get going.
Blazor runs on top of .NET , optionally providing the web server for your project which will serve the client files that run in the browser and run any server-side APIs that your Blazor project needs. .NET (previously known as .NET Core) is Microsoft’s cross-platform solution for working with .NET on Windows, Linux, and OSX.
You can find the installation files at www.microsoft.com/net/download. Look for the latest version of the .NET SDK (you’ll need at least version 6.0). Follow the installation instructions and install it on your machine, using Windows, OSX, or Linux.
Output should indicate that you installed the correct version. The version number should be at least 6.0.
Should the command’s output show an older version, you will need to download and install a more recent version of .NET SDK. These can run side by side so you will not break other .NET projects doing this.
Using Visual Studio
For people using Windows, Visual Studio (from now on, I will refer to Visual Studio as VS) is one of the integrated development environments (IDE) we will use throughout this book. If you are using OSX or Linux, you can use Visual Studio Code, and OSX users might prefer Visual Studio for Mac. With any one, you can edit your code, compile it, and run it all from the same application. And the code samples are also the same.
If you want to use Visual Studio, download the latest version of Visual Studio from www.visualstudio.com/downloads/. The Community Edition is free and should allow you to do everything done in this book.
The Visual Studio Installer Workloads Selection
About Microsoft Visual Studio
Using Visual Studio Code
Visual Studio Code (VSC) is a free, modern, cross-platform development environment with an integrated editor, git source control, and debugger. The environment has a huge range of extensions available allowing you to use all kinds of languages and tools directly from VSC. So, if you don’t have access to (because you’re running a non-Windows operating system or you don’t want to use) Visual Studio, use VSC.
Install VSC from www.visualstudio.com/. Install using the defaults.
Visual Studio Code Extensions Tab
C# for Visual Studio Code
Click Install.
Understanding the Blazor Templates for VS/Code
Throughout this book, we will create several different Blazor projects. With .NET Core, we can use the command-line interface (CLI) to create all kinds of projects, including Blazor WebAssembly and Blazor Server.
With Blazor projects, you have a couple of choices. You can create a standalone Blazor project (using the blazorwasm template) that does not need server-side code. This kind of project known as Blazor WebAssembly has the advantage that you can simply deploy it to any web server which will function as a file server, allowing browsers to download your site just like any other site. We will look at deployment in a later chapter.
Or you can create a hosted project (adding the --hosted option) with client, server, and shared code. This kind of Blazor WebAssembly project will require you to host it where there is .NET Core support because you will execute code on the server as well, for example, to retrieve data from a database.
The third option is to run all Blazor code on the server (using the blazorserver template). In this case, the browser will use a SignalR connection to receive UI updates from the server and to send user interaction back to the server for processing.
In this book, we will use the second option (Blazor WebAssembly hosted on ASP.NET MVC Core) most of the time, but the concepts you will learn in this book are the same for all three options. You can even develop for Blazor WebAssembly and Blazor Server at the same time! Why? Because debugging support for Blazor WebAssembly is limited, so you develop with Blazor Server using all debugger features you know and love. But you can test everything with Blazor WebAssembly ensuring you can run everything in the browser later. This is the way I like to work. However, to pull this off, you need some experience with Blazor first, so keep reading.
Generating the Project with Dotnet CLI
This should build without any errors.
Open your browser on this address (here https://localhost:5001), and you are ready to play!
Generating Your Project with Visual Studio
Start Visual Studio and select Create a new project.
Visual Studio New Project Dialog
Click Next.
Name your project MyFirstBlazor, choose the location where the project should be generated, and click Next.
New ASP.NET Core Web Application
Wait for Visual Studio to complete. Then build and run your solution by pressing F5. After a little while, the browser will open and display the Blazor application.
Running Blazor with Visual Studio Code
Or you can open VSC and then select File ➤ Open Folder….
Code Asking to Add Build and Debug Assets
Thanks to this integration with Visual Studio Code, you can simply press F5 to build and run your project.
VSC now uses Workspace Trust which might pop up a dialog asking if you trust the authors of a project. When opening the provided code download, you will probably encounter this.
Running the Generated Project
Your First Application – Home Screen
This generated Single-Page Application (SPA) has on the left side a navigation menu allowing you to jump between different pages. On the right side, you will see the selected component; in Figure 1-15, it is showing the Index component. And in the top right corner, there is an About link to https://blazor.net/ which is the official Blazor documentation website.
The Index component shows the mandatory “Hello, world!” demo, and it also contains a survey component you can click to fill out a survey (this is a real survey, so please let Microsoft know you like Blazor!). The SurveyPrompt is the first example of a custom Blazor component. We will discuss building components like SurveyPrompt in Chapters 3 and 4.
Your First Application – Counter Screen
Your First Application – Fetch data Screen
Examining the Project’s Parts
Now being able to play with these pages is all nice, but let us have a look at how all this works. We will look starting with the server project which hosts our Blazor website. Then we will look at the shared project which contains classes used by both server and client. Finally, we will examine the client project which is the actual Blazor implementation.
Visual Studio, Visual Studio Code, and Visual Studio for Mac use solution files to group projects that will form an application. So, a typical Blazor WebAssembly project consists of a server, a client, and a shared project grouped into a single solution. This simplifies building everything since the solution allows tools to figure out in which order to compile everything. Hey, you could even switch between Visual Studio, VS for Mac, and VSC because they all use the same project and solution files!
The Server Project
Web applications are a bunch of files that get downloaded by the browser from a server. It is the server’s job to provide the files to the browser upon request. There is a whole range of existing servers to choose from, for example, IIS on Windows or Apache on Linux. ASP.NET Core has a built-in server known as Kestrel that you generated with the --hosted option, which you can then run on Windows, Linux, or OSX. This is the preferred option to use during development.
The Server Project’s Program Class
The UseDeveloperExceptionPage Middleware
Would you like to see a detailed error page when the server has an uncaught exception? The UseDeveloperExceptionPage method which installs some error handling middleware takes care of that. Of course, you don’t need that in production (you should handle all exceptions correctly <grin>), so this middleware is only used when running in a development environment. How does the server know if you are running in development or release? The if statement you see here checks an environment variable called ASPNETCORE_ENVIRONMENT , and if the environment variable is set to Development, it knows you are running in development mode.
The launchSettings.json File
The Blazor bootstrap process requires a bunch of special files, especially dotnet.wasm (dotnet.wasm is the .NET runtime compiled as WebAssembly). This is served by the Blazor middleware, which is installed by the UseBlazorFrameworkFiles instruction. Later in this chapter, you will see why.
Look at the end of Listing 1-2. Here is another important middleware installed. The MapFallbackToFile("index.html") will return the index.html file which takes care of loading everything your Blazor application needs.
Using a Shared Project
The FetchData component downloads weather information from the server. These kinds of requests will be handled by the MVC middleware (MapControllers). We will discuss this in more detail in Chapter 6.
The Shared WeatherForecast Class
Understanding the Client Blazor Project
After this, there is another div; this is used to display errors in case your Blazor application has an uncaught exception.
This script will install Blazor by downloading dotnet.wasm. A little further we will look at this in more detail.
Listing 1-6. The index.html File
The Main Method
The App Component
The Index Component
Layout Components
The MainLayout Component
This component contains a div HTML element with two nested divs. The first nested div with class sidebar contains a single Blazor component: NavMenu. This is where your navigation menu gets defined. The sidebar will display a menu, allowing you to navigate between Home, Counter, and Fetch data. We will look in more detail at navigation and routing in Chapter 9.
The next nested div with class main has two parts. The first is the About link you see on every page. The second part contains the @Body; this is where the selected page will be shown. For example, when you click the Counter link in the navigation menu, the @Body will be replaced with the Counter component.
This is all for now, but the rest of the book will explain each part as we go along.
Debugging Client-Side Blazor
Of course, while building your Blazor app, you will encounter unexpected behavior from time to time. Debugging Blazor Server can be done just like any .NET project using Visual Studio or Code. But with Blazor WebAssembly, your code will be running in the browser. You will be happy to learn that the VS/VSC debugger works with Blazor, although limited. You can put breakpoints in your code, step through your code, and observe variables holding simple types like bool, int, and string. At the time of writing, debugging Blazor WebAssembly only works for Chrome or Edge, both Chromium-based browsers.
Debugging with Visual Studio
The launchSettings.json File for Debugging (Excerpt)
Setting a Breakpoint in the IncrementCount Method
Using the Locals Debugger Window to Inspect Simple Variables
Debugging with Visual Studio Code
The Blazor WASM Debugging Extension
Enable the JavaScript Preview Debugger
Open the folder containing the solution file. If it is the first time you open this folder with VSC, be patient, after a while, Figure 1-14 will pop up. Answer Yes. Also ensure Listing 1-11 is set up correctly like Visual Studio (this is actually independent of your IDE).
Adding a Breakpoint in VSC
Inspecting Variables in VSC
Developing with Hot Reload
With .NET Core 6.0, Microsoft introduces a really nice feature called hot reload . This allows you to make changes to your code and markup while your application is running. As soon as you make the change, your application will update (hot reloads), even keeping the existing state of the application.
Hot Reload with .NET CLI
A Simple Change
As soon as you make the change, the browser will update itself, keeping the current count!
Another Simple Change
Save. Clicking the Increment button will not add 3 to the counter.
If you want to restart again, go back to the command line and press Ctrl-Shift-R.
Hot Reload with Visual Studio
At the time of writing this chapter, hot reload does not work yet for Blazor WebAssembly application with Visual Studio. But, by the time you are reading this, it should work.
The Blazor WASM Bootstrap Process
At the bottom of Listing 1-14, you will find the <script> element responsible for bootstrapping Blazor in the browser. Let’s look at this process in detail.
Listing 1-14. The index.html File
Run the Blazor application. Open the browser’s developer tools (most browsers will open the developer tools when you press F12). We will have a look at what happens at the network layer.
In all screenshots, I will be using the Edge browser which is very similar to Chrome. If you prefer to use another browser, go right ahead since all modern desktop browsers have debugging support.
Clearing the Browser’s Storage
Examining the Bootstrap Process Using the Network Log
Now that the .NET runtime is running, you will see (scroll down?) that MyFirstBlazor.Client.dll gets downloaded, followed by all its dependencies, including mscorlib.dll and system.dll. These files contain the .NET libraries containing classes such as string used to execute all kinds of things, and they are the same libraries you use on the server. This is very powerful because you can reuse existing .NET libraries in Blazor you or others built before!
Total Download Size with Empty Cache
Total Download Size with Filled Cache
Let us now compare this with Blazor Server.
The Blazor Server Bootstrap Process
Let’s look at the bootstrapping process of a Blazor Server project.
Looking at Server-Side Blazor Network Activity
The SignalR Messages
Nullable Reference Types
Throughout this book, I will be using modern C# with some of the latest features. But there is one C# feature I want to discuss right now. Every developer, from time to time, will encounter a NullReferenceException, which is a real bug because you can always avoid it. What if the compiler can help you with this and warn you about a possible NullReferenceException? This is what the section “Nullable Reference Types” is all about.
An Apology
Who invented the null pointer? Tony Hoare did, and he apologized in 2009 and denoted this as his billion-dollar mistake (www.infoq.com/presentations/Null-References-The-Billion-Dollar-Mistake-Tony-Hoare/):
I call it my billion-dollar mistake. It was the invention of the null reference in 1965. At that time, I was designing the first comprehensive type system for references in an object oriented language (ALGOL W). My goal was to ensure that all use of references should be absolutely safe, with checking performed automatically by the compiler. But I couldn't resist the temptation to put in a null reference, simply because it was so easy to implement. This has led to innumerable errors, vulnerabilities, and system crashes, which have probably caused a billion dollars of pain and damage in the last forty years.
Many object-oriented programming languages still use the null pointer , and C# is no exception. Some languages even treated null differently. For example, in Objective-C, when a pointer is null, the compiler would not invoke a method on it. And it would do this silently! Of course, you would not get a NullReferenceException, but it did skip an important piece of functionality.
Using Null in C#
A Nullable Value Type
Nullable Reference Types
Setting the Nullable Compiler Option
Enabling Nullable Reference Types in the Project File
Inspecting the Nullable Flag
Possible Null Reference
No Possible Null Reference
So the whole idea of nullable reference types is to make the compiler do the analysis and to issue a warning when we can have a possible null being used which would result in a NullReferenceException.
Using References
A Person Class
Using a Constructor
Person with Nullable Name
However, this does not mimic real life. There is another technique we can use.
The Null-Forgiving Operator
The Null-Forgiving Operator
Using the Null-Forgiving Operator with Types
This is exactly the technique we will use to create Blazor components that have reference properties that we cannot initialize using a constructor.
The Person Class with Empty Name.
Nullable Reference Types and .NET Libraries
Microsoft has gone through a lot of effort to make all their libraries support nullable reference types. I want you to realize that this is all compiler meta-data, so you can use the new libraries supporting nullable reference types with older projects; the compiler will simply ignore this meta-data. You can also use libraries that do not support this meta-data, but you will need to use the null-forgiving operator with a lot of methods. But do yourself a favor – get to use nullable reference types and your code will be shipped with a lot less bugs! You can learn more at https://docs.microsoft.com/en-us/dotnet/csharp/nullable-references.
Summary
In this chapter, we looked at the history of the browser wars and how this resulted in the creation of WebAssembly. The .NET runtime allows you to run .NET assemblies, and because it can now also run on WebAssembly, we can now run .NET assemblies in the browser! All of this resulted in the creation of Blazor, where you build razor files containing .NET code which update the browser’s DOM, giving us the ability to build Single-Page Applications in .NET, instead of JavaScript.
First, we installed the prerequisites needed for developing and running Blazor applications. We then created our first Blazor project. This project will be used throughout this book to explain all the Blazor concepts you need to know about. We examined this solution, looking at the server-side project, the shared project, and the Blazor project, and compared the bootstrap process for both Blazor WebAssembly and Blazor Server.
Finally, we looked at using nullable reference types and how this can help writing better code with less bugs.