Many web applications need some way to identify the user, also known as authentication . Sometimes this is only to show the user what they were looking at before, so we need an identity to retrieve the user’s state from the server. Sometimes we need to protect certain resources, also known as authorization , which can be personal information, or contents that the user has paid for, or because of some legal requirement. In this chapter, we will look at OpenId Connect and how we can use this to identify the user and decide what the current user can do.
Representing the User
Let us first discuss how we can represent users. You might think that we just need to know the user’s name, but this is not true. We will represent the user as a collection of properties about the user, which can include the user’s name and also information like age and which department the user works for. We call this claims-based security . Some claims can represent things the user can do; these are known as roles. For example, one claim could state that the user has the admin role, allowing our software to check the role instead of the name. Users can move around in an organization, and then you simply change the role claims to give users more or less things they can do with the software.
Using Claims-Based Security
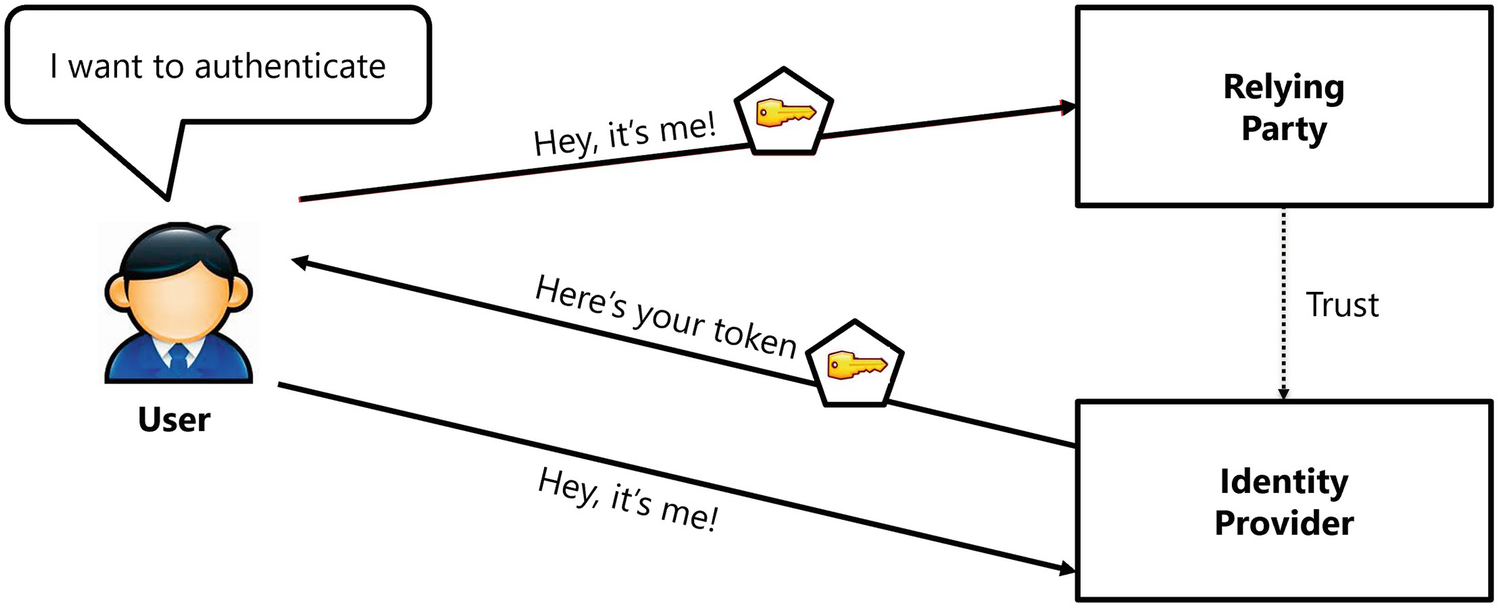
The Authentication Process
One more aspect about tokens is that once a user has received a token, the user can use it again and again without the need to go back to the identity provider. Of course, there needs to be a limit to this, and that is why tokens have a valid period, and after this period, the user will need to get a new token. My passport was issued to me a couple of years ago, but I can still use it until it expires. Then I will have to go back to city hall and get a new one. Of course, software tokens will not last that long, because it is easy to get a new one over the network.
Understanding Token Serialization
How are tokens serialized over a network? Modern applications using REST use the JSON Web Token (JWT) open standard. This allows us to transmit tokens in a secure way in the form of a JSON object.
A Serialized Token
The issuer claim (iss) states that this token was issued by my development identity provider with URL https://localhost:5000, and the not before claim (nbf) together with the expiry claim (exp) gives this token a validity period. The audience claim (aud) states that this token is intended for the application called Blazor. Finally, the subject claim (sub) contains a unique identifier for the current user. There are a lot of other official claims you can find in a token, and you can find their meaning on the IANA JSON Web Token Registry’s site at www.iana.org/assignments/jwt/jwt.xhtml.
The payload of the token is not encrypted, so never include sensitive information in here!
The signature allows our software to check if the token has been modified, and again you should ignore this (but not our software!).
Representing Claims in .NET
So how are claims represented in .NET? From the start, Microsoft has provided us with two interfaces to represent the user, IPrincipal and IIdentity.
Retrieving the Name of the User from ClaimsPrincipal
OpenId Connect
OpenId Connect is a standard protocol that allows us to secure our applications, including websites, mobile applications, server, and desktop applications. Because of differences in application types, OpenId Connect describes a number of flows, such as Resource Owner Password Credential, Client Credential, Implicit, Authorization Code, and Hybrid flows. With Blazor, we will use the Hybrid and Authorization Code flows.
Understanding OpenId Connect Hybrid Flow
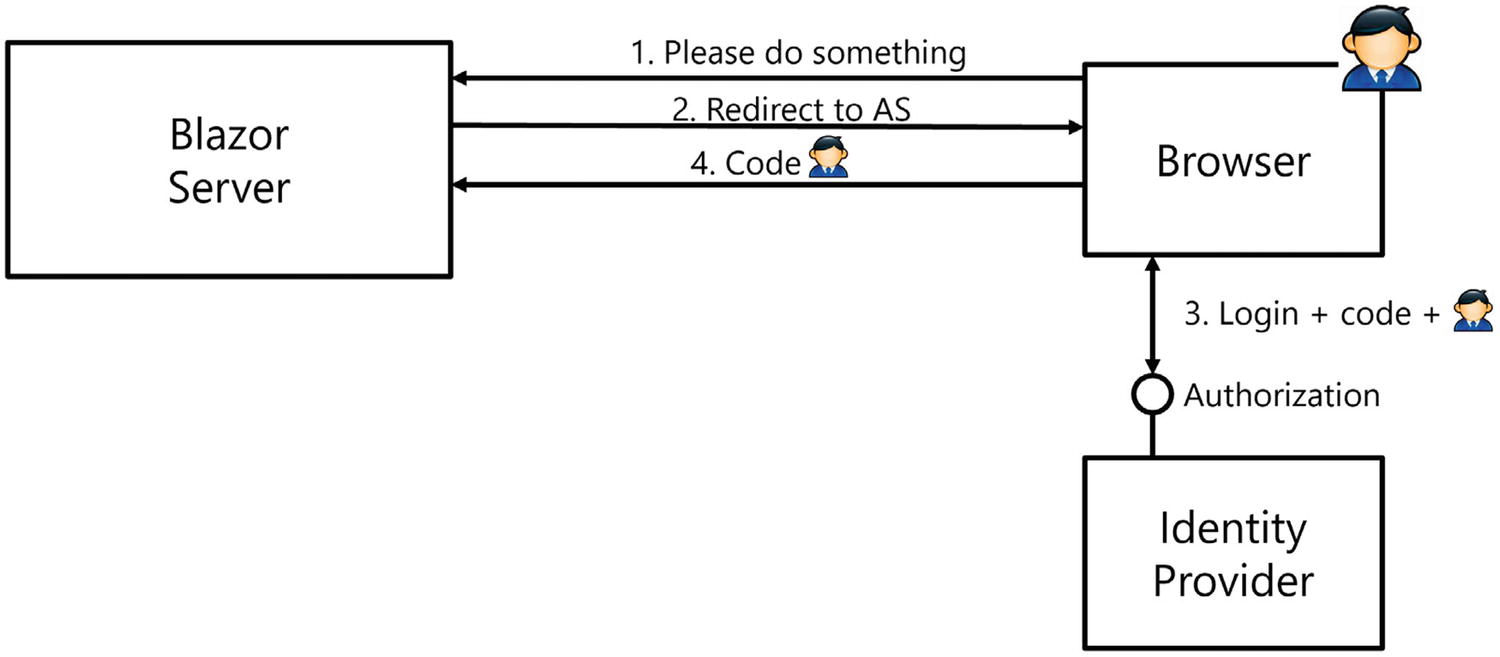
The OpenId Connect Hybrid Flow
When the not yet authenticated user visits a protected resource (Step 1), the Blazor Server will return an HTTP redirect result (Step 2) which will make the browser visit the identity provider, also known as an authorization server (AS). The URL contains credential information about the client (the ClientId and ClientSecret) together with a redirect URI. The identity provider identifies the client application through its ClientId and verifies if the redirect URI matches its list of registered client redirect URIs. The identity provider will then present the user with some kind of login UI (Step 3), for example, to enter the username and password. The identity provider is free how this login process works, and after a successful login, the identity provider will return an HTTP redirect to the browser (Step 4) so the browser will visit the redirect URI (the Blazor Server application) with the request containing a code and identity token. The redirect URI is then processed by the Blazor application, the identity token is turned into a ClaimsPrincipal, and the user has been authenticated. The Blazor application is also responsible for storing the ClaimsPrincipal, and with Blazor Server, this is done by storing the ClaimsPrincipal in a cookie, so the next request containing that cookie can deserialize it again. For the moment, we don’t need the code, but we will use it later.
A couple of remarks: an identity provider will only send tokens to known redirect URIs, so these have to be registered with the identity provider. This prevents unknown parties (hackers!) from hijacking requests. When you deploy your application, you should not forget to register the new redirect URI in the identity provider. There can be several registered redirect URIs, so you can keep developing locally and run the application in production using the same identity provider.
Identity Providers
There are many identity providers out there. For example, there is Microsoft Azure Active Directory, Google, Facebook, etc. Each of these identity providers comes with their own UI, but as long as they use OpenID Connect, the implementation works on the same principles.
Here, I want to use IdentityServer4 (www.identityserver.com/) which allows you to build your own identity provider for free (however, identity server is not free for commercial use). These people need to eat too!
Implementing the Identity Provider with IdentityServer4
Let us start by creating the project that we will use as our identity provider, using IdentityServer4. Create a new AspNet .NET Core Web App project and name it IdentityProvider.
Changing the Port
Use NuGet to Add IdentityServer4
Configuring Dependency Injection
Adding IdentityServer to the Pipeline
IdentityServer4 can be configured using a database or an in-memory configuration. We will use the latter because it is easier for learning and experimentation. Add a new class called Config to the project next to Program.cs. This Config class will contain the configuration for IdentityServer4.
Adding Users to IdentityServer
Adding Identity Resources
Adding Clients
Adding Users, Identity Resources, and Clients
Adding the Login UI to Our Identity Provider
When our users want to log in to the identity provider, the identity provider will present a login screen to the user. IdentityServer4 comes with a built-in UI, so here we will add this to the IdentityProvider project.
Getting everything installed is pretty easy with dotnet CLI.
This will install two new folders called QuickStart and Views and will also install some CSS and scripts in the wwwroot folder.
Configure Services for MVC
Adding MVC Middleware
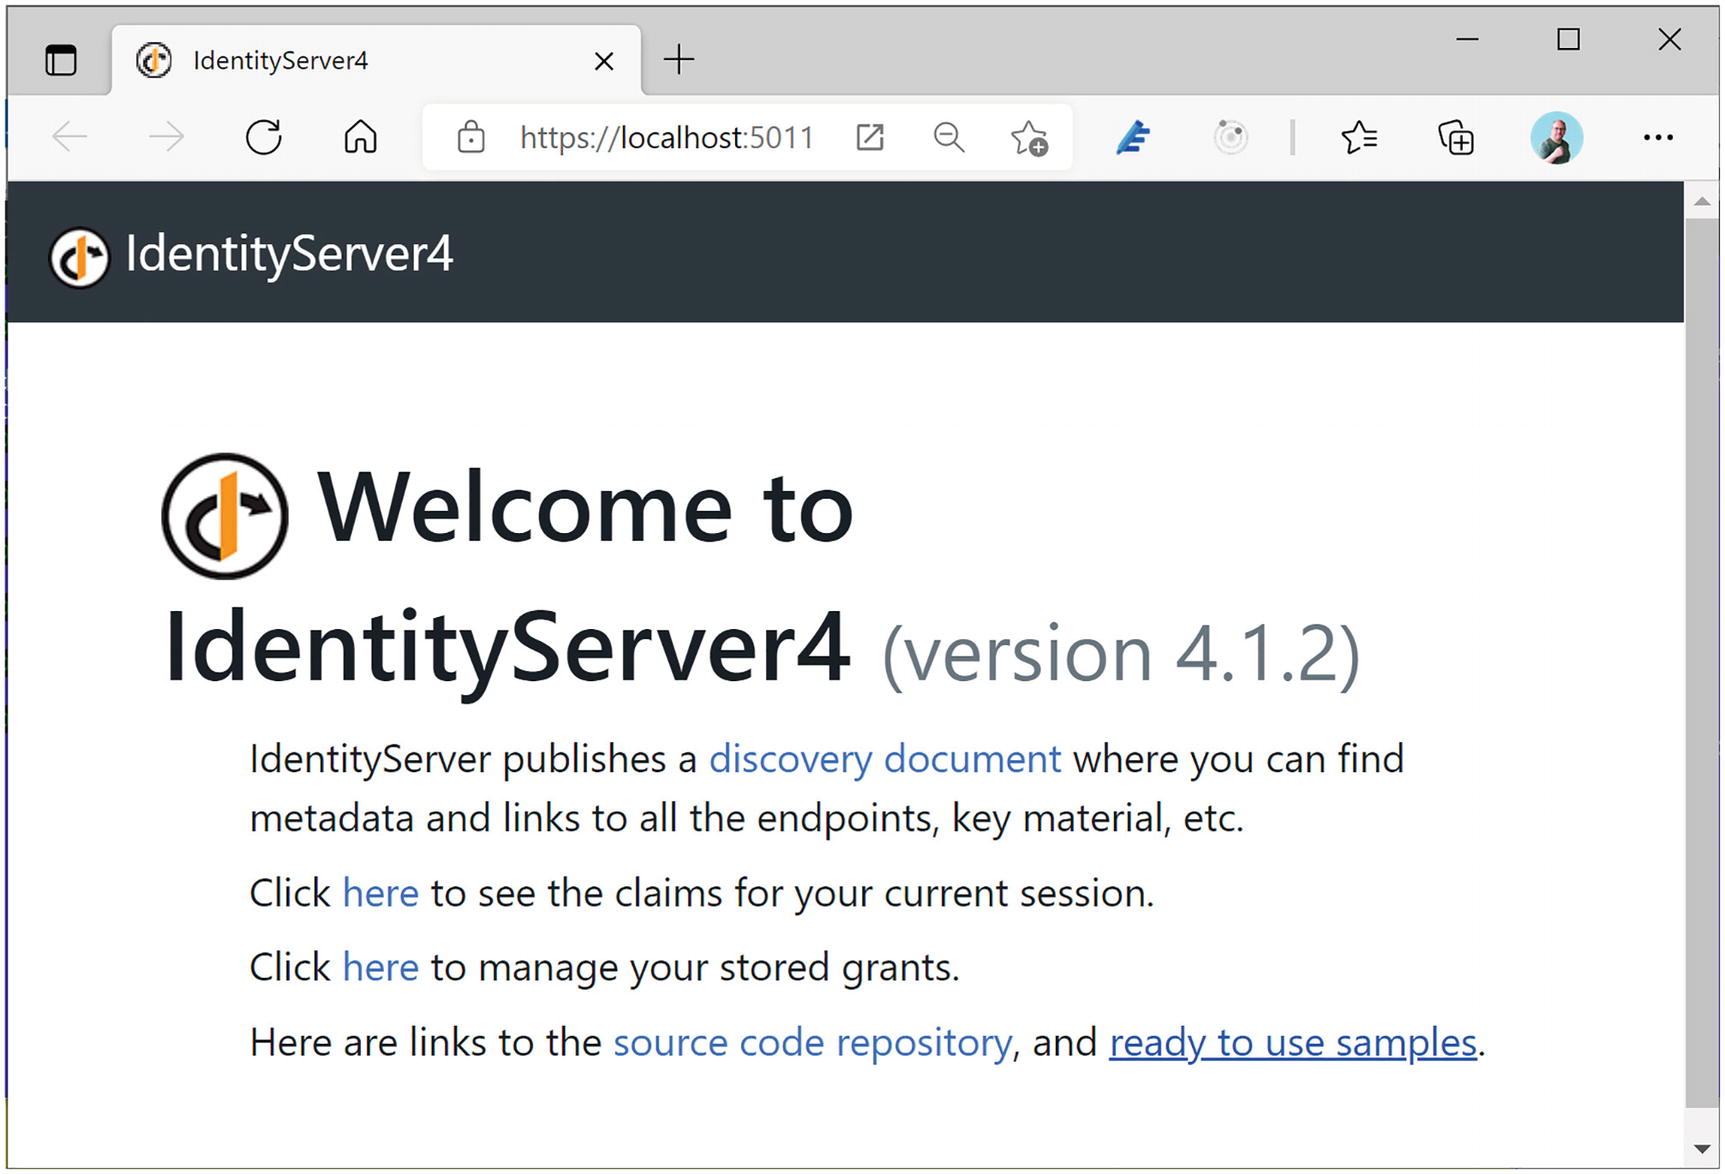
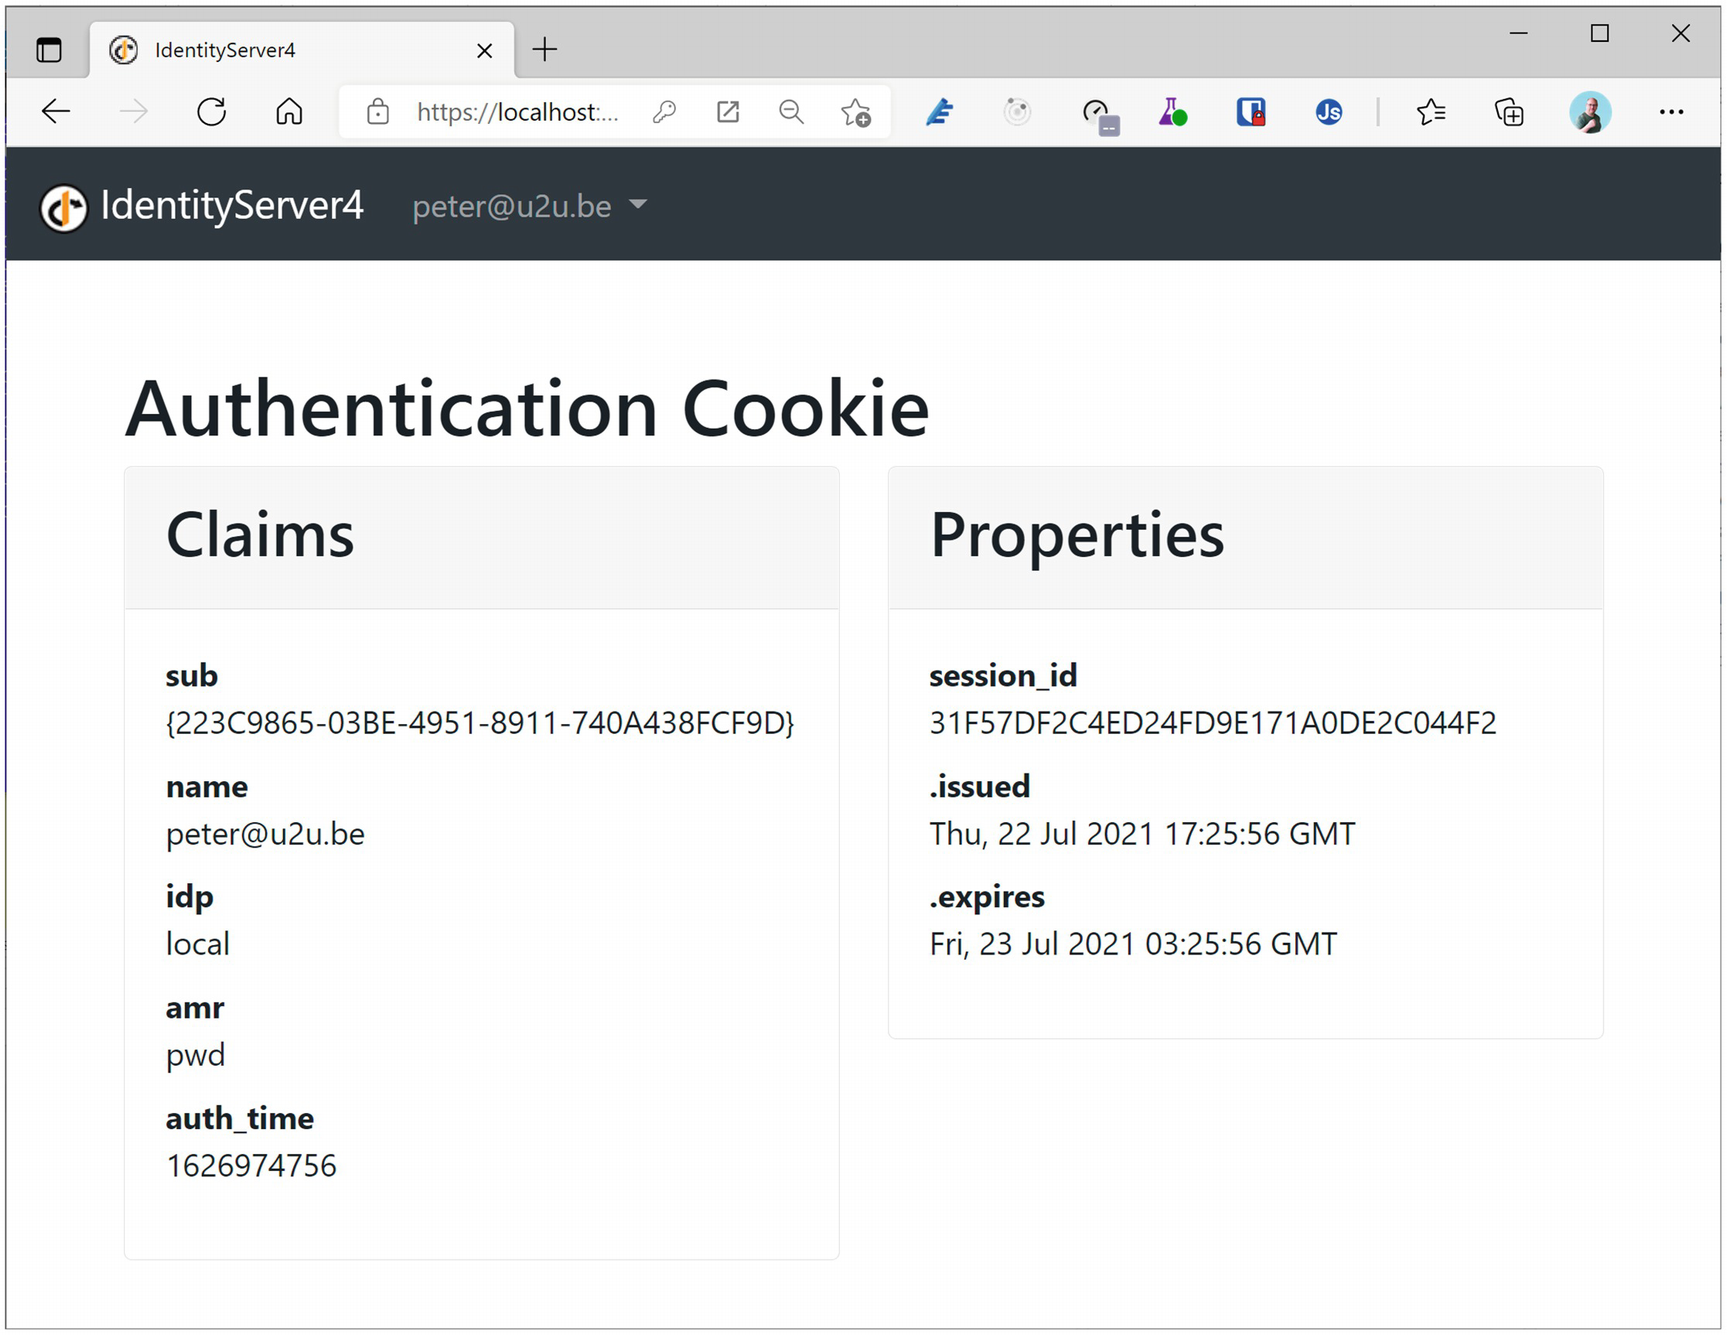
The Identity Server Home Page
Understanding User Consent

The User Consent Screen
Protecting a Blazor Server Application with Hybrid Flow
Now that we have our own identity provider, we can build a Blazor Server application and secure it. Later, we will do the same for Blazor WebAssembly.
Add a new Blazor Server application to the existing solution and name it Blazor.Server.OpenIdConnect. If you are using Visual Studio, leave the Authentication Type set to None. This will generate the project without any authentication components. In the next chapter on using OpenId Connect with Blazor WebAssembly, you will use a more practical approach that will generate the authentication components for you using the Authentication Type set to Individual Accounts.
Adding OpenId Connect to Blazor Server
Add the Microsoft.AspNetCore.Authentication.OpenIdConnect package to the Blazor.Server.OpenIdConnect project.
Configuring Authentication
Add Authentication Middleware
Configuring OpenId Connect
Implementing Authorization in Blazor Server
Before running the application, we should also protect one of our resources; otherwise, there is no need to authenticate using the identity provider. But first we need to understand how authentication works in Blazor using the AuthenticationState and AuthenticationStateProvider classes . The AuthenticationState class allows access to the current user’s claims with the User property of type ClaimsPrincipal, and the AuthenticationStateProvider abstracts away how we retrieve the current AuthenticationState, because the process is different in Blazor Server and Blazor WebAssembly. So you should always use the AuthenticationStateProvider in your Blazor components if you want these to work in both Blazor Server and Blazor WebAssembly. Listing 16-16 contains a nice example of how you do this.
In Blazor Server, the user’s ClaimsPrincipal is stored in the HttpContext.User property so AuthenticationStateProvider retrieves it there.
Using the AuthenticationState in a Component
The Index Component
Update App Component
Add RedirectToLogin
Add the Login.cshtml Razor Page
The Login Page’s Model
Let us walk through the authentication process step by step. First, start the IdentityProvider project; next, start the Blazor.Server.OpenIdConnect project.
Please do not forget to always start the IdentityProvider project; the easiest way with Visual Studio is to set up multiple startup projects.
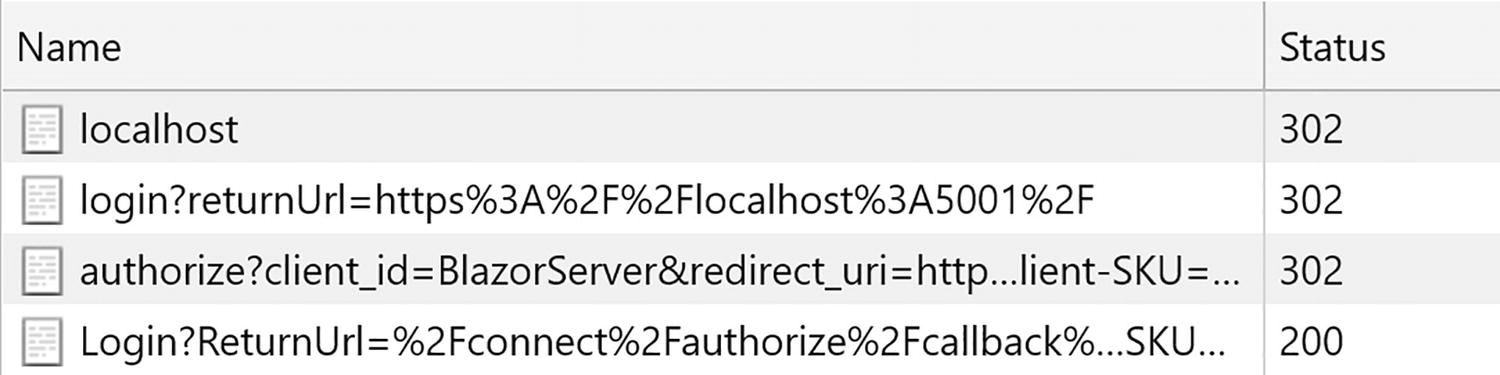
Redirecting to the Identity Provider
After completing the login process, you will be redirected to the Blazor Server’s signin-oidc URL which will be handled by the OpenId Connect middleware. This middleware will convert the identity token into a ClaimsPrincipal and redirect to the original URI that initiated the login process. The Cookie middleware will serialize the ClaimsPrincipal into a cookie (actually, it might use multiple cookies because of the limited length of cookies). The browser then will process the original URI and convert the cookie into the ClaimsPrincipal and because now the user is authenticated will give access to the Index component.
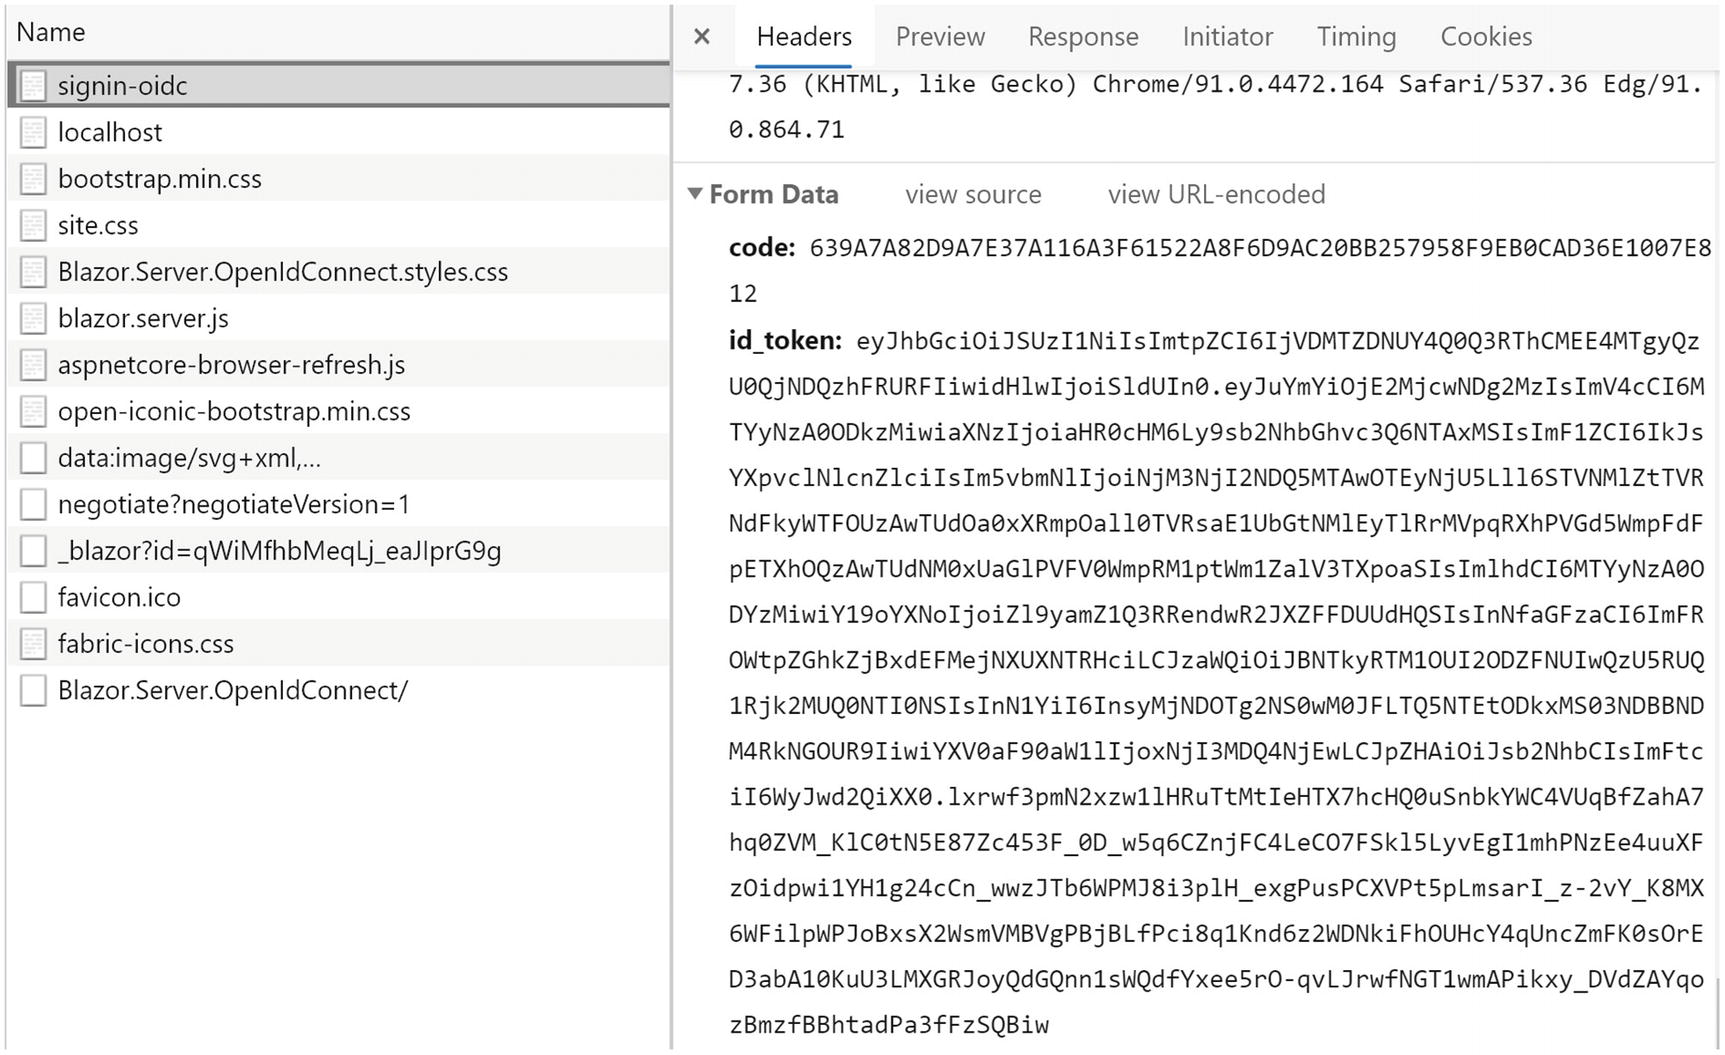
Receiving the Code and Id Token

Using jwt.io to Inspect a Token
Congratulations. You have just added authentication to your Blazor Server application!
Using AuthorizeView
Modifying the NavMenu Component
The LogoutModel Class
Remove the Authorize Attribute
The Logout Page
Setting the PostLogoutRedirectUris Property
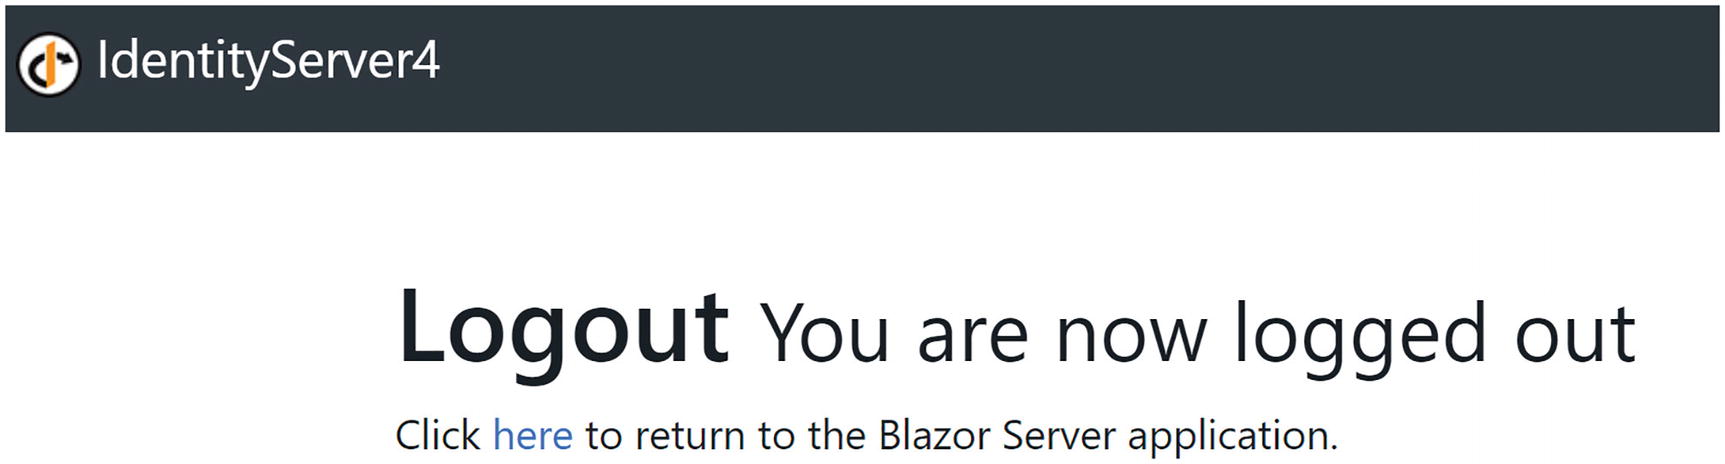
IdentityServer4 Showing the LogoutRedirectUri
Enable Automatic Redirect After Signing Out
Adding and Removing Claims
Adding an Additional Claim to the Users
Adding an IdentityResource for Address
Allowing the Address Scope for a Client
Requesting the Address Scope
However, we will not find the address claim in the Index component. Why? Because we need to explicitly map this additional claim using ClaimActions.
Add and Remove Claims with ClaimActions
Running the application and logging in again (!) will show the address claim.
Enabling Role-Based Security
Currently, we have claims that allow us to identify the user. We have the user’s name and address. But what if we would like to protect certain parts of our application so only certain users can access it? Should we check a long list of user names? No, in this case, we will define a number of roles, assign these roles to some of our users, and only allow access when the user has a specific role. This is known as role-based access control (RBAC).
Adding User Roles
Adding a Roles Scope
Adding the Roles Scope
Declaring the Roles Scope and Role Claim
Run the application, and log in again; the user’s role should be shown.
Using the Authorize Attribute for RBAC
Using AuthorizeView to Show Additional Content
Hiding NavLinks in the NavMenu
Run and log in with a user who has the admin role; you should see the Counter link in the navigation bar, and it should appear when you click it. Do the same for a user without the admin role; now there should be no Counter link in the navigation bar, and even manually modifying the browser’s URL to /counter will show a not authorized screen.
Accessing a Secured API
Where are we? We can use OpenId Connect to implement the authentication for our Blazor Server site, and we can use roles to protect certain sections of our application, either by writing code using the AuthenticationState or declaratively using the Authorize and AuthorizeView classes. This is enough when your Blazor Server accesses data itself. There is one more thing. Your Blazor application might need to access a protected API running in another application. How do we do this? The answer is of course more claims!
Using an Access Token
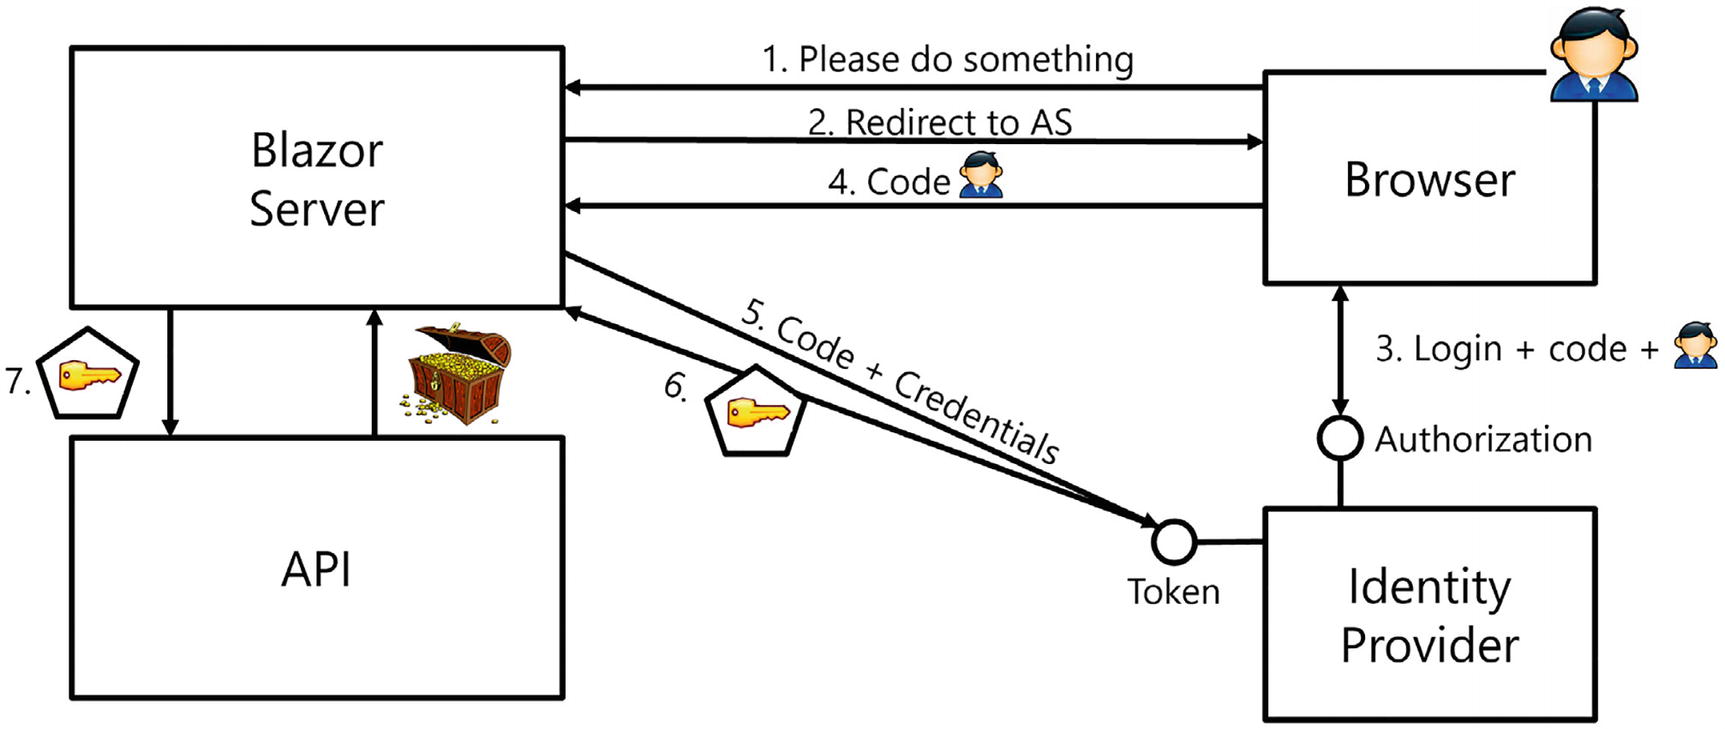
API Authorization with OpenId Connect Hybrid Flow
Steps 1–4 are the same as before, and our Blazor Server application receives an identity token and a code (which we ignored until now). This code can then be used together with the Blazor Server application’s identifying information to retrieve an access token (Step 5) from the identity provider. The identity provider will then use the code to verify which claims it should give to the Blazor Server application (Step 6). Once our application has an access token, it can send it along with the API request (Step 7) using a header to the API application, which can then use the claims in the access token to determine how is should behave.
Change the API Project’s Port
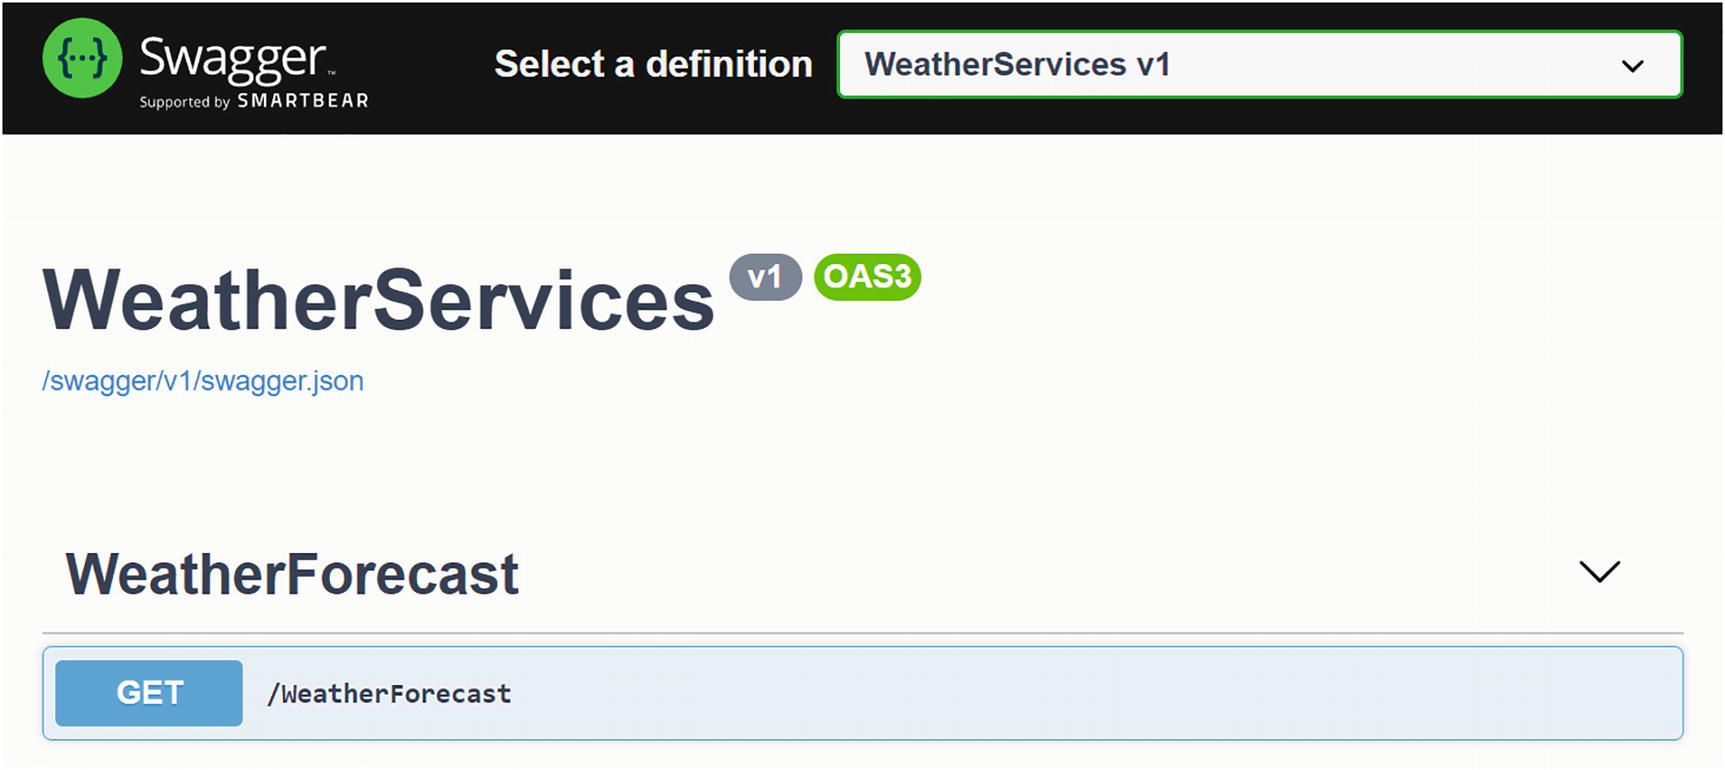
The Swagger UI
Click the GET button, then click Try It Out, and then Execute. You should see some forecasts.
Creating the CORS Policy
Adding the CORS Middleware
Registering the API Project with the Identity Provider
Adding an APIScope
Creating an ApiResource
Allowing the Client to Access an API
Registering the ApiScopes and ApiResources
Adding JWT Bearer Token Middleware
A client application will send the access token using an HTTP Authorization Bearer header, and we need our API project to look for this header and install the ClaimsPrincipal from the access token. Use NuGet to install the Microsoft.AspNetCore.Authentication.JwtBearer package in the WeatherServices project.
Adding JWT Authentication
Adding the Authentication Middleware
That’s all for the moment for our API.
Enabling the Bearer Token in the Client
Our client application should now use the received code to request an access token from the identity provider and use it in its API requests.
The WeatherForecastService
We also need to configure dependency injection in the Blazor Server project to give us an instance of the IHttpClientFactory. The IHttpClientFactory will give us an HttpClient that will be configured for us to include the access token and which will send it as a Bearer token to the API.
Adding the API Scope to the Client
Add Token Management
Start the IdentityProvider project, next the WeatherServices project, and finally the Blazor.Server.OpenIdConnect project. Log out (if you’re still logged in) and log in again. This will refresh our tokens.
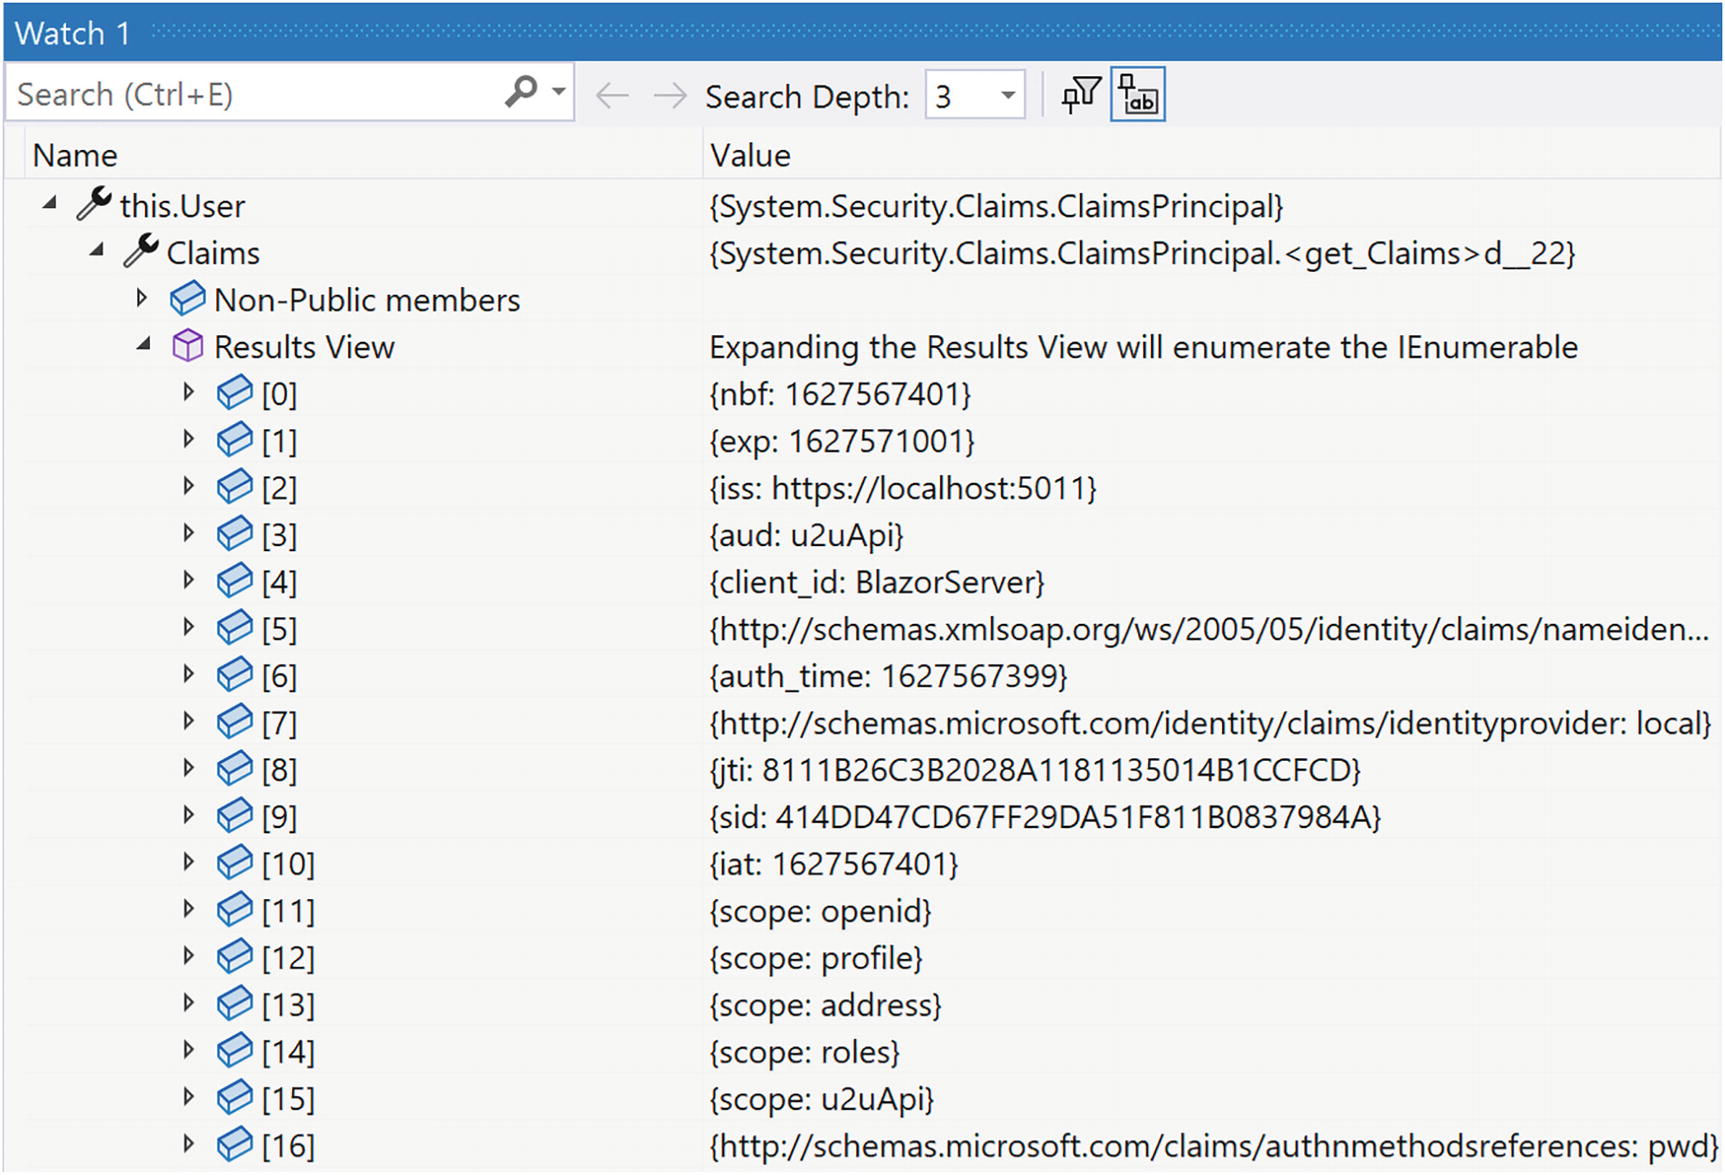
The WeatherServices ClaimsPrincipal
If the results view is empty, you will need to review your code because you forgot something. You should see the scope: u2uApi claim.
Protecting the WeatherForecastController
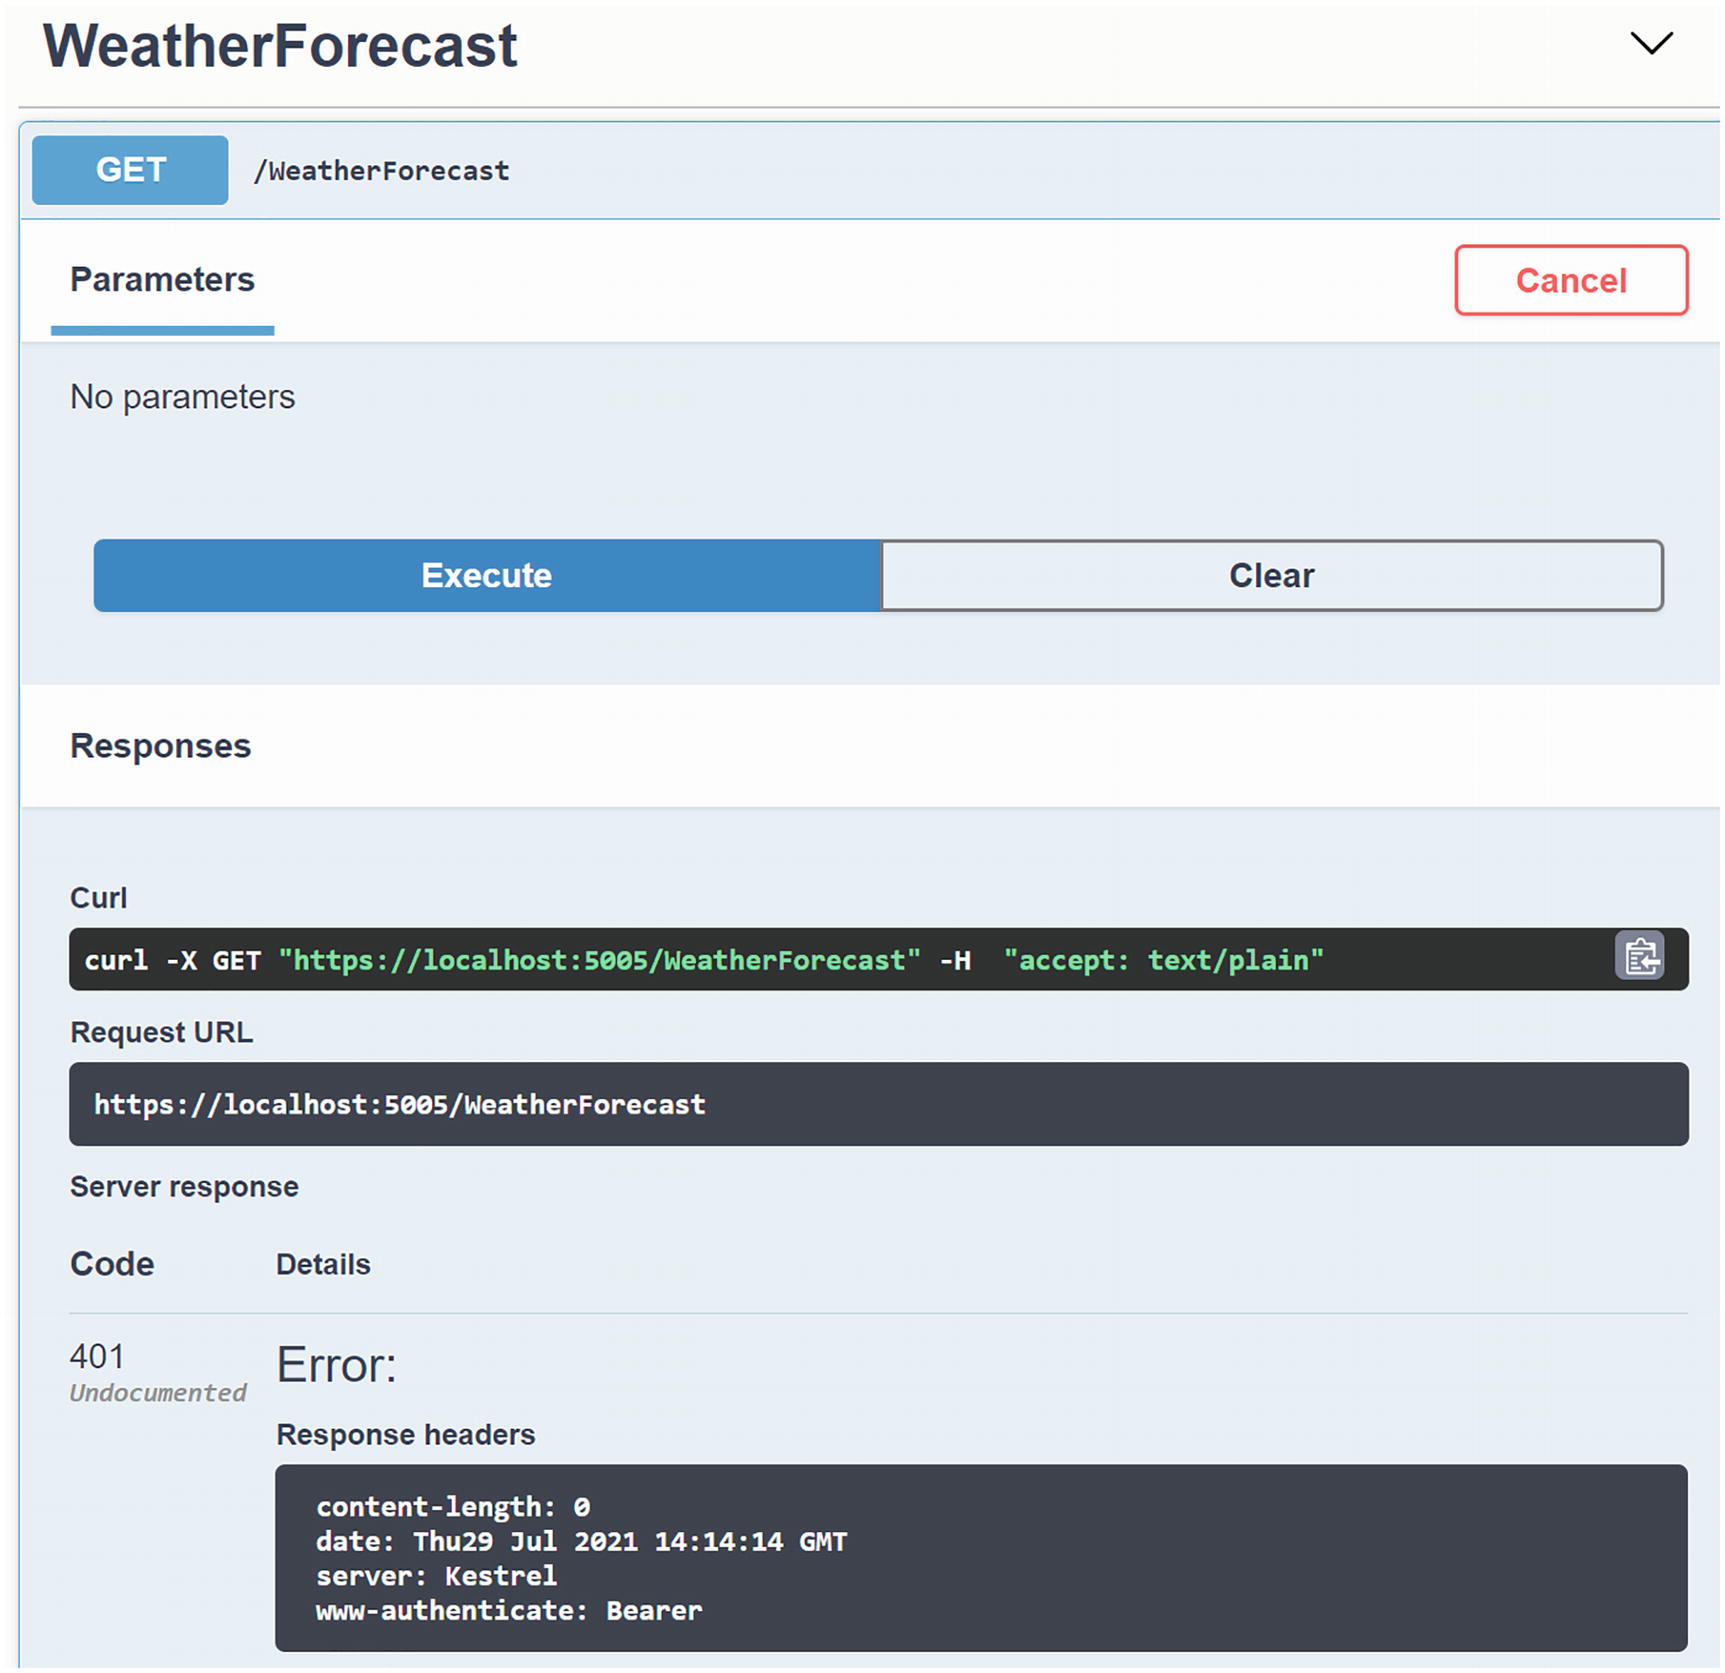
Accessing a Protected API with Swagger
Using Policy-Based Access Control
What if we want to use one or more claims to determine if the user can access a certain resource? For example, we might only want to allow authenticated users that live in Belgium to access the forecasts. In that case, we can use policy-based access control (PBAC).
Adding the Country Claim
Adding the Country IdentityResource
Allowing the Country Scope
Requesting the Country Scope in the Client
Adding the FromBelgium Policy
Using Policies with the AuthorizeView
Running the application and logging in as student@u2u.be will not show the link because this user is from France, while logging in as peter@u2u.be will show the link since the FromBelgium policy passed. This completes the client.
We want to use this policy with the API project as well, so we could copy this code. Let us do the proper thing and move the policy into a library project so we can use the same policy in our Blazor and API projects.
The Policies Class
Enabling the FromBelgium Policy in the API Project
Using a Policy to Protect an API
Including the Country Claim in the Access Token
Run all three projects, and log in with the peter@u2u.be user; the Fetch data link should be shown, and when you click the link, you should get a list of forecasts.
Congratulations. You just completed authentication and authorization for Blazor Server applications! Now let us look at Blazor WebAssembly in the next chapter.
Summary
In this chapter, we looked at protecting a Blazor Server application using OpenId Connect. In our modern world, applications use claims to allow applications to identify the current user and to protect resources. We then learned about the OpenId Connect Hybrid flow and used it for authentication, getting an identity token containing user’s claims. We then used the AuthenticationState class to access these claims. We updated routing to check the Authorize attribute and used the AuthorizeView component to conditionally render a UI according to the user’s claims. After this, we looked at retrieving an access token and used it to protect an API. This allows us to use different applications with the same Web API, each given different levels of access to our API. All of this using IdentityServer4 as the identity provider.