The Web is a big place. So your Blazor application will probably be used by people who speak different languages. I live in Belgium, where people speak Dutch, French, and German, and even if you live in a country where there is one official language, there are no borders on the Web. So if you want to enlarge your application’s reach and be more inclusive, you should consider supporting multiple languages. So how do you do this?
Understanding Internationalization, Globalization, and Localization
Let us first get a couple of definitions cleared out. Internationalization is the process of making an application support a range of languages. This means changing your application to support different languages but also taking into consideration things like decimal points and data formats. When users enter numbers and dates, you will have to take special support, for example, giving people a data picker. Internationalization is often abbreviated as I18n. Expect internalization to take a certain amount of time and effort. It is actually better to implement this as soon as possible.
After internationalizing your application, you can start localization. Localization is the process (probably repeated several times) to make the application support a specific language or locale. Localization is often abbreviated as L10n. The difference between a language and a locale is the country where a certain language is spoken. For example, in French as spoken in France, people use “petit déjeuner” to mean breakfast, while in French-speaking Belgium, the same word “déjeuner” is used. You have to take this into account, because some words have a completely different meaning. Dutch-speaking people may know what I am talking about!
Globalization, abbreviated as g11n, is the combination of internationalization and localization.
Note
If you have experience with globalization in ASP.NET Core, you will see that the concepts and implementation are very similar.
Representing the User’s Locale
In .NET programs, the user’s locale is stored in an instance of the CultureInfo class. You can create a CultureInfo instance passing the locale string in the constructor. A locale string uses two lowercase characters to represent the language, a hyphen, and two/three uppercase characters to represent the country. For example, American English uses “en-US”, while Canadian English used “en-CA”. You can also create a CultureInfo instance by just passing the two-character language as a string. CultureInfo has all kinds of capabilities; for example, you can ask what Monday means in the current locale or what the decimal separator is.
Create a new console application called UserLocales, and complete it as in Listing 14-1. Here, we create two CultureInfo instances, one for American English and one for Belgian Dutch (you can change this to your locale if you like). Then we print the localized name for Monday and the decimal separator.
using System;
using System.Globalization;
namespace UserLocales
{
internal class Program
{
private static void Main(string[] args)
{
var enUS = new CultureInfo("en-US");
Console.WriteLine(enUS.DateTimeFormat
.GetDayName(DayOfWeek.Monday));
Console.WriteLine(enUS.NumberFormat
.NumberDecimalSeparator);
var nlBE = new CultureInfo("nl-BE");
Console.WriteLine(nlBE.DateTimeFormat
.GetDayName(DayOfWeek.Monday));
Console.WriteLine(nlBE.NumberFormat
.NumberDecimalSeparator);
}
}
}
Listing 14-1
Using CultureInfo
The program’s output will look something like the following. It prints out “Monday” as the name of the English Monday and a “ . ” as the decimal separator. For Belgian Dutch, it prints “maandag” and a “ , ” as the decimal separator.
Monday
.
maandag
,
Some .NET methods allow you to pass a CultureInfo, especially the DateTime.class’s ToString method. Update the UserLocales application by adding Listing 14-2 to the end. This will print out today’s date in Belgian Dutch.
A lot of people like to use C#’s string interpolation. If you want this to use a certain locale, you need to set CultureInfo.CurrentCulture to the appropriate CultureInfo as in Listing 14-3.
CultureInfo.CurrentCulture = nlBE;
Console.WriteLine($"{DateTime.Now:D}");
Listing 14-3
Using String Interpolation with Another CultureInfo
This will again print today’s date as a localized string:
zaterdag 17 juli 2021
You can set the current CultureInfo explicitly, but you can have your Blazor application automatically detect the user’s language as we will see shortly.
CurrentCulture vs. CurrentUICulture
You will see that the CultureInfo class has two static properties, CurrentCulture and CurrentUICulture, to represent the current CultureInfo. What is the difference between these? The CurrentCulture property is used as the default for formatting values as we just saw in Listing 14-3. The CurrentUICulture is used by the runtime to look up the values from resource files which we will discuss in depth when we look at localization. Most of the time, you will keep both properties set to the same CultureInfo. But when you want to display numbers and dates in a different language than the UI, you would set these to different cultures.
Enabling Multiple Languages
Internationalizing your Blazor application is different between using Blazor WebAssembly and Blazor Server. Luckily, most concepts stay the same, so we will start with Blazor Server and continue with Blazor WebAssembly by internationalizing the PizzaPlace application.
Using Request Localization
Create a new Blazor Server application and name it L10nBlazorServer.
Open appsettings.json and add the “Cultures” configuration as in Listing 14-4. These are the languages our application will support. You can of course choose to hard-code the supported languages in your application, but I like the flexibility of putting the supported languages in configuration. I have put in this configuration a series of cultures (some of which are region independent) because some browsers do not allow me to set a region for certain languages, and Dutch is one of them. Feel free to replace these cultures with your own, which will make a lot more sense when you don’t understand Dutch or French.
{
"Logging": {
"LogLevel": {
"Default": "Information",
"Microsoft": "Warning",
"Microsoft.Hosting.Lifetime": "Information"
}
},
"AllowedHosts": "*",
"Cultures": {
"en-US": "English",
"nl-BE": "Nederlands (BE)",
"nl": "Nederlands",
"fr-BE": "Français (BE)",
"fr": "Francais"
}
}
Listing 14-4
Configuring the Supported Languages
Add a new folder called Globalization to your project (next to Pages) and add the ConfigurationExtensions class to it from Listing 14-5. This class contains a single GetCulturesSection extension method which will hide how configuration looks like by creating a Dictionary<string,string>.
using Microsoft.Extensions.Configuration;
using System.Collections.Generic;
using System.Linq;
namespace L10nBlazorServer.Globalization
{
public static class ConfigurationExtensions
{
public static Dictionary<string, string> GetCulturesSection
(this IConfiguration configuration)
=> configuration.GetSection("Cultures")
.GetChildren()
.ToDictionary(k => k.Key, v => v.Value);
}
}
Listing 14-5
The ConfigurationExtensions Class
We will use this method in the Startup class to retrieve our configuration and convert it into a RequestLocalizationOptions. We need this to configure the request localization middleware which will set the current culture. Add a new GetLocalizationOptions method from Listing 14-6 to the Startup class. Here, we do a couple of things. We need to set the supported cultures, and we need to set the culture which everything will default to in case someone visits with an unsupported culture.
How does our Blazor Server application determine what language the user speaks? We could ask the user what language they prefer upon first use, use a cookie, or use the query string, or we could use the IP address to figure out the country the user is visiting our site from. There is a better option in my humble opinion. Most people use a localized version of Windows. I cannot imagine my parents using an English Windows; no, they use a Dutch Windows. Same thing for the browser. Browsers actually send the language of the browser to the server using the Accept-Language header. For example, when I start the Blazor Server application and the browser opens the page, I can use the browser’s debugger to look at this header, which displays on my machine as
I prefer English (I am a developer), and I configured my browser to also support Dutch and French because I am from Belgium, so this header lists these locales in order of preference. This means we can simply look at this header to figure out the user’s preferred language. And in .NET, there is the request localization middleware that does exactly this!
To choose the Accept-Language header for localization, we need to configure the RequestCultureProviders. Initially, there will be three configured providers, one using the query string from the URL, one using cookies, and one using the Accept-Language header. As shown at the end of Listing 14-6, since we only want to use the last, we clear the list of providers and add the required AcceptLanguageHeaderRequestCultureProvider provider.
Open the Startup class, and update the ConfigureServices method by adding the services.AddLocalization method call as in Listing 14-7.
public void ConfigureServices(IServiceCollection services)
{
services.AddRazorPages();
services.AddServerSideBlazor();
services.AddSingleton<WeatherForecastService>();
services.AddLocalization();
}
Listing 14-7
Enabling Request Localization
Now add the request localization middleware to your ASP.NET pipeline by calling the UseRequestLocalization method in the Configure method as in Listing 14-8. This method requires a RequestLocalizationOptions instance which we retrieve from configuration (containing the list of supported cultures).
public void Configure(IApplicationBuilder app,
IWebHostEnvironment env)
{
if (env.IsDevelopment())
{
app.UseDeveloperExceptionPage();
}
else
{
app.UseExceptionHandler("/Error");
app.UseHsts();
}
app.UseHttpsRedirection();
app.UseStaticFiles();
// This middleware uses a couple of approaches to determine
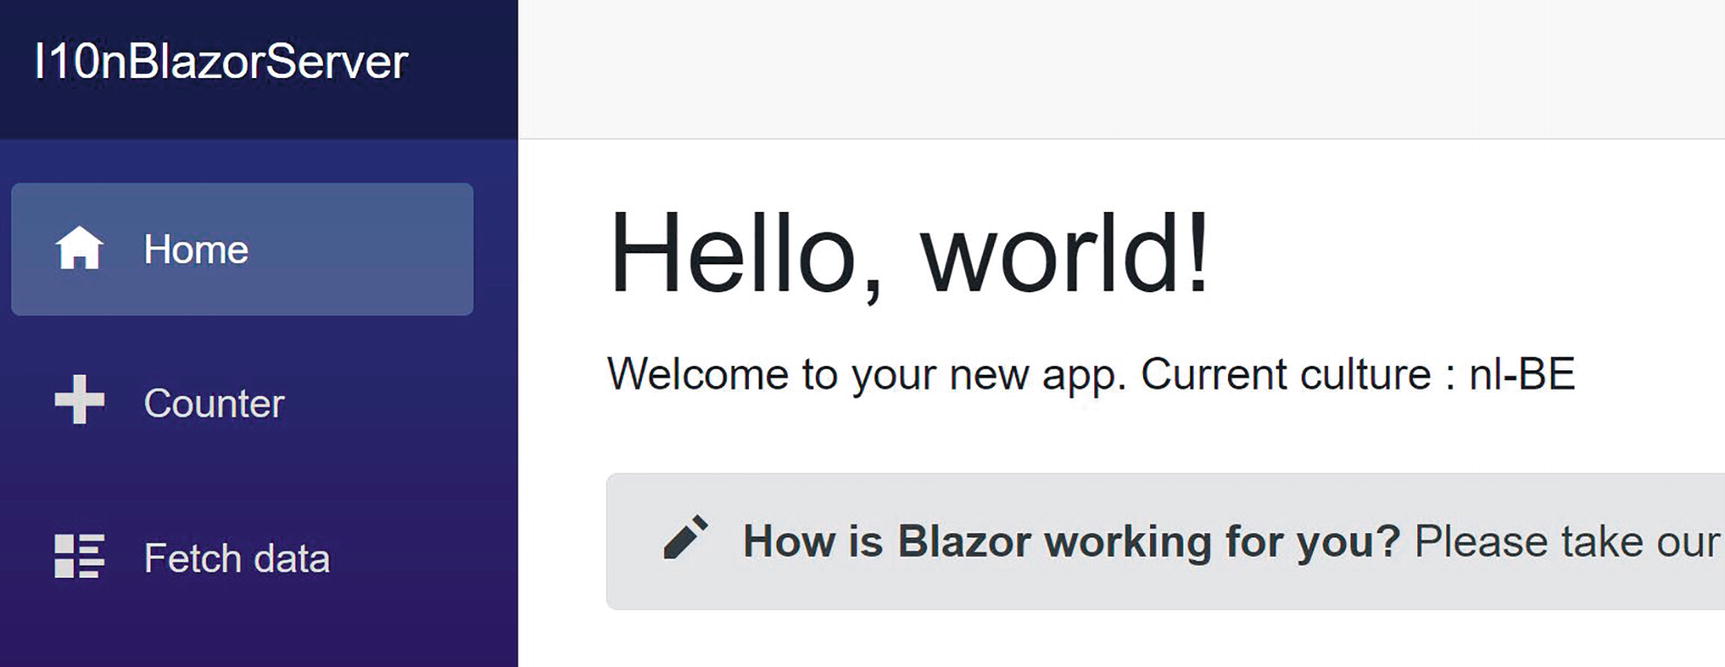
Time to see if all of this works. Open the Index.razor page and update it to display the current culture as in Listing 14-9.
@page "/"
<h1>Hello, world!</h1>
Welcome to your new app.
Current culture : @CultureInfo.CurrentCulture.Name
<SurveyPrompt Title="How is Blazor working for you?" />
Listing 14-9
Displaying the Current Culture
Running this should show the current culture as in Figure 14-1. Of course, depending on your browser’s settings, the culture might be different.
Figure 14-1
Testing Request Localization
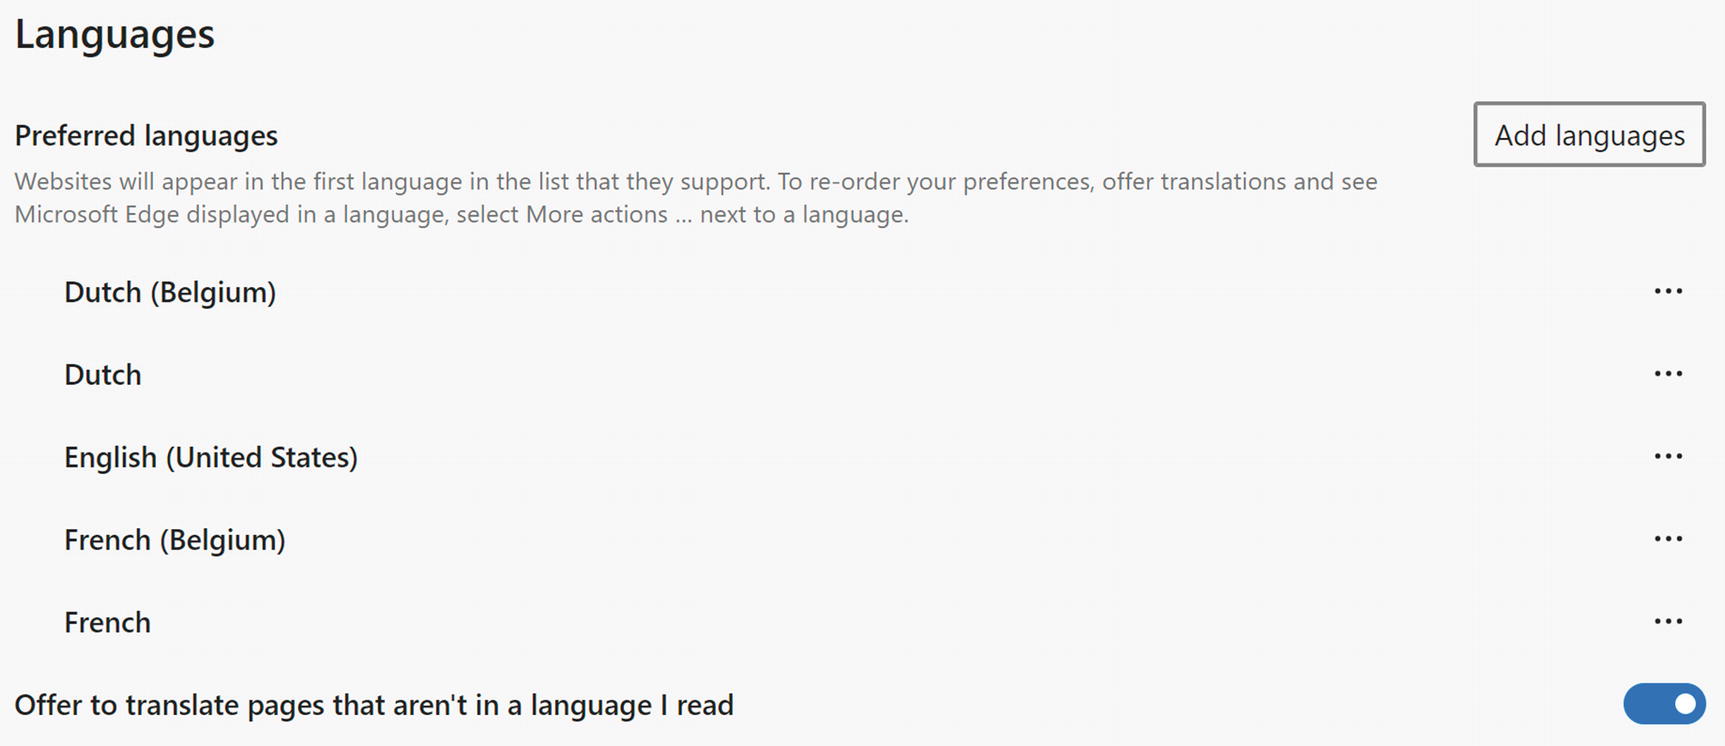
When I want to test my application’s localization, I change the Accept-Language header from the browser. I want to show you how to do this using Edge; other browsers like Chrome and Firefox have similar settings.
Open Settings and search for the Languages tab. You can add additional languages by clicking the Add languages button, and you can reorder the languages using the ellipsis (…) buttons as in Figure 14-2.
Figure 14-2
Changing the Preferred Languages in Edge
Internationalizing Your App
Now that we have the proper CultureInfo in place, we can start to internationalize our application. You should start examining each Blazor component and determine which output might vary by language; this means strings, numbers, and dates. Generally, numbers and dates will automatically format correctly when you use APIs such as string interpolation that uses the CurrentCulture. But what about strings? In this case, we need to replace these with a call to the IStringLocalizer<T> interface’s GetString method.
Start by adding the Microsoft.Extensions.Localization namespace to your _Imports.razor file as shown in Listing 14-10.
Enabling the Microsoft.Extensions.Localization Namespace
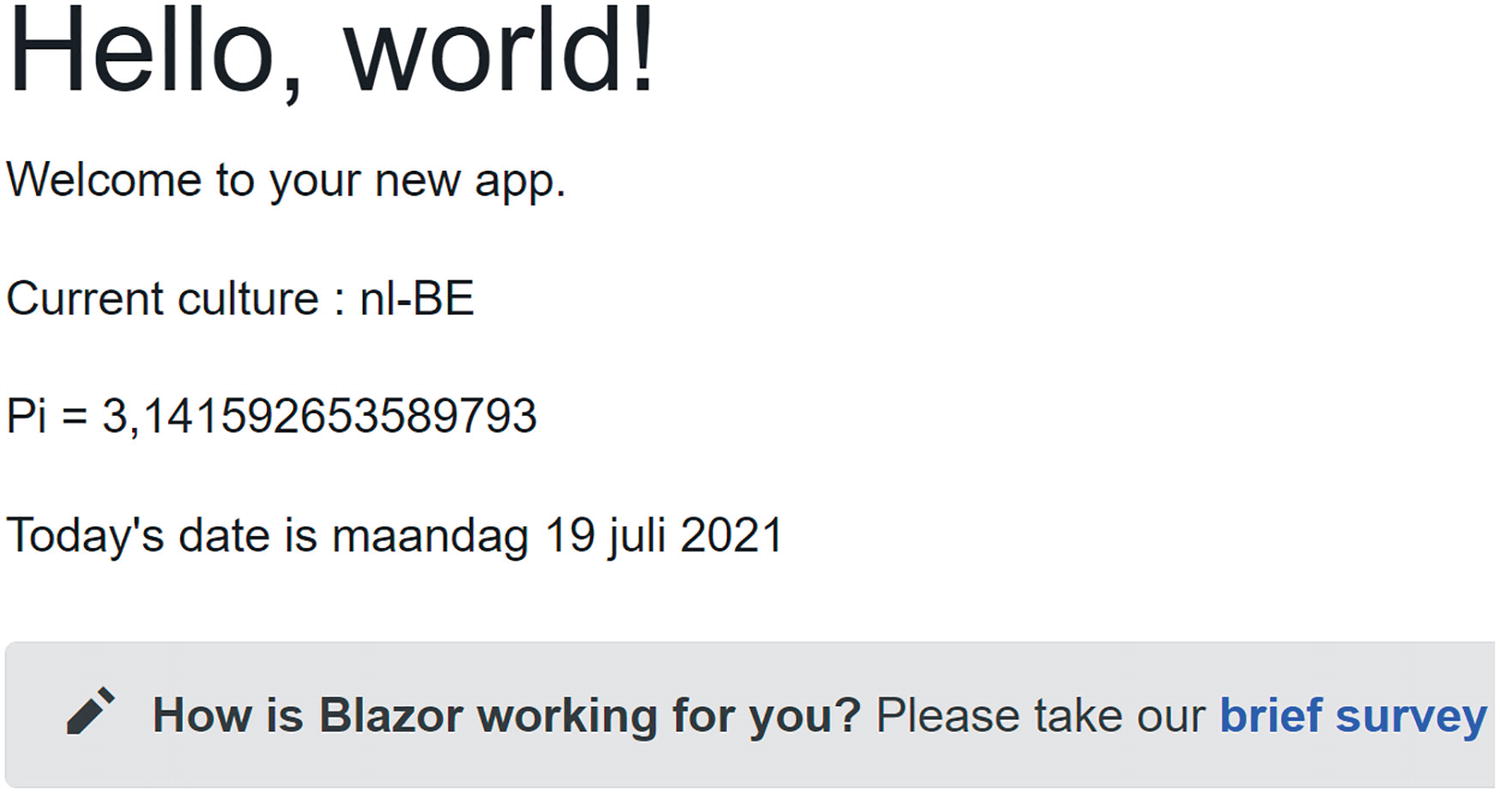
Now update the Index.razor file as in Listing 14-11. As you can see, we use dependency injection to get an instance for the IStringLocalizer<Index> interface, and then we call the localizer.GetString method, passing the string we want to localize. You can also use the indexer property of this interface instead of GetString. Both work the same way, so the choice is a matter of taste.
<p>@localizer["Today's date is"] @DateTime.Now.ToLongDateString()</p>
<SurveyPrompt Title="@localizer["How is Blazor working for you?"]" />
Listing 14-11
Using the IStringLocalizer<T> Interface
The IStringLocalizer<T> interface allows you to internationalize your application without any translation effort on your parts. Hey, you are still busy developing things, so putting effort in translations is way too early. This interface will simply return the string passed as an argument when there is no translation available yet!
Running an application will render as in Figure 14-3. Again, this might vary depending on the culture you use. Both PI and today’s date are rendered according to the CultureInfo.CurrentCulture, and the strings returned are the strings we passed to the localizer since we still have to localize these.
Figure 14-3
The Index Component with the nl-BE Culture
Localizing Your App
The IStringLocalizer<T> interface will try to find a localized version of each string by searching the resources for that component. Resources are stored in a .resx file, and if you have localized other applications, this will be familiar because Blazor uses the same mechanism used in .NET.
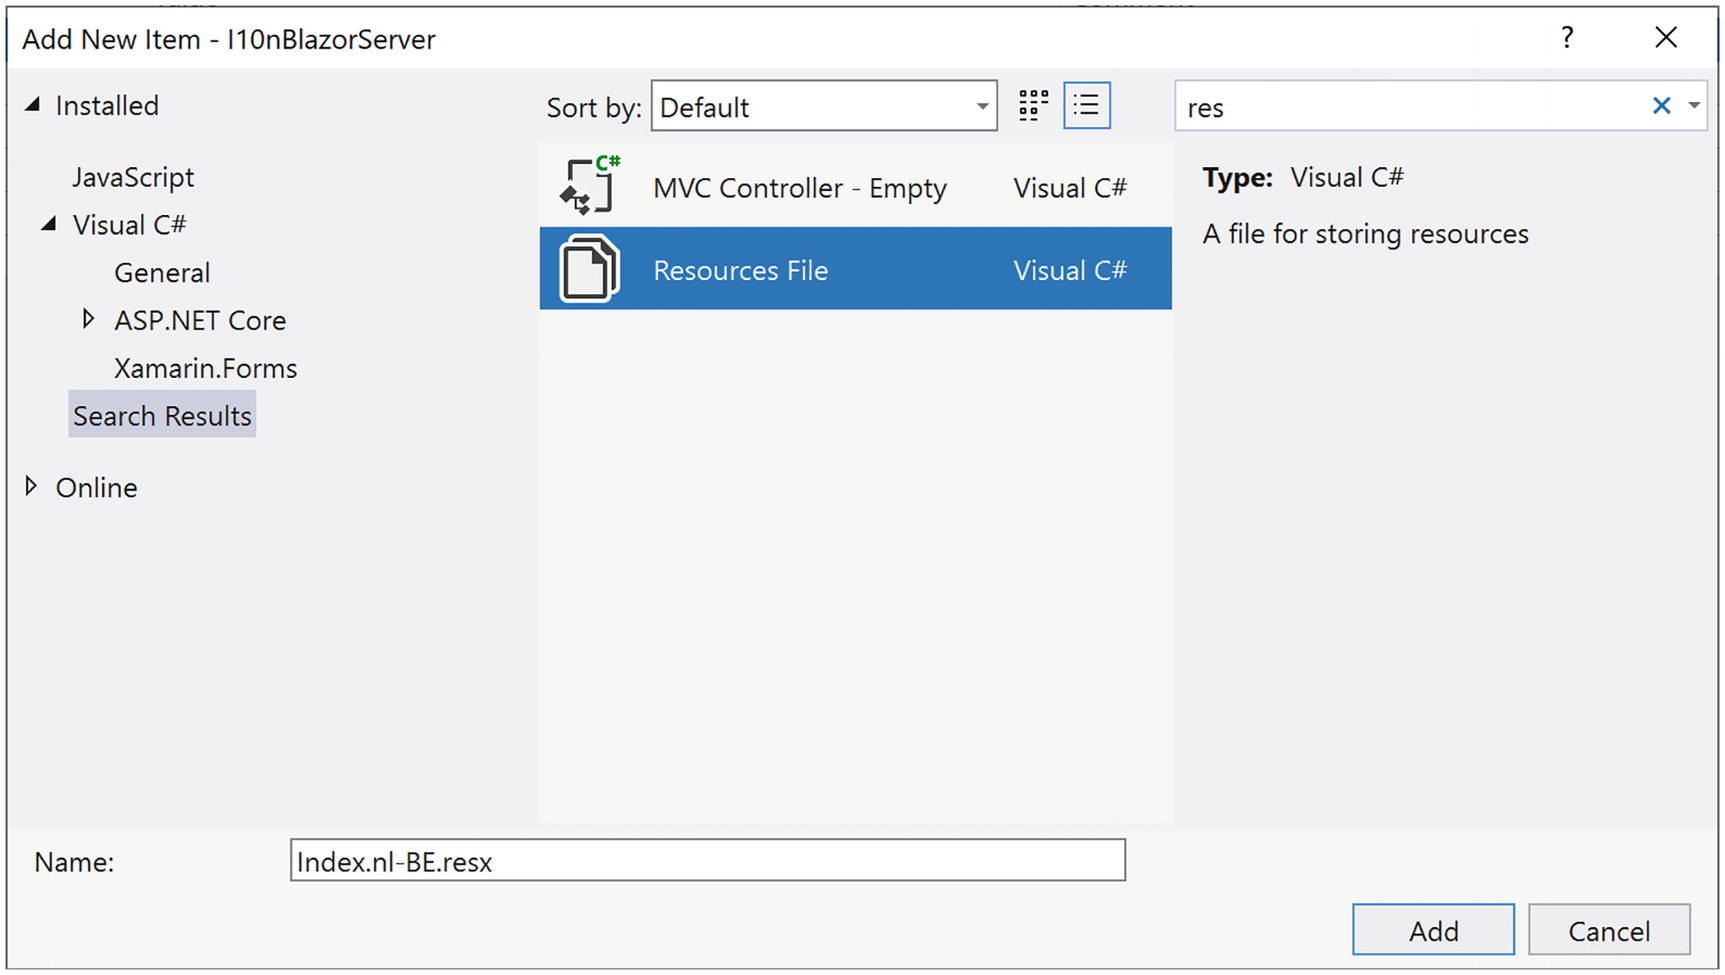
Adding Your First Resource File
Right-click the Pages folder and select Add ➤ New Item…. Search for the Resources File item as in Figure 14-4. Fill in Index.nl-BE.resx as the name (you might want to replace nl-BE with your locale) and click Add.
Figure 14-4
Add a New Resource
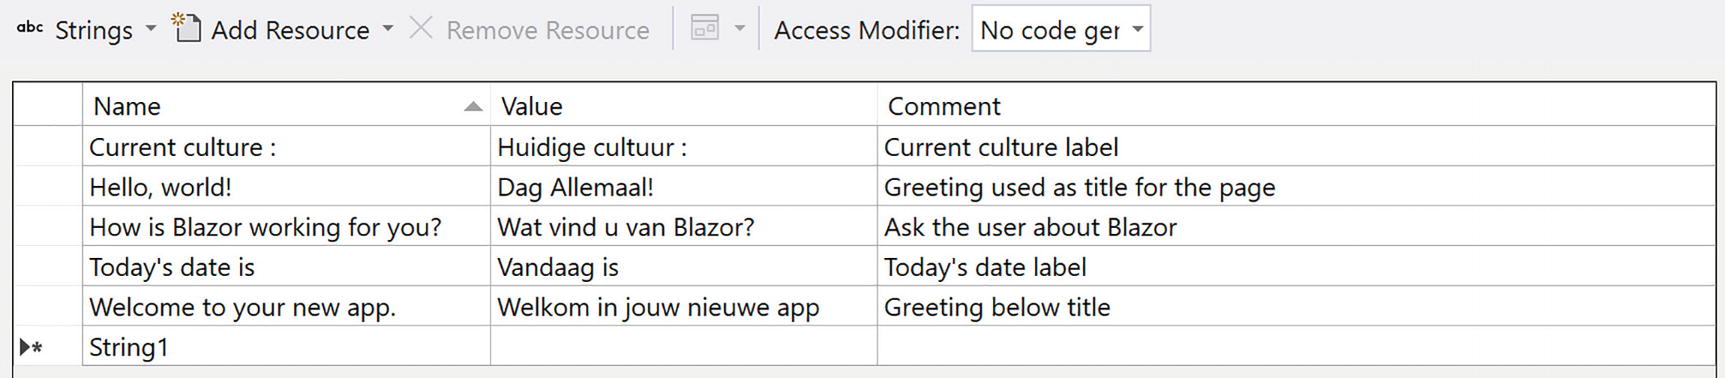
This will open the resource editor. Now copy each string from the localizer as the key, and translate it into the locale as in Figure 14-5. The comment is used to give more meaning to the translator, which is real life is probably not you.
Figure 14-5
The Localized Resource for nl-BE
Tip
Modern Windows allows you to copy a series of strings which it puts on a clipboard ring. You can then paste items from this clipboard ring using Windows key-V, instead of Ctrl-V.
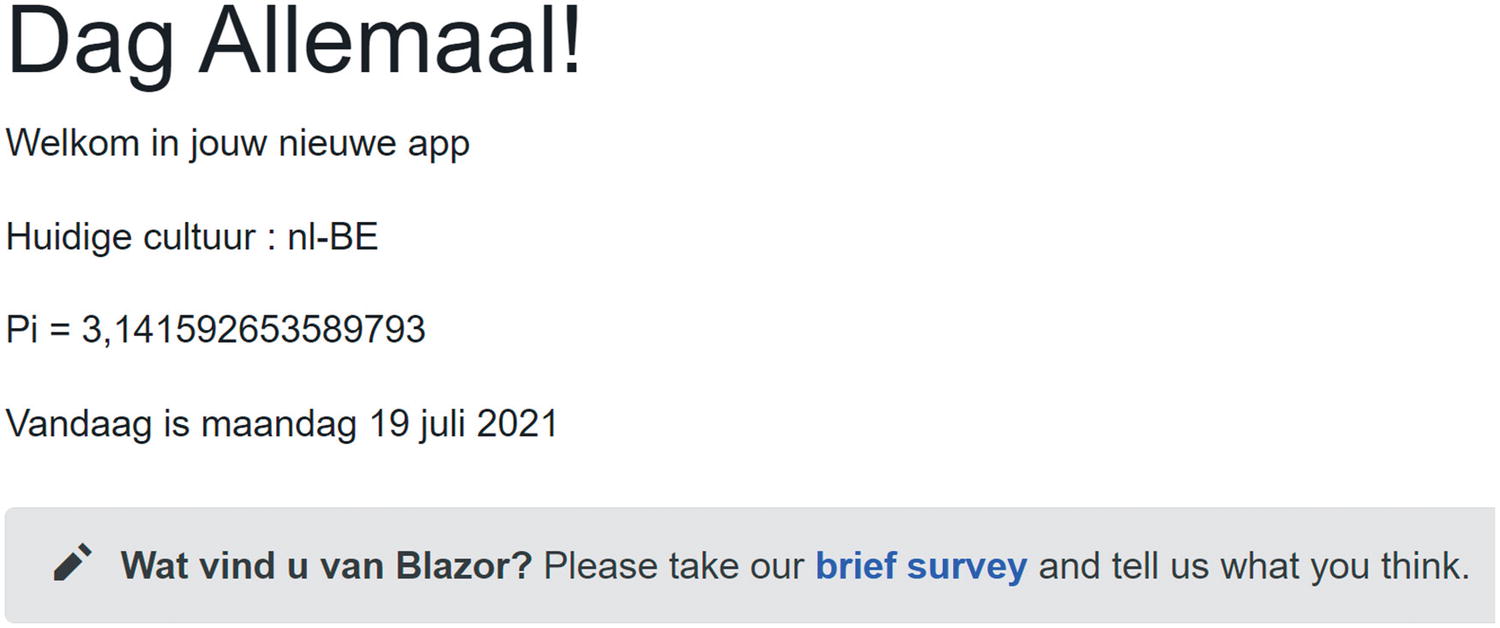
Running the application (keep going even if this does not work; there is more) should now render as Figure 14-6.
Figure 14-6
The Localized Index Page
Localizing SurveyPrompt
Why does the survey from Figure 14-6 still contain English? Because this is a different component of course! You should also internationalize and then localize this component too! However, the SurveyPrompt brings some challenges: It uses a couple of strings to build the prompt. Do not be tempted to internationalize each string individually because the structure of sentences (grammar) is different for different languages, and you don’t want to end up using Yoda (assuming you know Star Wars here) sentences!
First, we need to update the SurveyPrompt component as in Listing 14-12. Instead of using two string segments with an anchor in the middle, we should use a single string with a placeholder for the anchor. That is why we use a Prompt property, which will use string.Format to place the anchor somewhere as our translation will require. And the anchor also contains some text, so we should also internationalize the anchor, again using the same technique.
One other important thing. The Prompt property cannot return a string, because Blazor will HTML encode this string, replacing characters like “<” with “<”. With ASP.NET, you could use Html.Raw, but Blazor uses the MarkupString type to indicate that no HTML encoding is required. Bypassing HTML encoding is dangerous, so only use it where you are sure what the output will be like; otherwise, you may open your site for hacks like cross-site scripting!
localizer["Please take our {0} and tell us what you think."],
Anchor
);
}
Listing 14-12
The Internationalized SurveyPrompt
Add the SurveyPrompt.nl-BE.resx resource file (or use your own locale) to the Shared folder, and complete it as in Figure 14-7.
Figure 14-7
Localizing the SurveyPrompt Component
Running the application should now give you a completely localized Index component. The other components are left as an exercise because this is just repeating what we have learned.
Understanding Resource Lookup
When I run the application in Edge, everything looks fine, but when I open this with Firefox, I still get English! Why? Because Firefox does not support my locale – it only supports Dutch, not Belgian Dutch. So the Accept-Language header contains the following contents:
Accept-Language nl,en-US;q=0.7,en;q=0.3
This means that the Dutch CultureInfo instance will be installed for this browser, and Blazor will not find my nl-BE resource. What happens when the IStringLocalizer<Index> searches for localized content? It will start with the CurrentUICulture and look for a resource for it, so when the current culture is nl-BE, it will find the Index.nl-BE.resx resource. But now the culture is just nl, and I don’t have a resource file for that! Let us fix this. Copy the Index.nl-BE.resx file and rename it to Index.nl.resx. When I run the application, it displays Dutch again. So did we fix it? Yes, but at a price. Now we have two copies of each string in our application; what a waste! Twice as much to maintain… Is there a way to reuse the nl.resx file for the nl-BE locale? Yes! IStringLocalizer<Index> uses a resource lookup mechanism that will first search the nl-BE.resx file, and if it cannot find it, it will look for the language resource file, this time nl.resx. And if it cannot find it there, it will look for a .resx file. This means that we can remove any duplicates from the more specific nl-BE resource file. Remove all strings except the “Hello World!” key as in Figure 14-8. Why? As it turns out this greeting is different for people living in the Netherlands and this is the Dutch localization for Belgium.
Figure 14-8
The nl-BE Resource File
Update the nl resource file as in Figure 14-9 (the “Hello World!” key).
Figure 14-9
The nl Resource File
Running the app in Edge will now give me the Belgian greeting, and running it in Firefox will give me the greeting for the Netherlands. Mission accomplished!
Adding a Language Picker in Blazor Server
Many professional applications allow the user to pick the language for the UI in case the Accept-Language header is wrong, so let us do that. Of course, we will also need a way for the browser to remember that choice, and since all our logic is running on the server (we are still discussing Blazor Server), we will use a cookie to store the culture. This requires us to add another localization provider: the CookieRequestCultureProvider.
Open the Startup class and add this provider with code from Listing 14-13.
Now add a new Blazor component called LanguagePicker with markup from Listing 14-14 to the Shared folder. This will show a drop-down with the different available locales which we will read from configuration.
Also add a new LanguagePicker class as code-beside as in Listing 14-15. This will read the cultures from Configuration in the OnInitialized method and redirects to a CultureController when the user clicks the button, passing the component’s URI to it.
Now add a new Controllers folder to your project and inside it add the CultureController class from Listing 14-16 to it. This controller will set the cookie holding the selected culture, which gets picked up again by the CookieRequestCultureProvider and which will set the CurrentCulture and CurrentUICulture.
using Microsoft.AspNetCore.Localization;
using Microsoft.AspNetCore.Mvc;
namespace L10nBlazorServer.Controllers
{
public class CultureController : Controller
{
// This action sets the culture cookie used by the
// UseRequestLocalization middleware
[HttpGet("/Culture/SetCulture")]
public IActionResult SetCulture(string culture, string redirectUri)
Our Blazor project does not support controllers yet, so update Startup’s ConfigureServices method as in Listing 14-17 and the Configure method as in Listing 14-18.
public void ConfigureServices(IServiceCollection services)
{
services.AddRazorPages();
services.AddServerSideBlazor();
services.AddSingleton<WeatherForecastService>();
services.AddLocalization();
services.AddControllers();
}
Listing 14-17
Enabling Support for Controllers
public void Configure(IApplicationBuilder app,
IWebHostEnvironment env)
{
...
app.UseRouting();
app.UseEndpoints(endpoints =>
{
endpoints.MapControllers();
endpoints.MapBlazorHub();
endpoints.MapFallbackToPage("/_Host");
});
}
Listing 14-18
Adding Endpoint Routing for Controllers
To complete the application, we need to add the LanguagePicker to our layout page, so update MainLayout as in Listing 14-19.
Both LanguagePicker and MainLayout use an IStringLocalizer, so we need to add resource files for both of them. Add a new resource file called MainLayout.nl.resx with contents matching Figure 14-10. Or even better, use your own language (except when you are English speaking ).
Figure 14-10
The MainLayout Resource
And another resource called LanguagePicker.nl.resx as in Figure 14-11.
Figure 14-11
The LanguagePicker Resource
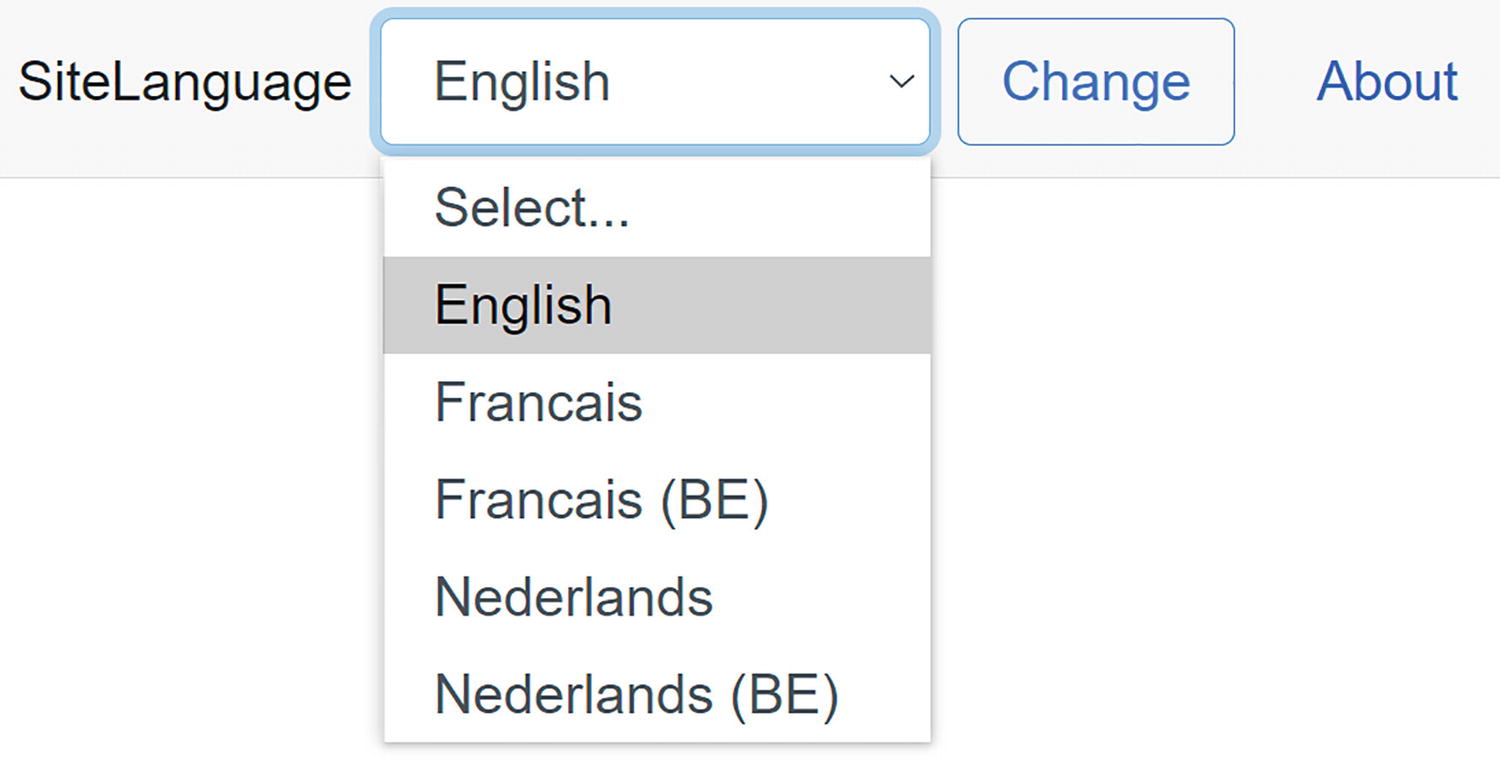
Run the application. The user can now select their preferred language from the drop-down as in Figure 14-12. When the user clicks the change button, the page will reload with the new language in place. And when they revisit the page, this choice will remain as long as the user does not clear the cookies. Our application now works in English and Dutch, and to support French, we need to provide additional resource files, for example, Index.fr.resx and Index.fr-BE.resx.
Figure 14-12
The LanguagePicker in Action
Making PizzaPlace International
Now it is time to look at Blazor WebAssembly. Most of the things we have seen will still work, but we do need to change our approach. For example, we can read the CultureInfo directly from the browser, and this is actually automatically done by the Blazor runtime.
This chapter’s accompanying code contains a starter solution, but you can continue if you want with the solution you got at the end of Chapter 10.
Enabling Globalization Data
To keep things small during the initial loading of your application, Blazor does not fully support globalization. But with a globalized application, we need these additional resources. Please add the BlazorWebAssemblyLoadAllGlobalizationData element from Listing 14-20 to the client project.
Note Be careful to place everything in the BlazorWebAssemblyLoadAllGlobalizationData element on one single line; otherwise, you will receive compile errors (own experience).
You also need to add the Microsoft.Extensions.Localization package to the client project. This adds about 0.2 MB to the initial download.
Globalizing Your Components
Let us examine each PizzaPlace component and see if it needs globalization. Start with the PizzaItem component as repeated in Listing 14-21. This component has no strings, so we don’t need to add the IStringLocalizer<T> interface. And the price for the pizza will automatically be localized by the runtime.
First, add the Microsoft.Extensions.Localization namespace to your _Imports.razor file as in Listing 14-24. This way, we don’t have to place a @using statement for each localized component.
@using Microsoft.Extensions.Localization
Listing 14-24
Updating _Imports.razor
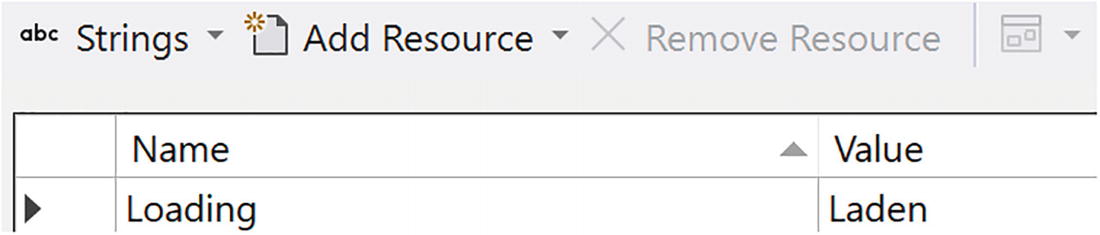
Add an IStringLocalizer<PizzaList> and use it in the loading UI, as in Listing 14-25.
Add a new resource file PizzaList.nl.resx next in the same folder as the PizzaList component with contents from Figure 14-13. This resource file here is provided as an example; feel free to replace this with a language you know.
Figure 14-13
The PizzaList Resource
We should configure dependency injection to provide the IStringLocalizer<T> instances, so add the last line of Listing 14-26 to Program.cs.
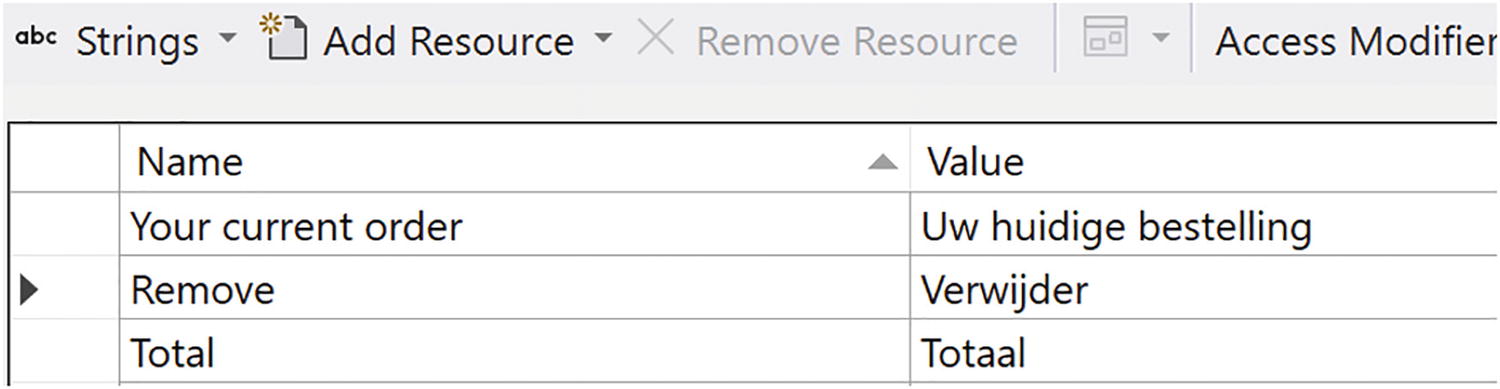
Add a new ShoppingBasket.nl.resx resource file and update as in Figure 14-14.
Figure 14-14
The ShoppingBasket Resource
For the other components, you are on your own. Update the three labels in the CustomerEntry component to use the localizer and build a resource file for these. The Index component has a couple of titles in it, so replace this with the localizer. Again, provide a resource file.
You should be ready to run the application, but first ensure your browser has been set to the language you have been using for the resource files before running. Your PizzaPlace should now support another language!
Adding a Language Picker in Blazor WebAssembly
Just like in the “Enabling Globalization Data” section, we will add a language picker so users can select the language they prefer. Except now we will not use a cookie to store the user’s choice. Instead, we will store it in local storage.
Let us start with configuration. With Blazor WebAssembly, we need to store our client-side configuration in the wwwroot folder, so add new App Settings file to the wwwroot folder and complete it as in Listing 14-28.
{
"Cultures": {
"en-US": "English",
"nl-BE": "Nederlands (BE)",
"nl": "Nederlands",
"fr-BE": "Francais (BE)",
"fr": "Francais"
}
}
Listing 14-28
The appsettings.json File
Add a new class called ConfigurationExtensions to the client project as in Listing 14-29. Yes, this is the same class we use in the Blazor Server project!
using Microsoft.Extensions.Configuration;
using System.Collections.Generic;
using System.Linq;
namespace PizzaPlace.Client
{
public static class ConfigurationExtensions
{
public static Dictionary<string, string> GetCulturesSection(
this IConfiguration configuration)
=> configuration.GetSection("Cultures")
.GetChildren()
.ToDictionary(k => k.Key, v => v.Value);
}
}
Listing 14-29
The ConfigurationExtensions Class
We will store the user’s choice in local storage, so add the script element from Listing 14-30 to the bottom of index.html.
<script>
window.blazorCulture = {
get: () => localStorage['BlazorCulture'],
set: (value) => localStorage['BlazorCulture'] = value
};
</script>
Listing 14-30
Storing the CultureInfo in localStorage
When the PizzaPlace application starts, we will attempt to read the culture from local storage, so add a new class called WebAssemblyHostExtension from Listing 14-31.
using Microsoft.AspNetCore.Components.WebAssembly.Hosting;
using Microsoft.Extensions.DependencyInjection;
using Microsoft.JSInterop;
using System.Globalization;
using System.Threading.Tasks;
namespace PizzaPlace.Client
{
public static class WebAssemblyHostExtension
{
public static async Task SetDefaultCulture(this WebAssemblyHost host)
We now need to update our Program class to use this extension method when the application starts, so replace the last line in Program.cs with Listing 14-32.
WebAssemblyHost? host = builder.Build();
await host.SetDefaultCulture();
await host.RunAsync();
Listing 14-32
Modifying Program
Now we are ready to create the LanguagePicker component. Add a new component called LanguagePicker with markup from Listing 14-33 and code-beside class from Listing 14-34. This will display a drop-down for the language, and when the user changes the selected language, we update local storage and install the correct culture. Then we use the NavigationManager to reload the page, which is necessary to update the page with the correct resource.
Finally, we need to add a MainLayout.nl.resx file as in Figure 14-15.
Figure 14-15
The MainLayout Resource
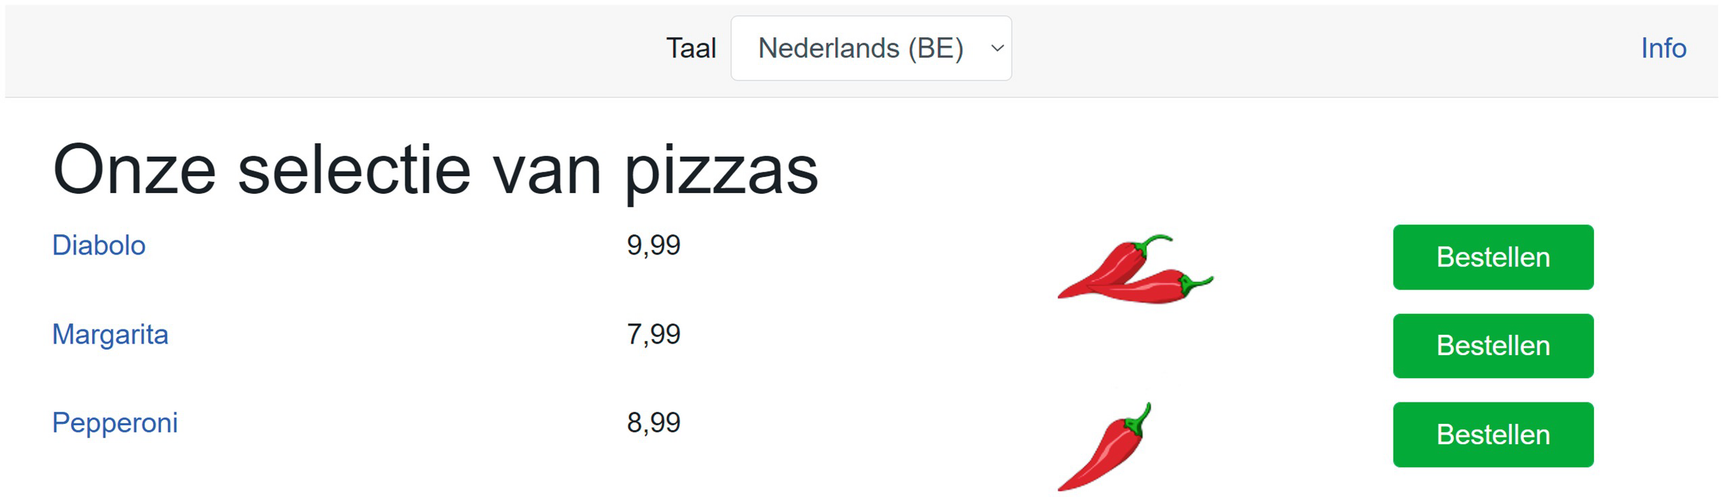
You should now be able to run the PizzaPlace application and pick the language from the LanguagePicker. Switch between US English and a language you provided the resources for. In Figure 14-16, I switched to Belgian Dutch (Nederlands). The drop-down menu also allows you to select French, but until we provide the proper resources for this language, it will display the default which is English.
Figure 14-16
Running the PizzaPlace Application in Dutch
Using Global Resources
You might have noticed something: can we reuse resources? Both Index and PizzaList components need a resource for the loading UI. Could we put this somewhere as a common resource? Yes, we can!
The IStringLocalizer<T> interface will look up resources for a certain type; whether this is a component or a simple class does not differ its behavior. So add a new folder to the PizzaPlace client project called Resources, and add a new class called CommonResources. Leave this class as it is and now add a new resource file called CommonResources.nl.resx. Put the common resources in this file, and now update the PizzaList component to use another IStringLocalizer<CommonResources> as in Listing 14-36. Now you can use the same type for other components that need a common resource.
In this chapter, we reviewed terms like internationalization (I18n) and localization (L10n). Then we looked at internationalizing a Blazor Server application using the IStringLocalizer<T> interface, and we added the proper resource files (.resx) to localize this application to another language. After this, we proceeded to support multiple languages for our PizzaPlace application, and we built a LanguagePicker so users can choose the language from a menu. We also looked at using the same resources in multiple components.


 ).
).