Sometimes there is just no escape from using JavaScript. For example, Blazor itself uses JavaScript to update the browser’s DOM from your Blazor components. In this chapter, you will look at interoperability with JavaScript and, as an example, you will build a Blazor component library to display a map using a popular open source JavaScript library. This chapter does require you to have some basic JavaScript knowledge.
Calling JavaScript from C#
Browsers have a lot of capabilities you might want to use in your Blazor website. For example, you might want to use the Browser’s local storage to keep track of some data. Thanks to Blazor’s JavaScript interoperability, this is easy.
Providing a Glue Function
To call JavaScript functionality, you start by building a glue function in JavaScript. I like to call these functions glue functions (my own naming convention) because they become the glue between .NET and JavaScript.
Glue functions are regular JavaScript functions. A JavaScript glue function can take any number of arguments, on the condition that they are JSON serializable (meaning that you can only use types that are convertible to JSON, including classes whose properties are JSON serializable). This is required because the arguments and return type are sent as JSON between .NET and JavaScript runtimes.
You then add this function to the JavaScript global scope object, which in the browser is the window object. You will look at an example a little later, so keep reading. You can then call this JavaScript glue function from your Blazor component.
Using IJSRuntime to Call the Glue Function
Back to .NET land. To invoke your JavaScript glue function from C#, you use the .NET IJSRuntime instance provided through dependency injection. This instance has the InvokeAsync<T> generic method, which takes the name of the glue function and its arguments and returns a value of type T, which is the .NET return type of the glue function. If your JavaScript method returns nothing, there is also the InvokeVoidAsync method. If this sounds confusing, you will look at an example right away.
The InvokeAsync method is asynchronous to support all asynchronous scenarios, and this is the recommended way of calling JavaScript. If you need to call the glue function synchronously, you can downcast the IJSRuntime instance to IJSInProcessRuntime and call its synchronous Invoke<T> method. This method takes the same arguments as InvokeAsync<T> with the same constraints.
Using synchronous calls for JavaScript interop is not recommended! Server-side Blazor requires the use of asynchronous calls because the calls will be serialized over SignalR to the client.
Storing Data in the Browser with Interop
It’s time to look at an example and you will start with the JavaScript glue function. Open the provided JSInterop solution (or you can create a new Blazor WebAssembly project from scratch). Open the wwwroot folder from the JSInterop project and add a new subfolder called scripts. Add a new JavaScript file to the scripts folder called interop.js and add the glue functions from Listing 10-1. This will add the blazorLocalStorage object to the global window object, containing three glue functions. These glue functions allow you to access the localStorage object from the browser, which allows you to store data on the client’s computer so you can access it later, even after the user has restarted the browser or computer.
window.blazorLocalStorage = {
get: key => key in localStorage ? JSON.parse(localStorage[key]) : null,
Your Blazor website needs to include this script, so open the index.html file from the wwwroot folder and add a script reference after the Blazor script, as shown in Listing 10-2.
Visual Studio Tip
You can drag and drop the interop.js file from Solution Explorer into the index.html file, and Visual Studio will do the rest.
Listing 10-2. Including the Script Reference in Your HTML Page
Now let’s look at how to call these set/get/delete glue functions. Open the Counter.razor Blazor component and modify it to look like Listing 10-3. The Counter component now will use local storage to remember the last value of the counter. Even restarting your browser will not lose the value of the counter because local storage is permanent. To do this, you use a CurrentCount property, which invokes your glue functions in the property setter to store the last value. The Counter component overrides the OnInitializedAsync method to retrieve the last stored value from local storage using the window.blazorLocalStorage.get glue function. It is possible that there is no value yet, and that is why we need to catch the exception that gets thrown in this case. I tried using a nullable int, but the IJSRuntime throws an error when converting a JavaScript null to a value type.
Invoking the Glue Functions from a Blazor Component
Run the solution and modify the Counter’s value. Now when you refresh your browser, you will see the last value of Counter. The Counter is now persisted between sessions! You can exit your browser and open it again, and you will see the Counter again with the last value.
Passing a Reference to JavaScript
Sometimes your JavaScript needs to access one of your HTML elements. You can do this by storing the element in an ElementReference and then pass this ElementReference to the glue function.
Note
Never use JavaScript interop to modify the DOM because this will interfere with the Blazor rendering process! If you need to modify the browser’s DOM, use a Blazor component.
You should use this ElementReference as an opaque handle, meaning you can only pass it to a JavaScript glue function, which will receive it as a JavaScript reference to the element. You cannot even pass the ElementReference to another component. This is by design, because each component gets rendered independently, and this might make the ElementReference point to a DOM element that is no longer there.
Let’s look at an example by setting the focus on an input element using interop. To be honest, there is a built-in method in Blazor to do this, but I want to use this as a simple example. Keep on reading; I will show you how to focus an input element without interop.
Start by adding a property of type ElementReference to the @code area in the Counter component as in Listing 10-4.
private ElementReference? inputElement;
Listing 10-4
Adding an ElementReference Property
Then add an input element with a @ref attribute to set the inputElement field as in Listing 10-5. We have seen this @ref syntax before; you can use it to get a reference to a Blazor component and also to an HTML element.
Now add another JavaScript file focus.js with the glue function from Listing 10-6. Don’t forget to add the script reference to index.html.
window.blazorFocus = {
set: (element) => { element.focus(); }
}
Listing 10-6
Adding the blazorFocus.set Glue Function
Now comes the “tricky” part. Blazor will create your component and then call the life cycle methods, such as OnInitializedAsync. If you invoke the blazorFocus.set glue function in OnInitializedAsync, the DOM has not been updated with the input element so this will result in a runtime error because the glue function will receive a null reference. You need to wait for the DOM to be updated, which means that you should only pass the ElementReference to your glue function in the OnAfterRender/OnAfterRenderAsync method!
Override the OnAfterRenderAsync method as in Listing 10-7. Since rendering is complete, we can expect the inputElement to be set, and we call the blazorFocus.set glue function. But just to be on the safe side, I check if inputElement is not null.
Passing the ElementReference in OnAfterRenderAsync
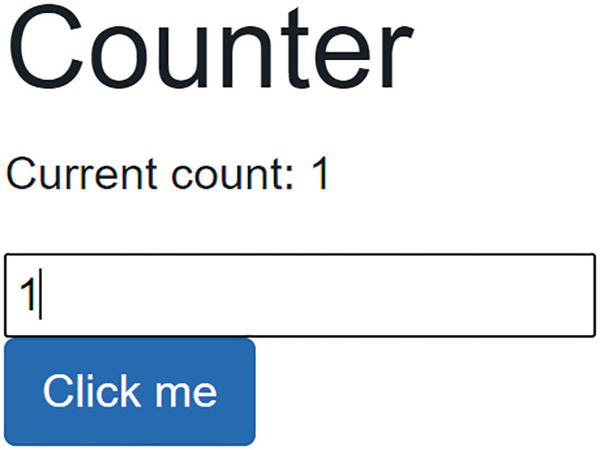
Run your solution, and you should see that the input element receives focus automatically, as in Figure 10-1.
Figure 10-1
The Counter Input Element Receives Focus Automatically
Calling .NET Methods from JavaScript
You can also call .NET methods from JavaScript. For example, your JavaScript might want to tell your component that something interesting has happened, like the user clicking something in the browser. Or your JavaScript might want to ask the Blazor component about some data it needs. You can call a .NET method, but with a couple of conditions. First, your .NET method’s arguments and return value need to be JSON serializable, the method must be public, and you need to add the JSInvokable attribute to the method. The method can be a static or instance method.
To invoke a static method, you use the JavaScript DotNet.invokeMethodAsync or DotNet.invokeMethod function, passing the name of the assembly, the name of the method, and its arguments. To call an instance method, you pass the instance wrapped as a DotNetObjectRef to a JavaScript glue function, which can then invoke the .NET method using the DotNetObjectRef’s invokeMethodAsync or invokeMethod function, passing the name of the .NET method and its arguments. If you want your component to work in Blazor Server, you need to use the asynchronous functions.
Adding a Glue Function Taking a .NET Instance
Let’s continue with the previous example. When you make a change to local storage, the storage triggers a JavaScript storage event, passing the old and new value (and more). This allows you to register for changes in other browser tabs or windows and use it to update the page with the latest data in localStorage.
Open interop.js from the previous example and add a watch function, as in Listing 10-8. The watch function takes a reference to a DotNetObjectRef instance and invokes the UpdateCounter method on this instance when storage changes. You can detect changes in storage by registering for the JavaScript storage event.
window.blazorLocalStorage = {
get: key => key in localStorage ? JSON.parse(localStorage[key]) : null,
The watch Function Allows You to Register for Local Storage Changes
When anyone or anything changes the local storage for this web page, the browser will trigger the storage event, and our JavaScript interop will invoke the UpdateCounter method (which we will implement next) in our C# Blazor component.
Time to add the UpdateCounter method. Open Counter.razor and add the UpdateCounter method to the @code area, as shown in Listing 10-9.
[JSInvokable]
public async Task UpdateCounter()
{
int c = await js.InvokeAsync<int>("blazorLocalStorage.get", nameof(CurrentCount));
currentCount = c;
this.StateHasChanged();
}
Listing 10-9
The UpdateCounter Method
This method triggers the UI to update with the latest value of CurrentCounter. Please note that this method follows the .NET async pattern returning a Task instance because the JavaScript interop will call this asynchronously using the invokeMethodAsync function from Listing 10-8. To complete the example, add the OnAfterRenderAsync life cycle method shown in Listing 10-10. The OnAfterRenderAsync method wraps the Counter component’s this reference in a DotNetObjectRef and passes it to the blazorLocalStorage.watch glue function.
To see this in action, open two browser tabs side by side on your website. When you change the value in one tab, you should see the other tab update to the same value automatically! You can use this to communicate between two tabs in the same browser like we do here.
Using Services for Interop
The previous example is not the way I would recommend doing interop with JavaScript because our components are tightly coupled to the IJSRuntime. There is a better way, and that is encapsulating the IJSRuntime code in a service. This will hide all the dirty details of interacting with JavaScript and allow for easier maintenance. In future generations of Blazor, some of this functionality might just be included, and then we only need to update the service implementation. Services can also easily be replaced during unit testing.
Building the LocalStorage Service
Add a new Services folder to the client project. Add a new interface inside this folder, name it ILocalStorage, and add the three methods from Listing 10-11 to it.
using System.Threading.Tasks;
namespace JSInterop.Services
{
public interface ILocalStorage
{
ValueTask<T> GetProperty<T>(string propName);
ValueTask SetProperty<T>(string propName, T value);
ValueTask WatchAsync<T>(T instance) where T : class;
}
}
Listing 10-11
Building the ILocalStorage Service Interface
These methods correspond with the glue functions from interop.js.
Now add a new class to the same Services folder and name it LocalStorage. This class should implement the ILocalStorage interface as in Listing 10-12. See how this class hides away all the details of performing JavaScript interop? And this is a simple case!
using Microsoft.AspNetCore.Components;
using Microsoft.JSInterop;
using System.Threading.Tasks;
namespace JSInterop.Services
{
public class LocalStorage : ILocalStorage
{
private readonly IJSRuntime js;
public LocalStorage(IJSRuntime js)
{
this.js = js;
}
public ValueTask<T> GetProperty<T>(string propName)
public ValueTask WatchAsync<T>(T instance) where T : class
=> js.InvokeVoidAsync("blazorLocalStorage.watch",
DotNetObjectReference.Create(instance));
}
}
Listing 10-12
Implementing the LocalStorage Service Class
Components will receive this service through dependency injection, so add it as a singleton as in Listing 10-13.
using JSInterop.Services;
using Microsoft.AspNetCore.Components.WebAssembly.Hosting;
using Microsoft.Extensions.Configuration;
using Microsoft.Extensions.DependencyInjection;
using Microsoft.Extensions.Logging;
using System;
using System.Collections.Generic;
using System.Net.Http;
using System.Text;
using System.Threading.Tasks;
namespace JSInterop
{
public class Program
{
public static async Task Main(string[] args)
{
var builder = WebAssemblyHostBuilder.CreateDefault(args);
builder.RootComponents.Add<App>("#app");
builder.Services
.AddScoped(sp => new HttpClient
{
BaseAddress =
new Uri(builder.HostEnvironment.BaseAddress)
});
builder.Services
.AddSingleton<ILocalStorage, LocalStorage>();
await builder.Build().RunAsync();
}
}
}
Listing 10-13
Registering the LocalStorage Service in Dependency Injection
Go back to the Counter component and replace each call of IJSRuntime using blazorLocalStorage with the LocalStorage service. Start by adding the inject directive for the ILocalStorage service as in Listing 10-14.
Injecting the ILocalStorage Service into the Counter Component
Now onto the OnInitialiazedAsync method, where we retrieve the value from local storage. Replace the IJSRuntime calls with LocalStorage calls, as in Listing 10-15.
And finally, update the OnAfterRenderAsync method as in Listing 10-18. This method now also uses the built-in FocusAsync method to set the focus on the input. No need for JavaScript interop. This method does require you to add a @using statement because FocusAsync is an extension method:
Our application has added some JavaScript to the application, and we have added this to the index.html page. This means that our JavaScript gets downloaded, even if we don’t use it (because no one clicked the Counter link). This is not so good. Also, our JavaScript is adding yet another identifier to the JavaScript window object. Again not so good, because another component might accidentally pick the same name. Here, we will examine how we can download JavaScript dynamically using modules, so only when we need it.
Using JavaScript Modules
Early use of JavaScript was for small and straightforward functionality. Then JavaScript usage started to explode making programs complex and hard to maintain. Since then, there have been attempts at introducing “libraries” in JavaScript which could be included in your program. Today, JavaScript has a module mechanism that we can use in Blazor. You can compare a JavaScript module like a .NET library, which you can load dynamically. In the current JSInterop Blazor application we have been building, copy the interop.js file, name it localstorage.js, and modify it to look like Listing 10-19. Instead of adding the get, set, and watch functions to the global window object, we export these functions (similar to the C# public keyword being used to make classes available outside the library) using a JavaScript module. A module also acts like a namespace, making the get, set, and watch functions relative to the module and not contaminating the global JavaScript window object.
let get = key => key in localStorage ? JSON.parse(localStorage[key]) : null;
let set = (key, value) => { localStorage[key] = JSON.stringify(value); };
let watch = async (instance) => {
window.addEventListener('storage', (e) => {
instance.invokeMethodAsync('UpdateCounter');
});
};
export { get, set, watch };
Listing 10-19
The localStorage JavaScript Module
Loading the Module into a Blazor Service
Once the module is ready, we can import it into a Blazor component or a service using the IJSRuntime instance. It works just like any other JavaScript interop by using the InvokeAsync<T> method, but now we use the IJSObjectReference type for T, calling the import function which is provided by Blazor.
First, add an Init method to the ILocalStorage interface as in Listing 10-20.
using System.Threading.Tasks;
namespace JSInterop.Services
{
public interface ILocalStorage
{
ValueTask Init();
ValueTask<T> GetProperty<T>(string propName);
ValueTask SetProperty<T>(string propName, T value);
ValueTask WatchAsync<T>(T instance) where T : class;
}
}
Listing 10-20
The Updated ILocalStorage Interface
Implement this method in the LocalStorage class as in Listing 10-21. This method does absolutely nothing here, but we will implement it in another class.
public ValueTask Init() => new ValueTask();
Listing 10-21
LocalStorage’s Init Method
Create a copy of the LocalStorage.cs service, and name it LocalStorageWithModule.cs. Modify it to look like Listing 10-22. Most of this class is similar to the implementation of the LocalStorage class, but note the Init method. Here, we invoke the “import” method, passing the path to the JavaScript module. Blazor dynamically loads it and returns an IJSObjectReference, which we use to invoke the get, set, and watch JavaScript functions. Why not do this in the constructor? Because InvokeAsync<T> is an asynchronous method, and we should not call these in the constructor.
using Microsoft.AspNetCore.Components;
using Microsoft.JSInterop;
using System.Threading.Tasks;
namespace JSInterop.Services
{
public class LocalStorageWithModule : ILocalStorage
public ValueTask WatchAsync<T>(T instance) where T : class
=> module!.InvokeVoidAsync("watch",
DotNetObjectReference.Create(instance));
}
}
Listing 10-22
Loading a JavaScript Module
Use this new class in the Counter component as shown in Listing 10-23. Actually, the only thing we need to change is to call the Init method on the localStorage service.
int c = await localStorage.GetProperty<int>(nameof(CurrentCount));
currentCount = c;
}
catch { }
}
Listing 10-23
The Counter Component Using the JavaScript Module
Build and run; everything should still work. The big advantage is that we don’t need to add the JavaScript to the index.html page. This becomes even more interesting for component libraries.
Adding a Map to PizzaPlace
Many physical businesses use a map to show to people where they are located. Wouldn’t it be nice to embellish the PizzaPlace application with a map, showing where you are and where the PizzaPlace restaurant is? That is what we will do next.
Choosing the Map JavaScript Library
Which map library will we use? There are many JavaScript libraries to choose from, for example, Google maps, Bing maps, etc. Author’s prerogative is to choose the maps library, and I have chosen the Leaflet open source library, which is lightweight, has many customization options, and is used by some of the leading companies such as GitHub, Flickr, Etsy, and Facebook. You can find the library’s website at https://leafletjs.com.
Adding the Leaflet Library
Open the index.html page, and add the Leaflet styling and JavaScript script to it as in Listing 10-24. The easiest way to do this is by copying this from the Leaflet QuickStart page at https://leafletjs.com/examples/quick-start/. This will also ensure you use the latest version (at the risk of breaking changes).
Listing 10-24. Adding the Leaflet Library
Note
We use SubResource Integrity (SRI) Checking to download this library to ensure we are using the correct library. Recently, British Airways (BA) got hacked (https://gbhackers.com/british-airways-hacked/), and more than 380,000 payment cards got compromised. So how could this have happened? Imagine that BA uses some external JavaScript library. If a hacker can change this external source and add his/her own code to the library, it is a piece of cake to steal any information that the user enters on the website. So how can you avoid this hack? SubResource Integrity (SRI) Checking adds a hash value (a checksum of the file) to the <script> tag, so if the external source gets modified, the browser will refuse to load and execute it.
Building the Leaflet Map Razor Library
You can use a map in many applications, so I think it makes a lot of sense to build this as a razor library. You can find Blazor component libraries that give you a Map component (e.g., https://github.com/fis-sst/BlazorMaps), but here we will build one as an exercise. Add a new Razor Class Library to your solution and name it Leaflet.Map.
Remove all the files from this project except the _Imports.razor file and wwwroot folder. Add a new map.js JavaScript file as in Listing 10-25 inside wwwroot. To save on typing (and typos), I suggest you copy this from the provided sources.
let showOrUpdate = (elementId, zoom, markers) => {
let elem = document.getElementById(elementId);
if (!elem) {
throw new Error('No element with ID ' + elementId);
There is one more thing we need to do to complete Listing 10-25. This is the ***ACCESSTOKEN*** placeholder which you need to replace with your own token, which we will do next.
Registering with the Map Provider
Leaflet will download its maps from a map provider, and here, we will use MapBox which you can use for free for development. You can find their site at www.mapbox.com/maps. You will need to sign up with this site to get your access token. So after signing up, you should go to your account and create an access token. Copy this token and replace ***ACCESSTOKEN*** with your token in Listing 10-25 (twice).
Creating the Map Component
Now add a new razor component to the Leaflet.Map library project and call it Map. Implement the component as shown in Listing 10-26. This component uses a div, which Leaflet will replace with the map. This div needs a unique id, which we generate using the Guid type from .NET, and we set its style to fill the parent element. The JavaScript module from Listing 10-25 uses the id to retrieve the div from the DOM:
let elem = document.getElementById(elementId);
The Map component then loads the map.js module using a path to the static map.js resource from wwwroot. We only need to do this once, so we do this in the OnInitializedAsync method.
Finally, when the Map component has been rendered, we call the Leaflet library using our module in the OnAfterRenderAsync method. However, since the OnInitializedAsync method has not completed yet, we need to check if the module has been loaded. When the OnInitializedAsync method completes, the component will render again, and then the showOrUpdate JavaScript method will get invoked.
Open Index.razor, and below the CustomerEntry component, add the Map component as in Listing 10-28. We also need to set the Zoom parameter, and I have found that Zoom 17 will show the location in sufficient detail to see roads. You can experiment with this parameter if you like.
<!-- End customer entry -->
<!-- Map -->
<div class="map">
<Map Zoom="17" />
</div>
<!-- End Map -->
Listing 10-28
Adding the Map Component
Add a new file called Index.razor.css to the client project in the Pages folder and add the map class as in Listing 10-29.
.map {
width: 550px;
height: 550px;
}
Listing 10-29
Styling the map Container
Run the PizzaPlace application. You should see a map like in Figure 10-2. As you can see, the map shows the location of where I work. If you like, you can change the coordinates in Listing 10-25 to suit where you live or work.
Figure 10-2
The Map Showing a Location
Adding Markers to the Map
Showing just a map is not enough. Let us add some markers to show the PizzaPlace location and your location. First, add a new class Marker to the Leaflet.Map project as in Listing 10-30. The class will serialize to a JavaScript object used by the Leaflet library. On the Leaflet library website, you can find more information to add circles, polygons, and popups. We will not do that since this is very similar to markers.
namespace Leaflet.Map
{
public class Marker
{
public string Description { get; set; }
public double X { get; set; }
public double Y { get; set; }
public bool ShowPopup { get; set; }
}
}
Listing 10-30
The Marker Class
Add a new parameter to the Map component called Markers as in Listing 10-31.
[Parameter] public List<Marker> Markers { get; set; }
= new List<Marker>();
Listing 10-31
The Map’s Markers Parameter
Update the showOrUpdate method to pass the Markers parameter as in Listing 10-32.
Our JavaScript is not doing anything with these markers yet, so we will have to update the JavaScript module. Update map.js as in Listing 10-33. This is a lot to type, so you may want to copy this from the provided sources. Don’t forget to update the ***ACCESSTOKEN*** placeholder.
let showOrUpdate = (elementId, zoom, markers) => {
let elem = document.getElementById(elementId);
if (!elem) {
throw new Error('No element with ID ' + elementId);
Now let us add some markers to our PizzaPlace application. Add a new to the Index.razor component as in Listing 10-34. Feel free to update the coordinates to a place near you.
private List<Marker> Markers = new List<Marker> {
new Marker {
X = 4.29660,
Y = 50.88022,
Description = "Pizza Place" },
new Marker {
X = 4.27638,
Y = 50.87136,
Description = "You",
ShowPopup = true },
};
Listing 10-34
Adding Some Markers
Data bind this to the Map component’s Markers parameter as in Listing 10-35.
<!-- Map -->
<div class="map">
<Map Zoom="17" Markers="@Markers"/>
</div>
<!-- End Map -->
Listing 10-35
Passing the Markers to the Map Component
Build and run the PizzaPlace application. You should now see markers on the map as in Figure 10-3. When you click the marker, it will show a popup.
Figure 10-3
The Map Showing Markers
Summary
In this chapter, you saw how you can call JavaScript from your Blazor components using the IJSRuntime.InvokeAsync<T> method. This requires you to register a JavaScript glue function by adding this function to the browser’s window global object. Or you can expose a JavaScript module and then load this module dynamically.
You can call your .NET static or instance method from JavaScript. Start by adding the JSInvokable attribute to the .NET method. If the method is static, you use the JavaScript DotNet.invokeMethodAsync function (or DotNet.invokeMethod if the call is synchronous), passing the name of the assembly, the name of the method, and its arguments. If the method is an instance method, you pass the .NET instance wrapped in a DotNetObjectRef to the glue function, which can then use the invokeMethodAsync function to call the method, passing the name of the method and its arguments.
Finally, you applied this knowledge by adding a map to the PizzaPlace application. You built a Blazor component library which uses a JavaScript module to call the Leaflet library and added a class to pass markers to the map.
When should we use JavaScript interop? Whenever you need to use a feature of the browser, such as local storage or the geolocation API, which is not supported by WebAssembly, you will have to resort to JavaScript interop. There are a lot of nice people out there who already did the work and provide their implementation as a Blazor component library, saving you a lot of time. So google around a bit first!