In the previous chapter, we looked at securing a Blazor Server application using OpenId Connect with identity and access tokens. Here, we will do the same but for Blazor WebAssembly. This time, we will use another OpenId Connect flow: Authorization Code flow with PKCE (pronounced pixie). I do recommend that you read the previous chapter before this one because it builds on top of some of the topics we saw there, and it continues with the code example from that chapter.
Authorization Code Flow with PKCE
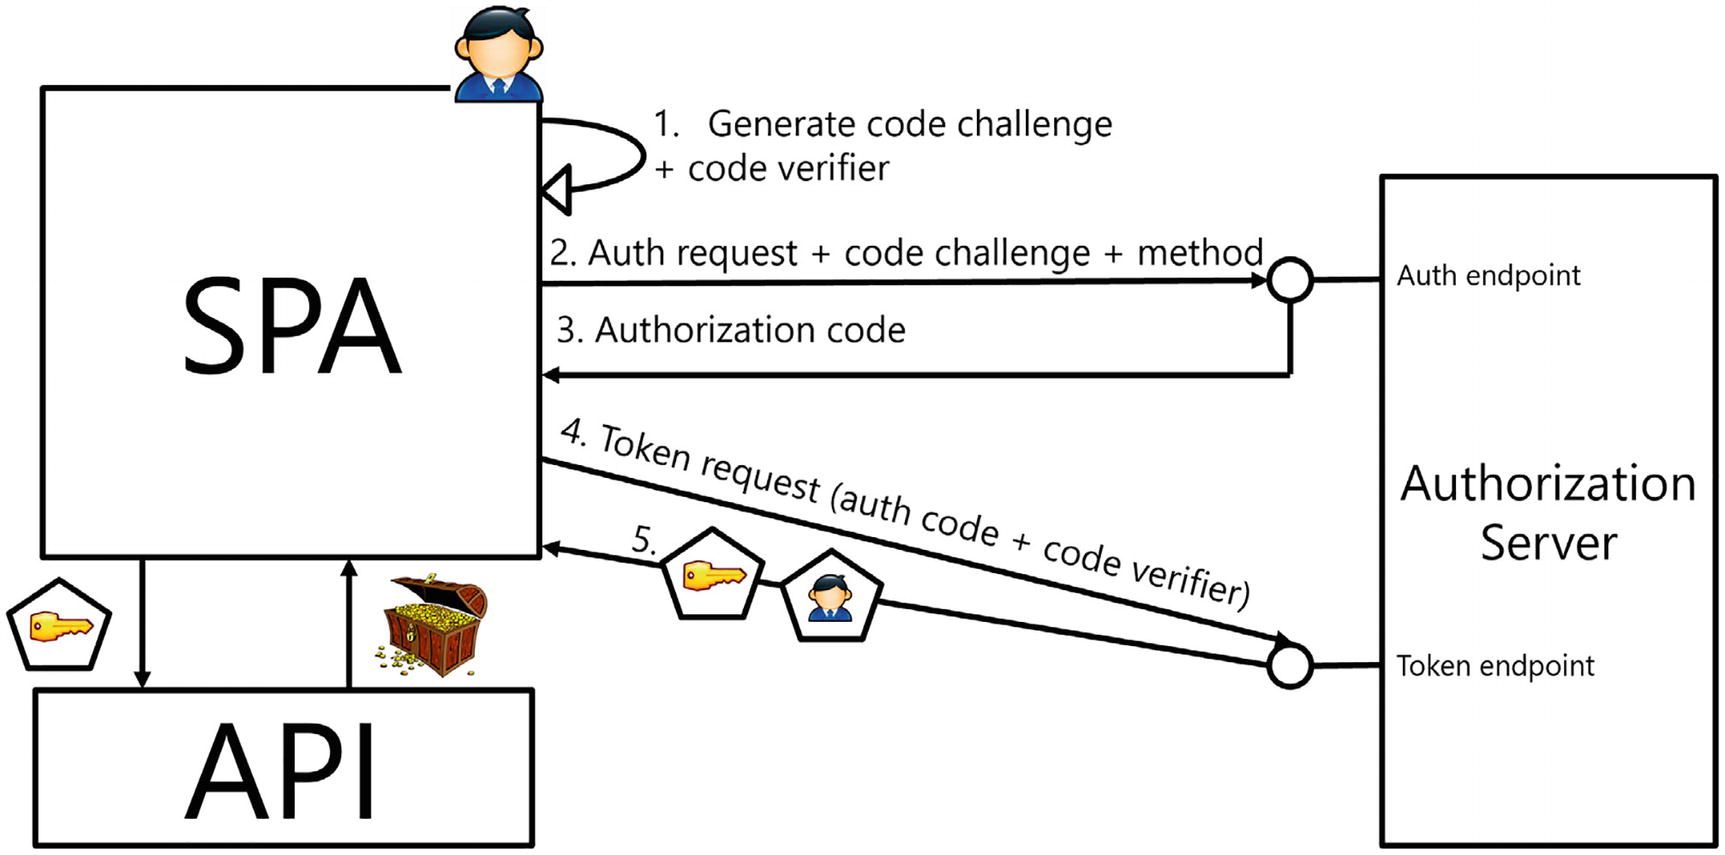
When comparing the Authorization Code flow from Figure 17-1 and Hybrid flow, you will see a lot of similarities. The big difference is that the identity token is only returned when the client application sends the code to the identity provider. Since the code is sent using the browser, there is a chance of this code being intercepted by a malicious user using an “Authorization Code Interception Attack,” so to protect this code, we will use Proof Key for Code Exchange (PKCE). This is to prevent another party of using the code to gain an access token.
Figure 17-1
Authorization Code Flow with PKCE
Understanding PKCE
How does PKCE work? It is all about proving ownership. Imagine the user wants to log in. The browser will generate a cryptographically random code verifier and then use a code challenge method to turn the code verifier into a code challenge (Step 1). The code challenge is then sent to the identity provider together with the code challenge method (Step 2). The identity provider will then make the user log in (with optional consent), save the code challenge with code challenge method, and return the code that allows the token retrieval back to the application (Step 3). The application can then use the code with the code verifier (Step 4) to prove that it was the client requesting the code (assuming a third party is unable to retrieve the code verifier from the code challenge – that is why generally a cryptographic hash method is used because it is practically impossible to retrieve reverse a hash). After the identity provider checks that the code verifier and code challenge match by applying the code challenge method to the code verifier and then comparing the results, it returns the requested tokens. Of course, this only works over HTTPS; otherwise, figuring out the code verifier is a piece of cake.
Registering the WASM Client Application
Let’s start by adding authentication to a Blazor WebAssembly application. Start with the solution from the previous chapter (which you can find in the provided sources should you want).
Creating and Examining the Application
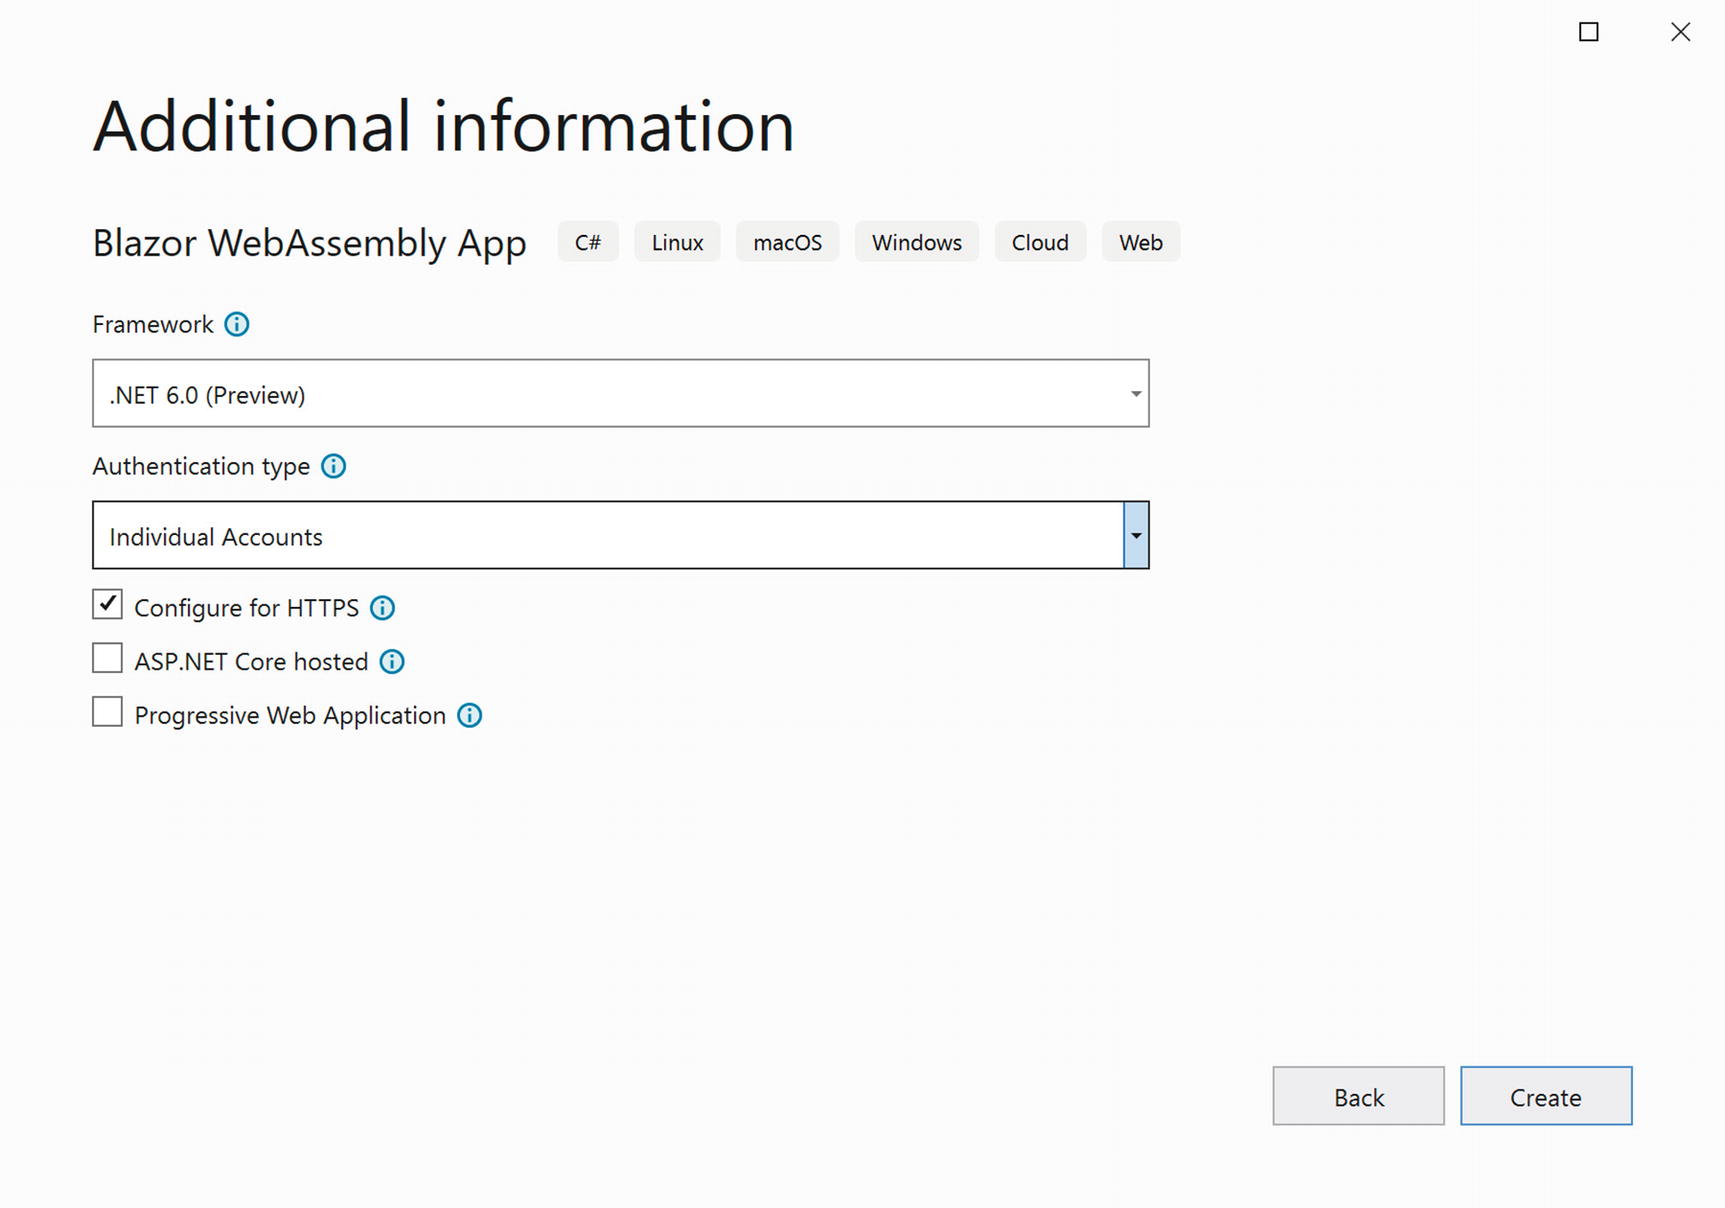
Add a new Blazor WebAssembly project called Blazor.Wasm.OpenIdConnect. No need to choose the Hosted option here, but you need to choose the Individual Accounts option as in Figure 17-2.
Figure 17-2
Creating the Blazor WebAssembly Project
Using the dotnet CLI, you can use the following command:
dotnet new blazorwasm -au Individual -o Blazor.Wasm.OpenIdConnect
The Individual Accounts option will automatically add the Microsoft.AspNetCore.Components.WebAssembly.Authentication package to your project and will also register a JavaScript library in index.html as in Listing 17-1. This library is used by Blazor to take care of talking to the identity provider.
In the Pages folder, you will also find the Authentication component as in Listing 17-2 which handles the /authentication/{action} URL. This component delegates the action to the RemoteAuthenticatorView which takes care of the OpenIdConnect authentication process.
To allow the user to log in, there is also the LoginDisplay component from Listing 17-3. When the user has been authorized, this will display a Log out button, and when clicked, it will redirect with the logout action to the Authentication component. When the user is not authorized, this component displays a Log in link which will take us to the login action. Using the AuthorizeView component makes this easy.
The App component is the same as the one in the Blazor Server component which will redirect us to the login page when the user is not yet authenticated.
Update the applicationUrl in the launchSettings.json file as in Listing 17-4 to change the port number to 5003 for HTTPS.
Now we are ready to register this Blazor WASM application in our identity provider.
Registering the Client Application
Add a new client called BlazorWasm to the Config class in the IdentityProvider project as shown in Listing 17-5. Here, we specify the client’s name and Id, we choose the Authorization Code flow with PKCE, and we pass it the redirectUris for our client application. Finally, we also list the required scopes. Since we first will implement authentication, we only need the OpenId and Profile scopes. Optionally, you can also enable client consent, but I left this out for practicality.
In the Blazor Server application, we hard-coded all the options for OpenId Connect; here, we will use configuration. Look for appsettings.json in the wwwroot and replace it as in Listing 17-6. Here, we specify the identity provider’s URL in the Authority property, and we set the remaining properties to the same values as in Listing 17-5.
Open the Blazor.Wasm.OpenIdConnect project’s Startup class and replace the configuration section name as in Listing 17-7. This will read all options from configuration.
Now we are ready to test our solution. Start the IdentityProvider project and then your Blazor WASM application. After a little while, your browser should show the Blazor application as shown in Figure 17-3 with a Log in link in the top right corner.
Figure 17-3
The Blazor Application Before Logging In
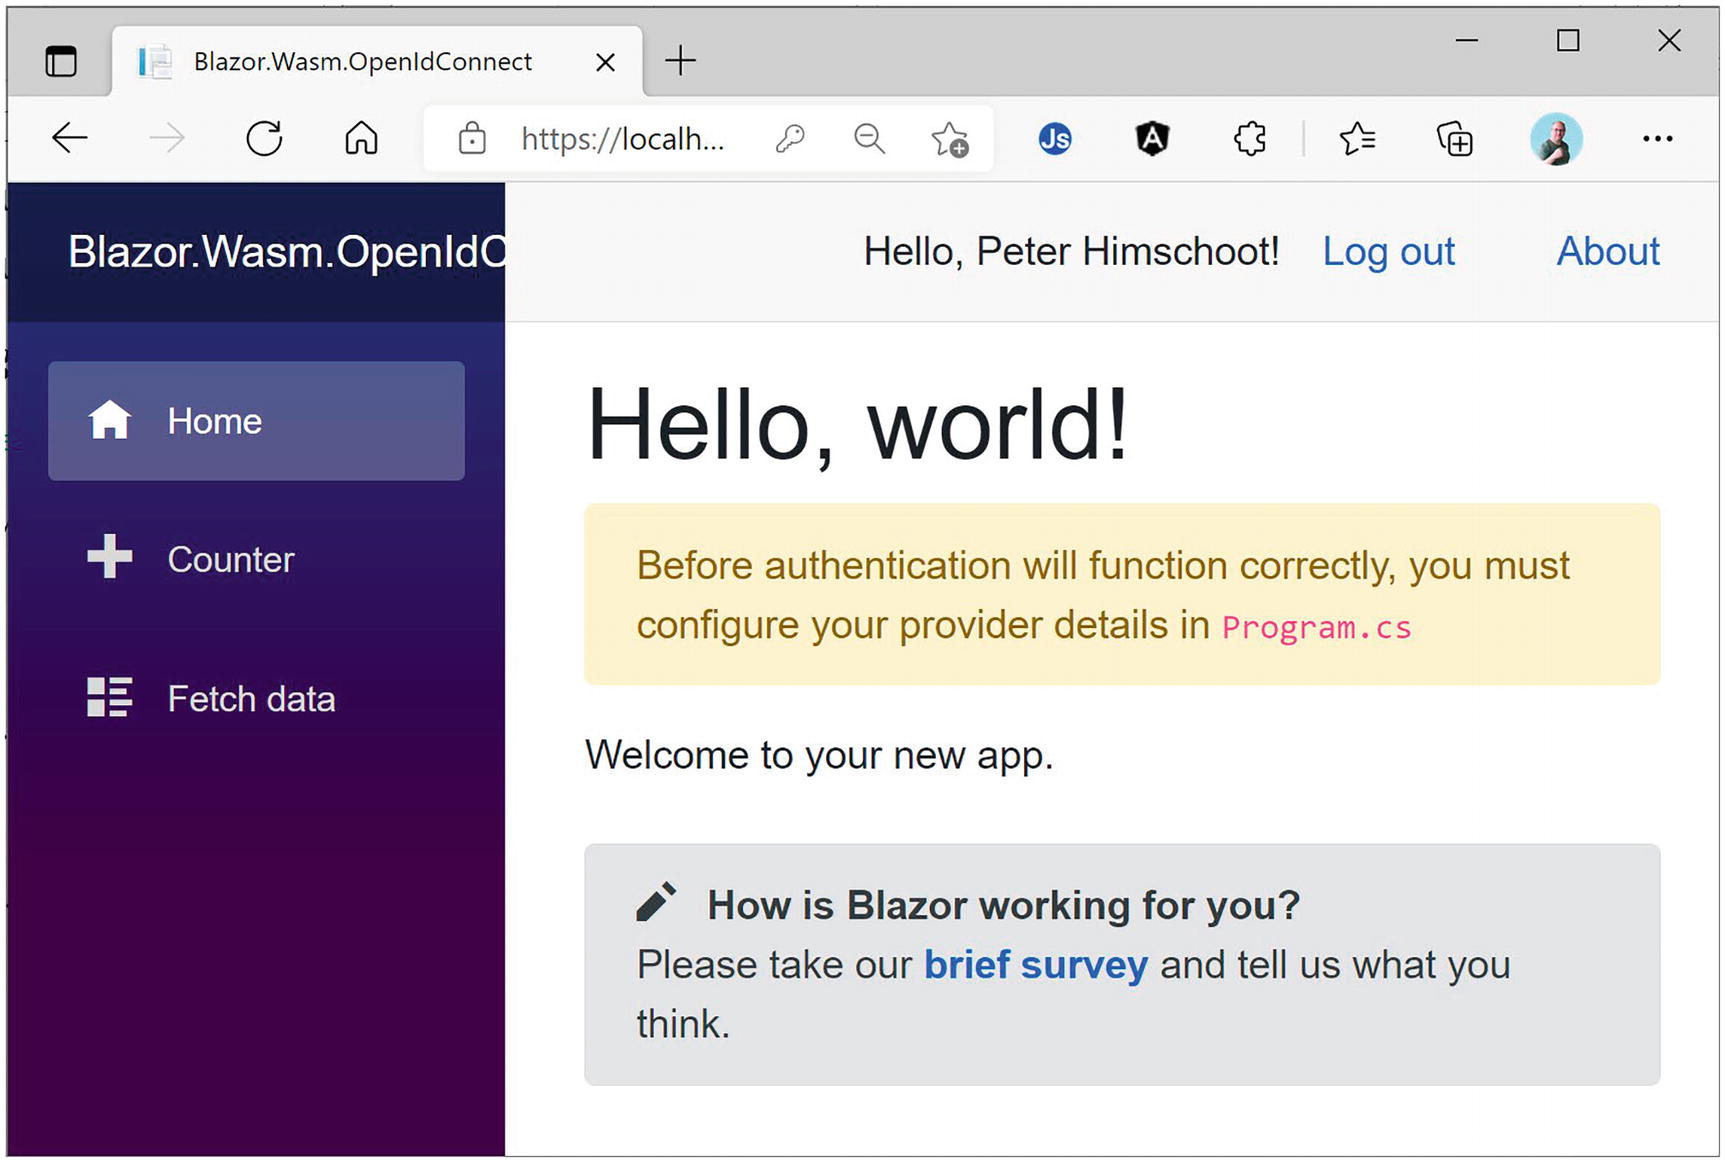
Click the Log in link and then complete the login procedure with a registered user, for example, peter@u2u.be and password u2u-secret. After this, the Blazor application will display the user’s name as in Figure 17-4.
Figure 17-4
The Blazor Application After Logging In
Customizing the Login Experience
There are still a couple of things we can do. Let us first remove the alert in Listing 17-8 from the Index component warning us about the need to configure our provider details. Since authentication works, we don’t need this anymore.
<div class="alert alert-warning" role="alert">
Before authentication will function correctly, you must configure your provider details in <code>Program.cs</code>
</div>
Listing 17-8
Remove the Provider Details Alert
Next, we can customize the RemoteAuthenticatorView. This has a series of RenderFragment properties that allow you to display a UI during the process of logging in and out. Listing 17-9 shows a couple of simple examples.
Congratulations! You have just completed the process of authentication with Blazor WASM. Here, most of the code was generated by the application’s template, so this was not a lot of work!
Accessing a Protected API
Time to implement the Fetch data link. Currently, this uses some sample data, and of course, we want to access this data from the WeatherService API just like in the previous chapter.
Fetching Data from the WeatherService API
Start by installing the Microsoft.Extensions.Http package. Add a new folder called Services to the Blazor.Wasm.OpenIdConnect project, and inside it, add a new WeatherForecastService class as in Listing 17-10. Just like with Blazor Server, this uses an IHttpClientFactory instance to create the configured HttpClient.
using System;
using System.Net.Http;
using System.Net.Http.Json;
using System.Threading.Tasks;
using static Blazor.Wasm.OpenIdConnect.Pages.FetchData;
The FetchData Component Using the WeatherForecastService
First, let us see if all of this works by first removing the Authorize attribute from the WeatherForecastController.Get method. Run the IdentityProvider, WeatherService, and Blazor.Wasm.OpenIdConnect projects. Click the Fetch data link, and you should get the forecasts from the WeatherService. Nice!
Using the AuthorizationMessageHandler
Add the Authorize attribute again, now without a policy like in Listing 17-14. Later, we will enable the policy.
[HttpGet]
[Authorize()]
// [Authorize(Policy = Policies.FromBelgium)]
public IEnumerable<WeatherForecast> Get()
Listing 17-14
Protecting the WeatherService API
However, clicking the Fetch data link will not work! We need to retrieve an access token and pass it using a Bearer header to the WeatherService API which requires the u2uApi scope. So first we need to tell IdentityService4 to grant access to this scope by adding it to the list of AllowedScopes as in Listing 17-15.
AllowedScopes = {
IdentityServerConstants.StandardScopes.OpenId,
IdentityServerConstants.StandardScopes.Profile,
"u2uApi",
}
Listing 17-15
Adding the Scope to the Client Configuration
We should also add this to the client configuration as in Listing 17-16.
When accessing the API, we will need to attach the proper access token. For this, we need to use the AuthorizationMessageHandler. With an HttpMessageHandler, you can configure the request, so here we retrieve the AuthorizationMessageHandler and make it attach the access token for the u2uApi scope. Update dependency injection by adding an HttpMessageHandler as in Listing 17-17 which will do just that. We do need to pass the base URI to which access tokens need to be attached by setting the authorizedUrls property.
builder.Services
.AddHttpClient<WeatherForecastService>(
client
=> client.BaseAddress = new Uri("https://localhost:5005")
Run your solution again. Now you should be able to access the WeatherService API. Whohoo!
Adding Client-Side Authorization
Should the user be able to click the Fetch data link when they’re not authorized? Of course, not. First, we should protect the FetchData component. Add the Microsoft.AspNetCore.Authorization namespace to your _Imports.razor file as in Listing 17-18.
@using Microsoft.AspNetCore.Authorization
Listing 17-18
Using Microsoft.AspNetCore.Authorization
Now apply the Authorize attribute to the FetchData component as in Listing 17-19.
@page "/fetchdata"
@inject WeatherForecastService weatherService
@attribute [Authorize]
Listing 17-19
Protecting the FetchData Component
Any unauthorized user will now be redirected to the login page when they click the Fetch data link in the navigation menu. I do think it is better to hide the link using the AuthorizeView in the NavMenu component as in Listing 17-20.
Run the solution again. When you’re not logged in, the Fetch data link should be hidden, and then when you log in, it will show.
Again, congratulations are in order. You added support for calling a protected API. The next thing we will do is to use roles to protect our API even further.
Using Role-Based Security
Time to add some role-based access control. We can assign role claims to users and then use a role to give certain users access to components and resources, and others will be denied access although they have been authenticated. Here, we will add a component to review the user’s claims, and then we will use the user’s role to protect it.
Creating the Claims Component
Let us start by adding a route to view the user’s claims. Add Listing 17-21 to the _Imports.razor file. This will give us access to the Claim type.
@using System.Security.Claims
Listing 17-21
Using System.Security.Claims
Now add a new Blazor component called Claims and modify it to match Listing 17-22. Here, we inject the AuthenticationStateProvider which allows us to access the AuthenticationState. In the OnInitializedAsync method, we call the GetAuthenticationStateAsync method and use it to fill the UserName and UserClaims properties (just like in the previous chapter).
Now add a new navigation link to the NavMenu component as in Listing 17-23. We only give access to users that have been authenticated, so we wrap this inside an AuthorizeView we added before to protect the Fetch data link.
<AuthorizeView>
<Authorized>
<div class="nav-item px-3">
<NavLink class="nav-link" href="fetchdata">
<span class="oi oi-list-rich"
aria-hidden="true"></span> Fetch data
</NavLink>
</div>
<div class="nav-item px-3">
<NavLink class="nav-link" href="claims">
<span class="oi oi-list-rich"
aria-hidden="true"></span> Claims
</NavLink>
</div>
</Authorized>
</AuthorizeView>
Listing 17-23
Adding the Claims Link to the NavMenu
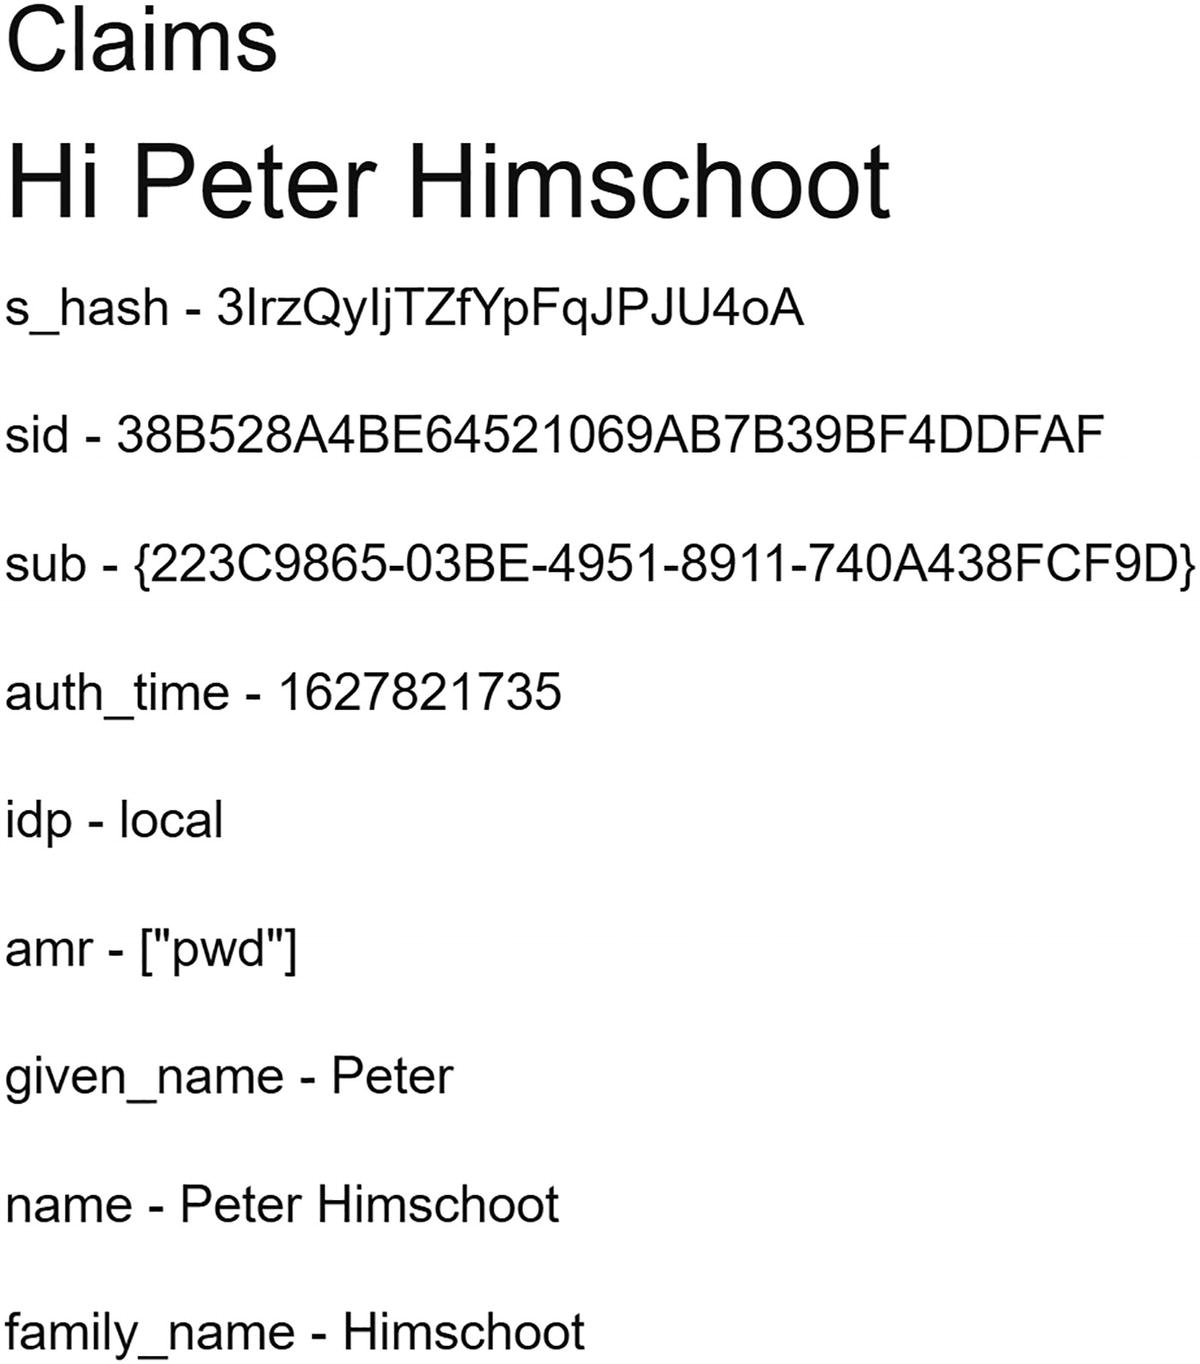
Run your solution (IdentityProvider, WeatherServices, and Blazor.Wasm.OpenIdConnect). After logging in with peter@u2u.be, you should see the user’s claims as in Figure 17-5.
Figure 17-5
The User’s Claims
Hmm. No roles claim. Let us fix this.
Enabling RBAC
Let us first look at the IdentityProvider project’s Config.GetClients method. As you can see, this client does not have the roles scope in the AllowedScopes property. Add it as in Listing 17-24.
new Client
{
ClientName = "BlazorWasm",
...
AllowedScopes = {
IdentityServerConstants.StandardScopes.OpenId,
IdentityServerConstants.StandardScopes.Profile,
"u2uApi",
"roles",
}
// RequireConsent = true
}
Listing 17-24
Adding the Roles Scopes to the Client
Our client should also require the roles scope, so update the appsettings.json from the Blazor.Wasm.OpenIdConnect project as in Listing 17-25.
Run again. Now you should see the role claim (if not, try logging out and then log in again since the claims are stored in a cookie and you need to refresh that cookie).
Viewing a user’s claims should only be possible for people who have sufficient rights to do so, so let us protect the Claims route so only users with an admin role can see it. This is quite simple: update the Authorize attribute to include the admin role as in Listing 17-26.
@attribute [Authorize(Roles = "admin")]
Listing 17-26
Requiring the Admin Role
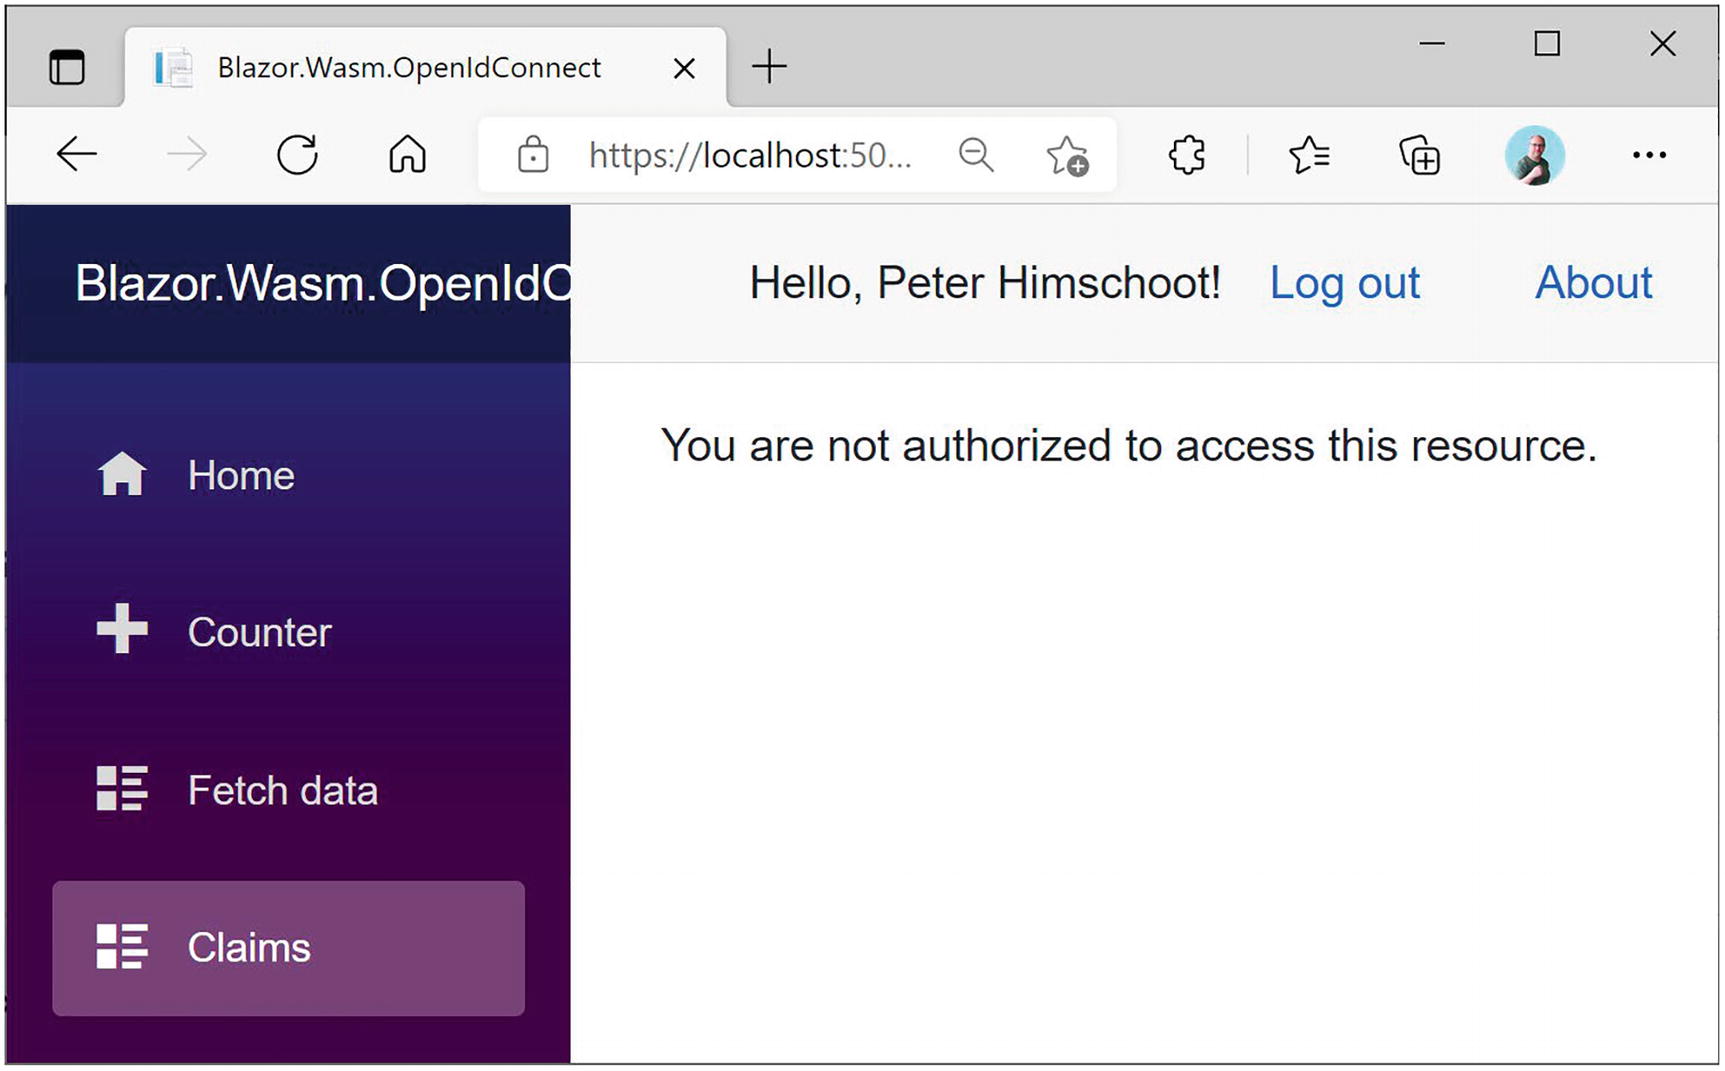
Run again. However, you will not be allowed to access the Claims component as shown in Figure 17-6. Why?
Figure 17-6
Unauthorized User
Promoting the Role Claim
Which claim represents the user’s role? Using claims is very flexible, so you could use any claim. That is why we need to tell the OIDC middleware which claim represents the role, so in the Blazor project, we need to set the userOptions.RoleClaim property as in Listing 17-27.
// Explain which claim contains the roles of the user
options.UserOptions.RoleClaim = "role";
});
Listing 17-27
Specifying the Role Claim
Run again. Log in with peter@u2u.be who has the admin role. You should be able to see the Claims route. Log in again with student@u2u.be, and you will see the unauthorized message. Maybe we should hide the Claims link when the user is not an admin? Update the NavMenu component by wrapping the claims NavLink with a <AuthorizeView Roles="admin"> as in Listing 17-28 which should take care of that.
Let us change our mind a little and decide that forecasts can only be seen by users with the country claim set to Belgium. For this, we will reuse the FromBelgium policy we created in the previous chapter. First, we need to enable the country scope in both the identity provider project and the Blazor project.
Updating Scopes
Update the GetClients method in the IdentityProvider project by adding an additional scope to the AllowedScopes property as in Listing 17-29.
AllowedScopes = {
IdentityServerConstants.StandardScopes.OpenId,
IdentityServerConstants.StandardScopes.Profile,
"u2uApi",
"roles",
"country"
}
Listing 17-29
Adding the Country Scope to the Identity Provider
Update the Blazor project’s appsettings.json as in Listing 17-30.
If you like, you can run the solution again to verify that you got the country claim.
Adding Policies
Time to add the FromBelgium policy to your Blazor WASM project. Add the Blazor.Shared.OpenIdConnect project as a project reference to the Blazor.Wasm.OpenIdConnect project. Then add Listing 17-31 to the end of Program.Main, but before await builder.Build().RunAsync();. This will enable the FromBelgium policy in our client project.
builder.Services.AddAuthorizationCore(options =>
{
options.AddPolicy(Policies.FromBelgium,
Policies.FromBelgiumPolicy());
});
Listing 17-31
Enabling Policy Authorization
Now enable this policy in the WeatherService API. We did most of the work in the previous chapter, so we only need to protect the WeatherForecastController.Get method using the FromBelgium policy as in Listing 17-32.
[Authorize(Policy = Policies.FromBelgium)]
public IEnumerable<WeatherForecast> Get()
Listing 17-32
Using a Policy to Protect an API
Run your project and log in with peter@u2u.be. You should be able to access the forecasts because this user has the country claim with value Belgium. Now try again with user student@u2u.be whose country claim has a different value. You will get an error. You can review this error by opening the browser’s debugger, and on the console tab, just like in Figure 17-7, you should see status code 403 (Forbidden).
Figure 17-7
Accessing the API with the Wrong Claims
Again, we can prevent users from accessing this resource by hiding the Fetch data link in the NavMenu as in Listing 17-33.
<AuthorizeView Policy="FromBelgium">
<Authorized>
<div class="nav-item px-3">
<NavLink class="nav-link" href="fetchdata">
<span class="oi oi-list-rich"
aria-hidden="true"></span> Fetch data
</NavLink>
</div>
</Authorized>
</AuthorizeView>
Listing 17-33
Hiding the NavLink
Summary
In this chapter, we used OpenId Connect to protect a Blazor WebAssembly project. We configured our identity provider for this application and then went on to use authentication. Then we used the AuthorizationMessageHandler to attach an access token so we can invoke a protected API. We also used role-based access control and policy-based access control to protect some of our components and resources.