I was attending the Microsoft Most Valued Professional and Regional Directors summit 2018 where we were introduced to Blazor for the first time by Steve Sanderson and Daniel Roth. And I must admit I was super excited about Blazor! Blazor is a framework that allows you to build Single-Page Applications (SPAs) using C# and allows you to run any standard .NET library in the browser. Before Blazor, your options for building a SPA were Angular, React, Vue.js (and others) using JavaScript, or one of the other higher-level languages like TypeScript (which gets compiled into JavaScript anyway). In this introduction, we will look at how browsers are now capable of running .NET assemblies in the browser using WebAssembly and Blazor.
A Tale of Two Wars
Think about it. The browser is one of the primary applications on your computer. You use it every day. Companies that build browsers know that very well and are bidding for you to use their browser. At the beginning of mainstream Internet, everyone was using Netscape, and Microsoft wanted a share of the market, so in 1995, they built Internet Explorer 1.0, released as part of Windows 95 Plus! pack.
The First Browser War
Newer versions were released rapidly, and browsers started to add new features such as <blink> and <marquee> elements. This was the beginning of the first browser war, giving people (especially designers) headaches because some developers were building pages with blinking marquee controls  . But developers were also getting sore heads because of incompatibilities between browsers. The first browser war was about having more HTML capabilities than the competition.
But all of this is now behind us with the introduction of HTML5 and modern browsers like Google Chrome, Microsoft Edge, Firefox, Safari, and Opera. HTML5 not only defines a series of standard HTML elements but also rules on how these should render, making it a lot easier to build a website that looks the same in all modern browsers. Then, in 1995, Brendan Eich wrote a little programming language known as ECMAScript (initially called LiveScript) in ten days (What!?). It was quickly dubbed JavaScript because its syntax was very similar to Java. I will be using the name JavaScript here because that is what most people call it.
JavaScript and Java are not related. Java and JavaScript have as much in common as ham and hamster (I don’t know who formulated this first, but I love this phrasing).
Little did Mr. Eich know how this language would impact the modern Web and even desktop application development. In 1995, Jesse James Garrett wrote a white paper called Ajax (Asynchronous JavaScript and XML), describing a set of technologies where JavaScript is used to load data from the server and that data is used to update the browser’s HTML. This avoids full page reloads and allows for client-side web applications, which are applications written in JavaScript that run completely in the browser. One of the first companies to apply Ajax was Microsoft when they built Outlook Web Access (OWA). OWA is a web application almost identical to the Outlook desktop application proving the power of Ajax. Soon other Ajax applications started to appear, with Google Maps stuck in my memory as one of the other keystone applications. Google Maps would download maps asynchronously and with some simple mouse interactions allowed you to zoom and pan the map. Before Google Maps, the server would do the map rendering and a browser displayed the map like any other image by downloading a bitmap from a server.
Building an Ajax website was a major undertaking that only big companies like Microsoft and Google could afford. This soon changed with the introduction of JavaScript libraries like jQuery and knockout.js (knockout was also written by Steve Sanderson, the author of Blazor!). Today, we build rich web apps with Angular, React, and Vue.js. All of them are using JavaScript or higher-level languages like TypeScript which gets transpiled into JavaScript.
Transpiling will take one language and convert it into another language. This is very popular with TypeScript which gives you a modern high-level typed language. You need JavaScript to run it in a browser, so TypeScript gets “transpiled” into JavaScript.
The Second Browser War

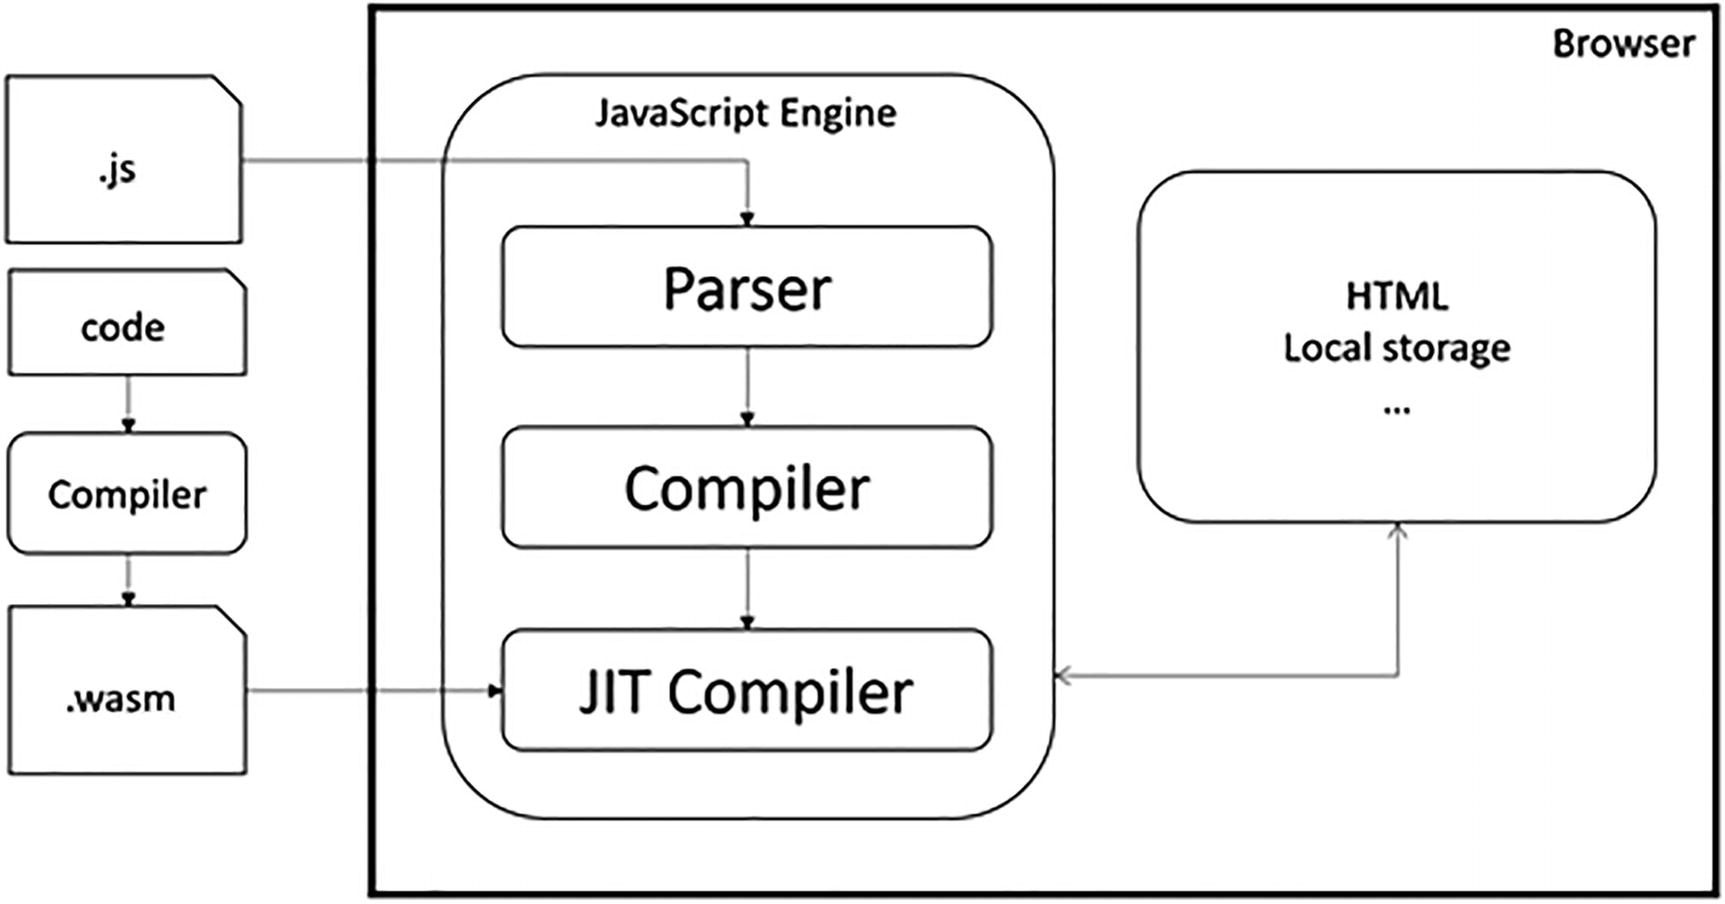
The JavaScript Execution Process
This process takes a lot of effort because JavaScript needs to be downloaded into the browser, where it gets parsed, then compiled into bytecode, and then Just-In-Time converted into native code. So how can we make this process even faster?
The second browser war is all about JavaScript performance.
Introducing WebAssembly
The WebAssembly Execution Process
Google Earth in WebAssembly
What is WebAssembly? From the official site webassembly.org:
WebAssembly (abbreviated Wasm) is a binary instruction format for a stack-based virtual machine. Wasm is designed as a portable target for compilation of high-level languages like C/C++/Rust, enabling deployment on the web for client and server applications.
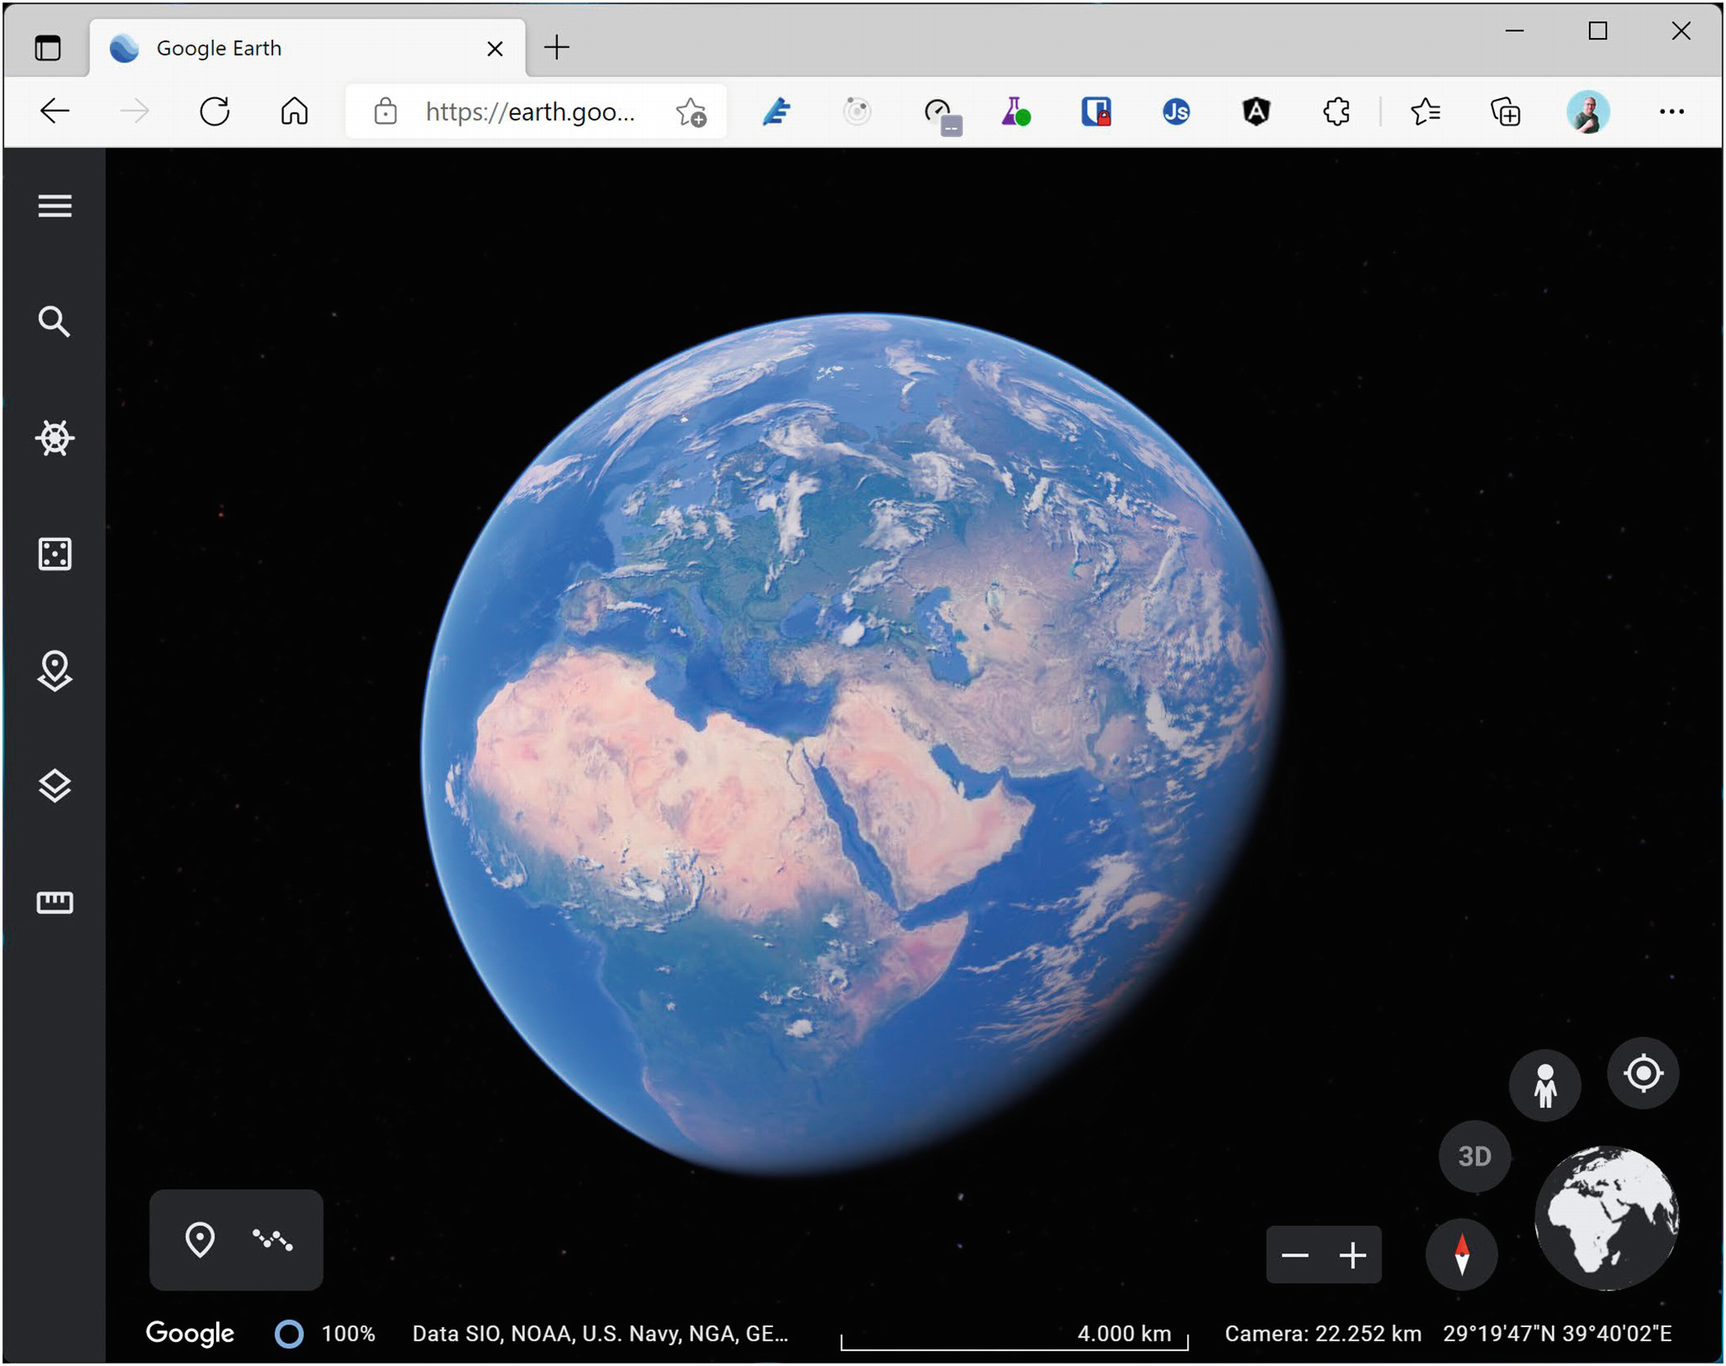
So WebAssembly as a new binary format optimized for browser execution, it is NOT JavaScript. It uses a stack-based virtual machine, just like .NET does. There are compilers for languages like C++ and Rust which compile to WASM. Some people have compiled C++ applications to WASM, allowing to run them in the browser. There is even a Windows 2000 operating system (https://bellard.org/jslinux/vm.html?url=https://bellard.org/jslinux/win2k.cfg&mem=192&graphic=1&w=1024&h=768) compiled to WASM so you can play minesweeper as shown in Figure 1-4!
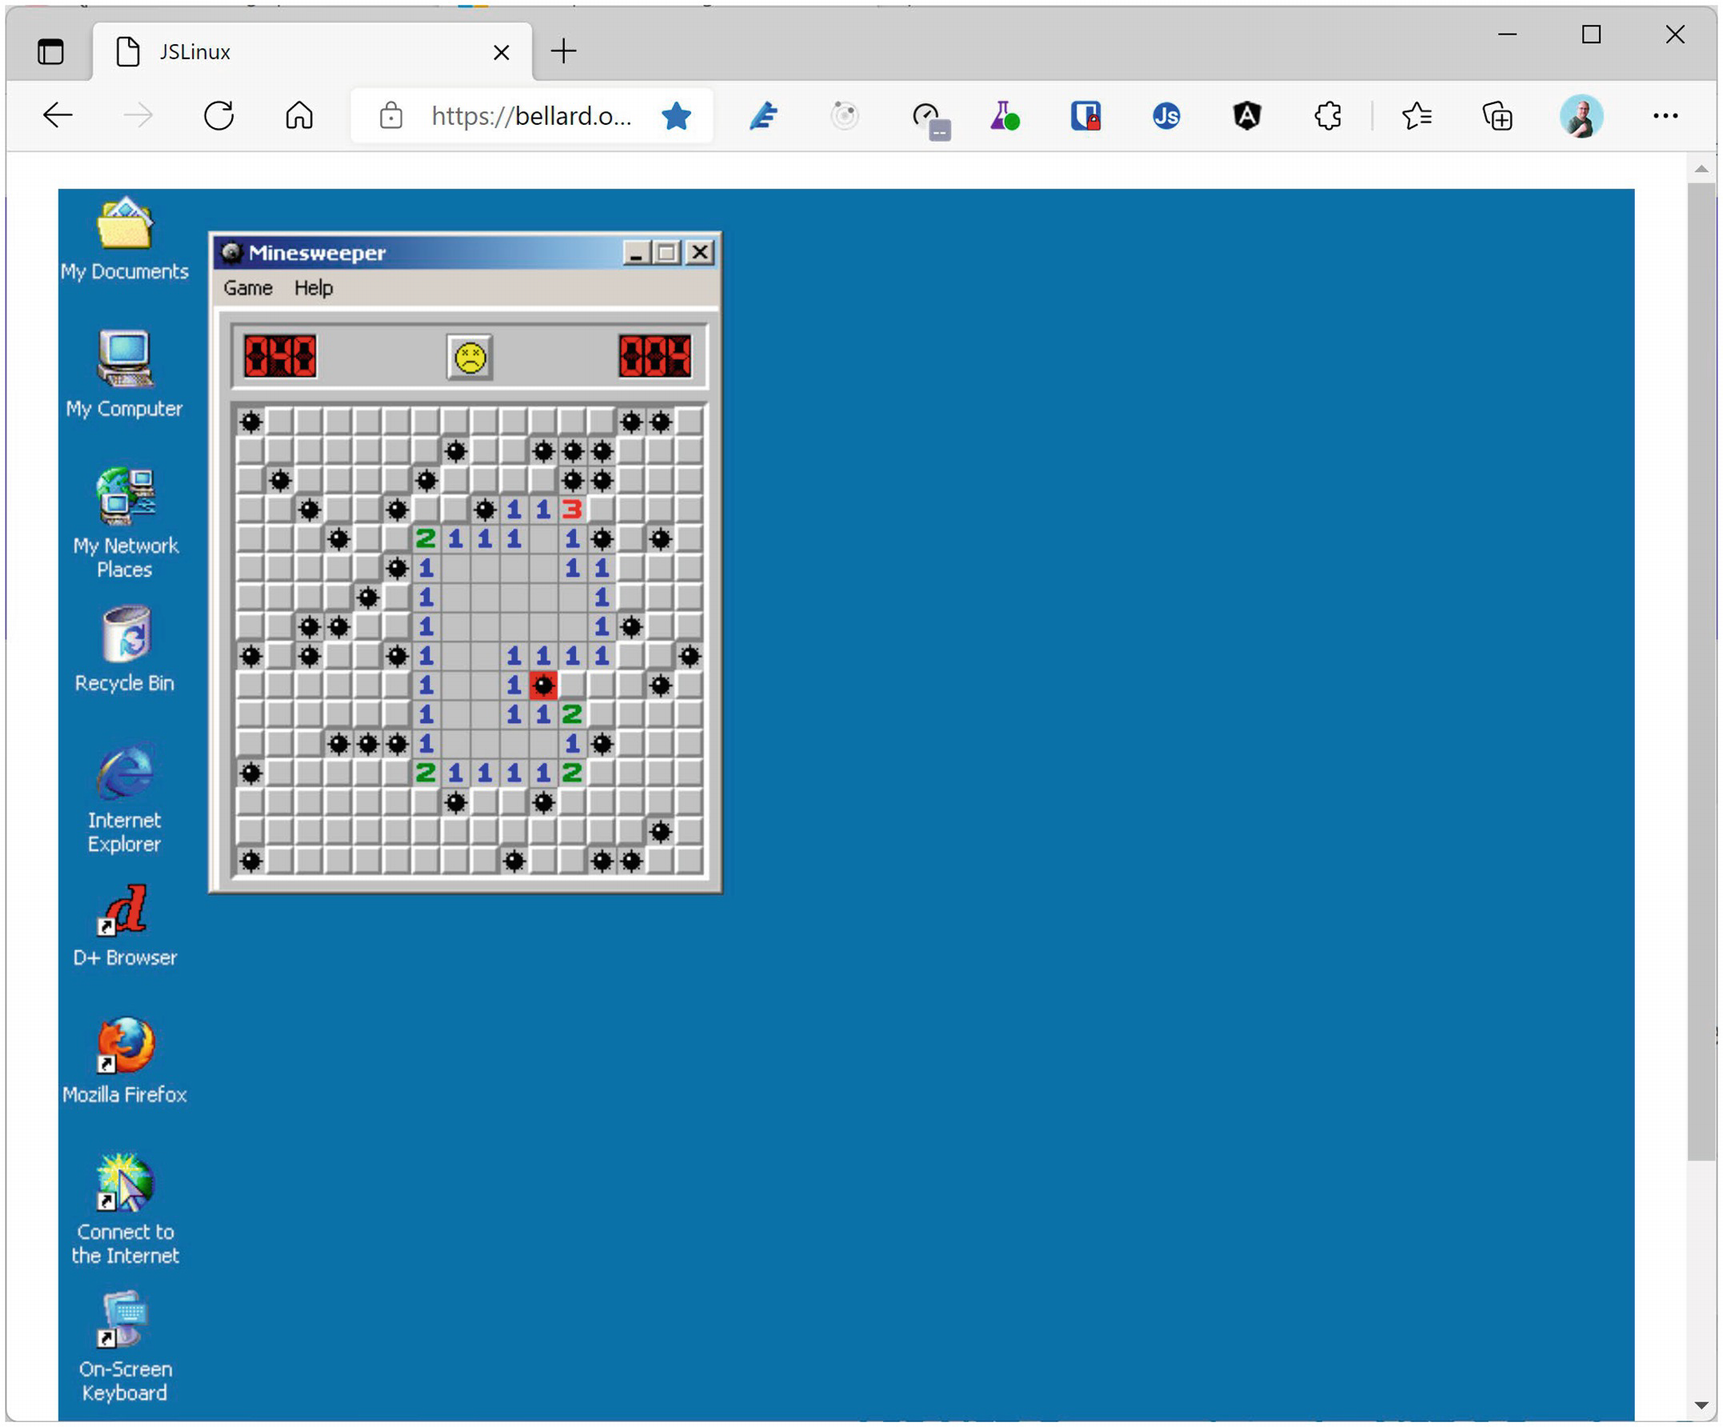
Windows 2000 Running in the Browser
Which Browsers Support WebAssembly?
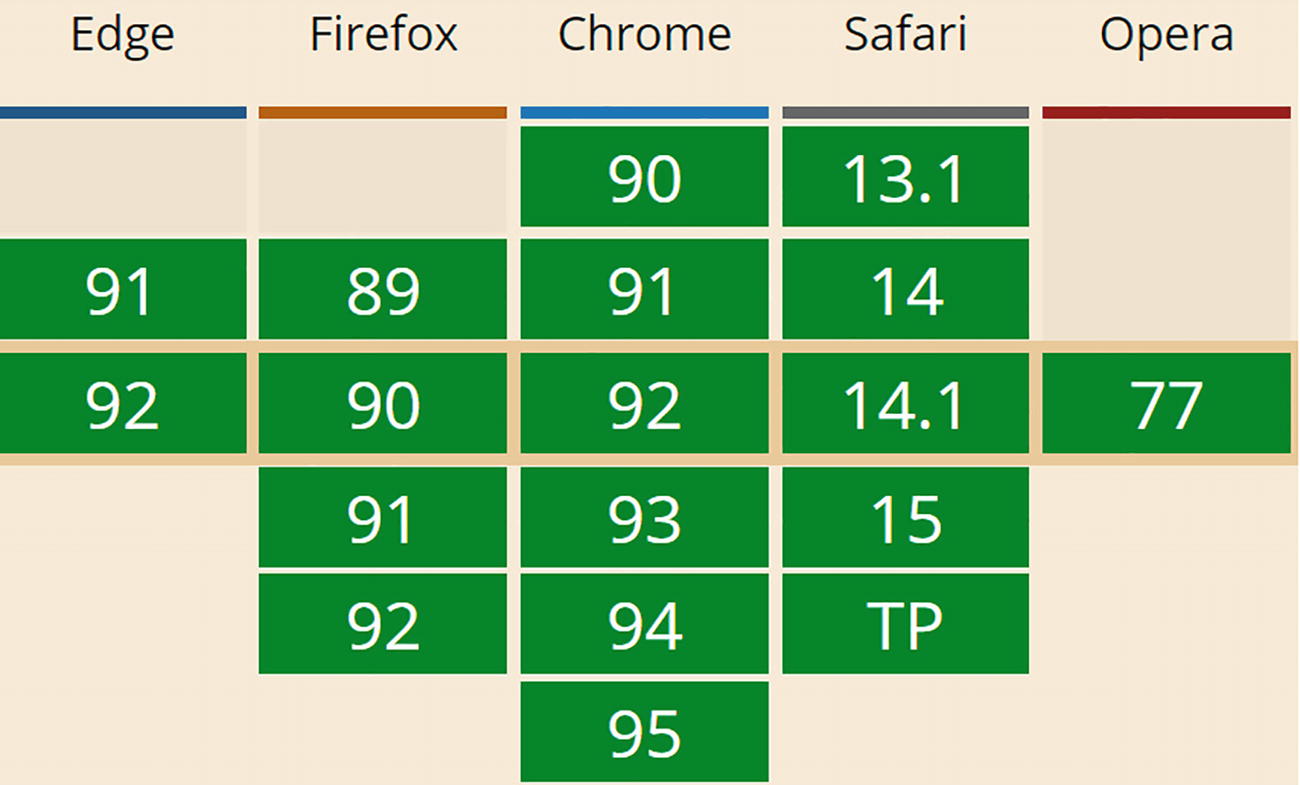
WebAssembly Support
As WebAssembly will become more and more important, we will see other browsers follow suit, but don’t expect Internet Explorer to support WASM.
WebAssembly and Mono
Mono is an open source implementation of the .NET CLI specification, meaning that Mono is a platform for running .NET assemblies. Mono is used in Xamarin (now called Multi-platform App UI, or MAUI for short) for building mobile applications that run on the Windows, Android, and iOS mobile operating systems. You can also use it to build applications for macOS, Linux, Tizen, and others. Mono also allows you to run .NET on Linux (its original purpose) and is written in C++. This last part is important because we saw that you can compile C++ to WebAssembly. So, what happened is that the Mono team decided to try to compile Mono to WebAssembly, which they did successfully. There are two approaches. One is where you take your .NET code and you compile it together with the Mono runtime into one big WASM application. However, this approach takes a lot of time because you need to take several steps to compile everything into WASM, not so practical for day-to-day development. The other approach takes the Mono runtime and compiles it into WASM, and this runs in the browser where it will execute .NET Intermediate Language just like normal .NET does. The big advantage is that you can simply run .NET assemblies without having to compile them first into WASM.
This is the approach currently taken by Blazor. In the beginning, Blazor used the Mono runtime, but they have now built their own .NET Core runtime for WebAssembly. But Blazor is not the only one taking this approach. For example, there is the Ooui project which allows you to run Xamarin.Forms applications in the browser. The disadvantage of this is that it needs to download a lot of .NET assemblies . This can be solved by using tree shaking algorithms which remove all unused code from assemblies. We will look at this in Chapter 15.
Interacting with the Browser with Blazor
WebAssembly with the .NET runtime allows you to run .NET code in the browser. Steve Sanderson used this to build Blazor. Blazor uses the popular ASP.NET MVC approach for building applications that run in the browser. MVC uses the razor syntax to generate HTML on the server. With Blazor, you build razor files (Blazor = Browser + Razor) which execute inside to browser to dynamically build a web page. With Blazor, you don’t need JavaScript to build a web app, which is good news for thousands of .NET developers who want to continue using C# (or F#). To use some browser features, you will still need JavaScript, and we will discuss this in Chapter 10.
How Does It Work?
Let’s start with a simple razor file in Listing 1-1 which you can find when you create a new Blazor project (which we will do further on in this chapter, no need to type anything yet).
Each code sample has been formatted for readability, sometimes splitting lines where this is not necessary and using less indentation. I leave it to you how you decide to format your code.
The Counter Razor File
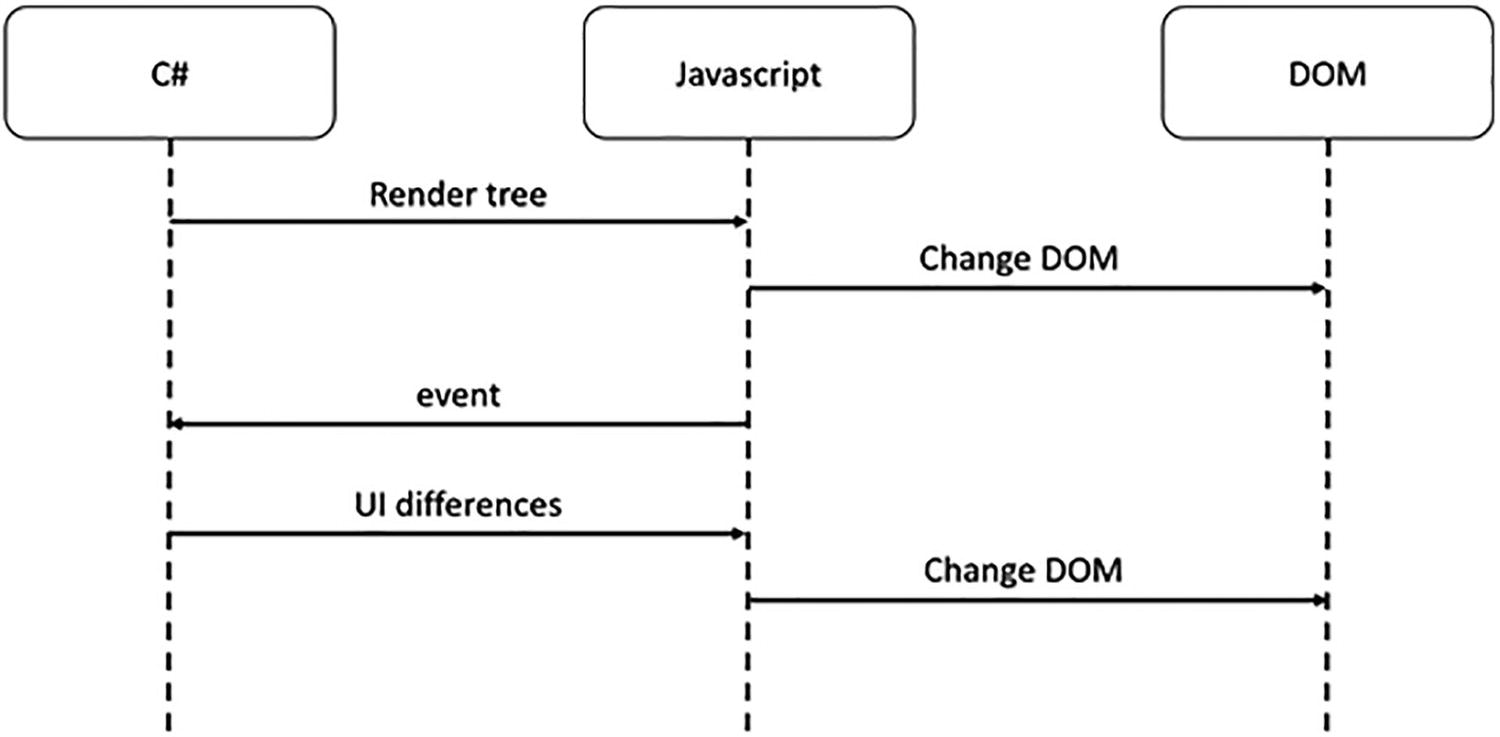
The Blazor WebAssembly DOM Generation Process
This model is very flexible. It allows you to build Progressive Web Apps, and your app can be embedded in Electron desktop applications of which Visual Studio Code is a prime example.
Blazor Server
At the August 7, 2018, ASP.NET community standup (www.youtube.com/watch?v=7Eh_l7jEcCo), Daniel Roth introduced a new execution model for Blazor now called Blazor Server. In this model, your Blazor site is running on the server resulting in a way smaller download for the browser.
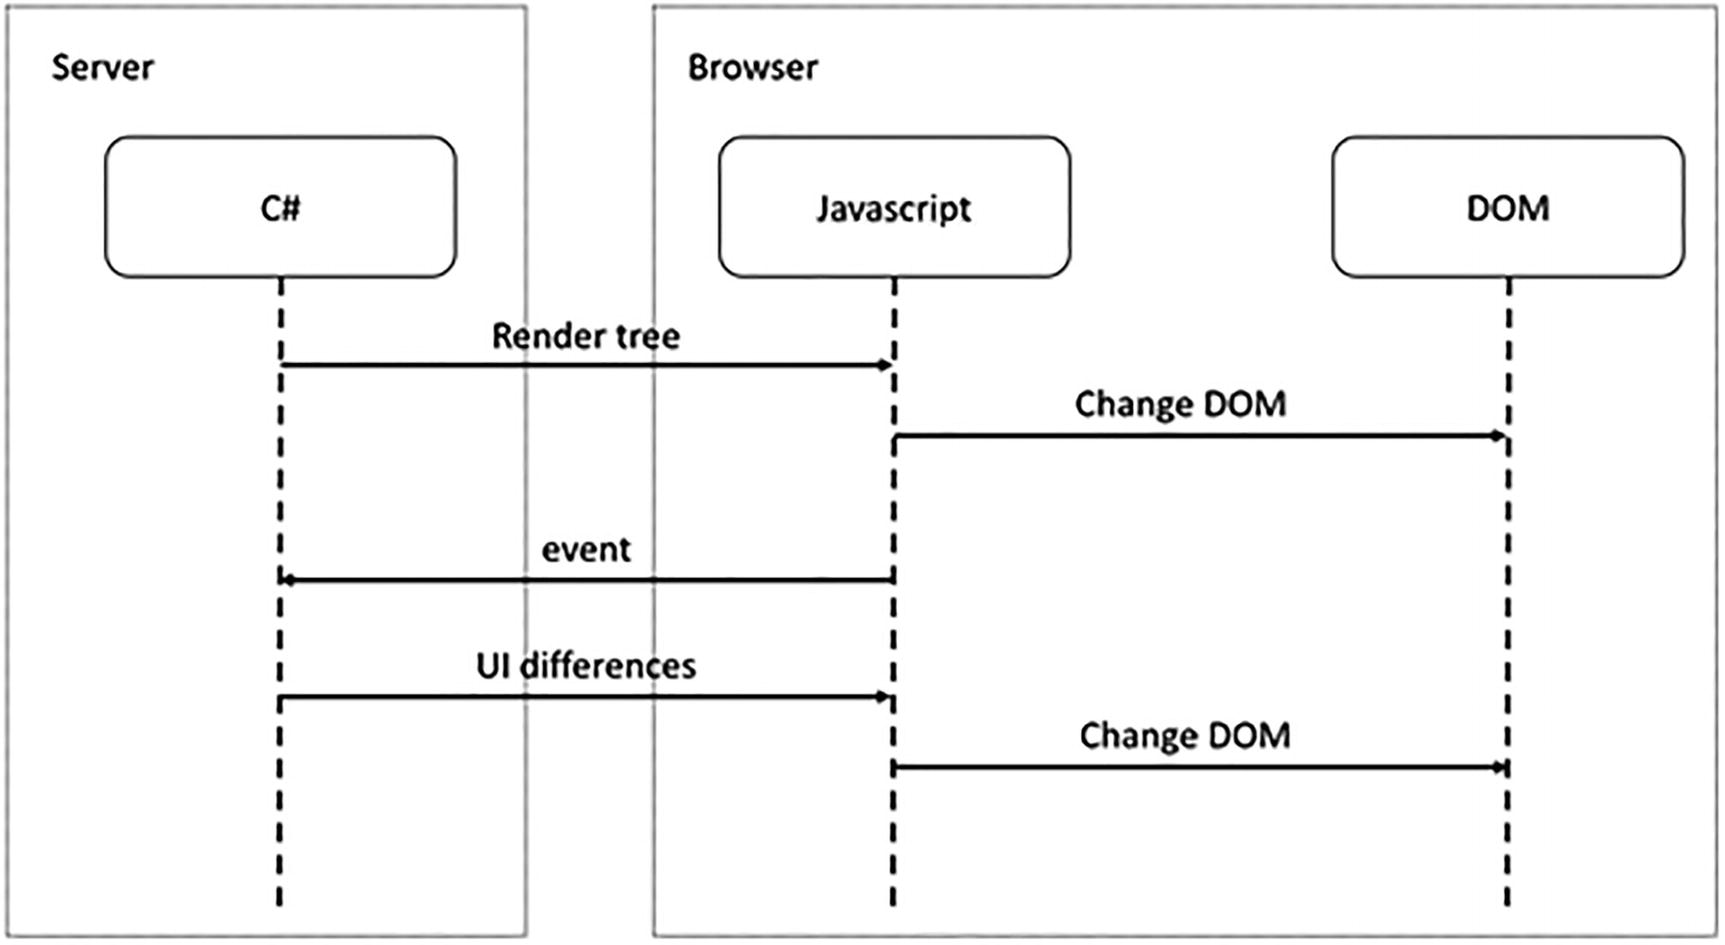
Blazor Server Runtime Model
Pros and Cons of the Blazor Server
Smaller downloads: With Blazor Server, your application does not need to download dotnet.wasm (the .NET runtime) nor all your .NET assemblies. The browser downloads a small JavaScript library which sets up the SignalR connection to the server. This means that the application will start a lot faster, especially on slower connections, but at the price that we continuously need a connection to the server to exchange small messages.
Development process: Blazor WebAssembly does not support all modern debugging capabilities, resulting in added logging. Because your .NET code is running on the server, you can use the regular .NET debugger with all of its advanced features. You could start building your Blazor application using the server-side model, and when it is finished, switch to the client-side model by switching the hosting model.
.NET APIs: Because you are running your .NET code on the server, you can use all the .NET APIs you would use with regular ASP.NET Core MVC applications, for example, accessing the database directly. Do note that doing this will stop you from quickly converting it into a client-side application. You can limit this by writing service classes and using dependency injection to inject different implementations depending on the environment your components are hosted in.
Online only: Running the Blazor application on the server does mean that your users will always need access to the server. This will prevent the application from running in Electron, nor will you be able to run it as a Progressive Web Application (PWA). And if the connection drops between the browser and server, your user could lose some work because the application will stop functioning. Blazor will try to reconnect to the server without losing any data, so most of the time, users will not lose any work done.
Server scalability: All your .NET code runs on the server, so if you have thousands of clients, your server(s) will have to handle all the work. Not only that, Blazor uses a stateful model which will require you to keep track of every user’s state on the server. So your server will need more resources than with Blazor WebAssembly which can use a stateless model.
Your First Blazor Project
Getting hands-on is the best way to learn. You will first install the prerequisites to developing with Blazor. Then you will create your first Blazor project, run the project to see it work, and finally inspect the different aspects of the project to get a “lay of the land” view for how Blazor applications are developed.
I learned an important lesson from the first edition of this book: never underestimate the speed at which Microsoft innovates! All code samples in the first edition of Blazor Revealed became invalid quite rapidly. I do not expect this to happen again with this edition since it is based on the Release To Manufacture (RTM) version of Blazor. If something does not work, simply consult the sources that come with this book. I will keep these up to date. Promise!
The source code for this book is available on GitHub via the book’s product page, located at www.apress.com/ISBN.
Installing Blazor Prerequisites
Working with Blazor requires you to install some prerequisites, so in this section, you will install what is needed to get going.
Blazor runs on top of .NET , optionally providing the web server for your project which will serve the client files that run in the browser and run any server-side APIs that your Blazor project needs. .NET (previously known as .NET Core) is Microsoft’s cross-platform solution for working with .NET on Windows, Linux, and OSX.
You can find the installation files at www.microsoft.com/net/download. Look for the latest version of the .NET SDK (you’ll need at least version 6.0). Follow the installation instructions and install it on your machine, using Windows, OSX, or Linux.
Output should indicate that you installed the correct version. The version number should be at least 6.0.
Should the command’s output show an older version, you will need to download and install a more recent version of .NET SDK. These can run side by side so you will not break other .NET projects doing this.
Using Visual Studio
For people using Windows, Visual Studio (from now on, I will refer to Visual Studio as VS) is one of the integrated development environments (IDE) we will use throughout this book. If you are using OSX or Linux, you can use Visual Studio Code, and OSX users might prefer Visual Studio for Mac. With any one, you can edit your code, compile it, and run it all from the same application. And the code samples are also the same.
If you want to use Visual Studio, download the latest version of Visual Studio from www.visualstudio.com/downloads/. The Community Edition is free and should allow you to do everything done in this book.
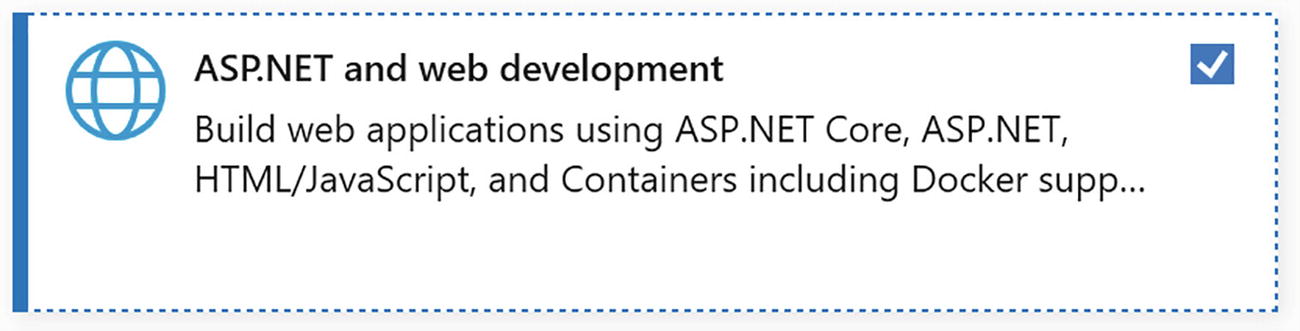
The Visual Studio Installer Workloads Selection
About Microsoft Visual Studio
Using Visual Studio Code
Visual Studio Code (VSC) is a free, modern, cross-platform development environment with an integrated editor, git source control, and debugger. The environment has a huge range of extensions available allowing you to use all kinds of languages and tools directly from VSC. So, if you don’t have access to (because you’re running a non-Windows operating system or you don’t want to use) Visual Studio, use VSC.
Install VSC from www.visualstudio.com/. Install using the defaults.

Visual Studio Code Extensions Tab

C# for Visual Studio Code
Click Install.
Understanding the Blazor Templates for VS/Code
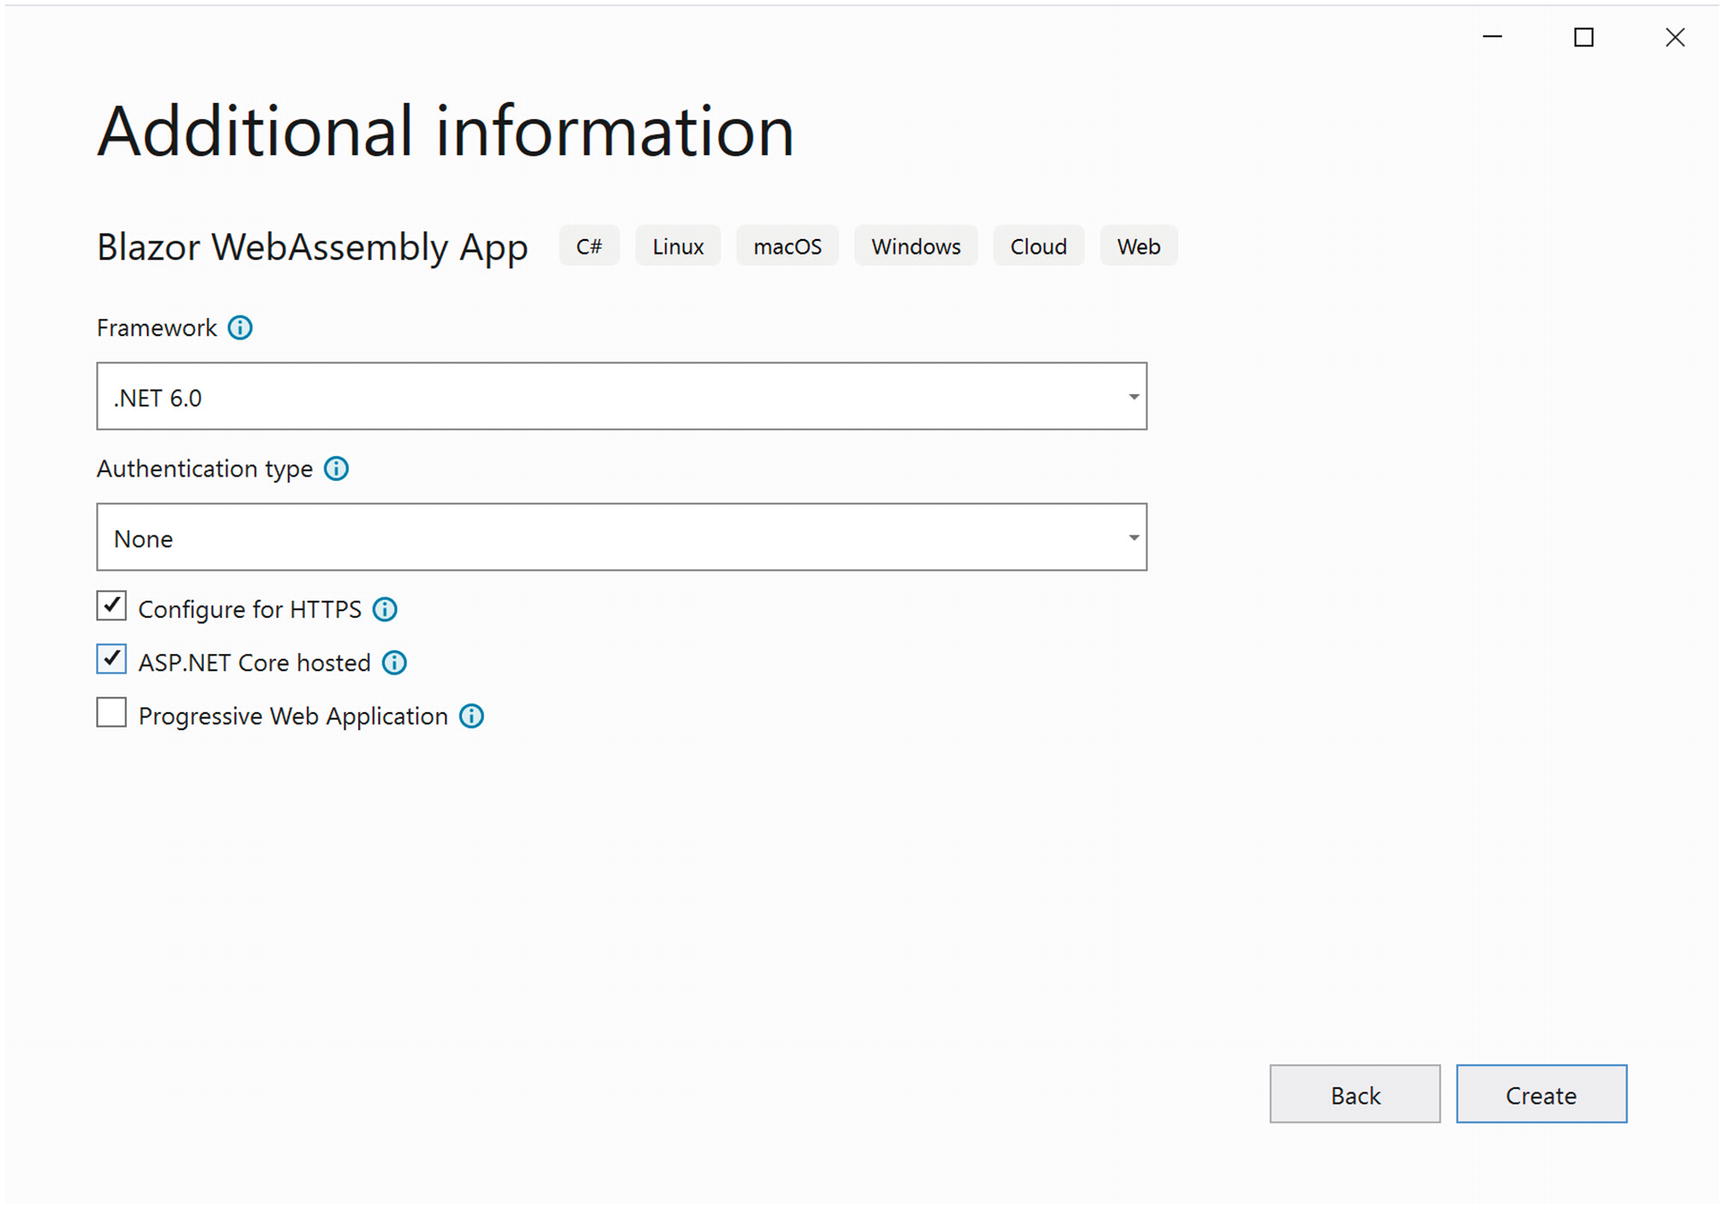
Throughout this book, we will create several different Blazor projects. With .NET Core, we can use the command-line interface (CLI) to create all kinds of projects, including Blazor WebAssembly and Blazor Server.
With Blazor projects, you have a couple of choices. You can create a standalone Blazor project (using the blazorwasm template) that does not need server-side code. This kind of project known as Blazor WebAssembly has the advantage that you can simply deploy it to any web server which will function as a file server, allowing browsers to download your site just like any other site. We will look at deployment in a later chapter.
Or you can create a hosted project (adding the --hosted option) with client, server, and shared code. This kind of Blazor WebAssembly project will require you to host it where there is .NET Core support because you will execute code on the server as well, for example, to retrieve data from a database.
The third option is to run all Blazor code on the server (using the blazorserver template). In this case, the browser will use a SignalR connection to receive UI updates from the server and to send user interaction back to the server for processing.
In this book, we will use the second option (Blazor WebAssembly hosted on ASP.NET MVC Core) most of the time, but the concepts you will learn in this book are the same for all three options. You can even develop for Blazor WebAssembly and Blazor Server at the same time! Why? Because debugging support for Blazor WebAssembly is limited, so you develop with Blazor Server using all debugger features you know and love. But you can test everything with Blazor WebAssembly ensuring you can run everything in the browser later. This is the way I like to work. However, to pull this off, you need some experience with Blazor first, so keep reading.
Generating the Project with Dotnet CLI
This should build without any errors.
Open your browser on this address (here https://localhost:5001), and you are ready to play!
Generating Your Project with Visual Studio
Start Visual Studio and select Create a new project.
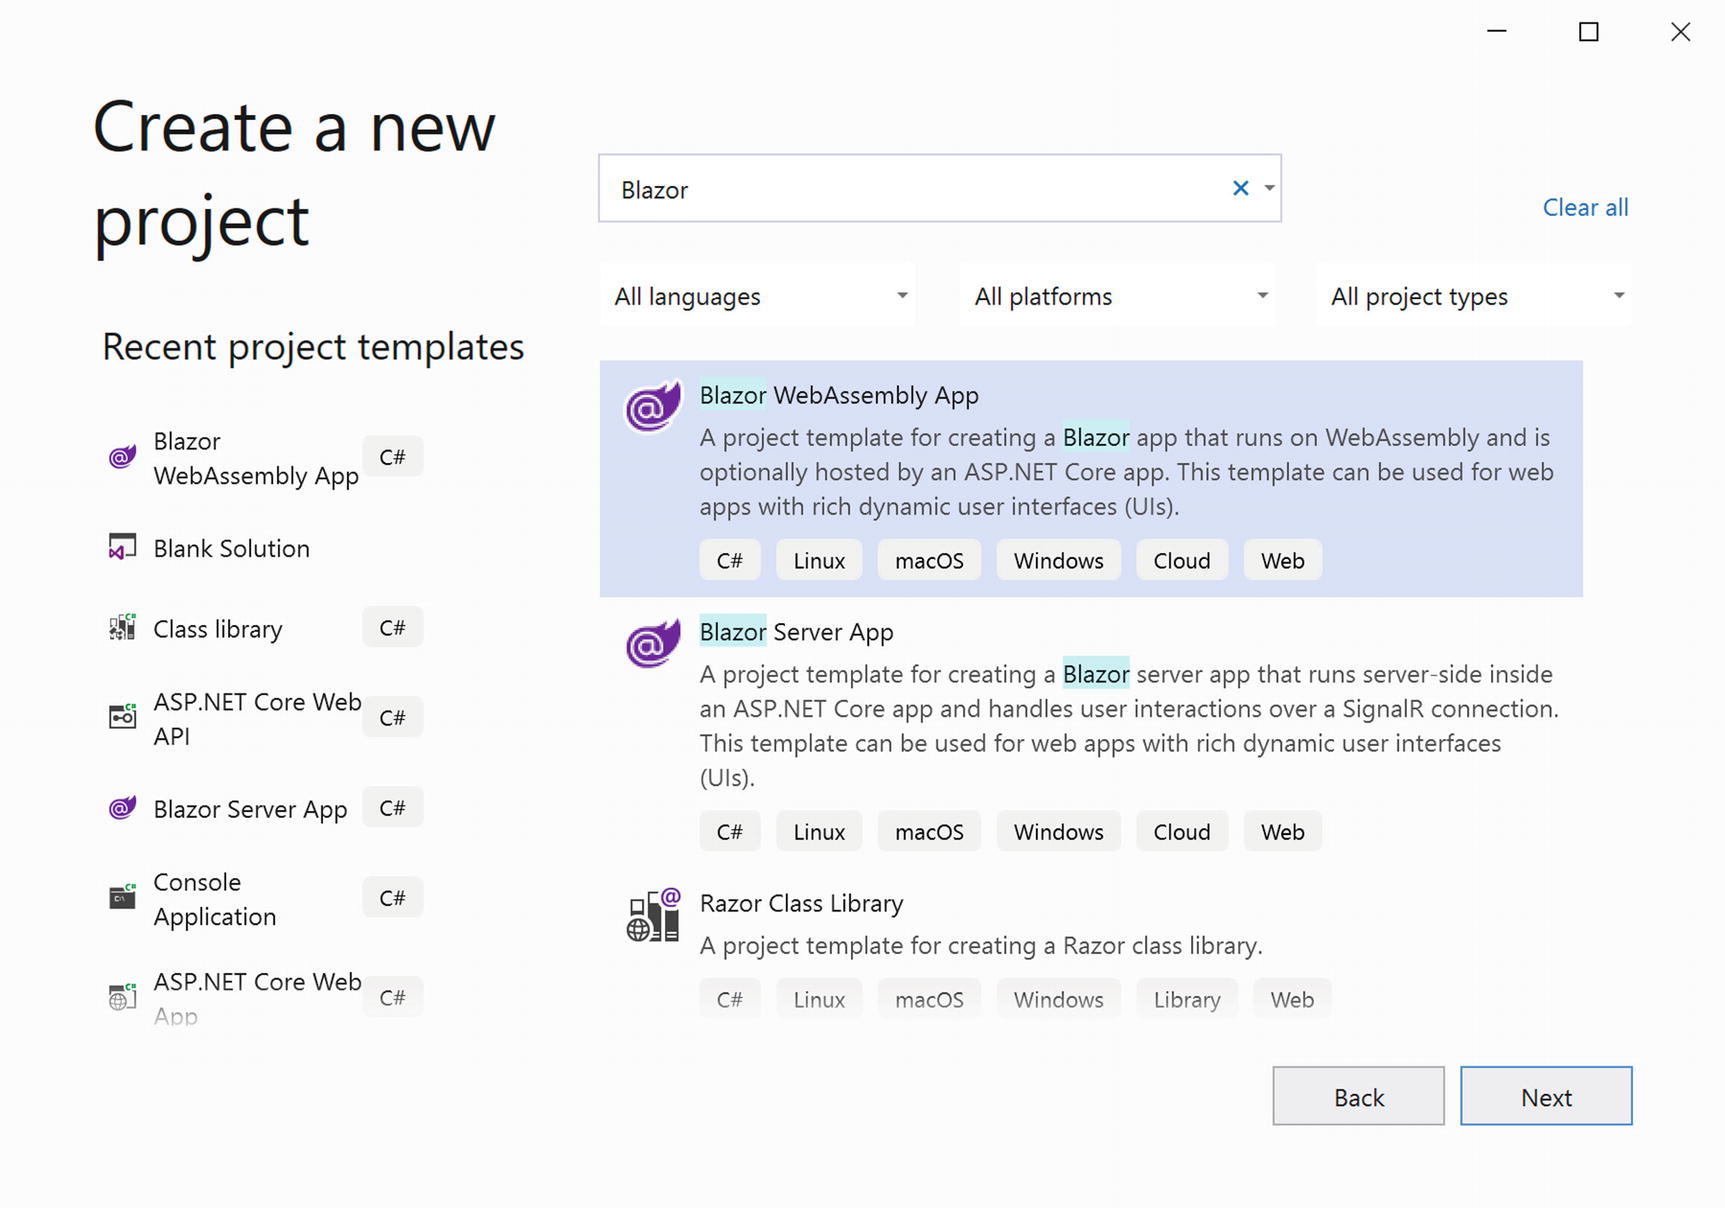
Visual Studio New Project Dialog
Click Next.
Name your project MyFirstBlazor, choose the location where the project should be generated, and click Next.
New ASP.NET Core Web Application
Wait for Visual Studio to complete. Then build and run your solution by pressing F5. After a little while, the browser will open and display the Blazor application.
Running Blazor with Visual Studio Code
Or you can open VSC and then select File ➤ Open Folder….
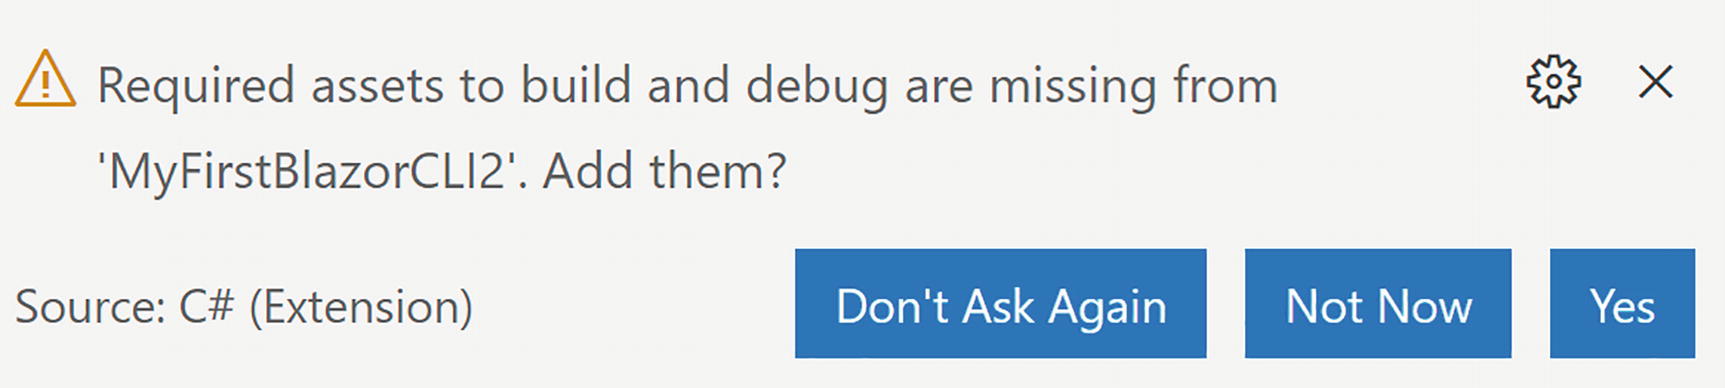
Code Asking to Add Build and Debug Assets
Thanks to this integration with Visual Studio Code, you can simply press F5 to build and run your project.
VSC now uses Workspace Trust which might pop up a dialog asking if you trust the authors of a project. When opening the provided code download, you will probably encounter this.
Running the Generated Project
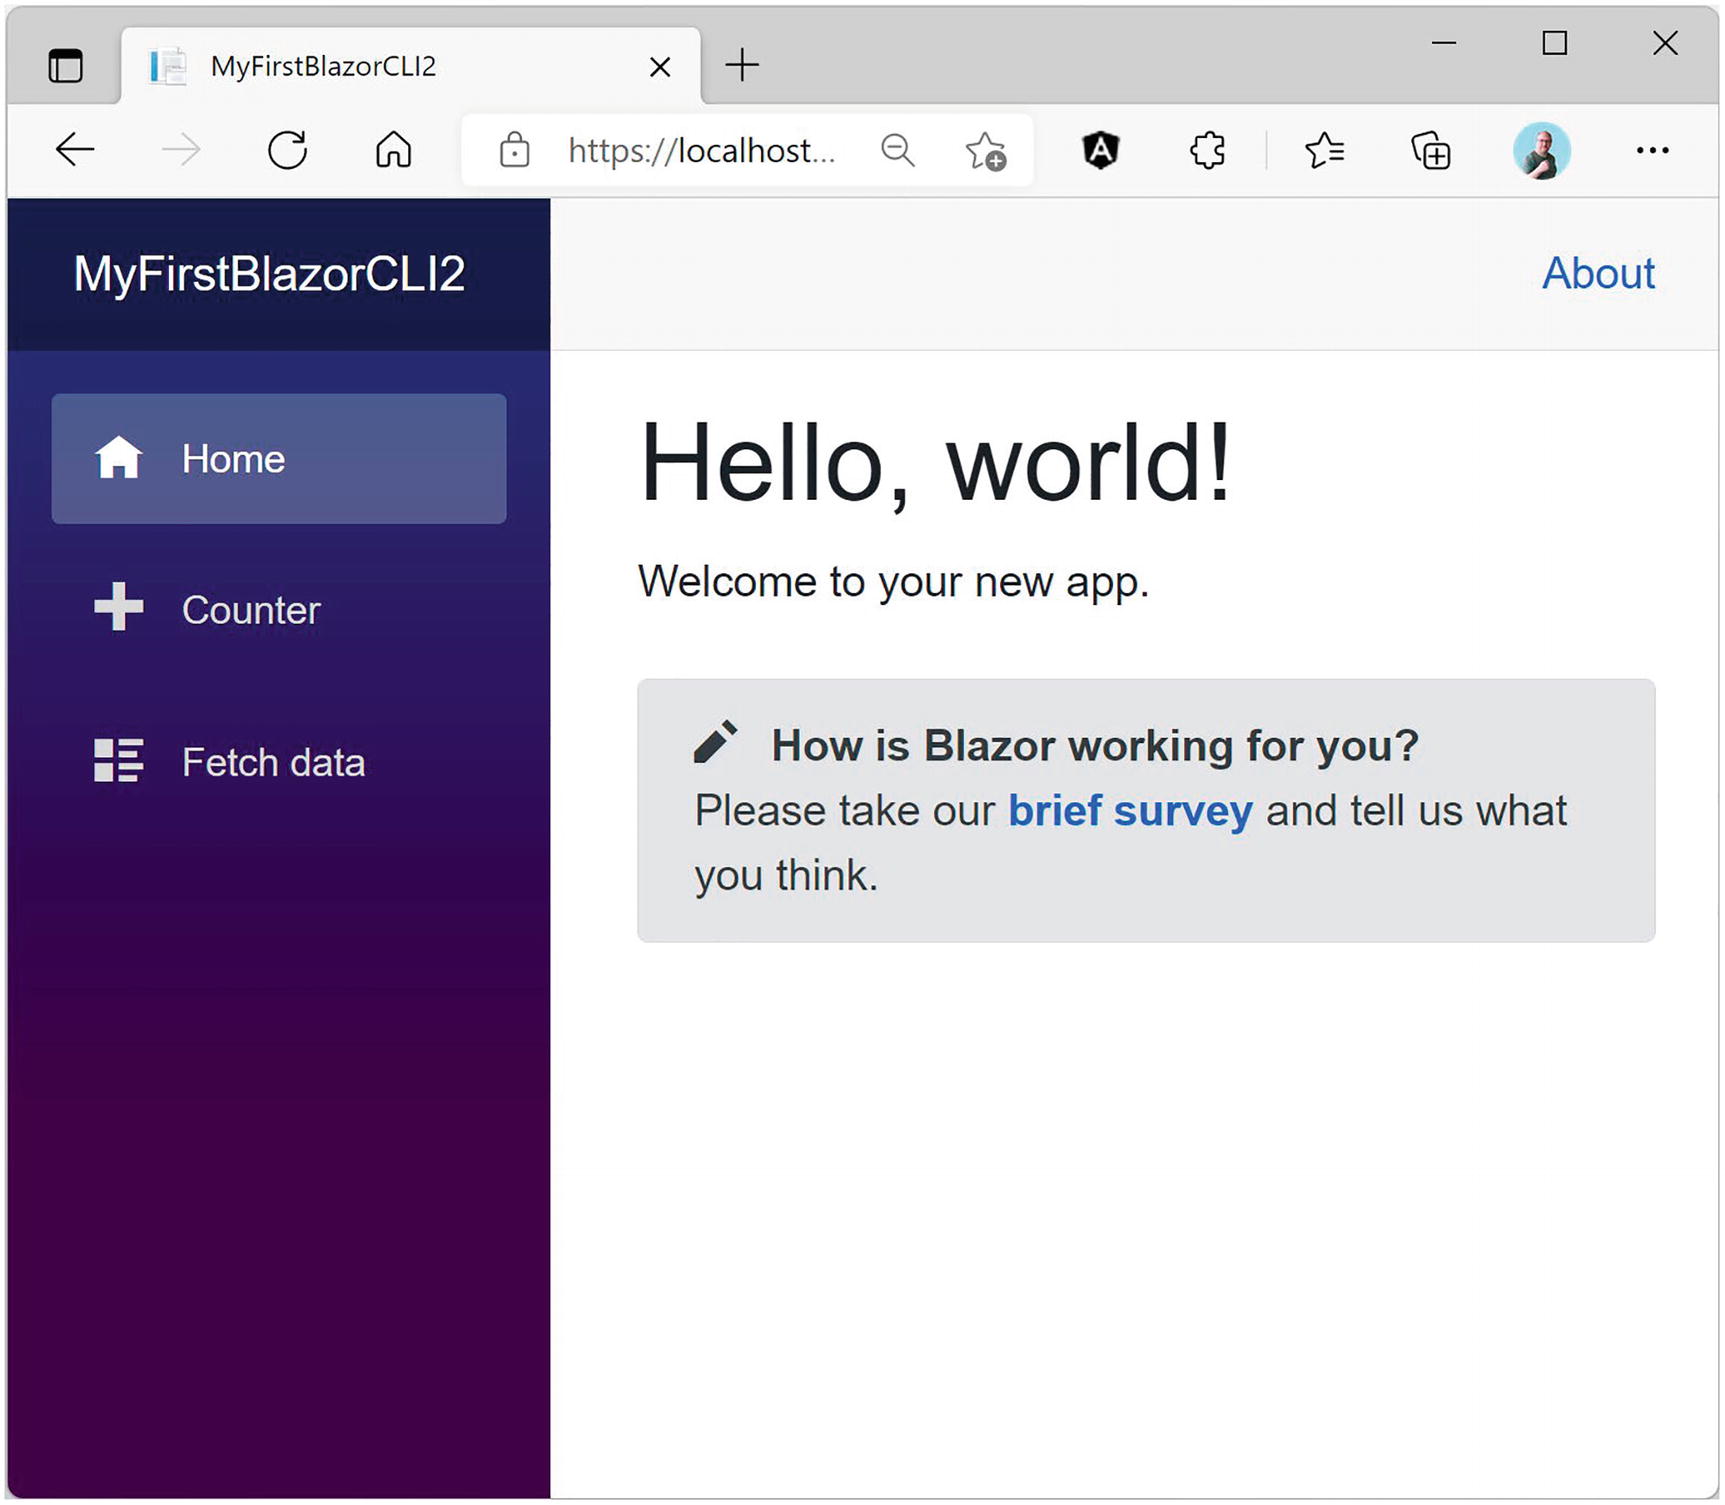
Your First Application – Home Screen
This generated Single-Page Application (SPA) has on the left side a navigation menu allowing you to jump between different pages. On the right side, you will see the selected component; in Figure 1-15, it is showing the Index component. And in the top right corner, there is an About link to https://blazor.net/ which is the official Blazor documentation website.
The Index component shows the mandatory “Hello, world!” demo, and it also contains a survey component you can click to fill out a survey (this is a real survey, so please let Microsoft know you like Blazor!). The SurveyPrompt is the first example of a custom Blazor component. We will discuss building components like SurveyPrompt in Chapters 3 and 4.
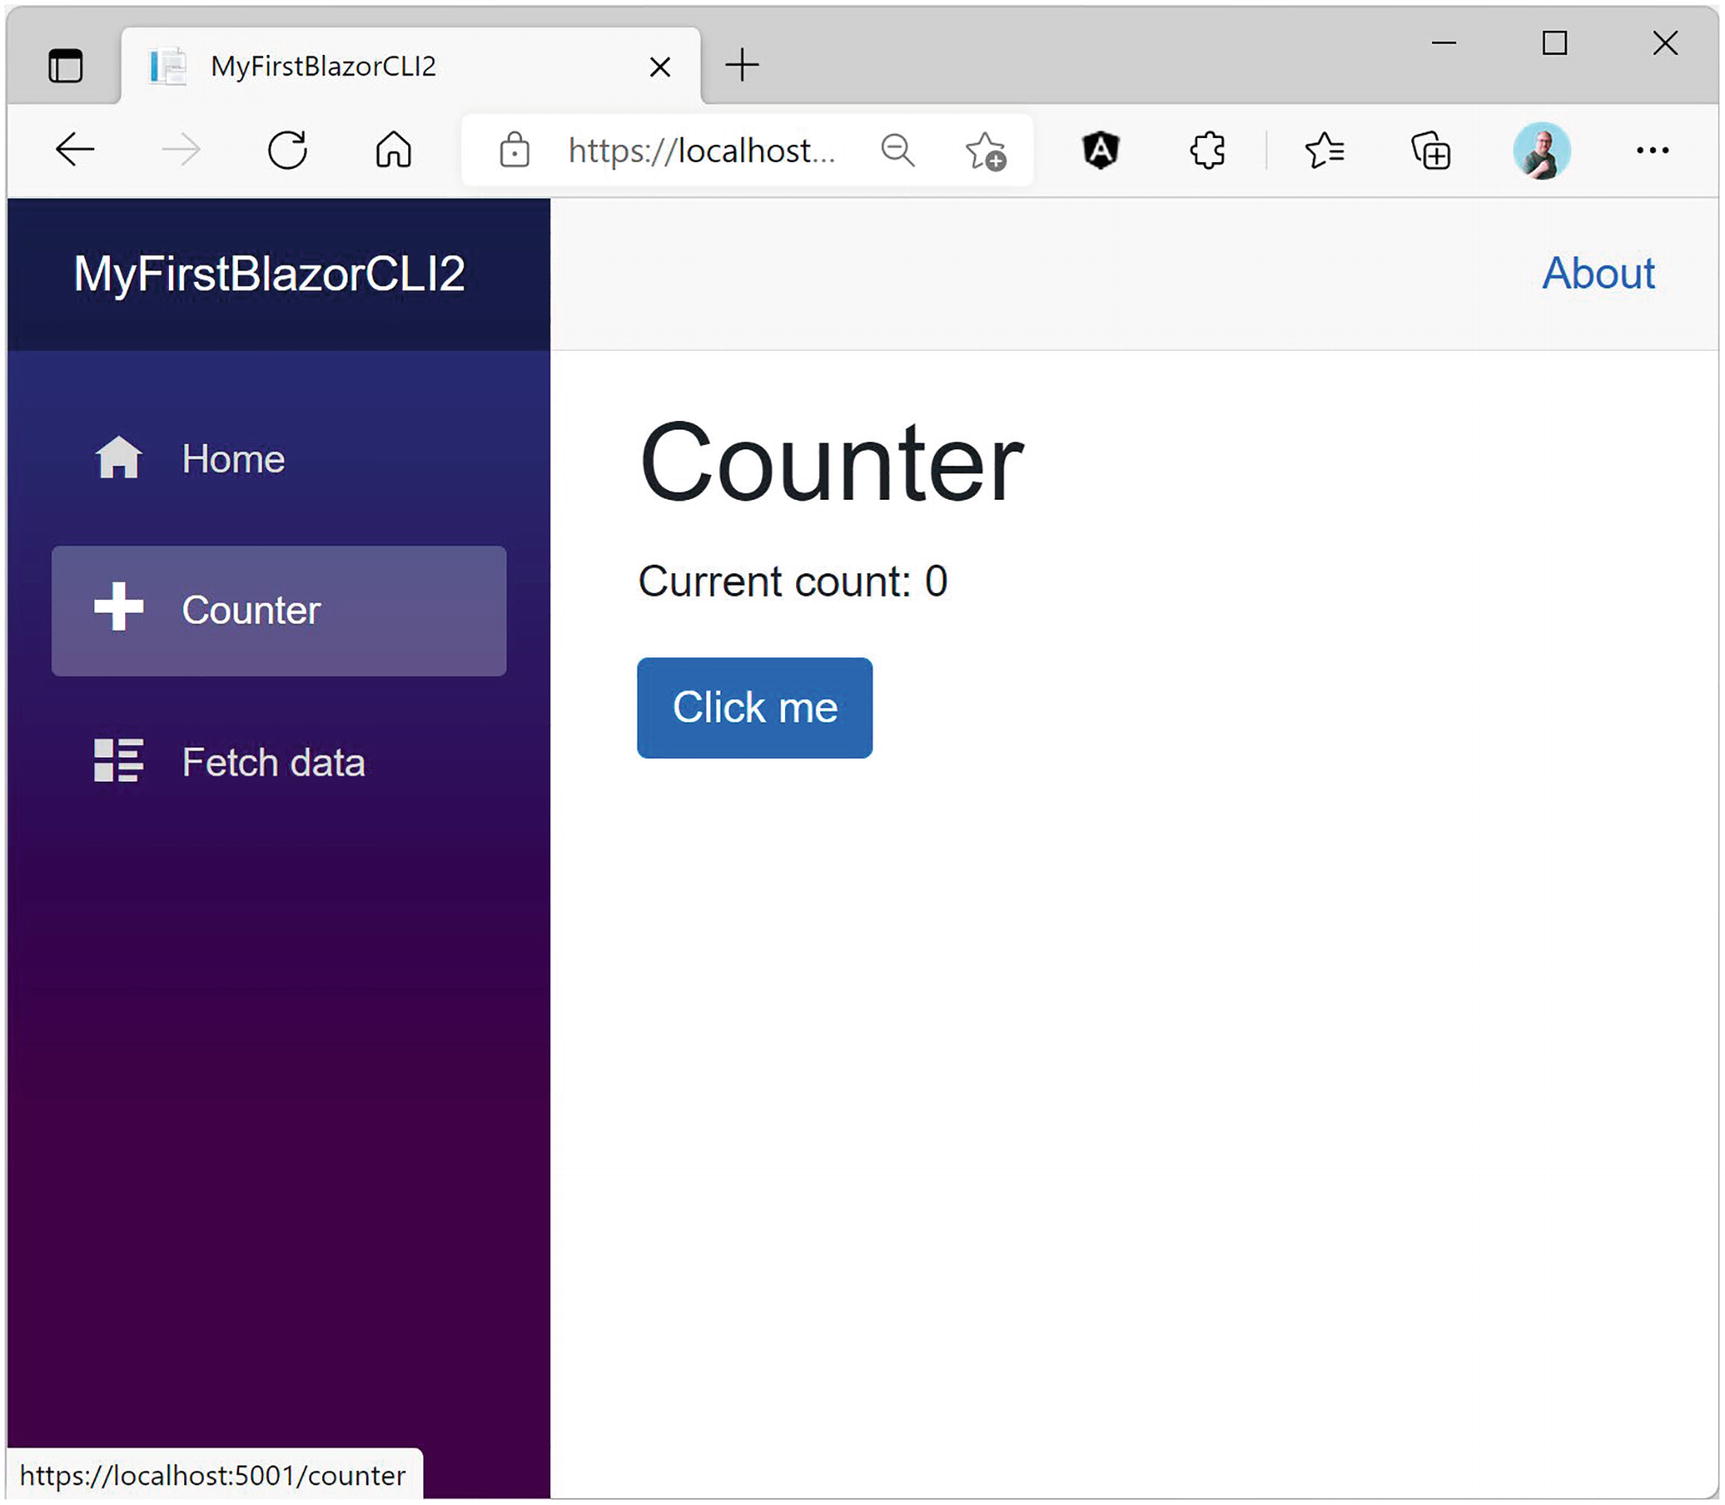
Your First Application – Counter Screen
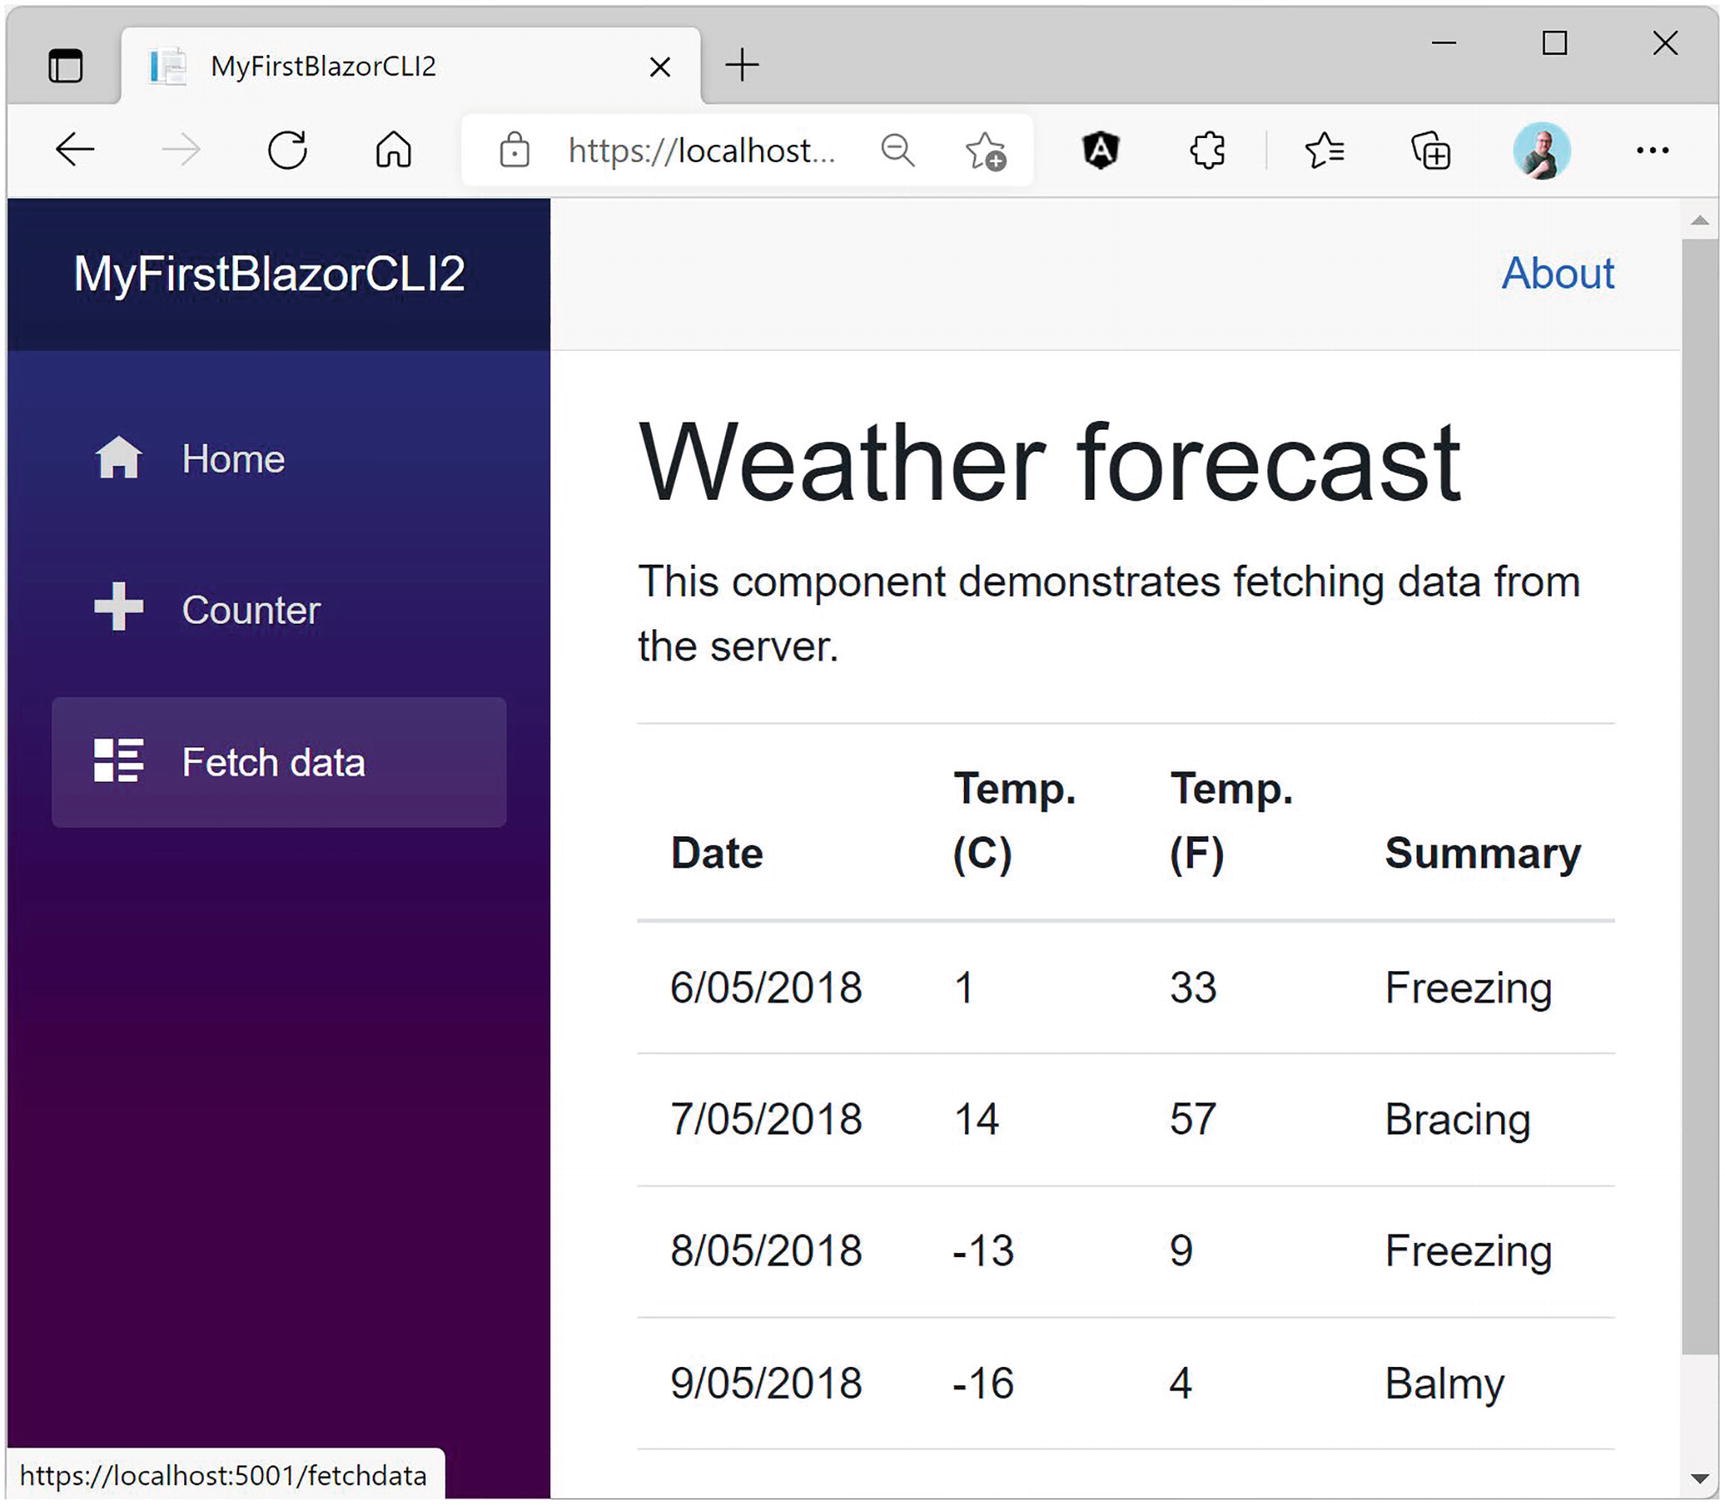
Your First Application – Fetch data Screen
Examining the Project’s Parts
Now being able to play with these pages is all nice, but let us have a look at how all this works. We will look starting with the server project which hosts our Blazor website. Then we will look at the shared project which contains classes used by both server and client. Finally, we will examine the client project which is the actual Blazor implementation.
Visual Studio, Visual Studio Code, and Visual Studio for Mac use solution files to group projects that will form an application. So, a typical Blazor WebAssembly project consists of a server, a client, and a shared project grouped into a single solution. This simplifies building everything since the solution allows tools to figure out in which order to compile everything. Hey, you could even switch between Visual Studio, VS for Mac, and VSC because they all use the same project and solution files!
The Server Project
Web applications are a bunch of files that get downloaded by the browser from a server. It is the server’s job to provide the files to the browser upon request. There is a whole range of existing servers to choose from, for example, IIS on Windows or Apache on Linux. ASP.NET Core has a built-in server known as Kestrel that you generated with the --hosted option, which you can then run on Windows, Linux, or OSX. This is the preferred option to use during development.
The Server Project’s Program Class
The UseDeveloperExceptionPage Middleware
Would you like to see a detailed error page when the server has an uncaught exception? The UseDeveloperExceptionPage method which installs some error handling middleware takes care of that. Of course, you don’t need that in production (you should handle all exceptions correctly <grin>), so this middleware is only used when running in a development environment. How does the server know if you are running in development or release? The if statement you see here checks an environment variable called ASPNETCORE_ENVIRONMENT , and if the environment variable is set to Development, it knows you are running in development mode.
The launchSettings.json File
The Blazor bootstrap process requires a bunch of special files, especially dotnet.wasm (dotnet.wasm is the .NET runtime compiled as WebAssembly). This is served by the Blazor middleware, which is installed by the UseBlazorFrameworkFiles instruction. Later in this chapter, you will see why.
Look at the end of Listing 1-2. Here is another important middleware installed. The MapFallbackToFile("index.html") will return the index.html file which takes care of loading everything your Blazor application needs.
Using a Shared Project
The FetchData component downloads weather information from the server. These kinds of requests will be handled by the MVC middleware (MapControllers). We will discuss this in more detail in Chapter 6.
The Shared WeatherForecast Class
Understanding the Client Blazor Project
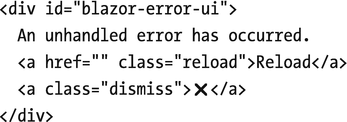
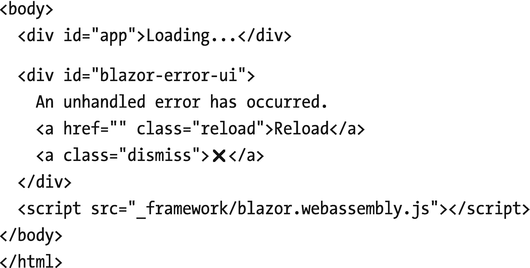
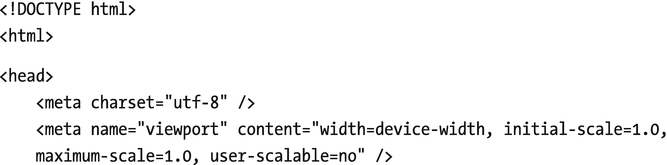
After this, there is another div; this is used to display errors in case your Blazor application has an uncaught exception.
This script will install Blazor by downloading dotnet.wasm. A little further we will look at this in more detail.
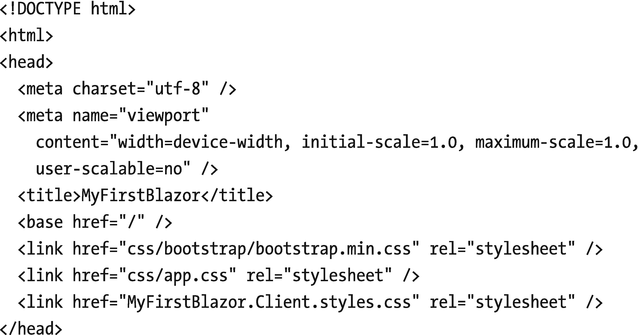
Listing 1-6. The index.html File
The Main Method
The App Component
The Index Component
Layout Components
The MainLayout Component
This component contains a div HTML element with two nested divs. The first nested div with class sidebar contains a single Blazor component: NavMenu. This is where your navigation menu gets defined. The sidebar will display a menu, allowing you to navigate between Home, Counter, and Fetch data. We will look in more detail at navigation and routing in Chapter 9.
The next nested div with class main has two parts. The first is the About link you see on every page. The second part contains the @Body; this is where the selected page will be shown. For example, when you click the Counter link in the navigation menu, the @Body will be replaced with the Counter component.
This is all for now, but the rest of the book will explain each part as we go along.
Debugging Client-Side Blazor
Of course, while building your Blazor app, you will encounter unexpected behavior from time to time. Debugging Blazor Server can be done just like any .NET project using Visual Studio or Code. But with Blazor WebAssembly, your code will be running in the browser. You will be happy to learn that the VS/VSC debugger works with Blazor, although limited. You can put breakpoints in your code, step through your code, and observe variables holding simple types like bool, int, and string. At the time of writing, debugging Blazor WebAssembly only works for Chrome or Edge, both Chromium-based browsers.
Debugging with Visual Studio
The launchSettings.json File for Debugging (Excerpt)
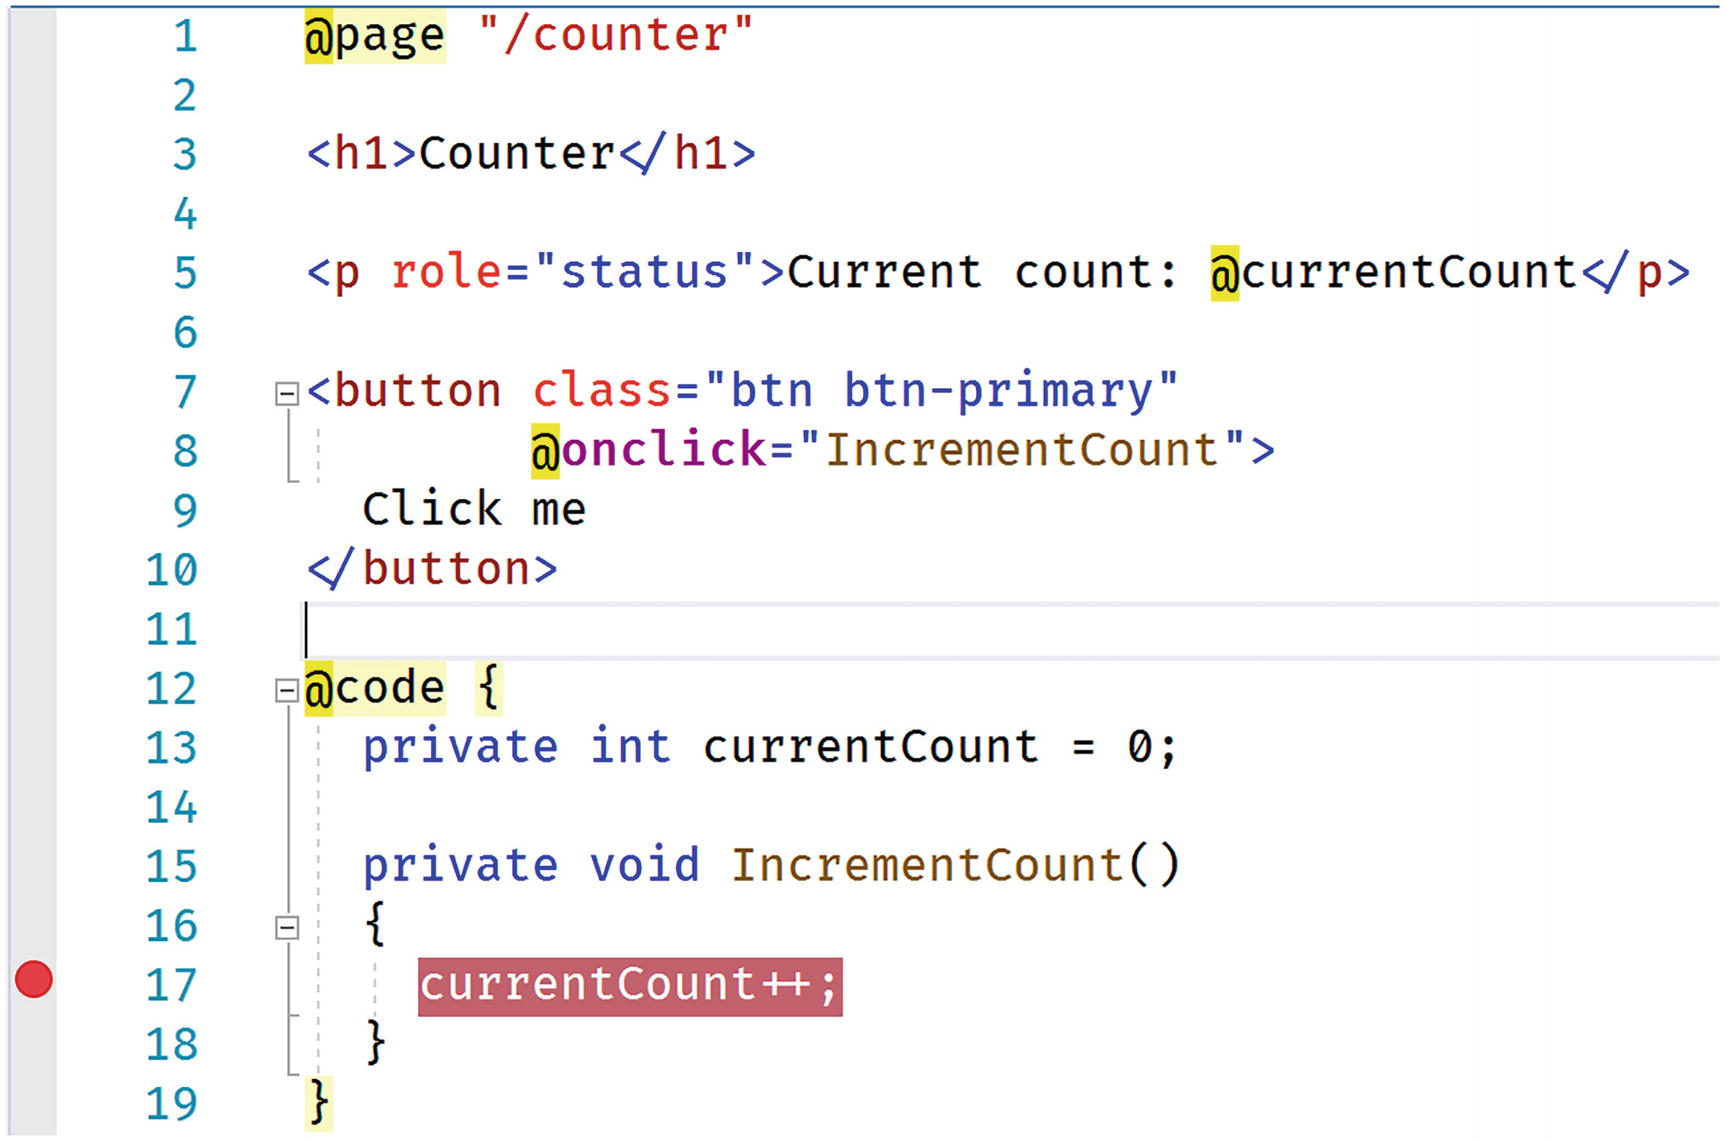
Setting a Breakpoint in the IncrementCount Method
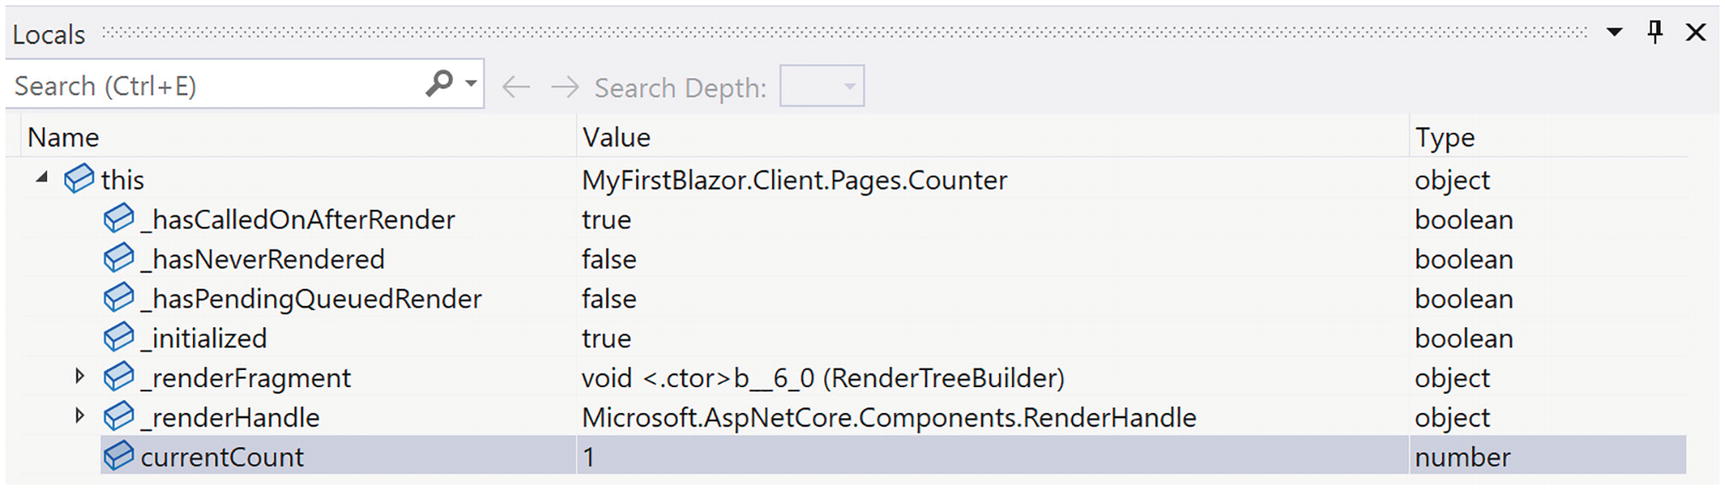
Using the Locals Debugger Window to Inspect Simple Variables
Debugging with Visual Studio Code

The Blazor WASM Debugging Extension

Enable the JavaScript Preview Debugger
Open the folder containing the solution file. If it is the first time you open this folder with VSC, be patient, after a while, Figure 1-14 will pop up. Answer Yes. Also ensure Listing 1-11 is set up correctly like Visual Studio (this is actually independent of your IDE).

Adding a Breakpoint in VSC
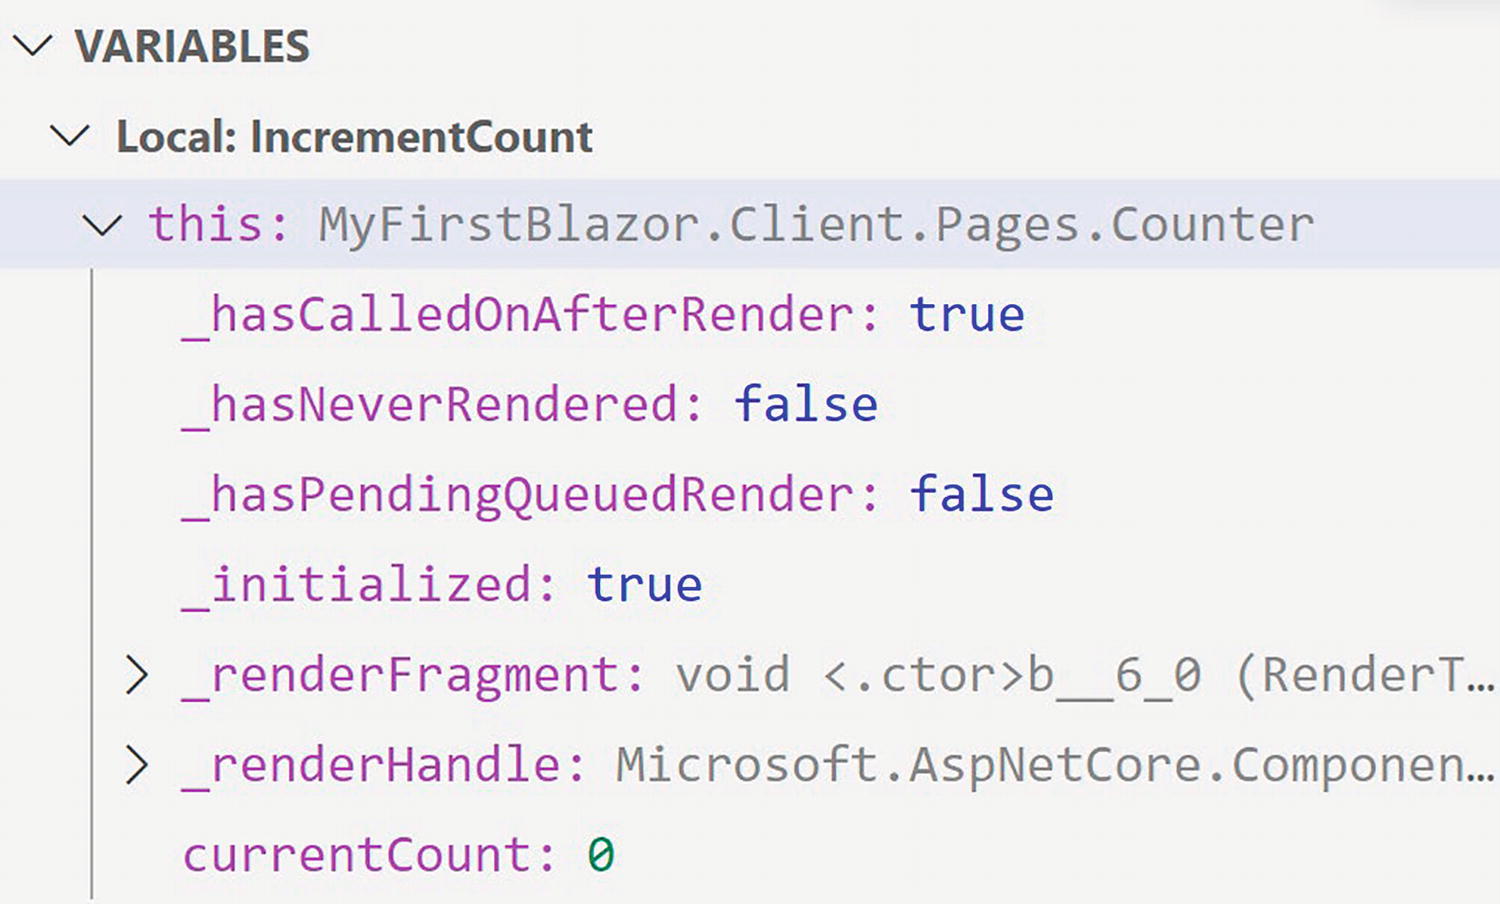
Inspecting Variables in VSC
Developing with Hot Reload
With .NET Core 6.0, Microsoft introduces a really nice feature called hot reload . This allows you to make changes to your code and markup while your application is running. As soon as you make the change, your application will update (hot reloads), even keeping the existing state of the application.
Hot Reload with .NET CLI
A Simple Change
As soon as you make the change, the browser will update itself, keeping the current count!
Another Simple Change
Save. Clicking the Increment button will not add 3 to the counter.
If you want to restart again, go back to the command line and press Ctrl-Shift-R.
Hot Reload with Visual Studio
At the time of writing this chapter, hot reload does not work yet for Blazor WebAssembly application with Visual Studio. But, by the time you are reading this, it should work.
The Blazor WASM Bootstrap Process
At the bottom of Listing 1-14, you will find the <script> element responsible for bootstrapping Blazor in the browser. Let’s look at this process in detail.
Listing 1-14. The index.html File
Run the Blazor application. Open the browser’s developer tools (most browsers will open the developer tools when you press F12). We will have a look at what happens at the network layer.
In all screenshots, I will be using the Edge browser which is very similar to Chrome. If you prefer to use another browser, go right ahead since all modern desktop browsers have debugging support.
Clearing the Browser’s Storage
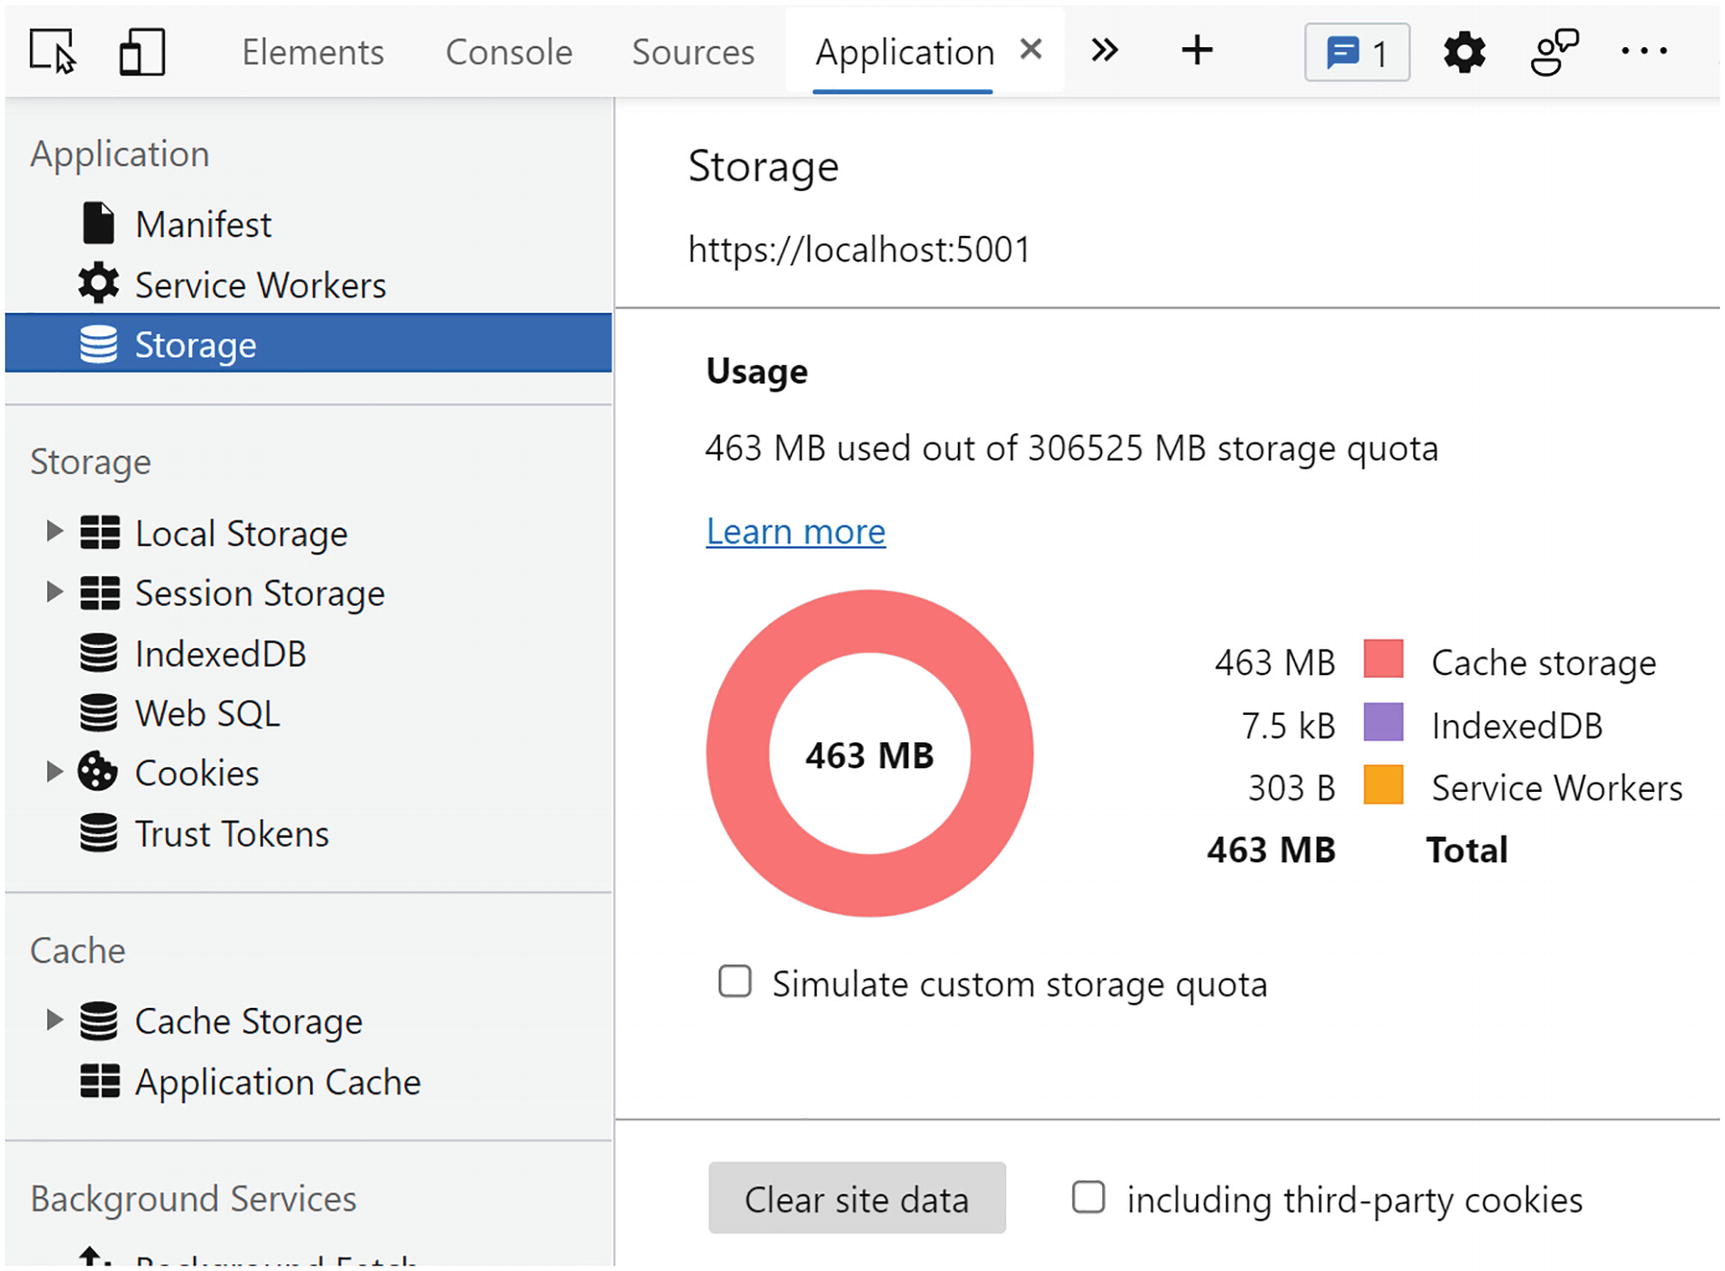
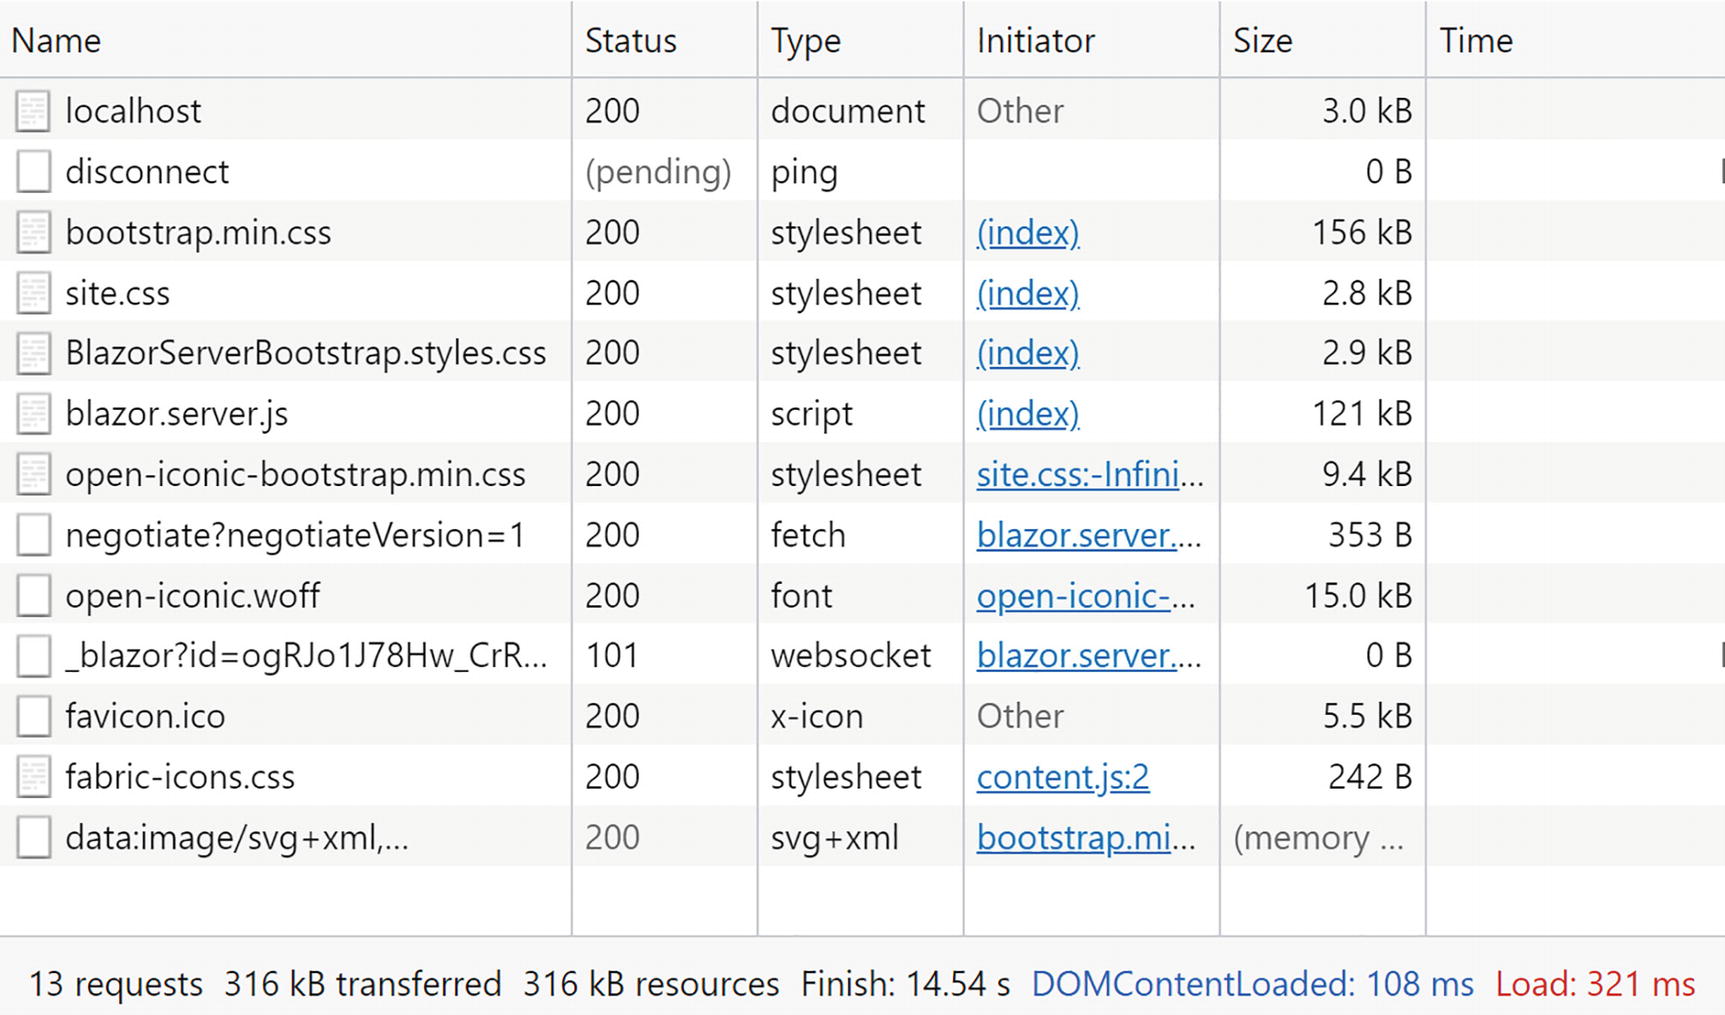
Examining the Bootstrap Process Using the Network Log
Now that the .NET runtime is running, you will see (scroll down?) that MyFirstBlazor.Client.dll gets downloaded, followed by all its dependencies, including mscorlib.dll and system.dll. These files contain the .NET libraries containing classes such as string used to execute all kinds of things, and they are the same libraries you use on the server. This is very powerful because you can reuse existing .NET libraries in Blazor you or others built before!

Total Download Size with Empty Cache

Total Download Size with Filled Cache
Let us now compare this with Blazor Server.
The Blazor Server Bootstrap Process
Let’s look at the bootstrapping process of a Blazor Server project.
Looking at Server-Side Blazor Network Activity

The SignalR Messages
Nullable Reference Types
Throughout this book, I will be using modern C# with some of the latest features. But there is one C# feature I want to discuss right now. Every developer, from time to time, will encounter a NullReferenceException, which is a real bug because you can always avoid it. What if the compiler can help you with this and warn you about a possible NullReferenceException? This is what the section “Nullable Reference Types” is all about.
An Apology
Who invented the null pointer? Tony Hoare did, and he apologized in 2009 and denoted this as his billion-dollar mistake (www.infoq.com/presentations/Null-References-The-Billion-Dollar-Mistake-Tony-Hoare/):
I call it my billion-dollar mistake. It was the invention of the null reference in 1965. At that time, I was designing the first comprehensive type system for references in an object oriented language (ALGOL W). My goal was to ensure that all use of references should be absolutely safe, with checking performed automatically by the compiler. But I couldn't resist the temptation to put in a null reference, simply because it was so easy to implement. This has led to innumerable errors, vulnerabilities, and system crashes, which have probably caused a billion dollars of pain and damage in the last forty years.
Many object-oriented programming languages still use the null pointer , and C# is no exception. Some languages even treated null differently. For example, in Objective-C, when a pointer is null, the compiler would not invoke a method on it. And it would do this silently! Of course, you would not get a NullReferenceException, but it did skip an important piece of functionality.
Using Null in C#
A Nullable Value Type
Nullable Reference Types
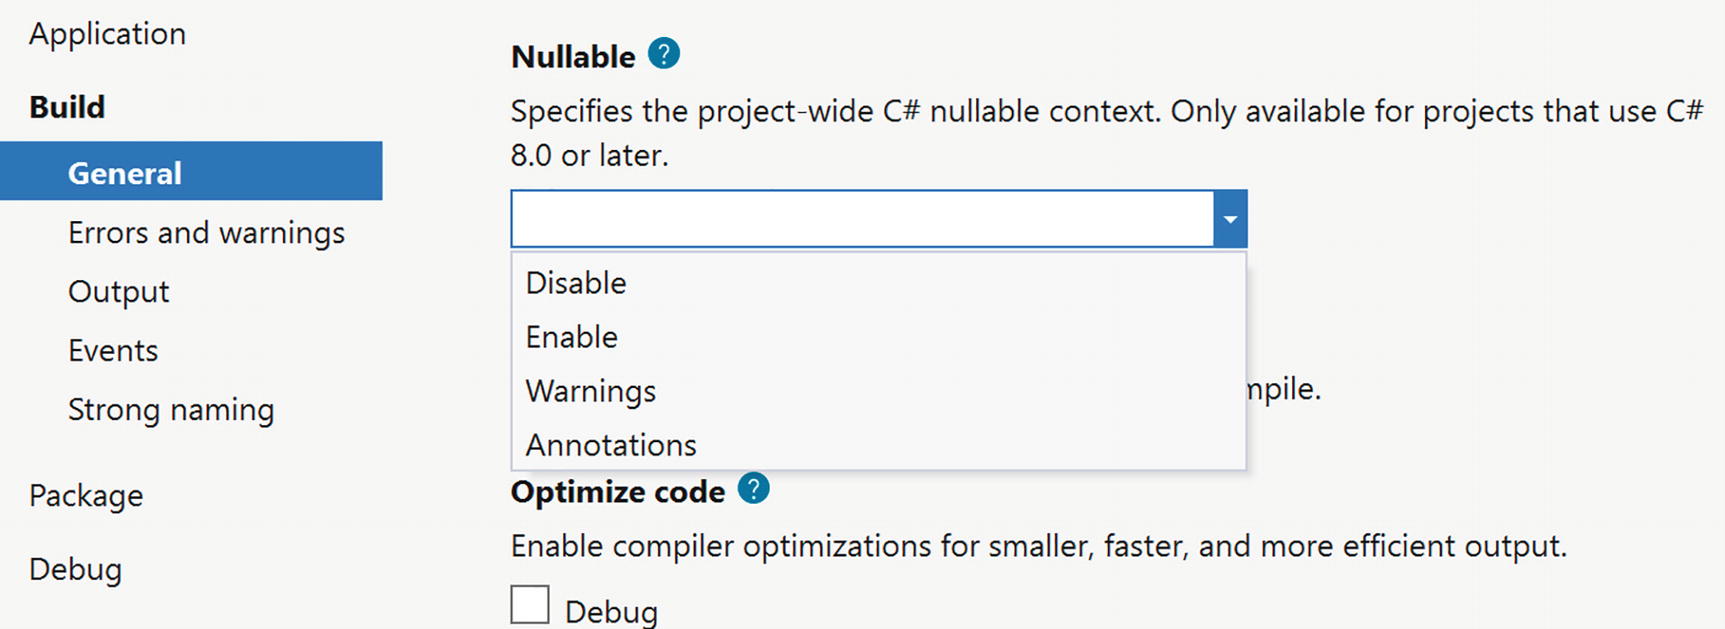
Setting the Nullable Compiler Option
Enabling Nullable Reference Types in the Project File

Inspecting the Nullable Flag
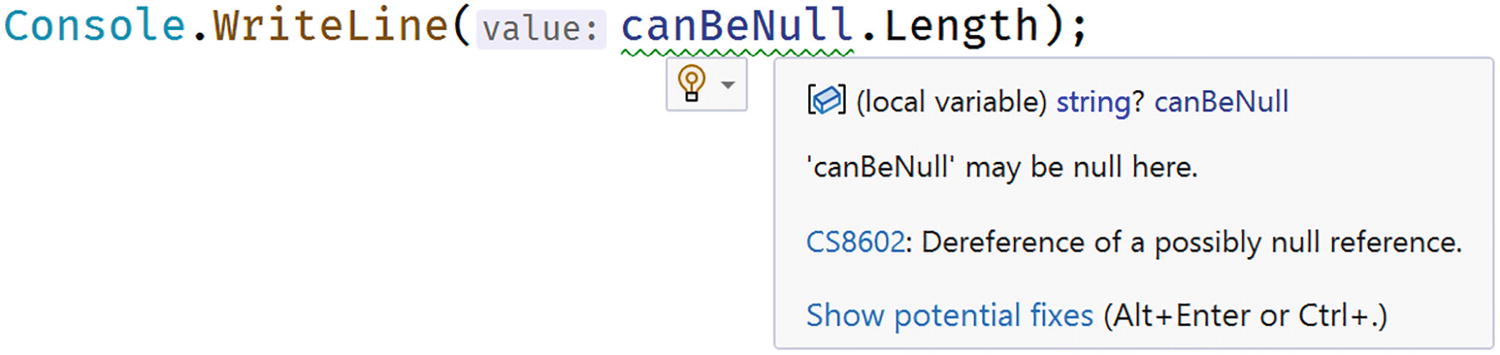
Possible Null Reference

No Possible Null Reference
So the whole idea of nullable reference types is to make the compiler do the analysis and to issue a warning when we can have a possible null being used which would result in a NullReferenceException.
Using References
A Person Class
Using a Constructor
Person with Nullable Name
However, this does not mimic real life. There is another technique we can use.
The Null-Forgiving Operator

The Null-Forgiving Operator
Using the Null-Forgiving Operator with Types
This is exactly the technique we will use to create Blazor components that have reference properties that we cannot initialize using a constructor.
The Person Class with Empty Name.
Nullable Reference Types and .NET Libraries
Microsoft has gone through a lot of effort to make all their libraries support nullable reference types. I want you to realize that this is all compiler meta-data, so you can use the new libraries supporting nullable reference types with older projects; the compiler will simply ignore this meta-data. You can also use libraries that do not support this meta-data, but you will need to use the null-forgiving operator with a lot of methods. But do yourself a favor – get to use nullable reference types and your code will be shipped with a lot less bugs! You can learn more at https://docs.microsoft.com/en-us/dotnet/csharp/nullable-references.
Summary
In this chapter, we looked at the history of the browser wars and how this resulted in the creation of WebAssembly. The .NET runtime allows you to run .NET assemblies, and because it can now also run on WebAssembly, we can now run .NET assemblies in the browser! All of this resulted in the creation of Blazor, where you build razor files containing .NET code which update the browser’s DOM, giving us the ability to build Single-Page Applications in .NET, instead of JavaScript.
First, we installed the prerequisites needed for developing and running Blazor applications. We then created our first Blazor project. This project will be used throughout this book to explain all the Blazor concepts you need to know about. We examined this solution, looking at the server-side project, the shared project, and the Blazor project, and compared the bootstrap process for both Blazor WebAssembly and Blazor Server.
Finally, we looked at using nullable reference types and how this can help writing better code with less bugs.