In previous chapters, we have been building a PizzaPlace application, which contains a number of components. We have tested these components by running the application and interacting with it. Here, we will look at writing unit tests for Blazor components using bUnit and MOQ.
Where Can We Find Bugs?
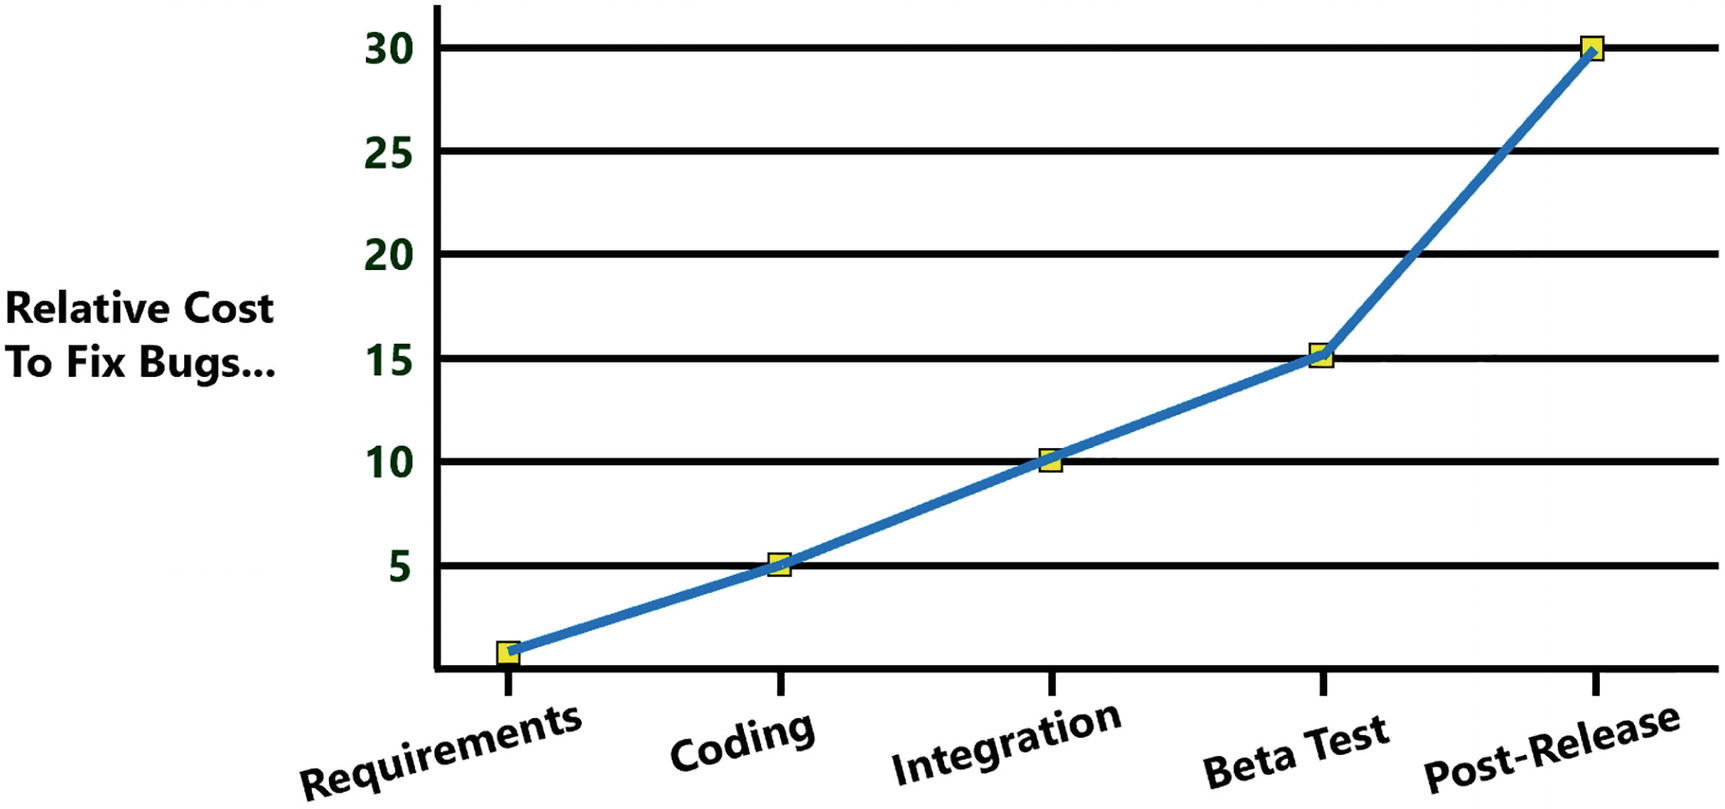
The Cost of Fixing Bugs
Requirements
Sometimes bugs are introduced even before a single line of code is written. Writing good requirements is hard, because these need to explain business concepts to developers who are typically not well versed in this domain. The same thing counts for advanced engineering concepts, like rocket building. Let’s look at an example. NASA lost its $125,000,000 Mars Climate Orbiter because of a simple missing piece of information in the requirements: which units to use. One team was using metric units (meters, kilogram), while another team was using imperial units (inch, pounds), and there was no conversion in place because each team thought the other team was using the same units! You can read more about it here: www.latimes.com/archives/la-xpm-1999-oct-01-mn-17288-story.html.
This bug could easily be averted! Since the specifications never mentioned the units, if someone had asked which units to use and add this to the specifications, this Mars Climate Orbiter would probably be spinning around Mars right now! So as a developer, if you think something is confusing or ambiguous, ask! Never assume anything!
Coding
It is easy to introduce bugs during coding. That is part of developing software. Code that was working very well can become buggy by a benign change. So how can we discover these bugs? We should automate our testing. By writing a piece of code (a unit test) that checks if another piece of code is behaving as expected, we can run this test every day and discover the bug hours after it was written. Have you ever received a bug report about some functionality you wrote three months ago? You will probably rub your head wondering what you were trying to do (and you write this code!). After studying your code for a while, understanding kicks in and you fix the bug (let us say a simple one-off bug). Now imagine the bug is discovered an hour after you made the change. Do you need to figure out what your code was doing? No, it is still fresh in your memory. That makes unit testing so efficient. And when you finish your code and all your unit tests are green (meaning check out OK), you can go home and sleep soundly!
Same thing counts for refactoring code. I mean, cleaning up some code and keeping the same functionality. How do you know if you introduced bugs while refactoring when there are no unit tests? If there are unit tests and they all pass before refactoring, it is easy to see after refactoring if you broke something. Just run the unit tests, and if they all pass, you did not break anything that was known to be working! Again, you can go home and sleep knowing you made your code more maintainable and did not introduce any new bugs!
Integration
Your code works on your machine. And your colleague’s code also works on their machine. But will your code work together with your colleague’s code? That is what integration is all about. A long time ago, teams would integrate code from different teams at the end of the project. Guess what!? This never went well, resulting in project overruns, sometimes by months. So development teams started to integrate at the end of each month and then at the end of the week. Integrations started to become automated using build systems. Now we can do continuous integration where we integrate changes to the code after each commit in source code. And when we have unit tests, we can run these after the compilation ends and use that to catch breaking changes. Again, this should illustrate the role of good unit tests. You use them to see if your code is working and also to see if everyone’s code keeps on working.
Beta Testing
At a certain point in time, you should expose end users to your application. Why? Because developers are not normal people. End users want things to be as simple as possible. For example, look at google.com. This site only has one text box where you type your question and a button to do the search. This simplicity made Google the most used search engine (sorry Microsoft). Developers are control freaks; they want power, not simplicity! Just open the options screen in Visual Studio. You can tweak just about anything! And most end users are not as proficient using computers as developers, sometimes resulting in surprises. Let me tell you about a personal experience I once had. We had built software that runs in a factory, and on a Sunday (they work in that factory continuously), I get a call from an end user. He told me “The button does not work!”. After half an hour on the phone, I decided to drive over there and see for myself. I get there and I click the button, and it works! So what was the problem? The button was small because we needed to cram a lot on the screen, and the end user has a bit of a tremor and moved the mouse when clicking, resulting in a click outside of the button. So we fixed the bug by making the button bigger. This is a nice example of a usability problem, where we as developers are not always aware of. So expose your software to your users often, and gain their feedback. We are building it for our end users, right?
Post-release
Perfect software does not exist. Have you ever writing an application that is bug-free? No? I have! It is called “Hello World!”. Anything beyond that is impossible. But having an end user discover a bug is bad news. It will lower the trust in the development team and in the quality of the software. So how do we stop bugs from making it into production? You can’t! The only thing you can do is to test as much as possible and warn the users that they may encounter bugs, especially early after release.
Why Should We Use Unit Tests?
So how do you test your Blazor application? Hit run and interact with the UI? No problem there, except every time you make a change to your application, you should test everything again. Who has time for that? Can’t someone else do it? Yes, that machine in front of you can! With unit testing, we automate this unit testing process.
What Makes a Good Unit Test?
When you practice unit testing, your development life cycle looks like this: make some change to the code, build, fix compiler errors, build again, and then run all your tests. Then fix the bugs discovered by your tests. And then you start again. How long does building your application take? A couple of seconds? Now imagine that your unit tests take 5 minutes. Would you want to wait for that? Would you be tempted to disable running the unit tests? A good unit test should be fast so we don’t have to wait very long. What makes unit tests slow? Typically, this is caused by accessing slow resources, like databases, disks, and the network. So with a unit test, we will avoid using slow resources. What if your unit tests need some setup? Every time you need to run the tests, you would have to prepare some things manually. Again, we don’t have time for that. A good unit test should also be automatic and repeatable , meaning that the test should report on success or failure and that again we avoid things that need some manual setup. What could that be? Again databases, files on disk, and the network! Another aspect of a good unit test is consistency . If your unit test fails, this should be because of a bug in your code, not because someone tripped over a network cable making the database or network inaccessible! So again, we should avoid things like databases, file shares, and networks.
Tests which do not have all the aspects from earlier do exist. You will have to write a test to interact with the database (but don’t start testing the framework used to access the database; that is the framework’s author’s job!). Their tests are known as integration tests , because we will run them during the build, not during the development life cycle.
Unit Testing Blazor Components
Let us create a couple of tests for a Blazor application. In the code download for this chapter, you can find the testing solution. Open it with your favorite editor. Everything in the project should look familiar. There is the Counter component and the FetchData component which uses an IWeatherService to retrieve the weather forecasts from a server.
Adding a Unit Test Project
Let us look at an example using xUnit , which is a popular testing library for .NET which we will also use for testing our Blazor components.
When you are using Visual Studio, right-click the test folder and select Add new project. In the Add New Project dialog, search for the xUnit Test Project template. Now click Next. Set the Location to the test folder and name it Testing.ComponentTests.
The Testing.ComponentTests Project
Adding bUnit to the Test Project
With the current unit test project, we can test our services and other non-Blazor classes. In order to test Blazor components, we need to add bUnit . So use your favorite method to add the bUnit package (choose latest stable version).
bUnit Projects
Write Your First Unit Test
Now that we have everything in place, we can write our first unit test. We will start by writing a simple unit test and see how this works with Visual Studio and Code.
Writing Good Unit Test Methods
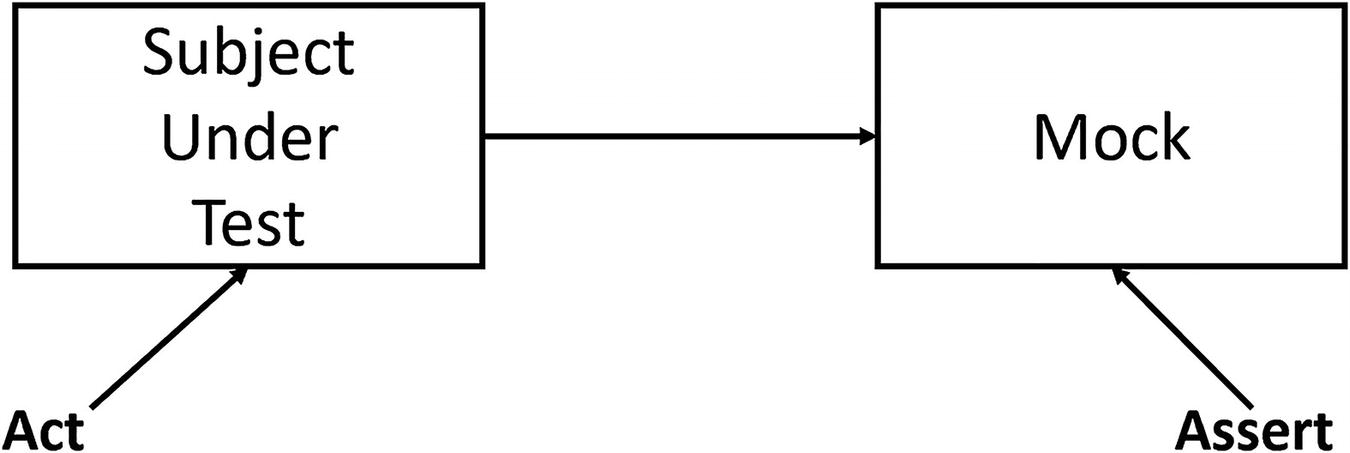
Every unit test will consist of three phases: Arrange, Act, and Assert, also known as the triple A of unit testing . The Arrange phase will set up the unit test by creating the subject under test (SUT), by which I mean the class we want to test and its dependencies. The Act phase will perform the call on the method we want to test, and the Assert will verify if the outcome is successful.
A Simple Utils Class
Testing the Square Method
Running Your Tests

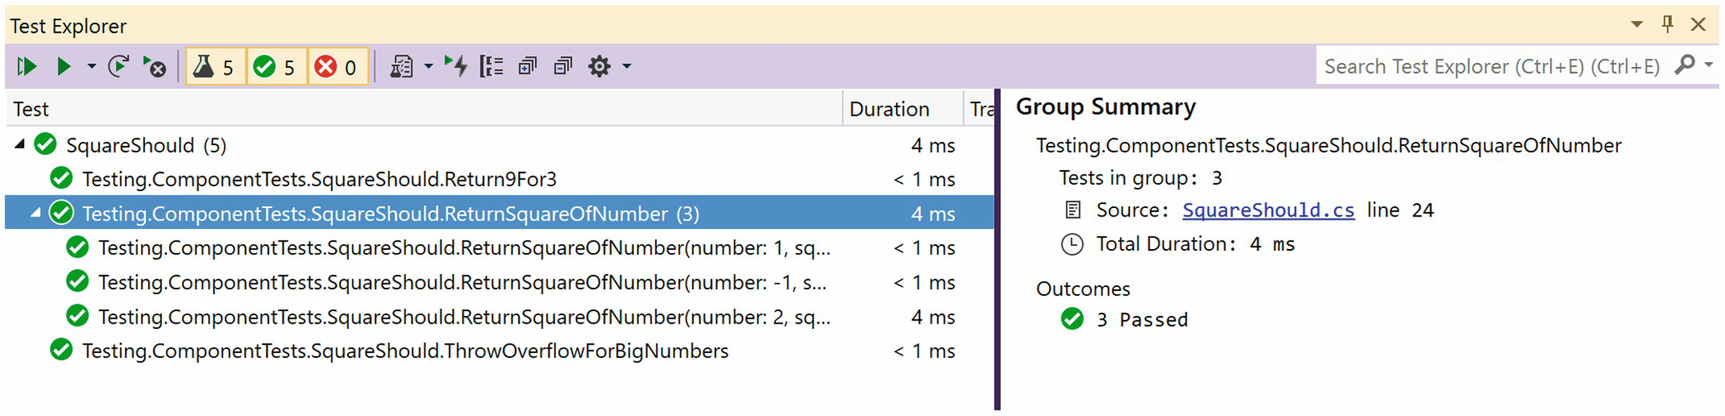
The Test Explorer

The .NET Core Test Explorer Extension

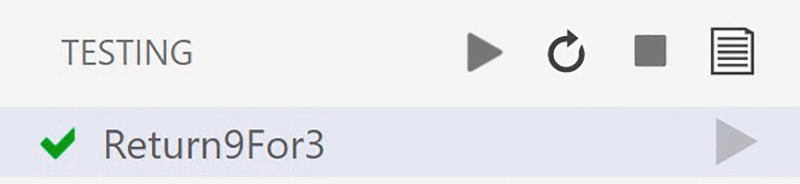
Test Explorer in VSC

The VSC Test Explorer Controls
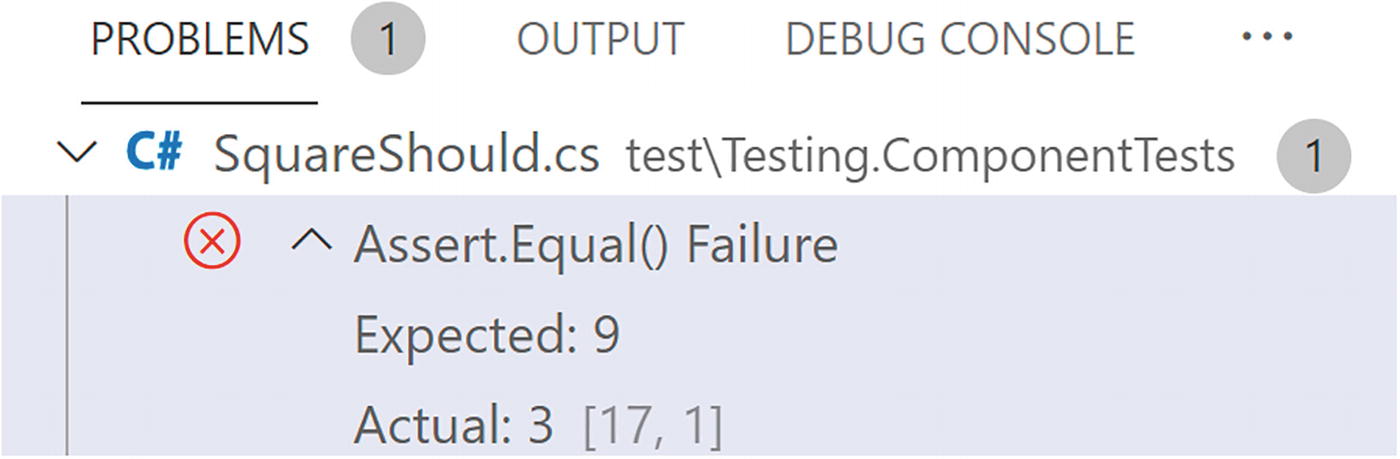
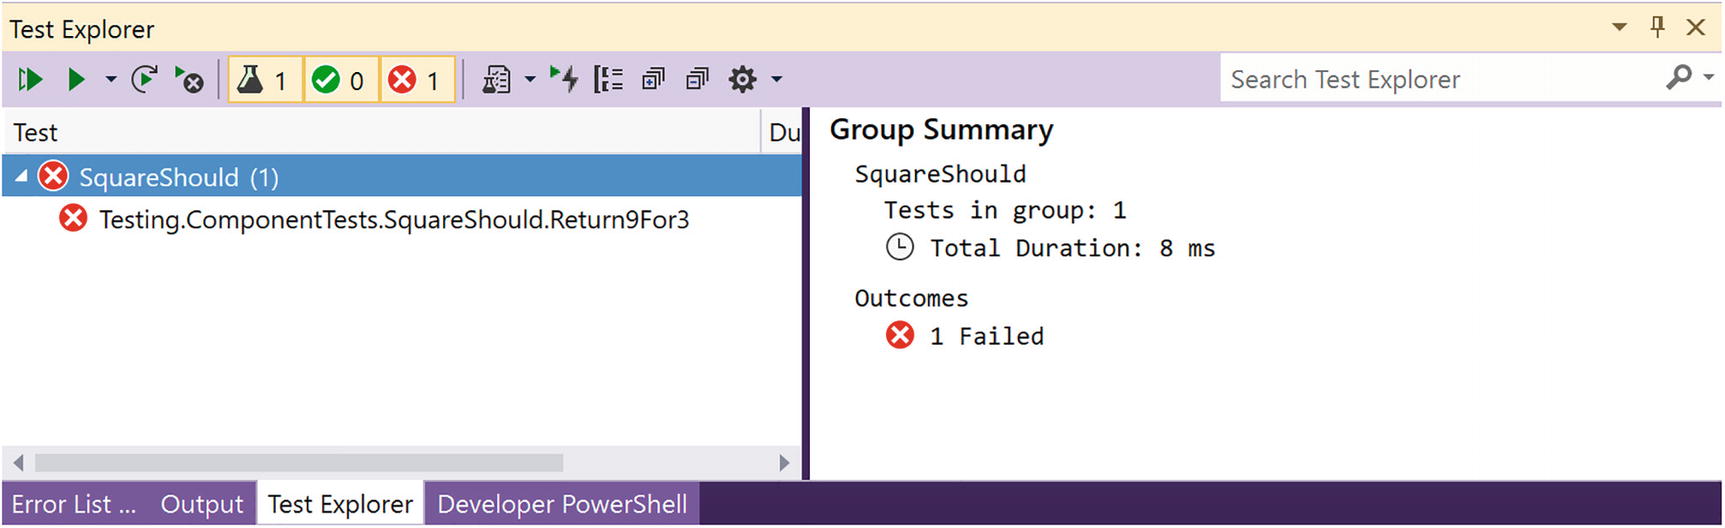
Reviewing Failed Tests
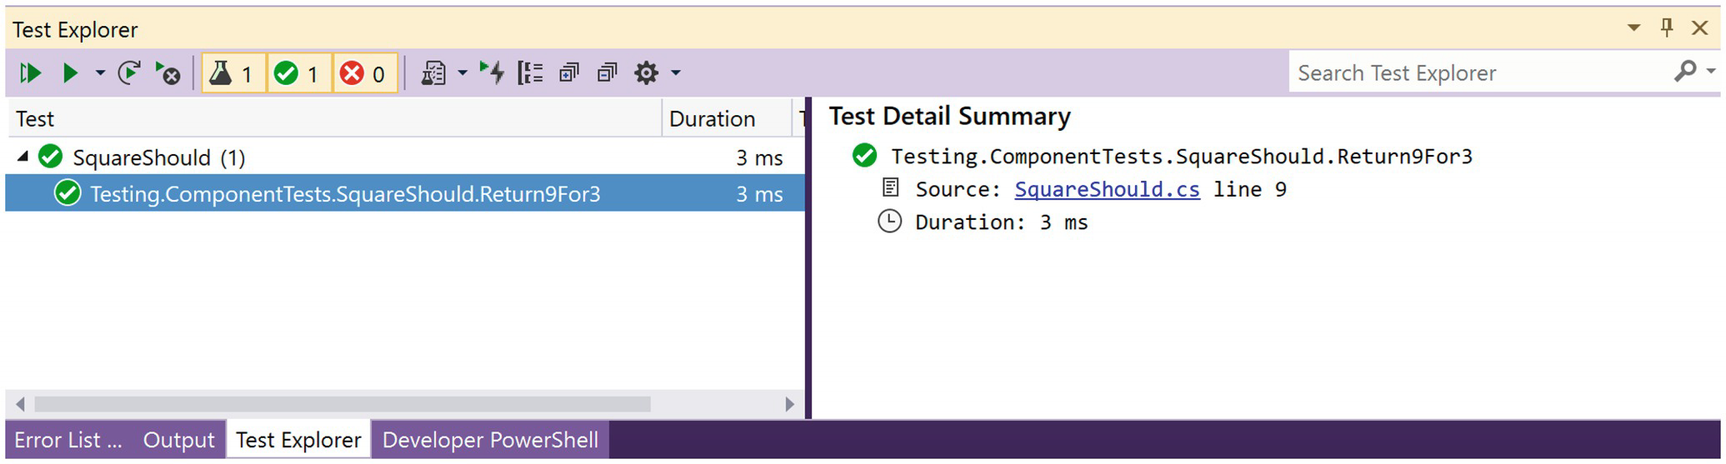
Making Your Test Pass
The Corrected Square Method
Using Facts and Theories
Using Theories
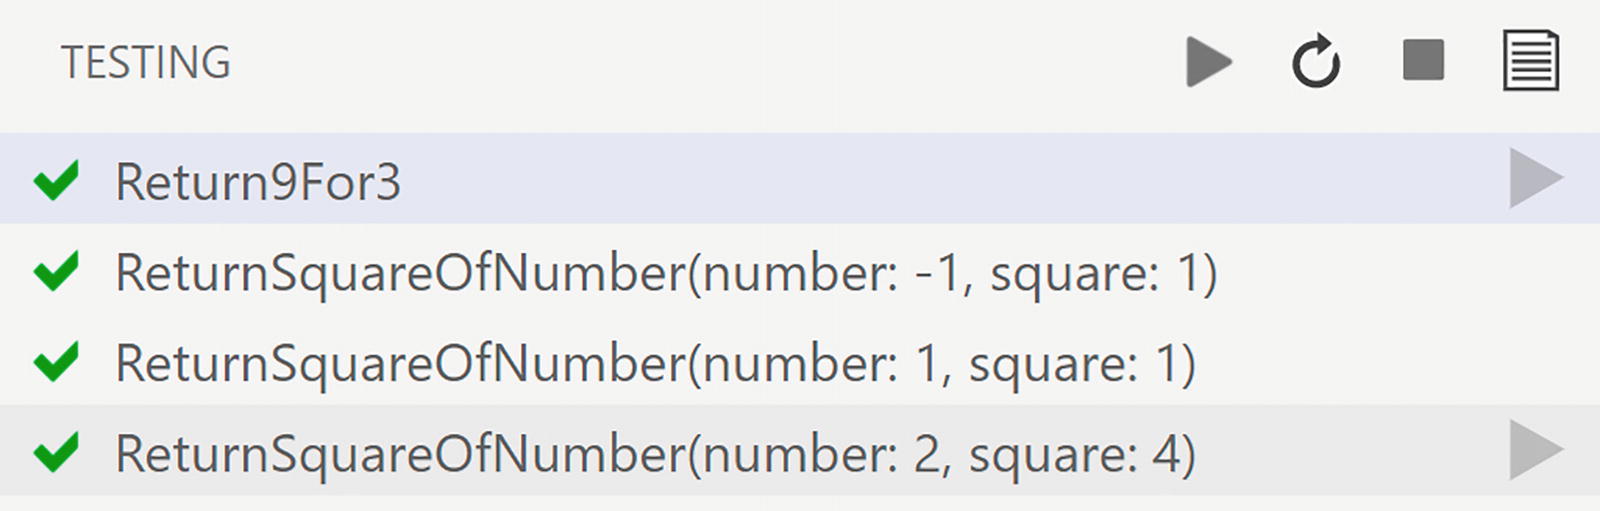
Checking Your Sanity
Testing Exceptional Cases
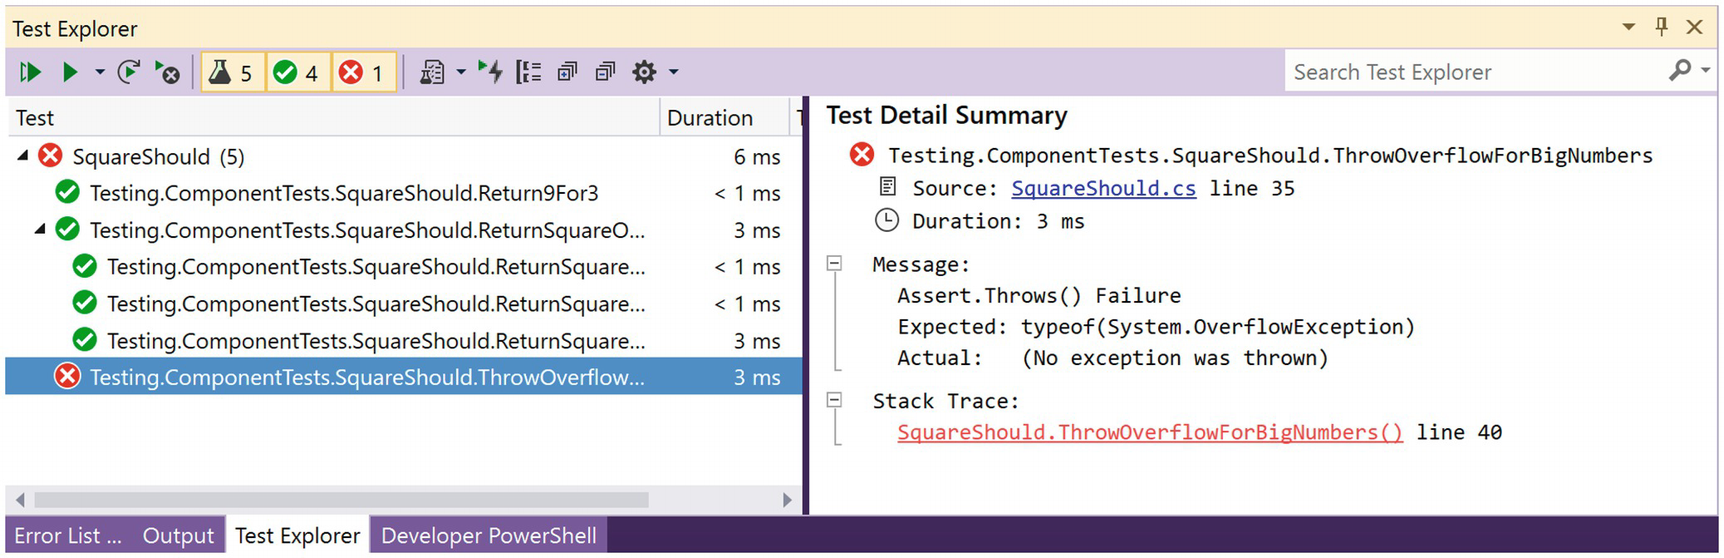
Sanity Check Please?
Enabling Overflow Checking
Run your test again. Now it passes. Whew! This was actually normal behavior.
Unit testing is great to discover these weird behaviors and allows you to catch modifications that cause bugs later.
Write a bUnit Tests with C#
We have seen how we can write unit tests for .NET classes and their methods. Here, we will look at how we can write tests for Blazor components on top of xUnit.
All tests written here use xUnit, but you can also use NUnit or MSTest. All of these are test frameworks that apply the same principles. You can even mix these frameworks so you don’t have to rewrite old tests when moving to another test framework.
Understanding bUnit?
bUnit is a testing library for Blazor components, written by Egil Hansen, and the sources can be found in GitHub at https://github.com/bUnit-dev/bUnit. With bUnit, you can easily write unit tests for Blazor components. Why should we write unit tests for Blazor components? Same reason you write unit tests for regular classes: to ensure they work as expected and that they keep on working in case some dependency gets updated. Of course, most of your testing should be on the service classes that implement business logic. For example, you want to make sure your Blazor component calls a certain method on a service when the user interacts with that component. With bUnit, we can automate that so no user has to actually click a button! And we can run these tests continuously so we will know when we break a component minutes after the change.
Part of testing a Blazor component is to render and examine the output of a component. But it goes way beyond this. You can interact with the component and see the changes, replace dependencies, etc.
The Counter Component
The CounterShould Class
Here, we are using xUnit together with bUnit, so our unit test has the [Fact] attribute. First, we do the Arrange phase, where we create the component under test (which I name cut, similar to sut) by calling the RenderComponent<Counter> method. This will create the component and render it in one go. So this also takes care of the Act phase. Next, we do the Assert phase, where we want to see if the component generated the right kind of output.
Our Test Fails
Improving Our Unit Test with Semantic Comparison
Using the Find Method
Run your tests and see if they pass, which they should.
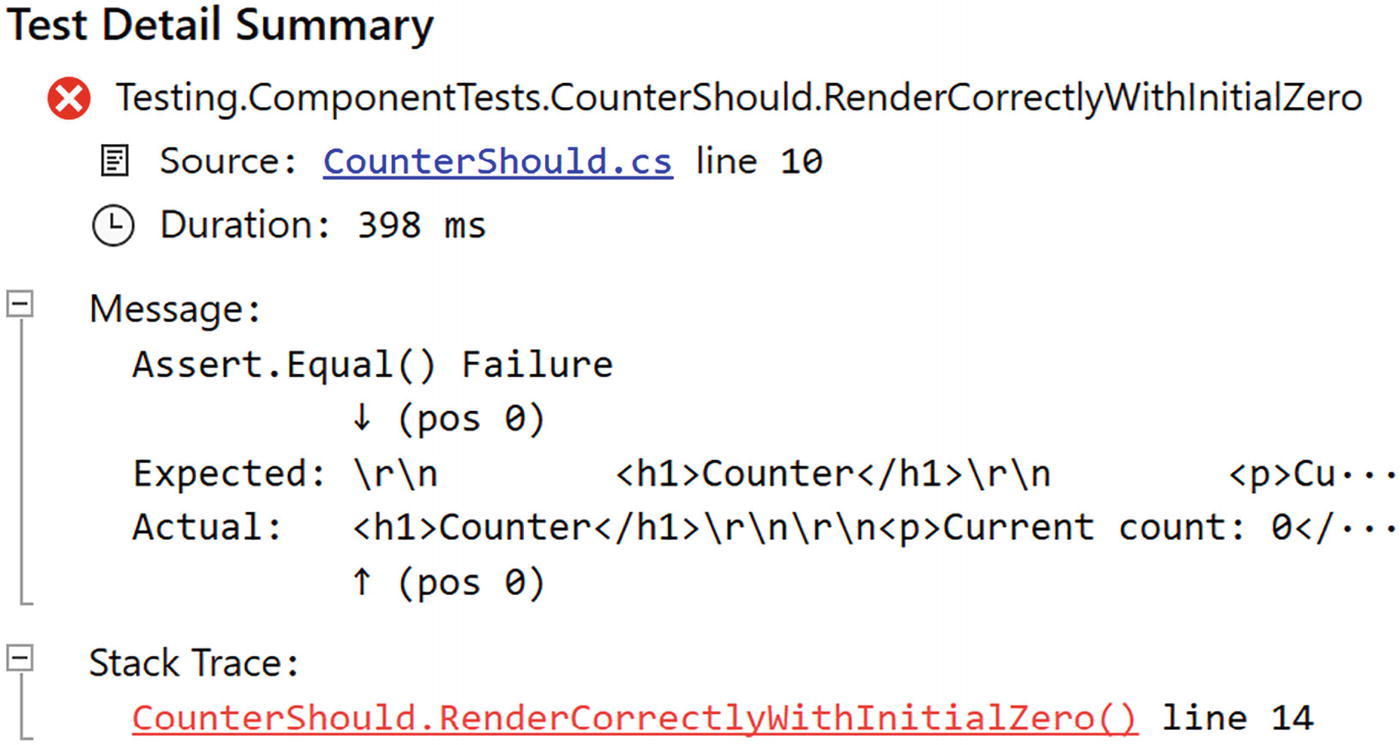
What happens when the test fails?
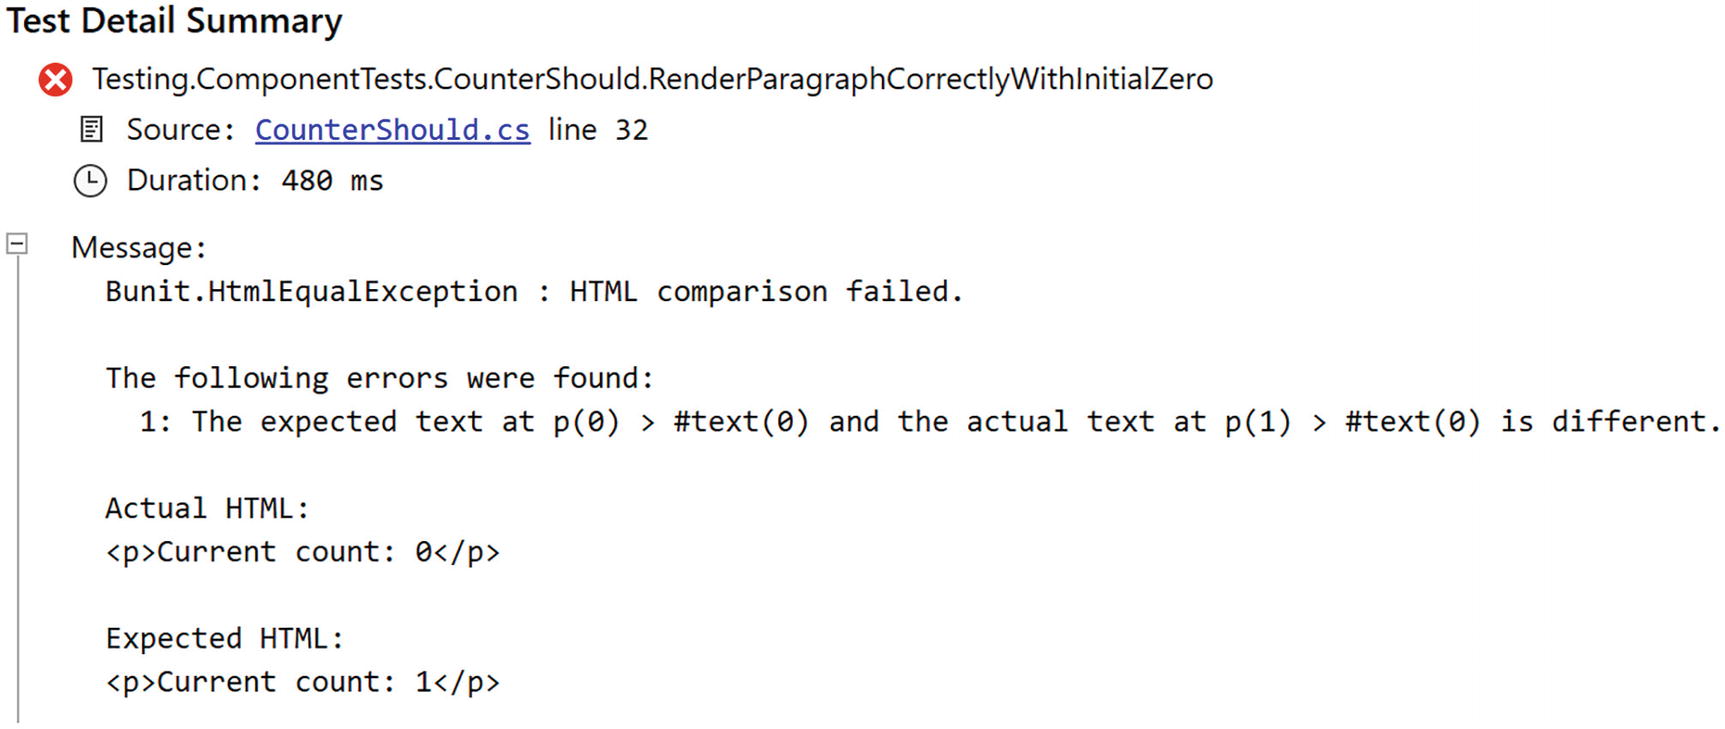
Our bUnit Test Fails
Testing Component Interaction
Interacting with the Counter Component
The bUnit library comes with many dispatch methods that make it possible to trigger events on your component. Retrieve the element in the component using the Find method, and then call the appropriate dispatch method on it, for example, Click. These dispatch methods also allow you to pass event arguments. So let us look at an example.
The MouseTracker Component’s Markup
The MouseTracker Component’s Code
In the unit test project, add a new class called MouseTrackerShould with a single unit test as in Listing 8-16. During the Arrange phase of the bUnit test, we create an instance of MouseEventArgs with ClientX and ClientY set to some value. We then create an instance of the MouseTracker component using the TestContext’s RenderComponent method. Now we Find the div from the component and store it in the theDiv reference.
The MouseTrackerShould Unit Test
Run the test; it should pass.
Passing Parameters to Our Component
The TwoWayCounter Component
The TwoWayCounterShould Test Class
This way of passing parameters to a component is very convenient, since we can use IntelliSense to choose the parameter’s name. There are other ways to pass the parameters, as shown in Listing 8-19. Here, we use xUnit’s Theory to pass different parameters to the component, and each parameter is passed as a ValueTuple, containing the name and value of each parameter (that is why these are wrapped in an opening and closing parenthesis).
Using a Theory to Test Different Cases
Using nameof to Pass Property Names
Testing Two-Way Data Binding and Events
Our TwoWayCounter has parameters to implement two-way data binding. Let us see if this component implements this correctly. We can use the same technique as before to pass handlers to the CurrentCountChanged and IncrementChanged parameters. But before we do this, add the FluentAssertions package to your test project. FluentAssertions allows you to write your assert statements in a more readable and concise way, and we will use it here (although this is not required). You can find out more about fluent assertions at https://fluentassertions.com.
Look at the bUnit test from Listing 8-21. We are adding four parameters, where two of them are of type EventCallback<int>. We assign a value to the EventCallback<int> using a delegate, and this delegate increments a local variable. This way, we count the number of invocations of the CurrentCountChanged and IncrementChanged event callback.
You can also use this technique to test regular delegates like Action and Func.
Testing Two-Way Changed Handlers
Modifying the Value of a Parameter
Testing Components that Use RenderFragment
The Alert Component
The AlertShould Test Class
Should the Alert component have additional parameters, we can pass the just like in Listing 8-18.
Passing a Counter As ChildContent
Passing the TwoWayCounter As ChildContent
Calling AddChildContent Multiple Times
The TemplatedList Component’s Markup
The TemplatedList Component’s Code
Using a RenderFragment in a Test
But what about the ItemContent parameter which uses the more complex RenderFragment<TItem>? Add a new unit test as in Listing 8-31. Here, we will pass five strings using the loader Func<ValueTask<IEnumerable<string>>>. Do note the use of the Enumerable.Repeat method to create a collection of elements. We pass the loader as a parameter to the TemplatedList<string> component, and we also pass the ItemContent, which is a RenderFragment<string>. Since this takes an argument, we use a Func<string, string> delegate which will return a RenderFragment<string> (because the Add method takes care of this).
Passing a RenderFragment<T>
Run this test; it should normally pass. And if it does not, we will discuss this in the section “Handling Asynchronous Re-renders,” so keep reading.
The ListItem Component
Passing a Component As a RenderFragment<TItem>
So the first argument is tl => tl.ItemContent which returns the parameter to set. The second argument is a lambda function, which takes the value for TItem (so in our case, a string), and returns another lambda function which takes a ComponentParameterCollectionBuilder<TComponent>. Does this sound familiar? Yes. It is the same type we have used to pass parameters to a component from the beginning of this section (Listing 8-18 example). Here, we add parameters to the ListItem component by calling Add.
Run this test (and the others if you like). All tests should pass. Phew!
Using Cascading Parameters
The CounterWithVC Component
Testing a Component with a Cascading Parameter
Using a Named Cascading Parameter
Passing a Named Cascading Parameter
Using MOQ to Create Fake Implementations
We have seen that components should do one thing very well (the single responsibility principle) and that we should use services to implement logic, such as retrieving data using REST, or to implement business logic. We pass these services to the component using dependency injection. Here, we will look at how to pass dependencies to components using bUnit and how to replace your services with fake implementations to better drive your unit tests.
Injecting Dependencies with bUnit
The FetchData Component
When you use this component in a Blazor application, the Blazor runtime will take care of injecting this dependency. When you use the component in a bUnit test, the bUnit runtime will take care of injecting the dependency. The only thing we need to tell is which class to use to instantiate the instance.
Testing the FetchData Component
Replacing Dependencies with Fake Objects
When you are testing a component, you want full control over dependencies. This means in many cases that you cannot use the real dependency. First of all, remember that tests should be fast and automatic? If the real dependency uses a database or a REST call to fetch data, this will make your test slow. Networks, disks, and databases are several factors slower than accessing data from memory. So we want to avoid these things. Also, databases and disks have memory, so when a test makes modifications to the data, the next time the test runs, it is using different data and will probably fail. So we don’t want to use the real dependency (we are testing the component, not the dependency!). So we will use a fake implementation of the dependency, and that is why it is so important to have your dependencies implement an interface. Building another class with the same interface is easy and practical.
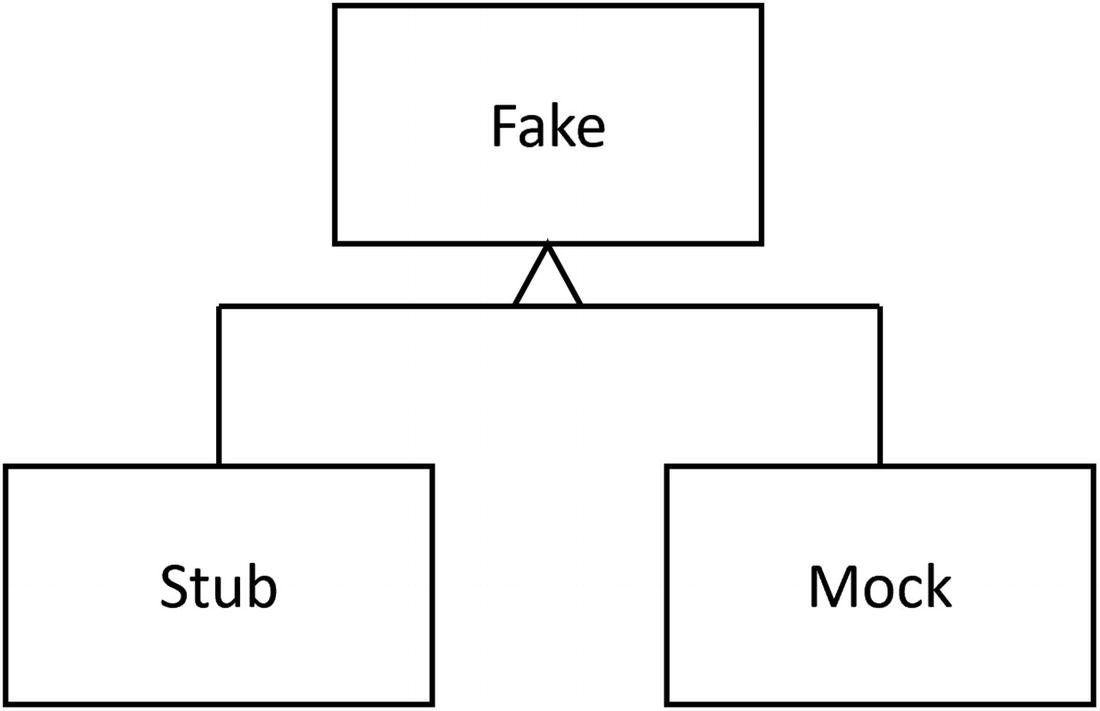
Fake, Stub, and Mock Objects for Testing
Using Stubs
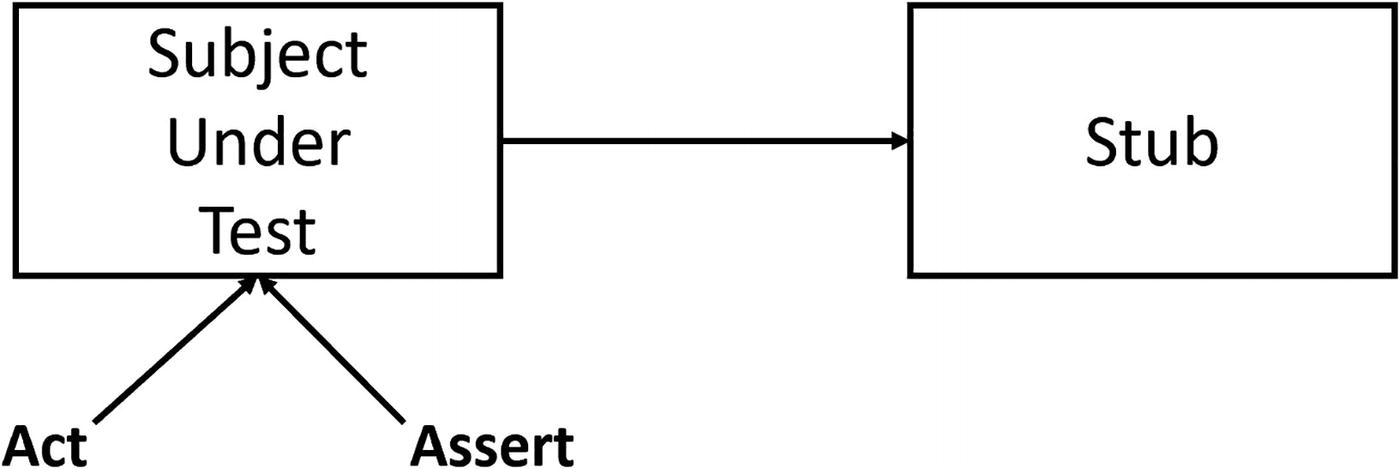
Using a Stub During a Test
Tests that use stubs are also known as state verification tests .
Let us build a stub for the IWeatherService . Start by adding a new class called WeatherServiceStub to the test project.
Implementing an IWeatherService Stub
Testing the FetchData Component with a Stub
Run the test. It should pass.
Using Mocks
Using a Mock During Testing
Tests like these are known as object interaction tests .
Update the FetchData Component to Use Logging
Implementing an ILogger Mock
Testing the FetchData Component Using a Mock
So we create a stub for the IWeatherService , a mock for the ILogger, and then we render the component. Now we want to check the Journal of the LoggerMock. There should be one call to the logger, so we check the length of the Journal. Then we check the entry’s state to see if it contains the message. All straight forward but a lot of work!
Run all your tests. The UseWeatherService test breaks! Why? Because we introduced another dependency, so we need to dependency inject a logger in this test too. I will leave the fixing in your capable hands.
Implementing Stubs and Mocks with MOQ
How can we implement stubs and mocks with a lot less work? Other people have been asking the same question, and some of them built libraries that make this possible. Generally, these libraries are known as isolation frameworks . Isolation frameworks allow you to quickly generate stubs and mocks for classes and interfaces, where you implement just the methods you need for the test, and verify if the subject under test invoked methods with certain arguments a certain number of times. Here, we will look at MOQ which is currently one of the most popular in the testing community. We will cover a lot of features of MOQ here, but if you want to learn more, you can visit https://documentation.help/Moq.
Start by adding the MOQ NuGet package to the test project. Now copy the UseWeatherServices method and rename it to UseWeatherServicesMOQ. Change its implementation like Listing 8-45. First, we create the forecasts data we want the IWeatherService to return. Next, we create an instance of Mock<IWeatherService> which is a class from MOQ. This class allows us to Setup methods from the interface and Returns a certain result. It is that simple to provide a stub implementation. But MOQ allows you to go further and makes the method return different results, depending on the arguments, for example.
Next, we configure bUnit’s dependency injection to inject a singleton instance, passing the stub.Object, which is an instance implementing the IWeatherService interface. No need to build our own class to create a stub.
Implementing a Stub with MOQ
Run the test; it should pass.
Implementing a Mock Using MOQ
Run the test. It should pass.
Writing bUnit Tests in Razor
The _Imports.razor File for Test Projects
I do advise to add your project’s namespaces here too.
The First Razor Test
In your test project, add a new razor component called RCounterShould as in Listing 8-48. Here, I will prefix the razor unit tests with an R, so we don’t get a name conflict with our other CounterShould test class. We will make the test inherit from TestContext, just like our test classes written in C#. Then we add a @code section and put our xUnit test method in there. Because this is a razor file, we can write the test’s markup using razor inside the Render method.
Writing a Simple Unit Test with Razor
Passing Parameters in a Razor Test
Testing a Component with ChildContent
Using a Razor Test for a Templated Component
Handling Asynchronous Re-renders
When you build a component that overrides OnInitializedAsync or OnParametersSetAsync, your component will at least render itself twice – first, when the component gets created and after completion of the OnInitializedAsync and again after completion of each OnParametersSetAsync.
Inside a bUnit test, this can give you issues. Let us look at an example.
Testing Asynchronous Re-renders
Testing Asynchronous Re-renders
Configuring Semantic Comparison
The bUnit testing library uses the AngleSharp Diffing library to compare the generated markup with the expected markup in the MarkupMatches method. You can find AngleSharp on GitHub at https://github.com/AngleSharp/AngleSharp.Diffing. To make your tests more robust, you can configure how the semantic comparison works; for example, we can tell it to ignore certain HTML attributes and elements.
Why Do We Need Semantic Comparison?
Using strings to compare markup is too sensitive to small changes in the markup. For example, formatting your code might add some whitespace, and since string comparison will compare each character, a working test will suddenly fail. And there are many more innocent changes that will break a test, for example, changing the order of attributes, or reordering the classes in the class attribute, or adding comments. Semantic comparison will ignore all of these changes, resulting in tests that will not break because of a simple change.
Customizing Semantic Comparison
Ignoring an Element with Semantic Comparison
Ignoring an Element with a Razor Test
By default, semantic comparison will ignore whitespace, but in some cases, you want to verify if the component actually renders some whitespace. Do this with diff:whitespace="preserve".
You can also tell semantic comparison to ignore case or use a regular expression for your comparison.
Regular expressions allow you to test for complex patterns in strings with a concise syntax. Regular expressions were invented in 1951, and we are still using them. What else was invented more than half a century ago that we are still using in IT? Learning regular expressions is something worthwhile investing in for your future in IT!
A Simple Card Component
Ignore Casing and Using Regular Expressions
Summary
In this chapter, we had a look at unit testing. With unit testing, you can see if your code and components behave as expected, and also it allows you to test if they continue behaving, so small changes that cause bugs are found as fast as possible. Good unit tests are fast, consistent, repeatable, and automatic. We have seen that testing Blazor components becomes very practical with bUnit, and we can author tests using C# or Razor. And with MOQ, we can quickly generate stubs and mocks to replace dependencies in our tests.