Blazor is used to build Single-Page Applications and has a stateful programming model, meaning that a Blazor application keeps its state in memory, as long as the user does not refresh the browser. Refreshing the browser will restart your Blazor application, losing all state in memory. How can you keep the application’s state? In this chapter, we will look at how your application can manage its state and pass data between pages, browser tabs, and even different browsers. Some of these techniques we have been using before, and we will also look at building complex Blazor applications using the redux pattern.
Examining Component State
This chapter comes with a prepared demo, because it reviews some of the techniques we have seen before. So start Visual Studio and open the StateManagement demo solution. Now start the StateManagementWASM project. Your browser should open. Navigate to the Counter page by clicking the Counter link in the navigation column of the application. A familiar component should render.
Click the button a couple of times and then refresh your browser. The Counter goes back to 0! The same thing happens when you click another link in the navigation menu. Imagine that this is your application and the user just spent a couple of minutes entering their data. Your user clicks another page, maybe to look at some references the user needs, the user comes back, and all the painstakingly entered data is gone! Should I encounter an application like this, I will most likely vow to never use this application again!
In a Blazor WebAssembly application, your component is running in the browser, and data gets stored in the memory of the browser. With Blazor Server, all the work is done on the server with a thin SignalR connection to update the DOM. The application’s data gets stored in a circuit, which is the way Blazor Server differentiates between data of different users. Data in a circuit gets stored in the server’s memory. But when the browser refreshed, the Blazor runtime creates a new circuit, losing all data stored in the original circuit.
All of this means that you should do some extra things to keep your user’s data.
What kind of data does Blazor store in the browser’s memory/circuit?
Render tree: Each time Blazor renders your components, it stores this in the render tree, which is an in-memory representation of all the HTML markup. This allows Blazor to calculate the difference between the previous render tree, so it only updates the DOM with the changes.
Component’s fields and properties.
Dependency injection instances.
JavaScript interop data.
Where can we store data so it does not get lost, even after a browser refresh?
Options are not to store the data, use local storage, use a server, or use the URL.
What Not to Store
First of all, I would like to note that you only need to save the data that is being created by the user. All other data can easily be reconstructed; for example, it is useless to store the render tree yourself. Blazor can always recreate this from scratch, provided your components still have their state. Data retrieved using a service, for example, the weather forecasts, can also be retrieved by revisiting the server. You only need to store changes made by the application user, for example, shopping carts, registration information for new users, etc.
Local Storage
All modern browsers allow you to persist data in the browser. You can choose between local storage and session storage, and their use is similar. The main difference is that local storage is kept even when you shut down your machine, while session storage will be lost when you close the application’s browser tab or the browser. Another advantage of local storage is that you can easily share data between browser tabs.
With the StateManagementWASM application running, click the Local Storage link in the navigation menu. Click the button to increment the counter. Now navigate to the Counter page, and back to the Local Storage page. Your counter keeps its value! Refresh your browser. Again, the counter keeps its value. You can even restart the browser.
How does this work? In Chapter 10, we built a local storage service which uses JavaScript interop to store values in local storage. Let us review this again.
Start with the service, which you can find in Listing 11-1. Here, we use the IJSRuntime to load the JavaScript module from Listing 11-2. It has methods to store values in local storage.
using Microsoft.JSInterop;
using System.Threading.Tasks;
namespace JSInterop.Services
{
public class LocalStorageWithModule : ILocalStorage
public ValueTask WatchAsync<T>(T instance) where T : class
=> this.module!.InvokeVoidAsync("watch",
DotNetObjectReference.Create(instance));
}
}
Listing 11-1
The LocalStorage Service
let get = key => key in localStorage ? JSON.parse(localStorage[key]) : null;
let set = (key, value) => { localStorage[key] = JSON.stringify(value); };
let watch = async (instance) => {
window.addEventListener('storage', (e) => {
instance.invokeMethodAsync('UpdateCounter');
});
};
export { get, set, watch };
Listing 11-2
The JavaScript LocalStorage Module
The CounterLocalStorage component from Listing 11-3 uses the local storage service to get the value when it initializes and again to store the value whenever the user changes it by clicking the button.
You do need to be careful with the value retrieved from local storage. When this value gets corrupted, it might crash the component, and since this value is persisted, the user cannot simply restart the application to fix the problem. That is why there is a try-catch block around this code. Worst case, the counter will start from 0 again. That is why in some cases using session storage is a better alternative, because this will clear once the user closes the tab in the browser.
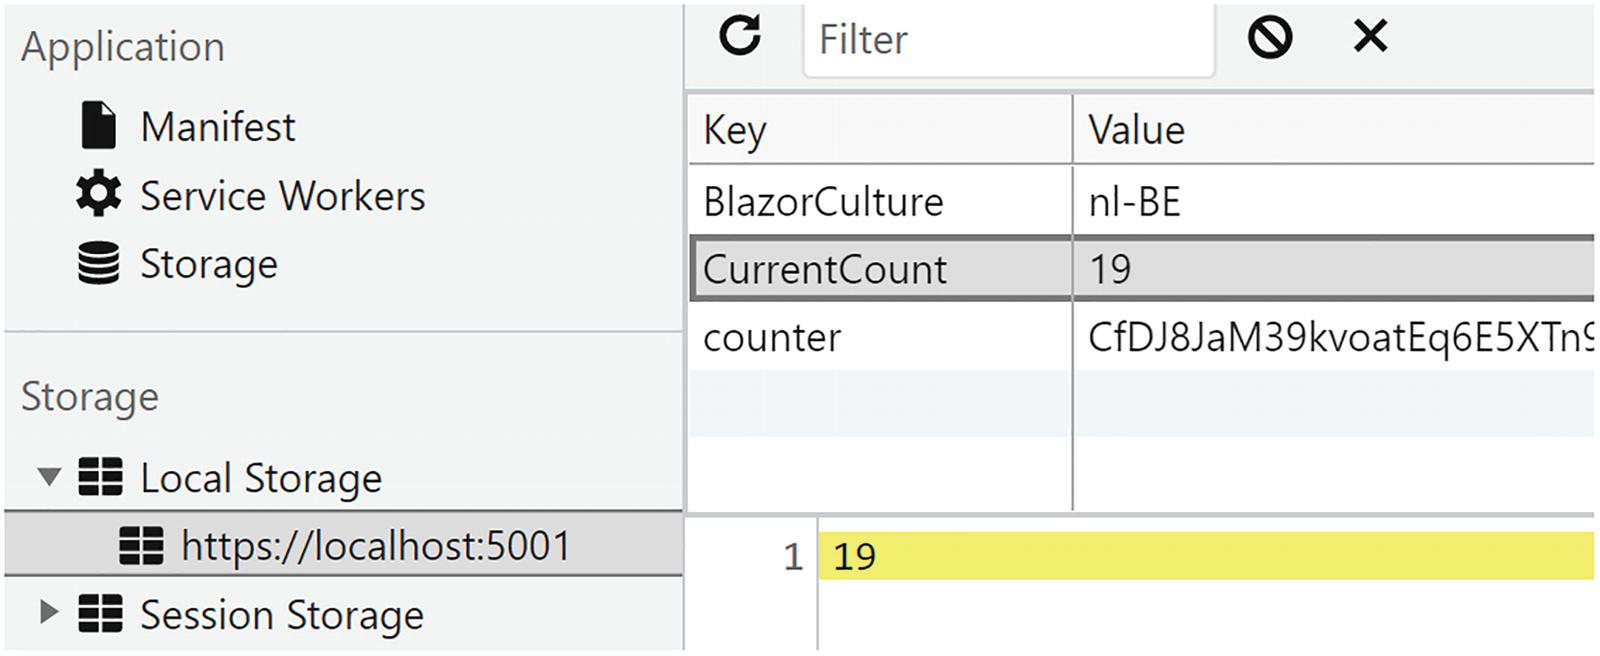
You can use the browser’s debugger to examine data stored in local and session storage. Open the browser’s debugger and open the debugger’s application tab. Select Local Storage, and click the application’s URL (e.g., https://localhost:5001). This will display all the local storage keys and values as in Figure 11-1. You might have other keys here, especially when developing because other applications you are building might have data stored here.
Figure 11-1
The Browser’s Local Storage
One disadvantage of this is that tech savvy users can open local storage in the browser debugger and see or modify the value. So do not store secrets here! With Blazor Server, you can use protected storage, which we discuss later in this chapter.
Local storage can also be used to communicate between two or more tabs in your browser. With the Local Storage page open, copy the URL and open a new tab to it. Select the Local Storage page, and increment the counter. You will see the counter update in the other tab! Every time a value in local storage is modified, the browser will trigger the storage event, and you can register for this using the WatchAsync method from the local storage service. This will invoke the UpdateCounter method from the component, as in Listing 11-3.
The Server
What if the user decides to switch to another browser? Local storage does not work across browsers, so in that case, you will need to store your state on a server. The server can then decide where to persist this data, for example, in a database.
The demo solution has a StateService project, which you will need to run before running the StateManagementWASM project. Use the command line and set your current folder to the StateService project’s folder. Then type dotnet run. This should start the server (I have kept this server as minimal as possible, so it only keeps the data in memory, but with a little work, you can store the data wherever you want). It does mean that restarting the server will reset all of its data.
Start the StateManagementWASM project and now select the State Service page from the navigation menu. Increment the counter a couple of times. Now open the page from another browser (or use another tab). You will now see that this other application will use the counter’s value you set in the first browser!
So how does this work? Open the StateService project, and look for the StateService class in the Services folder, as in Listing 11-4. This generic class allows you to store and retrieve a state using a key (user). Why user? Because this state service can and will be used by everyone, so we need to have some user identifying property. Since we will look at identifying the user in Chapter 16 later, I decided to simply hard-code the user in the client application, but you can substitute this easily with a string identifying the user obtained through authentication.
using System.Collections.Generic;
namespace StateService.Services
{
public class StateService<T>
{
private readonly Dictionary<string, T> counters
= new Dictionary<string, T>();
public T? GetState(string user)
{
if (this.counters.TryGetValue(user, out T? state))
{
return state;
}
return default;
}
public void SetState(string user, T state)
=> this.counters[user] = state;
}
}
Listing 11-4
The StateService Class
The StateService instance is exposed using the StateController from Listing 11-5. Nothing new here, except the [FromRoute] and [FromBody] attributes. With Web API, the controller tries to insert the correct value for its arguments, and it will look at the route, query strings, the body, and other places. Using the [FromRoute] and [FromBody] attribute on arguments will limit where the data comes from. For example, the user argument should always come from routing, so we use [FromRoute]. We will post the new state value in the body of the request, so we tell the controller to only accept this value from the body of the request. You can find more information at https://docs.microsoft.com/aspnet/core/mvc/models/model-binding.
using Microsoft.AspNetCore.Mvc;
using StateService.Services;
namespace StateService.Controllers
{
[ApiController]
public class StateController : ControllerBase
{
private readonly StateService<int> stateService;
public StateController(StateService<int> stateService)
=> this.stateService = stateService;
[HttpGet("state/{user}")]
public ActionResult<int> Get([FromRoute] string user)
=> Ok(this.stateService.GetState(user));
[HttpPost("state/{user}")]
public void Post([FromRoute] string user, [FromBody] int state)
=> this.stateService.SetState(user, state);
}
}
Listing 11-5
The StateController Class
One more thing, our service will run on another URL than the application (we could host the state service and our application using the same ASP.NET project, but I want to show you something important), and in that case, we need to configure Cross-Origin Requests (CORS). Browsers do not allow you to access services that run on another URL (Cross-Origin) without some extra work. This is a security feature, known as same-origin policy, and prevents a malicious site from reading data from another site.
Servers can enable browsers to access their data from another origin (so from another URL), but then we need to enable this explicitly on the server using CORS. You can learn more about CORS at https://docs.microsoft.com/aspnet/core/security/cors.
Open the Startup class and examine the ConfigureServices method as in Listing 11-6. Here, we add a CORS policy that allows localhost:5001 (our Blazor application) to access this service. We also need to enable the content-type header (used with REST) and the HTTP methods we need.
public void ConfigureServices(IServiceCollection services)
{
services.AddCors(options =>
{
options.AddPolicy(name: "CORS",
builder =>
{
builder.WithOrigins("https://localhost:5001");
builder.WithHeaders("content-type");
builder.WithMethods("GET", "POST");
});
});
services.AddControllers();
services.AddSingleton<StateService<int>>();
}
Listing 11-6
The ConfigureServices Method
Finally, we enable the CORS middleware in the Startup class’s Configure method as in Listing 11-7 that will allow the browser to query our service about CORS. Documentation states that we need to put the UseCors method between the UseRouting and UseEndpoints methods. We pass the policy name with the UseCors call.
app.UseRouting();
app.UseCors("CORS");
app.UseAuthorization();
app.UseEndpoints(endpoints =>
{
endpoints.MapControllers();
});
Listing 11-7
The Configure Method
This concludes our discussion about the state service. Time to look at the implementation in the Blazor application.
We are using a service in the Blazor WASM application to talk to the server as in Listing 11-8. This service uses the HttpClient to talk to the StateService server.
The CounterState component in Listing 11-9 uses this service to retrieve the state’s value in its OnInitializedAsync method and updates the state in the IncrementCount method. Almost identical to the local storage case.
using Microsoft.AspNetCore.Components;
using StateManagementWASM.Services;
using System.Threading.Tasks;
namespace StateManagementWASM.Pages
{
public partial class CounterState
{
[Inject]
public StateService<int> counterStateService { get; set; }
int? state = await counterStateService.GetState("peter");
if (state.HasValue)
{
CurrentCount = state.Value;
}
}
}
}
Listing 11-9
The CounterState Component
URL
In some cases, it might make a lot of sense to store your navigation data, for example, the step count in a wizard, or the product ID being shown, in the URL of the page. This has the advantage that users can add this page to their favorites, and data stored in the URL will survive a browser refresh and work across different browsers. Let us look at an example.
Using the StateManagementWASM demo, click the URL link in the navigation column. This will show the counterURL component. Now increment the counter using the button and watch the URL. This is where we store the current value of the counter.
Look at the counterURL component in Listing 11-10. Here, we use routing to put the value of the CurrentCount in the parameter with the same name. I have also used the int? constraint to make this parameter an optional integer. When the button gets clicked, we use the NavigationManager to navigate to the same URL, but with an incremented value. That’s it.
You can use the same techniques to store your state with Blazor Server, but there is one more possibility. We can have our data stored in local or session storage, but now using encryption. This uses the ASP.NET Core Data Protection API which will encrypt your data on the server which will then store the encrypted data in the browser’s local storage (or session storage). This only works with Blazor Server because the data protection API requires the server to provide encryption.
In the demo solution, you can find the StateManagementServer project. Run this project and click the Local Storage navigation link. Increment the counter and now open the browser’s debugger. Choose the application tab, and click the application’s URL in local storage. Look at the counter key (again, other keys might show up from other projects since every project uses localhost:5001 by default). The counter key is clearly encrypted here (containing some integer value).
Let us look at the CounterProtectedStorage component as in Listing 11-11. To use protected storage, you use the ProtectedLocalStorage (or ProtectedSessionStorage) instance which you request using dependency injection. This instance allows you to get, set, and delete a key asynchronously.
In the OnInitializedAsync method, use the GetAsync method to retrieve the value. This might not succeed, so this method returns a ProtectedBrowserStorageResult, which has a Success property. When this property is true, you can access the value using the Value property.
When the button gets clicked, use the SetAsync method to update the value.
var state = await localStorage.GetAsync<int>("counter");
if (state.Success)
{
currentCount = state.Value;
}
}
}
Listing 11-11
The CounterProtectedStorage Component
The Redux Pattern
Building complex applications with Blazor can become challenging. Single-Page Applications have to manage a lot more state than traditional web pages because some of this state is shared among different pages. Sometimes customers might also want advanced features, such as undo/redo functionality. Redux is a pattern used to reduce an application’s complexity. With redux, we will apply a couple of principles which are based on a minimal API and giving us predictable behavior using immutability. With redux, state mutability becomes predictable. Let us start with a couple of building blocks in redux.
The Big Picture
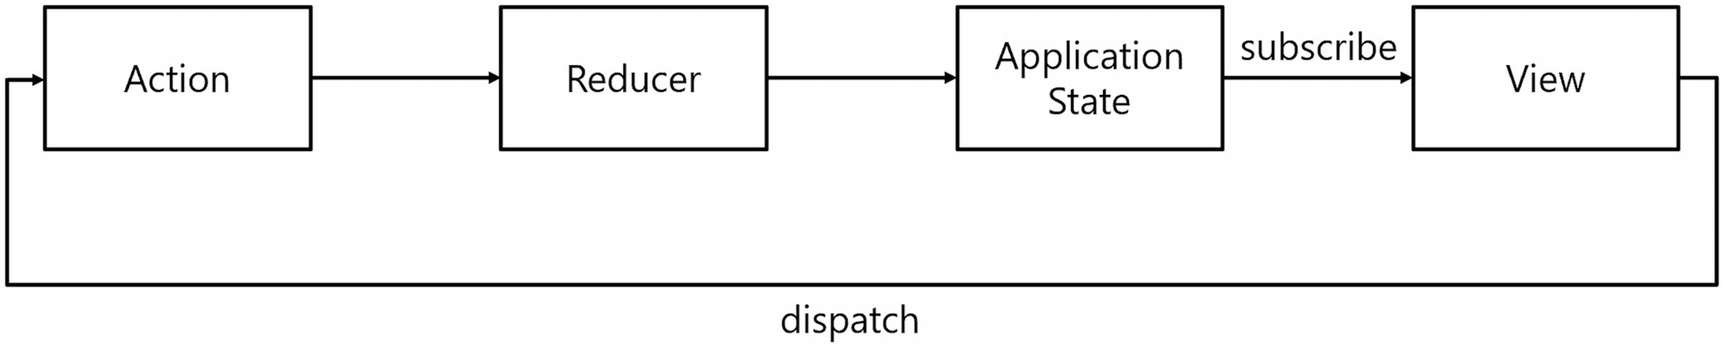
With redux, we have an application store which we modify through actions and reducers. When the user interacts with the application, we dispatch an action which holds the changes we need to apply. Then the reducer applies these changes to the store, resulting in a new store instance. Our components (the view) will then update themselves from the store. This process then repeats itself, as illustrated in Figure 11-2. Note the unidirectional flow of changes.
Figure 11-2
Redux Overview
The Application Store
With redux, we will store all our state in a single object hierarchy, known as the application store. We will consider this store to be the “Single Source of Truth.” To keep things manageable, the store is immutable, meaning that every change to the store will result in a new instance. Please realize that this does not mean that we will create a deep clone of the store instance after every change; no, a single object in the hierarchy will be replaced with a new instance when it needs a change. For example, with the PizzaPlace application, the store would contain three pieces of data, the menu, the shopping basket, and the customer information. When we add something to the shopping basket, we will get a new store instance, with the same menu and customer; only the shopping basket will be replaced with a new instance. Note that this allows us to keep track of each state change and easily undo this, opening up features like undo/redo. To undo a change, we simply restore the previous state from our tracked states! The application store allows the views (Blazor components) to access its data and uses reducers to modify it (by creating new immutable fragments).
There is another pattern called flux; the only difference between these two is that with flux we have multiple stores, while redux chooses to put everything in a single store.
Actions
Whenever the application wants to trigger a state change, for example, because of the user clicking a button, a timer expiring, etc., we dispatch an action. The action contains the data needed so the dispatcher knows what to do. For example, with the Counter component, we can have an IncrementCounterAction class, which does not contain any data because the Type of the instance is enough for the dispatcher to handle it. Should we want to set the Counter to a specific value, we can have the UpdateCounterAction which would contain the desired value. Actions describe what happened in the application and are used by the dispatcher to apply the desired change.
Reducers
The responsibility of a reducer is to apply an action to the store. Reducers must be pure functions. A pure function is a function that always returns the same result for its parameters. For example, adding two numbers together is a pure function, calling add on 2 and 3 will always return 5. Getting the time is not, since calling this function returns a different value at different points in time.
Views
Views (in our case, Blazor components) access the store to render the data and subscribe for changes in the store so they can update themselves when the data has been changed through a reducer.
Using Fluxor
Time to look at an actual implementation using the redux pattern. We will use Fluxor, which was written by Peter Morris and the GitHub community and which is an amazing implementation of the flux pattern (of which redux is a special case).
Start by creating a new hosted Blazor WebAssembly project; call it UsingRedux. Do enable the nullable reference type C# option in the shared project as in Listing 11-12.
<Project Sdk="Microsoft.NET.Sdk">
<PropertyGroup>
<TargetFramework>net6.0</TargetFramework>
<Nullable>enable</Nullable>
</PropertyGroup>
<ItemGroup>
<SupportedPlatform Include="browser" />
</ItemGroup>
</Project>
Listing 11-12
Enabling Nullable Reference Types
Let us first implement the Counter component using the Fluxor library, so add the NuGet package Fluxor to the UsingRedux.Shared project. I like putting the store, actions, and reducers in a shared library, which makes it easy to use with other application types.
Creating the Store
Add a new folder called Stores to the shared project.
Add a new class called AppStore as in Listing 11-13. Here, I am using the new C# record type, which is a very practical way to build an immutable reference type. With its convenient syntax, we can create the AppStore type and add three immutable properties. Because of that, the parameters of the AppStore type use Pascal casing. These parameters will get compiled into public read-only properties on the AppStore type, so we should use the naming convention for properties. You can learn more about record types at https://docs.microsoft.com/dotnet/csharp/whats-new/tutorials/records. The ClickCounter property holds the Counter’s data, and the IsLoading and Forecasts properties hold the data used by the FetchData component.
namespace UsingRedux.Shared.Stores
{
// AppStore is an immutable reference type!
public record AppStore(
int ClickCounter,
bool IsLoading,
WeatherForecast[]? Forecasts
);
}
Listing 11-13
Our Application’s Store
The AppStore instance will be initialized using the generic Feature<T> type that comes with the Fluxor library. Add a new folder called Features to the shared project, and add the AppFeature class as in Listing 11-14. The AppFeature will initialize our AppStore instance, since Fluxor will call the GetInitialState method and use the result as the initial store’s value.
using Fluxor;
using System;
using UsingRedux.Shared.Stores;
namespace UsingRedux.Shared.Features
{
public class AppFeature : Feature<AppStore>
{
public override string GetName()
=> nameof(AppStore);
protected override AppStore GetInitialState()
=> new AppStore(
ClickCounter: 0,
IsLoading: false,
Forecasts: Array.Empty<WeatherForecast>()
);
}
}
Listing 11-14
The AppFeature Class
Using the Store in Our Blazor Application
Now enable nullable reference types in the UsingRedux.Client project and add the Fluxor.Blazor.Web NuGet package to it. We also need to add some JavaScript, so open your index.html page and add the <script> tag from Listing 11-15 to the end of the <head> section.
Open Program.cs and add support for Fluxor by configuring dependency injection as in Listing 11-16. Fluxor uses dependency injection to find our redux classes, such as the reducers. Since these are defined in the shared project, we use the AppStore class to retrieve the appropriate assembly.
using Fluxor;
using Microsoft.AspNetCore.Components.WebAssembly.Hosting;
using Microsoft.Extensions.DependencyInjection;
using System;
using System.Net.Http;
using System.Reflection;
using System.Threading.Tasks;
using UsingRedux.Shared.Stores;
namespace UsingRedux.Client
{
public class Program
{
public static async Task Main(string[] args)
{
var builder = WebAssemblyHostBuilder.CreateDefault(args);
Open the App.razor class and add the StoreInitializer component to the top as in Listing 11-17. This component will initialize the store for the current user using the AppFeature class.
<Fluxor.Blazor.Web.StoreInitializer/>
Listing 11-17
Adding the Store Initializer
Add a new file called Counter.razor.cs to the Pages folder of the client project. Implement this class as in Listing 11-18. Our counter needs access to the store, so we use dependency injection to retrieve an instance of IState<AppStore>. This interface wraps our AppState and can be retrieved using the Value property. To simplify access, I have also added a helper property AppStore.
using Fluxor;
using Microsoft.AspNetCore.Components;
using UsingRedux.Shared.Stores;
namespace UsingRedux.Client.Pages
{
public partial class Counter
{
[Inject]
public IState<AppStore> State { get; set; } = default!;
public AppStore AppStore => State.Value;
}
}
Listing 11-18
The Counter’s Code
Now update the Counter.razor file as in Listing 11-19. Each component that uses the store should subscribe to changes in the store. The FluxorComponent takes care of that so we need to derive our component from this base class. Our counter needs to display a counter, which is in the store so we use the @AppStore.ClickCounter to display its value.
Build and run the application. Select the Counter link. You get a Counter with initial value 0, but the button does not do anything yet. Time to add an action and reducer.
Adding an Action
In the shared project, add a folder called Actions and add the IncrementCounterAction class from Listing 11-20. Again, I use a record type, since the action should not be mutable (and I like the conciseness). This action does not need any data, since the type of the action is enough to allow the reducer to do its work.
namespace UsingRedux.Shared.Actions
{
public record IncrementCounterAction;
}
Listing 11-20
The IncrementCounterAction
We will add more actions later in this chapter, so let us proceed to the reducer.
Implementing the Reducer
Add a new folder called Reducers to the shared project and add the AppReducer class to it from Listing 11-21. Reducers should be pure functions, so calling a reducer with the same arguments should result in the same result. I know I am repeating myself, but this is very important. Since reducers should be pure, they normally do not require any data except what they can find in the AppStore and Action class. So not to be tempted, I advise you make reducer methods static, and you add it to a static class. This should not limit the testability of your reducers. Fluxor also requires you to add the [ReducerMethod] attribute to the method, enabling it to detect reducers with reflection. In general, using reflection is slow, but if you just do reflection once, especially during the initialization of your application, this is no problem. So don’t worry about this. This reducer should return a new AppStore instance, with the ClickCounter incremented by 1. Again, C# records are very practical for this because we can make a full copy (a shallow clone) of the AppStore using the with syntax and listing the properties that need to change. This syntax will return new instance of the store, with new values for the listed properties.
using Fluxor;
using UsingRedux.Shared.Actions;
using UsingRedux.Shared.Stores;
namespace UsingRedux.Shared.Reducers
{
public static class AppReducer
{
[ReducerMethod]
public static AppStore ReduceIncrementCounterAction
(AppStore state, IncrementCounterAction action)
=> state with { ClickCounter = state.ClickCounter + 1 };
}
}
Listing 11-21
The AppReducer Static Class
We have an action and a reducer, so now we can update the Counter component to make the button work.
First update the Counter’s code as in Listing 11-22. We need a dispatcher so we ask dependency injection to supply one. And in the IncrementCounter method, we create the IncrementCounterAction and use the Dispatcher to dispatch it. That is all! With redux, your component knows the action, but not how this will be implemented, again keeping this logic out of your component!
using Fluxor;
using Microsoft.AspNetCore.Components;
using UsingRedux.Shared.Actions;
using UsingRedux.Shared.Stores;
namespace UsingRedux.Client.Pages
{
public partial class Counter
{
[Inject]
public IState<AppStore> State { get; set; } = default!;
[Inject]
public IDispatcher Dispatcher { get; set; } = default!;
public AppStore AppStore => State.Value;
public void IncrementCounter()
{
var action = new IncrementCounterAction();
Dispatcher.Dispatch(action);
}
}
}
Listing 11-22
The Counter’s Code with Action and Dispatch
Update the Counter so the button calls the IncrementCounter method when clicked as in Listing 11-23.
Run the application and click the button on the Counter component. It should increment!
Redux Effects
What if we need to call an asynchronous method? Do we call it in the reducer? No! Since reducers are synchronous, calling the asynchronous method would either block the reducer or return without the required result. To solve this, redux uses effects, which are asynchronous and function through use of actions and reducers. With effects, we will use two actions, one to start the effect asynchronously, and when the effect is done, it uses another action to dispatch the result. The best way to understand effects is with an example, so let us implement the FetchData component with redux.
Adding the First Action
Start by adding another action which will initiate the asynchronous call to fetch the weather forecasts. Inside the Actions folder of the shared project, add the FetchDataAction record from Listing 11-24.
namespace UsingRedux.Shared.Actions
{
public record FetchDataAction;
}
Listing 11-24
The FetchDataAction Record
Add a new FetchData.razor.cs file to the Pages folder of the client project to implement the FetchData component as in Listing 11-25. Again, we inject the store and dispatcher, and we dispatch the FetchDataAction in the OnInitialized life cycle method. Don’t forget to call the base class’s OnInitialized method!
using Fluxor;
using Microsoft.AspNetCore.Components;
using UsingRedux.Shared.Actions;
using UsingRedux.Shared.Stores;
namespace UsingRedux.Client.Pages
{
public partial class FetchData
{
[Inject]
public IState<AppStore> State { get; set; } = default!;
[Inject]
public IDispatcher Dispatcher { get; set; } = default!;
public AppStore AppStore => State.Value;
protected override void OnInitialized()
{
Dispatcher.Dispatch(new FetchDataAction());
base.OnInitialized();
}
}
}
Listing 11-25
The FetchData Component’s Code
Update the FetchData.razor file to inherit from FluxorComponent and use the store instance as in Listing 11-26. We don’t need the HttpClient (or service) here, so please remove it. We also check the store’s IsLoading property to show the loading UI while we are fetching the data. Finally, we will iterate over the Forecasts property to show the weather forecasts.
<p>This component demonstrates fetching data from the server.</p>
@if (AppStore.IsLoading)
{
<p><em>Loading...</em></p>
}
else
{
<table class="table">
<thead>
<tr>
<th>Date</th>
<th>Temp. (C)</th>
<th>Temp. (F)</th>
<th>Summary</th>
</tr>
</thead>
<tbody>
@foreach (var forecast in AppStore.Forecasts!)
{
<tr>
<td>@forecast.Date.ToShortDateString()</td>
<td>@forecast.TemperatureC</td>
<td>@forecast.TemperatureF</td>
<td>@forecast.Summary</td>
</tr>
}
</tbody>
</table>
}
Listing 11-26
The FetchData Component’s Markup
We also need to add a reducer for this action, so add the ReduceFetchDataAction method to the AppReducer static class from Listing 11-27. This will simply set the IsLoading property on our store, so the FetchData component will show the loading UI.
[ReducerMethod]
public static AppStore ReduceFetchDataAction
(AppStore state, FetchDataAction action)
=> state with { IsLoading = true };
Listing 11-27
The ReduceFetchDataAction Reducer Method
Adding the Second Action and Effect
Add another action called FetchDataResultAction to the Actions folder of the shared project as in Listing 11-28. This type has one property holding the forecasts which we will use in the reducer.
namespace UsingRedux.Shared.Actions
{
public record FetchDataResultAction(WeatherForecast[]? Forecasts);
}
Listing 11-28
The FetchDataResultAction Record
Add a new Effects folder to the Shared project and also add the System.Net.Http.Json package. We need this package to access the HttpClient class and its extension methods.
Now implement the effect as in Listing 11-29. Our effect needs to inherit from the Effect<T> base class, where T is the action that will trigger the effect. So when the FetchData component dispatches the FetchDataAction, this effect gets instantiated and the HandleAsync method will be invoked by Fluxor. When your effect needs some dependency, it can just ask using the effect’s constructor. Dependency injection will provide! Inside the HandleAsync method, we call the asynchronous method, in this case, the GetFromJsonAsync, and when that returns, we dispatch the result using the FetchDataResultAction.
using Fluxor;
using System.Net.Http;
using System.Net.Http.Json;
using System.Threading.Tasks;
using UsingRedux.Shared.Actions;
namespace UsingRedux.Shared.Effects
{
public class FetchDataActionEffect : Effect<FetchDataAction>
Now we need another reducer, so add the method to the AppReducer class as in Listing 11-30. This will set the store’s IsLoading to false and sets our Forecasts store property to the forecasts that were fetched by the effect.
[ReducerMethod]
public static AppStore ReduceFetchDataResultAction
(AppStore state, FetchDataResultAction action)
=> state with { IsLoading = false, Forecasts = action.Forecasts };
Listing 11-30
The ReduceFetchDataResultAction Reducer
Build and run. You should be able to fetch the forecasts now!
Think of effects as an interception mechanism that gets triggered by dispatching a certain action.
Summary
In this chapter, we looked at state management, so how do we keep state around even when the user refreshes the browser? We can store our application state in local storage, the server, and the URL. Then we looked at the redux pattern, which is used to build complex applications. Redux makes this easier by applying a couple of principles. Components data bind to the Store object, which you mutate by dispatching actions that contain the required change. Then a reducer applies this change to the store which will trigger an update of your components, completing the circle. Redux and flux have the advantage that you end up with a lot of little classes which are easier to maintain, applying the single responsibility principle.