In the previous chapter, you built a microservice using ASP.NET Core and Entity Framework Core to retrieve the menu of pizzas from the server. In this chapter, you will add support to the Blazor client to talk to that microservice. You will also complete the project by adding support for completing the order.
Using the HttpClient Class
Start by creating a fresh Blazor WASM project (with hosting enabled) just like you created in the first chapter (call it Blazor.Communication). You will use this project to examine the template that was created for you. You will start by looking at the server side of the solution, then the shared project’s code, and then the client side.
Examining the Server Project
Look at the Blazor.Communication.Server project and look for the WeatherForecastController class, which is in Listing 7-1.
Does this look somewhat familiar? Of course, it does; this is an API controller like we saw in the previous chapter. What URL you should use to access the list of WeatherForecasts?
The WeatherForecastController class exposes one REST endpoint at URI /WeatherForecast to retrieve a list of WeatherForecast objects. This time, the WeatherForecastController uses the [Route("[controller]")] attribute to set up the endpoint to generically listen to an URI that contains the name of the controller (without the suffix “Controller”) and then uses the [HttpGet] attribute to expect the GET method.
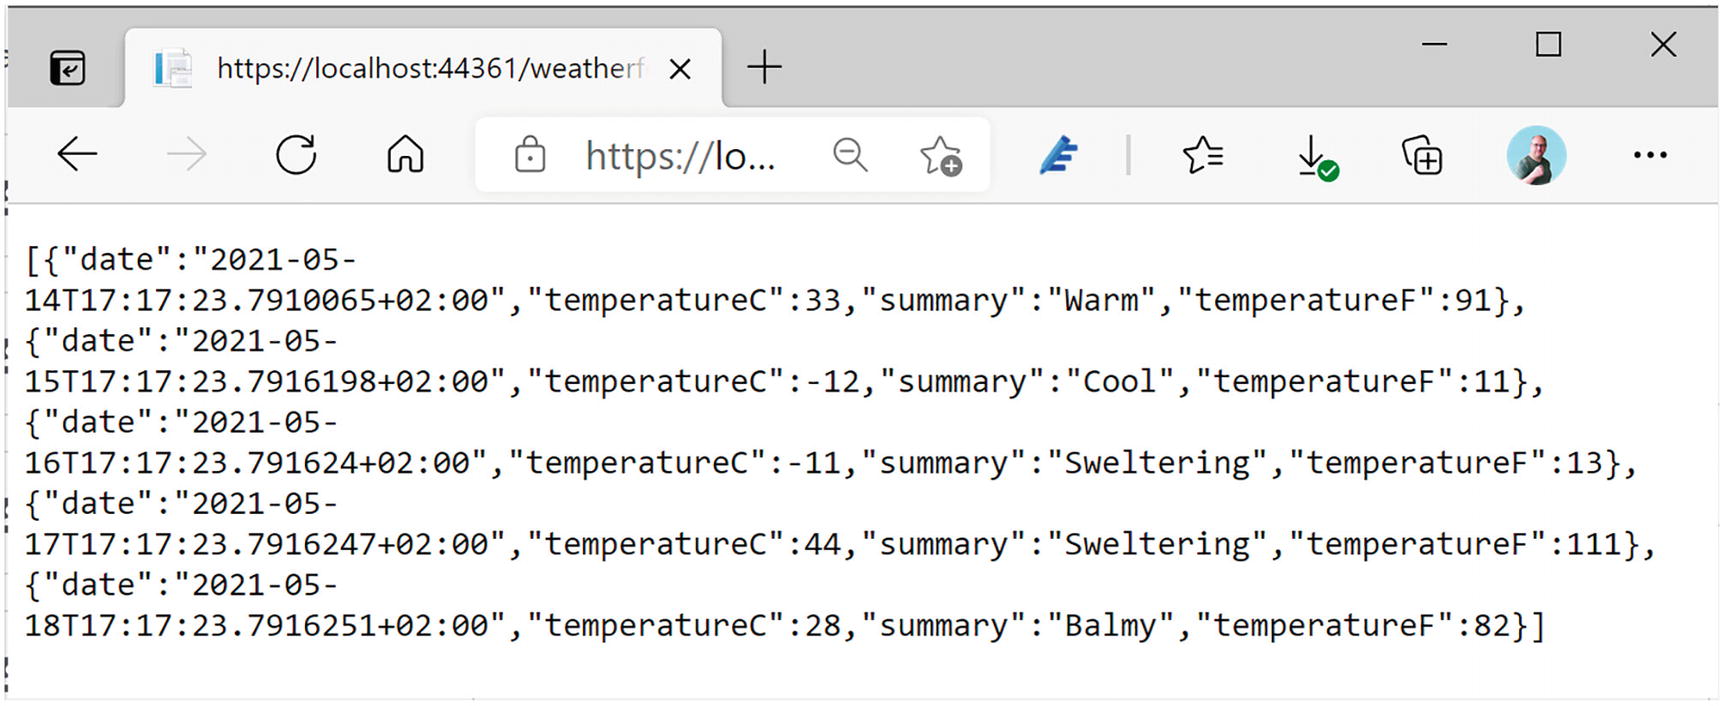
To invoke this method, you should use a GET on the /weatherforecast URI, which you can try with your browser (or if you prefer, Postman). Run the solution and type the URI in your browser (don’t forget you might have a different port number) which will result in Figure 7-1 (expect different weather; it is random).
Figure 7-1
Invoking the Service Using the Browser
The Get method from Listing 7-1 uses a random choice of temperatures and summaries to generate these forecasts, which is great for a demo.
Using a Shared Project. Why?
Now open the WeatherForecast class from the Blazor.Communication.Shared project, which is in Listing 7-2.
namespace Blazor.Communication.Shared;
public class WeatherForecast
{
public DateTime Date { get; set; }
public int TemperatureC { get; set; }
public string? Summary { get; set; }
public int TemperatureF => 32 + (int)(TemperatureC / 0.5556);
}
Listing 7-2
The Shared WeatherForecast Class
This WeatherForecast class is straightforward, containing the Date of the forecast, the temperature in Celsius and Fahrenheit, and a Summary, but I want to draw your attention to the fact that this class lives in the Shared project. This shared project is used both by the server and the client project.
If you ever created a web app with JavaScript, you should be familiar with the experience of building a data exchange class for the server project, for example, in C#, and building another class in JavaScript (or TypeScript) for the client. You must make sure that both classes serialize to the same JSON format; otherwise, you will get runtime errors or, even worse, lose data! If the model grows, you must update both classes again. This is a HUGE maintenance problem in these kinds of projects, because you run the risk of updating only one side on a busy workday.
With Blazor, you don’t suffer from this because both server and client use C#. And that is why there is a Shared project. You put your classes here, and they are shared between the server and client, and then you use them by simply adding a reference to the Shared project. Adding another piece of data means updating a shared class, which works easily! No longer must you update two pieces of code.
Looking at the Client Project
Now look at the Blazor.Communication.Client project. Inside the Pages folder, you will find the FetchData component from Listing 7-3.
@page "/fetchdata"
@using Blazor.Communication.Shared
@inject HttpClient Http
<h1>Weather forecast</h1>
<p>This component demonstrates fetching data from the server.</p>
Let’s look at this line by line. The first line adds the path for routing. You will look at routing in a later chapter. For the moment, you should know that when the URI is /fetchdata, the FetchData component will be shown in the browser.
The second line in Listing 7-3 adds a Razor @using statement for the Shared project’s namespace to the component. You need this because you use the WeatherForecast class from the Shared project. Just like in C#, you use using statements in Razor to refer to classes from another namespace.
On the third line, you inject the HttpClient instance using the @inject syntax from Razor. The HttpClient class is the one you will use to talk to the server. You will learn about the HttpClient class in more detail later in this chapter.
I do want to point out that you should never instantiate an instance of the HttpClient class yourself. Blazor sets up the HttpClient class in a special way, and if you create an instance yourself, it simply will not work as expected! Another reason not to create an instance yourself is that this is a dependency of the FetchData component, and we learned in Chapter 5 that classes and components should never create dependencies themselves!
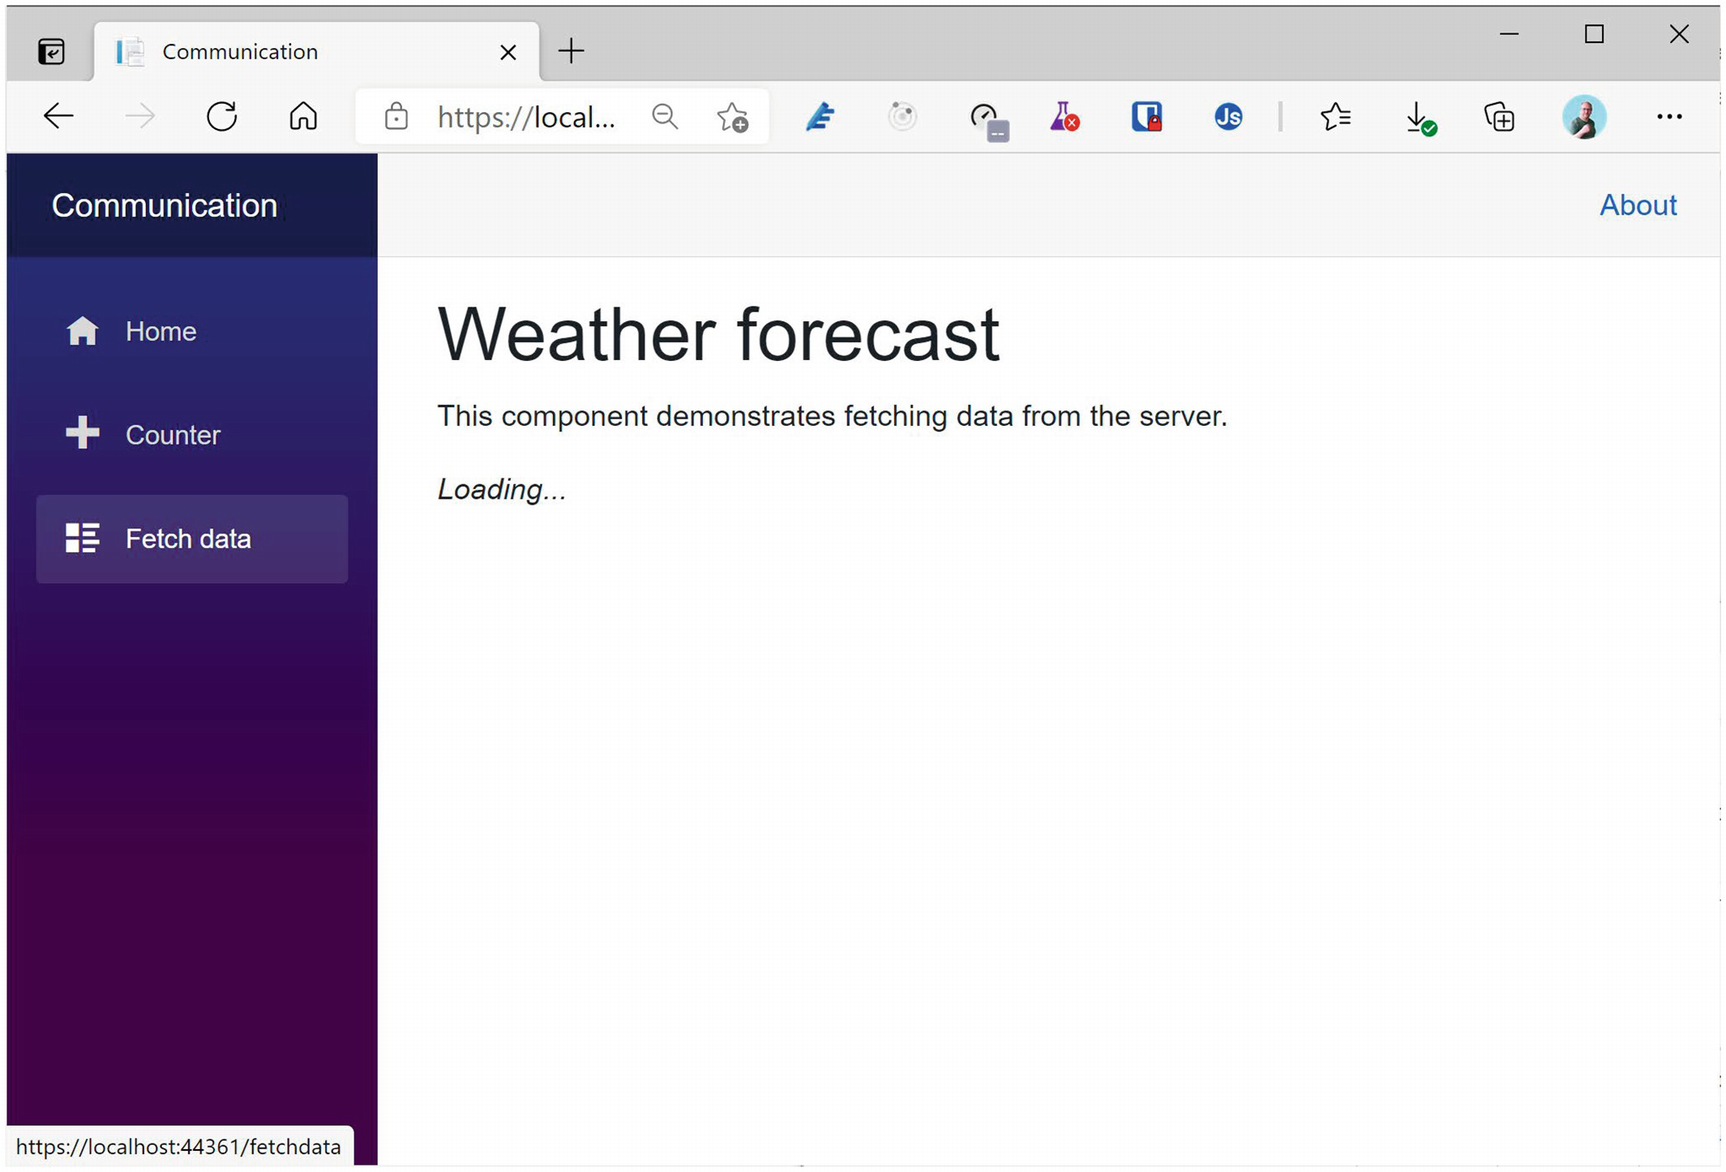
A little lower down in Listing 7-3, you will find an @if statement. Because you fetch the data from the server using an asynchronous way, the forecasts field will initially hold a null reference. So, if the forecasts field has not been set, you tell the user to wait. If you have a slow network, you can see this happening. When you test your Blazor application on your own machine, the network is fast, but you can emulate a slow network using the browser (in this case, using Google Chrome).
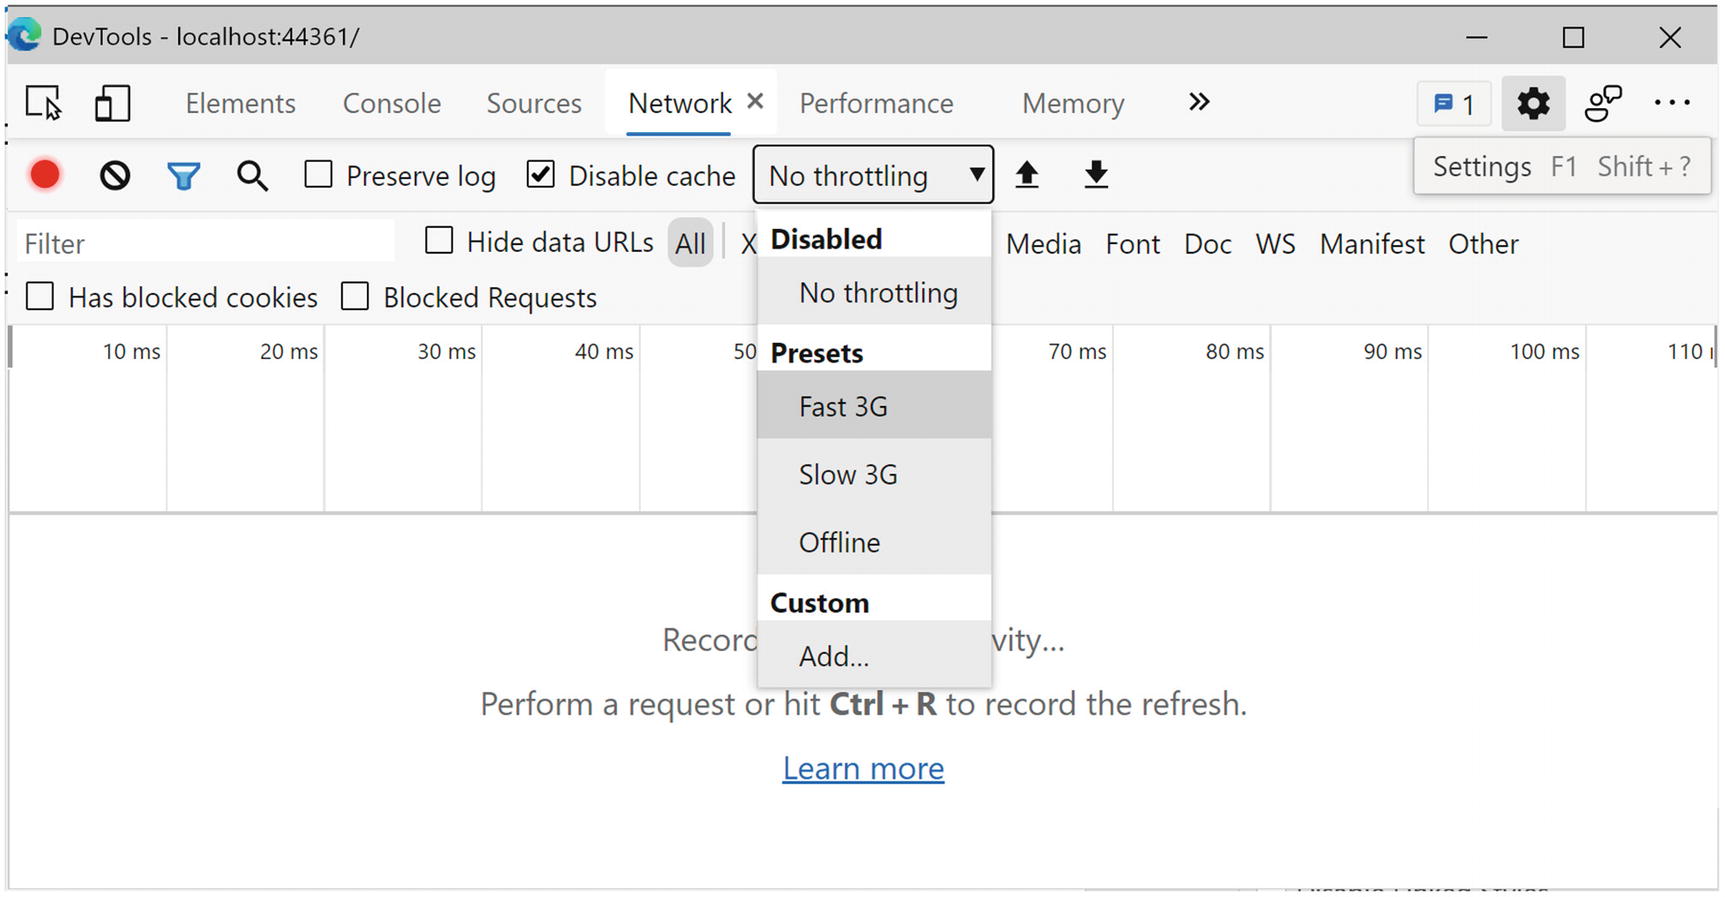
Emulating a Slow Network in Chrome
Start your Blazor project so the browser opens the Index page. Now open the debugger tools from the browser (on Windows with Chrome, you do this by pressing F12) and select the Network tab as in Figure 7-2. On the right side, you should see a drop-down list that allows you to select which kind of network to emulate. Select Slow 3G.
Figure 7-2
Using the Chrome Browser Debugger to Emulate a Slow Network
Next, select the Fetch data tab on your Blazor site (should you already be on this tab, select another tab and then the Fetch data tab). Because you now are using a slow network, the Loading… feedback will appear, as shown in Figure 7-3.
Figure 7-3
The Loading… Feedback with a Slow Network
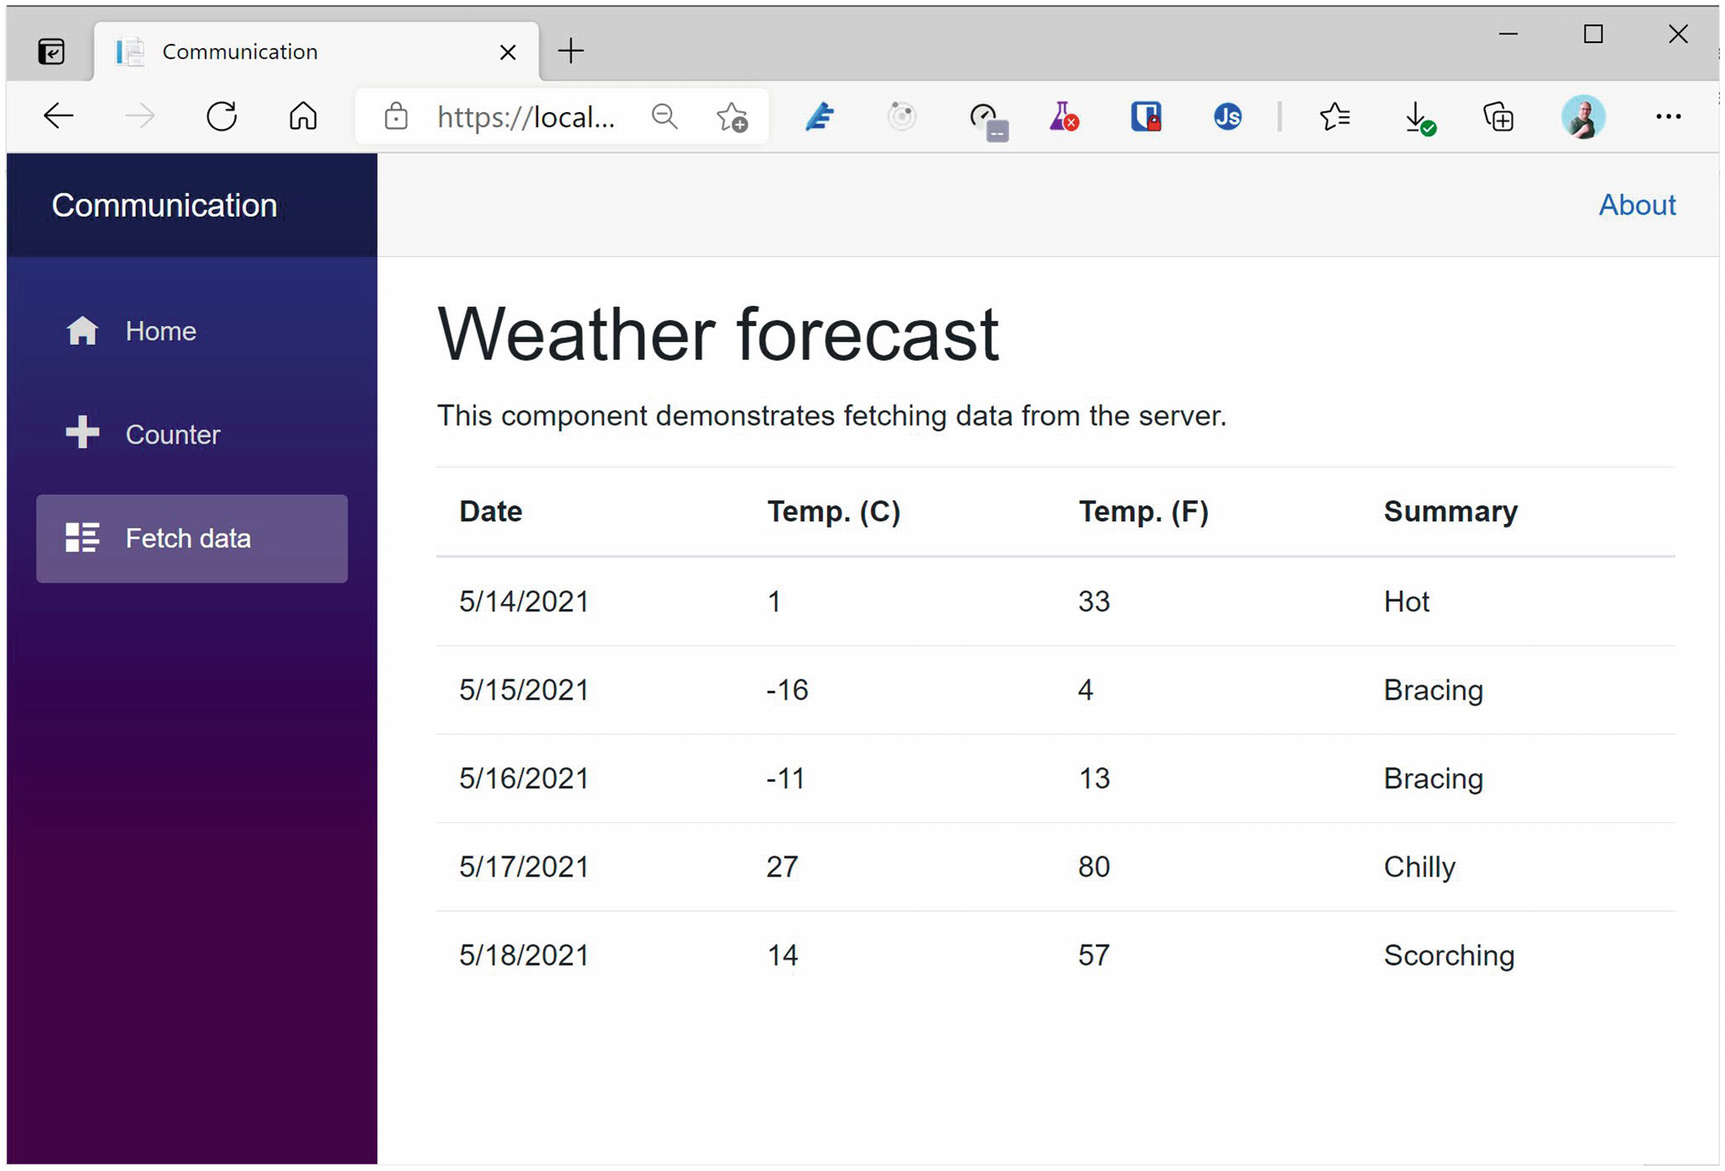
When the OnInitializedAsync method finished, the forecasts field holds data, and your razor file will show a table with the forecasts by iterating over them, as you can see in the else part of Listing 7-3.
Onto the @code section of the FetchData razor file. First, you declare a field called forecasts to hold an array of WeatherForecast instances. You then override the OnInitializedAsync life cycle method. Because you fetch the data from the server using an asynchronous API, you need to put your code in OnInitializedAsync. The OnInitializedAsync method is prefixed with C#’s async keyword, which makes it a breeze to call async APIs with the await keyword.
Asynchronous communication means that the client might need to wait a fair amount (for a computer) for the result to be returned. Asynchronous calls might take a long time, and we don’t want to block the application so we use an asynchronous call. Instead of using a call that will stop Blazor from completing other request (freezing the user interface), you use the OnInitializedAsync method, which will wait in the background for the result.
You use the Http.GetFromJsonAsync<WeatherForecast[]>("WeatherForecast") to invoke the server’s GET endpoint at the URI, and you tell the GetFromJsonAsync method (using generics) to expect an array of WeatherForecast objects. When the result comes back from the server, you put the result into the forecasts field, and Blazor will take care of re-rendering the UI with your new data, as shown in Figure 7-4.
Figure 7-4
Displaying the WeatherForecast Objects
Understanding the HttpClient Class
All communication between the client and server passes through the HttpClient class. This is the same class other applications in .NET use, and its role is to make the HTTP request to the server and to expose the result from the server. It also allows you to exchange binary or other formatted data, but in Blazor, we normally use JSON. With Blazor WASM, the HttpClient class uses the browser’s network stack to talk on the network.
The HttpClientJsonExtensions Methods
To make it a lot easier to talk to JSON microservices, .NET provides you with a bunch of handy extension methods that take care of converting between .NET objects and JSON, which you can find in the HttpClientJsonExtensions class. This class lives in the System.Net.Http.Json namespace. I advise you use these methods, so you don’t have to worry about serializing and deserializing JSON.
The GetFromJsonAsync extension method makes an asynchronous GET request to the specified URI. Its signature is in Listing 7-4. There are a couple of overloads available too.
GetFromJsonAsync<T> will expect the response to contain JSON as specified by the generic argument. For example, in Listing 7-5, it expects an array of WeatherForecast instances. You normally invoke the GetFromJsonAsync method by prefixing it with the await keyword. Don’t forget that you can only use the await keyword in methods and lambda functions that are async.
As you can see in Listing 7-4, there are additional arguments which we discuss later in this section.
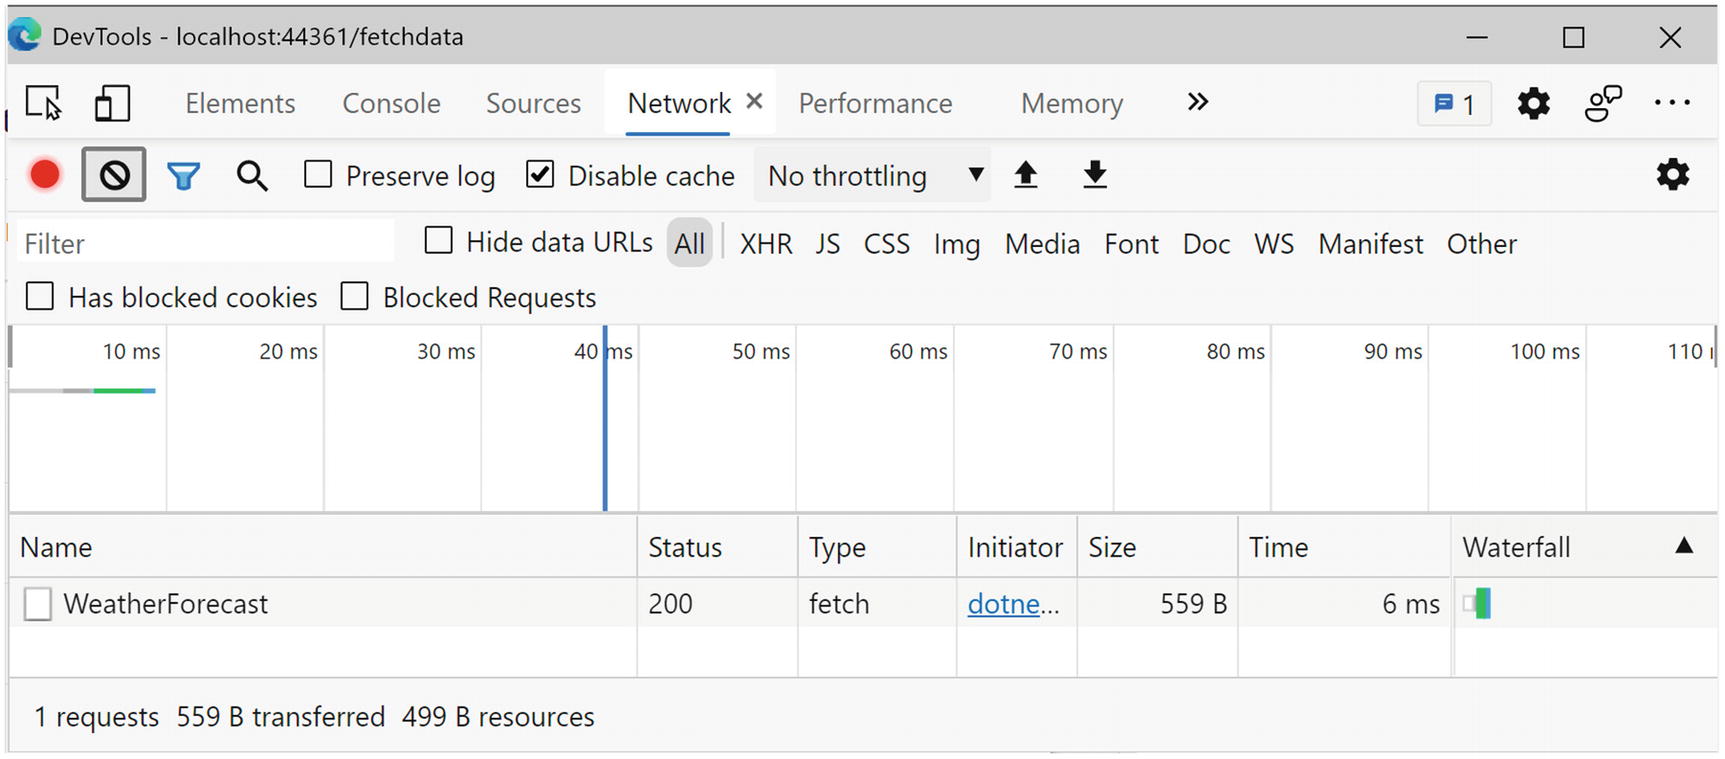
You can always inspect the request and response using your browser’s debugger. Run your Blazor project and open the browser’s debugger on the Network tab. Now select the Fetch data tab in your Blazor website to make it load the data and look at the browser’s Network tab as in Figure 7-5.
Figure 7-5
Inspecting the Network Using the Browser’s Debugger
See the WeatherForecasts entry in Figure 7-5? Now you can click that entry to look at the request and response. Let’s start with the request preview shown in Figure 7-6. Using the Preview tab, you can see the server’s response.
Figure 7-6
Using the Preview Tab to Look at the Response
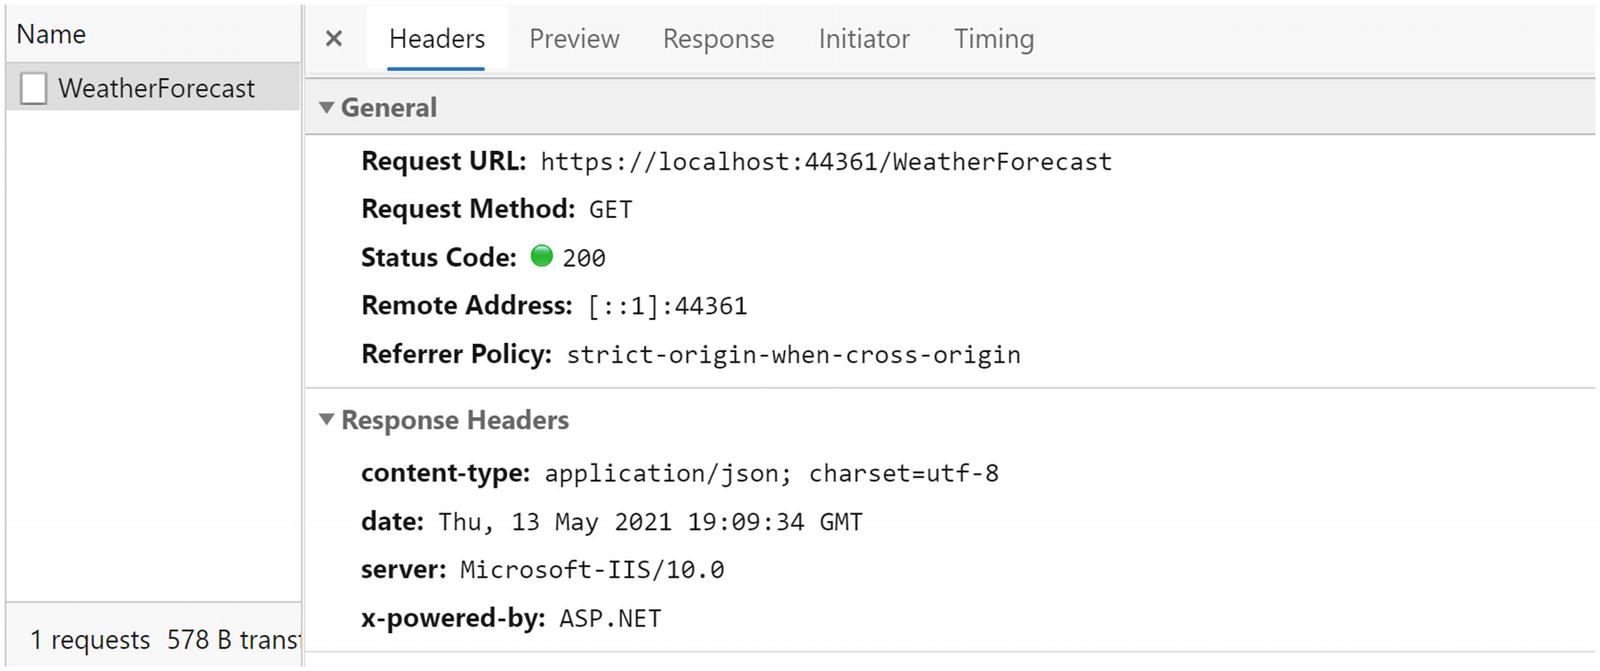
If you want to look at the request and response headers, you can click the Headers tab, as shown in Figure 7-7.
Figure 7-7
Using the Headers Tab to Look at the Request and the Request/Response Headers
Here, you can see the request’s URL and GET verb (the request method). It also shows the HTTP status code 200 OK. Scroll down to look at the headers. One of the response headers is Content-Type with a value of application/json, which was set by the server telling the client to expect JSON.
The PostAsJsonAsync extension method makes a POST request with the content argument serialized in the request body as JSON to the specified URI. Its signature is in Listing 7-6.
The PutAsJsonAsync extension method makes a PUT request with the content argument serialized as JSON in the request body to the specified URI. Its signature is in Listing 7-7. Its usage is very similar to PostJsonAsync; the only difference is that it uses the PUT verb.
Customizing Serialization with JsonSerializerOptions
Each of these methods takes an optional JsonSerializerOptions which allows you to control how JSON serialization works. For example, the default options will serialize the property names with the casing of the property name. However, there are services that require camel casing for properties. Let us see how we can control this with Listing 7-8. To change the casing, you can set the PropertyNamingPolicy property. Here, we set it to JsonNamingPolicy.CamelCase. This example also shows how you can control the serialization of enumerations. Normally, enumerations get serialized with their int value. For example, Spiciness.Spicy will get serialized as 1. But if you like, you can also use the name of the enumeration value, so Spiciness.Spicy will get serialized as “Spicy”. Do this by using the JsonStringEnumConverter as in Listing 7-8. Don’t forget you will have to pass the JsonSerializerOptions as an extra argument using the GetFromJsonAsync and similar methods.
So now you are ready to implement the client-side IMenuService you introduced earlier. Open the PizzaPlace solution and look in the PizzaPlace.Client project for Program.cs, which is shown in Listing 7-9.
using Microsoft.AspNetCore.Components.WebAssembly.Hosting;
using Microsoft.Extensions.DependencyInjection;
using PizzaPlace.Shared;
using System;
using System.Net.Http;
using System.Threading.Tasks;
namespace PizzaPlace.Client
{
public class Program
{
public static async Task Main(string[] args)
{
var builder = WebAssemblyHostBuilder.CreateDefault(args);
I would like to point out the third line of the Main method. Previously, I told you that you should never create the HttpClient instance yourself. But here we do! This method makes it very easy to configure your HttpClient instance so the service does not have to set the BaseAddress property. This works for other HttpClient properties too.
In the Main method, you added two services, HardCodedMenuService and ConsoleOrderService. Let’s replace these fake implementations with real services that talk to the server.
Implementing the MenuService
With Visual Studio, right-click the PizzaPlace.Client project and select Add ➤ New Folder from the drop-down menu. With Code, right-click the PizzaPlace.Client project and select New Folder. Name this folder Services. Now add a new class to this folder called MenuService, which can be found in Listing 7-10.
Again, you are applying the principle of single responsibility where you encapsulate how you talk to the server in a service. This way, you can easily replace this implementation with another one should the need occur.
using PizzaPlace.Shared;
using System.Linq;
using System.Net.Http;
using System.Net.Http.Json;
using System.Threading.Tasks;
namespace PizzaPlace.Client.Services
{
public class MenuService : IMenuService
{
private readonly HttpClient httpClient;
public MenuService(HttpClient httpClient)
{
this.httpClient = httpClient;
}
public async ValueTask<Menu> GetMenu()
{
var pizzas = await httpClient
.GetFromJsonAsync<Pizza[]>("/pizzas");
return new Menu { Pizzas = pizzas!.ToList() };
}
}
}
Listing 7-10
The MenuService Class
You start by adding a constructor to this class taking the MenuService’s dependency on HttpClient, and you store it in a field named httpClient. Then you implement the IMenuService interface’s GetMenu method where you talk to the server calling the GetFromJsonAsync on the server’s /pizza endpoint. Note that the /pizza endpoint is relative to the site’s base (<base href="/" />), which can be found in the index.html file. You can change this base address in Program.cs (see Listing 7-11). Because the MenuService service returns a menu and not a list of pizzas, you wrap the list of pizzas you got from the server into a Menu object. That’s it!
Note
Using the principle of single responsibility results in many small classes, which are easier to understand, maintain, and test.
You have the service; now you need to tell dependency injection to use the MenuService. In the Program class’s Main method, replace it as shown in Listing 7-11.
using Microsoft.AspNetCore.Components.WebAssembly.Hosting;
using Microsoft.Extensions.DependencyInjection;
using PizzaPlace.Client.Services;
using PizzaPlace.Shared;
using System;
using System.Net.Http;
using System.Threading.Tasks;
namespace PizzaPlace.Client
{
public class Program
{
public static async Task Main(string[] args)
{
var builder = WebAssemblyHostBuilder.CreateDefault(args);
Replacing the HardCodedMenuService with the MenuService
Run your project. You should see the list of pizzas (retrieved from your database) as in Figure 7-8! To switch between two implementations (a fake and a real one), all we have to do is to reconfigure dependency injection! Unlimited power!!!
Figure 7-8
The PizzaPlace App Showing the Pizzas from the Database
Showing a Loading UI
You will probably first see an empty menu, especially on a slow network. This might confuse some customers, so let’s add some UI to tell the customer to wait a bit. Update Index.razor to look like Listing 7-12. Here, we use an @if to check if the menu has been loaded, and as long as there are no pizzas on the menu, we use a bootstrap spinner in the else part. You can replace this with any kind of “loading” UI if you like. For example, you could use https://tobiasahlin.com/spinkit/.
@page "/"
@inject IMenuService MenuService
@inject IOrderService orderService
@if (State.Menu.Pizzas.Any())
{
<!-- Menu -->
<PizzaList Title="Our Selection of Pizzas"
Items="@State.Menu.Pizzas"
ButtonTitle="Order"
ButtonClass="btn btn-success pl-4 pr-4"
Selected="@AddToBasket" />
<!-- End menu -->
<!-- Shopping Basket -->
<ShoppingBasket Orders="@State.Basket.Orders"
GetPizzaFromId="@State.Menu.GetPizza"
Selected="@RemoveFromBasket" />
<!-- End shopping basket -->
<!-- Customer entry -->
<CustomerEntry Title="Please enter your details below"
If the menu has not been loaded yet, it will display a spinner like in Figure 7-9.
Figure 7-9
Showing a Loading Progress Bar While Loading the Menu
Storing Changes
Now onto storing the order from the customer. Because you don’t have a microservice yet for storing the order, you will build this first, and then you will implement the client service to send the order to the server.
Updating the Database with Orders
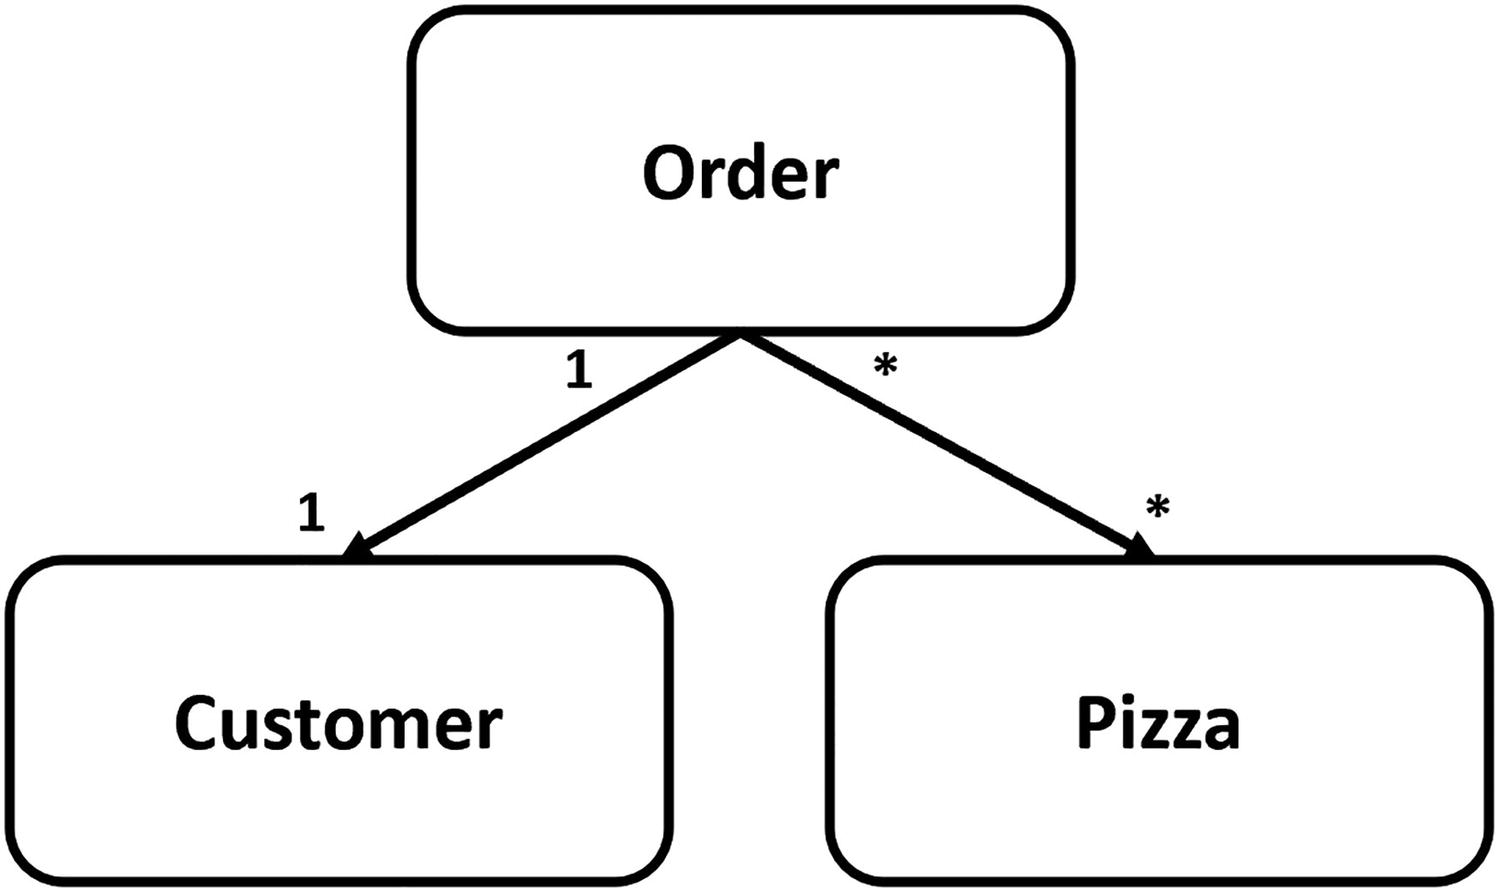
What is an order? Every order has a customer, and an order has one or more pizzas. A pizza can belong to more than one order, which can result in a specific problem: you need a many-to-many relation between pizzas and orders, as illustrated in Figure 7-10. But with Entity Framework Core, this is easy; again, this is taken care of for you.
Figure 7-10
Modeling the Relationships
Add a new class to the PizzaPlace.Shared project called Order, as shown in Listing 7-13. As expected, we have a property to store the Customer and a collection of Pizza instances. There is also an Id property because a database always needs an identifying field, known as the primary key.
using System.Collections.Generic;
namespace PizzaPlace.Shared
{
public class Order
{
public int Id { get; set; }
public Customer Customer { get; set; } = default!;
public ICollection<Pizza> Pizzas { get; set; } = default!;
}
}
Listing 7-13
The PizzaOrder Class
Next, update the Pizza class, as shown in Listing 7-14. Here, we are adding a collection to hold the orders. However, we don’t need to retrieve the orders from the server, and that is why we add the [JsonIgnore] attribute. This tells the JSON serialization to ignore it when converting to JSON.
using System.Collections.Generic;
using System.Text.Json.Serialization;
namespace PizzaPlace.Shared
{
public class Pizza
{
public Pizza(int id, string name, decimal price,
Spiciness spiciness)
{
this.Id = id;
this.Name = name;
this.Price = price;
this.Spiciness = spiciness;
}
public int Id { get; }
public string Name { get; }
public decimal Price { get; }
public Spiciness Spiciness { get; }
[JsonIgnore]
public ICollection<Order>? Orders { get; set; }
}
}
Listing 7-14
The Pizza Class
Now you can add these tables to the PizzaPlaceDbContext class, which can be found in Listing 7-15.
using Microsoft.EntityFrameworkCore;
using PizzaPlace.Shared;
namespace PizzaPlace.Server
{
public class PizzaPlaceDbContext : DbContext
{
public PizzaPlaceDbContext(
DbContextOptions<PizzaPlaceDbContext> options)
: base(options) { }
public DbSet<Pizza> Pizzas { get; set; } = default!;
public DbSet<Order> Orders { get; set; } = default!;
public DbSet<Customer> Customers { get; set; } = default!;
protected override void OnModelCreating(
ModelBuilder modelBuilder)
{
base.OnModelCreating(modelBuilder);
var pizzaEntity = modelBuilder.Entity<Pizza>();
pizzaEntity.HasKey(pizza => pizza.Id);
pizzaEntity.Property(pizza => pizza.Name)
.HasMaxLength(80);
pizzaEntity.Property(pizza => pizza.Price)
.HasColumnType("money");
pizzaEntity.Property(pizza => pizza.Spiciness)
.HasConversion<string>();
var ordersEntity = modelBuilder.Entity<Order>();
ordersEntity.HasKey(order => order.Id);
ordersEntity.HasOne(order => order.Customer);
ordersEntity.HasMany(order => order.Pizzas)
.WithMany(pizza => pizza.Orders);
var customerEntity = modelBuilder.Entity<Customer>();
Here you have added the Customers and Orders tables, and in the OnModelCreating method, you explain to Entity Framework Core how things should be mapped.
A Customer has a primary key Id and its string properties which we limit in length. An Order has a primary key Id and a single Customer, and it has a many-to-one relationship with Pizza (one Order can have many Pizzas, and each Pizza can belong to many Orders).
Build your project and fix any compiler error(s) you might have.
Now it is time to create another migration. This migration will update your database with your new tables. In Visual Studio, open the Package Manager Console (which you can find via View ➤ Other Windows ➤ Package Manager Console). With Code, open the integrated terminal. Or use the command line if you prefer (I really like the new terminal in Windows 10). Change the directory to the PizzaPlace.Server project.
Now type the following command:
dotnet-ef migrations add Orders
This will create a migration for your new database schema.
Apply the migration to your database by typing the following command:
dotnet-ef database update
This concludes the database part.
Building the Order Microservice
Time to build the microservice for taking orders. With Visual Studio, right-click the Controllers folder of the PizzaPlace.Server project and select New ➤ Controller. Select an Empty API Controller and name it OrdersController. With Code, right-click the Controllers folder of the PizzaPlace.Shared project and select New File, naming it OrdersController. This class can be found in Listing 7-16.
using Microsoft.AspNetCore.Http;
using Microsoft.AspNetCore.Mvc;
using PizzaPlace.Shared;
using System;
using System.Collections.Generic;
using System.Linq;
using System.Threading.Tasks;
namespace PizzaPlace.Server.Controllers
{
[Route("api/[controller]")]
[ApiController]
public class OrdersController : ControllerBase
{
private readonly PizzaPlaceDbContext db;
public OrdersController(PizzaPlaceDbContext db)
{
this.db = db;
}
[HttpPost("/orders")]
public IActionResult InsertOrder([FromBody] ShoppingBasket basket)
{
Order order = new Order();
order.Customer = basket.Customer;
order.Pizzas = new List<Pizza>();
foreach (int pizzaId in basket.Orders)
{
var pizza = db.Pizzas.Single(p => p.Id == pizzaId);
order.Pizzas.Add(pizza);
}
db.Orders.Add(order);
db.SaveChanges();
return Created("/orders", order.Id);
}
}
}
Listing 7-16
The OrdersController Class
The OrdersController needs a PizzaPlaceDbContext, so you add a constructor taking the instance and you let dependency injection take care of the rest. To create a new order, you use the POST verb for the InsertOrder method taking a ShoppingBasket instance in the request body.
Upon receipt of a basket instance, you create the order, and then set the order’s customer. Next, you fill up the order’s Pizzas collection with pizzas. We receive the Ids for the Pizzas, so we look them up with it. Then we add the new order instance to the PizzaPlaceDbContext Orders collection. Now when we call SaveChanges, Entity Framework will INSERT it in the Orders table. That’s it. Entity Framework Core does all the work of storing the data!
Talking to the Order Microservice
Add a new class called OrderService to the Services folder of the PizzaPlace.Client project. This OrderService uses a POST request to the server, as shown in Listing 7-17.
using PizzaPlace.Shared;
using System.Net.Http;
using System.Net.Http.Json;
using System.Threading.Tasks;
namespace PizzaPlace.Client.Services
{
public class OrderService : IOrderService
{
private readonly HttpClient httpClient;
public OrderService(HttpClient httpClient)
{
this.httpClient = httpClient;
}
public async ValueTask PlaceOrder(ShoppingBasket basket)
First, you add a constructor to the OrderService class, taking the HttpClient dependency, which you store in the httpClient field of the OrderService class. Next, you implement the IOrderService interface by adding the PlaceOrder method, taking a ShoppingBasket as a parameter. Finally, you invoke the asynchronous PostAsJsonAsync method using the await keyword.
Now open the Program class from the PizzaPlace.Client project and replace the ConsoleOrderService class with your new OrderService class, as shown in Listing 7-18.
using Microsoft.AspNetCore.Components.WebAssembly.Hosting;
using Microsoft.Extensions.DependencyInjection;
using PizzaPlace.Client.Services;
using PizzaPlace.Shared;
using System;
using System.Net.Http;
using System.Threading.Tasks;
namespace PizzaPlace.Client
{
public class Program
{
public static async Task Main(string[] args)
{
var builder = WebAssemblyHostBuilder.CreateDefault(args);
builder.RootComponents.Add<App>("#app");
builder.Services.AddScoped(sp => new HttpClient
{
BaseAddress = new Uri(builder.HostEnvironment
.BaseAddress)
});
builder.Services.AddTransient<IMenuService,
MenuService>();
builder.Services.AddTransient<IOrderService,
OrderService>();
await builder.Build().RunAsync();
}
}
}
Listing 7-18
Configuring Dependency Injection to Use the OrderService Class
Run your PizzaPlace application and place an order for a couple of pizzas. Now open SQL Server Object Explorer in Visual Studio (or SQL Operations Studio) and examine the Customers and Orders tables. They should contain your new order. You will also see another table in the database, the OrderPizza table. This table was generated by Entity Framework to store the many-to-many relationship between Orders and Pizzas.
Summary
In this chapter, you learned that in Blazor you talk to the server using the HttpClient class, calling the GetFromJsonAsync and PostAsJsonAsync extension methods. You also learned that you should encapsulate calling the server using a client-side service class so you can easily change the implementation by switching the service type using dependency injection.