09
Working with Files, Streams, and Serialization
This chapter is about reading and writing to files and streams, text encoding, and serialization.
We will cover the following topics:
- Managing the filesystem
- Reading and writing with streams
- Encoding and decoding text
- Serializing object graphs
- Controlling JSON processing
Managing the filesystem
Your applications will often need to perform input and output operations with files and directories in different environments. The System and System.IO namespaces contain classes for this purpose.
Handling cross-platform environments and filesystems
Let's explore how to handle cross-platform environments like the differences between Windows and Linux or macOS. Paths are different for Windows, macOS, and Linux, so we will start by exploring how .NET handles this:
- Use your preferred code editor to create a new solution/workspace named
Chapter09. - Add a console app project, as defined in the following list:
- Project template: Console Application/
console - Workspace/solution file and folder:
Chapter09 - Project file and folder:
WorkingWithFileSystems
- Project template: Console Application/
- In
Program.cs, add statements to statically import theSystem.Console,System.IO.Directory,System.Environment, andSystem.IO.Pathtypes, as shown in the following code:using static System.Console; using static System.IO.Directory; using static System.IO.Path; using static System.Environment; - In
Program.cs, create a staticOutputFileSystemInfomethod, and write statements in it to do the following:- Output the path and directory separation characters.
- Output the path of the current directory.
- Output some special paths for system files, temporary files, and documents.
static void OutputFileSystemInfo()
{
  WriteLine("{0,-33} {1}", arg0: "Path.PathSeparator",
    arg1: PathSeparator);
  WriteLine("{0,-33} {1}", arg0: "Path.DirectorySeparatorChar",
    arg1: DirectorySeparatorChar);
  WriteLine("{0,-33} {1}", arg0: "Directory.GetCurrentDirectory()",
    arg1: GetCurrentDirectory());
  WriteLine("{0,-33} {1}", arg0: "Environment.CurrentDirectory",
    arg1: CurrentDirectory);
  WriteLine("{0,-33} {1}", arg0: "Environment.SystemDirectory",
    arg1: SystemDirectory);
  WriteLine("{0,-33} {1}", arg0: "Path.GetTempPath()",
    arg1: GetTempPath());
  WriteLine("GetFolderPath(SpecialFolder");
  WriteLine("{0,-33} {1}", arg0: " .System)",
    arg1: GetFolderPath(SpecialFolder.System));
  WriteLine("{0,-33} {1}", arg0: " .ApplicationData)",
    arg1: GetFolderPath(SpecialFolder.ApplicationData));
  WriteLine("{0,-33} {1}", arg0: " .MyDocuments)",
    arg1: GetFolderPath(SpecialFolder.MyDocuments));
  WriteLine("{0,-33} {1}", arg0: " .Personal)",
    arg1: GetFolderPath(SpecialFolder.Personal));
}
The
Environmenttype has many other useful members that we did not use in this code, including theGetEnvironmentVariablesmethod and theOSVersionandProcessorCountproperties. - In
Program.cs, above the function, call theOutputFileSystemInfomethod, as shown in the following code:OutputFileSystemInfo(); - Run the code and view the result, as shown in Figure 9.1:
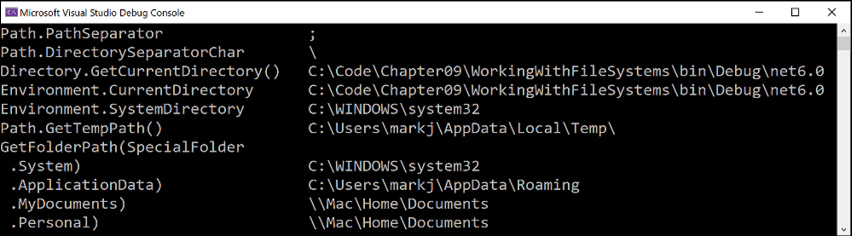
Figure 9.1: Running your application to show filesystem information on Windows
When running the console app using dotnet run with Visual Studio Code, the CurrentDirectory will be the project folder, not a folder inside bin.
Good Practice: Windows uses a backslash \ for the directory separator character. macOS and Linux use a forward slash / for the directory separator character. Do not assume what character is used in your code when combining paths.
Managing drives
To manage drives, use the DriveInfo type, which has a static method that returns information about all the drives connected to your computer. Each drive has a drive type.
Let's explore drives:
- Create a
WorkWithDrivesmethod, and write statements to get all the drives and output their name, type, size, available free space, and format, but only if the drive is ready, as shown in the following code:static void WorkWithDrives() { WriteLine("{0,-30} | {1,-10} | {2,-7} | {3,18} | {4,18}", "NAME", "TYPE", "FORMAT", "SIZE (BYTES)", "FREE SPACE"); foreach (DriveInfo drive in DriveInfo.GetDrives()) { if (drive.IsReady) { WriteLine( "{0,-30} | {1,-10} | {2,-7} | {3,18:N0} | {4,18:N0}", drive.Name, drive.DriveType, drive.DriveFormat, drive.TotalSize, drive.AvailableFreeSpace); } else { WriteLine("{0,-30} | {1,-10}", drive.Name, drive.DriveType); } } }Good Practice: Check that a drive is ready before reading properties such as
TotalSizeor you will see an exception thrown with removable drives. - In
Program.cs, comment out the previous method call and add a call toWorkWithDrives, as shown highlighted in the following code:// OutputFileSystemInfo(); WorkWithDrives(); - Run the code and view the result, as shown in Figure 9.2:

Figure 9.2: Showing drive information on Windows
Managing directories
To manage directories, use the Directory, Path, and Environment static classes. These types include many members for working with the filesystem.
When constructing custom paths, you must be careful to write your code so that it makes no assumptions about the platform, for example, what to use for the directory separator character:
- Create a
WorkWithDirectoriesmethod, and write statements to do the following:- Define a custom path under the user's home directory by creating an array of strings for the directory names, and then properly combining them with the
Pathtype'sCombinemethod. - Check for the existence of the custom directory path using the
Existsmethod of theDirectoryclass. - Create and then delete the directory, including files and subdirectories within it, using the
CreateDirectoryandDeletemethods of theDirectoryclass:
static void WorkWithDirectories() { // define a directory path for a new folder // starting in the user's folder string newFolder = Combine( GetFolderPath(SpecialFolder.Personal), "Code", "Chapter09", "NewFolder"); WriteLine($"Working with: {newFolder}"); // check if it exists WriteLine($"Does it exist? {Exists(newFolder)}"); // create directory WriteLine("Creating it..."); CreateDirectory(newFolder); WriteLine($"Does it exist? {Exists(newFolder)}"); Write("Confirm the directory exists, and then press ENTER: "); ReadLine(); // delete directory WriteLine("Deleting it..."); Delete(newFolder, recursive: true); WriteLine($"Does it exist? {Exists(newFolder)}"); } - Define a custom path under the user's home directory by creating an array of strings for the directory names, and then properly combining them with the
- In
Program.cs, comment out the previous method call, and add a call toWorkWithDirectories. - Run the code and view the result, and use your favorite file management tool to confirm that the directory has been created before pressing Enter to delete it, as shown in the following output:
Working with: /Users/markjprice/Code/Chapter09/NewFolder Does it exist? False
Creating it...
Does it exist? True
Confirm the directory exists, and then press ENTER:
Deleting it...
Does it exist? False
Managing files
When working with files, you could statically import the file type, just as we did for the directory type, but, for the next example, we will not, because it has some of the same methods as the directory type and they would conflict. The file type has a short enough name not to matter in this case. The steps are as follows:
- Create a
WorkWithFilesmethod, and write statements to do the following:- Check for the existence of a file.
- Create a text file.
- Write a line of text to the file.
- Close the file to release system resources and file locks (this would normally be done inside a
try-finallystatement block to ensure that the file is closed even if an exception occurs when writing to it). - Copy the file to a backup.
- Delete the original file.
- Read the backup file's contents and then close it:
static void WorkWithFiles() { // define a directory path to output files // starting in the user's folder string dir = Combine( GetFolderPath(SpecialFolder.Personal), "Code", "Chapter09", "OutputFiles"); CreateDirectory(dir); // define file paths string textFile = Combine(dir, "Dummy.txt"); string backupFile = Combine(dir, "Dummy.bak"); WriteLine($"Working with: {textFile}"); // check if a file exists WriteLine($"Does it exist? {File.Exists(textFile)}"); // create a new text file and write a line to it StreamWriter textWriter = File.CreateText(textFile); textWriter.WriteLine("Hello, C#!"); textWriter.Close(); // close file and release resources WriteLine($"Does it exist? {File.Exists(textFile)}"); // copy the file, and overwrite if it already exists File.Copy(sourceFileName: textFile, destFileName: backupFile, overwrite: true); WriteLine( $"Does {backupFile} exist? {File.Exists(backupFile)}"); Write("Confirm the files exist, and then press ENTER: "); ReadLine(); // delete file File.Delete(textFile); WriteLine($"Does it exist? {File.Exists(textFile)}"); // read from the text file backup WriteLine($"Reading contents of {backupFile}:"); StreamReader textReader = File.OpenText(backupFile); WriteLine(textReader.ReadToEnd()); textReader.Close(); } - In
Program.cs, comment out the previous method call, and add a call toWorkWithFiles. - Run the code and view the result, as shown in the following output:
Working with: /Users/markjprice/Code/Chapter09/OutputFiles/Dummy.txt
Does it exist? False
Does it exist? True
Does /Users/markjprice/Code/Chapter09/OutputFiles/Dummy.bak exist? True
Confirm the files exist, and then press ENTER:
Does it exist? False
Reading contents of /Users/markjprice/Code/Chapter09/OutputFiles/Dummy.bak:
Hello, C#!
Managing paths
Sometimes, you need to work with parts of a path; for example, you might want to extract just the folder name, the filename, or the extension. Sometimes, you need to generate temporary folders and filenames. You can do this with static methods of the Path class:
- Add the following statements to the end of the
WorkWithFilesmethod:// Managing paths WriteLine($"Folder Name: {GetDirectoryName(textFile)}"); WriteLine($"File Name: {GetFileName(textFile)}"); WriteLine("File Name without Extension: {0}", GetFileNameWithoutExtension(textFile)); WriteLine($"File Extension: {GetExtension(textFile)}"); WriteLine($"Random File Name: {GetRandomFileName()}"); WriteLine($"Temporary File Name: {GetTempFileName()}"); - Run the code and view the result, as shown in the following output:
Folder Name: /Users/markjprice/Code/Chapter09/OutputFiles File Name: Dummy.txt File Name without Extension: Dummy File Extension: .txt Random File Name: u45w1zki.co3 Temporary File Name: /var/folders/tz/xx0y_wld5sx0nv0fjtq4tnpc0000gn/T/tmpyqrepP.tmpGetTempFileNamecreates a zero-byte file and returns its name, ready for you to use.GetRandomFileNamejust returns a filename; it doesn't create the file.
Getting file information
To get more information about a file or directory, for example, its size or when it was last accessed, you can create an instance of the FileInfo or DirectoryInfo class.
FileInfo and DirectoryInfo both inherit from FileSystemInfo, so they both have members such as LastAccessTime and Delete, as well as extra members specific to themselves, as shown in the following table:
|
Class |
Members |
|
|
Fields: Properties: Methods: |
|
|
Properties: Methods: |
|
|
Properties: Methods: |
Let's write some code that uses a FileInfo instance for efficiently performing multiple actions on a file:
- Add statements to the end of the
WorkWithFilesmethod to create an instance ofFileInfofor the backup file and write information about it to the console, as shown in the following code:FileInfo info = new(backupFile); WriteLine($"{backupFile}:"); WriteLine($"Contains {info.Length} bytes"); WriteLine($"Last accessed {info.LastAccessTime}"); WriteLine($"Has readonly set to {info.IsReadOnly}"); - Run the code and view the result, as shown in the following output:
/Users/markjprice/Code/Chapter09/OutputFiles/Dummy.bak:
Contains 11 bytes
Last accessed 26/10/2021 09:08:26
Has readonly set to False
The number of bytes might be different on your operating system because operating systems can use different line endings.
Controlling how you work with files
When working with files, you often need to control how they are opened. The File.Open method has overloads to specify additional options using enum values.
The enum types are as follows:
FileMode: This controls what you want to do with the file, likeCreateNew,OpenOrCreate, orTruncate.FileAccess: This controls what level of access you need, likeReadWrite.FileShare: This controls locks on the file to allow other processes the specified level of access, likeRead.
You might want to open a file and read from it, and allow other processes to read it too, as shown in the following code:
FileStream file = File.Open(pathToFile,
  FileMode.Open, FileAccess.Read, FileShare.Read);
There is also an enum for attributes of a file as follows:
FileAttributes: This is to check aFileSystemInfo-derived types'Attributesproperty for values likeArchiveandEncrypted.
You could check a file or directory's attributes, as shown in the following code:
FileInfo info = new(backupFile);
WriteLine("Is the backup file compressed? {0}",
  info.Attributes.HasFlag(FileAttributes.Compressed));
Reading and writing with streams
A stream is a sequence of bytes that can be read from and written to. Although files can be processed rather like arrays, with random access provided by knowing the position of a byte within the file, it can be useful to process files as a stream in which the bytes can be accessed in sequential order.
Streams can also be used to process terminal input and output and networking resources such as sockets and ports that do not provide random access and cannot seek (that is, move) to a position. You can write code to process some arbitrary bytes without knowing or caring where it comes from. Your code simply reads or writes to a stream, and another piece of code handles where the bytes are actually stored.
Understanding abstract and concrete streams
There is an abstract class named Stream that represents any type of stream. Remember that an abstract class cannot be instantiated using new; they can only be inherited.
There are many concrete classes that inherit from this base class, including FileStream, MemoryStream, BufferedStream, GZipStream, and SslStream, so they all work the same way. All streams implement IDisposable, so they have a Dispose method to release unmanaged resources.
Some of the common members of the Stream class are described in the following table:
|
Member |
Description |
|
|
These properties determine if you can read from and write to the stream. |
|
|
These properties determine the total number of bytes and the current position within the stream. These properties may throw an exception for some types of streams. |
|
|
This method closes the stream and releases its resources. |
|
|
If the stream has a buffer, then this method writes the bytes in the buffer to the stream and the buffer is cleared. |
|
|
This property determines if the |
|
|
This method moves the current position to the one specified in its parameter. |
|
|
These methods read a specified number of bytes from the stream into a byte array and advance the position. |
|
|
This method reads the next byte from the stream and advances the position. |
|
|
These methods write the contents of a byte array into the stream. |
|
|
This method writes a byte to the stream. |
Understanding storage streams
Some storage streams that represent a location where the bytes will be stored are described in the following table:
|
Namespace |
Class |
Description |
|
|
|
Bytes stored in the filesystem. |
|
|
|
Bytes stored in memory in the current process. |
|
|
|
Bytes stored at a network location. |
FileStream has been re-written in .NET 6 to have much higher performance and reliability on Windows.
Understanding function streams
Some function streams that cannot exist on their own, but can only be "plugged onto" other streams to add functionality, are described in the following table:
|
Namespace |
Class |
Description |
|
|
|
This encrypts and decrypts the stream. |
|
|
|
These compress and decompress the stream. |
|
|
|
This sends credentials across the stream. |
Understanding stream helpers
Although there will be occasions where you need to work with streams at a low level, most often, you can plug helper classes into the chain to make things easier. All the helper types for streams implement IDisposable, so they have a Dispose method to release unmanaged resources.
Some helper classes to handle common scenarios are described in the following table:
|
Namespace |
Class |
Description |
|
|
|
This reads from the underlying stream as plain text. |
|
|
|
This writes to the underlying stream as plain text. |
|
|
|
This reads from streams as .NET types. For example, the |
|
|
|
This writes to streams as .NET types. For example, the |
|
|
|
This reads from the underlying stream using XML format. |
|
|
|
This writes to the underlying stream using XML format. |
Writing to text streams
Let's type some code to write text to a stream:
- Use your preferred code editor to add a new console app named
WorkingWithStreamsto theChapter09solution/workspace:- In Visual Studio, set the startup project for the solution to the current selection.
- In Visual Studio Code, select
WorkingWithStreamsas the active OmniSharp project.
- In the
WorkingWithStreamsproject, inProgram.cs, import theSystem.Xmlnamespace and statically import theSystem.Console,System.Environment, andSystem.IO.Pathtypes. - At the bottom of
Program.cs, define a static class namedViperwith a static array ofstringvalues namedCallsigns, as shown in the following code:static class Viper { // define an array of Viper pilot call signs public static string[] Callsigns = new[] { "Husker", "Starbuck", "Apollo", "Boomer", "Bulldog", "Athena", "Helo", "Racetrack" }; } - Above the
Viperclass, define aWorkWithTextmethod that enumerates the Viper call signs, writing each one on its own line in a single text file, as shown in the following code:static void WorkWithText() { // define a file to write to string textFile = Combine(CurrentDirectory, "streams.txt"); // create a text file and return a helper writer StreamWriter text = File.CreateText(textFile); // enumerate the strings, writing each one // to the stream on a separate line foreach (string item in Viper.Callsigns) { text.WriteLine(item); } text.Close(); // release resources // output the contents of the file WriteLine("{0} contains {1:N0} bytes.", arg0: textFile, arg1: new FileInfo(textFile).Length); WriteLine(File.ReadAllText(textFile)); } - Below the namespace imports, call the
WorkWithTextmethod. - Run the code and view the result, as shown in the following output:
/Users/markjprice/Code/Chapter09/WorkingWithStreams/streams.txt contains 60 bytes. Husker Starbuck Apollo Boomer Bulldog Athena Helo Racetrack - Open the file that was created and check that it contains the list of call signs.
Writing to XML streams
There are two ways to write an XML element, as follows:
WriteStartElementandWriteEndElement: Use this pair when an element might have child elements.WriteElementString: Use this when an element does not have children.
Now, let's try storing the Viper pilot call signs array of string values in an XML file:
- Create a
WorkWithXmlmethod that enumerates the call signs, writing each one as an element in a single XML file, as shown in the following code:static void WorkWithXml() { // define a file to write to string xmlFile = Combine(CurrentDirectory, "streams.xml"); // create a file stream FileStream xmlFileStream = File.Create(xmlFile); // wrap the file stream in an XML writer helper // and automatically indent nested elements XmlWriter xml = XmlWriter.Create(xmlFileStream, new XmlWriterSettings { Indent = true }); // write the XML declaration xml.WriteStartDocument(); // write a root element xml.WriteStartElement("callsigns"); // enumerate the strings writing each one to the stream foreach (string item in Viper.Callsigns) { xml.WriteElementString("callsign", item); } // write the close root element xml.WriteEndElement(); // close helper and stream xml.Close(); xmlFileStream.Close(); // output all the contents of the file WriteLine("{0} contains {1:N0} bytes.", arg0: xmlFile, arg1: new FileInfo(xmlFile).Length); WriteLine(File.ReadAllText(xmlFile)); } - In
Program.cs, comment out the previous method call, and add a call to theWorkWithXmlmethod. - Run the code and view the result, as shown in the following output:
/Users/markjprice/Code/Chapter09/WorkingWithStreams/streams.xml contains
310 bytes.
<?xml version="1.0" encoding="utf-8"?>
<callsigns>
  <callsign>Husker</callsign>
  <callsign>Starbuck</callsign>
  <callsign>Apollo</callsign>
  <callsign>Boomer</callsign>
  <callsign>Bulldog</callsign>
  <callsign>Athena</callsign>
  <callsign>Helo</callsign>
  <callsign>Racetrack</callsign>
</callsigns>
Disposing of file resources
When you open a file to read or write to it, you are using resources outside of .NET. These are called unmanaged resources and must be disposed of when you are done working with them. To deterministically control when they are disposed of, we can call the Dispose method inside of a finally block.
Let's improve our previous code that works with XML to properly dispose of its unmanaged resources:
- Modify the
WorkWithXmlmethod, as shown highlighted in the following code:static void WorkWithXml() { FileStream? xmlFileStream = null; XmlWriter? xml = null; try { // define a file to write to string xmlFile = Combine(CurrentDirectory, "streams.xml"); // create a file stream xmlFileStream = File.Create(xmlFile); // wrap the file stream in an XML writer helper // and automatically indent nested elements xml = XmlWriter.Create(xmlFileStream, new XmlWriterSettings { Indent = true }); // write the XML declaration xml.WriteStartDocument(); // write a root element xml.WriteStartElement("callsigns"); // enumerate the strings writing each one to the stream foreach (string item in Viper.Callsigns) { xml.WriteElementString("callsign", item); } // write the close root element xml.WriteEndElement(); // close helper and stream xml.Close(); xmlFileStream.Close(); // output all the contents of the file WriteLine($"{0} contains {1:N0} bytes.", arg0: xmlFile, arg1: new FileInfo(xmlFile).Length); WriteLine(File.ReadAllText(xmlFile)); } catch (Exception ex) { // if the path doesn't exist the exception will be caught WriteLine($"{ex.GetType()} says {ex.Message}"); } finally { if (xml != null) { xml.Dispose(); WriteLine("The XML writer's unmanaged resources have been disposed."); if (xmlFileStream != null) { xmlFileStream.Dispose(); WriteLine("The file stream's unmanaged resources have been disposed."); } } } }You could also go back and modify the other methods you previously created but I will leave that as an optional exercise for you.
- Run the code and view the result, as shown in the following output:
The XML writer's unmanaged resources have been disposed.
The file stream's unmanaged resources have been disposed.
Good Practice: Before calling the Dispose method, check that the object is not null.
Simplifying disposal by using the using statement
You can simplify the code that needs to check for a null object and then call its Dispose method by using the using statement. Generally, I would recommend using using rather than manually calling Dispose unless you need a greater level of control.
Confusingly, there are two uses for the using keyword: importing a namespace and generating a finally statement that calls Dispose on an object that implements IDisposable.
The compiler changes a using statement block into a try-finally statement without a catch statement. You can use nested try statements; so, if you do want to catch any exceptions, you can, as shown in the following code example:
using (FileStream file2 = File.OpenWrite(
  Path.Combine(path, "file2.txt")))
{
  using (StreamWriter writer2 = new StreamWriter(file2))
  {
    try
    {
      writer2.WriteLine("Welcome, .NET!");
    }
    catch(Exception ex)
    {
      WriteLine($"{ex.GetType()} says {ex.Message}");
    }
  } // automatically calls Dispose if the object is not null
} // automatically calls Dispose if the object is not null
You can even simplify the code further by not explicitly specifying the braces and indentation for the using statements, as shown in the following code:
using FileStream file2 = File.OpenWrite(
  Path.Combine(path, "file2.txt"));
using StreamWriter writer2 = new(file2);
try
{
  writer2.WriteLine("Welcome, .NET!");
}
catch(Exception ex)
{
  WriteLine($"{ex.GetType()} says {ex.Message}");
}
Compressing streams
XML is relatively verbose, so it takes up more space in bytes than plain text. Let's see how we can squeeze the XML using a common compression algorithm known as GZIP:
- At the top of
Program.cs, import the namespace for working with compression, as shown in the following code:using System.IO.Compression; // BrotliStream, GZipStream, CompressionMode - Add a
WorkWithCompressionmethod, which uses instances ofGZipStreamto create a compressed file containing the same XML elements as before and then decompresses it while reading it and outputting to the console, as shown in the following code:static void WorkWithCompression() { string fileExt = "gzip"; // compress the XML output string filePath = Combine( CurrentDirectory, $"streams.{fileExt}"); FileStream file = File.Create(filePath); Stream compressor = new GZipStream(file, CompressionMode.Compress); using (compressor) { using (XmlWriter xml = XmlWriter.Create(compressor)) { xml.WriteStartDocument(); xml.WriteStartElement("callsigns"); foreach (string item in Viper.Callsigns) { xml.WriteElementString("callsign", item); } // the normal call to WriteEndElement is not necessary // because when the XmlWriter disposes, it will // automatically end any elements of any depth } } // also closes the underlying stream // output all the contents of the compressed file WriteLine("{0} contains {1:N0} bytes.", filePath, new FileInfo(filePath).Length); WriteLine($"The compressed contents:"); WriteLine(File.ReadAllText(filePath)); // read a compressed file WriteLine("Reading the compressed XML file:"); file = File.Open(filePath, FileMode.Open); Stream decompressor = new GZipStream(file, CompressionMode.Decompress); using (decompressor) { using (XmlReader reader = XmlReader.Create(decompressor)) { while (reader.Read()) // read the next XML node { // check if we are on an element node named callsign if ((reader.NodeType == XmlNodeType.Element) && (reader.Name == "callsign")) { reader.Read(); // move to the text inside element WriteLine($"{reader.Value}"); // read its value } } } } } - In
Program.cs, leave the call toWorkWithXml, and add a call toWorkWithCompression, as shown highlighted in the following code:// WorkWithText(); WorkWithXml(); WorkWithCompression(); - Run the code and compare the sizes of the XML file and the compressed XML file. It is less than half the size of the same XML without compression, as shown in the following edited output:
/Users/markjprice/Code/Chapter09/WorkingWithStreams/streams.xml contains 310 bytes.
/Users/markjprice/Code/Chapter09/WorkingWithStreams/streams.gzip contains 150 bytes.
Compressing with the Brotli algorithm
In .NET Core 2.1, Microsoft introduced an implementation of the Brotli compression algorithm. In performance, Brotli is like the algorithm used in DEFLATE and GZIP, but the output is about 20% denser. The steps are as follows:
- Modify the
WorkWithCompressionmethod to have an optional parameter to indicate if Brotli should be used and to use Brotli by default, as shown highlighted in the following code:static void WorkWithCompression(bool useBrotli = true) { string fileExt = useBrotli ? "brotli" : "gzip"; // compress the XML output string filePath = Combine( CurrentDirectory, $"streams.{fileExt}"); FileStream file = File.Create(filePath); Stream compressor; if (useBrotli) { compressor = new BrotliStream(file, CompressionMode.Compress); } else { compressor = new GZipStream(file, CompressionMode.Compress); } using (compressor) { using (XmlWriter xml = XmlWriter.Create(compressor)) { xml.WriteStartDocument(); xml.WriteStartElement("callsigns"); foreach (string item in Viper.Callsigns) { xml.WriteElementString("callsign", item); } } } // also closes the underlying stream // output all the contents of the compressed file WriteLine("{0} contains {1:N0} bytes.", filePath, new FileInfo(filePath).Length); WriteLine($"The compressed contents:"); WriteLine(File.ReadAllText(filePath)); // read a compressed file WriteLine("Reading the compressed XML file:"); file = File.Open(filePath, FileMode.Open); Stream decompressor; if (useBrotli) { decompressor = new BrotliStream( file, CompressionMode.Decompress); } else { decompressor = new GZipStream( file, CompressionMode.Decompress); } using (decompressor) { using (XmlReader reader = XmlReader.Create(decompressor)) { while (reader.Read()) { // check if we are on an element node named callsign if ((reader.NodeType == XmlNodeType.Element) && (reader.Name == "callsign")) { reader.Read(); // move to the text inside element WriteLine($"{reader.Value}"); // read its value } } } } } - Near the top of
Program.cs, callWorkWithCompressiontwice, once with the default using Brotli and once with GZIP, as shown in the following code:WorkWithCompression(); WorkWithCompression(useBrotli: false); - Run the code and compare the sizes of the two compressed XML files. Brotli is more than 21% denser, as shown in the following edited output:
/Users/markjprice/Code/Chapter09/WorkingWithStreams/streams.brotli contains 118 bytes.
/Users/markjprice/Code/Chapter09/WorkingWithStreams/streams.gzip contains 150 bytes.
Encoding and decoding text
Text characters can be represented in different ways. For example, the alphabet can be encoded using Morse code into a series of dots and dashes for transmission over a telegraph line.
In a similar way, text inside a computer is stored as bits (ones and zeros) representing a code point within a code space. Most code points represent a single character, but they can also have other meanings like formatting.
For example, ASCII has a code space with 128 code points. .NET uses a standard called Unicode to encode text internally. Unicode has more than one million code points.
Sometimes, you will need to move text outside .NET for use by systems that do not use Unicode or use a variation of Unicode, so it is important to learn how to convert between encodings.
The following table lists some alternative text encodings commonly used by computers:
|
Encoding |
Description |
|
ASCII |
This encodes a limited range of characters using the lower seven bits of a byte. |
|
UTF-8 |
This represents each Unicode code point as a sequence of one to four bytes. |
|
UTF-7 |
This is designed to be more efficient over 7-bit channels than UTF-8 but it has security and robustness issues, so UTF-8 is recommended over UTF-7. |
|
UTF-16 |
This represents each Unicode code point as a sequence of one or two 16-bit integers. |
|
UTF-32 |
This represents each Unicode code point as a 32-bit integer and is therefore a fixed-length encoding unlike the other Unicode encodings, which are all variable-length encodings. |
|
ANSI/ISO encodings |
This provides support for a variety of code pages that are used to support a specific language or group of languages. |
Good Practice: In most cases today, UTF-8 is a good default, which is why it is literally the default encoding, that is, Encoding.Default.
Encoding strings as byte arrays
- Use your preferred code editor to add a new console app named
WorkingWithEncodingsto theChapter09solution/workspace. - In Visual Studio Code, select
WorkingWithEncodingsas the active OmniSharp project. - In
Program.cs, import theSystem.Textnamespace and statically import theConsoleclass. - Add statements to encode a
stringusing an encoding chosen by the user, loop through each byte, and then decode it back into astringand output it, as shown in the following code:WriteLine("Encodings"); WriteLine("[1] ASCII"); WriteLine("[2] UTF-7"); WriteLine("[3] UTF-8"); WriteLine("[4] UTF-16 (Unicode)"); WriteLine("[5] UTF-32"); WriteLine("[any other key] Default"); // choose an encoding Write("Press a number to choose an encoding: "); ConsoleKey number = ReadKey(intercept: false).Key; WriteLine(); WriteLine(); Encoding encoder = number switch { ConsoleKey.D1 => Encoding.ASCII, ConsoleKey.D2 => Encoding.UTF7, ConsoleKey.D3 => Encoding.UTF8, ConsoleKey.D4 => Encoding.Unicode, ConsoleKey.D5 => Encoding.UTF32, _ => Encoding.Default }; // define a string to encode string message = "Café cost: £4.39"; // encode the string into a byte array byte[] encoded = encoder.GetBytes(message); // check how many bytes the encoding needed WriteLine("{0} uses {1:N0} bytes.", encoder.GetType().Name, encoded.Length); WriteLine(); // enumerate each byte WriteLine($"BYTE HEX CHAR"); foreach (byte b in encoded) { WriteLine($"{b,4} {b.ToString("X"),4} {(char)b,5}"); } // decode the byte array back into a string and display it string decoded = encoder.GetString(encoded); WriteLine(decoded); - Run the code and note the warning to avoid using
Encoding.UTF7because it is insecure. Of course, if you need to generate text using that encoding for compatibility with another system, it needs to remain an option in .NET. - Press 1 to choose ASCII and note that when outputting the bytes, the pound sign (£) and accented e (é) cannot be represented in ASCII, so it uses a question mark instead.
BYTE HEX CHAR 67 43 C 97 61 a 102 66 f 63 3F ? 32 20 111 6F o 115 73 s 116 74 t 58 3A : 32 20 63 3F ? 52 34 4 46 2E . 51 33 3 57 39 9 Caf? cost: ?4.39 - Rerun the code and press 3 to choose UTF-8 and note that UTF-8 requires two extra bytes for the two characters that need 2 bytes each (18 bytes instead of 16 bytes total) but it can encode and decode the é and £ characters.
UTF8EncodingSealed uses 18 bytes. BYTE HEX CHAR 67 43 C 97 61 a 102 66 f 195 C3 Ã 169 A9 © 32 20 111 6F o 115 73 s 116 74 t 58 3A : 32 20 194 C2 Â 163 A3 £ 52 34 4 46 2E . 51 33 3 57 39 9 Café cost: £4.39 - Rerun the code and press 4 to choose Unicode (UTF-16) and note that UTF-16 requires two bytes for every character, so 32 bytes in total, and it can encode and decode the é and £ characters. This encoding is used internally by .NET to store
charandstringvalues.
Encoding and decoding text in files
When using stream helper classes, such as StreamReader and StreamWriter, you can specify the encoding you want to use. As you write to the helper, the text will automatically be encoded, and as you read from the helper, the bytes will be automatically decoded.
To specify an encoding, pass the encoding as a second parameter to the helper type's constructor, as shown in the following code:
StreamReader reader = new(stream, Encoding.UTF8);
StreamWriter writer = new(stream, Encoding.UTF8);
Good Practice: Often, you won't have the choice of which encoding to use, because you will be generating a file for use by another system. However, if you do, pick one that uses the least number of bytes, but can store every character you need.
Serializing object graphs
Serialization is the process of converting a live object into a sequence of bytes using a specified format. Deserialization is the reverse process. You would do this to save the current state of a live object so that you can recreate it in the future. For example, saving the current state of a game so that you can continue at the same place tomorrow. Serialized objects are usually stored in a file or database.
There are dozens of formats you can specify, but the two most common ones are eXtensible Markup Language (XML) and JavaScript Object Notation (JSON).
Good Practice: JSON is more compact and is best for web and mobile applications. XML is more verbose but is better supported in more legacy systems. Use JSON to minimize the size of serialized object graphs. JSON is also a good choice when sending object graphs to web applications and mobile applications because JSON is the native serialization format for JavaScript and mobile apps often make calls over limited bandwidth, so the number of bytes is important.
.NET has multiple classes that will serialize to and from XML and JSON. We will start by looking at XmlSerializer and JsonSerializer.
Serializing as XML
Let's start by looking at XML, probably the world's most used serialization format (for now). To show a typical example, we will define a custom class to store information about a person and then create an object graph using a list of Person instances with nesting:
- Use your preferred code editor to add a new console app named
WorkingWithSerializationto theChapter09solution/workspace. - In Visual Studio Code, select
WorkingWithSerializationas the active OmniSharp project. - Add a class named
Personwith aSalaryproperty that isprotected, meaning it is only accessible to itself and derived classes. To populate the salary, the class has a constructor with a single parameter to set the initial salary, as shown in the following code:namespace Packt.Shared; public class Person { public Person(decimal initialSalary) { Salary = initialSalary; } public string? FirstName { get; set; } public string? LastName { get; set; } public DateTime DateOfBirth { get; set; } public HashSet<Person>? Children { get; set; } protected decimal Salary { get; set; } } - In
Program.cs, import namespaces for working with XML serialization and statically import theConsole,Environment, andPathclasses, as shown in the following code:using System.Xml.Serialization; // XmlSerializer using Packt.Shared; // Person using static System.Console; using static System.Environment; using static System.IO.Path; - Add statements to create an object graph of
Personinstances, as shown in the following code:// create an object graph List<Person> people = new() { new(30000M) { FirstName = "Alice", LastName = "Smith", DateOfBirth = new(1974, 3, 14) }, new(40000M) { FirstName = "Bob", LastName = "Jones", DateOfBirth = new(1969, 11, 23) }, new(20000M) { FirstName = "Charlie", LastName = "Cox", DateOfBirth = new(1984, 5, 4), Children = new() { new(0M) { FirstName = "Sally", LastName = "Cox", DateOfBirth = new(2000, 7, 12) } } } }; // create object that will format a List of Persons as XML XmlSerializer xs = new(people.GetType()); // create a file to write to string path = Combine(CurrentDirectory, "people.xml"); using (FileStream stream = File.Create(path)) { // serialize the object graph to the stream xs.Serialize(stream, people); } WriteLine("Written {0:N0} bytes of XML to {1}", arg0: new FileInfo(path).Length, arg1: path); WriteLine(); // Display the serialized object graph WriteLine(File.ReadAllText(path)); - Run the code, view the result, and note that an exception is thrown, as shown in the following output:
Unhandled Exception: System.InvalidOperationException: Packt.Shared.Person cannot be serialized because it does not have a parameterless constructor. - In
Person, add a statement to define a parameterless constructor, as shown in the following code:public Person() { }The constructor does not need to do anything, but it must exist so that the
XmlSerializercan call it to instantiate newPersoninstances during the deserialization process. - Rerun the code and view the result, and note that the object graph is serialized as XML elements like
<FirstName>Bob</FirstName>and that theSalaryproperty is not included because it is not apublicproperty, as shown in the following output:Written 752 bytes of XML to /Users/markjprice/Code/Chapter09/WorkingWithSerialization/people.xml <?xml version="1.0"?> <ArrayOfPerson xmlns:xsi="http://www.w3.org/2001/XMLSchema-instance" xmlns:xsd="http://www.w3.org/2001/XMLSchema"> <Person> <FirstName>Alice</FirstName> <LastName>Smith</LastName> <DateOfBirth>1974-03-14T00:00:00</DateOfBirth> </Person> <Person> <FirstName>Bob</FirstName> <LastName>Jones</LastName> <DateOfBirth>1969-11-23T00:00:00</DateOfBirth> </Person> <Person> <FirstName>Charlie</FirstName> <LastName>Cox</LastName> <DateOfBirth>1984-05-04T00:00:00</DateOfBirth> <Children> <Person> <FirstName>Sally</FirstName> <LastName>Cox</LastName> <DateOfBirth>2000-07-12T00:00:00</DateOfBirth> </Person> </Children> </Person> </ArrayOfPerson>
Generating compact XML
We could make the XML more compact using attributes instead of elements for some fields:
- In
Person, import theSystem.Xml.Serializationnamespace so that you can decorate some properties with the[XmlAttribute]attribute. - Decorate the first name, last name, and date of birth properties with the
[XmlAttribute]attribute, and set a short name for each property, as shown highlighted in the following code:[XmlAttribute("fname")] public string FirstName { get; set; } [XmlAttribute("lname")] public string LastName { get; set; } [XmlAttribute("dob")] public DateTime DateOfBirth { get; set; } - Run the code and note that the size of the file has been reduced from 752 to 462 bytes, a space-saving of more than a third, by outputting property values as XML attributes, as shown in the following output:
Written 462 bytes of XML to /Users/markjprice/Code/Chapter09/ WorkingWithSerialization/people.xml
<?xml version="1.0"?>
<ArrayOfPerson xmlns:xsi="http://www.w3.org/2001/XMLSchema-instance" xmlns:xsd="http://www.w3.org/2001/XMLSchema">
  <Person fname="Alice" lname="Smith" dob="1974-03-14T00:00:00" />
  <Person fname="Bob" lname="Jones" dob="1969-11-23T00:00:00" />
  <Person fname="Charlie" lname="Cox" dob="1984-05-04T00:00:00">
    <Children>
      <Person fname="Sally" lname="Cox" dob="2000-07-12T00:00:00" />
    </Children>
  </Person>
</ArrayOfPerson>
Deserializing XML files
Now let's try deserializing the XML file back into live objects in memory:
- Add statements to open the XML file and then deserialize it, as shown in the following code:
using (FileStream xmlLoad = File.Open(path, FileMode.Open)) { // deserialize and cast the object graph into a List of Person List<Person>? loadedPeople = xs.Deserialize(xmlLoad) as List<Person>; if (loadedPeople is not null) { foreach (Person p in loadedPeople) { WriteLine("{0} has {1} children.", p.LastName, p.Children?.Count ?? 0); } } } - Run the code and note that the people are loaded successfully from the XML file and then enumerated, as shown in the following output:
Smith has 0 children.
Jones has 0 children.
Cox has 1 children.
There are many other attributes that can be used to control the XML generated.
If you don't use any annotations, XmlSerializer performs a case-insensitive match using the property name when deserializing.
Good Practice: When using XmlSerializer, remember that only the public fields and properties are included, and the type must have a parameterless constructor. You can customize the output with attributes.
Serializing with JSON
One of the most popular .NET libraries for working with the JSON serialization format is Newtonsoft.Json, known as Json.NET. It is mature and powerful. Let's see it in action:
- In the
WorkingWithSerializationproject, add a package reference for the latest version ofNewtonsoft.Json, as shown in the following markup:<ItemGroup> <PackageReference Include="Newtonsoft.Json" Version="13.0.1" /> </ItemGroup> - Build the
WorkingWithSerializationproject to restore packages. - In
Program.cs, add statements to create a text file and then serialize the people into the file as JSON, as shown in the following code:// create a file to write to string jsonPath = Combine(CurrentDirectory, "people.json"); using (StreamWriter jsonStream = File.CreateText(jsonPath)) { // create an object that will format as JSON Newtonsoft.Json.JsonSerializer jss = new(); // serialize the object graph into a string jss.Serialize(jsonStream, people); } WriteLine(); WriteLine("Written {0:N0} bytes of JSON to: {1}", arg0: new FileInfo(jsonPath).Length, arg1: jsonPath); // Display the serialized object graph WriteLine(File.ReadAllText(jsonPath)); - Run the code and note that JSON requires less than half the number of bytes compared to XML with elements. It's even smaller than the XML file, which uses attributes, as shown in the following output:
Written 366 bytes of JSON to: /Users/markjprice/Code/Chapter09/ WorkingWithSerialization/people.json [{"FirstName":"Alice","LastName":"Smith","DateOfBirth":"1974-03-
14T00:00:00","Children":null},{"FirstName":"Bob","LastName":"Jones","Date
OfBirth":"1969-11-23T00:00:00","Children":null},{"FirstName":"Charlie","L astName":"Cox","DateOfBirth":"1984-05-04T00:00:00","Children":[{"FirstNam e":"Sally","LastName":"Cox","DateOfBirth":"2000-07-12T00:00:00","Children ":null}]}]
High-performance JSON processing
.NET Core 3.0 introduced a new namespace for working with JSON, System.Text.Json, which is optimized for performance by leveraging APIs like Span<T>.
Also, older libraries like Json.NET are implemented by reading UTF-16. It would be more performant to read and write JSON documents using UTF-8 because most network protocols, including HTTP, use UTF-8 and you can avoid transcoding UTF-8 to and from Json.NET's Unicode string values.
With the new API, Microsoft achieved between 1.3x and 5x improvement, depending on the scenario.
The original author of Json.NET, James Newton-King, joined Microsoft and has been working with them to develop their new JSON types. As he says in a comment discussing the new JSON APIs, "Json.NET isn't going away," as shown in Figure 9.3:

Figure 9.3: A comment by the original author of Json.NET
Let's see how to use the new JSON APIs to deserialize a JSON file:
- In the
WorkingWithSerializationproject, inProgram.cs, import the new JSON class for performing serialization using an alias to avoid conflicting names with the Json.NET one we used before, as shown in the following code:using NewJson = System.Text.Json.JsonSerializer; - Add statements to open the JSON file, deserialize it, and output the names and counts of the children of the people, as shown in the following code:
using (FileStream jsonLoad = File.Open(jsonPath, FileMode.Open)) { // deserialize object graph into a List of Person List<Person>? loadedPeople = await NewJson.DeserializeAsync(utf8Json: jsonLoad, returnType: typeof(List<Person>)) as List<Person>; if (loadedPeople is not null) { foreach (Person p in loadedPeople) { WriteLine("{0} has {1} children.", p.LastName, p.Children?.Count ?? 0); } } } - Run the code and view the result, as shown in the following output:
Smith has 0 children.
Jones has 0 children.
Cox has 1 children.
Good Practice: Choose Json.NET for developer productivity and a large feature set or System.Text.Json for performance.
Controlling JSON processing
There are many options for taking control of how JSON is processed, as shown in the following list:
- Including and excluding fields.
- Setting a casing policy.
- Selecting a case-sensitivity policy.
- Choosing between compact and prettified whitespace.
Let's see some in action:
- Use your preferred code editor to add a new console app named
WorkingWithJsonto theChapter09solution/workspace. - In Visual Studio Code, select
WorkingWithJsonas the active OmniSharp project. - In the
WorkingWithJsonproject, inProgram.cs, delete the existing code, import the two main namespaces for working with JSON, and then statically import theSystem.Console,System.Environment, andSystem.IO.Pathtypes, as shown in the following code:using System.Text.Json; // JsonSerializer using System.Text.Json.Serialization; // [JsonInclude] using static System.Console; using static System.Environment; using static System.IO.Path; - At the bottom of
Program.cs, define a class namedBook, as shown in the following code:public class Book { // constructor to set non-nullable property public Book(string title) { Title = title; } // properties public string Title { get; set; } public string? Author { get; set; } // fields [JsonInclude] // include this field public DateOnly PublishDate; [JsonInclude] // include this field public DateTimeOffset Created; public ushort Pages; } - Above the
Bookclass, add statements to create an instance of theBookclass and serialize it to JSON, as shown in the following code:Book csharp10 = new(title: "C# 10 and .NET 6 - Modern Cross-platform Development") { Author = "Mark J Price", PublishDate = new(year: 2021, month: 11, day: 9), Pages = 823, Created = DateTimeOffset.UtcNow, }; JsonSerializerOptions options = new() { IncludeFields = true, // includes all fields PropertyNameCaseInsensitive = true, WriteIndented = true, PropertyNamingPolicy = JsonNamingPolicy.CamelCase, }; string filePath = Combine(CurrentDirectory, "book.json"); using (Stream fileStream = File.Create(filePath)) { JsonSerializer.Serialize<Book>( utf8Json: fileStream, value: csharp10, options); } WriteLine("Written {0:N0} bytes of JSON to {1}", arg0: new FileInfo(filePath).Length, arg1: filePath); WriteLine(); // Display the serialized object graph WriteLine(File.ReadAllText(filePath)); - Run the code and view the result, as shown in the following output:
Written 315 bytes of JSON to C:\Code\Chapter09\WorkingWithJson\bin\Debug\net6.0\book.json
{
  "title": "C# 10 and .NET 6 - Modern Cross-platform Development",
  "author": "Mark J Price",
  "publishDate": {
    "year": 2021,
    "month": 11,
    "day": 9,
    "dayOfWeek": 2,
    "dayOfYear": 313,
    "dayNumber": 738102
  },
  "created": "2021-08-20T08:07:02.3191648+00:00",
  "pages": 823
}
Note the following:
- The JSON file is 315 bytes.
- The member names use camelCasing, for example,
publishDate. This is best for subsequent processing in a browser with JavaScript. - All fields are included due to the options set, including
pages. - JSON is prettified for easier human legibility.
DateTimeOffsetvalues are stored as a single standard string format.DateOnlyvalues are stored as an object with sub-properties for date parts likeyearandmonth.
- In
Program.cs, when setting theJsonSerializerOptions, comment out the setting of casing policy, write indented, and include fields. - Run the code and view the result, as shown in the following output:
Written 230 bytes of JSON to C:\Code\Chapter09\WorkingWithJson\bin\Debug\net6.0\book.json
{"Title":"C# 10 and .NET 6 - Modern Cross-platform Development","Author":"Mark J Price","PublishDate":{"Year":2021,"Month":11,"Day":9,"DayOfWeek":2,"DayOfYear":313,"DayNumber":738102},"Created":"2021-08-20T08:12:31.6852484+00:00"}
Note the following:
- The JSON file is 230 bytes, a more than 25% reduction.
- The member names use normal casing, for example,
PublishDate. - The
Pagesfield is missing. The other fields are included due to the[JsonInclude]attribute onPublishDateandCreatedfield. - JSON is compact with minimal whitespace to save bandwidth for transmission or storage.
New JSON extension methods for working with HTTP responses
In .NET 5, Microsoft added refinements to the types in the System.Text.Json namespace like extension methods for HttpResponse, which you will see in Chapter 16, Building and Consuming Web Services.
Migrating from Newtonsoft to new JSON
If you have existing code that uses the Newtonsoft Json.NET library and you want to migrate to the new System.Text.Json namespace, then Microsoft has specific documentation for that, which you will find at the following link:
Practicing and exploring
Test your knowledge and understanding by answering some questions, get some hands-on practice, and explore this chapter's topics with more in-depth research.
Exercise 9.1 – Test your knowledge
Answer the following questions:
- What is the difference between using the
Fileclass and theFileInfoclass? - What is the difference between the
ReadBytemethod and theReadmethod of a stream? - When would you use the
StringReader,TextReader, andStreamReaderclasses? - What does the
DeflateStreamtype do? - How many bytes per character does UTF-8 encoding use?
- What is an object graph?
- What is the best serialization format to choose for minimizing space requirements?
- What is the best serialization format to choose for cross-platform compatibility?
- Why is it bad to use a
stringvalue like"\Code\Chapter01"to represent a path, and what should you do instead? - Where can you find information about NuGet packages and their dependencies?
Exercise 9.2 – Practice serializing as XML
In the Chapter09 solution/workspace, create a console application named Exercise02 that creates a list of shapes, uses serialization to save it to the filesystem using XML, and then deserializes it back:
// create a list of Shapes to serialize
List<Shape> listOfShapes = new()
{
  new Circle { Colour = "Red", Radius = 2.5 },
  new Rectangle { Colour = "Blue", Height = 20.0, Width = 10.0 },
  new Circle { Colour = "Green", Radius = 8.0 },
  new Circle { Colour = "Purple", Radius = 12.3 },
  new Rectangle { Colour = "Blue", Height = 45.0, Width = 18.0 }
};
Shapes should have a read-only property named Area so that when you deserialize, you can output a list of shapes, including their areas, as shown here:
List<Shape> loadedShapesXml =
  serializerXml.Deserialize(fileXml) as List<Shape>;
foreach (Shape item in loadedShapesXml)
{
  WriteLine("{0} is {1} and has an area of {2:N2}",
    item.GetType().Name, item.Colour, item.Area);
}
This is what your output should look like when you run your console application:
Loading shapes from XML:
Circle is Red and has an area of 19.63
Rectangle is Blue and has an area of 200.00
Circle is Green and has an area of 201.06
Circle is Purple and has an area of 475.29
Rectangle is Blue and has an area of 810.00
Exercise 9.3 – Explore topics
Use the links on the following page to learn more detail about the topics covered in this chapter:
Summary
In this chapter, you learned how to read from and write to text files and XML files, how to compress and decompress files, how to encode and decode text, and how to serialize an object into JSON and XML (and deserialize it back again).
In the next chapter, you will learn how to work with databases using Entity Framework Core.