07
Packaging and Distributing .NET Types
This chapter is about how C# keywords are related to .NET types, and about the relationship between namespaces and assemblies. You'll also become familiar with how to package and publish your .NET apps and libraries for cross-platform use, how to use legacy .NET Framework libraries in .NET libraries, and the possibility of porting legacy .NET Framework code bases to modern .NET.
This chapter covers the following topics:
- The road to .NET 6
- Understanding .NET components
- Publishing your applications for deployment
- Decompiling .NET assemblies
- Packaging your libraries for NuGet distribution
- Porting from .NET Framework to modern .NET
- Working with preview features
The road to .NET 6
This part of the book is about the functionality in the Base Class Library (BCL) APIs provided by .NET and how to reuse functionality across all the different .NET platforms using .NET Standard.
First, we will review the route to this point and why it is important to understand the past.
.NET Core 2.0 and later's support for a minimum of .NET Standard 2.0 is important because it provides many of the APIs that were missing from the first version of .NET Core. The 15 years' worth of libraries and applications that .NET Framework developers had available to them that are relevant for modern development have now been migrated to .NET and can run cross-platform on macOS and Linux variants, as well as on Windows.
.NET Standard 2.1 added about 3,000 new APIs. Some of those APIs need runtime changes that would break backward compatibility, so .NET Framework 4.8 only implements .NET Standard 2.0. .NET Core 3.0, Xamarin, Mono, and Unity implement .NET Standard 2.1.
.NET 6 removes the need for .NET Standard if all your projects can use .NET 6. Since you might still need to create class libraries for legacy .NET Framework projects or legacy Xamarin mobile apps, there is still a need to create .NET Standard 2.0 and 2.1 class libraries. In March 2021, I surveyed professional developers, and half still needed to create .NET Standard 2.0 compliant class libraries.
Now that .NET 6 has been released with preview support for mobile and desktop apps built using .NET MAUI, the need for .NET Standard has been further reduced.
To summarize the progress that .NET has made over the past five years, I have compared the major .NET Core and modern .NET versions with the equivalent .NET Framework versions in the following list:
- .NET Core 1.x: much smaller API compared to .NET Framework 4.6.1, which was the current version in March 2016.
- .NET Core 2.x: reached API parity with .NET Framework 4.7.1 for modern APIs because they both implement .NET Standard 2.0.
- .NET Core 3.x: larger API compared to .NET Framework for modern APIs because.NET Framework 4.8 does not implement .NET Standard 2.1.
- .NET 5: even larger API compared to .NET Framework 4.8 for modern APIs, with much-improved performance.
- .NET 6: final unification with the support for mobile apps in .NET MAUI, expected by May 2022.
.NET Core 1.0
.NET Core 1.0 was released in June 2016 and focused on implementing an API suitable for building modern cross-platform apps, including web and cloud applications and services for Linux using ASP.NET Core.
.NET Core 1.1
.NET Core 1.1 was released in November 2016 and focused on fixing bugs, increasing the number of Linux distributions supported, supporting .NET Standard 1.6, and improving performance, especially with ASP.NET Core for web apps and services.
.NET Core 2.0
.NET Core 2.0 was released in August 2017 and focused on implementing .NET Standard 2.0, the ability to reference .NET Framework libraries, and more performance improvements.
The third edition of this book was published in November 2017, so it covered up to .NET Core 2.0 and .NET Core for Universal Windows Platform (UWP) apps.
.NET Core 2.1
.NET Core 2.1 was released in May 2018 and focused on an extendable tooling system, adding new types like Span<T>, new APIs for cryptography and compression, a Windows Compatibility Pack with an additional 20,000 APIs to help port old Windows applications, Entity Framework Core value conversions, LINQ GroupBy conversions, data seeding, query types, and even more performance improvements, including the topics listed in the following table:
|
Feature |
Chapter |
Topic |
|
Spans |
8 |
Working with spans, indexes, and ranges |
|
Brotli compression |
9 |
Compressing with the Brotli algorithm |
|
Cryptography |
20 |
What's new in cryptography? |
|
EF Core Lazy loading |
10 |
Enabling lazy loading |
|
EF Core Data seeding |
10 |
Understanding data seeding |
.NET Core 2.2
.NET Core 2.2 was released in December 2018 and focused on diagnostic improvements for the runtime, optional tiered compilation, and adding new features to ASP.NET Core and Entity Framework Core like spatial data support using types from the NetTopologySuite (NTS) library, query tags, and collections of owned entities.
.NET Core 3.0
.NET Core 3.0 was released in September 2019 and focused on adding support for building Windows desktop applications using Windows Forms (2001), Windows Presentation Foundation (WPF; 2006), and Entity Framework 6.3, side-by-side and app-local deployments, a fast JSON reader, serial port access and other pinout access for Internet of Things (IoT) solutions, and tiered compilation by default, including the topics listed in the following table:
|
Feature |
Chapter |
Topic |
|
Embedding .NET in-app |
7 |
Publishing your applications for deployment |
|
|
8 |
Working with spans, indexes, and ranges |
|
|
9 |
High-performance JSON processing |
|
Async streams |
12 |
Working with async streams |
The fourth edition of this book was published in October 2019, so it covered some of the new APIs added in later versions up to .NET Core 3.0.
.NET Core 3.1
.NET Core 3.1 was released in December 2019 and focused on bug fixes and refinements so that it could be a Long Term Support (LTS) release, not losing support until December 2022.
.NET 5.0
.NET 5.0 was released in November 2020 and focused on unifying the various .NET platforms except mobile, refining the platform, and improving performance, including the topics listed in the following table:
|
Feature |
Chapter |
Topic |
|
|
8 |
Working with numbers |
|
Regular expression performance improvements |
8 |
Regular expression performance improvements |
|
|
9 |
High-performance JSON processing |
|
EF Core generated SQL |
10 |
Getting the generated SQL |
|
EF Core Filtered Include |
10 |
Filtering included entities |
|
EF Core Scaffold-DbContext now singularizes using Humanizer |
10 |
Scaffolding models using an existing database |
.NET 6.0
.NET 6.0 was released in November 2021 and focused on unifying with the mobile platform, adding more features to EF Core for data management, and improving performance, including the topics listed in the following table:
|
Feature |
Chapter |
Topic |
|
Check .NET SDK status |
7 |
Checking your .NET SDKs for updates |
|
Support for Apple Silicon |
7 |
Creating a console application to publish |
|
Link trim mode as default |
7 |
Reducing the size of apps using app trimming |
|
|
8 |
Specifying date and time values |
|
|
8 |
Improving performance by ensuring the capacity of a collection |
|
EF Core configure conventions |
10 |
Configuring preconvention models |
|
New LINQ methods |
11 |
Building LINQ expressions with the Enumerable class |
Improving performance from .NET Core 2.0 to .NET 5
Microsoft has made significant improvements to performance in the past few years. You can read a detailed blog post at the following link: https://devblogs.microsoft.com/dotnet/performance-improvements-in-net-5/.
Checking your .NET SDKs for updates
With .NET 6, Microsoft added a command to check the versions of .NET SDKs and runtimes that you have installed and warn you if any need updating. For example, you enter the following command:
dotnet sdk check
You will then see results, including the status of available updates, as shown in the following partial output:
.NET SDKs:
Version                         Status
-----------------------------------------------------------------------------
3.1.412                         Up to date.
5.0.202                         Patch 5.0.206 is available.
...
Understanding .NET components
.NET is made up of several pieces, which are shown in the following list:
- Language compilers: These turn your source code written with languages such as C#, F#, and Visual Basic into intermediate language (IL) code stored in assemblies. With C# 6.0 and later, Microsoft switched to an open-source rewritten compiler known as Roslyn that is also used by Visual Basic.
- Common Language Runtime (CoreCLR): This runtime loads assemblies, compiles the IL code stored in them into native code instructions for your computer's CPU, and executes the code within an environment that manages resources such as threads and memory.
- Base Class Libraries (BCL or CoreFX): These are prebuilt assemblies of types packaged and distributed using NuGet for performing common tasks when building applications. You can use them to quickly build anything you want, rather like combining LEGO™ pieces. .NET Core 2.0 implemented .NET Standard 2.0, which is a superset of all previous versions of .NET Standard, and lifted .NET Core up to parity with .NET Framework and Xamarin. .NET Core 3.0 implemented .NET Standard 2.1, which added new capabilities and enables performance improvements beyond those available in .NET Framework. .NET 6 implements a unified BCL across all types of apps, including mobile.
Understanding assemblies, NuGet packages, and namespaces
An assembly is where a type is stored in the filesystem. Assemblies are a mechanism for deploying code. For example, the System.Data.dll assembly contains types for managing data. To use types in other assemblies, they must be referenced. Assemblies can be static (pre-created) or dynamic (generated at runtime). Dynamic assemblies are an advanced feature that we will not cover in this book. Assemblies can be compiled into a single file as a DLL (class library) or an EXE (console app).
Assemblies are distributed as NuGet packages, which are files downloadable from public online feeds and can contain multiple assemblies and other resources. You will also hear about project SDKs, workloads, and platforms, which are combinations of NuGet packages.
Microsoft's NuGet feed is found here: https://www.nuget.org/.
What is a namespace?
A namespace is the address of a type. Namespaces are a mechanism to uniquely identify a type by requiring a full address rather than just a short name. In the real world, Bob of 34 Sycamore Street is different from Bob of 12 Willow Drive.
In .NET, the IActionFilter interface of the System.Web.Mvc namespace is different from the IActionFilter interface of the System.Web.Http.Filters namespace.
Understanding dependent assemblies
If an assembly is compiled as a class library and provides types for other assemblies to use, then it has the file extension .dll (dynamic link library), and it cannot be executed standalone.
Likewise, if an assembly is compiled as an application, then it has the file extension .exe (executable) and can be executed standalone. Before .NET Core 3.0, console apps were compiled to .dll files and had to be executed by the dotnet run command or a host executable.
Any assembly can reference one or more class library assemblies as dependencies, but you cannot have circular references. So, assembly B cannot reference assembly A if assembly A already references assembly B. The compiler will warn you if you attempt to add a dependency reference that would cause a circular reference. Circular references are often a warning sign of poor code design. If you are sure that you need a circular reference, then use an interface to solve it.
Understanding the Microsoft .NET project SDKs
By default, console applications have a dependency reference on the Microsoft .NET project SDK. This platform contains thousands of types in NuGet packages that almost all applications would need, such as the System.Int32 and System.String types.
When using .NET, you reference the dependency assemblies, NuGet packages, and platforms that your application needs in a project file.
Let's explore the relationship between assemblies and namespaces:
- Use your preferred code editor to create a new solution/workspace named
Chapter07. - Add a console app project, as defined in the following list:
- Project template: Console Application /
console - Workspace/solution file and folder:
Chapter07 - Project file and folder:
AssembliesAndNamespaces
- Project template: Console Application /
- Open
AssembliesAndNamespaces.csprojand note that it is a typical project file for a .NET 6 application, as shown in the following markup:<Project Sdk="Microsoft.NET.Sdk"> <PropertyGroup> <OutputType>Exe</OutputType> <TargetFramework>net6.0</TargetFramework> <Nullable>enable</Nullable> <ImplicitUsings>enable</ImplicitUsings> </PropertyGroup> </Project>
Understanding namespaces and types in assemblies
Many common .NET types are in the System.Runtime.dll assembly. There is not always a one-to-one mapping between assemblies and namespaces. A single assembly can contain many namespaces and a namespace can be defined in many assemblies. You can see the relationship between some assemblies and the namespaces that they supply types for, as shown in the following table:
|
Assembly |
Example namespaces |
Example types |
|
|
|
|
|
|
|
|
|
|
|
|
|
|
|
|
Understanding NuGet packages
.NET is split into a set of packages, distributed using a Microsoft-supported package management technology named NuGet. Each of these packages represents a single assembly of the same name. For example, the System.Collections package contains the System.Collections.dll assembly.
The following are the benefits of packages:
- Packages can be easily distributed on public feeds.
- Packages can be reused.
- Packages can ship on their own schedule.
- Packages can be tested independently of other packages.
- Packages can support different OSes and CPUs by including multiple versions of the same assembly built for different OSes and CPUs.
- Packages can have dependencies specific to only one library.
- Apps are smaller because unreferenced packages aren't part of the distribution. The following table lists some of the more important packages and their important types:
|
Package |
Important types |
|
|
|
|
|
|
|
|
|
|
|
|
|
|
|
Understanding frameworks
There is a two-way relationship between frameworks and packages. Packages define the APIs, while frameworks group packages. A framework without any packages would not define any APIs.
.NET packages each support a set of frameworks. For example, the System.IO.FileSystem package version 4.3.0 supports the following frameworks:
- .NET Standard, version 1.3 or later.
- .NET Framework, version 4.6 or later.
- Six Mono and Xamarin platforms (for example, Xamarin.iOS 1.0).
More Information: You can read the details at the following link: https://www.nuget.org/packages/System.IO.FileSystem/.
Importing a namespace to use a type
Let's explore how namespaces are related to assemblies and types:
- In the
AssembliesAndNamespacesproject, inProgram.cs, enter the following code:XDocument doc = new(); - Build the project and note the compiler error message, as shown in the following output:
The type or namespace name 'XDocument' could not be found (are you missing a using directive or an assembly reference?)The
XDocumenttype is not recognized because we have not told the compiler what the namespace of the type is. Although this project already has a reference to the assembly that contains the type, we also need to either prefix the type name with its namespace or import the namespace. - Click inside the
XDocumentclass name. Your code editor displays a light bulb, showing that it recognizes the type and can automatically fix the problem for you. - Click the light bulb, and select
using System.Xml.Linq;from the menu.
This will import the namespace by adding a using statement to the top of the file. Once a namespace is imported at the top of a code file, then all the types within the namespace are available for use in that code file by just typing their name without the type name needing to be fully qualified by prefixing it with its namespace.
Sometimes I like to add a comment with a type name after importing a namespace to remind me why I need to import that namespace, as shown in the following code:
using System.Xml.Linq; // XDocument
Relating C# keywords to .NET types
One of the common questions I get from new C# programmers is, "What is the difference between string with a lowercase s and String with an uppercase S?"
The short answer is easy: none. The long answer is that all C# type keywords like string or int are aliases for a .NET type in a class library assembly.
When you use the string keyword, the compiler recognizes it as a System.String type. When you use the int type, the compiler recognizes it as a System.Int32 type.
Let's see this in action with some code:
- In
Program.cs, declare two variables to holdstringvalues, one using lowercasestringand one using uppercaseString, as shown in the following code:string s1 = "Hello"; String s2 = "World"; WriteLine($"{s1} {s2}"); - Run the code, and note that at the moment, they both work equally well, and literally mean the same thing.
- In
AssembliesAndNamespaces.csproj, add entries to prevent theSystemnamespace from being globally imported, as shown in the following markup:<ItemGroup> <Using Remove="System" /> </ItemGroup> - In
Program.csnote the compiler error message, as shown in the following output:The type or namespace name 'String' could not be found (are you missing a using directive or an assembly reference?) - At the top of
Program.cs, import theSystemnamespace with ausingstatement that will fix the error, as shown in the following code:using System; // String
Good Practice: When you have a choice, use the C# keyword instead of the actual type because the keywords do not need the namespace imported.
Mapping C# aliases to .NET types
The following table shows the 18 C# type keywords along with their actual .NET types:
|
Keyword |
.NET type |
Keyword |
.NET type |
|
|
|
|
|
|
|
|
|
|
|
|
|
|
|
|
|
|
|
|
|
|
|
|
|
|
|
|
|
|
|
|
|
|
|
|
|
|
|
|
|
|
|
|
|
Other .NET programming language compilers can do the same thing. For example, the Visual Basic .NET language has a type named Integer that is its alias for System.Int32.
Understanding native-sized integers
C# 9 introduced nint and nuint keyword alias for native-sized integers, meaning that the storage size for the integer value is platform specific. They store a 32-bit integer in a 32-bit process and sizeof() returns 4 bytes; they store a 64-bit integer in a 64-bit process and sizeof() returns 8 bytes. The aliases represent pointers to the integer value in memory, which is why their .NET names are IntPtr and UIntPtr. The actual storage type will be either System.Int32 or System.Int64 depending on the process.
In a 64-bit process, the following code:
WriteLine($"int.MaxValue = {int.MaxValue:N0}");
WriteLine($"nint.MaxValue = {nint.MaxValue:N0}");
produces this output:
int.MaxValue = 2,147,483,647
nint.MaxValue = 9,223,372,036,854,775,807
Revealing the location of a type
Code editors provide built-in documentation for .NET types. Let's explore:
- Right-click inside
XDocumentand choose Go to Definition. - Navigate to the top of the code file and note the assembly filename is
System.Xml.XDocument.dll, but the class is in theSystem.Xml.Linqnamespace, as shown in Figure 7.1: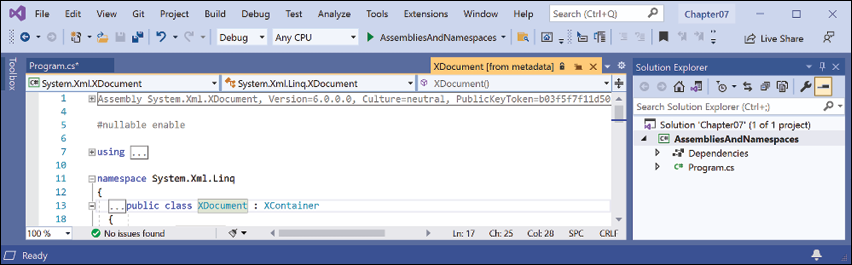
Figure 7.1: Assembly and namespace that contains the XDocument type
- Close the XDocument [from metadata] tab.
- Right-click inside
stringorStringand choose Go to Definition. - Navigate to the top of the code file and note the assembly filename is
System.Runtime.dllbut the class is in theSystemnamespace.
Actually, your code editor is technically lying to you. If you remember when we wrote code in Chapter 2, Speaking C#, when we revealed the extent of the C# vocabulary, we discovered that the System.Runtime.dll assembly contains zero types.
What it does contain are type-forwarders. These are special types that appear to exist in an assembly but actually are implemented elsewhere. In this case, they are implemented deep inside the .NET runtime using highly optimized code.
Sharing code with legacy platforms using .NET Standard
Before .NET Standard, there were Portable Class Libraries (PCLs). With PCLs, you could create a library of code and explicitly specify which platforms you want the library to support, such as Xamarin, Silverlight, and Windows 8. Your library could then use the intersection of APIs that are supported by the specified platforms.
Microsoft realized that this is unsustainable, so they created .NET Standard—a single API that all future .NET platforms would support. There are older versions of .NET Standard, but .NET Standard 2.0 was an attempt to unify all important recent .NET platforms. .NET Standard 2.1 was released in late 2019 but only .NET Core 3.0 and that year's version of Xamarin support its new features. For the rest of this book, I will use the term .NET Standard to mean .NET Standard 2.0.
.NET Standard is similar to HTML5 in that they are both standards that a platform should support. Just as Google's Chrome browser and Microsoft's Edge browser implement the HTML5 standard, .NET Core, .NET Framework, and Xamarin all implement .NET Standard. If you want to create a library of types that will work across variants of legacy .NET, you can do so most easily with .NET Standard.
Good Practice: Since many of the API additions in .NET Standard 2.1 required runtime changes, and .NET Framework is Microsoft's legacy platform that needs to remain as unchanging as possible, .NET Framework 4.8 remained on .NET Standard 2.0 rather than implementing .NET Standard 2.1. If you need to support .NET Framework customers, then you should create class libraries on .NET Standard 2.0 even though it is not the latest and does not support all the recent language and BCL new features.
Your choice of which .NET Standard version to target comes down to a balance between maximizing platform support and available functionality. A lower version supports more platforms but has a smaller set of APIs. A higher version supports fewer platforms but has a larger set of APIs. Generally, you should choose the lowest version that supports all the APIs that you need.
Understanding defaults for class libraries with different SDKs
When using the dotnet SDK tool to create a class library it might be useful to know which target framework will be used by default, as shown in the following table:
|
SDK |
Default target framework for new class libraries |
|
.NET Core 3.1 |
|
|
.NET 5 |
|
|
.NET 6 |
|
Of course, just because a class library targets a specific version of .NET by default does not mean you cannot change it after creating a class library project using the default template.
You can manually set the target framework to a value that supports the projects that need to reference that library, as shown in the following table:
|
Class library target framework |
Can be used by projects that target |
|
|
.NET Framework 4.6.1 or later, .NET Core 2.0 or later, .NET 5.0 or later, Mono 5.4 or later, Xamarin.Android 8.0 or later, Xamarin.iOS 10.14 or later |
|
|
.NET Core 3.0 or later, .NET 5.0 or later, Mono 6.4 or later, Xamarin.Android 10.0 or later, Xamarin.iOS 12.16 or later |
|
|
.NET 5.0 or later |
|
|
.NET 6.0 or later |
Good Practice: Always check the target framework of a class library and then manually change it to something more appropriate if necessary. Make a conscious decision about what it should be rather than accept the default.
Creating a .NET Standard 2.0 class library
We will create a class library using .NET Standard 2.0 so that it can be used across all important .NET legacy platforms and cross-platform on Windows, macOS, and Linux operating systems, while also having access to a wide set of .NET APIs:
- Use your preferred code editor to add a new class library named
SharedLibraryto theChapter07solution/workspace. - If you use Visual Studio 2022, when prompted for the Target Framework, select .NET Standard 2.0, and then set the startup project for the solution to the current selection.
- If you use Visual Studio Code, include a switch to target .NET Standard 2.0, as shown in the following command:
dotnet new classlib -f netstandard2.0 - If you use Visual Studio Code, select
SharedLibraryas the active OmniSharp project.
Good Practice: If you need to create types that use new features in .NET 6.0, as well as types that only use .NET Standard 2.0 features, then you can create two separate class libraries: one targeting .NET Standard 2.0 and one targeting .NET 6.0. You will see this in action in Chapter 10, Working with Data Using Entity Framework Core.
An alternative to manually creating two class libraries is to create one that supports multi-targeting. If you would like me to add a section about multi-targeting to the next edition, please let me know. You can read about multi-targeting here: https://docs.microsoft.com/en-us/dotnet/standard/library-guidance/cross-platform-targeting#multi-targeting.
Controlling the .NET SDK
By default, executing dotnet commands uses the most recent installed .NET SDK. There may be times when you want to control which SDK is used.
For example, one reader of the fourth edition wanted their experience to match the book steps that use the .NET Core 3.1 SDK. But they had installed the .NET 5.0 SDK as well and that was being used by default. As described in the previous section, the behavior when creating new class libraries changed to target .NET 5.0 instead of .NET Standard 2.0, and that confused the reader.
You can control the .NET SDK used by default by using a global.json file. The dotnet command searches the current folder and ancestor folders for a global.json file.
- Create a subdirectory/folder in the
Chapter07folder namedControlSDK. - On Windows, start Command Prompt or Windows Terminal. On macOS, start Terminal. If you are using Visual Studio Code, then you can use the integrated terminal.
- In the
ControlSDKfolder, at the command prompt or terminal, enter a command to create aglobal.jsonfile that forces the use of the latest .NET Core 3.1 SDK, as shown in the following command:dotnet new globaljson --sdk-version 3.1.412 - Open the
global.jsonfile and review its contents, as shown in the following markup:{ "sdk": { "version": "3.1.412" } }You can discover the version numbers of the latest .NET SDKs in the table at the following link: https://dotnet.microsoft.com/download/visual-studio-sdks
- In the
ControlSDKfolder, at the command prompt or terminal, enter a command to create a class library project, as shown in the following command:dotnet new classlib - If you do not have the .NET Core 3.1 SDK installed then you will see an error, as shown in the following output:
Could not execute because the application was not found or a compatible .NET SDK is not installed. - If you do have the .NET Core 3.1 SDK installed, then a class library project will be created that targets .NET Standard 2.0 by default.
You do not need to complete the above steps, but if you want to try and do not already have .NET Core 3.1 SDK installed then you can install it from the following link:
https://dotnet.microsoft.com/download/dotnet/3.1
Publishing your code for deployment
If you write a novel and you want other people to read it, you must publish it.
Most developers write code for other developers to use in their own code, or for users to run as an app. To do so, you must publish your code as packaged class libraries or executable applications.
There are three ways to publish and deploy a .NET application. They are:
- Framework-dependent deployment (FDD).
- Framework-dependent executables (FDEs).
- Self-contained.
If you choose to deploy your application and its package dependencies, but not .NET itself, then you rely on .NET already being on the target computer. This works well for web applications deployed to a server because .NET and lots of other web applications are likely already on the server.
Framework-dependent deployment (FDD) means you deploy a DLL that must be executed by the dotnet command-line tool. Framework-dependent executables (FDE) means you deploy an EXE that can be run directly from the command line. Both require .NET to be already installed on the system.
Sometimes, you want to be able to give someone a USB stick containing your application and know that it can execute on their computer. You want to perform a self-contained deployment. While the size of the deployment files will be larger, you'll know that it will work.
Creating a console application to publish
Let's explore how to publish a console application:
- Use your preferred code editor to add a new console app named
DotNetEverywhereto theChapter07solution/workspace. - In Visual Studio Code, select
DotNetEverywhereas the active OmniSharp project. When you see the pop-up warning message saying that required assets are missing, click Yes to add them. - In
Program.cs, delete the comment and statically import theConsoleclass. - In
Program.cs, add a statement to output a message saying the console app can run everywhere and some information about the operating system, as shown in the following code:WriteLine("I can run everywhere!"); WriteLine($"OS Version is {Environment.OSVersion}."); if (OperatingSystem.IsMacOS()) { WriteLine("I am macOS."); } else if (OperatingSystem.IsWindowsVersionAtLeast(major: 10)) { WriteLine("I am Windows 10 or 11."); } else { WriteLine("I am some other mysterious OS."); } WriteLine("Press ENTER to stop me."); ReadLine(); - Open
DotNetEverywhere.csprojand add the runtime identifiers to target three operating systems inside the<PropertyGroup>element, as shown highlighted in the following markup:<Project Sdk="Microsoft.NET.Sdk"> <PropertyGroup> <OutputType>Exe</OutputType> <TargetFramework>net6.0</TargetFramework> <Nullable>enable</Nullable> <ImplicitUsings>enable</ImplicitUsings> <RuntimeIdentifiers> win10-x64;osx-x64;osx.11.0-arm64;linux-x64;linux-arm64 </RuntimeIdentifiers> </PropertyGroup> </Project>- The
win10-x64RID value means Windows 10 or Windows Server 2016 64-bit. You could also use thewin10-arm64RID value to deploy to a Microsoft Surface Pro X. - The
osx-x64RID value means macOS Sierra 10.12 or later. You can also specify version-specific RID values likeosx.10.15-x64(Catalina),osx.11.0-x64(Big Sur on Intel), orosx.11.0-arm64(Big Sur on Apple Silicon). - The
linux-x64RID value means most desktop distributions of Linux like Ubuntu, CentOS, Debian, or Fedora. Uselinux-armfor Raspbian or Raspberry Pi OS 32-bit. Uselinux-arm64for a Raspberry Pi running Ubuntu 64-bit.
- The
Understanding dotnet commands
When you install the .NET SDK, it includes a command-line interface (CLI) named dotnet.
Creating new projects
The .NET CLI has commands that work on the current folder to create a new project using templates:
- On Windows, start Command Prompt or Windows Terminal. On macOS, start Terminal. If you are using Visual Studio Code, then you can use the integrated terminal.
- Enter the
dotnet new --listordotnet new -lcommand to list your currently installed templates, as shown in Figure 7.2: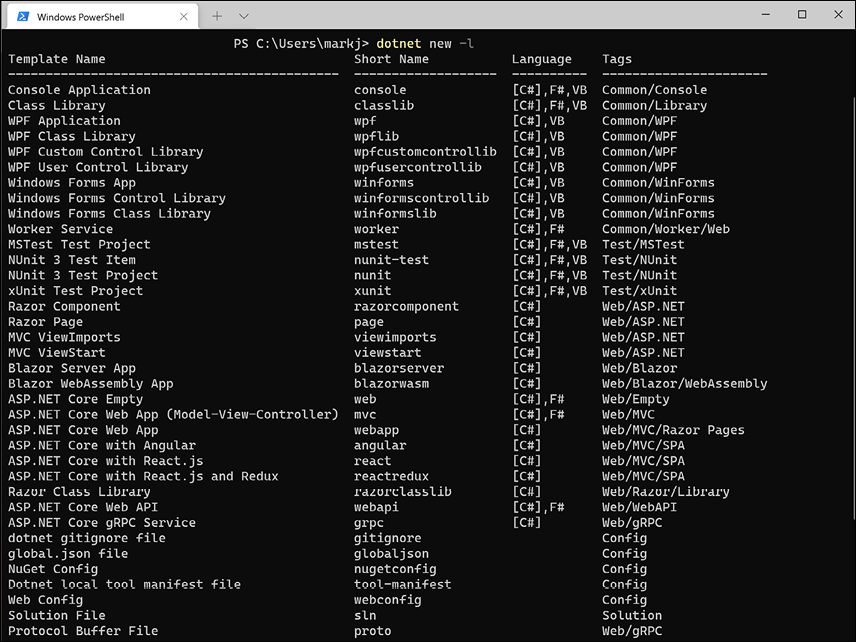
Figure 7.2: A list of installed dotnet new project templates
Most dotnet command-line switches have a long and a short version. For example, --list or -l. The short ones are quicker to type but more likely to be misinterpreted by you or other humans. Sometimes more typing is clearer.
Getting information about .NET and its environment
It is useful to see what .NET SDKs and runtimes are currently installed, alongside information about the operating system, as shown in the following command:
dotnet --info
Note the results, as shown in the following partial output:
.NET SDK (reflecting any global.json):
 Version:   6.0.100
 Commit:    22d70b47bc
Runtime Environment:
 OS Name:     Windows
 OS Version:  10.0.19043
 OS Platform: Windows
 RID:         win10-x64
 Base Path:   C:\Program Files\dotnet\sdk\6.0.100\
Host (useful for support):
  Version: 6.0.0
  Commit:  91ba01788d
.NET SDKs installed:
  3.1.412 [C:\Program Files\dotnet\sdk]
  5.0.400 [C:\Program Files\dotnet\sdk]
  6.0.100 [C:\Program Files\dotnet\sdk]
.NET runtimes installed:
  Microsoft.AspNetCore.All 2.1.29 [...\dotnet\shared\Microsoft.AspNetCore.All]
...
Managing projects
The .NET CLI has the following commands that work on the project in the current folder, to manage the project:
dotnet restore: This downloads dependencies for the project.dotnet build: This builds, aka compiles, the project.dotnet test: This builds and then runs unit tests for the project.dotnet run: This builds and then runs the project.dotnet pack: This creates a NuGet package for the project.dotnet publish: This builds and then publishes the project, either with dependencies or as a self-contained application.dotnet add: This adds a reference to a package or class library to the project.dotnet remove: This removes a reference to a package or class library from the project.dotnet list: This lists the package or class library references for the project.
Publishing a self-contained app
Now that you have seen some example dotnet tool commands, we can publish our cross-platform console app:
- At the command line, make sure that you are in the
DotNetEverywherefolder. - Enter a command to build and publish the release version of the console application for Windows 10, as shown in the following command:
dotnet publish -c Release -r win10-x64 - Note the build engine restores any needed packages, compiles the project source code into an assembly DLL, and creates a
publishfolder, as shown in the following output:Microsoft (R) Build Engine version 17.0.0+073022eb4 for .NET Copyright (C) Microsoft Corporation. All rights reserved. Determining projects to restore... Restored C:\Code\Chapter07\DotNetEverywhere\DotNetEverywhere.csproj (in 46.89 sec). DotNetEverywhere -> C:\Code\Chapter07\DotNetEverywhere\bin\Release\net6.0\win10-x64\DotNetEverywhere.dll DotNetEverywhere -> C:\Code\Chapter07\DotNetEverywhere\bin\Release\net6.0\win10-x64\publish\ - Enter the commands to build and publish the release versions for macOS and Linux variants, as shown in the following commands:
dotnet publish -c Release -r osx-x64
dotnet publish -c Release -r osx.11.0-arm64
dotnet publish -c Release -r linux-x64
dotnet publish -c Release -r linux-arm64
Good Practice: You could automate these commands by using a scripting language like PowerShell and execute it on any operating system using the cross-platform PowerShell Core. Just create a file with the extension
.ps1with the five commands on it. Then execute the file. Learn more about PowerShell at the following link: https://github.com/markjprice/cs10dotnet6/tree/main/docs/powershell - Open a macOS Finder window or Windows File Explorer, navigate to
DotNetEverywhere\bin\Release\net6.0, and note the output folders for the various operating systems. - In the
win10-x64folder, select thepublishfolder, note all the supporting assemblies likeMicrosoft.CSharp.dll. - Select the
DotNetEverywhereexecutable file, and note it is 161 KB, as shown in Figure 7.3: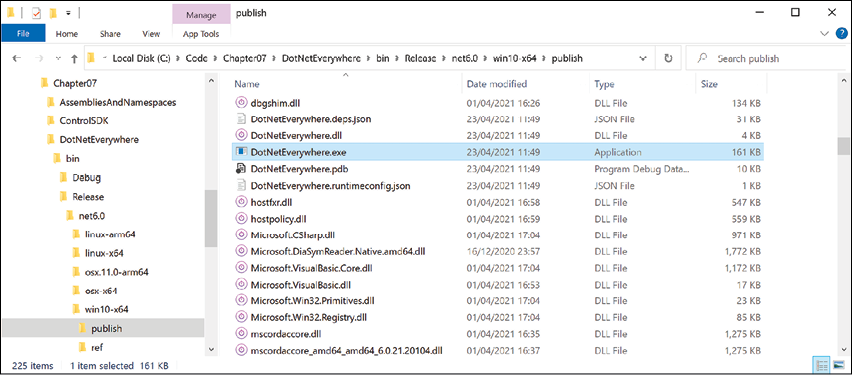
Figure 7.3: The DotNetEverywhere executable file for Windows 10 64-bit
- If you are on Windows, then double-click to execute the program and note the result, as shown in the following output:
I can run everywhere! OS Version is Microsoft Windows NT 10.0.19042.0. I am Windows 10. Press ENTER to stop me. - Note that the total size of the
publishfolder and all its files is 64.8 MB. - In the
osx.11.0-arm64folder, select thepublishfolder, note all the supporting assemblies, and then select theDotNetEverywhereexecutable file, and note the executable is 126 KB, and thepublishfolder is 71.8 MB.
If you copy any of those publish folders to the appropriate operating system, the console application will run; this is because it is a self-contained deployable .NET application. For example, on macOS with Intel, as shown in the following output:
I can run everywhere!
OS Version is Unix 11.2.3
I am macOS.
Press ENTER to stop me.
This example used a console app, but you could just as easily create an ASP.NET Core website or web service, or a Windows Forms or WPF app. Of course, you can only deploy Windows desktop apps to Windows computers, not Linux or macOS.
Publishing a single-file app
To publish as a "single" file, you can specify flags when publishing. With .NET 5, single-file apps were primarily focused on Linux because there are limitations in both Windows and macOS that mean true single-file publishing is not technically possible. With .NET 6, you can now create proper single-file apps on Windows.
If you can assume that .NET 6 is already installed on the computer on which you want to run your app, then you can use the extra flags when you publish your app for release to say that it does not need to be self-contained and that you want to publish it as a single file (if possible), as shown in the following command (that must be entered on a single line):
dotnet publish -r win10-x64 -c Release --self-contained=false
/p:PublishSingleFile=true
This will generate two files: DotNetEverywhere.exe and DotNetEverywhere.pdb. The .exe is the executable. The .pdb file is a program debug database file that stores debugging information.
There is no .exe file extension for published applications on macOS, so if you use osx-x64 in the command above, the filename will not have an extension.
If you prefer the .pdb file to be embedded in the .exe file, then add a <DebugType> element to the <PropertyGroup> element in your .csproj file and set it to embedded, as shown highlighted in the following markup:
<PropertyGroup>
  <OutputType>Exe</OutputType>
  <TargetFramework>net6.0</TargetFramework>
  <Nullable>enable</Nullable>
  <ImplicitUsings>enable</ImplicitUsings>
  <RuntimeIdentifiers>
    win10-x64;osx-x64;osx.11.0-arm64;linux-x64;linux-arm64
  </RuntimeIdentifiers>
  <DebugType>embedded</DebugType>
</PropertyGroup>
If you cannot assume that .NET 6 is already installed on a computer, then although Linux also only generates the two files, expect the following additional files for Windows: coreclr.dll, clrjit.dll, clrcompression.dll, and mscordaccore.dll.
Let's see an example for Windows:
- At the command line, enter the command to build the release version of the console application for Windows 10, as shown in the following command:
dotnet publish -c Release -r win10-x64 /p:PublishSingleFile=true - Navigate to the
DotNetEverywhere\bin\Release\net6.0\win10-x64\publishfolder, select theDotNetEverywhereexecutable file, and note the executable is now 58.3 MB, and there is also a.pdbfile that is 10 KB. The sizes on your system will vary.
Reducing the size of apps using app trimming
One of the problems with deploying a .NET app as a self-contained app is that the .NET libraries take up a lot of space. One of the biggest needs for reduced size is Blazor WebAssembly components because all the .NET libraries need to be downloaded to the browser.
Luckily, you can reduce this size by not packaging unused assemblies with your deployments. Introduced with .NET Core 3.0, the app trimming system can identify the assemblies needed by your code and remove those that are not needed.
With .NET 5, the trimming went further by removing individual types, and even members like methods from within an assembly if they are not used. For example, with a Hello World console app, the System.Console.dll assembly is trimmed from 61.5 KB to 31.5 KB. For .NET 5, this is an experimental feature so it is disabled by default.
With .NET 6, Microsoft added annotations to their libraries to indicate how they can be safely trimmed so the trimming of types and members was made the default. This is known as link trim mode.
The catch is how well the trimming identifies unused assemblies, types, and members. If your code is dynamic, perhaps using reflection, then it might not work correctly, so Microsoft also allows manual control.
Enabling assembly-level trimming
There are two ways to enable assembly-level trimming.
The first way is to add an element in the project file, as shown in the following markup:
<PublishTrimmed>true</PublishTrimmed>
The second way is to add a flag when publishing, as shown highlighted in the following command:
dotnet publish ... -p:PublishTrimmed=True
Enabling type-level and member-level trimming
There are two ways to enable type-level and member-level trimming.
The first way is to add two elements in the project file, as shown in the following markup:
<PublishTrimmed>true</PublishTrimmed>
<TrimMode>Link</TrimMode>
The second way is to add two flags when publishing, as shown highlighted in the following command:
dotnet publish ... -p:PublishTrimmed=True -p:TrimMode=Link
For .NET 6, link trim mode is the default, so you only need to specify the switch if you want to set an alternative trim mode like copyused, which means assembly-level trimming.
Decompiling .NET assemblies
One of the best ways to learn how to code for .NET is to see how professionals do it.
Good Practice: You could decompile someone else's assemblies for non-learning purposes like copying their code for use in your own production library or application, but remember that you are viewing their intellectual property, so please respect that.
Decompiling using the ILSpy extension for Visual Studio 2022
For learning purposes, you can decompile any .NET assembly with a tool like ILSpy.
- In Visual Studio 2022 for Windows, navigate to Extensions | Manage Extensions.
- In the search box, enter
ilspy. - For the ILSpy extension, click Download.
- Click Close.
- Close Visual Studio to allow the extension to install.
- Restart Visual Studio and reopen the
Chapter07solution. - In Solution Explorer, right-click the DotNetEverywhere project and select Open output in ILSpy.
- Navigate to File | Open….
- Navigate to the following folder:
Code/Chapter07/DotNetEverywhere/bin/Release/net6.0/linux-x64 - Select the
System.IO.FileSystem.dllassembly and click Open. - In the Assemblies tree, expand the System.IO.FileSystem assembly, expand the System.IO namespace, select the Directory class, and wait for it to decompile.
- In the
Directoryclass, click the [+] to expand theGetParentmethod, as shown in Figure 7.4: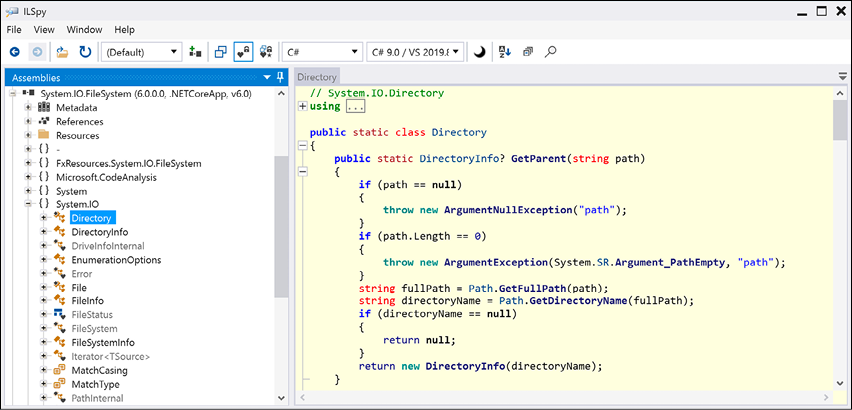
Figure 7.4: Decompiled GetParent method of Directory class on Windows
- Note the good practice of checking the
pathparameter and throwing anArgumentNullExceptionif it isnullor anArgumentExceptionif it is zero length. - Close ILSpy.
Decompiling using the ILSpy extension for Visual Studio Code
A similar capability is available cross-platform as an extension for Visual Studio Code.
- If you have not already installed the ILSpy .NET Decompiler extension for Visual Studio Code, then search for it and install it now.
- On macOS or Linux the extension has a dependency on Mono so you will also need to install Mono from the following link: https://www.mono-project.com/download/stable/.
- In Visual Studio Code, navigate to View | Command Palette….
- Type
ilspyand then select ILSpy: Decompile IL Assembly (pick file). - Navigate to the following folder:
Code/Chapter07/DotNetEverywhere/bin/Release/net6.0/linux-x64 - Select the
System.IO.FileSystem.dllassembly and click Select assembly. Nothing will appear to happen, but you can confirm that ILSpy is working by viewing the Output window, selecting ilspy-vscode in the dropdown list, and seeing the processing, as shown in Figure 7.5: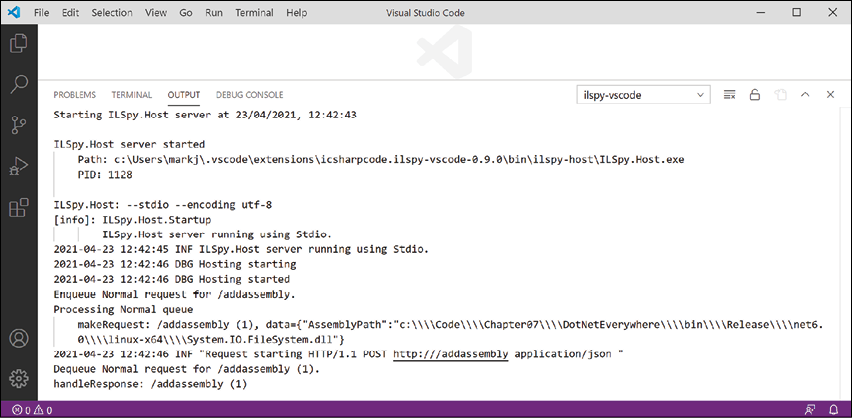
Figure 7.5: ILSpy extension output when selecting an assembly to decompile
- In EXPLORER, expand ILSPY DECOMPILED MEMBERS, select the assembly, close the Output window, and note the two edit windows that open showing assembly attributes using C# code and external DLL and assembly references using IL code, as shown in Figure 7.6:

Figure 7.6: Expanding ILSPY DECOMPILED MEMBERS
- In the IL code on the right side, note the reference to the
System.Runtimeassembly, including the version number, as shown in the following code:.module extern libSystem.Native .assembly extern System.Runtime { .publickeytoken = ( b0 3f 5f 7f 11 d5 0a 3a ) .ver 6:0:0:0 }.module extern libSystem.Nativemeans this assembly makes function calls to Linux system APIs as you would expect from code that interacts with the filesystem. If we had decompiled the Windows equivalent of this assembly, it would use.module extern kernel32.dllinstead, which is a Win32 API. - In EXPLORER, in ILSPY DECOMPILED MEMBERS, expand the assembly, expand the System.IO namespace, select Directory, and note the two edit windows that open showing the decompiled
Directoryclass using C# code on the left and IL code on the right, as shown in Figure 7.7: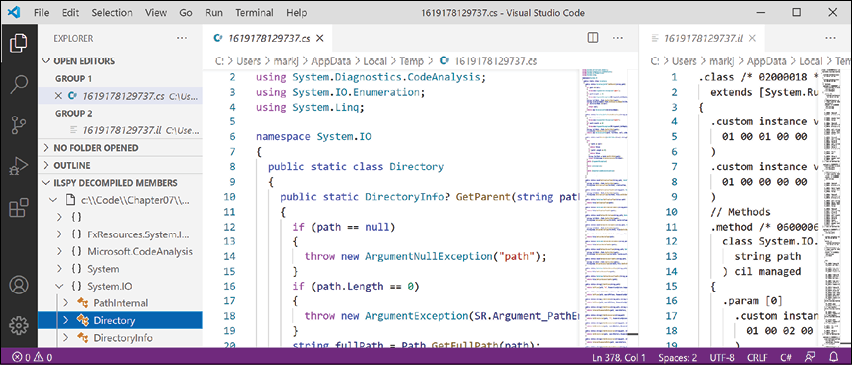
Figure 7.7: The decompiled Directory class in C# and IL code
- Compare the C# source code for the
GetParentmethod, shown in the following code:public static DirectoryInfo? GetParent(string path) { if (path == null) { throw new ArgumentNullException("path"); } if (path.Length == 0) { throw new ArgumentException(SR.Argument_PathEmpty, "path"); } string fullPath = Path.GetFullPath(path); string directoryName = Path.GetDirectoryName(fullPath); if (directoryName == null) { return null; } return new DirectoryInfo(directoryName); } - With the equivalent IL source code of the
GetParentmethod, as shown in the following code:.method /* 06000067 */ public hidebysig static class System.IO.DirectoryInfo GetParent ( string path ) cil managed { .param [0] .custom instance void System.Runtime.CompilerServices .NullableAttribute::.ctor(uint8) = ( 01 00 02 00 00 ) // Method begins at RVA 0x62d4 // Code size 64 (0x40) .maxstack 2 .locals /* 1100000E */ ( [0] string, [1] string ) IL_0000: ldarg.0 IL_0001: brtrue.s IL_000e IL_0003: ldstr "path" /* 700005CB */ IL_0008: newobj instance void [System.Runtime] System.ArgumentNullException::.ctor(string) /* 0A000035 */ IL_000d: throw IL_000e: ldarg.0 IL_000f: callvirt instance int32 [System.Runtime] System.String::get_Length() /* 0A000022 */ IL_0014: brtrue.s IL_0026 IL_0016: call string System.SR::get_Argument_PathEmpty() /* 0600004C */ IL_001b: ldstr "path" /* 700005CB */ IL_0020: newobj instance void [System.Runtime] System.ArgumentException::.ctor(string, string) /* 0A000036 */ IL_0025: throw IL_0026: ldarg.0 IL_0027: call string [System.Runtime.Extensions] System.IO.Path::GetFullPath(string) /* 0A000037 */ IL_002c: stloc.0 IL_002d: ldloc.0 IL_002e: call string [System.Runtime.Extensions] System.IO.Path::GetDirectoryName(string) /* 0A000038 */ IL_0033: stloc.1 IL_0034: ldloc.1 IL_0035: brtrue.s IL_0039 IL_0037: ldnull IL_0038: ret IL_0039: ldloc.1 IL_003a: newobj instance void System.IO.DirectoryInfo::.ctor(string) /* 06000097 */ IL_003f: ret } // end of method Directory::GetParentGood Practice: The IL code edit windows are not especially useful unless you get very advanced with C# and .NET development when knowing how the C# compiler translates your source code into IL code can be important. The much more useful edit windows contain the equivalent C# source code written by Microsoft experts. You can learn a lot of good practices from seeing how professionals implement types. For example, the
GetParentmethod shows how to check arguments fornulland other argument exceptions. - Close the edit windows without saving changes.
- In EXPLORER, in ILSPY DECOMPILED MEMBERS, right-click the assembly and choose Unload Assembly.
No, you cannot technically prevent decompilation
I sometimes get asked if there is a way to protect compiled code to prevent decompilation. The quick answer is no, and if you think about it, you'll see why this has to be the case. You can make it harder using obfuscation tools like Dotfuscator, but ultimately you cannot completely prevent it.
All compiled applications contain instructions to the platform, operating system, and hardware on which it runs. Those instructions have to be functionally the same as the original source code but are just harder for a human to read. Those instructions must be readable to execute your code; they therefore must be readable to be decompiled. If you protect your code from decompilation using some custom technique, then you would also prevent your code from running!
Virtual machines simulate hardware and so can capture all interaction between your running application and the software and hardware that it thinks it is running on.
If you could protect your code, then you would also prevent attaching to it with a debugger and stepping through it. If the compiled application has a pdb file, then you can attach a debugger and step through the statements line-by-line. Even without the pdb file, you can still attach a debugger and get some idea of how the code works.
This is true for all programming languages. Not just .NET languages like C#, Visual Basic, and F#, but also C, C++, Delphi, assembly language: all can be attached to for debugging or to be disassembled or decompiled. Some tools used by professionals are shown in the following table:
|
Type |
Product |
Description |
|
Virtual Machine |
VMware |
Professionals like malware analysts always run software inside a VM. |
|
Debugger |
SoftICE |
Runs underneath the operating system usually in a VM. |
|
Debugger |
WinDbg |
Useful for understanding Windows internals because it knows more about Windows data structures than other debuggers. |
|
Disassembler |
IDA Pro |
Used by professional malware analysts. |
|
Decompiler |
HexRays |
Decompiles C apps. Plugin for IDA Pro. |
|
Decompiler |
DeDe |
Decompiles Delphi apps. |
|
Decompiler |
dotPeek |
.NET decompiler from JetBrains. |
Good Practice: Debugging, disassembling, and decompiling someone else's software is likely against its license agreement and illegal in many jurisdictions. Instead of trying to protect your intellectual property with a technical solution, the law is sometimes your only recourse.
Packaging your libraries for NuGet distribution
Before we learn how to create and package our own libraries, we will review how a project can use an existing package.
Referencing a NuGet package
Let's say that you want to add a package created by a third-party developer, for example, Newtonsoft.Json, a popular package for working with the JavaScript Object Notation (JSON) serialization format:
- In the
AssembliesAndNamespacesproject, add a reference to theNewtonsoft.JsonNuGet package, either using the GUI for Visual Studio 2022 or thedotnet add packagecommand for Visual Studio Code. - Open the
AssembliesAndNamespaces.csprojfile and note that a package reference has been added, as shown in the following markup:<ItemGroup> <PackageReference Include="newtonsoft.json" Version="13.0.1" /> </ItemGroup>
If you have a more recent version of the newtonsoft.json package, then it has been updated since this chapter was written.
Fixing dependencies
To consistently restore packages and write reliable code, it's important that you fix dependencies. Fixing dependencies means you are using the same family of packages released for a specific version of .NET, for example, SQLite for .NET 6.0, as shown highlighted in the following markup:
<Project Sdk="Microsoft.NET.Sdk">
  <PropertyGroup>
    <OutputType>Exe</OutputType>
    <TargetFramework>net6.0</TargetFramework>
  </PropertyGroup>
  <ItemGroup>
    <PackageReference
      Include="Microsoft.EntityFrameworkCore.Sqlite"
      Version="6.0.0" />
  </ItemGroup>
</Project>
To fix dependencies, every package should have a single version with no additional qualifiers. Additional qualifiers include betas (beta1), release candidates (rc4), and wildcards (*).
Wildcards allow future versions to be automatically referenced and used because they always represent the most recent release. But wildcards are therefore dangerous because they could result in the use of future incompatible packages that break your code.
This can be worth the risk while writing a book where new preview versions are released every month and you do not want to keep updating the package references, as I did during 2021, and as shown in the following markup:
<PackageReference
  Include="Microsoft.EntityFrameworkCore.Sqlite"
  Version="6.0.0-preview.*" />
If you use the dotnet add package command, or Visual Studio's Manage NuGet Packages, then it will by default use the latest specific version of a package. But if you copy and paste configuration from a blog article or manually add a reference yourself, you might include wildcard qualifiers.
The following dependencies are examples of NuGet package references that are not fixed and therefore should be avoided unless you know the implications:
<PackageReference Include="System.Net.Http" Version="4.1.0-*" />
<PackageReference Include="Newtonsoft.Json" Version="12.0.3-beta1" />
Good Practice: Microsoft guarantees that if you fixed your dependencies to what ships with a specific version of .NET, for example, 6.0.0, those packages will all work together. Almost always fix your dependencies.
Packaging a library for NuGet
Now, let's package the SharedLibrary project that you created earlier:
- In the
SharedLibraryproject, rename theClass1.csfile toStringExtensions.cs. - Modify its contents to provide some useful extension methods for validating various text values using regular expressions, as shown in the following code:
using System.Text.RegularExpressions;
namespace Packt.Shared
{
  public static class StringExtensions
  {
    public static bool IsValidXmlTag(this string input)
    {
      return Regex.IsMatch(input,
        @"^<([a-z]+)([^<]+)*(?:>(.*)<\/\1>|\s+\/>)$");
    }
    public static bool IsValidPassword(this string input)
    {
      // minimum of eight valid characters
      return Regex.IsMatch(input, "^[a-zA-Z0-9_-]{8,}$");
    }
    public static bool IsValidHex(this string input)
    {
      // three or six valid hex number characters
      return Regex.IsMatch(input,
        "^#?([a-fA-F0-9]{3}|[a-fA-F0-9]{6})$");
    }
  }
}
You will learn how to write regular expressions in Chapter 8, Working with Common .NET Types.
- In
SharedLibrary.csproj, modify its contents, as shown highlighted in the following markup, and note the following:PackageIdmust be globally unique, so you must use a different value if you want to publish this NuGet package to the https://www.nuget.org/ public feed for others to reference and download.PackageLicenseExpressionmust be a value from the following link: https://spdx.org/licenses/ or you could specify a custom license.- All the other elements are self-explanatory:
<Project Sdk="Microsoft.NET.Sdk">
  <PropertyGroup>
    <TargetFramework>netstandard2.0</TargetFramework>
    <GeneratePackageOnBuild>true</GeneratePackageOnBuild>
    <PackageId>Packt.CSdotnet.SharedLibrary</PackageId>
    <PackageVersion>6.0.0.0</PackageVersion>
    <Title>C# 10 and .NET 6 Shared Library</Title>
    <Authors>Mark J Price</Authors>
    <PackageLicenseExpression>
      MS-PL
    </PackageLicenseExpression>
    <PackageProjectUrl>
      https://github.com/markjprice/cs10dotnet6
    </PackageProjectUrl>
    <PackageIcon>packt-csdotnet-sharedlibrary.png</PackageIcon>
    <PackageRequireLicenseAcceptance>true</PackageRequireLicenseAcceptance>
    <PackageReleaseNotes>
      Example shared library packaged for NuGet.
    </PackageReleaseNotes>
    <Description>
      Three extension methods to validate a string value.
    </Description>
    <Copyright>
      Copyright © 2016-2021 Packt Publishing Limited
    </Copyright>
    <PackageTags>string extensions packt csharp dotnet</PackageTags>
  </PropertyGroup>
  <ItemGroup>
    <None Include="packt-csdotnet-sharedlibrary.png">
      <Pack>True</Pack>
      <PackagePath></PackagePath>
    </None>
  </ItemGroup>
</Project>
Good Practice: Configuration property values that are
trueorfalsevalues cannot have any whitespace so the<PackageRequireLicenseAcceptance>entry cannot have a carriage return and indentation as shown in the preceding markup. - Download the icon file and save it in the
SharedLibraryfolder from the following link: https://github.com/markjprice/cs10dotnet6/blob/main/vs4win/Chapter07/SharedLibrary/packt-csdotnet-sharedlibrary.png. - Build the release assembly:
- In Visual Studio, select Release in the toolbar, and then navigate to Build | Build SharedLibrary.
- In Visual Studio Code, in Terminal, enter
dotnet build -c Release
- If we had not set
<GeneratePackageOnBuild>totruein the project file, then we would have to create a NuGet package manually using the following additional steps:- In Visual Studio, navigate to Build | Pack SharedLibrary.
- In Visual Studio Code, in Terminal, enter
dotnet pack -c Release.
Publishing a package to a public NuGet feed
If you want everyone to be able to download and use your NuGet package, then you must upload it to a public NuGet feed like Microsoft's:
- Start your favorite browser and navigate to the following link: https://www.nuget.org/packages/manage/upload.
- You will need to sign in with a Microsoft account at https://www.nuget.org/ if you want to upload a NuGet package for other developers to reference as a dependency package.
- Click on Browse... and select the
.nupkgfile that was created by generating the NuGet package. The folder path should beCode\Chapter07\SharedLibrary\bin\Releaseand the file is namedPackt.CSdotnet.SharedLibrary.6.0.0.nupkg. - Verify that the information you entered in the
SharedLibrary.csprojfile has been correctly filled in, and then click Submit. - Wait a few seconds, and you will see a success message showing that your package has been uploaded, as shown in Figure 7.8:
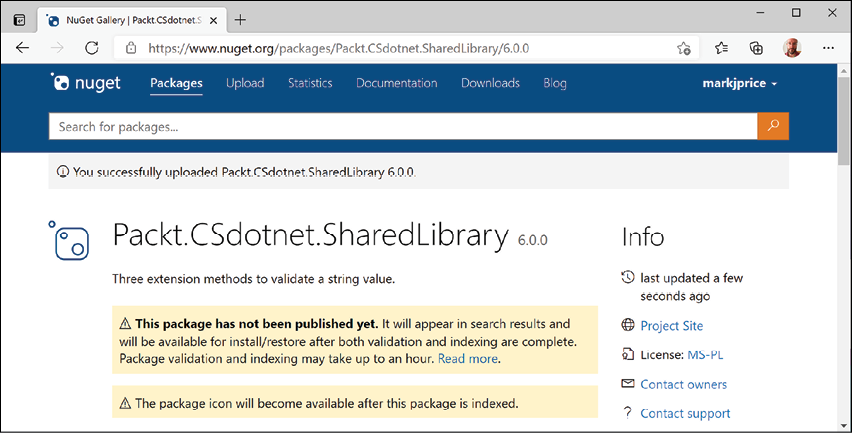
Figure 7.8: A NuGet package upload message
Good Practice: If you get an error, then review the project file for mistakes, or read more information about the PackageReference format at https://docs.microsoft.com/en-us/nuget/reference/msbuild-targets.
Publishing a package to a private NuGet feed
Organizations can host their own private NuGet feeds. This can be a handy way for many developer teams to share work. You can read more at the following link:
https://docs.microsoft.com/en-us/nuget/hosting-packages/overview
Exploring NuGet packages with a tool
A handy tool named NuGet Package Explorer for opening and reviewing more details about a NuGet package was created by Uno Platform. As well as being a website, it can be installed as a cross-platform app. Let's see what it can do:
- Start your favorite browser and navigate to the following link: https://nuget.info.
- In the search box, enter
Packt.CSdotnet.SharedLibrary. - Select the package v6.0.0 published by Mark J Price and then click the Open button.
- In the Contents section, expand the lib folder and the netstandard2.0 folder.
- Select SharedLibrary.dll, and note the details, as shown in Figure 7.9:
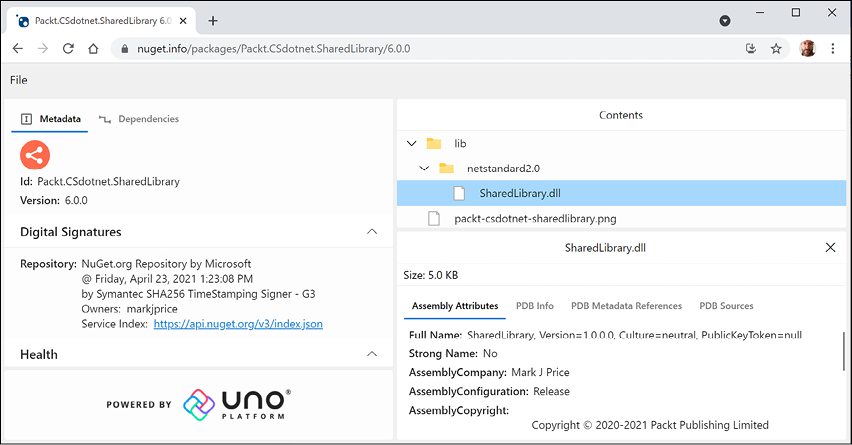
Figure 7.9: Exploring my package using NuGet Package Explorer from Uno Platform
- If you want to use this tool locally in the future, click the install button in your browser.
- Close your browser.
Not all browsers support installing web apps like this. I recommend Chrome for testing and development.
Testing your class library package
You will now test your uploaded package by referencing it in the AssembliesAndNamespaces project:
- In the
AssembliesAndNamespacesproject, add a reference to your (or my) package, as shown highlighted in the following markup:<ItemGroup> <PackageReference Include="newtonsoft.json" Version="13.0.1" /> <PackageReference Include="packt.csdotnet.sharedlibrary" Version="6.0.0" /> </ItemGroup> - Build the console app.
- In
Program.cs, import thePackt.Sharednamespace. - In
Program.cs, prompt the user to enter somestringvalues, and then validate them using the extension methods in the package, as shown in the following code:Write("Enter a color value in hex: "); string? hex = ReadLine(); // or "00ffc8" WriteLine("Is {0} a valid color value? {1}", arg0: hex, arg1: hex.IsValidHex()); Write("Enter a XML element: "); string? xmlTag = ReadLine(); // or "<h1 class=\"<\" />" WriteLine("Is {0} a valid XML element? {1}", arg0: xmlTag, arg1: xmlTag.IsValidXmlTag()); Write("Enter a password: "); string? password = ReadLine(); // or "secretsauce" WriteLine("Is {0} a valid password? {1}", arg0: password, arg1: password.IsValidPassword()); - Run the code, enter some values as prompted, and view the results, as shown in the following output:
Enter a color value in hex: 00ffc8
Is 00ffc8 a valid color value? True
Enter an XML element: <h1 class="<" />
Is <h1 class="<" /> a valid XML element? False
Enter a password: secretsauce
Is secretsauce a valid password? True
Porting from .NET Framework to modern .NET
If you are an existing .NET Framework developer, then you may have existing applications that you think you should port to modern .NET. But you should carefully consider if porting is the right choice for your code, because sometimes, the best choice is not to port.
For example, you might have a complex website project that runs on .NET Framework 4.8 but is only visited by a small number of users. If it works and handles the visitor traffic on minimal hardware, then potentially spending months porting it to .NET 6 could be a waste of time. But if the website currently requires many expensive Windows servers, then the cost of porting could eventually pay off if you can migrate to fewer, less costly Linux servers.
Could you port?
Modern .NET has great support for the following types of applications on Windows, macOS, and Linux so they are good candidates for porting:
- ASP.NET Core MVC websites.
- ASP.NET Core Web API web services (REST/HTTP).
- ASP.NET Core SignalR services.
- Console application command-line interfaces.
Modern .NET has decent support for the following types of applications on Windows, so they are potential candidates for porting:
- Windows Forms applications.
- Windows Presentation Foundation (WPF) applications.
Modern .NET has good support for the following types of applications on cross-platform desktop and mobile devices:
- Xamarin apps for mobile iOS and Android.
- .NET MAUI for desktop Windows and macOS, or mobile iOS and Android.
Modern .NET does not support the following types of legacy Microsoft projects:
- ASP.NET Web Forms websites. These might be best reimplemented using ASP.NET Core Razor Pages or Blazor.
- Windows Communication Foundation (WCF) services (but there is an open-source project named CoreWCF that you might be able to use depending on requirements). WCF services might be better reimplemented using ASP.NET Core gRPC services.
- Silverlight applications. These might be best reimplemented using .NET MAUI.
Silverlight and ASP.NET Web Forms applications will never be able to be ported to modern .NET, but existing Windows Forms and WPF applications could be ported to .NET on Windows in order to benefit from the new APIs and faster performance.
Legacy ASP.NET MVC web applications and ASP.NET Web API web services currently on .NET Framework could be ported to modern .NET and then be hosted on Windows, Linux, or macOS.
Should you port?
Even if you could port, should you? What benefits do you gain? Some common benefits include the following:
- Deployment to Linux, Docker, or Kubernetes for websites and web services: These OSes are lightweight and cost-effective as website and web service platforms, especially when compared to the more costly Windows Server.
- Removal of dependency on IIS and System.Web.dll: Even if you continue to deploy to Windows Server, ASP.NET Core can be hosted on lightweight, higher-performance Kestrel (or other) web servers.
- Command-line tools: Tools that developers and administrators use to automate their tasks are often built as console applications. The ability to run a single tool cross-platform is very useful.
Differences between .NET Framework and modern .NET
There are three key differences, as shown in the following table:
|
Modern .NET |
.NET Framework |
|
Distributed as NuGet packages, so each application can be deployed with its own app-local copy of the version of .NET that it needs. |
Distributed as a system-wide, shared set of assemblies (literally, in the Global Assembly Cache (GAC)). |
|
Split into small, layered components, so a minimal deployment can be performed. |
Single, monolithic deployment. |
|
Removes older technologies, such as ASP.NET Web Forms, and non-cross-platform features, such as AppDomains, .NET Remoting, and binary serialization. |
As well as some similar technologies to those in modern .NET like ASP.NET Core MVC, it also retains some older technologies, such as ASP.NET Web Forms. |
Understanding the .NET Portability Analyzer
Microsoft has a useful tool that you can run against your existing applications to generate a report for porting. You can watch a demonstration of the tool at the following link: https://channel9.msdn.com/Blogs/Seth-Juarez/A-Brief-Look-at-the-NET-Portability-Analyzer.
Understanding the .NET Upgrade Assistant
Microsoft's latest tool for upgrading legacy projects to modern .NET is the .NET Upgrade Assistant.
For my day job, I work for a company named Optimizely. We have an enterprise-scale Digital Experience Platform (DXP) based on .NET Framework comprising a Content Management System (CMS) and for building digital commerce websites. Microsoft needed a challenging migration project to design and test the .NET Upgrade Assistant with, so we worked with them to build a great tool.
Currently, it supports the following .NET Framework project types and more will be added later:
- ASP.NET MVC
- Windows Forms
- WPF
- Console Application
- Class Library
It is installed as a global dotnet tool, as shown in the following command:
dotnet tool install -g upgrade-assistant
You can read more about this tool and how to use it at the following link:
https://docs.microsoft.com/en-us/dotnet/core/porting/upgrade-assistant-overview
Using non-.NET Standard libraries
Most existing NuGet packages can be used with modern .NET, even if they are not compiled for .NET Standard or a modern version like .NET 6. If you find a package that does not officially support .NET Standard, as shown on its nuget.org web page, you do not have to give up. You should try it and see if it works.
For example, there is a package of custom collections for handling matrices created by Dialect Software LLC, documented at the following link:
https://www.nuget.org/packages/DialectSoftware.Collections.Matrix/
This package was last updated in 2013, which was long before .NET Core or .NET 6 existed, so this package was built for .NET Framework. As long as an assembly package like this only uses APIs available in .NET Standard, it can be used in a modern .NET project.
Let's try using it and see if it works:
- In the
AssembliesAndNamespacesproject, add a package reference for Dialect Software's package, as shown in the following markup:<PackageReference Include="dialectsoftware.collections.matrix" Version="1.0.0" /> - Build the
AssembliesAndNamespacesproject to restore packages. - In
Program.cs, add statements to import theDialectSoftware.CollectionsandDialectSoftware.Collections.Genericsnamespaces. - Add statements to create instances of
AxisandMatrix<T>, populate them with values, and output them, as shown in the following code:Axis x = new("x", 0, 10, 1); Axis y = new("y", 0, 4, 1); Matrix<long> matrix = new(new[] { x, y }); for (int i = 0; i < matrix.Axes[0].Points.Length; i++) { matrix.Axes[0].Points[i].Label = "x" + i.ToString(); } for (int i = 0; i < matrix.Axes[1].Points.Length; i++) { matrix.Axes[1].Points[i].Label = "y" + i.ToString(); } foreach (long[] c in matrix) { matrix[c] = c[0] + c[1]; } foreach (long[] c in matrix) { WriteLine("{0},{1} ({2},{3}) = {4}", matrix.Axes[0].Points[c[0]].Label, matrix.Axes[1].Points[c[1]].Label, c[0], c[1], matrix[c]); } - Run the code, noting the warning message and the results, as shown in the following output:
warning NU1701: Package 'DialectSoftware.Collections.Matrix
1.0.0' was restored using '.NETFramework,Version=v4.6.1,
.NETFramework,Version=v4.6.2, .NETFramework,Version=v4.7,
.NETFramework,Version=v4.7.1, .NETFramework,Version=v4.7.2,
.NETFramework,Version=v4.8' instead of the project target framework 'net6.0'. This package may not be fully compatible with your project.
x0,y0 (0,0) = 0
x0,y1 (0,1) = 1
x0,y2 (0,2) = 2
x0,y3 (0,3) = 3
...
Even though this package was created before .NET 6 existed, and the compiler and runtime have no way of knowing if it will work and therefore show warnings, because it happens to only call .NET Standard-compatible APIs, it works.
Working with preview features
It is a challenge for Microsoft to deliver some new features that have cross-cutting effects across many parts of .NET like the runtime, language compilers, and API libraries. It is the classic chicken and egg problem. What do you do first?
From a practical perspective, it means that although Microsoft might have completed the majority of the work needed for a feature, the whole thing might not be ready until very late in their now annual cycle of .NET releases, too late for proper testing in "the wild."
So, from .NET 6 onward, Microsoft will include preview features in general availability (GA) releases. Developers can opt into these preview features and provide Microsoft with feedback. In a later GA release, they can be enabled for everyone.
Good Practice: Preview features are not supported in production code. Preview features are likely to have breaking changes before the final release. Enable preview features at your own risk.
Requiring preview features
The [RequiresPreviewFeatures] attribute is used to indicate assemblies, types, or members that use and therefore require warnings about preview features. A code analyzer then scans for this assembly and generates warnings if needed. If your code does not use any preview features, you will not see any warnings. If you use any preview features, then your code should warn consumers of your code that you use preview features.
Enabling preview features
Let's look at an example of a preview feature available in .NET 6, the ability to define an interface with a static abstract method:
- Use your preferred code editor to add a new console app named
UsingPreviewFeaturesto theChapter07solution/workspace. - In Visual Studio Code, select
UsingPreviewFeaturesas the active OmniSharp project. When you see the pop-up warning message saying that required assets are missing, click Yes to add them. - In the project file, add an element to enable preview features and an element to enable preview language features, as shown highlighted in the following markup:
<Project Sdk="Microsoft.NET.Sdk"> <PropertyGroup> <OutputType>Exe</OutputType> <TargetFramework>net6.0</TargetFramework> <Nullable>enable</Nullable> <ImplicitUsings>enable</ImplicitUsings> <EnablePreviewFeatures>true</EnablePreviewFeatures> <LangVersion>preview</LangVersion> </PropertyGroup> </Project> - In
Program.cs, delete the comment and statically import theConsoleclass. - Add statements to define an interface with a static abstract method, a class that implements it, and then call the method in the top-level program, as shown in the following code:
using static System.Console; Doer.DoSomething(); public interface IWithStaticAbstract { static abstract void DoSomething(); } public class Doer : IWithStaticAbstract { public static void DoSomething() { WriteLine("I am an implementation of a static abstract method."); } } - Run the console app and note that it outputs correctly.
Generic mathematics
Why has Microsoft added the ability to define static abstract methods? What are they useful for?
For a long time, developers have asked Microsoft for the ability to use operators like * on generic types. This would enable a developer to define mathematical methods to perform operations like adding, averaging, and so on to any generic type rather than having to create dozens of overloaded methods for all the numeric types they want to support. Support for static abstract methods in interfaces is a foundational feature that would enable generic mathematics.
If you are interested, you can read more about this at the following link:
https://devblogs.microsoft.com/dotnet/preview-features-in-net-6-generic-math/
Practicing and exploring
Test your knowledge and understanding by answering some questions, getting some hands-on practice, and exploring with deeper research into topics of this chapter.
Exercise 7.1 – Test your knowledge
Answer the following questions:
- What is the difference between a namespace and an assembly?
- How do you reference another project in a
.csprojfile? - What is the benefit of a tool like ILSpy?
- Which .NET type does the C#
floatalias represent? - When porting an application from .NET Framework to .NET 6, what tool should you run before porting, and what tool could you run to perform much of the porting work?
- What is the difference between framework-dependent and self-contained deployments of .NET applications?
- What is a RID?
- What is the difference between the
dotnet packanddotnet publishcommands? - What types of applications written for the .NET Framework can be ported to modern .NET?
- Can you use packages written for .NET Framework with modern .NET?
Exercise 7.2 – Explore topics
Use the links on the following page to learn more detail about the topics covered in this chapter:
Exercise 7.3 – Explore PowerShell
PowerShell is Microsoft's scripting language for automating tasks on every operating system. Microsoft recommends Visual Studio Code with the PowerShell extension for writing PowerShell scripts.
Since PowerShell is its own extensive language there is not space in this book to cover it. Instead, I have created some supplementary pages on the books GitHub repository to introduce you to some key concepts and show some examples:
https://github.com/markjprice/cs10dotnet6/tree/main/docs/powershell
Summary
In this chapter, we reviewed the journey to .NET 6, we explored the relationship between assemblies and namespaces, we saw options for publishing an app for distribution to multiple operating systems, packaged and distributed a class library, and we discussed options for porting existing .NET Framework code bases.
In the next chapter, you will learn about some common Base Class Library types that are included with modern .NET.