06
Implementing Interfaces and Inheriting Classes
This chapter is about deriving new types from existing ones using object-oriented programming (OOP). You will learn about defining operators and local functions for performing simple actions and delegates and events for exchanging messages between types. You will implement interfaces for common functionality. You will learn about generics and the difference between reference and value types. You will create a derived class to inherit from a base class to reuse functionality, override an inherited type member, and use polymorphism. Finally, you will learn how to create extension methods and how to cast between classes in an inheritance hierarchy.
This chapter covers the following topics:
- Setting up a class library and console application
- More about methods
- Raising and handling events
- Making types safely reusable with generics
- Implementing interfaces
- Managing memory with reference and value types
- Working with null values
- Inheriting from classes
- Casting within inheritance hierarchies
- Inheriting and extending .NET types
- Using an analyzer to write better code
Setting up a class library and console application
We will start by defining a workspace/solution with two projects like the one created in Chapter 5, Building Your Own Types with Object-Oriented Programming. Even if you completed all the exercises in that chapter, follow the instructions below because we will use C# 10 features in the class library, so it needs to target .NET 6.0 rather than .NET Standard 2.0:
- Use your preferred coding tool to create a new workspace/solution named
Chapter06. - Add a class library project, as defined in the following list:
- Project template: Class Library /
classlib - Workspace/solution file and folder:
Chapter06 - Project file and folder:
PacktLibrary
- Project template: Class Library /
- Add a console app project, as defined in the following list:
- Project template: Console Application /
console - Workspace/solution file and folder:
Chapter06 - Project file and folder:
PeopleApp
- Project template: Console Application /
- In the
PacktLibraryproject, rename the file namedClass1.cstoPerson.cs. - Modify the
Person.csfile contents, as shown in the following code:using static System.Console; namespace Packt.Shared; public class Person : object { // fields public string? Name; // ? allows null public DateTime DateOfBirth; public List<Person> Children = new(); // C# 9 or later // methods public void WriteToConsole() { WriteLine($"{Name} was born on a {DateOfBirth:dddd}."); } } - In the
PeopleAppproject, add a project reference toPacktLibrary, as shown highlighted in the following markup:<Project Sdk="Microsoft.NET.Sdk"> <PropertyGroup> <OutputType>Exe</OutputType> <TargetFramework>net6.0</TargetFramework> <Nullable>enable</Nullable> <ImplicitUsings>enable</ImplicitUsings> </PropertyGroup> <ItemGroup> <ProjectReference Include="..\PacktLibrary\PacktLibrary.csproj" /> </ItemGroup> </Project> - Build the
PeopleAppproject and note the output indicating that both projects have been built successfully.
More about methods
We might want two instances of Person to be able to procreate. We can implement this by writing methods. Instance methods are actions that an object does to itself; static methods are actions the type does.
Which you choose depends on what makes the most sense for the action.
Good Practice: Having both static and instance methods to perform similar actions often makes sense. For example, string has both a Compare static method and a CompareTo instance method. This puts the choice of how to use the functionality in the hands of the programmers using your type, giving them more flexibility.
Implementing functionality using methods
Let's start by implementing some functionality by using both static and instance methods:
- Add one instance method and one static method to the
Personclass that will allow twoPersonobjects to procreate, as shown in the following code:// static method to "multiply" public static Person Procreate(Person p1, Person p2) { Person baby = new() { Name = $"Baby of {p1.Name} and {p2.Name}" }; p1.Children.Add(baby); p2.Children.Add(baby); return baby; } // instance method to "multiply" public Person ProcreateWith(Person partner) { return Procreate(this, partner); }Note the following:
- In the
staticmethod namedProcreate, thePersonobjects to procreate are passed as parameters namedp1andp2. - A new
Personclass namedbabyis created with a name composed of a combination of the two people who have procreated. This could be changed later by setting the returnedbabyvariable'sNameproperty. - The
babyobject is added to theChildrencollection of both parents and then returned. Classes are reference types, meaning a reference to thebabyobject stored in memory is added, not a clone of thebabyobject. You will learn the difference between reference types and value types later in this chapter. - In the instance method named
ProcreateWith, thePersonobject to procreate with is passed as a parameter namedpartner, and it, along withthis, is passed to the staticProcreatemethod to reuse the method implementation.thisis a keyword that references the current instance of the class.
Good Practice: A method that creates a new object, or modifies an existing object, should return a reference to that object so that the caller can access the results.
- In the
- In the
PeopleAppproject, at the top of theProgram.csfile, delete the comment and import the namespace for ourPersonclass and statically import theConsoletype, as shown in the following code:using Packt.Shared; using static System.Console; - In
Program.cs, create three people and have them procreate with each other, noting that to add a double-quote character into astring, you must prefix it with a backslash character like this,\", as shown in the following code:Person harry = new() { Name = "Harry" }; Person mary = new() { Name = "Mary" }; Person jill = new() { Name = "Jill" }; // call instance method Person baby1 = mary.ProcreateWith(harry); baby1.Name = "Gary"; // call static method Person baby2 = Person.Procreate(harry, jill); WriteLine($"{harry.Name} has {harry.Children.Count} children."); WriteLine($"{mary.Name} has {mary.Children.Count} children."); WriteLine($"{jill.Name} has {jill.Children.Count} children."); WriteLine( format: "{0}'s first child is named \"{1}\".", arg0: harry.Name, arg1: harry.Children[0].Name); - Run the code and view the result, as shown in the following output:
Harry has 2 children.
Mary has 1 children.
Jill has 1 children.
Harry's first child is named "Gary".
Implementing functionality using operators
The System.String class has a static method named Concat that concatenates two string values and returns the result, as shown in the following code:
string s1 = "Hello ";
string s2 = "World!";
string s3 = string.Concat(s1, s2);
WriteLine(s3); // Hello World!
Calling a method like Concat works, but it might be more natural for a programmer to use the + symbol operator to "add" two string values together, as shown in the following code:
string s3 = s1 + s2;
A well-known biblical phrase is Go forth and multiply, meaning to procreate. Let's write code so that the * (multiply) symbol will allow two Person objects to procreate.
We do this by defining a static operator for the * symbol. The syntax is rather like a method, because in effect, an operator is a method, but uses a symbol instead of a method name, which makes the syntax more concise.
- In
Person.cs, create astaticoperator for the*symbol, as shown in the following code:// operator to "multiply" public static Person operator *(Person p1, Person p2) { return Person.Procreate(p1, p2); }Good Practice: Unlike methods, operators do not appear in IntelliSense lists for a type. For every operator that you define, make a method as well, because it may not be obvious to a programmer that the operator is available. The implementation of the operator can then call the method, reusing the code you have written. A second reason for providing a method is that operators are not supported by every language compiler; for example, although arithmetic operators like * are supported by Visual Basic and F#, there is no requirement that other languages support all operators supported by C#.
- In
Program.cs, after calling theProcreatemethod and before the statements that write to the console, use the*operator to make another baby, as shown highlighted in the following code:// call static method Person baby2 = Person.Procreate(harry, jill); // call an operator Person baby3 = harry * mary; - Run the code and view the result, as shown in the following output:
Harry has 3 children.
Mary has 2 children.
Jill has 1 children.
Harry's first child is named "Gary".
Implementing functionality using local functions
A language feature introduced in C# 7.0 is the ability to define a local function.
Local functions are the method equivalent of local variables. In other words, they are methods that are only accessible from within the containing method in which they have been defined. In other languages, they are sometimes called nested or inner functions.
Local functions can be defined anywhere inside a method: the top, the bottom, or even somewhere in the middle!
We will use a local function to implement a factorial calculation:
- In
Person.cs, add statements to define aFactorialfunction that uses a local function inside itself to calculate the result, as shown in the following code:// method with a local function public static int Factorial(int number) { if (number < 0) { throw new ArgumentException( $"{nameof(number)} cannot be less than zero."); } return localFactorial(number); int localFactorial(int localNumber) // local function { if (localNumber < 1) return 1; return localNumber * localFactorial(localNumber - 1); } } - In
Program.cs, add a statement to call theFactorialfunction and write the return value to the console, as shown in the following code:WriteLine($"5! is {Person.Factorial(5)}"); - Run the code and view the result, as shown in the following output:
5! is 120
Raising and handling events
Methods are often described as actions that an object can perform, either on itself or on related objects. For example, List<T> can add an item to itself or clear itself, and File can create or delete a file in the filesystem.
Events are often described as actions that happen to an object. For example, in a user interface, Button has a Click event, a click being something that happens to a button, and FileSystemWatcher listens to the filesystem for change notifications and raises events like Created and Deleted that are triggered when a directory or file changes.
Another way of thinking of events is that they provide a way of exchanging messages between two objects.
Events are built on delegates, so let's start by having a look at what delegates are and how they work.
Calling methods using delegates
You have already seen the most common way to call or execute a method: use the . operator to access the method using its name. For example, Console.WriteLine tells the Console type to access its WriteLine method.
The other way to call or execute a method is to use a delegate. If you have used languages that support function pointers, then think of a delegate as being a type-safe method pointer.
In other words, a delegate contains the memory address of a method that matches the same signature as the delegate so that it can be called safely with the correct parameter types.
For example, imagine there is a method in the Person class that must have a string type passed as its only parameter, and it returns an int type, as shown in the following code:
public int MethodIWantToCall(string input)
{
  return input.Length; // it doesn't matter what the method does
}
I can call this method on an instance of Person named p1 like this:
int answer = p1.MethodIWantToCall("Frog");
Alternatively, I can define a delegate with a matching signature to call the method indirectly. Note that the names of the parameters do not have to match. Only the types of parameters and return values must match, as shown in the following code:
delegate int DelegateWithMatchingSignature(string s);
Now, I can create an instance of the delegate, point it at the method, and finally, call the delegate (which calls the method), as shown in the following code:
// create a delegate instance that points to the method
DelegateWithMatchingSignature d = new(p1.MethodIWantToCall);
// call the delegate, which calls the method
int answer2 = d("Frog");
You are probably thinking, "What's the point of that?" Well, it provides flexibility.
For example, we could use delegates to create a queue of methods that need to be called in order. Queuing actions that need to be performed is common in services to provide improved scalability.
Another example is to allow multiple actions to perform in parallel. Delegates have built-in support for asynchronous operations that run on a different thread, and that can provide improved responsiveness. You will learn how to do this in Chapter 12, Improving Performance and Scalability Using Multitasking.
The most important example is that delegates allow us to implement events for sending messages between different objects that do not need to know about each other. Events are an example of loose coupling between components because the components do not need to know about each other, they just need to know the event signature.
Delegates and events are two of the most confusing features of C# and can take a few attempts to understand, so don't worry if you feel lost!
Defining and handling delegates
Microsoft has two predefined delegates for use as events. Their signatures are simple, yet flexible, as shown in the following code:
public delegate void EventHandler(
  object? sender, EventArgs e);
public delegate void EventHandler<TEventArgs>(
  object? sender, TEventArgs e);
Good Practice: When you want to define an event in your own types, you should use one of these two predefined delegates.
Let's explore delegates and events:
- Add statements to the
Personclass and note the following points, as shown in the following code:- It defines an
EventHandlerdelegate field namedShout. - It defines an
intfield to storeAngerLevel. - It defines a method named
Poke. - Each time a person is poked, their
AngerLevelincrements. Once theirAngerLevelreaches three, they raise theShoutevent, but only if there is at least one event delegate pointing at a method defined somewhere else in the code; that is, it is notnull:
// delegate field
public EventHandler? Shout;
// data field
public int AngerLevel;
// method
public void Poke()
{
  AngerLevel++;
  if (AngerLevel >= 3)
  {
    // if something is listening...
    if (Shout != null)
    {
      // ...then call the delegate
      Shout(this, EventArgs.Empty);
    }
  }
}
Checking whether an object is not
nullbefore calling one of its methods is very common. C# 6.0 and later allowsnullchecks to be simplified inline using a?symbol before the.operator, as shown in the following code:Shout?.Invoke(this, EventArgs.Empty); - It defines an
- At the bottom of
Program.cs, add a method with a matching signature that gets a reference to thePersonobject from thesenderparameter and outputs some information about them, as shown in the following code:static void Harry_Shout(object? sender, EventArgs e) { if (sender is null) return; Person p = (Person)sender; WriteLine($"{p.Name} is this angry: {p.AngerLevel}."); }Microsoft's convention for method names that handle events is
ObjectName_EventName. - In
Program.cs, add a statement to assign the method to the delegate field, as shown in the following code:harry.Shout = Harry_Shout; - Add statements to call the
Pokemethod four times, after assigning the method to theShoutevent, as shown highlighted in the following code:harry.Shout = Harry_Shout; harry.Poke(); harry.Poke(); harry.Poke(); harry.Poke(); - Run the code and view the result, and note that Harry says nothing the first two times he is poked, and only gets angry enough to shout once he's been poked at least three times, as shown in the following output:
Harry is this angry: 3.
Harry is this angry: 4.
Defining and handling events
You've now seen how delegates implement the most important functionality of events: the ability to define a signature for a method that can be implemented by a completely different piece of code, and then call that method and any others that are hooked up to the delegate field.
But what about events? There is less to them than you might think.
When assigning a method to a delegate field, you should not use the simple assignment operator as we did in the preceding example.
Delegates are multicast, meaning that you can assign multiple delegates to a single delegate field. Instead of the = assignment, we could have used the += operator so we could add more methods to the same delegate field. When the delegate is called, all the assigned methods are called, although you have no control over the order in which they are called.
If the Shout delegate field was already referencing one or more methods, by assigning a method, it would replace all the others. With delegates that are used for events, we usually want to make sure that a programmer only ever uses either the += operator or the -= operator to assign and remove methods:
- To enforce this, in
Person.cs, add theeventkeyword to the delegate field declaration, as shown highlighted in the following code:public event EventHandler? Shout; - Build the
PeopleAppproject and note the compiler error message, as shown in the following output:Program.cs(41,13): error CS0079: The event 'Person.Shout' can only appear on the left hand side of += or -=This is (almost) all that the
eventkeyword does! If you will never have more than one method assigned to a delegate field, then technically you do not need "events," but it is still good practice to indicate your meaning and that you expect a delegate field to be used as an event. - Modify the method assignment to use
+=, as shown in the following code:harry.Shout += Harry_Shout; - Run the code and note that it has the same behavior as before.
Making types safely reusable with generics
In 2005, with C# 2.0 and .NET Framework 2.0, Microsoft introduced a feature named generics, which enables your types to be more safely reusable and more efficient. It does this by allowing a programmer to pass types as parameters, similar to how you can pass objects as parameters.
Working with non-generic types
First, let's look at an example of working with a non-generic type so that you can understand the problem that generics are designed to solve, such as weakly typed parameters and values, and performance problems caused by using System.Object.
System.Collections.Hashtable can be used to store multiple values each with a unique key that can later be used to quickly look up its value. Both the key and value can be any object because they are declared as System.Object. Although this provides flexibility when storing value types like integers, it is slow, and bugs are easier to introduce because no type checks are made when adding items.
Let's write some code:
- In
Program.cs, create an instance of the non-generic collection,System.Collections.Hashtable, and then add four items to it, as shown in the following code:// non-generic lookup collection System.Collections.Hashtable lookupObject = new(); lookupObject.Add(key: 1, value: "Alpha"); lookupObject.Add(key: 2, value: "Beta"); lookupObject.Add(key: 3, value: "Gamma"); lookupObject.Add(key: harry, value: "Delta"); - Add statements to define a
keywith the value of2and use it to look up its value in the hash table, as shown in the following code:int key = 2; // lookup the value that has 2 as its key WriteLine(format: "Key {0} has value: {1}", arg0: key, arg1: lookupObject[key]); - Add statements to use the
harryobject to look up its value, as shown in the following code:// lookup the value that has harry as its key WriteLine(format: "Key {0} has value: {1}", arg0: harry, arg1: lookupObject[harry]); - Run the code and note that it works, as shown in the following output:
Key 2 has value: Beta
Key Packt.Shared.Person has value: Delta
Although the code works, there is potential for mistakes because literally any type can be used for the key or value. If another developer used your lookup object and expected all the items to be a certain type, they might cast them to that type and get exceptions because some values might be a different type. A lookup object with lots of items would also give poor performance.
Good Practice: Avoid types in the System.Collections namespace.
Working with generic types
System.Collections.Generic.Dictionary<TKey, TValue> can be used to store multiple values each with a unique key that can later be used to quickly look up its value. Both the key and value can be any object, but you must tell the compiler what the types of the key and value will be when you first instantiate the collection. You do this by specifying types for the generic parameters in angle brackets <>, TKey, and TValue.
Good Practice: When a generic type has one definable type, it should be named T, for example, List<T>, where T is the type stored in the list. When a generic type has multiple definable types, they should use T as a name prefix and have a sensible name, for example, Dictionary<TKey, TValue>.
This provides flexibility, it is faster, and bugs are easier to avoid because type checks are made when adding items.
Let's write some code to solve the problem by using generics:
- In
Program.cs, create an instance of the generic lookup collectionDictionary<TKey, TValue>and then add four items to it, as shown in the following code:// generic lookup collection Dictionary<int, string> lookupIntString = new(); lookupIntString.Add(key: 1, value: "Alpha"); lookupIntString.Add(key: 2, value: "Beta"); lookupIntString.Add(key: 3, value: "Gamma"); lookupIntString.Add(key: harry, value: "Delta"); - Note the compile error when using
harryas a key, as shown in the following output:/Users/markjprice/Code/Chapter06/PeopleApp/Program.cs(98,32): error CS1503: Argument 1: cannot convert from 'Packt.Shared.Person' to 'int' [/Users/markjprice/Code/Chapter06/PeopleApp/PeopleApp.csproj] - Replace
harrywith4. - Add statements to set the
keyto3and use it to look up its value in the dictionary, as shown in the following code:key = 3; WriteLine(format: "Key {0} has value: {1}", arg0: key, arg1: lookupIntString[key]); - Run the code and note that it works, as shown in the following output:
Key 3 has value: Gamma
Implementing interfaces
Interfaces are a way of connecting different types to make new things. Think of them like the studs on top of LEGO™ bricks, which allow them to "stick" together, or electrical standards for plugs and sockets.
If a type implements an interface, then it is making a promise to the rest of .NET that it supports specific functionality. This is why they are sometimes described as being contracts.
Common interfaces
Here are some common interfaces that your types might need to implement:
|
Interface |
Method(s) |
Description |
|
|
|
This defines a comparison method that a type implements to order or sort its instances. |
|
|
|
This defines a comparison method that a secondary type implements to order or sort instances of a primary type. |
|
|
|
This defines a disposal method to release unmanaged resources more efficiently than waiting for a finalizer (see the Releasing unmanaged resources section later in this chapter for more details. |
|
|
|
This defines a culture-aware method to format the value of an object into a string representation. |
|
|
|
This defines methods to convert an object to and from a stream of bytes for storage or transfer. |
|
|
|
This defines a method to format inputs based on a language and region. |
Comparing objects when sorting
One of the most common interfaces that you will want to implement is IComparable. It has one method named CompareTo. It has two variations, one that works with a nullable object type and one that works with a nullable generic type T, as shown in the following code:
namespace System
{
  public interface IComparable
  {
    int CompareTo(object? obj);
  }
  public interface IComparable<in T>
  {
    int CompareTo(T? other);
  }
}
For example, the string type implements IComparable by returning -1 if the string is less than the string being compared to or 1 if it is greater. The int type implements IComparable by returning -1 if the int is less than the int being compared to or 1 if it is greater.
If a type implements one of the IComparable interfaces, then arrays and collections can sort it.
Before we implement the IComparable interface and its CompareTo method for the Person class, let's see what happens when we try to sort an array of Person instances:
- In
Program.cs, add statements that create an array ofPersoninstances and write the items to the console, and then attempt to sort the array and write the items to the console again, as shown in the following code:Person[] people = { new() { Name = "Simon" }, new() { Name = "Jenny" }, new() { Name = "Adam" }, new() { Name = "Richard" } }; WriteLine("Initial list of people:"); foreach (Person p in people) { WriteLine($" {p.Name}"); } WriteLine("Use Person's IComparable implementation to sort:"); Array.Sort(people); foreach (Person p in people) { WriteLine($" {p.Name}"); } - Run the code and an exception will be thrown. As the message explains, to fix the problem, our type must implement
IComparable, as shown in the following output:Unhandled Exception: System.InvalidOperationException: Failed to compare two elements in the array. ---> System.ArgumentException: At least one object must implement IComparable. - In
Person.cs, after inheriting fromobject, add a comma and enterIComparable<Person>, as shown in the following code:public class Person : object, IComparable<Person>Your code editor will draw a red squiggle under the new code to warn you that you have not yet implemented the method you have promised to. Your code editor can write the skeleton implementation for you if you click on the light bulb and choose the Implement interface option.
- Scroll down to the bottom of the
Personclass to find the method that was written for you and delete the statement that throws theNotImplementedExceptionerror, as shown highlighted in the following code:public int CompareTo(Person? other) { throw new NotImplementedException(); } - Add a statement to call the
CompareTomethod of theNamefield, which uses thestringtype's implementation ofCompareToand return the result, as shown highlighted in the following code:public int CompareTo(Person? other) { if (Name is null) return 0; return Name.CompareTo(other?.Name); }We have chosen to compare two
Personinstances by comparing theirNamefields.Personinstances will, therefore, be sorted alphabetically by their name. For simplicity, I have not addednullchecks throughout these examples. - Run the code and note that this time it works as it should, as shown in the following output:
Initial list of people:
  Simon
  Jenny
  Adam
  Richard
Use Person's IComparable implementation to sort:
  Adam
  Jenny
  Richard
  Simon
Good Practice: If anyone will want to sort an array or collection of instances of your type, then implement the IComparable interface.
Comparing objects using a separate class
Sometimes, you won't have access to the source code for a type, and it might not implement the IComparable interface. Luckily, there is another way to sort instances of a type. You can create a separate type that implements a slightly different interface, named IComparer:
- In the
PacktLibraryproject, add a new class file namedPersonComparer.cscontaining a class that implements theIComparerinterface that will compare two people, that is, twoPersoninstances. Implement it by comparing the length of theirNamefield, or if the names are the same length, then by comparing the names alphabetically, as shown in the following code:namespace Packt.Shared; public class PersonComparer : IComparer<Person> { public int Compare(Person? x, Person? y) { if (x is null || y is null) { return 0; } // Compare the Name lengths... int result = x.Name.Length.CompareTo(y.Name.Length); // ...if they are equal... if (result == 0) { // ...then compare by the Names... return x.Name.CompareTo(y.Name); } else // result will be -1 or 1 { // ...otherwise compare by the lengths. return result; } } } - In
Program.cs, add statements to sort the array using this alternative implementation, as shown in the following code:WriteLine("Use PersonComparer's IComparer implementation to sort:"); Array.Sort(people, new PersonComparer()); foreach (Person p in people) { WriteLine($" {p.Name}"); } - Run the code and view the result, as shown in the following output:
Use PersonComparer's IComparer implementation to sort:
  Adam
  Jenny
  Simon
  Richard
This time, when we sort the people array, we explicitly ask the sorting algorithm to use the PersonComparer type instead, so that the people are sorted with the shortest names first, like Adam, and the longest names last, like Richard; and when the lengths of two or more names are equal, to sort them alphabetically, like Jenny and Simon.
Implicit and explicit interface implementations
Interfaces can be implemented implicitly and explicitly. Implicit implementations are simpler and more common. Explicit implementations are only necessary if a type must have multiple methods with the same name and signature.
For example, both IGamePlayer and IKeyHolder might have a method called Lose with the same parameters because both a game and a key can be lost. In a type that must implement both interfaces, only one implementation of Lose can be the implicit method. If both interfaces can share the same implementation, that works, but if not then the other Lose method will have to be implemented differently and called explicitly, as shown in the following code:
public interface IGamePlayer
{
  void Lose();
}
public interface IKeyHolder
{
  void Lose();
}
public class Person : IGamePlayer, IKeyHolder
{
  public void Lose() // implicit implementation
  {
    // implement losing a key
  }
  void IGamePlayer.Lose() // explicit implementation
  {
    // implement losing a game
  }
}
// calling implicit and explicit implementations of Lose
Person p = new();
p.Lose(); // calls implicit implementation of losing a key
((IGamePlayer)p).Lose(); // calls explicit implementation of losing a game
IGamePlayer player = p as IGamePlayer;
player.Lose(); // calls explicit implementation of losing a game
Defining interfaces with default implementations
A language feature introduced in C# 8.0 is default implementations for an interface. Let's see it in action:
- In the
PacktLibraryproject, add a new file namedIPlayable.cs. - Modify the statements to define a public
IPlayableinterface with two methods toPlayandPause, as shown in the following code:namespace Packt.Shared; public interface IPlayable { void Play(); void Pause(); } - In the
PacktLibraryproject, add a new class file namedDvdPlayer.cs. - Modify the statements in the file to implement the
IPlayableinterface, as shown in the following code:using static System.Console; namespace Packt.Shared; public class DvdPlayer : IPlayable { public void Pause() { WriteLine("DVD player is pausing."); } public void Play() { WriteLine("DVD player is playing."); } }This is useful, but what if we decide to add a third method named
Stop? Before C# 8.0, this would be impossible once at least one type implements the original interface. One of the main points of an interface is that it is a fixed contract.C# 8.0 allows an interface to add new members after release as long as they have a default implementation. C# purists do not like the idea, but for practical reasons, such as avoiding breaking changes or having to define a whole new interface, it is useful, and other languages such as Java and Swift enable similar techniques.
Support for default interface implementations requires some fundamental changes to the underlying platform, so they are only supported with C# if the target framework is .NET 5.0 or later, .NET Core 3.0 or later, or .NET Standard 2.1. They are therefore not supported by .NET Framework.
- Modify the
IPlayableinterface to add aStopmethod with a default implementation, as shown highlighted in the following code:using static System.Console; namespace Packt.Shared; public interface IPlayable { void Play(); void Pause(); void Stop() // default interface implementation { WriteLine("Default implementation of Stop."); } } - Build the
PeopleAppproject and note that the projects compile successfully despite theDvdPlayerclass not implementingStop. In the future, we could override the default implementation ofStopby implementing it in theDvdPlayerclass.
Managing memory with reference and value types
I have mentioned reference types a couple of times. Let's look at them in more detail.
There are two categories of memory: stack memory and heap memory. With modern operating systems, the stack and heap can be anywhere in physical or virtual memory.
Stack memory is faster to work with (because it is managed directly by the CPU and because it uses a last-in, first-out mechanism, it is more likely to have the data in its L1 or L2 cache) but limited in size, while heap memory is slower but much more plentiful.
For example, in a macOS terminal, I can enter the command ulimit -a to discover that the stack size is limited to 8,192 KB and that other memory is "unlimited." This limited amount of stack memory is why it is so easy to fill it up and get a "stack overflow."
Defining reference and value types
There are three C# keywords that you can use to define object types: class, record, and struct. All can have the same members, such as fields and methods. One difference between them is how memory is allocated.
When you define a type using record or class, you are defining a reference type. This means that the memory for the object itself is allocated on the heap, and only the memory address of the object (and a little overhead) is stored on the stack.
When you define a type using record struct or struct, you are defining a value type. This means that the memory for the object itself is allocated on the stack.
If a struct uses field types that are not of the struct type, then those fields will be stored on the heap, meaning the data for that object is stored in both the stack and the heap!
These are the most common struct types:
- Number
Systemtypes:byte,sbyte,short,ushort,int,uint,long,ulong,float,double, anddecimal - Other
Systemtypes:char,DateTime, andbool System.Drawingtypes:Color,Point, andRectangle
Almost all the other types are class types, including string.
Apart from the difference in terms of where in memory the data for a type is stored, the other major difference is that you cannot inherit from a struct.
How reference and value types are stored in memory
Imagine that you have a console app that declares some variables, as shown in the following code:
int number1 = 49;
long number2 = 12;
System.Drawing.Point location = new(x: 4, y: 5);
Person kevin = new() { Name = "Kevin",
  DateOfBirth = new(year: 1988, month: 9, day: 23) };
Person sally;
Let's review what memory is allocated on the stack and heap when these statements execute, as shown in Figure 6.1 and as described in the following list:
- The
number1variable is a value type (also known asstruct) so it is allocated on the stack and it uses 4 bytes of memory since it is a 32-bit integer. Its value, 49, is stored directly in the variable. - The
number2variable is also a value type so it is also allocated on the stack, and it uses 8 bytes since it is a 64-bit integer. - The
locationvariable is also a value type so it is allocated on the stack and it uses 8 bytes since it is made up of two 32-bit integers,xandy. - The
kevinvariable is a reference type (also known asclass) so 8 bytes for a 64-bit memory address (assuming a 64-bit operating system) is allocated on the stack and enough bytes on the heap to store an instance of aPerson. - The
sallyvariable is a reference type so 8 bytes for a 64-bit memory address is allocated on the stack. It is currentlynull, meaning no memory has yet been allocated for it on the heap.
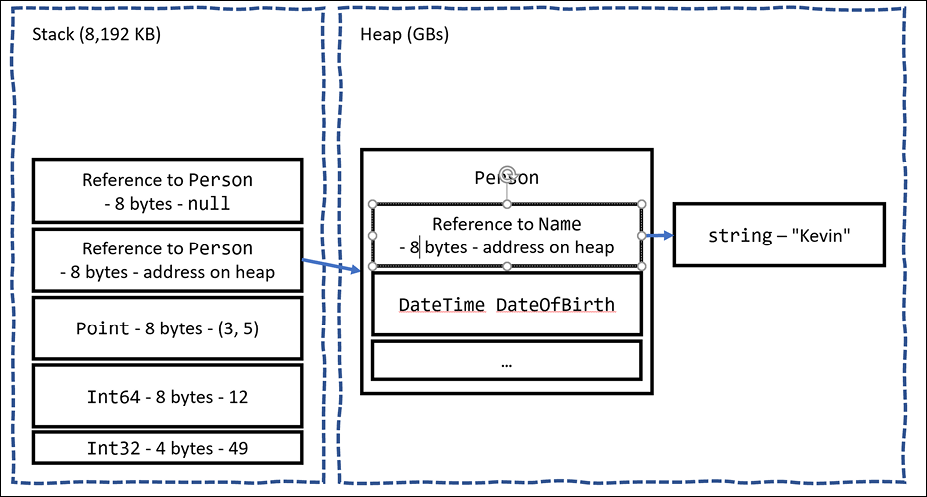
Figure 6.1: How value and reference types are allocated in the stack and heap
All the allocated memory for a reference type is stored on the heap. If a value type such as DateTime is used for a field of a reference type like Person, then the DateTime value is stored on the heap.
If a value type has a field that is a reference type, then that part of the value type is stored on the heap. Point is a value type that consists of two fields, both of which are themselves value types, so the entire object can be allocated on the stack. If the Point value type had a field that was a reference type, like string, then the string bytes would be stored on the heap.
Equality of types
It is common to compare two variables using the == and != operators. The behavior of these two operators is different for reference types and value types.
When you check the equality of two value type variables, .NET literally compares the values of those two variables on the stack and returns true if they are equal, as shown in the following code:
int a = 3;
int b = 3;
WriteLine($"a == b: {(a == b)}"); // true
When you check the equality of two reference type variables, .NET compares the memory addresses of those two variables and returns true if they are equal, as shown in the following code:
Person a = new() { Name = "Kevin" };
Person b = new() { Name = "Kevin" };
WriteLine($"a == b: {(a == b)}"); // false
This is because they are not the same object. If both variables literally point to the same object on the heap, then they would be equal, as shown in the following code:
Person a = new() { Name = "Kevin" };
Person b = a;
WriteLine($"a == b: {(a == b)}"); // true
The one exception to this behavior is the string type. It is a reference type, but the equality operators have been overridden to make them behave as if they were value types, as shown in the following code:
string a = "Kevin";
string b = "Kevin";
WriteLine($"a == b: {(a == b)}"); // true
You can do something similar with your classes to make the equality operators return true even if they are not the same object (same memory address on the heap) but instead if their fields have the same values, but that is beyond the scope of this book. Alternatively, use a record class because one of their benefits is that they implement this behavior for you.
Defining struct types
Let's explore defining your own value types:
- In the
PacktLibraryproject, add a file namedDisplacementVector.cs. - Modify the file, as shown in the following code, and note the following:
- The type is declared using
structinstead ofclass. - It has two
intfields, namedXandY. - It has a constructor for setting initial values for
XandY. - It has an operator for adding two instances together that returns a new instance of the type with
Xadded toX, andYadded toY.
namespace Packt.Shared; public struct DisplacementVector { public int X; public int Y; public DisplacementVector(int initialX, int initialY) { X = initialX; Y = initialY; } public static DisplacementVector operator +( DisplacementVector vector1, DisplacementVector vector2) { return new( vector1.X + vector2.X, vector1.Y + vector2.Y); } } - The type is declared using
- In
Program.cs, add statements to create two new instances ofDisplacementVector, add them together, and output the result, as shown in the following code:DisplacementVector dv1 = new(3, 5); DisplacementVector dv2 = new(-2, 7); DisplacementVector dv3 = dv1 + dv2; WriteLine($"({dv1.X}, {dv1.Y}) + ({dv2.X}, {dv2.Y}) = ({dv3.X}, {dv3.Y})"); - Run the code and view the result, as shown in the following output:
(3, 5) + (-2, 7) = (1, 12)
Good Practice: If the total bytes used by all the fields in your type is 16 bytes or less, your type only uses value types for its fields, and you will never want to derive from your type, then Microsoft recommends that you use struct. If your type uses more than 16 bytes of stack memory, if it uses reference types for its fields, or if you might want to inherit from it, then use class.
Working with record struct types
C# 10 introduced the ability to use the record keyword with struct types as well as with class types.
We could define the DisplacementVector type, as shown in the following code:
public record struct DisplacementVector(int X, int Y);
With this change, Microsoft recommends explicitly specifying class if you want to define a record class even though the class keyword is optional, as shown in the following code:
public record class ImmutableAnimal(string Name);
Releasing unmanaged resources
In the previous chapter, we saw that constructors can be used to initialize fields and that a type may have multiple constructors. Imagine that a constructor allocates an unmanaged resource; that is, anything that is not controlled by .NET, such as a file or mutex under the control of the operating system. The unmanaged resource must be manually released because .NET cannot do it for us using its automatic garbage collection feature.
Garbage collection is an advanced topic, so for this topic, I will show some code examples, but you do not need to write the code yourself.
Each type can have a single finalizer that will be called by the .NET runtime when the resources need to be released. A finalizer has the same name as a constructor; that is, the type name, but it is prefixed with a tilde, ~.
Do not confuse a finalizer (also known as a destructor) with a Deconstruct method. A destructor releases resources; that is, it destroys an object in memory. A Deconstruct method returns an object split up into its constituent parts and uses the C# deconstruction syntax, for example, when working with tuples:
public class Animal
{
  public Animal() // constructor
  {
    // allocate any unmanaged resources
  }
  ~Animal() // Finalizer aka destructor
  {
    // deallocate any unmanaged resources
  }
}
The preceding code example is the minimum you should do when working with unmanaged resources. But the problem with only providing a finalizer is that the .NET garbage collector requires two garbage collections to completely release the allocated resources for this type.
Though optional, it is recommended to also provide a method to allow a developer who uses your type to explicitly release resources so that the garbage collector can release managed parts of an unmanaged resource, such as a file, immediately and deterministically, and then release the managed memory part of the object in a single garbage collection instead of two rounds of garbage collection.
There is a standard mechanism for doing this by implementing the IDisposable interface, as shown in the following example:
public class Animal : IDisposable
{
  public Animal()
  {
    // allocate unmanaged resource
  }
  ~Animal() // Finalizer
  {
    Dispose(false);
  }
  bool disposed = false; // have resources been released?
  public void Dispose()
  {
    Dispose(true);
    // tell garbage collector it does not need to call the finalizer
    GC.SuppressFinalize(this);
  }
  protected virtual void Dispose(bool disposing)
  {
    if (disposed) return;
    // deallocate the *unmanaged* resource
    // ...
    if (disposing)
    {
      // deallocate any other *managed* resources
      // ...
    }
    disposed = true;
  }
}
There are two Dispose methods, one public and one protected:
- The
public void Disposemethod will be called by a developer using your type. When called, both unmanaged and managed resources need to be deallocated. - The
protected virtual void Disposemethod with aboolparameter is used internally to implement the deallocation of resources. It needs to check thedisposingparameter anddisposedfield because if the finalizer thread has already run and it called the~Animalmethod, then only unmanaged resources need to be deallocated.
The call to GC.SuppressFinalize(this) is what notifies the garbage collector that it no longer needs to run the finalizer, and removes the need for a second garbage collection.
Ensuring that Dispose is called
When someone uses a type that implements IDisposable, they can ensure that the public Dispose method is called with the using statement, as shown in the following code:
using (Animal a = new())
{
  // code that uses the Animal instance
}
The compiler converts your code into something like the following, which guarantees that even if an exception occurs, the Dispose method will still be called:
Animal a = new();
try
{
  // code that uses the Animal instance
}
finally
{
  if (a != null) a.Dispose();
}
You will see practical examples of releasing unmanaged resources with IDisposable, using statements, and try...finally blocks in Chapter 9, Working with Files, Streams, and Serialization.
Working with null values
You have seen how to store primitive values like numbers in struct variables. But what if a variable does not yet have a value? How can we indicate that? C# has the concept of a null value, which can be used to indicate that a variable has not been set.
Making a value type nullable
By default, value types like int and DateTime must always have a value, hence their name. Sometimes, for example, when reading values stored in a database that allows empty, missing, or null values, it is convenient to allow a value type to be null. We call this a nullable value type.
You can enable this by adding a question mark as a suffix to the type when declaring a variable.
Let's see an example:
- Use your preferred coding tool to add a new Console Application to the
Chapter06workspace/solution namedNullHandling. This section requires a full application with a project file, so you will not be able to use a .NET Interactive notebook. - In Visual Studio Code, select
NullHandlingas the active OmniSharp project. In Visual Studio, setNullHandlingas the startup project. - In
Program.cs, type statements to declare and assign values, includingnull, tointvariables, as shown in the following code:int thisCannotBeNull = 4; thisCannotBeNull = null; // compile error! int? thisCouldBeNull = null; WriteLine(thisCouldBeNull); WriteLine(thisCouldBeNull.GetValueOrDefault()); thisCouldBeNull = 7; WriteLine(thisCouldBeNull); WriteLine(thisCouldBeNull.GetValueOrDefault()); - Comment out the statement that gives a compile error.
- Run the code and view the result, as shown in the following output:
0
7
7
The first line is blank because it is outputting the null value!
Understanding nullable reference types
The use of the null value is so common, in so many languages, that many experienced programmers never question the need for its existence. But there are many scenarios where we could write better, simpler code if a variable is not allowed to have a null value.
The most significant change to the language in C# 8 was the introduction of nullable and non- nullable reference types. "But wait!", you are probably thinking, "Reference types are already nullable!"
And you would be right, but in C# 8 and later, reference types can be configured to no longer allow the null value by setting a file- or project-level option to enable this useful new feature. Since this is a big change for C#, Microsoft decided to make the feature opt-in.
It will take multiple years for this new C# language feature to make an impact since thousands of existing library packages and apps will expect the old behavior. Even Microsoft did not have time to fully implement this new feature in all the main .NET packages until .NET 6.
During the transition, you can choose between several approaches for your own projects:
- Default: No changes are needed. Non-nullable reference types are not supported.
- Opt-in project, opt-out files: Enable the feature at the project level and, for any files that need to remain compatible with old behavior, opt out. This is the approach Microsoft is using internally while it updates its own packages to use this new feature.
- Opt-in files: Only enable the feature for individual files.
Enabling nullable and non-nullable reference types
To enable the feature at the project level, add the following to your project file:
<PropertyGroup>
  ...
  <Nullable>enable</Nullable>
</PropertyGroup>
This is now done by default in project templates that target .NET 6.0.
To disable the feature at the file level, add the following to the top of a code file:
#nullable disable
To enable the feature at the file level, add the following to the top of a code file:
#nullable enable
Declaring non-nullable variables and parameters
If you enable nullable reference types and you want a reference type to be assigned the null value, then you will have to use the same syntax as making a value type nullable, that is, adding a ? symbol after the type declaration.
So, how do nullable reference types work? Let's look at an example. When storing information about an address, you might want to force a value for the street, city, and region, but the building can be left blank, that is, null:
- In
NullHandling.csproj, inProgram.cs, at the bottom of the file, add statements to declare anAddressclass with four fields, as shown in the following code:class Address { public string? Building; public string Street; public string City; public string Region; } - After a few seconds, note the warnings about non-nullable fields, like
Streetnot being initialized, as shown in Figure 6.2: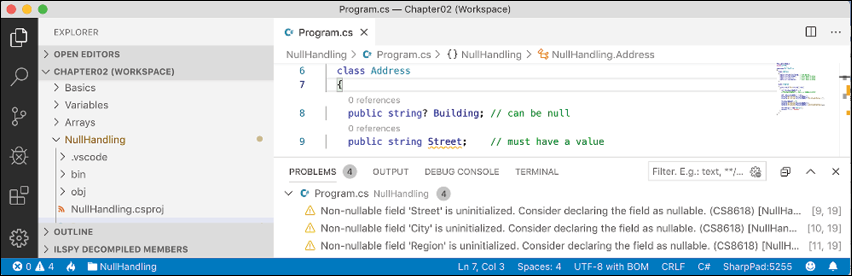
Figure 6.2: Warning messages about non-nullable fields in the PROBLEMS window
- Assign the empty
stringvalue to each of the three fields that are non-nullable, as shown in the following code:public string Street = string.Empty; public string City = string.Empty; public string Region = string.Empty; - In
Program.cs, at the top of the file, statically importConsoleand then add statements to instantiate anAddressand set its properties, as shown in the following code:Address address = new(); address.Building = null; address.Street = null; address.City = "London"; address.Region = null; - Note the warnings, as shown in Figure 6.3:
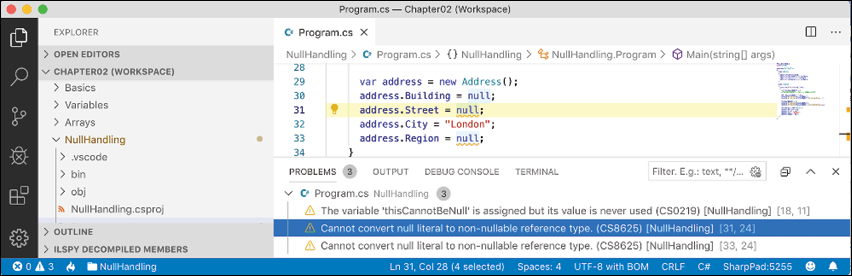
Figure 6.3: Warning message about assigning null to a non-nullable field
So, this is why the new language feature is named nullable reference types. Starting with C# 8.0, unadorned reference types can become non-nullable, and the same syntax is used to make a reference type nullable as is used for value types.
Checking for null
Checking whether a nullable reference type or nullable value type variable currently contains null is important because if you do not, a NullReferenceException can be thrown, which results in an error. You should check for a null value before using a nullable variable, as shown in the following code:
// check that the variable is not null before using it
if (thisCouldBeNull != null)
{
  // access a member of thisCouldBeNull
  int length = thisCouldBeNull.Length; // could throw exception
  ...
}
C# 7 introduced is combined with the ! (not) operator as an alternative to !=, as shown in the following code:
if (!(thisCouldBeNull is null))
{
C# 9 introduced is not as an even clearer alternative, as shown in the following code:
if (thisCouldBeNull is not null)
{
If you are trying to use a member of a variable that might be null, use the null-conditional operator ?., as shown in the following code:
string authorName = null;
// the following throws a NullReferenceException
int x = authorName.Length;
// instead of throwing an exception, null is assigned to y
int? y = authorName?.Length;
Sometimes you want to either assign a variable to a result or use an alternative value, such as 3, if the variable is null. You do this using the null-coalescing operator, ??, as shown in the following code:
// result will be 3 if authorName?.Length is null
int result = authorName?.Length ?? 3;
Console.WriteLine(result);
Good Practice: Even if you enable nullable reference types, you should still check non-nullable parameters for null and throw an ArgumentNullException.
Checking for null in method parameters
When defining methods with parameters, it is good practice to check for null values.
In earlier versions of C#, you would have to write if statements to check for null parameter values and then throw an ArgumentNullException for any parameter that is null, as shown in the following code:
public void Hire(Person manager, Person employee)
{
  if (manager == null)
  {
    throw new ArgumentNullException(nameof(manager));
  }
  if (employee == null)
  {
    throw new ArgumentNullException(nameof(employee));
  }
  ...
}
C# 11 might introduce a new !! suffix that does this for you, as shown in the following code:
public void Hire(Person manager!!, Person employee!!)
{
  ...
}
The if statement and throwing of the exception are done for you.
Inheriting from classes
The Person type we created earlier derived (inherited) from object, the alias for System.Object. Now, we will create a subclass that inherits from Person:
- In the
PacktLibraryproject, add a new class file namedEmployee.cs. - Modify its contents to define a class named
Employeethat derives fromPerson, as shown in the following code:using System; namespace Packt.Shared; public class Employee : Person { } - In
Program.cs, add statements to create an instance of theEmployeeclass, as shown in the following code:Employee john = new() { Name = "John Jones", DateOfBirth = new(year: 1990, month: 7, day: 28) }; john.WriteToConsole(); - Run the code and view the result, as shown in the following output:
John Jones was born on a Saturday.
Note that the Employee class has inherited all the members of Person.
Extending classes to add functionality
Now, we will add some employee-specific members to extend the class.
- In
Employee.cs, add statements to define two properties for an employee code and the date they were hired, as shown in the following code:public string? EmployeeCode { get; set; } public DateTime HireDate { get; set; } - In
Program.cs, add statements to set John's employee code and hire date, as shown in the following code:john.EmployeeCode = "JJ001"; john.HireDate = new(year: 2014, month: 11, day: 23); WriteLine($"{john.Name} was hired on {john.HireDate:dd/MM/yy}"); - Run the code and view the result, as shown in the following output:
John Jones was hired on 23/11/14
Hiding members
So far, the WriteToConsole method is inherited from Person, and it only outputs the employee's name and date of birth. We might want to change what this method does for an employee:
- In
Employee.cs, add statements to redefine theWriteToConsolemethod, as shown highlighted in the following code:using static System.Console; namespace Packt.Shared; public class Employee : Person { public string? EmployeeCode { get; set; } public DateTime HireDate { get; set; } public void WriteToConsole() { WriteLine(format: "{0} was born on {1:dd/MM/yy} and hired on {2:dd/MM/yy}", arg0: Name, arg1: DateOfBirth, arg2: HireDate); } } - Run the code and view the result, as shown in the following output:
John Jones was born on 28/07/90 and hired on 01/01/01
John Jones was hired on 23/11/14
Your coding tool warns you that your method now hides the method from Person by drawing a squiggle under the method name, the PROBLEMS/Error List window includes more details, and the compiler will output the warning when you build and run the console application, as shown in Figure 6.4:
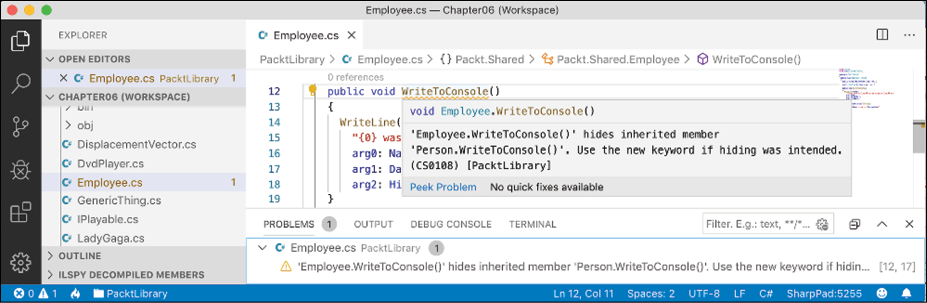
Figure 6.4: Hidden method warning
As the warning describes, you can hide this message by applying the new keyword to the method, to indicate that you are deliberately replacing the old method, as shown highlighted in the following code:
public new void WriteToConsole()
Overriding members
Rather than hiding a method, it is usually better to override it. You can only override if the base class chooses to allow overriding, by applying the virtual keyword to any methods that should allow overriding.
Let's see an example:
- In
Program.cs, add a statement to write the value of thejohnvariable to the console using itsstringrepresentation, as shown in the following code:WriteLine(john.ToString()); - Run the code and note that the
ToStringmethod is inherited fromSystem.Object, so the implementation returns the namespace and type name, as shown in the following output:Packt.Shared.Employee - In
Person.cs, override this behavior by adding aToStringmethod to output the name of the person as well as the type name, as shown in the following code:// overridden methods public override string ToString() { return $"{Name} is a {base.ToString()}"; }The
basekeyword allows a subclass to access members of its superclass; that is, the base class that it inherits or derives from. - Run the code and view the result. Now, when the
ToStringmethod is called, it outputs the person's name, as well as returning the base class's implementation ofToString, as shown in the following output:John Jones is a Packt.Shared.Employee
Good Practice: Many real-world APIs, for example, Microsoft's Entity Framework Core, Castle's DynamicProxy, and Episerver's content models, require the properties that you define in your classes to be marked as virtual so that they can be overridden. Carefully decide which of your method and property members should be marked as virtual.
Inheriting from abstract classes
Earlier in this chapter, you learned about interfaces that can define a set of members that a type must have to meet a basic level of functionality. These are very useful, but their main limitation is that until C# 8 they could not provide any implementation of their own.
This is a particular problem if you still need to create class libraries that will work with .NET Framework and other platforms that do not support .NET Standard 2.1.
In those earlier platforms, you could use abstract classes as a sort of halfway house between a pure interface and a fully implemented class.
When a class is marked as abstract, this means that it cannot be instantiated because you are indicating that the class is not complete. It needs more implementation before it can be instantiated.
For example, the System.IO.Stream class is abstract because it implements common functionality that all streams would need but is not complete, so you cannot instantiate it using new Stream().
Let's compare the two types of interface and two types of class, as shown in the following code:
public interface INoImplementation // C# 1.0 and later
{
  void Alpha(); // must be implemented by derived type
}
public interface ISomeImplementation // C# 8.0 and later
{
  void Alpha(); // must be implemented by derived type
  void Beta()
  {
    // default implementation; can be overridden
  }
}
public abstract class PartiallyImplemented // C# 1.0 and later
{
  public abstract void Gamma(); // must be implemented by derived type
  public virtual void Delta() // can be overridden
  {
    // implementation
  }
}
public class FullyImplemented : PartiallyImplemented, ISomeImplementation
{
  public void Alpha()
  {
    // implementation
  }
  public override void Gamma()
  {
    // implementation
  }
}
// you can only instantiate the fully implemented class
FullyImplemented a = new();
// all the other types give compile errors
PartiallyImplemented b = new(); // compile error!
ISomeImplementation c = new(); // compile error!
INoImplementation d = new(); // compile error!
Preventing inheritance and overriding
You can prevent another developer from inheriting from your class by applying the sealed keyword to its definition. No one can inherit from Scrooge McDuck, as shown in the following code:
public sealed class ScroogeMcDuck
{
}
An example of sealed in .NET is the string class. Microsoft has implemented some extreme optimizations inside the string class that could be negatively affected by your inheritance, so Microsoft prevents that.
You can prevent someone from further overriding a virtual method in your class by applying the sealed keyword to the method. No one can change the way Lady Gaga sings, as shown in the following code:
using static System.Console;
namespace Packt.Shared;
public class Singer
{
  // virtual allows this method to be overridden
  public virtual void Sing()
  {
    WriteLine("Singing...");
  }
}
public class LadyGaga : Singer
{
  // sealed prevents overriding the method in subclasses
  public sealed override void Sing()
  {
    WriteLine("Singing with style...");
  }
}
You can only seal an overridden method.
Understanding polymorphism
You have now seen two ways to change the behavior of an inherited method. We can hide it using the new keyword (known as non-polymorphic inheritance), or we can override it (known as polymorphic inheritance).
Both ways can access members of the base or superclass by using the base keyword, so what is the difference?
It all depends on the type of variable holding a reference to the object. For example, a variable of the Person type can hold a reference to a Person class, or any type that derives from Person.
Let's see how this could affect your code:
- In
Employee.cs, add statements to override theToStringmethod so it writes the employee's name and code to the console, as shown in the following code:public override string ToString() { return $"{Name}'s code is {EmployeeCode}"; } - In
Program.cs, write statements to create a new employee named Alice, store it in a variable of typePerson, and call both variables'WriteToConsoleandToStringmethods, as shown in the following code:Employee aliceInEmployee = new() { Name = "Alice", EmployeeCode = "AA123" }; Person aliceInPerson = aliceInEmployee; aliceInEmployee.WriteToConsole(); aliceInPerson.WriteToConsole(); WriteLine(aliceInEmployee.ToString()); WriteLine(aliceInPerson.ToString()); - Run the code and view the result, as shown in the following output:
Alice was born on 01/01/01 and hired on 01/01/01
Alice was born on a Monday
Alice's code is AA123
Alice's code is AA123
When a method is hidden with new, the compiler is not smart enough to know that the object is an Employee, so it calls the WriteToConsole method in Person.
When a method is overridden with virtual and override, the compiler is smart enough to know that although the variable is declared as a Person class, the object itself is an Employee class and, therefore, the Employee implementation of ToString is called.
The member modifiers and the effect they have are summarized in the following table:
|
Variable type |
Member modifier |
Method executed |
In class |
|
|
|
|
|
|
|
|
|
|
|
|
|
|
|
|
|
|
|
|
In my opinion, polymorphism is academic to most programmers. If you get the concept, that's cool; but, if not, I suggest that you don't worry about it. Some people like to make others feel inferior by saying understanding polymorphism is important for all C# programmers to learn, but IMHO it's not.
You can have a successful career with C# and never need to be able to explain polymorphism, just as a racing car driver doesn't need to be able to explain the engineering behind fuel injection.
Good Practice: You should use virtual and override rather than new to change the implementation of an inherited method whenever possible.
Casting within inheritance hierarchies
Casting between types is subtly different from converting between types. Casting is between similar types, like between a 16-bit integer and a 32-bit integer, or between a superclass and one of its subclasses. Converting is between dissimilar types, such as between text and a number.
Implicit casting
In the previous example, you saw how an instance of a derived type can be stored in a variable of its base type (or its base's base type, and so on). When we do this, it is called implicit casting.
Explicit casting
Going the other way is an explicit cast, and you must use parentheses around the type you want to cast into as a prefix to do it:
- In
Program.cs, add a statement to assign thealiceInPersonvariable to a newEmployeevariable, as shown in the following code:Employee explicitAlice = aliceInPerson; - Your coding tool displays a red squiggle and a compile error, as shown in Figure 6.5:
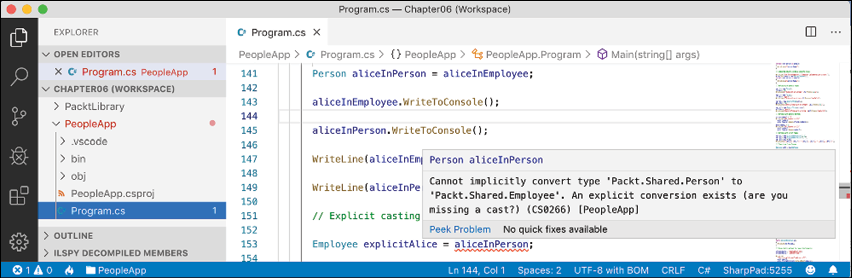
Figure 6.5: A missing explicit cast compile error
- Change the statement to prefix the assigned variable named with a cast to the
Employeetype, as shown in the following code:Employee explicitAlice = (Employee)aliceInPerson;
Avoiding casting exceptions
The compiler is now happy; but, because aliceInPerson might be a different derived type, like Student instead of Employee, we need to be careful. In a real application with more complex code, the current value of this variable could have been set to a Student instance, and then this statement would throw an InvalidCastException error.
We can handle this by writing a try statement, but there is a better way. We can check the type of an object using the is keyword:
- Wrap the explicit cast statement in an
ifstatement, as shown highlighted in the following code:if (aliceInPerson is Employee) { WriteLine($"{nameof(aliceInPerson)} IS an Employee"); Employee explicitAlice = (Employee)aliceInPerson; // safely do something with explicitAlice } - Run the code and view the result, as shown in the following output:
aliceInPerson IS an EmployeeYou can simplify the code further using a declaration pattern and this will avoid needing to perform an explicit cast, as shown in the following code:
if (aliceInPerson is Employee explicitAlice)
{
  WriteLine($"{nameof(aliceInPerson)} IS an Employee");
  // safely do something with explicitAlice
}
Alternatively, you can use the
askeyword to cast. Instead of throwing an exception, theaskeyword returnsnullif the type cannot be cast. - In
Main, add the statements to cast Alice using theaskeyword and then check whether the return value is not null, as shown in the following code:Employee? aliceAsEmployee = aliceInPerson as Employee; // could be null if (aliceAsEmployee != null) { WriteLine($"{nameof(aliceInPerson)} AS an Employee"); // safely do something with aliceAsEmployee }Since accessing a member of a
nullvariable will throw aNullReferenceExceptionerror, you should always check fornullbefore using the result. - Run the code and view the result, as shown in the following output:
aliceInPerson AS an Employee
What if you want to execute a block of statements when Alice is not an employee?
In the past, you would have had to use the ! (not) operator, as shown in the following code:
if (!(aliceInPerson is Employee))
With C# 9 and later, you can use the not keyword, as shown in the following code:
if (aliceInPerson is not Employee)
Good Practice: Use the is and as keywords to avoid throwing exceptions when casting between derived types. If you don't do this, you must write try-catch statements for InvalidCastException.
Inheriting and extending .NET types
.NET has prebuilt class libraries containing hundreds of thousands of types. Rather than creating your own completely new types, you can often get a head start by deriving from one of Microsoft's types to inherit some or all of its behavior and then overriding or extending it.
Inheriting exceptions
As an example of inheritance, we will derive a new type of exception:
- In the
PacktLibraryproject, add a new class file namedPersonException.cs. - Modify the contents of the file to define a class named
PersonExceptionwith three constructors, as shown in the following code:namespace Packt.Shared; public class PersonException : Exception { public PersonException() : base() { } public PersonException(string message) : base(message) { } public PersonException(string message, Exception innerException) : base(message, innerException) { } }Unlike ordinary methods, constructors are not inherited, so we must explicitly declare and explicitly call the base constructor implementations in
System.Exceptionto make them available to programmers who might want to use those constructors with our custom exception. - In
Person.cs, add statements to define a method that throws an exception if a date/time parameter is earlier than a person's date of birth, as shown in the following code:public void TimeTravel(DateTime when) { if (when <= DateOfBirth) { throw new PersonException("If you travel back in time to a date earlier than your own birth, then the universe will explode!"); } else { WriteLine($"Welcome to {when:yyyy}!"); } } - In
Program.cs, add statements to test what happens when employee John Jones tries to time travel too far back, as shown in the following code:try { john.TimeTravel(when: new(1999, 12, 31)); john.TimeTravel(when: new(1950, 12, 25)); } catch (PersonException ex) { WriteLine(ex.Message); } - Run the code and view the result, as shown in the following output:
Welcome to 1999!
If you travel back in time to a date earlier than your own birth, then the universe will explode!
Good Practice: When defining your own exceptions, give them the same three constructors that explicitly call the built-in ones.
Extending types when you can't inherit
Earlier, we saw how the sealed modifier can be used to prevent inheritance.
Microsoft has applied the sealed keyword to the System.String class so that no one can inherit and potentially break the behavior of strings.
Can we still add new methods to strings? Yes, if we use a language feature named extension methods, which was introduced with C# 3.0.
Using static methods to reuse functionality
Since the first version of C#, we've been able to create static methods to reuse functionality, such as the ability to validate that a string contains an email address. The implementation will use a regular expression that you will learn more about in Chapter 8, Working with Common .NET Types.
Let's write some code:
- In the
PacktLibraryproject, add a new class namedStringExtensions, as shown in the following code, and note the following:- The class imports a namespace for handling regular expressions.
- The
IsValidEmailmethod isstaticand it uses theRegextype to check for matches against a simple email pattern that looks for valid characters before and after the@symbol.
using System.Text.RegularExpressions; namespace Packt.Shared; public class StringExtensions { public static bool IsValidEmail(string input) { // use simple regular expression to check // that the input string is a valid email return Regex.IsMatch(input, @"[a-zA-Z0-9\.-_]+@[a-zA-Z0-9\.-_]+"); } } - In
Program.cs, add statements to validate two examples of email addresses, as shown in the following code:string email1 = "pamela@test.com"; string email2 = "ian&test.com"; WriteLine("{0} is a valid e-mail address: {1}", arg0: email1, arg1: StringExtensions.IsValidEmail(email1)); WriteLine("{0} is a valid e-mail address: {1}", arg0: email2, arg1: StringExtensions.IsValidEmail(email2)); - Run the code and view the result, as shown in the following output:
pamela@test.com is a valid e-mail address: True
ian&test.com is a valid e-mail address: False
This works, but extension methods can reduce the amount of code we must type and simplify the usage of this function.
Using extension methods to reuse functionality
It is easy to make static methods into extension methods:
- In
StringExtensions.cs, add thestaticmodifier before the class, and add thethismodifier before thestringtype, as highlighted in the following code:public static class StringExtensions { public static bool IsValidEmail(this string input) {These two changes tell the compiler that it should treat the method as one that extends the
stringtype. - In
Program.cs, add statements to use the extension method forstringvalues that need to be checked for valid email addresses, as shown in the following code:WriteLine("{0} is a valid e-mail address: {1}", arg0: email1, arg1: email1.IsValidEmail()); WriteLine("{0} is a valid e-mail address: {1}", arg0: email2, arg1: email2.IsValidEmail());Note the subtle simplification in the syntax for calling the
IsValidEmailmethod. The older, longer syntax still works too. - The
IsValidEmailextension method now appears to be a method just like all the actual instance methods of thestringtype, such asIsNormalizedandInsert, as shown in Figure 6.6: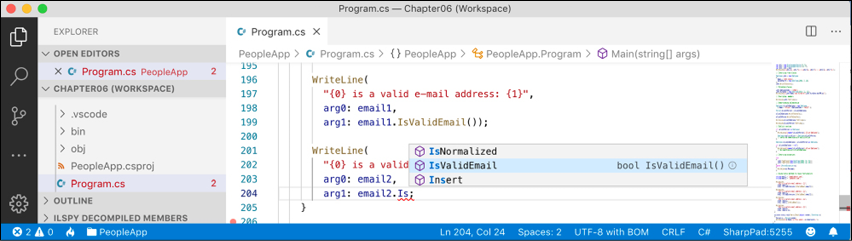
Figure 6.6: Extension methods appear in IntelliSense alongside instance methods
- Run the code and view the result, which will be the same as before.
Good Practice: Extension methods cannot replace or override existing instance methods. You cannot, for example, redefine the Insert method. The extension method will appear as an overload in IntelliSense, but an instance method will be called in preference to an extension method with the same name and signature.
Although extension methods might not seem to give a big benefit, in Chapter 11, Querying and Manipulating Data Using LINQ, you will see some extremely powerful uses of extension methods.
Using an analyzer to write better code
.NET analyzers find potential issues and suggest fixes for them. StyleCop is a commonly used analyzer for helping you write better C# code.
Let's see it in action, advising how to improve the code in the project template for a console app when targeting .NET 5.0 so that the console app already has a Program class with a Main method:
- Use your preferred code editor to add a console app project, as defined in the following list:
- Project template: Console Application /
console -f net5.0 - Workspace/solution file and folder:
Chapter06 - Project file and folder:
CodeAnalyzing - Target framework: .NET 5.0 (Current)
- Project template: Console Application /
- In the
CodeAnalyzingproject, add a package reference forStyleCop.Analyzers. - Add a JSON file to your project named
stylecop.jsonfor controlling StyleCop settings. - Modify its contents, as shown in the following markup:
{
  "$schema": "https://raw.githubusercontent.com/DotNetAnalyzers/StyleCopAnalyzers/master/StyleCop.Analyzers/StyleCop.Analyzers/Settings/stylecop.schema.json",
  "settings": {
  }
}
The
$schemaentry enables IntelliSense while editing thestylecop.jsonfile in your code editor. - Edit the project file, change the target framework to
net6.0, add entries to configure the file namedstylecop.jsonto not be included in published deployments, and to enable it as an additional file for processing during development, as shown highlighted in the following markup:<Project Sdk="Microsoft.NET.Sdk"> <PropertyGroup> <OutputType>Exe</OutputType> <TargetFramework>net6.0</TargetFramework> </PropertyGroup> <ItemGroup> <None Remove="stylecop.json" /> </ItemGroup> <ItemGroup> <AdditionalFiles Include="stylecop.json" /> </ItemGroup> <ItemGroup> <PackageReference Include="StyleCop.Analyzers" Version="1.2.0-*"> <PrivateAssets>all</PrivateAssets> <IncludeAssets>runtime; build; native; contentfiles; analyzers</IncludeAssets> </PackageReference> </ItemGroup> </Project> - Build your project.
- You will see warnings for everything it thinks is wrong, as shown in Figure 6.7:
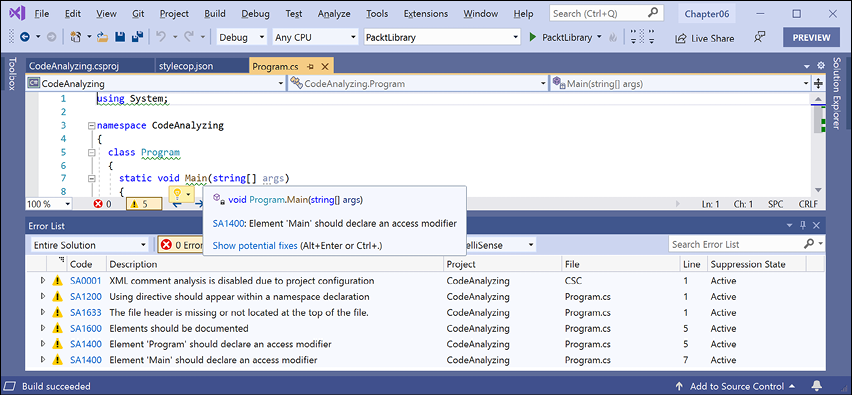
Figure 6.7: StyleCop code analyzer warnings
- For example, it wants
usingdirectives to be put within the namespace declaration, as shown in the following output:C:\Code\Chapter06\CodeAnalyzing\Program.cs(1,1): warning SA1200: Using directive should appear within a namespace declaration [C:\Code\Chapter06\CodeAnalyzing\CodeAnalyzing.csproj]
Suppressing warnings
To suppress a warning, you have several options, including adding code and setting configuration.
To suppress using an attribute, as shown in the following code:
[assembly:SuppressMessage("StyleCop.CSharp.OrderingRules", "SA1200:UsingDirectivesMustBePlacedWithinNamespace", Justification = "Reviewed.")]
To suppress using a directive, as shown in the following code:
#pragma warning disable SA1200 // UsingDirectivesMustBePlacedWithinNamespace
using System;
#pragma warning restore SA1200 // UsingDirectivesMustBePlacedWithinNamespace
Let's suppress the warning by modifying the stylecop.json file:
- In
stylecop.json, add a configuration option to setusingstatements to be allowable outside a namespace, as shown highlighted in the following markup:{ "$schema": "https://raw.githubusercontent.com/DotNetAnalyzers/StyleCopAnalyzers/master/StyleCop.Analyzers/StyleCop.Analyzers/Settings/stylecop.schema.json", "settings": { "orderingRules": { "usingDirectivesPlacement": "outsideNamespace" } } } - Build the project and note that warning SA1200 has disappeared.
- In
stylecop.json, set the using directives placement topreserve, which allowsusingstatements both inside and outside a namespace, as shown in the following markup:"orderingRules": { "usingDirectivesPlacement": "preserve" }
Fixing the code
Now, let's fix all the other warnings:
- In
CodeAnalyzing.csproj, add an element to automatically generate an XML file for documentation, as shown highlighted in the following markup:<Project Sdk="Microsoft.NET.Sdk"> <PropertyGroup> <OutputType>Exe</OutputType> <TargetFramework>net6.0</TargetFramework> <GenerateDocumentationFile>true</GenerateDocumentationFile> </PropertyGroup> - In
stylecop.json, add a configuration option to provide values for documentation for the company name and copyright text, as shown highlighted in the following markup:{ "$schema": "https://raw.githubusercontent.com/DotNetAnalyzers/StyleCopAnalyzers/master/StyleCop.Analyzers/StyleCop.Analyzers/Settings/stylecop.schema.json", "settings": { "orderingRules": { "usingDirectivesPlacement": "preserve" }, "documentationRules": { "companyName": "Packt", "copyrightText": "Copyright (c) Packt. All rights reserved." } } } - In
Program.cs, add comments for a file header with company and copyright text, move theusing System;declaration inside the namespace, and set explicit access modifiers and XML comments for the class and method, as shown in the following code:// <copyright file="Program.cs" company="Packt"> // Copyright (c) Packt. All rights reserved. // </copyright> namespace CodeAnalyzing { using System; /// <summary> /// The main class for this console app. /// </summary> public class Program { /// <summary> /// The main entry point for this console app. /// </summary> /// <param name="args">A string array of arguments passed to the console app.</param> public static void Main(string[] args) { Console.WriteLine("Hello World!"); } } } - Build the project.
- Expand the
bin/Debug/net6.0folder and note the autogenerated file namedCodeAnalyzing.xml, as shown in the following markup:<?xml version="1.0"?> <doc> <assembly> <name>CodeAnalyzing</name> </assembly> <members> <member name="T:CodeAnalyzing.Program"> <summary> The main class for this console app. </summary> </member> <member name="M:CodeAnalyzing.Program.Main(System.String[])"> <summary> The main entry point for this console app. </summary> <param name="args">A string array of arguments passed to the console app.</param> </member> </members> </doc>
Understanding common StyleCop recommendations
Inside a code file, you should order the contents, as shown in the following list:
- External alias directives
- Using directives
- Namespaces
- Delegates
- Enums
- Interfaces
- Structs
- Classes
Within a class, record, struct, or interface, you should order the contents, as shown in the following list:
- Fields
- Constructors
- Destructors (finalizers)
- Delegates
- Events
- Enums
- Interfaces
- Properties
- Indexers
- Methods
- Structs
- Nested classes and records
Good Practice: You can learn about all the StyleCop rules at the following link: https://github.com/DotNetAnalyzers/StyleCopAnalyzers/blob/master/DOCUMENTATION.md.
Practicing and exploring
Test your knowledge and understanding by answering some questions. Get some hands-on practice and explore this chapter's topics with more in-depth research.
Exercise 6.1 – Test your knowledge
Answer the following questions:
- What is a delegate?
- What is an event?
- How are a base class and a derived class related, and how can the derived class access the base class?
- What is the difference between
isandasoperators? - Which keyword is used to prevent a class from being derived from or a method from being further overridden?
- Which keyword is used to prevent a class from being instantiated with the
newkeyword? - Which keyword is used to allow a member to be overridden?
- What's the difference between a destructor and a deconstruct method?
- What are the signatures of the constructors that all exceptions should have?
- What is an extension method, and how do you define one?
Exercise 6.2 – Practice creating an inheritance hierarchy
Explore inheritance hierarchies by following these steps:
- Add a new console application named
Exercise02to yourChapter06solution/workspace. - Create a class named
Shapewith properties namedHeight,Width, andArea. - Add three classes that derive from it—
Rectangle,Square, andCircle—with any additional members you feel are appropriate and that override and implement theAreaproperty correctly. - In
Main, add statements to create one instance of each shape, as shown in the following code:Rectangle r = new(height: 3, width: 4.5); WriteLine($"Rectangle H: {r.Height}, W: {r.Width}, Area: {r.Area}"); Square s = new(5); WriteLine($"Square H: {s.Height}, W: {s.Width}, Area: {s.Area}"); Circle c = new(radius: 2.5); WriteLine($"Circle H: {c.Height}, W: {c.Width}, Area: {c.Area}"); - Run the console application and ensure that the result looks like the following output:
Rectangle H: 3, W: 4.5, Area: 13.5
Square H: 5, W: 5, Area: 25
Circle H: 5, W: 5, Area: 19.6349540849362
Exercise 6.3 – Explore topics
Use the links on the following page to learn more about the topics covered in this chapter:
Summary
In this chapter, you learned about local functions and operators, delegates and events, implementing interfaces, generics, and deriving types using inheritance and OOP. You also learned about base and derived classes, and how to override a type member, use polymorphism, and cast between types.
In the next chapter, you will learn how .NET is packaged and deployed, and, in subsequent chapters, the types that it provides you with to implement common functionality such as file handling, database access, encryption, and multitasking.