05
Building Your Own Types with Object-Oriented Programming
This chapter is about making your own types using object-oriented programming (OOP). You will learn about all the different categories of members that a type can have, including fields to store data and methods to perform actions. You will use OOP concepts such as aggregation and encapsulation. You will also learn about language features such as tuple syntax support, out variables, inferred tuple names, and default literals.
This chapter will cover the following topics:
- Talking about OOP
- Building class libraries
- Storing data with fields
- Writing and calling methods
- Controlling access with properties and indexers
- Pattern matching with objects
- Working with records
Talking about OOP
An object in the real world is a thing, such as a car or a person, whereas an object in programming often represents something in the real world, such as a product or bank account, but this can also be something more abstract.
In C#, we use the class (mostly) or struct (sometimes) C# keywords to define a type of object. You will learn about the difference between classes and structs in Chapter 6, Implementing Interfaces and Inheriting Classes. You can think of a type as being a blueprint or template for an object.
The concepts of OOP are briefly described here:
- Encapsulation is the combination of the data and actions that are related to an object. For example, a
BankAccounttype might have data, such asBalanceandAccountName, as well as actions, such asDepositandWithdraw. When encapsulating, you often want to control what can access those actions and the data, for example, restricting how the internal state of an object can be accessed or modified from the outside. - Composition is about what an object is made of. For example, a
Caris composed of different parts, such as fourWheelobjects, severalSeatobjects, and anEngine. - Aggregation is about what can be combined with an object. For example, a
Personis not part of aCarobject, but they could sit in the driver'sSeatand then become the car'sDriver—two separate objects that are aggregated together to form a new component. - Inheritance is about reusing code by having a subclass derive from a base or superclass. All functionality in the base class is inherited by and becomes available in the derived class. For example, the base or super
Exceptionclass has some members that have the same implementation across all exceptions, and the sub or derivedSqlExceptionclass inherits those members and has extra members only relevant to when a SQL database exception occurs, like a property for the database connection. - Abstraction is about capturing the core idea of an object and ignoring the details or specifics. C# has the
abstractkeyword that formalizes this concept. If a class is not explicitly abstract, then it can be described as being concrete. Base or superclasses are often abstract, for example, the superclassStreamis abstract, and its subclasses, likeFileStreamandMemoryStream, are concrete. Only concrete classes can be used to create objects; abstract classes can only be used as the base for other classes because they are missing some implementation. Abstraction is a tricky balance. If you make a class more abstract, more classes will be able to inherit from it, but at the same time, there will be less functionality to share. - Polymorphism is about allowing a derived class to override an inherited action to provide custom behavior.
Building class libraries
Class library assemblies group types together into easily deployable units (DLL files). Apart from when you learned about unit testing, you have only created console applications or .NET Interactive notebooks to contain your code. To make the code that you write reusable across multiple projects, you should put it in class library assemblies, just like Microsoft does.
Creating a class library
The first task is to create a reusable .NET class library:
- Use your preferred coding tool to create a new class library, as defined in the following list:
- Project template: Class Library /
classlib - Workspace/solution file and folder:
Chapter05 - Project file and folder:
PacktLibrary
- Project template: Class Library /
- Open the
PacktLibrary.csprojfile, and note that by default class libraries target .NET 6 and therefore can only work with other .NET 6-compatible assemblies, as shown in the following markup:<Project Sdk="Microsoft.NET.Sdk"> <PropertyGroup> <TargetFramework>net6.0</TargetFramework> <Nullable>enable</Nullable> <ImplicitUsings>enable</ImplicitUsings> </PropertyGroup> </Project> - Modify the framework to target .NET Standard 2.0 and remove the entries that enable nullable and implicit usings, as shown highlighted in the following markup:
<Project Sdk="Microsoft.NET.Sdk"> <PropertyGroup> <TargetFramework>netstandard2.0</TargetFramework> </PropertyGroup> </Project> - Save and close the file.
- Delete the file named
Class1.cs. - Compile the project so that other projects can reference it later:
- In Visual Studio Code, enter the following command:
dotnet build. - In Visual Studio, navigate to Build | Build PacktLibrary.
- In Visual Studio Code, enter the following command:
Good Practice: To use the latest C# language and .NET platform features, put types in a .NET 6 class library. To support legacy .NET platforms like .NET Core, .NET Framework, and Xamarin, put types that you might reuse in a.NET Standard 2.0 class library.
Defining a class in a namespace
The next task is to define a class that will represent a person:
- Add a new class file named
Person.cs. - Statically import
System.Console. - Set the namespace to
Packt.Shared.
Good Practice: We're doing this because it is important to put your classes in a logically named namespace. A better namespace name would be domain-specific, for example, System.Numerics for types related to advanced numbers. In this case, the types we will create are Person, BankAccount, and WondersOfTheWorld and they do not have a typical domain so we will use the more generic Packt.Shared.
Your class file should now look like the following code:
using System;
using static System.Console;
namespace Packt.Shared
{
  public class Person
  {
  }
}
Note that the C# keyword public is applied before class. This keyword is an access modifier, and it allows for any other code to access this class.
If you do not explicitly apply the public keyword, then it will only be accessible within the assembly that defined it. This is because the implicit access modifier for a class is internal. We need this class to be accessible outside the assembly, so we must make sure it is public.
Simplifying namespace declarations
To simplify your code if you are targeting .NET 6.0 and therefore using C# 10 or later, you can end a namespace declaration with a semi-colon and remove the braces, as shown in the following code:
using System;
namespace Packt.Shared; // the class in this file is in this namespace
public class Person
{
}
This is known as a file-scoped namespace declaration. You can only have one file-scoped namespace per file. We will use this in a class library that targets .NET 6.0 later in this chapter.
Good Practice: Put each type that you create in its own file so that you can use file-scoped namespace declarations.
Understanding members
This type does not yet have any members encapsulated within it. We will create some over the following pages. Members can be fields, methods, or specialized versions of both. You'll find a description of them here:
- Fields are used to store data. There are also three specialized categories of field, as shown in the following bullets:
- Constant: The data never changes. The compiler literally copies the data into any code that reads it.
- Read-only: The data cannot change after the class is instantiated, but the data can be calculated or loaded from an external source at the time of instantiation.
- Event: The data references one or more methods that you want to execute when something happens, such as clicking on a button or responding to a request from some other code. Events will be covered in Chapter 6, Implementing Interfaces and Inheriting Classes.
- Methods are used to execute statements. You saw some examples when you learned about functions in Chapter 4, Writing, Debugging, and Testing Functions. There are also four specialized categories of method:
- Constructor: The statements execute when you use the
newkeyword to allocate memory to instantiate a class. - Property: The statements execute when you get or set data. The data is commonly stored in a field but could be stored externally or calculated at runtime. Properties are the preferred way to encapsulate fields unless the memory address of the field needs to be exposed.
- Indexer: The statements execute when you get or set data using "array" syntax
[]. - Operator: The statements execute when you use an operator like
+and/on operands of your type.
- Constructor: The statements execute when you use the
Instantiating a class
In this section, we will make an instance of the Person class.
Referencing an assembly
Before we can instantiate a class, we need to reference the assembly that contains it from another project. We will use the class in a console app:
- Use your preferred coding tool to add a new console app to the
Chapter05workspace/solution namedPeopleApp. - If you are using Visual Studio Code:
- Select
PeopleAppas the active OmniSharp project. When you see the pop-up warning message saying that required assets are missing, click Yes to add them. - Edit
PeopleApp.csprojto add a project reference toPacktLibrary, as shown highlighted in the following markup:<Project Sdk="Microsoft.NET.Sdk"> <PropertyGroup> <OutputType>Exe</OutputType> <TargetFramework>net6.0</TargetFramework> <Nullable>enable</Nullable> <ImplicitUsings>enable</ImplicitUsings> </PropertyGroup> <ItemGroup> <ProjectReference Include="../PacktLibrary/PacktLibrary.csproj" /> </ItemGroup> </Project> - In a terminal, enter a command to compile the
PeopleAppproject and its dependencyPacktLibraryproject, as shown in the following command:dotnet build
- Select
- If you are using Visual Studio:
- Set the startup project for the solution to the current selection.
- In Solution Explorer, select the
PeopleAppproject, navigate to Project | Add Project Reference…, check the box to select thePacktLibraryproject, and then click OK. - Navigate to Build | Build PeopleApp.
Importing a namespace to use a type
Now, we are ready to write statements to work with the Person class:
- In the
PeopleAppproject/folder, openProgram.cs. - At the top of the
Program.csfile, delete the comment, and add statements to import the namespace for ourPersonclass and statically import theConsoleclass, as shown in the following code:using Packt.Shared; using static System.Console; - In
Program.cs, add statements to:- Create an instance of the
Persontype. - Output the instance using a textual description of itself.
The
newkeyword allocates memory for the object and initializes any internal data. We could usevarin place of thePersonclass name, but then we would need to specifyPersonafter thenewkeyword, as shown in the following code:// var bob = new Person(); // C# 1.0 or later Person bob = new(); // C# 9.0 or later WriteLine(bob.ToString());You might be wondering, "Why does the
bobvariable have a method namedToString? ThePersonclass is empty!" Don't worry, we're about to find out! - Create an instance of the
- Run the code and view the result, as shown in the following output:
Packt.Shared.Person
Understanding objects
Although our Person class did not explicitly choose to inherit from a type, all types ultimately inherit directly or indirectly from a special type named System.Object.
The implementation of the ToString method in the System.Object type simply outputs the full namespace and type name.
Back in the original Person class, we could have explicitly told the compiler that Person inherits from the System.Object type, as shown in the following code:
public class Person : System.Object
When class B inherits from class A, we say that A is the base or superclass and B is the derived or subclass. In this case, System.Object is the base or superclass and Person is the derived or subclass.
You can also use the C# alias keyword object, as shown in the following code:
public class Person : object
Inheriting from System.Object
Let's make our class explicitly inherit from object and then review what members all objects have:
- Modify your
Personclass to explicitly inherit fromobject. - Click inside the
objectkeyword and press F12, or right-click on theobjectkeyword and choose Go to Definition.
You will see the Microsoft-defined System.Object type and its members. This is something you don't need to understand the details of yet, but notice that it has a method named ToString, as shown in Figure 5.1:
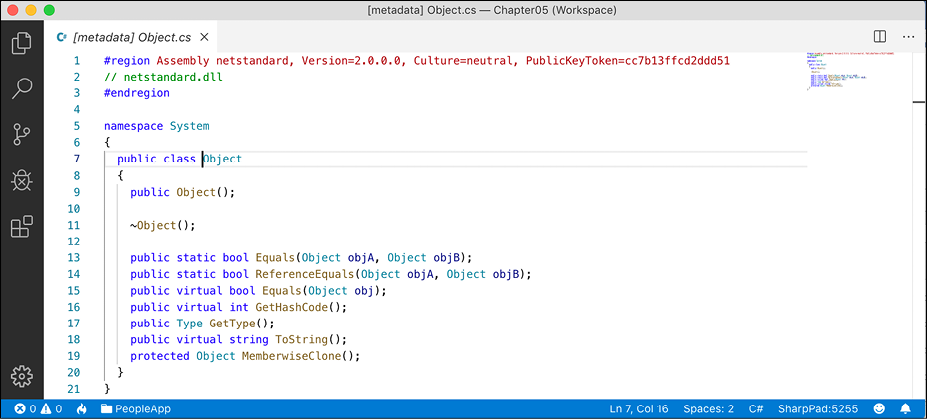
Figure 5.1: System.Object class definition
Good Practice: Assume other programmers know that if inheritance is not specified, the class will inherit from System.Object.
Storing data within fields
In this section, we will be defining a selection of fields in the class to store information about a person.
Defining fields
Let's say that we have decided that a person is composed of a name and a date of birth. We will encapsulate these two values inside a person, and the values will be visible outside it.
Inside the Person class, write statements to declare two public fields for storing a person's name and date of birth, as shown in the following code:
public class Person : object
{
  // fields
  public string Name;
  public DateTime DateOfBirth;
}
You can use any type for a field, including arrays and collections such as lists and dictionaries. These would be used if you needed to store multiple values in one named field. In this example, a person only has one name and one date of birth.
Understanding access modifiers
Part of encapsulation is choosing how visible the members are.
Note that, as we did with the class, we explicitly applied the public keyword to these fields. If we hadn't, then they would be implicitly private to the class, which means they are accessible only inside the class.
There are four access modifier keywords, and two combinations of access modifier keywords that you can apply to a class member, like a field or method, as shown in the following table:
|
Access Modifier |
Description |
|
|
Member is accessible inside the type only. This is the default. |
|
|
Member is accessible inside the type and any type in the same assembly. |
|
|
Member is accessible inside the type and any type that inherits from the type. |
|
|
Member is accessible everywhere. |
|
|
Member is accessible inside the type, any type in the same assembly, and any type that inherits from the type. Equivalent to a fictional access modifier named |
|
|
Member is accessible inside the type and any type that inherits from the type and is in the same assembly. Equivalent to a fictional access modifier named |
Good Practice: Explicitly apply one of the access modifiers to all type members, even if you want to use the implicit access modifier for members, which is private. Additionally, fields should usually be private or protected, and you should then create public properties to get or set the field values. This is because it controls access. You will do this later in the chapter.
Setting and outputting field values
Now we will use those fields in your code:
- At the top of
Program.cs, make sure theSystemnamespace is imported. We need to do this to use theDateTimetype. - After instantiating
bob, add statements to set his name and date of birth, and then output those fields formatted nicely, as shown in the following code:bob.Name = "Bob Smith"; bob.DateOfBirth = new DateTime(1965, 12, 22); // C# 1.0 or later WriteLine(format: "{0} was born on {1:dddd, d MMMM yyyy}", arg0: bob.Name, arg1: bob.DateOfBirth);We could have used string interpolation too, but for long strings it will wrap over multiple lines, which can be harder to read in a printed book. In the code examples in this book, remember that
{0}is a placeholder forarg0, and so on. - Run the code and view the result, as shown in the following output:
Bob Smith was born on Wednesday, 22 December 1965Your output may look different based on your locale, that is, language and culture.
The format code for
arg1is made of several parts.ddddmeans the name of the day of the week.dmeans the number of the day of the month.MMMMmeans the name of the month. Lowercasemis used for minutes in time values.yyyymeans the full number of the year.yywould mean the two-digit year.You can also initialize fields using a shorthand object initializer syntax using curly braces. Let's see how.
- Add statements underneath the existing code to create another new person named Alice. Note the different format code for the date of birth when writing her to the console, as shown in the following code:
Person alice = new() { Name = "Alice Jones", DateOfBirth = new(1998, 3, 7) // C# 9.0 or later }; WriteLine(format: "{0} was born on {1:dd MMM yy}", arg0: alice.Name, arg1: alice.DateOfBirth); - Run the code and view the result, as shown in the following output:
Alice Jones was born on 07 Mar 98
Storing a value using an enum type
Sometimes, a value needs to be one of a limited set of options. For example, there are seven ancient wonders of the world, and a person may have one favorite. At other times, a value needs to be a combination of a limited set of options. For example, a person may have a bucket list of ancient world wonders they want to visit. We are able to store this data by defining an enum type.
An enum type is a very efficient way of storing one or more choices because, internally, it uses integer values in combination with a lookup table of string descriptions:
- Add a new file to the
PacktLibraryproject namedWondersOfTheAncientWorld.cs. - Modify the
WondersOfTheAncientWorld.csfile, as shown in the following code:namespace Packt.Shared { public enum WondersOfTheAncientWorld { GreatPyramidOfGiza, HangingGardensOfBabylon, StatueOfZeusAtOlympia, TempleOfArtemisAtEphesus, MausoleumAtHalicarnassus, ColossusOfRhodes, LighthouseOfAlexandria } }Good Practice: If you use are writing code in a .NET Interactive notebook, then the code cell containing the
enummust be above the code cell defining thePersonclass. - In the
Personclass, add the following statement to your list of fields:public WondersOfTheAncientWorld FavoriteAncientWonder; - In
Program.cs, add the following statements:bob.FavoriteAncientWonder = WondersOfTheAncientWorld.StatueOfZeusAtOlympia; WriteLine( format: "{0}'s favorite wonder is {1}. Its integer is {2}.", arg0: bob.Name, arg1: bob.FavoriteAncientWonder, arg2: (int)bob.FavoriteAncientWonder); - Run the code and view the result, as shown in the following output:
Bob Smith's favorite wonder is StatueOfZeusAtOlympia. Its integer is 2.
The enum value is internally stored as an int for efficiency. The int values are automatically assigned starting at 0, so the third world wonder in our enum has a value of 2. You can assign int values that are not listed in the enum. They will output as the int value instead of a name since a match will not be found.
Storing multiple values using an enum type
For the bucket list, we could create an array or collection of instances of the enum, and collections will be explained later in this chapter, but there is a better way. We can combine multiple choices into a single value using enum flags:
- Modify the
enumby decorating it with the[System.Flags]attribute, and explicitly set abytevalue for each wonder that represents different bit columns, as shown highlighted in the following code:namespace Packt.Shared { [System.Flags] public enum WondersOfTheAncientWorld : byte { None = 0b_0000_0000, // i.e. 0 GreatPyramidOfGiza = 0b_0000_0001, // i.e. 1 HangingGardensOfBabylon = 0b_0000_0010, // i.e. 2 StatueOfZeusAtOlympia = 0b_0000_0100, // i.e. 4 TempleOfArtemisAtEphesus = 0b_0000_1000, // i.e. 8 MausoleumAtHalicarnassus = 0b_0001_0000, // i.e. 16 ColossusOfRhodes = 0b_0010_0000, // i.e. 32 LighthouseOfAlexandria = 0b_0100_0000 // i.e. 64 } }We are assigning explicit values for each choice that would not overlap when looking at the bits stored in memory. We should also decorate the
enumtype with theSystem.Flagsattribute so that when the value is returned it can automatically match with multiple values as a comma-separatedstringinstead of returning anintvalue.Normally, an
enumtype uses anintvariable internally, but since we don't need values that big, we can reduce memory requirements by 75%, that is, 1 byte per value instead of 4 bytes, by telling it to use abytevariable.If we want to indicate that our bucket list includes the Hanging Gardens of Babylon and the Mausoleum at Halicarnassus ancient world wonders, then we would want the
16and2bits set to1. In other words, we would store the value18:64
32
16
8
4
2
1
0
0
1
0
0
1
0
- In the
Personclass, add the following statement to your list of fields, as shown in the following code:public WondersOfTheAncientWorld BucketList; - In
Program.cs, add statements to set the bucket list using the|operator (bitwise logical OR) to combine the enum values. We could also set the value using the number 18 cast into the enum type, as shown in the comment, but we shouldn't because that would make the code harder to understand, as shown in the following code:bob.BucketList = WondersOfTheAncientWorld.HangingGardensOfBabylon | WondersOfTheAncientWorld.MausoleumAtHalicarnassus; // bob.BucketList = (WondersOfTheAncientWorld)18; WriteLine($"{bob.Name}'s bucket list is {bob.BucketList}"); - Run the code and view the result, as shown in the following output:
Bob Smith's bucket list is HangingGardensOfBabylon, MausoleumAtHalicarnassus
Good Practice: Use the enum values to store combinations of discrete options. Derive an enum type from byte if there are up to eight options, from ushort if there are up to 16 options, from uint if there are up to 32 options, and from ulong if there are up to 64 options.
Storing multiple values using collections
Let's now add a field to store a person's children. This is an example of aggregation because children are instances of a class that is related to the current person but are not part of the person itself. We will use a generic List<T> collection type that can store an ordered collection of any type. You will learn more about collections in Chapter 8, Working with Common .NET Types. For now, just follow along:
- In
Person.cs, import theSystem.Collections.Genericnamespace, as shown in the following code:using System.Collections.Generic; // List<T> - Declare a new field in the
Personclass, as shown in the following code:public List<Person> Children = new List<Person>();
List<Person> is read aloud as "list of Person," for example, "the type of the property named Children is a list of Person instances." We explicitly changed the class library to target .NET Standard 2.0 (that uses the C# 7 compiler), so we cannot use target-typed new to initialize the Children field. If we had left it targeting .NET 6.0, then we could use target-typed new, as shown in the following code:
public List<Person> Children = new();
We must ensure the collection is initialized to a new instance of a list of Person before we can add items to it, otherwise, the field will be null and it will throw runtime exceptions when we try to use any of its members like Add.
Understanding generic collections
The angle brackets in the List<T> type is a feature of C# called generics that was introduced in 2005 with C# 2.0. It's a fancy term for making a collection strongly typed, that is, the compiler knows specifically what type of object can be stored in the collection. Generics improve the performance and correctness of your code.
Strongly typed has a different meaning to statically typed. The old System.Collection types are statically typed to contain weakly typed System.Object items. The newer System.Collection.Generic types are statically typed to contain strongly typed <T> instances.
Ironically, the term generics means we can use a more specific static type!
- In
Program.cs, add statements to add two children forBoband then show how many children he has and what their names are, as shown in the following code:bob.Children.Add(new Person { Name = "Alfred" }); // C# 3.0 and later bob.Children.Add(new() { Name = "Zoe" }); // C# 9.0 and later WriteLine( $"{bob.Name} has {bob.Children.Count} children:"); for (int childIndex = 0; childIndex < bob.Children.Count; childIndex++) { WriteLine($" {bob.Children[childIndex].Name}"); }We could also use a
foreachstatement to enumerate over the collection. As an extra challenge, change theforstatement to output the same information usingforeach. - Run the code and view the result, as shown in the following output:
Bob Smith has 2 children:
  Alfred
  Zoe
Making a field static
The fields that we have created so far have all been instance members, meaning that a different value of each field exists for each instance of the class that is created. The alice and bob variables have different Name values.
Sometimes, you want to define a field that only has one value that is shared across all instances.
These are called static members because fields are not the only members that can be static. Let's see what can be achieved using static fields:
- In the
PacktLibraryproject, add a new class file namedBankAccount.cs. - Modify the class to give it three fields, two instance fields and one static field, as shown in the following code:
namespace Packt.Shared
{
  public class BankAccount
  {
    public string AccountName; // instance member
    public decimal Balance; // instance member
    public static decimal InterestRate; // shared member
  }
}
Each instance of
BankAccountwill have its ownAccountNameandBalancevalues, but all instances will share a singleInterestRatevalue. - In
Program.cs, add statements to set the shared interest rate and then create two instances of theBankAccounttype, as shown in the following code:BankAccount.InterestRate = 0.012M; // store a shared value BankAccount jonesAccount = new(); // C# 9.0 and later jonesAccount.AccountName = "Mrs. Jones"; jonesAccount.Balance = 2400; WriteLine(format: "{0} earned {1:C} interest.", arg0: jonesAccount.AccountName, arg1: jonesAccount.Balance * BankAccount.InterestRate); BankAccount gerrierAccount = new(); gerrierAccount.AccountName = "Ms. Gerrier"; gerrierAccount.Balance = 98; WriteLine(format: "{0} earned {1:C} interest.", arg0: gerrierAccount.AccountName, arg1: gerrierAccount.Balance * BankAccount.InterestRate);:Cis a format code that tells .NET to use the currency format for the numbers. In Chapter 8, Working with Common .NET Types, you will learn how to control the culture that determines the currency symbol. For now, it will use the default for your operating system installation. I live in London, UK, hence my output shows British Pounds (£). - Run the code and view the additional output:
Mrs. Jones earned £28.80 interest.
Ms. Gerrier earned £1.18 interest.
Fields are not the only members that can be static. Constructors, methods, properties, and other members can also be static.
Making a field constant
If the value of a field will never ever change, you can use the const keyword and assign a literal value at compile time:
- In
Person.cs, add the following code:// constants public const string Species = "Homo Sapien"; - To get the value of a constant field, you must write the name of the class, not the name of an instance of the class. In
Program.cs, add a statement to write Bob's name and species to the console, as shown in the following code:WriteLine($"{bob.Name} is a {Person.Species}"); - Run the code and view the result, as shown in the following output:
Bob Smith is a Homo SapienExamples of
constfields in Microsoft types includeSystem.Int32.MaxValueandSystem.Math.PIbecause neither value will ever change, as you can see in Figure 5.2: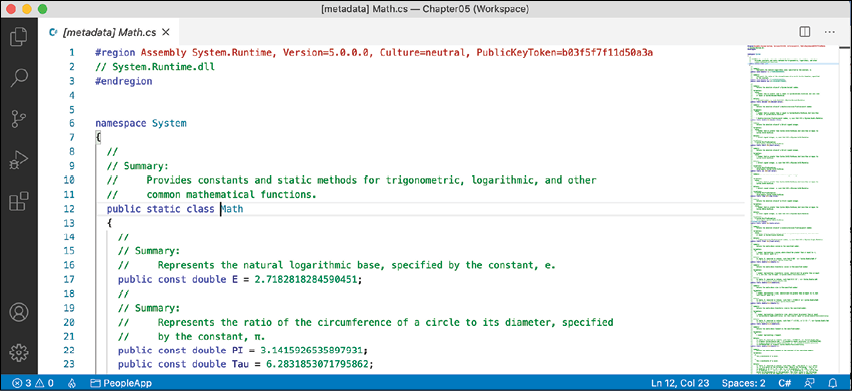
Figure 5.2: Examples of constants
Good Practice: Constants are not always the best choice for two important reasons: the value must be known at compile time, and it must be expressible as a literal string, Boolean, or number value. Every reference to the const field is replaced with the literal value at compile time, which will, therefore, not be reflected if the value changes in a future version and you do not recompile any assemblies that reference it to get the new value.
Making a field read-only
Often a better choice for fields that should not change is to mark them as read-only:
- In
Person.cs, add a statement to declare an instance read-only field to store a person's home planet, as shown in the following code:// read-only fields public readonly string HomePlanet = "Earth"; - In
Program.cs, add a statement to write Bob's name and home planet to the console, as shown in the following code:WriteLine($"{bob.Name} was born on {bob.HomePlanet}"); - Run the code and view the result, as shown in the following output:
Bob Smith was born on Earth
Good Practice: Use read-only fields over constant fields for two important reasons: the value can be calculated or loaded at runtime and can be expressed using any executable statement. So, a read-only field can be set using a constructor or a field assignment. Every reference to the field is a live reference, so any future changes will be correctly reflected by the calling code.
You can also declare static readonly fields whose values will be shared across all instances of the type.
Initializing fields with constructors
Fields often need to be initialized at runtime. You do this in a constructor that will be called when you make an instance of the class using the new keyword. Constructors execute before any fields are set by the code that is using the type.
- In
Person.cs, add statements after the existing read-onlyHomePlanetfield to define a second read-only field and then set theNameandInstantiatedfields in a constructor, as shown highlighted in the following code:// read-only fields public readonly string HomePlanet = "Earth"; public readonly DateTime Instantiated; // constructors public Person() { // set default values for fields // including read-only fields Name = "Unknown"; Instantiated = DateTime.Now; } - In
Program.cs, add statements to instantiate a new person and then output its initial field values, as shown in the following code:Person blankPerson = new(); WriteLine(format: "{0} of {1} was created at {2:hh:mm:ss} on a {2:dddd}.", arg0: blankPerson.Name, arg1: blankPerson.HomePlanet, arg2: blankPerson.Instantiated); - Run the code and view the result, as shown in the following output:
Unknown of Earth was created at 11:58:12 on a Sunday
Defining multiple constructors
You can have multiple constructors in a type. This is especially useful to encourage developers to set initial values for fields:
- In
Person.cs, add statements to define a second constructor that allows a developer to set initial values for the person's name and home planet, as shown in the following code:public Person(string initialName, string homePlanet) { Name = initialName; HomePlanet = homePlanet; Instantiated = DateTime.Now; } - In
Program.cs, add statements to create another person using the constructor with two parameters, as shown in the following code:Person gunny = new(initialName: "Gunny", homePlanet: "Mars"); WriteLine(format: "{0} of {1} was created at {2:hh:mm:ss} on a {2:dddd}.", arg0: gunny.Name, arg1: gunny.HomePlanet, arg2: gunny.Instantiated); - Run the code and view the result:
Gunny of Mars was created at 11:59:25 on a Sunday
Constructors are a special category of method. Let's look at methods in more detail.
Writing and calling methods
Methods are members of a type that execute a block of statements. They are functions that belong to a type.
Returning values from methods
Methods can return a single value or return nothing:
- A method that performs some actions but does not return a value indicates this with the
voidtype before the name of the method. - A method that performs some actions and returns a value indicates this with the type of the return value before the name of the method.
For example, in the next task, you will create two methods:
WriteToConsole: This will perform an action (writing some text to the console), but it will return nothing from the method, indicated by thevoidkeyword.GetOrigin: This will return a text value, indicated by thestringkeyword.
Let's write the code:
- In
Person.cs, add statements to define the two methods that I described earlier, as shown in the following code:// methods public void WriteToConsole() { WriteLine($"{Name} was born on a {DateOfBirth:dddd}."); } public string GetOrigin() { return $"{Name} was born on {HomePlanet}."; } - In
Program.cs, add statements to call the two methods, as shown in the following code:bob.WriteToConsole(); WriteLine(bob.GetOrigin()); - Run the code and view the result, as shown in the following output:
Bob Smith was born on a Wednesday.
Bob Smith was born on Earth.
Combining multiple returned values using tuples
Each method can only return a single value that has a single type. That type could be a simple type, such as string in the previous example, a complex type, such as Person, or a collection type, such as List<Person>.
Imagine that we want to define a method named GetTheData that needs to return both a string value and an int value. We could define a new class named TextAndNumber with a string field and an int field, and return an instance of that complex type, as shown in the following code:
public class TextAndNumber
{
  public string Text;
  public int Number;
}
public class LifeTheUniverseAndEverything
{
  public TextAndNumber GetTheData()
  {
    return new TextAndNumber
    {
      Text = "What's the meaning of life?",
      Number = 42
    };
  }
}
But defining a class just to combine two values together is unnecessary, because in modern versions of C# we can use tuples. Tuples are an efficient way to combine two or more values into a single unit. I pronounce them as tuh-ples but I have heard other developers pronounce them as too-ples. To-may-toe, to-mah-toe, po-tay-toe, po-tah-toe, I guess.
Tuples have been a part of some languages such as F# since their first version, but .NET only added support for them with .NET 4.0 in 2010 using the System.Tuple type.
Language support for tuples
It was only with C# 7.0 in 2017 that C# added language syntax support for tuples using the parentheses characters () and at the same time, .NET added a new System.ValueTuple type that is more efficient in some common scenarios than the old .NET 4.0 System.Tuple type. The C# tuple syntax uses the more efficient one.
Let's explore tuples:
- In
Person.cs, add statements to define a method that returns a tuple that combines astringandint, as shown in the following code:public (string, int) GetFruit() { return ("Apples", 5); } - In
Program.cs, add statements to call theGetFruitmethod and then output the tuple's fields automatically namedItem1andItem2, as shown in the following code:(string, int) fruit = bob.GetFruit(); WriteLine($"{fruit.Item1}, {fruit.Item2} there are."); - Run the code and view the result, as shown in the following output:
Apples, 5 there are.
Naming the fields of a tuple
To access the fields of a tuple, the default names are Item1, Item2, and so on.
You can explicitly specify the field names:
- In
Person.cs, add statements to define a method that returns a tuple with named fields, as shown in the following code:public (string Name, int Number) GetNamedFruit() { return (Name: "Apples", Number: 5); } - In
Program.cs, add statements to call the method and output the tuple's named fields, as shown in the following code:var fruitNamed = bob.GetNamedFruit(); WriteLine($"There are {fruitNamed.Number} {fruitNamed.Name}."); - Run the code and view the result, as shown in the following output:
There are 5 Apples.
Inferring tuple names
If you are constructing a tuple from another object, you can use a feature introduced in C# 7.1 called tuple name inference.
In Program.cs, create two tuples, made of a string and int value each, as shown in the following code:
var thing1 = ("Neville", 4);
WriteLine($"{thing1.Item1} has {thing1.Item2} children.");
var thing2 = (bob.Name, bob.Children.Count);
WriteLine($"{thing2.Name} has {thing2.Count} children.");
In C# 7.0, both things would use the Item1 and Item2 naming schemes. In C# 7.1 and later, thing2 can infer the names Name and Count.
Deconstructing tuples
You can also deconstruct tuples into separate variables. The deconstructing declaration has the same syntax as named field tuples, but without a named variable for the tuple, as shown in the following code:
// store return value in a tuple variable with two fields
(string TheName, int TheNumber) tupleWithNamedFields = bob.GetNamedFruit();
// tupleWithNamedFields.TheName
// tupleWithNamedFields.TheNumber
// deconstruct return value into two separate variables
(string name, int number) = GetNamedFruit();
// name
// number
This has the effect of splitting the tuple into its parts and assigning those parts to new variables.
- In
Program.cs, add statements to deconstruct the tuple returned from theGetFruitmethod, as shown in the following code:(string fruitName, int fruitNumber) = bob.GetFruit(); WriteLine($"Deconstructed: {fruitName}, {fruitNumber}"); - Run the code and view the result, as shown in the following output:
Deconstructed: Apples, 5
Deconstructing types
Tuples are not the only type that can be deconstructed. Any type can have special methods named Deconstruct that break down the object into parts. Let's implement some for the Person class:
- In
Person.cs, add twoDeconstructmethods withoutparameters defined for the parts we want to deconstruct into, as shown in the following code:// deconstructors public void Deconstruct(out string name, out DateTime dob) { name = Name; dob = DateOfBirth; } public void Deconstruct(out string name, out DateTime dob, out WondersOfTheAncientWorld fav) { name = Name; dob = DateOfBirth; fav = FavoriteAncientWonder; } - In
Program.cs, add statements to deconstructbob, as shown in the following code:// Deconstructing a Person var (name1, dob1) = bob; WriteLine($"Deconstructed: {name1}, {dob1}"); var (name2, dob2, fav2) = bob; WriteLine($"Deconstructed: {name2}, {dob2}, {fav2}"); - Run the code and view the result, as shown in the following output:
Deconstructed: Bob Smith, 22/12/1965 00:00:00
Deconstructed: Bob Smith, 22/12/1965 00:00:00, StatueOfZeusAtOlympia
B
Defining and passing parameters to methods
Methods can have parameters passed to them to change their behavior. Parameters are defined a bit like variable declarations but inside the parentheses of the method, as you saw earlier in this chapter with constructors. Let's see more examples:
- In
Person.cs, add statements to define two methods, the first without parameters and the second with one parameter, as shown in the following code:public string SayHello() { return $"{Name} says 'Hello!'"; } public string SayHelloTo(string name) { return $"{Name} says 'Hello {name}!'"; } - In
Program.cs, add statements to call the two methods and write the return value to the console, as shown in the following code:WriteLine(bob.SayHello()); WriteLine(bob.SayHelloTo("Emily")); - Run the code and view the result:
Bob Smith says 'Hello!'
Bob Smith says 'Hello Emily!'
When typing a statement that calls a method, IntelliSense shows a tooltip with the name and type of any parameters, and the return type of the method, as shown in Figure 5.3:

Figure 5.3: An IntelliSense tooltip for a method with no overloads
Overloading methods
Instead of having two different method names, we could give both methods the same name. This is allowed because the methods each have a different signature.
A method signature is a list of parameter types that can be passed when calling the method. Overloaded methods cannot differ only in the return type.
- In
Person.cs, change the name of theSayHelloTomethod toSayHello. - In
Program.cs, change the method call to use theSayHellomethod, and note that the quick info for the method tells you that it has one additional overload, 1/2, as well as 2/2, as shown in Figure 5.4:
Figure 5.4: An IntelliSense tooltip for an overloaded method
Good Practice: Use overloaded methods to simplify your class by making it appear to have fewer methods.
Passing optional and named parameters
Another way to simplify methods is to make parameters optional. You make a parameter optional by assigning a default value inside the method parameter list. Optional parameters must always come last in the list of parameters.
We will now create a method with three optional parameters:
- In
Person.cs, add statements to define the method, as shown in the following code:public string OptionalParameters( string command = "Run!", double number = 0.0, bool active = true) { return string.Format( format: "command is {0}, number is {1}, active is {2}", arg0: command, arg1: number, arg2: active); } - In
Program.cs, add a statement to call the method and write its return value to the console, as shown in the following code:WriteLine(bob.OptionalParameters()); - Watch IntelliSense appear as you type the code. You will see a tooltip, showing the three optional parameters with their default values, as shown in Figure 5.5:

Figure 5.5: IntelliSense showing optional parameters as you type code
- Run the code and view the result, as shown in the following output:
command is Run!, number is 0, active is True - In
Program.cs, add a statement to pass astringvalue for thecommandparameter and adoublevalue for thenumberparameter, as shown in the following code:WriteLine(bob.OptionalParameters("Jump!", 98.5)); - Run the code and see the result, as shown in the following output:
command is Jump!, number is 98.5, active is True
The default values for the command and number parameters have been replaced, but the default for active is still true.
Naming parameter values when calling methods
Optional parameters are often combined with naming parameters when you call the method, because naming a parameter allows the values to be passed in a different order than how they were declared.
- In
Program.cs, add a statement to pass astringvalue for thecommandparameter and adoublevalue for thenumberparameter but using named parameters, so that the order they are passed through can be swapped around, as shown in the following code:WriteLine(bob.OptionalParameters( number: 52.7, command: "Hide!")); - Run the code and view the result, as shown in the following output:
command is Hide!, number is 52.7, active is TrueYou can even use named parameters to skip over optional parameters.
- In
Program.cs, add a statement to pass astringvalue for thecommandparameter using positional order, skip thenumberparameter, and use the namedactiveparameter, as shown in the following code:WriteLine(bob.OptionalParameters("Poke!", active: false)); - Run the code and view the result, as shown in the following output:
command is Poke!, number is 0, active is False
Controlling how parameters are passed
When a parameter is passed into a method, it can be passed in one of three ways:
- By value (this is the default): Think of these as being in-only.
- By reference as a
refparameter: Think of these as being in-and-out. - As an
outparameter: Think of these as being out-only.
Let's see some examples of passing parameters in and out:
- In
Person.cs, add statements to define a method with three parameters, oneinparameter, onerefparameter, and oneoutparameter, as shown in the following method:public void PassingParameters(int x, ref int y, out int z) { // out parameters cannot have a default // AND must be initialized inside the method z = 99; // increment each parameter x++; y++; z++; } - In
Program.cs, add statements to declare someintvariables and pass them into the method, as shown in the following code:int a = 10; int b = 20; int c = 30; WriteLine($"Before: a = {a}, b = {b}, c = {c}"); bob.PassingParameters(a, ref b, out c); WriteLine($"After: a = {a}, b = {b}, c = {c}"); - Run the code and view the result, as shown in the following output:
Before: a = 10, b = 20, c = 30 After: a = 10, b = 21, c = 100- When passing a variable as a parameter by default, its current value gets passed, not the variable itself. Therefore,
xhas a copy of the value of theavariable. Theavariable retains its original value of10. - When passing a variable as a
refparameter, a reference to the variable gets passed into the method. Therefore,yis a reference tob. Thebvariable gets incremented when theyparameter gets incremented. - When passing a variable as an
outparameter, a reference to the variable gets passed into the method. Therefore,zis a reference toc. The value of thecvariable gets replaced by whatever code executes inside the method. We could simplify the code in theMainmethod by not assigning the value30to thecvariable since it will always be replaced anyway.
- When passing a variable as a parameter by default, its current value gets passed, not the variable itself. Therefore,
Simplified out parameters
In C# 7.0 and later, we can simplify code that uses the out variables.
In Program.cs, add statements to declare some more variables including an out parameter named f declared inline, as shown in the following code:
int d = 10;
int e = 20;
WriteLine($"Before: d = {d}, e = {e}, f doesn't exist yet!");
// simplified C# 7.0 or later syntax for the out parameter
bob.PassingParameters(d, ref e, out int f);
WriteLine($"After: d = {d}, e = {e}, f = {f}");
Understanding ref returns
In C# 7.0 or later, the ref keyword is not just for passing parameters into a method; it can also be applied to the return value. This allows an external variable to reference an internal variable and modify its value after the method call. This might be useful in advanced scenarios, for example, passing around placeholders into big data structures, but it's beyond the scope of this book.
Splitting classes using partial
When working on large projects with multiple team members, or when working with especially large and complex class implementations, it is useful to be able to split the definition of a class across multiple files. You do this using the partial keyword.
Imagine we want to add statements to the Person class that are automatically generated by a tool like an object-relational mapper that reads schema information from a database. If the class is defined as partial, then we can split the class into an autogenerated code file and a manually edited code file.
Let's write some code that simulates this example:
- In
Person.cs, add thepartialkeyword, as shown highlighted in the following code:namespace Packt.Shared { public partial class Person { - In the
PacktLibraryproject/folder, add a new class file namedPersonAutoGen.cs. - Add statements to the new file, as shown in the following code:
namespace Packt.Shared { public partial class Person { } }
The rest of the code we write for this chapter will be written in the PersonAutoGen.cs file.
Controlling access with properties and indexers
Earlier, you created a method named GetOrigin that returned a string containing the name and origin of the person. Languages such as Java do this a lot. C# has a better way: properties.
A property is simply a method (or a pair of methods) that acts and looks like a field when you want to get or set a value, thereby simplifying the syntax.
Defining read-only properties
A readonly property only has a get implementation.
- In
PersonAutoGen.cs, in thePersonclass, add statements to define three properties:- The first property will perform the same role as the
GetOriginmethod using the property syntax that works with all versions of C# (although, it uses the string interpolation syntax from C# 6 and later). - The second property will return a greeting message using the lambda expression body
=>syntax from C# 6 and later. - The third property will calculate the person's age.
// a property defined using C# 1 - 5 syntax
public string Origin
{
  get
  {
    return $"{Name} was born on {HomePlanet}";
  }
}
// two properties defined using C# 6+ lambda expression body syntax
public string Greeting => $"{Name} says 'Hello!'";
public int Age => System.DateTime.Today.Year - DateOfBirth.Year;
Good Practice: This isn't the best way to calculate someone's age, but we aren't learning how to calculate an age from a date of birth. If you need to do that properly, read the discussion at the following link: https://stackoverflow.com/questions/9/how-do-i-calculate-someones-age-in-c
- The first property will perform the same role as the
- In
Program.cs, add the statements to get the properties, as shown in the following code:Person sam = new() { Name = "Sam", DateOfBirth = new(1972, 1, 27) }; WriteLine(sam.Origin); WriteLine(sam.Greeting); WriteLine(sam.Age); - Run the code and view the result, as shown in the following output:
Sam was born on Earth
Sam says 'Hello!'
49
The output shows 49 because I ran the console application on August 15, 2021 when Sam was 49 years old.
Defining settable properties
To create a settable property, you must use the older syntax and provide a pair of methods—not just a get part, but also a set part:
- In
PersonAutoGen.cs, add statements to define astringproperty that has both agetandsetmethod (also known as a getter and setter), as shown in the following code:public string FavoriteIceCream { get; set; } // auto-syntaxAlthough you have not manually created a field to store the person's favorite ice cream, it is there, automatically created by the compiler for you.
Sometimes, you need more control over what happens when a property is set. In this scenario, you must use a more detailed syntax and manually create a
privatefield to store the value for the property. - In
PersonAutoGen.cs, add statements to define astringfield andstringproperty that has both agetandset, as shown in the following code:private string favoritePrimaryColor; public string FavoritePrimaryColor { get { return favoritePrimaryColor; } set { switch (value.ToLower()) { case "red": case "green": case "blue": favoritePrimaryColor = value; break; default: throw new System.ArgumentException( $"{value} is not a primary color. " + "Choose from: red, green, blue."); } } }Good Practice: Avoid adding too much code to your getters and setters. This could indicate a problem with your design. Consider adding private methods that you then call in setters and getters to simplify your implementations.
- In
Program.cs, add statements to set Sam's favorite ice cream and color, and then write them out, as shown in the following code:sam.FavoriteIceCream = "Chocolate Fudge"; WriteLine($"Sam's favorite ice-cream flavor is {sam.FavoriteIceCream}."); sam.FavoritePrimaryColor = "Red"; WriteLine($"Sam's favorite primary color is {sam.FavoritePrimaryColor}."); - Run the code and view the result, as shown in the following output:
Sam's favorite ice-cream flavor is Chocolate Fudge.
Sam's favorite primary color is Red.
If you try to set the color to any value other than red, green, or blue, then the code will throw an exception. The calling code could then use a
trystatement to display the error message.Good Practice: Use properties instead of fields when you want to validate what value can be stored when you want to data bind in XAML, which we will cover in Chapter 19, Building Mobile and Desktop Apps Using .NET MAUI, and when you want to read and write to a field without using a method pair like
GetAgeandSetAge.
Requiring properties to be set during instantiation
C# 10 introduces the required modifier. If you use it on a property, the compiler will ensure that you set the property to a value when you instantiate it, as shown in the following code:
public class Book
{
  public required string Isbn { get; set; }
  public string Title { get; set; }
}
If you attempt to instantiate a Book without setting the Isbn property you will see a compiler error, as shown in the following code:
Book novel = new();
The required keyword might not make it into the final release version of .NET 6 so treat this section as theoretical.
Defining indexers
Indexers allow the calling code to use the array syntax to access a property. For example, the string type defines an indexer so that the calling code can access individual characters in the string.
We will define an indexer to simplify access to the children of a person:
- In
PersonAutoGen.cs, add statements to define an indexer to get and set a child using the index of the child, as shown in the following code:// indexers public Person this[int index] { get { return Children[index]; // pass on to the List<T> indexer } set { Children[index] = value; } }You can overload indexers so that different types can be used for their parameters. For example, as well as passing an
intvalue, you could also pass astringvalue. - In
Program.cs, add statements to add two children toSam, and then access the first and second child using the longerChildrenfield and the shorter indexer syntax, as shown in the following code:sam.Children.Add(new() { Name = "Charlie" }); sam.Children.Add(new() { Name = "Ella" }); WriteLine($"Sam's first child is {sam.Children[0].Name}"); WriteLine($"Sam's second child is {sam.Children[1].Name}"); WriteLine($"Sam's first child is {sam[0].Name}"); WriteLine($"Sam's second child is {sam[1].Name}"); - Run the code and view the result, as shown in the following output:
Sam's first child is Charlie
Sam's second child is Ella
Sam's first child is Charlie
Sam's second child is Ella
Pattern matching with objects
In Chapter 3, Controlling Flow, Converting Types, and Handling Exceptions, you were introduced to basic pattern matching. In this section, we will explore pattern matching in more detail.
Creating and referencing a .NET 6 class library
The enhanced pattern matching features are only available in modern .NET class libraries that support C# 9 or later.
- Use your preferred coding tool to add a new class library named
PacktLibraryModernto the workspace/solution namedChapter05. - In the
PeopleAppproject, add a reference to thePacktLibraryModernclass library, as shown highlighted in the following markup:<Project Sdk="Microsoft.NET.Sdk"> <PropertyGroup> <OutputType>Exe</OutputType> <TargetFramework>net6.0</TargetFramework> <Nullable>enable</Nullable> <ImplicitUsings>enable</ImplicitUsings> </PropertyGroup> <ItemGroup> <ProjectReference Include="../PacktLibrary/PacktLibrary.csproj" /> <ProjectReference Include="../PacktLibraryModern/PacktLibraryModern.csproj" /> </ItemGroup> </Project> - Build the
PeopleAppproject.
Defining flight passengers
In this example, we will define some classes that represent various types of passengers on a flight and then we will use a switch expression with pattern matching to determine the cost of their flight.
- In the
PacktLibraryModernproject/folder, rename the fileClass1.cstoFlightPatterns.cs. - In
FlightPatterns.cs, add statements to define three types of passengers with different properties, as shown in the following code:namespace Packt.Shared; // C# 10 file-scoped namespace public class BusinessClassPassenger { public override string ToString() { return $"Business Class"; } } public class FirstClassPassenger { public int AirMiles { get; set; } public override string ToString() { return $"First Class with {AirMiles:N0} air miles"; } } public class CoachClassPassenger { public double CarryOnKG { get; set; } public override string ToString() { return $"Coach Class with {CarryOnKG:N2} KG carry on"; } } - In
Program.cs, add statements to define an object array containing five passengers of various types and property values, and then enumerate them, outputting the cost of their flight, as shown in the following code:object[] passengers = { new FirstClassPassenger { AirMiles = 1_419 }, new FirstClassPassenger { AirMiles = 16_562 }, new BusinessClassPassenger(), new CoachClassPassenger { CarryOnKG = 25.7 }, new CoachClassPassenger { CarryOnKG = 0 }, }; foreach (object passenger in passengers) { decimal flightCost = passenger switch { FirstClassPassenger p when p.AirMiles > 35000 => 1500M, FirstClassPassenger p when p.AirMiles > 15000 => 1750M, FirstClassPassenger _ => 2000M, BusinessClassPassenger _ => 1000M, CoachClassPassenger p when p.CarryOnKG < 10.0 => 500M, CoachClassPassenger _ => 650M, _ => 800M }; WriteLine($"Flight costs {flightCost:C} for {passenger}"); }While reviewing the preceding code, note the following:
- To pattern match on the properties of an object, you must name a local variable that can then be used in an expression like
p. - To pattern match on a type only, you can use
_to discard the local variable. - The switch expression also uses
_to represent its default branch.
- To pattern match on the properties of an object, you must name a local variable that can then be used in an expression like
- Run the code and view the result, as shown in the following output:
Flight costs £2,000.00 for First Class with 1,419 air miles
Flight costs £1,750.00 for First Class with 16,562 air miles
Flight costs £1,000.00 for Business Class
Flight costs £650.00 for Coach Class with 25.70 KG carry on
Flight costs £500.00 for Coach Class with 0.00 KG carry on
Enhancements to pattern matching in C# 9 or later
The previous examples worked with C# 8. Now we will look at some enhancements in C# 9 and later. First, you no longer need to use the underscore to discard when doing type matching:
- In
Program.cs, comment out the C# 8 syntax and add C# 9 and later syntax to modify the branches for first-class passengers to use a nested switch expression and the new support for conditionals like>, as shown in the following code:decimal flightCost = passenger switch { /* C# 8 syntax FirstClassPassenger p when p.AirMiles > 35000 => 1500M, FirstClassPassenger p when p.AirMiles > 15000 => 1750M, FirstClassPassenger => 2000M, */ // C# 9 or later syntax FirstClassPassenger p => p.AirMiles switch { > 35000 => 1500M, > 15000 => 1750M, _ => 2000M }, BusinessClassPassenger => 1000M, CoachClassPassenger p when p.CarryOnKG < 10.0 => 500M, CoachClassPassenger => 650M, _ => 800M }; - Run the code to view the results, and note they are the same as before.
You could also use the relational pattern in combination with the property pattern to avoid the nested switch expression, as shown in the following code:
FirstClassPassenger { AirMiles: > 35000 } => 1500,
FirstClassPassenger { AirMiles: > 15000 } => 1750M,
FirstClassPassenger => 2000M,
Working with records
Before we dive into the new records language feature of C# 9 and later, let us see some other related new features.
Init-only properties
You have used object initialization syntax to instantiate objects and set initial properties throughout this chapter. Those properties can also be changed after instantiation.
Sometimes you want to treat properties like readonly fields so they can be set during instantiation but not after. The new init keyword enables this. It can be used in place of the set keyword:
- In the
PacktLibraryModernproject/folder, add a new file namedRecords.cs. - In
Records.cs, define an immutable person class, as shown in the following code:namespace Packt.Shared; // C# 10 file-scoped namespace public class ImmutablePerson { public string? FirstName { get; init; } public string? LastName { get; init; } } - In
Program.cs, add statements to instantiate a new immutable person and then try to change one of its properties, as shown in the following code:ImmutablePerson jeff = new() { FirstName = "Jeff", LastName = "Winger" }; jeff.FirstName = "Geoff"; - Compile the console app and note the compile error, as shown in the following output:
Program.cs(254,7): error CS8852: Init-only property or indexer 'ImmutablePerson.FirstName' can only be assigned in an object initializer, or on 'this' or 'base' in an instance constructor or an 'init' accessor. [/Users/markjprice/Code/Chapter05/PeopleApp/PeopleApp.csproj] - Comment out the attempt to set the
FirstNameproperty after instantiation.
Understanding records
Init-only properties provide some immutability to C#. You can take the concept further by using records. These are defined by using the record keyword instead of the class keyword. That can make the whole object immutable, and it acts like a value when compared. We will discuss equality and comparisons of classes, records, and value types in more detail in Chapter 6, Implementing Interfaces and Inheriting Classes.
Records should not have any state (properties and fields) that changes after instantiation. Instead, the idea is that you create new records from existing ones with any changed state. This is called non-destructive mutation. To do this, C# 9 introduced the with keyword:
- In
Records.cs, add a record namedImmutableVehicle, as shown in the following code:public record ImmutableVehicle { public int Wheels { get; init; } public string? Color { get; init; } public string? Brand { get; init; } } - In
Program.cs, add statements to create acarand then a mutated copy of it, as shown in the following code:ImmutableVehicle car = new() { Brand = "Mazda MX-5 RF", Color = "Soul Red Crystal Metallic", Wheels = 4 }; ImmutableVehicle repaintedCar = car with { Color = "Polymetal Grey Metallic" }; WriteLine($"Original car color was {car.Color}."); WriteLine($"New car color is {repaintedCar.Color}."); - Run the code to view the results, and note the change to the car color in the mutated copy, as shown in the following output:
Original car color was Soul Red Crystal Metallic.
New car color is Polymetal Grey Metallic.
Positional data members in records
The syntax for defining a record can be greatly simplified using positional data members.
Simplifying data members in records
Instead of using object initialization syntax with curly braces, sometimes you might prefer to provide a constructor with positional parameters as you saw earlier in this chapter. You can also combine this with a deconstructor for splitting the object into individual parts, as shown in the following code:
public record ImmutableAnimal
{
  public string Name { get; init; }
  public string Species { get; init; }
  public ImmutableAnimal(string name, string species)
  {
    Name = name;
    Species = species;
  }
  public void Deconstruct(out string name, out string species)
  {
    name = Name;
    species = Species;
  }
}
The properties, constructor, and deconstructor can be generated for you:
- In
Records.cs, add statements to define another record using simplified syntax known as positional records, as shown in the following code:// simpler way to define a record // auto-generates the properties, constructor, and deconstructor public record ImmutableAnimal(string Name, string Species); - In
Program.cs, add statements to construct and deconstruct immutable animals, as shown in the following code:ImmutableAnimal oscar = new("Oscar", "Labrador"); var (who, what) = oscar; // calls Deconstruct method WriteLine($"{who} is a {what}."); - Run the application and view the results, as shown in the following output:
Oscar is a Labrador.
You will see records again when we look at C# 10 support for creating struct records in Chapter 6, Implementing Interfaces and Inheriting Classes.
Practicing and exploring
Test your knowledge and understanding by answering some questions, get some hands-on practice, and explore this chapter's topics with deeper research.
Exercise 5.1 – Test your knowledge
Answer the following questions:
- What are the six combinations of access modifier keywords and what do they do?
- What is the difference between the
static,const, andreadonlykeywords when applied to a type member? - What does a constructor do?
- Why should you apply the
[Flags]attribute to anenumtype when you want to store combined values? - Why is the
partialkeyword useful? - What is a tuple?
- What does the
recordkeyword do? - What does overloading mean?
- What is the difference between a field and a property?
- How do you make a method parameter optional?
Exercise 5.2 – Explore topics
Use the links on the following page to learn more detail about the topics covered in this chapter:
Summary
In this chapter, you learned about making your own types using OOP. You learned about some of the different categories of members that a type can have, including fields to store data and methods to perform actions, and you used OOP concepts, such as aggregation and encapsulation. You saw examples of how to use modern C# features like relational and property pattern matching enhancements, init-only properties, and records.
In the next chapter, you will take these concepts further by defining delegates and events, implementing interfaces, and inheriting from existing classes.