03
Controlling Flow, Converting Types, and Handling Exceptions
This chapter is all about writing code that performs simple operations on variables, makes decisions, performs pattern matching, repeats statements or blocks, converts variable or expression values from one type to another, handles exceptions, and checks for overflows in number variables.
This chapter covers the following topics:
- Operating on variables
- Understanding selection statements
- Understanding iteration statements
- Casting and converting between types
- Handling exceptions
- Checking for overflow
Operating on variables
Operators apply simple operations such as addition and multiplication to operands such as variables and literal values. They usually return a new value that is the result of the operation that can be assigned to a variable.
Most operators are binary, meaning that they work on two operands, as shown in the following pseudocode:
var resultOfOperation = firstOperand operator secondOperand;
Examples of binary operators include adding and multiplying, as shown in the following code:
int x = 5;
int y = 3;
int resultOfAdding = x + y;
int resultOfMultiplying = x * y;
Some operators are unary, meaning they work on a single operand, and can apply before or after the operand, as shown in the following pseudocode:
var resultOfOperation = onlyOperand operator;
var resultOfOperation2 = operator onlyOperand;
Examples of unary operators include incrementors and retrieving a type or its size in bytes, as shown in the following code:
int x = 5;
int postfixIncrement = x++;
int prefixIncrement = ++x;
Type theTypeOfAnInteger = typeof(int);
int howManyBytesInAnInteger = sizeof(int);
A ternary operator works on three operands, as shown in the following pseudocode:
var resultOfOperation = firstOperand firstOperator
  secondOperand secondOperator thirdOperand;
Exploring unary operators
Two common unary operators are used to increment, ++, and decrement, --, a number. Let us write some example code to show how they work:
- If you've completed the previous chapters, then you will already have a
Codefolder. If not, then you'll need to create it. - Use your preferred coding tool to create a new console app, as defined in the following list:
- Project template: Console Application /
console - Workspace/solution file and folder:
Chapter03 - Project file and folder:
Operators
- Project template: Console Application /
- At the top of
Program.cs, statically importSystem.Console. - In
Program.cs, declare two integer variables namedaandb, setato3, incrementawhile assigning the result tob, and then output their values, as shown in the following code:int a = 3; int b = a++; WriteLine($"a is {a}, b is {b}"); - Before running the console application, ask yourself a question: what do you think the value of
bwill be when output? Once you've thought about that, run the code, and compare your prediction against the actual result, as shown in the following output:a is 4, b is 3The variable
bhas the value3because the++operator executes after the assignment; this is known as a postfix operator. If you need to increment before the assignment, then use the prefix operator. - Copy and paste the statements, and then modify them to rename the variables and use the prefix operator, as shown in the following code:
int c = 3; int d = ++c; // increment c before assigning it WriteLine($"c is {c}, d is {d}"); - Rerun the code and note the result, as shown in the following output:
a is 4, b is 3
c is 4, d is 4
Good Practice: Due to the confusion between prefix and postfix for the increment and decrement operators when combined with an assignment, the Swift programming language designers decided to drop support for this operator in version 3. My recommendation for usage in C# is to never combine the use of
++and--operators with an assignment operator,=. Perform the operations as separate statements.
Exploring binary arithmetic operators
Increment and decrement are unary arithmetic operators. Other arithmetic operators are usually binary and allow you to perform arithmetic operations on two numbers, as the following shows:
- Add the statements to declare and assign values to two integer variables named
eandf, and then apply the five common binary arithmetic operators to the two numbers, as shown in the following code:int e = 11; int f = 3; WriteLine($"e is {e}, f is {f}"); WriteLine($"e + f = {e + f}"); WriteLine($"e - f = {e - f}"); WriteLine($"e * f = {e * f}"); WriteLine($"e / f = {e / f}"); WriteLine($"e % f = {e % f}"); - Run the code and note the result, as shown in the following output:
e is 11, f is 3
e + f = 14
e - f = 8
e * f = 33
e / f = 3
e % f = 2
To understand the divide
/and modulo%operators when applied to integers, you need to think back to primary school. Imagine you have eleven sweets and three friends.How can you divide the sweets between your friends? You can give three sweets to each of your friends, and there will be two left over. Those two sweets are the modulus, also known as the remainder after dividing. If you have twelve sweets, then each friend gets four of them, and there are none left over, so the remainder would be 0.
- Add statements to declare and assign a value to a
doublevariable namedgto show the difference between whole number and real number divisions, as shown in the following code:double g = 11.0; WriteLine($"g is {g:N1}, f is {f}"); WriteLine($"g / f = {g / f}"); - Run the code and note the result, as shown in the following output:
g is 11.0, f is 3
g / f = 3.6666666666666665
If the first operand is a floating-point number, such as g with the value 11.0, then the divide operator returns a floating-point value, such as 3.6666666666665, rather than a whole number.
Assignment operators
You have already been using the most common assignment operator, =.
To make your code more concise, you can combine the assignment operator with other operators like arithmetic operators, as shown in the following code:
int p = 6;
p += 3; // equivalent to p = p + 3;
p -= 3; // equivalent to p = p - 3;
p *= 3; // equivalent to p = p * 3;
p /= 3; // equivalent to p = p / 3;
Exploring logical operators
Logical operators operate on Boolean values, so they return either true or false. Let's explore binary logical operators that operate on two Boolean values:
- Use your preferred coding tool to add a new console app to the
Chapter03workspace/solution namedBooleanOperators.- In Visual Studio Code, select
BooleanOperatorsas the active OmniSharp project. When you see the pop-up warning message saying that required assets are missing, click Yes to add them. - In Visual Studio, set the start up project for the solution to the current selection.
Good Practice: Remember to statically import the
System.Consoletype to simplify statements.
- In Visual Studio Code, select
- In
Program.cs, add statements to declare two Boolean variables with values oftrueandfalse, and then output truth tables showing the results of applying AND, OR, and XOR (exclusive OR) logical operators, as shown in the following code:bool a = true; bool b = false; WriteLine($"AND | a | b "); WriteLine($"a | {a & a,-5} | {a & b,-5} "); WriteLine($"b | {b & a,-5} | {b & b,-5} "); WriteLine(); WriteLine($"OR | a | b "); WriteLine($"a | {a | a,-5} | {a | b,-5} "); WriteLine($"b | {b | a,-5} | {b | b,-5} "); WriteLine(); WriteLine($"XOR | a | b "); WriteLine($"a | {a ^ a,-5} | {a ^ b,-5} "); WriteLine($"b | {b ^ a,-5} | {b ^ b,-5} "); - Run the code and note the results, as shown in the following output:
AND  | a     | b
a    | True  | False
b    | False | False
OR   | a     | b
a    | True  | True
b    | True  | False
XOR  | a     | b
a    | False | True
b    | True  | False
For the AND & logical operator, both operands must be true for the result to be true. For the OR | logical operator, either operand can be true for the result to be true. For the XOR ^ logical operator, either operand can be true (but not both!) for the result to be true.
Exploring conditional logical operators
Conditional logical operators are like logical operators, but you use two symbols instead of one, for example, && instead of &, or || instead of |.
In Chapter 4, Writing, Debugging, and Testing Functions, you will learn about functions in more detail, but I need to introduce functions now to explain conditional logical operators, also known as short-circuiting Boolean operators.
A function executes statements and then returns a value. That value could be a Boolean value like true that is used in a Boolean operation. Let's make use of conditional logical operators:
- At the bottom of
Program.cs, write statements to declare a function that writes a message to the console and returnstrue, as shown in the following code:static bool DoStuff() { WriteLine("I am doing some stuff."); return true; }Good Practice: If you are using .NET Interactive Notebook, write the
DoStufffunction in a separate code cell and then execute it to make its context available to other code cells. - After the previous
WriteLinestatements, perform an AND&operation on theaandbvariables and the result of calling the function, as shown in the following code:WriteLine(); WriteLine($"a & DoStuff() = {a & DoStuff()}"); WriteLine($"b & DoStuff() = {b & DoStuff()}"); - Run the code, view the result, and note that the function was called twice, once for a and once for b, as shown in the following output:
I am doing some stuff. a & DoStuff() = True I am doing some stuff. b & DoStuff() = False - Change the
&operators into&&operators, as shown in the following code:WriteLine($"a && DoStuff() = {a && DoStuff()}"); WriteLine($"b && DoStuff() = {b && DoStuff()}"); - Run the code, view the result, and note that the function does run when combined with the
avariable. It does not run when combined with thebvariable because thebvariable isfalseso the result will befalseanyway, so it does not need to execute the function, as shown in the following output:I am doing some stuff. a && DoStuff() = True b && DoStuff() = False // DoStuff function was not executed!Good Practice: Now you can see why the conditional logical operators are described as being short-circuiting. They can make your apps more efficient, but they can also introduce subtle bugs in cases where you assume that the function would always be called. It is safest to avoid them when used in combination with functions that cause side effects.
Exploring bitwise and binary shift operators
Bitwise operators affect the bits in a number. Binary shift operators can perform some common arithmetic calculations much faster than traditional operators, for example, any multiplication by a factor of 2.
Let's explore bitwise and binary shift operators:
- Use your preferred coding tool to add a new Console Application to the
Chapter03workspace/solution namedBitwiseAndShiftOperators. - In Visual Studio Code, select
BitwiseAndShiftOperatorsas the active OmniSharp project. When you see the pop-up warning message saying that required assets are missing, click Yes to add them. - In
Program.cs, type statements to declare two integer variables with values 10 and 6, and then output the results of applying AND, OR, and XOR bitwise operators, as shown in the following code:int a = 10; // 00001010 int b = 6; // 00000110 WriteLine($"a = {a}"); WriteLine($"b = {b}"); WriteLine($"a & b = {a & b}"); // 2-bit column only WriteLine($"a | b = {a | b}"); // 8, 4, and 2-bit columns WriteLine($"a ^ b = {a ^ b}"); // 8 and 4-bit columns - Run the code and note the results, as shown in the following output:
a = 10 b = 6 a & b = 2 a | b = 14 a ^ b = 12 - In
Program.cs, add statements to output the results of applying the left-shift operator to move the bits of the variableaby three columns, multiplyingaby 8, and right-shifting the bits of the variablebby one column, as shown in the following code:// 01010000 left-shift a by three bit columns WriteLine($"a << 3 = {a << 3}"); // multiply a by 8 WriteLine($"a * 8 = {a * 8}"); // 00000011 right-shift b by one bit column WriteLine($"b >> 1 = {b >> 1}"); - Run the code and note the results, as shown in the following output:
a << 3 = 80
a * 8 = 80
b >> 1 = 3
The 80 result is because the bits in it were shifted three columns to the left, so the 1-bits moved into the 64- and 16-bit columns and 64 + 16 = 80. This is the equivalent of multiplying by 8, but CPUs can perform a bit-shift faster. The 3 result is because the 1-bits in b were shifted one column into the 2- and 1-bit columns.
Good Practice: Remember that when operating on integer values, the & and | symbols are bitwise operators, and when operating on Boolean values like true and false, the & and | symbols are logical operators.
We can illustrate the operations by converting the integer values into binary strings of zeros and ones:
- At the bottom of
Program.cs, add a function to convert an integer value into a binary (Base2)stringof up to eight zeros and ones, as shown in the following code:static string ToBinaryString(int value) { return Convert.ToString(value, toBase: 2).PadLeft(8, '0'); } - Above the function, add statements to output
a,b, and the results of the various bitwise operators, as shown in the following code:WriteLine(); WriteLine("Outputting integers as binary:"); WriteLine($"a = {ToBinaryString(a)}"); WriteLine($"b = {ToBinaryString(b)}"); WriteLine($"a & b = {ToBinaryString(a & b)}"); WriteLine($"a | b = {ToBinaryString(a | b)}"); WriteLine($"a ^ b = {ToBinaryString(a ^ b)}"); - Run the code and note the results, as shown in the following output:
Outputting integers as binary:
a =     00001010
b =     00000110
a & b = 00000010
a | b = 00001110
a ^ b = 00001100
Miscellaneous operators
nameof and sizeof are convenient operators when working with types:
nameofreturns the short name (without the namespace) of a variable, type, or member as astringvalue, which is useful when outputting exception messages.sizeofreturns the size in bytes of simple types, which is useful for determining the efficiency of data storage.
There are many other operators; for example, the dot between a variable and its members is called the member access operator and the round brackets at the end of a function or method name are called the invocation operator, as shown in the following code:
int age = 47;
// How many operators in the following statement?
char firstDigit = age.ToString()[0];
// There are four operators:
// = is the assignment operator
// . is the member access operator
// () is the invocation operator
// [] is the indexer access operator
Understanding selection statements
Every application needs to be able to select from choices and branch along different code paths. The two selection statements in C# are if and switch. You can use if for all your code, but switch can simplify your code in some common scenarios such as when there is a single variable that can have multiple values that each require different processing.
Branching with the if statement
The if statement determines which branch to follow by evaluating a Boolean expression. If the expression is true, then the block executes. The else block is optional, and it executes if the if expression is false. The if statement can be nested.
The if statement can be combined with other if statements as else if branches, as shown in the following code:
if (expression1)
{
  // runs if expression1 is true
}
else if (expression2)
{
  // runs if expression1 is false and expression2 if true
}
else if (expression3)
{
  // runs if expression1 and expression2 are false
  // and expression3 is true
}
else
{
  // runs if all expressions are false
}
Each if statement's Boolean expression is independent of the others and, unlike switch statements, does not need to reference a single value.
Let's write some code to explore selection statements like if:
- Use your preferred coding tool to add a new Console Application to the
Chapter03workspace/solution namedSelectionStatements. - In Visual Studio Code, select
SelectionStatementsas the active OmniSharp project. - In
Program.cs, type statements to check if a password is at least eight characters, as shown in the following code:string password = "ninja"; if (password.Length < 8) { WriteLine("Your password is too short. Use at least 8 characters."); } else { WriteLine("Your password is strong."); } - Run the code and note the result, as shown in the following output:
Your password is too short. Use at least 8 characters.
Why you should always use braces with if statements
As there is only a single statement inside each block, the preceding code could be written without the curly braces, as shown in the following code:
if (password.Length < 8)
  WriteLine("Your password is too short. Use at least 8 characters.");
else
  WriteLine("Your password is strong.");
This style of if statement should be avoided because it can introduce serious bugs, for example, the infamous #gotofail bug in Apple's iPhone iOS operating system.
For 18 months after Apple's iOS 6 was released, in September 2012, it had a bug in its Secure Sockets Layer (SSL) encryption code, which meant that any user running Safari, the device's web browser, who tried to connect to secure websites, such as their bank, was not properly secure because an important check was being accidentally skipped.
Just because you can leave out the curly braces doesn't mean you should. Your code is not "more efficient" without them; instead, it is less maintainable and potentially more dangerous.
Pattern matching with the if statement
A feature introduced with C# 7.0 and later is pattern matching. The if statement can use the is keyword in combination with declaring a local variable to make your code safer:
- Add statements so that if the value stored in the variable named
ois anint, then the value is assigned to the local variable namedi, which can then be used inside theifstatement. This is safer than using the variable namedobecause we know for sure thatiis anintvariable and not something else, as shown in the following code:// add and remove the "" to change the behavior object o = "3"; int j = 4; if (o is int i) { WriteLine($"{i} x {j} = {i * j}"); } else { WriteLine("o is not an int so it cannot multiply!"); } - Run the code and view the results, as shown in the following output:
o is not an int so it cannot multiply! - Delete the double-quote characters around the
"3"value so that the value stored in the variable namedois aninttype instead of astringtype. - Rerun the code to view the results, as shown in the following output:
3 x 4 = 12
Branching with the switch statement
The switch statement is different from the if statement because switch compares a single expression against a list of multiple possible case statements. Every case statement is related to the single expression. Every case section must end with:
- The
breakkeyword (like case 1 in the following code) - Or the
gotocasekeywords (like case 2 in the following code) - Or they should have no statements (like case 3 in the following code)
- Or the
gotokeyword that references a named label (like case 5 in the following code) - Or the
returnkeyword to leave the current function (not shown in the code)
Let's write some code to explore the switch statements:
- Type statements for a
switchstatement. You should note that the penultimate statement is a label that can be jumped to, and the first statement generates a random number between 1 and 6 (the number 7 in the code is an exclusive upper bound). Theswitchstatement branches are based on the value of this random number, as shown in the following code:int number = (new Random()).Next(1, 7); WriteLine($"My random number is {number}"); switch (number) { case 1: WriteLine("One"); break; // jumps to end of switch statement case 2: WriteLine("Two"); goto case 1; case 3: // multiple case section case 4: WriteLine("Three or four"); goto case 1; case 5: goto A_label; default: WriteLine("Default"); break; } // end of switch statement WriteLine("After end of switch"); A_label: WriteLine($"After A_label");Good Practice: You can use the
gotokeyword to jump to another case or a label. Thegotokeyword is frowned upon by most programmers but can be a good solution to code logic in some scenarios. However, you should use it sparingly. - Run the code multiple times to see what happens in various cases of random numbers, as shown in the following example output:
// first random run
My random number is 4
Three or four
One
After end of switch
After A_label
// second random run
My random number is 2
Two
One
After end of switch
After A_label
// third random run
My random number is 6
Default
After end of switch
After A_label
// fourth random run
My random number is 1
One
After end of switch
After A_label
// fifth random run
My random number is 5
After A_label
Pattern matching with the switch statement
Like the if statement, the switch statement supports pattern matching in C# 7.0 and later. The case values no longer need to be literal values; they can be patterns.
Let's see an example of pattern matching with the switch statement using a folder path. If you are using macOS, then swap the commented statement that sets the path variable and replace my username with your user folder name:
- Add statements to declare a
stringpath to a file, open it as either a read-only or writeable stream, and then show a message based on what type and capabilities the stream has, as shown in the following code:// string path = "/Users/markjprice/Code/Chapter03"; string path = @"C:\Code\Chapter03"; Write("Press R for read-only or W for writeable: "); ConsoleKeyInfo key = ReadKey(); WriteLine(); Stream? s; if (key.Key == ConsoleKey.R) { s = File.Open( Path.Combine(path, "file.txt"), FileMode.OpenOrCreate, FileAccess.Read); } else { s = File.Open( Path.Combine(path, "file.txt"), FileMode.OpenOrCreate, FileAccess.Write); } string message; switch (s) { case FileStream writeableFile when s.CanWrite: message = "The stream is a file that I can write to."; break; case FileStream readOnlyFile: message = "The stream is a read-only file."; break; case MemoryStream ms: message = "The stream is a memory address."; break; default: // always evaluated last despite its current position message = "The stream is some other type."; break; case null: message = "The stream is null."; break; } WriteLine(message); - Run the code and note that the variable named
sis declared as aStreamtype so it could be any subtype of stream, such as a memory stream or file stream. In this code, the stream is created using theFile.Openmethod, which returns a file stream and, depending on your key press, it will be writeable or read-only, so the result will be a message that describes the situation, as shown in the following output:The stream is a file that I can write to.
In .NET, there are multiple subtypes of Stream, including FileStream and MemoryStream. In C# 7.0 and later, your code can more concisely branch, based on the subtype of stream, and declare and assign a local variable to safely use it. You will learn more about the System.IO namespace and the Stream type in Chapter 9, Working with Files, Streams, and Serialization.
Additionally, case statements can include a when keyword to perform more specific pattern matching. In the first case statement in the preceding code, s will only be a match if the stream is a FileStream and its CanWrite property is true.
Simplifying switch statements with switch expressions
In C# 8.0 or later, you can simplify switch statements using switch expressions.
Most switch statements are very simple, yet they require a lot of typing. switch expressions are designed to simplify the code you need to type while still expressing the same intent in scenarios where all cases return a value to set a single variable. switch expressions use a lambda, =>, to indicate a return value.
Let's implement the previous code that used a switch statement using a switch expression so that you can compare the two styles:
- Type statements to set the message based on what type and capabilities the stream has, using a
switchexpression, as shown in the following code:message = s switch { FileStream writeableFile when s.CanWrite => "The stream is a file that I can write to.", FileStream readOnlyFile => "The stream is a read-only file.", MemoryStream ms => "The stream is a memory address.", null => "The stream is null.", _ => "The stream is some other type." }; WriteLine(message);The main differences are the removal of the
caseandbreakkeywords. The underscore character_is used to represent the default return value. - Run the code, and note the result is the same as before.
Understanding iteration statements
Iteration statements repeat a block of statements either while a condition is true or for each item in a collection. The choice of which statement to use is based on a combination of ease of understanding to solve the logic problem and personal preference.
Looping with the while statement
The while statement evaluates a Boolean expression and continues to loop while it is true. Let's explore iteration statements:
- Use your preferred coding tool to add a new Console Application to the
Chapter03workspace/solution namedIterationStatements. - In Visual Studio Code, select
IterationStatementsas the active OmniSharp project. - In
Program.cs, type statements to define awhilestatement that loops while an integer variable has a value less than 10, as shown in the following code:int x = 0; while (x < 10) { WriteLine(x); x++; } - Run the code and view the results, which should be the numbers 0 to 9, as shown in the following output:
0
1
2
3
4
5
6
7
8
9
Looping with the do statement
The do statement is like while, except the Boolean expression is checked at the bottom of the block instead of the top, which means that the block always executes at least once, as the following shows:
- Type statements to define a
doloop, as shown in the following code:string? password; do { Write("Enter your password: "); password = ReadLine(); } while (password != "Pa$$w0rd"); WriteLine("Correct!"); - Run the code, and note that you are prompted to enter your password repeatedly until you enter it correctly, as shown in the following output:
Enter your password: password Enter your password: 12345678 Enter your password: ninja Enter your password: correct horse battery staple Enter your password: Pa$$w0rd Correct! - As an optional challenge, add statements so that the user can only make ten attempts before an error message is displayed.
Looping with the for statement
The for statement is like while, except that it is more succinct. It combines:
- An initializer expression, which executes once at the start of the loop.
- A conditional expression, which executes on every iteration at the start of the loop to check whether the looping should continue.
- An iterator expression, which executes on every loop at the bottom of the statement.
The for statement is commonly used with an integer counter. Let's explore some code:
- Type a
forstatement to output the numbers 1 to 10, as shown in the following code:for (int y = 1; y <= 10; y++) { WriteLine(y); } - Run the code to view the result, which should be the numbers 1 to 10.
Looping with the foreach statement
The foreach statement is a bit different from the previous three iteration statements.
It is used to perform a block of statements on each item in a sequence, for example, an array or collection. Each item is usually read-only, and if the sequence structure is modified during iteration, for example, by adding or removing an item, then an exception will be thrown.
Try the following example:
- Type statements to create an array of string variables and then output the length of each one, as shown in the following code:
string[] names = { "Adam", "Barry", "Charlie" }; foreach (string name in names) { WriteLine($"{name} has {name.Length} characters."); } - Run the code and view the results, as shown in the following output:
Adam has 4 characters.
Barry has 5 characters.
Charlie has 7 characters.
Understanding how foreach works internally
A creator of any type that represents multiple items, like an array or collection, should make sure that a programmer can use the foreach statement to enumerate through the type's items.
Technically, the foreach statement will work on any type that follows these rules:
- The type must have a method named
GetEnumeratorthat returns an object. - The returned object must have a property named
Currentand a method namedMoveNext. - The
MoveNextmethod must change the value ofCurrentand returntrueif there are more items to enumerate through or returnfalseif there are no more items.
There are interfaces named IEnumerable and IEnumerable<T> that formally define these rules, but technically the compiler does not require the type to implement these interfaces.
The compiler turns the foreach statement in the preceding example into something like the following pseudocode:
IEnumerator e = names.GetEnumerator();
while (e.MoveNext())
{
  string name = (string)e.Current; // Current is read-only!
  WriteLine($"{name} has {name.Length} characters.");
}
Due to the use of an iterator, the variable declared in a foreach statement cannot be used to modify the value of the current item.
Casting and converting between types
You will often need to convert values of variables between different types. For example, data input is often entered as text at the console, so it is initially stored in a variable of the string type, but it then needs to be converted into a date/time, or number, or some other data type, depending on how it should be stored and processed.
Sometimes you will need to convert between number types, like between an integer and a floating point, before performing calculations.
Converting is also known as casting, and it has two varieties: implicit and explicit. Implicit casting happens automatically, and it is safe, meaning that you will not lose any information.
Explicit casting must be performed manually because it may lose information, for example, the precision of a number. By explicitly casting, you are telling the C# compiler that you understand and accept the risk.
Casting numbers implicitly and explicitly
Implicitly casting an int variable into a double variable is safe because no information can be lost as the following shows:
- Use your preferred coding tool to add a new Console Application to the
Chapter03workspace/solution namedCastingConverting. - In Visual Studio Code, select
CastingConvertingas the active OmniSharp project. - In
Program.cs, type statements to declare and assign anintvariable and adoublevariable, and then implicitly cast the integer's value when assigning it to thedoublevariable, as shown in the following code:int a = 10; double b = a; // an int can be safely cast into a double WriteLine(b); - Type statements to declare and assign a
doublevariable and anintvariable, and then implicitly cast thedoublevalue when assigning it to theintvariable, as shown in the following code:double c = 9.8; int d = c; // compiler gives an error for this line WriteLine(d); - Run the code and note the error message, as shown in the following output:
Error: (6,9): error CS0266: Cannot implicitly convert type 'double' to 'int'. An explicit conversion exists (are you missing a cast?)This error message will also appear in the Visual Studio Error List or Visual Studio Code PROBLEMS window.
You cannot implicitly cast a
doublevariable into anintvariable because it is potentially unsafe and could lose data, like the value after the decimal point. You must explicitly cast adoublevariable into anintvariable using a pair of round brackets around the type you want to cast thedoubletype into. The pair of round brackets is the cast operator. Even then, you must beware that the part after the decimal point will be trimmed off without warning because you have chosen to perform an explicit cast and therefore understand the consequences. - Modify the assignment statement for the
dvariable, as shown in the following code:int d = (int)c; WriteLine(d); // d is 9 losing the .8 part - Run the code to view the results, as shown in the following output:
10
9
We must perform a similar operation when converting values between larger integers and smaller integers. Again, beware that you might lose information because any value too big will have its bits copied and then be interpreted in ways that you might not expect!
- Enter statements to declare and assign a long 64-bit variable to an int 32-bit variable, both using a small value that will work and a too-large value that will not, as shown in the following code:
long e = 10; int f = (int)e; WriteLine($"e is {e:N0} and f is {f:N0}"); e = long.MaxValue; f = (int)e; WriteLine($"e is {e:N0} and f is {f:N0}"); - Run the code to view the results, as shown in the following output:
e is 10 and f is 10 e is 9,223,372,036,854,775,807 and f is -1 - Modify the value of
eto 5 billion, as shown in the following code:e = 5_000_000_000; - Run the code to view the results, as shown in the following output:
e is 5,000,000,000 and f is 705,032,704
Converting with the System.Convert type
An alternative to using the cast operator is to use the System.Convert type. The System.Convert type can convert to and from all the C# number types, as well as Booleans, strings, and date and time values.
Let's write some code to see this in action:
- At the top of
Program.cs, statically import theSystem.Convertclass, as shown in the following code:using static System.Convert; - At the bottom of
Program.cs, type statements to declare and assign a value to adoublevariable, convert it to an integer, and then write both values to the console, as shown in the following code:double g = 9.8; int h = ToInt32(g); // a method of System.Convert WriteLine($"g is {g} and h is {h}"); - Run the code and view the result, as shown in the following output:
g is 9.8 and h is 10
One difference between casting and converting is that converting rounds the double value 9.8 up to 10 instead of trimming the part after the decimal point.
Rounding numbers
You have now seen that the cast operator trims the decimal part of a real number and that the System.Convert methods round up or down. However, what is the rule for rounding?
Understanding the default rounding rules
In British primary schools for children aged 5 to 11, pupils are taught to round up if the decimal part is .5 or higher and round down if the decimal part is less.
Let's explore if C# follows the same primary school rule:
- Type statements to declare and assign an array of
doublevalues, convert each of them to an integer, and then write the result to the console, as shown in the following code:double[] doubles = new[] { 9.49, 9.5, 9.51, 10.49, 10.5, 10.51 }; foreach (double n in doubles) { WriteLine($"ToInt32({n}) is {ToInt32(n)}"); } - Run the code and view the result, as shown in the following output:
ToInt32(9.49) is 9
ToInt32(9.5) is 10
ToInt32(9.51) is 10
ToInt32(10.49) is 10
ToInt32(10.5) is 10
ToInt32(10.51) is 11
We have shown that the rule for rounding in C# is subtly different from the primary school rule:
- It always rounds down if the decimal part is less than the midpoint .5.
- It always rounds up if the decimal part is more than the midpoint .5.
- It will round up if the decimal part is the midpoint .5 and the non-decimal part is odd, but it will round down if the non-decimal part is even.
This rule is known as Banker's Rounding, and it is preferred because it reduces bias by alternating when it rounds up or down. Sadly, other languages such as JavaScript use the primary school rule.
Taking control of rounding rules
You can take control of the rounding rules by using the Round method of the Math class:
- Type statements to round each of the
doublevalues using the "away from zero" rounding rule, also known as rounding "up," and then write the result to the console, as shown in the following code:foreach (double n in doubles) { WriteLine(format: "Math.Round({0}, 0, MidpointRounding.AwayFromZero) is {1}", arg0: n, arg1: Math.Round(value: n, digits: 0, mode: MidpointRounding.AwayFromZero)); } - Run the code and view the result, as shown in the following output:
Math.Round(9.49, 0, MidpointRounding.AwayFromZero) is 9
Math.Round(9.5, 0, MidpointRounding.AwayFromZero) is 10
Math.Round(9.51, 0, MidpointRounding.AwayFromZero) is 10
Math.Round(10.49, 0, MidpointRounding.AwayFromZero) is 10
Math.Round(10.5, 0, MidpointRounding.AwayFromZero) is 11
Math.Round(10.51, 0, MidpointRounding.AwayFromZero) is 11
Good Practice: For every programming language that you use, check its rounding rules. They may not work the way you expect!
Converting from any type to a string
The most common conversion is from any type into a string variable for outputting as human-readable text, so all types have a method named ToString that they inherit from the System.Object class.
The ToString method converts the current value of any variable into a textual representation. Some types can't be sensibly represented as text, so they return their namespace and type name instead.
Let's convert some types into a string:
- Type statements to declare some variables, convert them to their
stringrepresentation, and write them to the console, as shown in the following code:int number = 12; WriteLine(number.ToString()); bool boolean = true; WriteLine(boolean.ToString()); DateTime now = DateTime.Now; WriteLine(now.ToString()); object me = new(); WriteLine(me.ToString()); - Run the code and view the result, as shown in the following output:
12
True
02/28/2021 17:33:54
System.Object
Converting from a binary object to a string
When you have a binary object like an image or video that you want to either store or transmit, you sometimes do not want to send the raw bits because you do not know how those bits could be misinterpreted, for example, by the network protocol transmitting them or another operating system that is reading the store binary object.
The safest thing to do is to convert the binary object into a string of safe characters. Programmers call this Base64 encoding.
The Convert type has a pair of methods, ToBase64String and FromBase64String, that perform this conversion for you. Let's see them in action:
- Type statements to create an array of bytes randomly populated with byte values, write each byte nicely formatted to the console, and then write the same bytes converted to Base64 to the console, as shown in the following code:
// allocate array of 128 bytes
byte[] binaryObject = new byte[128];
// populate array with random bytes
(new Random()).NextBytes(binaryObject);
WriteLine("Binary Object as bytes:");
for(int index = 0; index < binaryObject.Length; index++)
{
  Write($"{binaryObject[index]:X} ");
}
WriteLine();
// convert to Base64 string and output as text
string encoded = ToBase64String(binaryObject);
WriteLine($"Binary Object as Base64: {encoded}");
By default, an
intvalue would output assuming decimal notation, that is, base10. You can use format codes such as:Xto format the value using hexadecimal notation. - Run the code and view the result, as shown in the following output:
Binary Object as bytes:
B3 4D 55 DE 2D E BB CF BE 4D E6 53 C3 C2 9B 67 3 45 F9 E5 20 61 7E 4F 7A 81 EC 49 F0 49 1D 8E D4 F7 DB 54 AF A0 81 5 B8 BE CE F8 36 90 7A D4 36 42
4 75 81 1B AB 51 CE 5 63 AC 22 72 DE 74 2F 57 7F CB E7 47 B7 62 C3 F4 2D
61 93 85 18 EA 6 17 12 AE 44 A8 D B8 4C 89 85 A9 3C D5 E2 46 E0 59 C9 DF
10 AF ED EF 8AA1 B1 8D EE 4A BE 48 EC 79 A5 A 5F 2F 30 87 4A C7 7F 5D C1 D
26 EE
Binary Object as Base64: s01V3i0Ou8++TeZTw8KbZwNF +eUgYX5PeoHsSfBJHY7U99tU r6CBBbi+zvg2kHrUNkIEdYEbq1HOBWOsInLedC9Xf8vnR7diw/QtYZOFGOoGFxKuRKgNuEyJha k81eJG4FnJ3xCv7e+KobGN7kq+SO x5pQpfLzCHSsd/XcENJu4=
Parsing from strings to numbers or dates and times
The second most common conversion is from strings to numbers or date and time values.
The opposite of ToString is Parse. Only a few types have a Parse method, including all the number types and DateTime.
Let's see Parse in action:
- Type statements to parse an integer and a date and time value from strings and then write the result to the console, as shown in the following code:
int age = int.Parse("27"); DateTime birthday = DateTime.Parse("4 July 1980"); WriteLine($"I was born {age} years ago."); WriteLine($"My birthday is {birthday}."); WriteLine($"My birthday is {birthday:D}."); - Run the code and view the result, as shown in the following output:
I was born 27 years ago.
My birthday is 04/07/1980 00:00:00.
My birthday is 04 July 1980.
By default, a date and time value outputs with the short date and time format. You can use format codes such as
Dto output only the date part using the long date format.Good Practice: Use the standard date and time format specifiers, as shown at the following link: https://docs.microsoft.com/en-us/dotnet/standard/base-types/standard-date-and-time-format-strings#table-of-format-specifiers
Errors using Parse
One problem with the Parse method is that it gives errors if the string cannot be converted.
- Type a statement to attempt to parse a string containing letters into an integer variable, as shown in the following code:
int count = int.Parse("abc"); - Run the code and view the result, as shown in the following output:
Unhandled Exception: System.FormatException: Input string was not in a correct format.
As well as the preceding exception message, you will see a stack trace. I have not included stack traces in this book because they take up too much space.
Avoiding exceptions using the TryParse method
To avoid errors, you can use the TryParse method instead. TryParse attempts to convert the input string and returns true if it can convert it and false if it cannot.
The out keyword is required to allow the TryParse method to set the count variable when the conversion works.
Let's see TryParse in action:
- Replace the
intcountdeclaration with statements to use theTryParsemethod and ask the user to input a count for a number of eggs, as shown in the following code:Write("How many eggs are there? "); string? input = ReadLine(); // or use "12" in notebook if (int.TryParse(input, out int count)) { WriteLine($"There are {count} eggs."); } else { WriteLine("I could not parse the input."); } - Run the code, enter
12, and view the result, as shown in the following output:How many eggs are there? 12 There are 12 eggs. - Run the code, enter
twelve(or change thestringvalue to"twelve"in a notebook), and view the result, as shown in the following output:How many eggs are there? twelve I could not parse the input.
You can also use methods of the System.Convert type to convert string values into other types; however, like the Parse method, it gives an error if it cannot convert.
Handling exceptions
You've seen several scenarios where errors have occurred when converting types. Some languages return error codes when something goes wrong. .NET uses exceptions that are richer and designed only for failure reporting compared to return values that have multiple uses. When this happens, we say a runtime exception has been thrown.
When an exception is thrown, the thread is suspended and if the calling code has defined a try-catch statement, then it is given a chance to handle the exception. If the current method does not handle it, then its calling method is given a chance, and so on up the call stack.
As you have seen, the default behavior of a console application or a .NET Interactive notebook is to output a message about the exception, including a stack trace, and then stop running the code. The application is terminated. This is better than allowing the code to continue executing in a potentially corrupt state. Your code should only catch and handle exceptions that it understands and can properly fix.
Good Practice: Avoid writing code that will throw an exception whenever possible, perhaps by performing if statement checks. Sometimes you can't, and sometimes it is best to allow the exception to be caught by a higher-level component that is calling your code. You will learn how to do this in Chapter 4, Writing, Debugging, and Testing Functions.
Wrapping error-prone code in a try block
When you know that a statement can cause an error, you should wrap that statement in a try block. For example, parsing from text to a number can cause an error. Any statements in the catch block will be executed only if an exception is thrown by a statement in the try block.
We don't have to do anything inside the catch block. Let's see this in action:
- Use your preferred coding tool to add a new Console Application to the
Chapter03workspace/solution namedHandlingExceptions. - In Visual Studio Code, select
HandlingExceptionsas the active OmniSharp project. - Type statements to prompt the user to enter their age and then write their age to the console, as shown in the following code:
WriteLine("Before parsing");
Write("What is your age? ");
string? input = ReadLine(); // or use "49" in a notebook
try
{
  int age = int.Parse(input);
  WriteLine($"You are {age} years old.");
}
catch
{
}
WriteLine("After parsing");
You will see the following compiler message:
Warning CS8604 Possible null reference argument for parameter 's' in 'int int.Parse(string s)'.By default in new .NET 6 projects, Microsoft has enabled nullable reference types so you will see many more compiler warnings like this. In production code, you should add code to check fornulland handle that possibility appropriately. In this book, I will not include thesenullchecks because the code samples are not designed to be production quality andnullchecks everywhere will clutter the code and use up valuable pages. In this case, it is impossible forinputto benullbecause the user must press Enter forReadLineto return and that will return an emptystring. You will see hundreds of more examples of potentiallynullvariables throughout the code samples in this book. Those warnings are safe to ignore for the book code examples. You only need similar warnings when you write your own production code. You will see more about null handling in Chapter 6, Implementing Interfaces and Inheriting Classes.This code includes two messages to indicate before parsing and after parsing to make clearer the flow through the code. These will be especially useful as the example code grows more complex.
- Run the code, enter
49, and view the result, as shown in the following output:Before parsing What is your age? 49 You are 49 years old. After parsing - Run the code, enter
Kermit, and view the result, as shown in the following output:Before parsing What is your age? Kermit After parsing
When the code was executed, the error exception was caught and the default message and stack trace were not output, and the console application continued running. This is better than the default behavior, but it might be useful to see the type of error that occurred.
Good Practice: You should never use an empty catch statement like this in production code because it "swallows" exceptions and hides potential problems. You should at least log the exception if you cannot or do not want to handle it properly, or rethrow it so that higher-level code can decide instead. You will learn about logging in Chapter 4, Writing, Debugging, and Testing Functions.
Catching all exceptions
To get information about any type of exception that might occur, you can declare a variable of type System.Exception to the catch block:
- Add an exception variable declaration to the
catchblock and use it to write information about the exception to the console, as shown in the following code:catch (Exception ex) { WriteLine($"{ex.GetType()} says {ex.Message}"); } - Run the code, enter
Kermitagain, and view the result, as shown in the following output:Before parsing What is your age? Kermit System.FormatException says Input string was not in a correct format. After parsing
Catching specific exceptions
Now that we know which specific type of exception occurred, we can improve our code by catching just that type of exception and customizing the message that we display to the user:
- Leave the existing
catchblock, and above it, add a newcatchblock for the format exception type, as shown in the following highlighted code:catch (FormatException) { WriteLine("The age you entered is not a valid number format."); } catch (Exception ex) { WriteLine($"{ex.GetType()} says {ex.Message}"); } - Run the code, enter
Kermitagain, and view the result, as shown in the following output:Before parsing What is your age? Kermit The age you entered is not a valid number format. After parsingThe reason we want to leave the more general catch below is that there might be other types of exceptions that can occur.
- Run the code, enter
9876543210, and view the result, as shown in the following output:Before parsing What is your age? 9876543210 System.OverflowException says Value was either too large or too small for an Int32. After parsingLet's add another
catchblock for this type of exception. - Leave the existing
catchblocks, and add a newcatchblock for the overflow exception type, as shown in the following highlighted code:catch (OverflowException) { WriteLine("Your age is a valid number format but it is either too big or small."); } catch (FormatException) { WriteLine("The age you entered is not a valid number format."); } - Run the code, enter
9876543210, and view the result, as shown in the following output:Before parsing What is your age? 9876543210 Your age is a valid number format but it is either too big or small. After parsing
The order in which you catch exceptions is important. The correct order is related to the inheritance hierarchy of the exception types. You will learn about inheritance in Chapter 5, Building Your Own Types with Object-Oriented Programming. However, don't worry too much about this—the compiler will give you build errors if you get exceptions in the wrong order anyway.
Good Practice: Avoid over-catching exceptions. They should often be allowed to propagate up the call stack to be handled at a level where more information is known about the circumstances that could change the logic of how they should be handled. You will learn about this in Chapter 4, Writing, Debugging, and Testing Functions.
Catching with filters
You can also add filters to a catch statement using the when keyword, as shown in the following code:
Write("Enter an amount: ");
string? amount = ReadLine();
try
{
  decimal amountValue = decimal.Parse(amount);
}
catch (FormatException) when (amount.Contains("$"))
{
  WriteLine("Amounts cannot use the dollar sign!");
}
catch (FormatException)
{
  WriteLine("Amounts must only contain digits!");
}
Checking for overflow
Earlier, we saw that when casting between number types, it was possible to lose information, for example, when casting from a long variable to an int variable. If the value stored in a type is too big, it will overflow.
Throwing overflow exceptions with the checked statement
The checked statement tells .NET to throw an exception when an overflow happens instead of allowing it to happen silently, which is done by default for performance reasons.
We will set the initial value of an int variable to its maximum value minus one. Then, we will increment it several times, outputting its value each time. Once it gets above its maximum value, it overflows to its minimum value and continues incrementing from there. Let's see this in action:
- Use your preferred coding tool to add a new Console Application to the
Chapter03workspace/solution namedCheckingForOverflow. - In Visual Studio Code, select
CheckingForOverflowas the active OmniSharp project. - In
Program.cs, type statements to declare and assign an integer to one less than its maximum possible value, and then increment it and write its value to the console three times, as shown in the following code:int x = int.MaxValue - 1; WriteLine($"Initial value: {x}"); x++; WriteLine($"After incrementing: {x}"); x++; WriteLine($"After incrementing: {x}"); x++; WriteLine($"After incrementing: {x}"); - Run the code and view the result that shows the value overflowing silently and wrapping around to large negative values, as shown in the following output:
Initial value: 2147483646 After incrementing: 2147483647 After incrementing: -2147483648 After incrementing: -2147483647 - Now, let's get the compiler to warn us about the overflow by wrapping the statements using a
checkedstatement block, as shown highlighted in the following code:checked { int x = int.MaxValue - 1; WriteLine($"Initial value: {x}"); x++; WriteLine($"After incrementing: {x}"); x++; WriteLine($"After incrementing: {x}"); x++; WriteLine($"After incrementing: {x}"); } - Run the code and view the result that shows the overflow being checked and causing an exception to be thrown, as shown in the following output:
Initial value: 2147483646 After incrementing: 2147483647 Unhandled Exception: System.OverflowException: Arithmetic operation resulted in an overflow. - Just like any other exception, we should wrap these statements in a
trystatement block and display a nicer error message for the user, as shown in the following code:try { // previous code goes here } catch (OverflowException) { WriteLine("The code overflowed but I caught the exception."); } - Run the code and view the result, as shown in the following output:
Initial value: 2147483646
After incrementing: 2147483647
The code overflowed but I caught the exception.
Disabling compiler overflow checks with the unchecked statement
The previous section was about the default overflow behavior at runtime and how to use the checked statement to change that behavior. This section is about compile time overflow behavior and how to use the unchecked statement to change that behavior.
A related keyword is unchecked. This keyword switches off overflow checks performed by the compiler within a block of code. Let's see how to do this:
- Type the following statement at the end of the previous statements. The compiler will not compile this statement because it knows it would overflow:
int y = int.MaxValue + 1; - Hover your mouse pointer over the error, and note a compile-time check is shown as an error message, as shown in Figure 3.1:
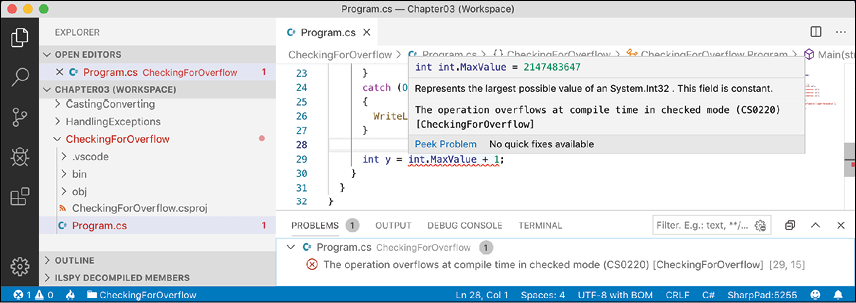
Figure 3.1: A compile-time check in the PROBLEMS window
- To disable compile-time checks, wrap the statement in an
uncheckedblock, write the value ofyto the console, decrement it, and repeat, as shown in the following code:unchecked { int y = int.MaxValue + 1; WriteLine($"Initial value: {y}"); y--; WriteLine($"After decrementing: {y}"); y--; WriteLine($"After decrementing: {y}"); } - Run the code and view the results, as shown in the following output:
Initial value: -2147483648
After decrementing: 2147483647
After decrementing: 2147483646
Of course, it would be rare that you would want to explicitly switch off a check like this because it allows an overflow to occur. But perhaps you can think of a scenario where you might want that behavior.
Practicing and exploring
Test your knowledge and understanding by answering some questions, get some hands-on practice, and explore with deeper research into this chapter's topics.
Exercise 3.1 – Test your knowledge
Answer the following questions:
- What happens when you divide an
intvariable by0? - What happens when you divide a
doublevariable by0? - What happens when you overflow an
intvariable, that is, set it to a value beyond its range? - What is the difference between
x = y++;andx = ++y;? - What is the difference between
break,continue, andreturnwhen used inside a loop statement? - What are the three parts of a
forstatement and which of them are required? - What is the difference between the
=and==operators? - Does the following statement compile?
for ( ; true; ) ; - What does the underscore
_represent in aswitchexpression? - What interface must an object implement to be enumerated over by using the
foreachstatement?
Exercise 3.2 – Explore loops and overflow
What will happen if this code executes?
int max = 500;
for (byte i = 0; i < max; i++)
{
  WriteLine(i);
}
Create a console application in Chapter03 named Exercise02 and enter the preceding code. Run the console application and view the output. What happens?
What code could you add (don't change any of the preceding code) to warn us about the problem?
Exercise 3.3 – Practice loops and operators
FizzBuzz is a group word game for children to teach them about division. Players take turns to count incrementally, replacing any number divisible by three with the word fizz, any number divisible by five with the word buzz, and any number divisible by both with fizzbuzz.
Create a console application in Chapter03 named Exercise03 that outputs a simulated FizzBuzz game counting up to 100. The output should look something like Figure 3.2:
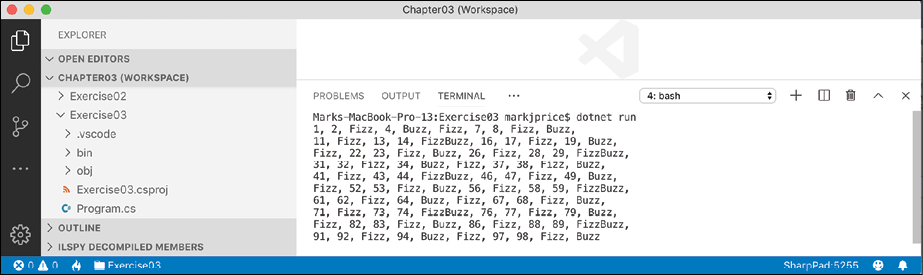
Figure 3.2: A simulated FizzBuzz game output
Exercise 3.4 – Practice exception handling
Create a console application in Chapter03 named Exercise04 that asks the user for two numbers in the range 0-255 and then divides the first number by the second:
Enter a number between 0 and 255: 100
Enter another number between 0 and 255: 8
100 divided by 8 is 12
Write exception handlers to catch any thrown errors, as shown in the following output:
Enter a number between 0 and 255: apples
Enter another number between 0 and 255: bananas
FormatException: Input string was not in a correct format.
Exercise 3.5 – Test your knowledge of operators
What are the values of x and y after the following statements execute?
- Increment and addition operators:
x = 3; y = 2 + ++x; - Binary shift operators:
x = 3 << 2; y = 10 >> 1; - Bitwise operators:
x = 10 & 8;
y = 10 | 7;
Exercise 3.6 – Explore topics
Use the links on the following page to learn about the topics covered in this chapter in more detail:
Summary
In this chapter, you experimented with some operators, learned how to branch and loop, how to convert between types, and how to catch exceptions.
You are now ready to learn how to reuse blocks of code by defining functions, how to pass values into them and get values back, and how to track down bugs in your code and squash them!