17
Building User Interfaces Using Blazor
This chapter is about using Blazor to build user interfaces. I will describe the different flavors of Blazor and their pros and cons.
You will learn how to build Blazor components that can execute their code on the web server or in the web browser. When hosted with Blazor Server, it uses SignalR to communicate needed updates to the user interface in the browser. When hosted with Blazor WebAssembly, the components execute their code in the client and must make HTTP calls to interact with the server.
In this chapter, we will cover the following topics:
- Understanding Blazor
- Comparing Blazor project templates
- Building components using Blazor Server
- Abstracting a service for a Blazor component
- Building components using Blazor WebAssembly
- Improving Blazor WebAssembly apps
Understanding Blazor
Blazor lets you build shared components and interactive web user interfaces using C# instead of JavaScript. In April 2019, Microsoft announced that Blazor "is no longer experimental and we are committing to ship it as a supported web UI framework, including support for running client side in the browser on WebAssembly." Blazor is supported on all modern browsers.
JavaScript and friends
Traditionally, any code that needs to execute in a web browser is written using the JavaScript programming language or a higher-level technology that transpiles (transforms or compiles) into JavaScript. This is because all browsers have supported JavaScript for about two decades, so it has become the lowest common denominator for implementing business logic on the client side.
JavaScript does have some issues, however. Although it has superficial similarities to C-style languages like C# and Java, it is actually very different once you dig beneath the surface. It is a dynamically typed pseudo-functional language that uses prototypes instead of class inheritance for object reuse. It might look human, but you will get a surprise when it's revealed to actually be a Skrull.
Wouldn't it be great if we could use the same language and libraries in a web browser as we do on the server side?
Silverlight – C# and .NET using a plugin
Microsoft made a previous attempt at achieving this goal with a technology named Silverlight. When Silverlight 2.0 was released in 2008, a C# and .NET developer could use their skills to build libraries and visual components that were executed in the web browser by the Silverlight plugin.
By 2011 and Silverlight 5.0, Apple's success with the iPhone and Steve Jobs' hatred of browser plugins like Flash eventually led to Microsoft abandoning Silverlight since, like Flash, Silverlight is banned from iPhones and iPads.
WebAssembly – a target for Blazor
A recent development in browsers has given Microsoft the opportunity to make another attempt. In 2017, the WebAssembly Consensus was completed, and all major browsers now support it: Chromium (Chrome, Edge, Opera, Brave), Firefox, and WebKit (Safari). Blazor is not supported by Microsoft's Internet Explorer because it is a legacy web browser.
WebAssembly (Wasm) is a binary instruction format for a virtual machine that provides a way to run code written in multiple languages on the web at near-native speed. Wasm is designed as a portable target for the compilation of high-level languages like C#.
Understanding Blazor hosting models
Blazor is a single programming or app model with multiple hosting models:
- Blazor Server runs on the server side, so the C# code that you write has full access to all resources that your business logic might need without needing to authenticate. It then uses SignalR to communicate user interface updates to the client side.
- The server must keep a live SignalR connection to each client and track the current state of every client, so Blazor Server does not scale well if you need to support lots of clients. It first shipped as part of ASP.NET Core 3.0 in September 2019 and is included with .NET 5.0 and later.
- Blazor WebAssembly runs on the client side, so the C# code that you write only has access to resources in the browser and it must make HTTP calls (that might require authentication) before it can access resources on the server. It first shipped as an extension to ASP.NET Core 3.1 in May 2020 and was versioned 3.2 because it is a Current release and therefore not covered by ASP.NET Core 3.1's Long Term Support. The Blazor WebAssembly 3.2 version used the Mono runtime and Mono libraries; .NET 5 and later versions use the Mono runtime and the .NET 5 libraries. "Blazor WebAssembly runs on a .NET IL interpreter without any JIT so it's not going to win any speed competitions. We have made some significant speed improvements though in .NET 5, and we expect to improve things further for .NET 6."—Daniel Roth
- .NET MAUI Blazor App, aka Blazor Hybrid, runs in the .NET process, renders its web UI to a web view control using a local interop channel, and is hosted in a .NET MAUI app. It is conceptually like Electron apps that use Node.js. We will see this hosting model in online chapter, Chapter 19, Building Mobile and Desktop Apps Using .NET MAUI.
This multi-host model means that, with careful planning, a developer can write Blazor components once, and then run them on the web server side, web client side, or within a desktop app.
Although Blazor Server is supported on Internet Explorer 11, Blazor WebAssembly is not.
Blazor WebAssembly has optional support for Progressive Web Apps (PWAs), meaning a website visitor can use a browser menu to add the app to their desktop and run the app offline.
Understanding Blazor components
It is important to understand that Blazor is used to create user interface components. Components define how to render the user interface, react to user events, and can be composed and nested, and compiled into a NuGet Razor class library for packaging and distribution.
For example, you might create a component named Rating.razor, as shown in the following markup:
<div>
@for (int i = 0; i < Maximum; i++)
{
  if (i < Value)
  {
    <span class="oi oi-star-filled" />
  }
  else
  {
    <span class="oi oi-star-empty" />
  }
}
</div>
@code {
  [Parameter]
  public byte Maximum { get; set; }
  [Parameter]
  public byte Value { get; set; }
}
Instead of a single file with both markup and an @code block, the code can be stored in a separate code-behind file named Rating.razor.cs. The class in this file must be partial and have the same name as the component.
You could then use the component on a web page, as shown in the following markup:
<h1>Review</h1>
<Rating id="rating" Maximum="5" Value="3" />
<textarea id="comment" />
There are many built-in Blazor components, including ones to set elements like <title> in the <head> section of a web page, and plenty of third parties who will sell you components for common purposes.
In the future, Blazor might not be limited to only creating user interface components using web technologies. Microsoft has an experimental technology known as Blazor Mobile Bindings that allows developers to use Blazor to build mobile user interface components. Instead of using HTML and CSS to build a web user interface, it uses XAML and .NET MAUI to build a cross-platform graphical user interface.
What is the difference between Blazor and Razor?
You might wonder why Blazor components use .razor as their file extension. Razor is a template markup syntax that allows the mixing of HTML and C#. Older technologies that support Razor syntax use the .cshtml file extension to indicate the mix of C# and HTML.
Razor syntax is used for:
- ASP.NET Core MVC views and partial views that use the
.cshtmlfile extension. The business logic is separated into a controller class that treats the view as a template to push the view model to, which then outputs it to a web page. - Razor Pages that use the
.cshtmlfile extension. The business logic can be embedded or separated into a file that uses the.cshtml.csfile extension. The output is a web page. - Blazor components that use the
.razorfile extension. The output is not a web page, although layouts can be used to wrap a component so it outputs as a web page, and the@pagedirective can be used to assign a route that defines the URL path to retrieve the component as a page.
Comparing Blazor project templates
One way to understand the choice between the Blazor Server and Blazor WebAssembly hosting models is to review the differences in their default project templates.
Reviewing the Blazor Server project template
Let us look at the default template for a Blazor Server project. Mostly you will see that it is the same as an ASP.NET Core Razor Pages template, with a few key additions:
- Use your preferred code editor to add a new project, as defined in the following list:
- Project template: Blazor Server App /
blazorserver - Workspace/solution file and folder:
PracticalApps - Project file and folder:
Northwind.BlazorServer - Other Visual Studio options: Authentication Type: None; Configure for HTTPS: selected; Enable Docker: cleared
- Project template: Blazor Server App /
- In Visual Studio Code, select
Northwind.BlazorServeras the active OmniSharp project. - Build the
Northwind.BlazorServerproject. - In the
Northwind.BlazorServerproject/folder, openNorthwind.BlazorServer.csprojand note that it is identical to an ASP.NET Core project that uses the Web SDK and targets .NET 6.0. - Open
Program.cs, and note it is almost identical to an ASP.NET Core project. Differences include the section that configures services, with its call to theAddServerSideBlazormethod, as shown highlighted in the following code:builder.Services.AddRazorPages(); builder.Services.AddServerSideBlazor(); builder.Services.AddSingleton<WeatherForecastService>(); - Also note the section for configuring the HTTP pipeline, which adds the calls to the
MapBlazorHubandMapFallbackToPagemethods that configure the ASP.NET Core app to accept incoming SignalR connections for Blazor components, while other requests fall back to a Razor Page named_Host.cshtml, as shown highlighted in the following code:app.UseRouting(); app.MapBlazorHub(); app.MapFallbackToPage("/_Host"); app.Run(); - In the
Pagesfolder, open_Host.cshtmland note that it sets a shared layout named_Layoutand renders a Blazor component of typeAppthat is prerendered on the server, as shown in the following markup:@page "/" @namespace Northwind.BlazorServer.Pages @addTagHelper *, Microsoft.AspNetCore.Mvc.TagHelpers @{ Layout = "_Layout"; } <component type="typeof(App)" render-mode="ServerPrerendered" /> - In the
Pagesfolder, open the shared layout file named_Layout.cshtml, as shown in the following markup:@using Microsoft.AspNetCore.Components.Web @namespace Northwind.BlazorServer.Pages @addTagHelper *, Microsoft.AspNetCore.Mvc.TagHelpers <!DOCTYPE html> <html lang="en"> <head> <meta charset="utf-8" /> <meta name="viewport" content="width=device-width, initial-scale=1.0" /> <base href="~/" /> <link rel="stylesheet" href="css/bootstrap/bootstrap.min.css" /> <link href="css/site.css" rel="stylesheet" /> <link href="Northwind.BlazorServer.styles.css" rel="stylesheet" /> <component type="typeof(HeadOutlet)" render-mode="ServerPrerendered" /> </head> <body> @RenderBody() <div id="blazor-error-ui"> <environment include="Staging,Production"> An error has occurred. This application may no longer respond until reloaded. </environment> <environment include="Development"> An unhandled exception has occurred. See browser dev tools for details. </environment> <a href="" class="reload">Reload</a> <a class="dismiss"> </a>
</div>
<script src="_framework/blazor.server.js"></script>
</body>
</html>
</a>
</div>
<script src="_framework/blazor.server.js"></script>
</body>
</html>
While reviewing the preceding markup, note the following:
<div id="blazor-error-ui">for showing Blazor errors that will appear as a yellow bar at the bottom of the web page when an error occurs- The script block for
blazor.server.jsmanages the SignalR connection back to the server
- In the
Northwind.BlazorServerfolder, openApp.razorand note that it defines aRouterfor all components found in the current assembly, as shown in the following code:<Router AppAssembly="@typeof(App).Assembly"> <Found Context="routeData"> <RouteView RouteData="@routeData" DefaultLayout="@typeof(MainLayout)" /> <FocusOnNavigate RouteData="@routeData" Selector="h1" /> </Found> <NotFound> <PageTitle>Not found</PageTitle> <LayoutView Layout="@typeof(MainLayout)"> <p>Sorry, there's nothing at this address.</p> </LayoutView> </NotFound> </Router>While reviewing the preceding markup, note the following:
- If a matching route is found, then
RouteViewis executed that sets the default layout for the component toMainLayoutand passes any route data parameters to the component. - If a matching route is not found, then
LayoutViewis executed that renders the internal markup (in this case, a simple paragraph element with a message telling the visitor there is nothing at this address) insideMainLayout.
- If a matching route is found, then
- In the
Sharedfolder, openMainLayout.razorand note that it defines<div>for a sidebar containing a navigation menu that is implemented by theNavMenu.razorcomponent file in this project, and an HTML5 element such as<main>and<article>for the content, as shown in the following code:@inherits LayoutComponentBase <PageTitle>Northwind.BlazorServer</PageTitle> <div class="page"> <div class="sidebar"> <NavMenu /> </div> <main> <div class="top-row px-4"> <a href="https://docs.microsoft.com/aspnet/" target="_blank">About</a> </div> <article class="content px-4"> @Body </article> </main> </div> - In the
Sharedfolder, openMainLayout.razor.cssand note that it contains isolated CSS styles for the component. - In the
Sharedfolder, openNavMenu.razorand note that it has three menu items for Home, Counter, and Fetch data. These are created by using a Microsoft-provided Blazor component namedNavLink, as shown in the following markup:<div class="top-row ps-3 navbar navbar-dark"> <div class="container-fluid"> <a class="navbar-brand" href="">Northwind.BlazorServer</a> <button title="Navigation menu" class="navbar-toggler" @onclick="ToggleNavMenu"> <span class="navbar-toggler-icon"></span> </button> </div> </div> <div class="@NavMenuCssClass" @onclick="ToggleNavMenu"> <nav class="flex-column"> <div class="nav-item px-3"> <NavLink class="nav-link" href="" Match="NavLinkMatch.All"> <span class="oi oi-home" aria-hidden="true"></span> Home </NavLink> </div> <div class="nav-item px-3"> <NavLink class="nav-link" href="counter"> <span class="oi oi-plus" aria-hidden="true"></span> Counter </NavLink> </div> <div class="nav-item px-3"> <NavLink class="nav-link" href="fetchdata"> <span class="oi oi-list-rich" aria-hidden="true"></span> Fetch data </NavLink> </div> </nav> </div> @code { private bool collapseNavMenu = true; private string? NavMenuCssClass => collapseNavMenu ? "collapse" : null; private void ToggleNavMenu() { collapseNavMenu = !collapseNavMenu; } } - In the
Pagesfolder, openFetchData.razorand note that it defines a component that fetches weather forecasts from an injected dependency weather service and then renders them in a table, as shown in the following code:@page "/fetchdata" <PageTitle>Weather forecast</PageTitle> @using Northwind.BlazorServer.Data @inject WeatherForecastService ForecastService <h1>Weather forecast</h1> <p>This component demonstrates fetching data from a service.</p> @if (forecasts == null) { <p><em>Loading...</em></p> } else { <table class="table"> <thead> <tr> <th>Date</th> <th>Temp. (C)</th> <th>Temp. (F)</th> <th>Summary</th> </tr> </thead> <tbody> @foreach (var forecast in forecasts) { <tr> <td>@forecast.Date.ToShortDateString()</td> <td>@forecast.TemperatureC</td> <td>@forecast.TemperatureF</td> <td>@forecast.Summary</td> </tr> } </tbody> </table> } @code { private WeatherForecast[]? forecasts; protected override async Task OnInitializedAsync() { forecasts = await ForecastService.GetForecastAsync(DateTime.Now); } } - In the
Datafolder, openWeatherForecastService.csand note that it is not a Web API controller class; it is just an ordinary class that returns random weather data, as shown in the following code:namespace Northwind.BlazorServer.Data { public class WeatherForecastService { private static readonly string[] Summaries = new[] { "Freezing", "Bracing", "Chilly", "Cool", "Mild", "Warm", "Balmy", "Hot", "Sweltering", "Scorching" }; public Task<WeatherForecast[]> GetForecastAsync(DateTime startDate) { return Task.FromResult(Enumerable.Range(1, 5) .Select(index => new WeatherForecast { Date = startDate.AddDays(index), TemperatureC = Random.Shared.Next(-20, 55), Summary = Summaries[Random.Shared.Next(Summaries.Length)] }).ToArray()); } } }
Understanding CSS and JavaScript isolation
Blazor components often need to provide their own CSS to apply styling or JavaScript for activities that cannot be performed purely in C#, like access to browser APIs. To ensure this does not conflict with site-level CSS and JavaScript, Blazor supports CSS and JavaScript isolation. If you have a component named Index.razor, simply create a CSS file named Index.razor.css. The styles defined within this file will override any other styles in the project.
Understanding Blazor routing to page components
The Router component that we saw in the App.razor file enables routing to components. The markup for creating an instance of a component looks like an HTML tag where the name of the tag is the component type. Components can be embedded on a web page using an element, for example, <Rating Stars="5" />, or can be routed to like a Razor Page or MVC controller.
How to define a routable page component
To create a routable page component, add the @page directive to the top of a component's .razor file, as shown in the following markup:
@page "customers"
The preceding code is the equivalent of an MVC controller decorated with the [Route] attribute, as shown in the following code:
[Route("customers")]
public class CustomersController
{
The Router component scans the assembly specifically in its AppAssembly parameter for components decorated with the [Route] attribute and registers their URL paths.
Any single-page component can have multiple @page directives to register multiple routes.
At runtime, the page component is merged with any specific layout that you have specified, just like an MVC view or Razor Page would be. By default, the Blazor Server project template defines MainLayout.razor as the layout for page components.
Good Practice: By convention, put routable page components in the Pages folder.
How to navigate Blazor routes
Microsoft provides a dependency service named NavigationManager that understands Blazor routing and the NavLink component.
The NavigateTo method is used to go to the specified URL.
How to pass route parameters
Blazor routes can include case-insensitive named parameters, and your code can most easily access the passed values by binding the parameter to a property in the code block using the [Parameter] attribute, as shown in the following markup:
@page "/customers/{country}"
<div>Country parameter as the value: @Country</div>
@code {
  [Parameter]
  public string Country { get; set; }
}
The recommended way to handle a parameter that should have a default value when it is missing is to suffix the parameter with ? and use the null coalescing operator in the OnParametersSet method, as shown in the following markup:
@page "/customers/{country?}"
<div>Country parameter as the value: @Country</div>
@code {
  [Parameter]
  public string Country { get; set; }
  protected override void OnParametersSet()
  {
    // if the automatically set property is null
    // set its value to USA
    Country = Country ?? "USA";
  }
}
Understanding base component classes
The OnParametersSet method is defined by the base class that components inherit from by default named ComponentBase, as shown in the following code:
using Microsoft.AspNetCore.Components;
public abstract class ComponentBase : IComponent, IHandleAfterRender, IHandleEvent
{
  // members not shown
}
ComponentBase has some useful methods that you can call and override, as shown in the following table:
|
Method(s) |
Description |
|
|
Call this method to execute a function on the associated renderer's synchronization context. |
|
|
Override these methods to invoke code after each time the component has been rendered. |
|
|
Override these methods to invoke code after the component has received its initial parameters from its parent in the render tree. |
|
|
Override these methods to invoke code after the component has received parameters and the values have been assigned to properties. |
|
|
Override this method to indicate if the component should render. |
|
|
Call this method to cause the component to re-render. |
Blazor components can have shared layouts in a similar way to MVC views and Razor Pages.
Create a .razor component file, but make it explicitly inherit from LayoutComponentBase, as shown in the following markup:
@inherits LayoutComponentBase
<div>
  ...
  @Body
  ...
</div>
The base class has a property named Body that you can render in the markup at the correct place within the layout.
Set a default layout for components in the App.razor file and its Router component. To explicitly set a layout for a component, use the @layout directive, as shown in the following markup:
@page "/customers"
@layout AlternativeLayout
<div>
  ...
</div>
How to use the navigation link component with routes
In HTML, you use the <a> element to define navigation links, as shown in the following markup:
<a href="/customers">Customers</a>
In Blazor, use the <NavLink> component, as shown in the following markup:
<NavLink href="/customers">Customers</NavLink>
The NavLink component is better than an anchor element because it automatically sets its class to active if its href is a match on the current location URL. If your CSS uses a different class name, then you can set the class name in the NavLink.ActiveClass property.
By default, in the matching algorithm, the href is a path prefix, so if NavLink has an href of /customers, as shown in the preceding code example, then it would match all the following paths and set them all to have the active class style:
/customers
/customers/USA
/customers/Germany/Berlin
To ensure that the matching algorithm only performs matches on all of the paths, set the Match parameter to NavLinkMatch.All, as shown in the following code:
<NavLink href="/customers" Match="NavLinkMatch.All">Customers</NavLink>
If you set other attributes such as target, they are passed through to the underlying <a> element that is generated.
Running the Blazor Server project template
Now that we have reviewed the project template and the important parts that are specific to Blazor Server, we can start the website and review its behavior:
- In the
Propertiesfolder, openlaunchSettings.json. - Modify the
applicationUrlto use port5000forHTTPand port5001forHTTPS, as shown highlighted in the following markup:"profiles": { "Northwind.BlazorServer": { "commandName": "Project", "dotnetRunMessages": true, "launchBrowser": true, "applicationUrl": "https://localhost:5001;http://localhost:5000", "environmentVariables": { "ASPNETCORE_ENVIRONMENT": "Development" } }, - Start the website.
- Start Chrome.
- Navigate to
https://localhost:5001/. - In the left navigation menu, click Fetch data, as shown in Figure 17.1:
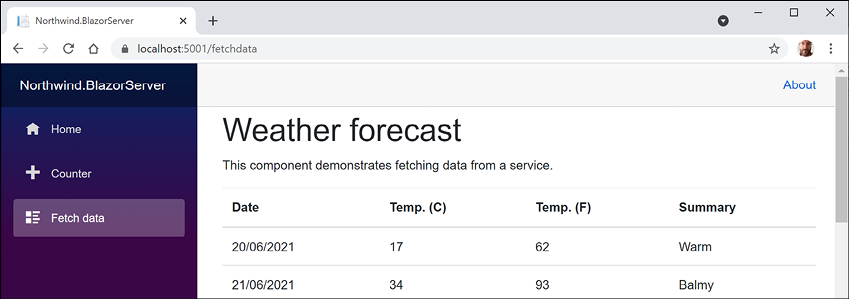
Figure 17.1: Fetching weather data into a Blazor Server app
- In the browser address bar, change the route to
/applesand note the missing message, as shown in Figure 17.2:
Figure 17.2: The missing component message
- Close Chrome and shut down the web server.
Reviewing the Blazor WebAssembly project template
Now we will create a Blazor WebAssembly project. I will not show code in the book if the code is the same as in a Blazor Server project:
- Use your preferred code editor to add a new project to the
PracticalAppssolution or workspace, as defined in the following list:- Project template: Blazor WebAssembly App /
blazorwasm - Switches:
--pwa --hosted - Workspace/solution file and folder:
PracticalApps - Project file and folder:
Northwind.BlazorWasm - Authentication Type: None
- Configure for HTTPS: checked
- ASP.NET Core hosted: checked
- Progressive Web Application: checked
While reviewing the generated folders and files, note that three projects are generated, as described in the following list:
Northwind.BlazorWasm.Clientis the Blazor WebAssembly project in theNorthwind.BlazorWasm\Clientfolder.Northwind.BlazorWasm.Serveris an ASP.NET Core project website in theNorthwind.BlazorWasm\Serverfolder for hosting the weather service that has the same implementation for returning random weather forecasts as before, but is implemented as a proper Web API controller class. The project file has project references toSharedandClient, and a package reference to support Blazor WebAssembly on the server side.Northwind.BlazorWasm.Sharedis a class library in theNorthwind.BlazorWasm\Sharedfolder that contains models for the weather service.
The folder structure is simplified, as shown in Figure 17.3:
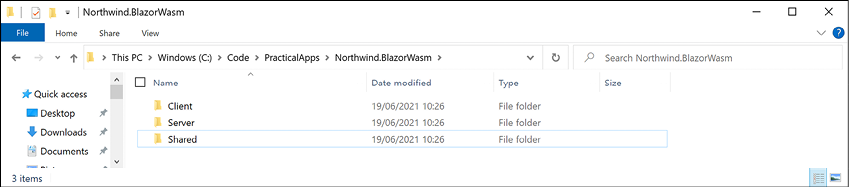
Figure 17.3: The folder structure for the Blazor WebAssembly project template
There are two ways to deploy a Blazor WebAssembly app. You could deploy just the
Clientproject by placing its published files in any static hosting web server. It could be configured to call the weather service that you created in Chapter 16, Building and Consuming Web Services, or you can deploy theServerproject, which references theClientapp and hosts both the weather service and the Blazor WebAssembly app. The app is placed in the server websitewwwrootfolder along with any other static assets. You can read more about these choices at the following link: https://docs.microsoft.com/en-us/aspnet/core/blazor/host-and-deploy/webassembly - Project template: Blazor WebAssembly App /
- In the
Clientfolder, openNorthwind.BlazorWasm.Client.csprojand note that it uses the Blazor WebAssembly SDK and references two WebAssembly packages and theSharedproject, as well as the service worker required for PWA support, as shown in the following markup:<Project Sdk="Microsoft.NET.Sdk.BlazorWebAssembly"> <PropertyGroup> <TargetFramework>net6.0</TargetFramework> <Nullable>enable</Nullable> <ImplicitUsings>enable</ImplicitUsings> <ServiceWorkerAssetsManifest>service-worker-assets.js </ServiceWorkerAssetsManifest> </PropertyGroup> <ItemGroup> <PackageReference Include= "Microsoft.AspNetCore.Components.WebAssembly" Version="6.0.0" /> <PackageReference Include= "Microsoft.AspNetCore.Components.WebAssembly.DevServer" Version="6.0.0" PrivateAssets="all" /> </ItemGroup> <ItemGroup> <ProjectReference Include= "..\Shared\Northwind.BlazorWasm.Shared.csproj" /> </ItemGroup> <ItemGroup> <ServiceWorker Include="wwwroot\service-worker.js" PublishedContent="wwwroot\service-worker.published.js" /> </ItemGroup> </Project> - In the
Clientfolder, openProgram.csand note that the host builder is forWebAssemblyinstead of server-side ASP.NET Core, and that it registers a dependency service for making HTTP requests, which is an extremely common requirement for Blazor WebAssembly apps, as shown in the following code:using Microsoft.AspNetCore.Components.Web; using Microsoft.AspNetCore.Components.WebAssembly.Hosting; using Northwind.BlazorWasm.Client; var builder = WebAssemblyHostBuilder.CreateDefault(args); builder.RootComponents.Add<App>("#app"); builder.RootComponents.Add<HeadOutlet>("head::after"); builder.Services.AddScoped(sp => new HttpClient { BaseAddress = new Uri(builder.HostEnvironment.BaseAddress) }); await builder.Build().RunAsync(); - In the
wwwrootfolder, openindex.htmland note themanifest.jsonandservice-worker.jsfiles supporting offline work, and theblazor.webassembly.jsscript that downloads all the NuGet packages for Blazor WebAssembly, as shown in the following markup:<!DOCTYPE html> <html> <head> <meta charset="utf-8" /> <meta name="viewport" content="width=device-width, initial-scale=1.0, maximum-scale=1.0, user-scalable=no" /> <title>Northwind.BlazorWasm</title> <base href="/" /> <link href="css/bootstrap/bootstrap.min.css" rel="stylesheet" /> <link href="css/app.css" rel="stylesheet" /> <link href="Northwind.BlazorWasm.Client.styles.css" rel="stylesheet" /> <link href="manifest.json" rel="manifest" /> <link rel="apple-touch-icon" sizes="512x512" href="icon-512.png" /> <link rel="apple-touch-icon" sizes="192x192" href="icon-192.png" /> </head> <body> <div id="app">Loading...</div> <div id="blazor-error-ui"> An unhandled error has occurred. <a href="" class="reload">Reload</a> <a class="dismiss"></a>
</div>
<script src="_framework/blazor.webassembly.js"></script>
<script>navigator.serviceWorker.register('service-worker.js');</script>
</body>
</html>
- Note that the following
.razorfiles are identical to those in a Blazor Server project:App.razorShared\MainLayout.razorShared\NavMenu.razorShared\SurveyPrompt.razorPages\Counter.razorPages\Index.razor
- In the
Pagesfolder, openFetchData.razorand note that the markup is like Blazor Server except for the injected dependency service for making HTTP requests, as shown highlighted in the following partial markup:@page "/fetchdata" @using Northwind.BlazorWasm.Shared @inject HttpClient Http <h1>Weather forecast</h1> ... @code { private WeatherForecast[]? forecasts; protected override async Task OnInitializedAsync() { forecasts = await Http.GetFromJsonAsync<WeatherForecast[]>("WeatherForecast"); } } - Start the
Northwind.BlazorWasm.Serverproject. - Note that the app has the same functionality as before. The Blazor component code is executing inside the browser instead of on the server. The weather service is running on the web server.
- Close Chrome and shut down the web server.
Building components using Blazor Server
In this section, we will build a component to list, create, and edit customers in the Northwind database. We will build it first for Blazor Server naively, and then refactor it to work with both Blazor Server and Blazor WebAssembly.
Defining and testing a simple component
We will add the new component to the existing Blazor Server project:
- In the
Northwind.BlazorServerproject (not theNorthwind.BlazorWasm.Serverproject), in thePagesfolder, add a new file namedCustomers.razor. In Visual Studio, the project item is named Razor Component.Good Practice: Component filenames must start with an uppercase letter, or you will have compile errors!
- Add statements to output a heading for the
Customerscomponent and define a code block that defines a property to store the name of a country, as shown in the following markup:<h3>Customers@(string.IsNullOrWhiteSpace(Country) ? " Worldwide" : " in " + Country)</h3> @code { [Parameter] public string? Country { get; set; } } - In the
Pagesfolder, in theIndex.razorcomponent, add statements to the bottom of the file to instantiate theCustomerscomponent twice, once passingGermanyas the country parameter, and once without setting the country, as shown in the following markup:<Customers Country="Germany" /> <Customers /> - Start the
Northwind.BlazorServerwebsite project. - Start Chrome.
- Navigate to
https://localhost:5001/and note theCustomerscomponents, as shown in Figure 17.4:
Figure 17.4: The Customers component with the Country parameter set to Germany and not set
- Close Chrome and shut down the web server.
Making the component a routable page component
It is simple to turn this component into a routable page component with a route parameter for the country:
- In the
Pagesfolder, in theCustomers.razorcomponent, add a statement at the top of the file to register/customersas its route with an optional country route parameter, as shown in the following markup:@page "/customers/{country?}" - In the
Sharedfolder, openNavMenu.razorand add two list item elements for our routable page component to show customers worldwide and in Germany that both use an icon of people, as shown in the following markup:<div class="nav-item px-3"> <NavLink class="nav-link" href="customers" Match="NavLinkMatch.All"> <span class="oi oi-people" aria-hidden="true"></span> Customers Worldwide </NavLink> </div> <div class="nav-item px-3"> <NavLink class="nav-link" href="customers/Germany"> <span class="oi oi-people" aria-hidden="true"></span> Customers in Germany </NavLink> </div>We used an icon of people for the customers menu item. You can see the other available icons at the following link: https://iconify.design/icon-sets/oi/
- Start the website project.
- Start Chrome.
- Navigate to
https://localhost:5001/. - In the left navigation menu, click Customers in Germany, and note that the country name is correctly passed to the page component and that the component uses the same shared layout as the other page components, like
Index.razor. - Close Chrome and shut down the web server.
Getting entities into a component
Now that you have seen the minimum implementation of a component, we can add some useful functionality to it. In this case, we will use the Northwind database context to fetch customers from the database:
- In
Northwind.BlazorServer.csproj, add a reference to the Northwind database context project for either SQL Server or SQLite, as shown in the following markup:<ItemGroup> <!-- change Sqlite to SqlServer if you prefer --> <ProjectReference Include="..\Northwind.Common.DataContext.Sqlite \Northwind.Common.DataContext.Sqlite.csproj" /> </ItemGroup> - Build the
Northwind.BlazorServerproject. - In
Program.cs, import the namespace for working with the Northwind database context, as shown in the following code:using Packt.Shared; // AddNorthwindContext extension method - In the section that configures services, add a statement to register the Northwind database context in the dependency services collection, as shown in the following code:
builder.Services.AddNorthwindContext(); - Open
_Imports.razorand import namespaces for working with the Northwind entities so that Blazor components that we build do not need to import the namespaces individually, as shown in the following markup:@using Packt.Shared @* Northwind entities *@The
_Imports.razorfile only applies to.razorfiles. If you use code-behind.csfiles to implement component code, then they must have namespaces imported separately or use global usings to implicitly import the namespace. - In the
Pagesfolder, inCustomers.razor, add statements to inject the Northwind database context and then use it to output a table of all customers, as shown in the following code:@using Microsoft.EntityFrameworkCore @* ToListAsync extension method *@ @page "/customers/{country?}" @inject NorthwindContext db <h3>Customers @(string.IsNullOrWhiteSpace(Country) ? "Worldwide" : "in " + Country)</h3> @if (customers == null) { <p><em>Loading...</em></p> } else { <table class="table"> <thead> <tr> <th>Id</th> <th>Company Name</th> <th>Address</th> <th>Phone</th> <th></th> </tr> </thead> <tbody> @foreach (Customer c in customers) { <tr> <td>@c.CustomerId</td> <td>@c.CompanyName</td> <td> @c.Address<br/> @c.City<br/> @c.PostalCode<br/> @c.Country </td> <td>@c.Phone</td> <td> <a class="btn btn-info" href="editcustomer/@c.CustomerId"> <i class="oi oi-pencil"></i></a> <a class="btn btn-danger" href="deletecustomer/@c.CustomerId"> <i class="oi oi-trash"></i></a> </td> </tr> } </tbody> </table> } @code { [Parameter] public string? Country { get; set; } private IEnumerable<Customer>? customers; protected override async Task OnParametersSetAsync() { if (string.IsNullOrWhiteSpace(Country)) { customers = await db.Customers.ToListAsync(); } else { customers = await db.Customers .Where(c => c.Country == Country).ToListAsync(); } } } - Start the
Northwind.BlazorServerproject website. - Start Chrome.
- Navigate to
https://localhost:5001/. - In the left navigation menu, click Customers Worldwide, and note that the table of customers loads from the database and renders in the web page, as shown in Figure 17.5:
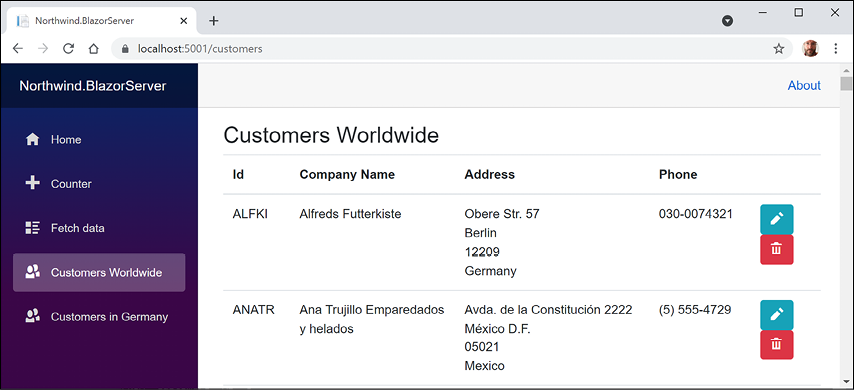
Figure 17.5: The list of customers worldwide
- In the left navigation menu, click Customers in Germany, and note that the table of customers is filtered to only show German customers.
- In the browser address bar, change
GermanytoUK, and note that the table of customers is filtered to only show UK customers. - In the left navigation menu, click Home, and note that the customers component also works correctly when used as an embedded component on a page.
- Click any of the edit or delete buttons and note that they return a message saying
Sorry, there's nothing at this address. because we have not yet implemented that functionality. - Close the browser.
- Shut down the web server.
Abstracting a service for a Blazor component
Currently, the Blazor component directly calls the Northwind database context to fetch the customers. This works fine in Blazor Server since the component executes on the server. But this component would not work when hosted in Blazor WebAssembly.
We will now create a local dependency service to enable better reuse of the components:
- In the
Northwind.BlazorServerproject, in theDatafolder, add a new file namedINorthwindService.cs. (The Visual Studio project item template is named Interface.) - Modify its contents to define a contract for a local service that abstracts CRUD operations, as shown in the following code:
namespace Packt.Shared; public interface INorthwindService { Task<List<Customer>> GetCustomersAsync(); Task<List<Customer>> GetCustomersAsync(string country); Task<Customer?> GetCustomerAsync(string id); Task<Customer> CreateCustomerAsync(Customer c); Task<Customer> UpdateCustomerAsync(Customer c); Task DeleteCustomerAsync(string id); } - In the
Datafolder, add a new file namedNorthwindService.csand modify its contents to implement theINorthwindServiceinterface by using the Northwind database context, as shown in the following code:using Microsoft.EntityFrameworkCore; namespace Packt.Shared; public class NorthwindService : INorthwindService { private readonly NorthwindContext db; public NorthwindService(NorthwindContext db) { this.db = db; } public Task<List<Customer>> GetCustomersAsync() { return db.Customers.ToListAsync(); } public Task<List<Customer>> GetCustomersAsync(string country) { return db.Customers.Where(c => c.Country == country).ToListAsync(); } public Task<Customer?> GetCustomerAsync(string id) { return db.Customers.FirstOrDefaultAsync (c => c.CustomerId == id); } public Task<Customer> CreateCustomerAsync(Customer c) { db.Customers.Add(c); db.SaveChangesAsync(); return Task.FromResult(c); } public Task<Customer> UpdateCustomerAsync(Customer c) { db.Entry(c).State = EntityState.Modified; db.SaveChangesAsync(); return Task.FromResult(c); } public Task DeleteCustomerAsync(string id) { Customer? customer = db.Customers.FirstOrDefaultAsync (c => c.CustomerId == id).Result; if (customer == null) { return Task.CompletedTask; } else { db.Customers.Remove(customer); return db.SaveChangesAsync(); } } } - In
Program.cs, in the section that configures services, add a statement to registerNorthwindServiceas a transient service that implements theINorthwindServiceinterface, as shown in the following code:builder.Services.AddTransient<INorthwindService, NorthwindService>(); - In the
Pagesfolder, openCustomers.razorand replace the directive to inject the Northwind database context with a directive to inject the registered Northwind service, as shown in the following code:@inject INorthwindService service - Modify the
OnParametersSetAsyncmethod to call the service, as shown highlighted in the following code:protected override async Task OnParametersSetAsync() { if (string.IsNullOrWhiteSpace(Country)) { customers = await service.GetCustomersAsync(); } else { customers = await service.GetCustomersAsync(Country); } } - Start the
Northwind.BlazorServerwebsite project and confirm that it retains the same functionality as before.
Defining forms using the EditForm component
Microsoft provides ready-made components for building forms. We will use them to provide, create, and edit functionality for customers.
Microsoft provides the EditForm component and several form elements such as InputText to make it easier to use forms with Blazor.
EditForm can have a model set to bind it to an object with properties and event handlers for custom validation, as well as recognizing standard Microsoft validation attributes on the model class, as shown in the following code:
<EditForm Model="@customer" OnSubmit="ExtraValidation">
  <DataAnnotationsValidator />
  <ValidationSummary />
  <InputText id="name" @bind-Value="customer.CompanyName" />
  <button type="submit">Submit</button>
</EditForm>
@code {
  private Customer customer = new();
  private void ExtraValidation()
  {
    // perform any extra validation
  }
}
As an alternative to a ValidationSummary component, you can use the ValidationMessage component to show a message next to an individual form element.
Building and using a customer form component
Now we can create a shared component to create or edit a customer:
- In the
Sharedfolder, create a new file namedCustomerDetail.razor. (The Visual Studio project item template is named Razor Component.) This component will be reused on multiple page components. - Modify its contents to define a form to edit the properties of a customer, as shown in the following code:
<EditForm Model="@Customer" OnValidSubmit="@OnValidSubmit"> <DataAnnotationsValidator /> <div class="form-group"> <div> <label>Customer Id</label> <div> <InputText @bind-Value="@Customer.CustomerId" /> <ValidationMessage For="@(() => Customer.CustomerId)" /> </div> </div> </div> <div class="form-group "> <div> <label>Company Name</label> <div> <InputText @bind-Value="@Customer.CompanyName" /> <ValidationMessage For="@(() => Customer.CompanyName)" /> </div> </div> </div> <div class="form-group "> <div> <label>Address</label> <div> <InputText @bind-Value="@Customer.Address" /> <ValidationMessage For="@(() => Customer.Address)" /> </div> </div> </div> <div class="form-group "> <div> <label>Country</label> <div> <InputText @bind-Value="@Customer.Country" /> <ValidationMessage For="@(() => Customer.Country)" /> </div> </div> </div> <button type="submit" class="btn btn-@ButtonStyle"> @ButtonText </button> </EditForm> @code { [Parameter] public Customer Customer { get; set; } = null!; [Parameter] public string ButtonText { get; set; } = "Save Changes"; [Parameter] public string ButtonStyle { get; set; } = "info"; [Parameter] public EventCallback OnValidSubmit { get; set; } } - In the
Pagesfolder, create a new file namedCreateCustomer.razor. This will be a routable page component. - Modify its contents to use the customer detail component to create a new customer, as shown in the following code:
@page "/createcustomer" @inject INorthwindService service @inject NavigationManager navigation <h3>Create Customer</h3> <CustomerDetail ButtonText="Create Customer" Customer="@customer" OnValidSubmit="@Create" /> @code { private Customer customer = new(); private async Task Create() { await service.CreateCustomerAsync(customer); navigation.NavigateTo("customers"); } } - In the
Pagesfolder, open the file namedCustomers.razorand after the<h3>element, add a<div>element with a button to navigate to thecreatecustomerpage component, as shown in the following markup:<div class="form-group"> <a class="btn btn-info" href="createcustomer"> <i class="oi oi-plus"></i> Create New</a> </div> - In the
Pagesfolder, create a new file namedEditCustomer.razorand modify its contents to use the customer detail component to edit and save changes to an existing customer, as shown in the following code:@page "/editcustomer/{customerid}" @inject INorthwindService service @inject NavigationManager navigation <h3>Edit Customer</h3> <CustomerDetail ButtonText="Update" Customer="@customer" OnValidSubmit="@Update" /> @code { [Parameter] public string CustomerId { get; set; } private Customer? customer = new(); protected async override Task OnParametersSetAsync() { customer = await service.GetCustomerAsync(CustomerId); } private async Task Update() { if (customer is not null) { await service.UpdateCustomerAsync(customer); } navigation.NavigateTo("customers"); } } - In the
Pagesfolder, create a new file namedDeleteCustomer.razorand modify its contents to use the customer detail component to show the customer that is about to be deleted, as shown in the following code:@page "/deletecustomer/{customerid}" @inject INorthwindService service @inject NavigationManager navigation <h3>Delete Customer</h3> <div class="alert alert-danger"> Warning! This action cannot be undone! </div> <CustomerDetail ButtonText="Delete Customer" ButtonStyle="danger" Customer="@customer" OnValidSubmit="@Delete" /> @code { [Parameter] public string CustomerId { get; set; } private Customer? customer = new(); protected async override Task OnParametersSetAsync() { customer = await service.GetCustomerAsync(CustomerId); } private async Task Delete() { if (customer is not null) { await service.DeleteCustomerAsync(CustomerId); } navigation.NavigateTo("customers"); } }
Testing the customer form component
Now we can test the customer form component and how to use it to create, edit, and delete customers:
- Start the
Northwind.BlazorServerwebsite project. - Start Chrome.
- Navigate to
https://localhost:5001/. - Navigate to Customers Worldwide and click the + Create New button.
- Enter an invalid Customer Id like
ABCDEF, leave the textbox, and note the validation message, as shown in Figure 17.6: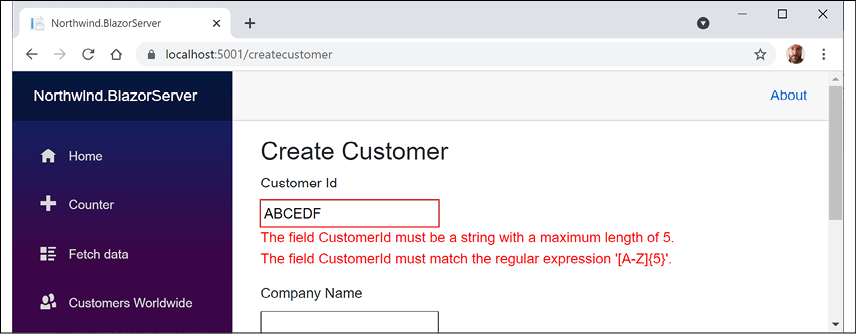
Figure 17.6: Creating a new customer and entering an invalid customer ID
- Change the Customer Id to
ABCDE, enter values for the other textboxes, and click the Create Customer button. - When the list of customers appears, scroll down to the bottom of the page to see the new customer.
- On the ABCDE customer row, click the Edit icon button, change the address, click the Update button, and note that the customer record has been updated.
- On the ABCDE customer row, click the Delete icon button, note the warning, click the Delete Customer button, and note that the customer record has been deleted.
- Close Chrome and shut down the web server.
Building components using Blazor WebAssembly
Now we will reuse the same functionality in the Blazor WebAssembly project so that you can clearly see the key differences.
Since we abstracted the local dependency service in the INorthwindService interface, we will be able to reuse all the components and that interface, as well as the entity model classes. The only part that will need to be rewritten is the implementation of the NorthwindService class. Instead of directly calling the NorthwindContext class, it will call a customer Web API controller on the server side, as shown in Figure 17.7:
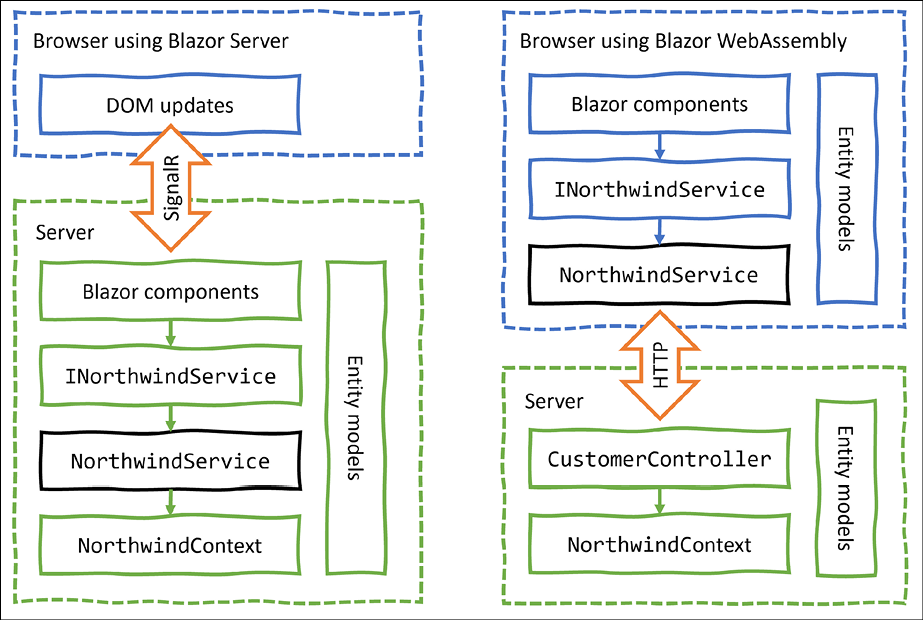
Figure 17.7: Comparing implementations using Blazor Server and Blazor WebAssembly
Configuring the server for Blazor WebAssembly
First, we need a web service that the client app can call to get and manage customers. If you completed Chapter 16, Building and Consuming Web Services, then you have a customer service in the Northwind.WebApi service project that you could use. However, to keep this chapter more self-contained, let's build a customer Web API controller in the Northwind.BlazorWasm.Server project:
Warning! Unlike previous projects, relative path references for shared projects like the entity models and the database are two levels up, for example, "..\..".
- In the
Serverproject/folder, openNorthwind.BlazorWasm.Server.csprojand add statements to reference the Northwind database context project for either SQL Server or SQLite, as shown in the following markup:<ItemGroup> <!-- change Sqlite to SqlServer if you prefer --> <ProjectReference Include="..\..\Northwind.Common.DataContext.Sqlite \Northwind.Common.DataContext.Sqlite.csproj" /> </ItemGroup> - Build the
Northwind.BlazorWasm.Serverproject. - In the
Serverproject/folder, openProgram.csand add a statement to import the namespace for working with the Northwind database context, as shown in the following code:using Packt.Shared; - In the section that configures services, add a statement to register the Northwind database context for either SQL Server or SQLite, as shown in the following code:
// if using SQL Server builder.Services.AddNorthwindContext(); // if using SQLite builder.Services.AddNorthwindContext( relativePath: Path.Combine("..", "..")); - In the
Serverproject, in theControllersfolder, create a file namedCustomersController.csand add statements to define a Web API controller class with similar CRUD methods as before, as shown in the following code:using Microsoft.AspNetCore.Mvc; // [ApiController], [Route] using Microsoft.EntityFrameworkCore; // ToListAsync, FirstOrDefaultAsync using Packt.Shared; // NorthwindContext, Customer namespace Northwind.BlazorWasm.Server.Controllers; [ApiController] [Route("api/[controller]")] public class CustomersController : ControllerBase { private readonly NorthwindContext db; public CustomersController(NorthwindContext db) { this.db = db; } [HttpGet] public async Task<List<Customer>> GetCustomersAsync() { return await db.Customers.ToListAsync(); } [HttpGet("in/{country}")] // different path to disambiguate public async Task<List<Customer>> GetCustomersAsync(string country) { return await db.Customers .Where(c => c.Country == country).ToListAsync(); } [HttpGet("{id}")] public async Task<Customer?> GetCustomerAsync(string id) { return await db.Customers .FirstOrDefaultAsync(c => c.CustomerId == id); } [HttpPost] public async Task<Customer?> CreateCustomerAsync (Customer customerToAdd) { Customer? existing = await db.Customers.FirstOrDefaultAsync (c => c.CustomerId == customerToAdd.CustomerId); if (existing == null) { db.Customers.Add(customerToAdd); int affected = await db.SaveChangesAsync(); if (affected == 1) { return customerToAdd; } } return existing; } [HttpPut] public async Task<Customer?> UpdateCustomerAsync(Customer c) { db.Entry(c).State = EntityState.Modified; int affected = await db.SaveChangesAsync(); if (affected == 1) { return c; } return null; } [HttpDelete("{id}")] public async Task<int> DeleteCustomerAsync(string id) { Customer? c = await db.Customers.FirstOrDefaultAsync (c => c.CustomerId == id); if (c != null) { db.Customers.Remove(c); int affected = await db.SaveChangesAsync(); return affected; } return 0; } }
Configuring the client for Blazor WebAssembly
Second, we can reuse the components from the Blazor Server project. Since the components will be identical, we can copy them and only need to make changes to the local implementation of the abstracted Northwind service:
- In the
Clientproject, openNorthwind.BlazorWasm.Client.csprojand add statements to reference the Northwind entity models library project (not the database context project) for either SQL Server or SQLite, as shown in the following markup:<ItemGroup> <!-- change Sqlite to SqlServer if you prefer --> <ProjectReference Include="..\..\Northwind.Common.EntityModels.Sqlite\ Northwind.Common.EntityModels.Sqlite.csproj" /> </ItemGroup> - Build the
Northwind.BlazorWasm.Clientproject. - In the
Clientproject, open_Imports.razorand import thePackt.Sharednamespace to make the Northwind entity model types available in all Blazor components, as shown in the following code:@using Packt.Shared - In the
Clientproject, in theSharedfolder, openNavMenu.razorand add aNavLinkelement for customers worldwide and in France, as shown in the following markup:<div class="nav-item px-3"> <NavLink class="nav-link" href="customers" Match="NavLinkMatch.All"> <span class="oi oi-people" aria-hidden="true"></span> Customers Worldwide </NavLink> </div> <div class="nav-item px-3"> <NavLink class="nav-link" href="customers/France"> <span class="oi oi-people" aria-hidden="true"></span> Customers in France </NavLink> </div> - Copy the
CustomerDetail.razorcomponent from theNorthwind.BlazorServerproject'sSharedfolder to theNorthwind.BlazorWasmClientproject'sSharedfolder. - Copy the following routable page components from the
Northwind.BlazorServerproject'sPagesfolder to theNorthwind.BlazorWasmClientproject'sPagesfolder:CreateCustomer.razorCustomers.razorDeleteCustomer.razorEditCustomer.razor
- In the
Clientproject, create aDatafolder. - Copy the
INorthwindService.csfile from theNorthwind.BlazorServerproject'sDatafolder into theClientproject'sDatafolder. - In the
Datafolder, add a new file namedNorthwindService.cs. - Modify its contents to implement the
INorthwindServiceinterface by using anHttpClientto call the customers Web API service, as shown in the following code:using System.Net.Http.Json; // GetFromJsonAsync, ReadFromJsonAsync using Packt.Shared; // Customer namespace Northwind.BlazorWasm.Client.Data { public class NorthwindService : INorthwindService { private readonly HttpClient http; public NorthwindService(HttpClient http) { this.http = http; } public Task<List<Customer>> GetCustomersAsync() { return http.GetFromJsonAsync <List<Customer>>("api/customers"); } public Task<List<Customer>> GetCustomersAsync(string country) { return http.GetFromJsonAsync <List<Customer>>($"api/customers/in/{country}"); } public Task<Customer> GetCustomerAsync(string id) { return http.GetFromJsonAsync <Customer>($"api/customers/{id}"); } public async Task<Customer> CreateCustomerAsync (Customer c) { HttpResponseMessage response = await http.PostAsJsonAsync("api/customers", c); return await response.Content .ReadFromJsonAsync<Customer>(); } public async Task<Customer> UpdateCustomerAsync(Customer c) { HttpResponseMessage response = await http.PutAsJsonAsync("api/customers", c); return await response.Content .ReadFromJsonAsync<Customer>(); } public async Task DeleteCustomerAsync(string id) { HttpResponseMessage response = await http.DeleteAsync($"api/customers/{id}"); } } } - In
Program.cs, import thePackt.SharedandNorthwind.BlazorWasm.Client.Datanamespaces. - In the section for configuring services, add a statement to register the Northwind dependency service, as shown in the following code:
builder.Services.AddTransient<INorthwindService, NorthwindService>();
Testing the Blazor WebAssembly components and service
Now we can start the Blazor WebAssembly server hosting project to test if the components work with the abstracted Northwind service that calls the customers Web API service:
- In the
Serverproject/folder, start theNorthwind.BlazorWasm.Serverwebsite project. - Start Chrome, show Developer Tools, and select the Network tab.
- Navigate to
https://localhost:5001/. Your port number will be different since it is randomly assigned. View the console output to discover what it is. - Select the Console tab and note that Blazor WebAssembly has loaded .NET assemblies into the browser cache and that they take about 10 MB of space, as shown in Figure 17.8:
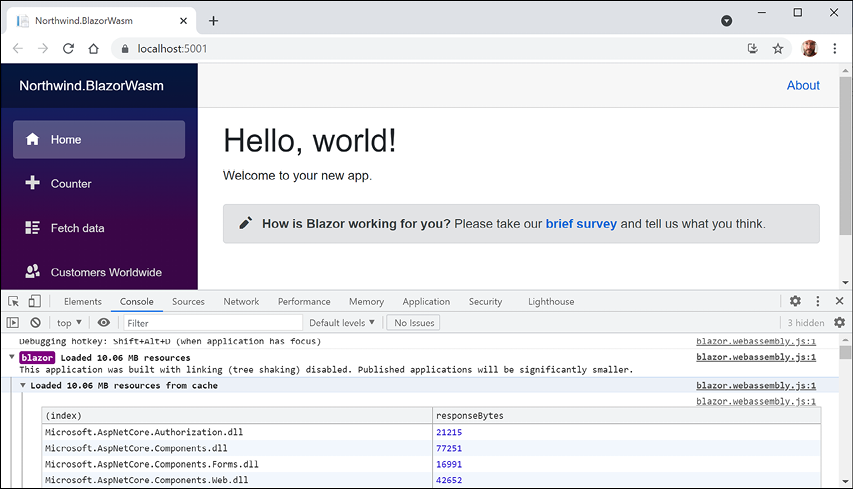
Figure 17.8: Blazor WebAssembly loading .NET assemblies into the browser cache
- Select the Network tab.
- In the left navigation menu, click Customers Worldwide and note the HTTP
GETrequest with the JSON response containing all customers, as shown in Figure 17.9: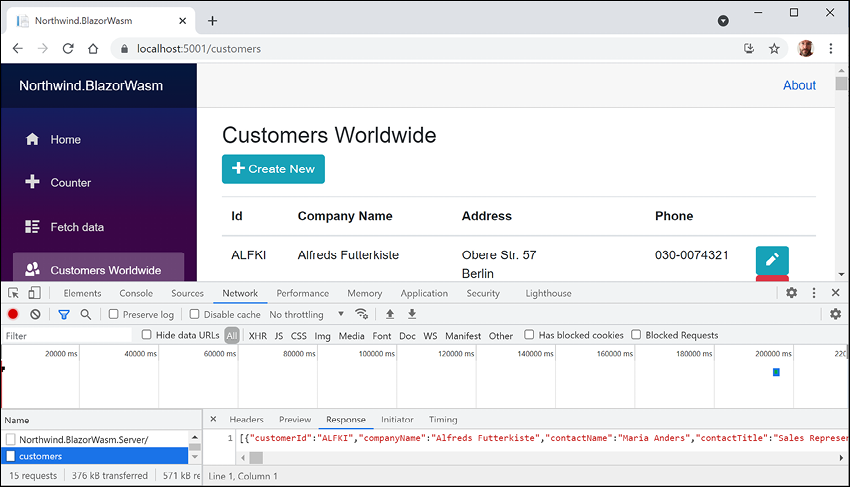
Figure 17.9: The HTTP GET request with the JSON response containing all customers
- Click the + Create New button, complete the form to add a new customer as before, and note the HTTP
POSTrequest made, as shown in Figure 17.10:
Figure 17.10: The HTTP POST request for creating a new customer
- Repeat the steps as before to edit and then delete the newly created customer.
- Close Chrome and shut down the web server.
Improving Blazor WebAssembly apps
There are common ways to improve Blazor WebAssembly apps. We'll look at some of the most popular ones now.
Enabling Blazor WebAssembly AOT
By default, the .NET runtime used by Blazor WebAssembly is doing IL interpretation using an interpreter written in WebAssembly. Unlike other .NET apps, it does not use a just-in-time (JIT) compiler, so the performance of CPU-intensive workloads is lower than you might hope for.
In .NET 6, Microsoft has added support for ahead-of-time (AOT) compilation, but you must explicitly opt-in because although it can dramatically improve runtime performance, AOT compilation can take several minutes on small projects like the ones in this book and potentially much longer for larger projects. The size of the compiled app is also larger than without AOT—typically twice the size. The decision to use AOT is therefore based on a balance of increased compile and browser download times, with potentially much faster runtimes.
AOT was the top requested feature in a Microsoft survey, and the lack of AOT was cited as a primary reason why some developers had not yet adopted .NET for developing single-page applications (SPAs).
Let's install the additional required workload for Blazor AOT named .NET WebAssembly build tools and then enable AOT for our Blazor WebAssembly project:
- In the command prompt or terminal with admin rights, install the Blazor AOT workload, as shown in the following command:
dotnet workload install wasm-tools - Note the messages, as shown in the following partial output:
... Installing pack Microsoft.NET.Runtime.MonoAOTCompiler.Task version 6.0.0... Installing pack Microsoft.NETCore.App.Runtime.AOT.Cross.browser-wasm version 6.0.0... Successfully installed workload(s) wasm-tools. - Modify the
Northwind.BlazorWasm.Clientproject file to enable AOT, as shown highlighted in the following markup:<PropertyGroup> <TargetFramework>net6.0</TargetFramework> <Nullable>enable</Nullable> <ImplicitUsings>enable</ImplicitUsings> <ServiceWorkerAssetsManifest>service-worker-assets.js </ServiceWorkerAssetsManifest> <RunAOTCompilation>true</RunAOTCompilation> </PropertyGroup> - Publish the
Northwind.BlazorWasm.Clientproject, as shown in the following command:dotnet publish -c Release - Note that 75 assemblies have AOT applied, as shown in the following partial output:
Northwind.BlazorWasm.Client -> C:\Code\PracticalApps\Northwind.BlazorWasm\Client\bin\Release\net6.0\Northwind.BlazorWasm.Client.dll Northwind.BlazorWasm.Client (Blazor output) -> C:\Code\PracticalApps\Northwind.BlazorWasm\Client\bin\Release\net6.0\wwwroot Optimizing assemblies for size, which may change the behavior of the app. Be sure to test after publishing. See: https://aka.ms/dotnet-illink AOT'ing 75 assemblies [1/75] Microsoft.Extensions.Caching.Abstractions.dll -> Microsoft.Extensions.Caching.Abstractions.dll.bc ... [75/75] Microsoft.EntityFrameworkCore.Sqlite.dll -> Microsoft.EntityFrameworkCore.Sqlite.dll.bc Compiling native assets with emcc. This may take a while ... ... Linking with emcc. This may take a while ... ... Optimizing dotnet.wasm ... Compressing Blazor WebAssembly publish artifacts. This may take a while... - Wait for the process to finish. The process can take around 20 minutes even on a modern multi-core CPU.
- Navigate to the
Northwind.BlazorWasm\Client\bin\release\net6.0\publishfolder and note the increased size of the download from 10 MB to 112 MB.
Without AOT, the downloaded Blazor WebAssembly app took about 10 MB of space. With AOT, it took about 112 MB. This increase in size will affect a website visitor's experience.
The use of AOT is a balance between slower initial download and faster potential execution. Depending on the specifics of your app, AOT might not be worth it.
Exploring Progressive Web App support
Progressive Web App (PWA) support in Blazor WebAssembly projects means that the web app gains the following benefits:
- It acts as a normal web page until the visitor explicitly decides to progress to a full app experience.
- After the app is installed, launch it from the OS's start menu or desktop.
- It visually appears in its own app window instead of a browser tab.
- It works offline.
- It automatically updates.
Let us see PWA support in action:
- Start the
Northwind.BlazorWasm.Serverweb host project. - Navigate to
https://localhost:5001/or whatever your port number is. - In Chrome, in the address bar on the right, click the icon with the tooltip Install Northwind.BlazorWasm, as shown in Figure 17.11:

Figure 17.11: Installing Northwind.BlazorWasm as an app
- Click the Install button.
- Close Chrome. You might also need to close the app if it runs automatically.
- Launch the Northwind.BlazorWasm app from your Windows Start menu or macOS Launchpad and note that it has a full app experience.
- On the right of the title bar, click the three dots menu and note that you can uninstall the app, but do not do so yet.
- Navigate to Developer Tools. On Windows, press F12 or Ctrl + Shift + I. On macOS, press Cmd + Shift + I.
- Select the Network tab and then, in the Throttling dropdown, select the Offline preset.
- In the left navigation menu, click Home and then click Customers Worldwide, and note the failure to load any customers and the error message at the bottom of the app window, as shown in Figure 17.12:
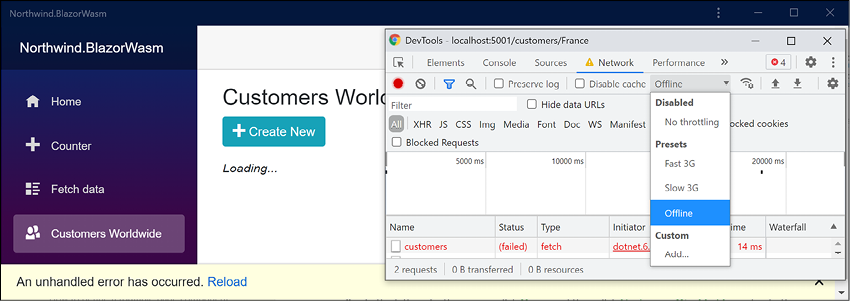
Figure 17.12: Failure to load any customers when the network is offline
- In Developer Tools, set Throttling back to Disabled: No throttling.
- Click the Reload link in the yellow error bar at the bottom of the app and note that functionality returns.
- You could now uninstall the PWA app or just close it.
Implementing offline support for PWAs
We could improve the experience by caching HTTP GET responses from the Web API service locally, storing new, modified, or deleted customers locally, and then synchronizing with the server later by making the stored HTTP requests once network connectivity is restored. But that takes a lot of effort to implement well, so it is beyond the scope of this book.
Understanding the browser compatibility analyzer for Blazor WebAssembly
With .NET 6, Microsoft has unified the .NET library for all workloads. However, although in theory, this means that a Blazor WebAssembly app has full access to all .NET APIs, in practice, it runs inside a browser sandbox so there are limitations. If you call an unsupported API, this will throw a PlatformNotSupportedException.
To be forewarned about unsupported APIs, you can add a platform compatibility analyzer that will warn you when your code uses APIs that are not supported by browsers.
Blazor WebAssembly App and Razor Class Library project templates automatically enable browser compatibility checks.
To manually activate browser compatibility checks, for example, in a Class Library project, add an entry to the project file, as shown in the following markup:
<ItemGroup>
  <SupportedPlatform Include="browser" />
</ItemGroup>
Microsoft decorates unsupported APIs, as shown in the following code:
[UnsupportedOSPlatform("browser")]
public void DoSomethingOutsideTheBrowserSandbox()
{
  ...
}
Good Practice: If you create libraries that should not be used in Blazor WebAssembly apps, then you should decorate your APIs in the same way.
Sharing Blazor components in a class library
We currently have components duplicated in a Blazor Server project and a Blazor WebAssembly project. It would be better to have them defined once in a class library project and reference them from the two other Blazor projects.
Let's create a new Razor class library:
- Use your preferred code editor to add a new project, as defined in the following list:
- Project template: Razor Class Library /
razorclasslib - Workspace/solution file and folder:
PracticalApps - Project file and folder:
Northwind.Blazor.Customers - Support pages and views: checked
- Project template: Razor Class Library /
- In the
Northwind.Blazor.Customersproject, add a project reference to theNorthwind.Common.EntityModels.SqliteorSqlServerproject. - In the
Northwind.Blazor.Customersproject, add an entry to check browser compatibility, as shown highlighted in the following markup:<Project Sdk="Microsoft.NET.Sdk.Razor"> <PropertyGroup> <TargetFramework>net6.0</TargetFramework> <Nullable>enable</Nullable> <ImplicitUsings>enable</ImplicitUsings> <AddRazorSupportForMvc>true</AddRazorSupportForMvc> </PropertyGroup> <ItemGroup> <FrameworkReference Include="Microsoft.AspNetCore.App" /> </ItemGroup> <ItemGroup> <ProjectReference Include="..\Northwind.Common.EntityModels.Sqlite \Northwind.Common.EntityModels.Sqlite.csproj" /> </ItemGroup> <ItemGroup> <SupportedPlatform Include="browser" /> </ItemGroup> </Project> - In the
Northwind.BlazorServerproject, add a project reference to theNorthwind.Blazor.Customersproject. - Build the
Northwind.BlazorServerproject. - In the
Northwind.Blazor.Customersproject, delete theAreasfolder and all its contents. - Copy the
_Imports.razorfile from the root of theNorthwind.BlazorServerproject to the root of theNorthwind.Blazor.Customersproject. - In
_Imports.razor, delete the two imports for theNorthwind.BlazorServernamespace and add a statement to import the namespace that will contain our shared Blazor components, as shown in the following code:@using Northwind.Blazor.Customers.Shared - Create three folders named
Data,Pages, andShared. - Move
INorthwindService.csfrom theNorthwind.BlazorServerproject'sDatafolder to theNorthwind.Blazor.Customersproject'sDatafolder. - Move all the components from the
Northwind.BlazorServerproject'sSharedfolder to theNorthwind.Blazor.Customersproject'sSharedfolder. - Move the
CreateCustomer.razor,Customers.razor,EditCustomer.razor, andDeleteCustomer.razorcomponents from theNorthwind.BlazorServerproject'sPagesfolder to theNorthwind.Blazor.Customersproject'sPagesfolder.We will leave the other page components because they have dependencies on the weather service that has not been properly refactored.
- In the
Northwind.BlazorServerproject, in_Imports.razor, remove theusingstatement forNorthwind.BlazorServer.Sharedand add statements to import the page and shared components in the class library, as shown in the following code:@using Northwind.Blazor.Customers.Pages @using Northwind.Blazor.Customers.Shared - In the
Northwind.BlazorServerproject, inApp.razor, add a parameter to tell theRoutercomponent to scan the additional assembly to set up the routes for the page components in the class library, as shown highlighted in the following code:<Router AppAssembly="@typeof(App).Assembly" AdditionalAssemblies="new[] { typeof(Customers).Assembly }">Good Practice: It does not matter which class you specify as long as it is in the external assembly. I chose
Customerssince it is the most important and obvious component class. - Start the
Northwind.BlazorServerproject and note that it has the same behavior as before.Good Practice: You can now reuse the Blazor components in other Blazor Server projects. However, you cannot use that class library in Blazor WebAssembly projects because it has a dependency on the full ASP.NET Core workload. Creating Blazor component libraries that work with both hosting models is beyond the scope of this book.
Interop with JavaScript
By default, Blazor components do not have access to browser capabilities like local storage, geolocation, and media capture, or any JavaScript libraries like React or Vue. If you need to interact with them, you can use JavaScript Interop.
Let's see an example that uses the browser window's alert box and local storage that can persist up to 5 MB of data per visitor indefinitely:
- In the
Northwind.BlazorServerproject, in thewwwrootfolder, add a folder namedscripts. - In the
scriptsfolder, add a file namedinterop.js. - Modify its contents, as shown in the following code:
function messageBox(message) { window.alert(message); } function setColorInStorage() { if (typeof (Storage) !== "undefined") { localStorage.setItem("color", document.getElementById("colorBox").value); } } function getColorFromStorage() { if (typeof (Storage) !== "undefined") { document.getElementById("colorBox").value = localStorage.getItem("color"); } } - In the
Pagesfolder, in_Layout.cshtml, after thescriptelement that adds Blazor Server support, add ascriptelement that references the JavaScript file that you just created, as shown in the following code:<script src="scripts/interop.js"></script> - In the
Pagesfolder, inIndex.razor, delete the twoCustomerscomponent instances and then add a button and a code block that uses the Blazor JavaScript runtime dependency service to call a JavaScript function, as shown in the following code:<button type="button" class="btn btn-info" @onclick="AlertBrowser"> Poke the browser</button> <hr /> <input id="colorBox" /> <button type="button" class="btn btn-info" @onclick="SetColor"> Set Color</button> <button type="button" class="btn btn-info" @onclick="GetColor"> Get Color</button> @code { [Inject] public IJSRuntime JSRuntime { get; set; } = null!; public async Task AlertBrowser() { await JSRuntime.InvokeVoidAsync( "messageBox", "Blazor poking the browser"); } public async Task SetColor() { await JSRuntime.InvokeVoidAsync("setColorInStorage"); } public async Task GetColor() { await JSRuntime.InvokeVoidAsync("getColorFromStorage"); } } - Start the
Northwind.BlazorServerproject. - Start Chrome and navigate to
https://localhost:5001/. - On the home page, in the textbox, enter
redand then click the Set Color button. - Show Developer Tools, select the Application tab, expand Local Storage, select
https://localhost:5001, and note the key-value paircolor-red, as shown in Figure 17.13: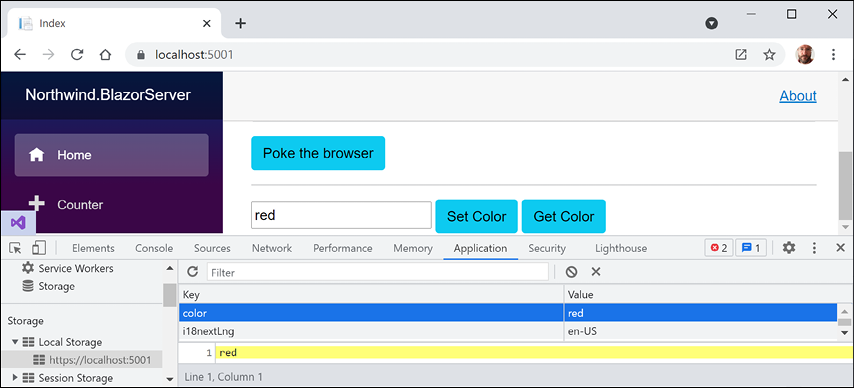
Figure 17.13: Storing a color in browser local storage using JavaScript Interop
- Close Chrome and shut down the web server.
- Start the
Northwind.BlazorServerproject. - Start Chrome and navigate to
https://localhost:5001/. - On the home page, click the Get Color button and note that the value
redis shown in the textbox, retrieved from local storage between visitor sessions. - Close Chrome and shut down the web server.
Libraries of Blazor components
There are many libraries of Blazor components. Paid component libraries are from companies like Telerik, DevExpress, and Syncfusion. Open source Blazor component libraries include the following:
- Radzen Blazor Components: https://blazor.radzen.com/
- Awesome Open Source Blazor Projects: https://awesomeopensource.com/projects/blazor
Practicing and exploring
Test your knowledge and understanding by answering some questions, get some hands-on practice, and explore this chapter's topics with deeper research.
Exercise 17.1 – Test your knowledge
Answer the following questions:
- What are the two primary hosting models for Blazor, and how are they different?
- In a Blazor Server website project, compared to an ASP.NET Core MVC website project, what extra configuration is required in the Startup class?
- One of the benefits of Blazor is being able to implement client-side components using C# and .NET instead of JavaScript. Does a Blazor component need any JavaScript?
- In a Blazor project, what does the
App.razorfile do? - What is a benefit of using the
<NavLink>component? - How can you pass a value into a component?
- What is a benefit of using the
<EditForm>component? - How can you execute some statements when parameters are set?
- How can you execute some statements when a component appears?
- What are two key differences in the
Programclass between a Blazor Server and Blazor WebAssembly project?
Exercise 17.2 – Practice by creating a times table component
Create a component that renders a times table based on a parameter named Number and then test your component in two ways.
First, by adding an instance of your component to the Index.razor file, as shown in the following markup:
<timestable Number="6" />
Second, by entering a path in the browser address bar, as shown in the following link:
https://localhost:5001/timestable/6
Exercise 17.3 – Practice by creating a country navigation item
Add an action method to the CustomersController class to return a list of country names.
In the shared NavMenu component, call the customer's web service to get the list of country names and loop through them, creating a menu item for each country.
Exercise 17.4 – Explore topics
Use the links on the following page to learn more detail about the topics covered in this chapter:
Summary
In this chapter, you learned how to build Blazor components hosted for both Server and WebAssembly. You saw some of the key differences between the two hosting models, like how data should be managed using dependency services.