16
Building and Consuming Web Services
This chapter is about learning how to build web services (aka HTTP or REST services) using the ASP.NET Core Web API and consuming web services using HTTP clients that could be any other type of .NET app, including a website or a mobile or desktop app.
This chapter requires knowledge and skills that you learned in Chapter 10, Working with Data Using Entity Framework Core, and Chapters 13 to 15, about practical applications of C# and .NET and building websites using ASP.NET Core.
In this chapter, we will cover the following topics:
- Building web services using ASP.NET Core Web API
- Documenting and testing web services
- Consuming web services using HTTP clients
- Implementing advanced features for web services
- Building web services using minimal APIs
Building web services using ASP.NET Core Web API
Before we build a modern web service, we need to cover some background to set the context for this chapter.
Understanding web service acronyms
Although HTTP was designed originally to request and respond with HTML and other resources for humans to look at, it is also good for building services.
Roy Fielding stated in his doctoral dissertation, describing the Representational State Transfer (REST) architectural style, that the HTTP standard would be good for building services because it defines the following:
- URIs to uniquely identify resources, like
https://localhost:5001/api/products/23. - Methods to perform common tasks on those resources, like
GET,POST,PUT, andDELETE. - The ability to negotiate the media type of content exchanged in requests and responses, such as XML and JSON. Content negotiation happens when the client specifies a request header like
Accept: application/xml,*/*;q=0.8. The default response format used by the ASP.NET Core Web API is JSON, which means one of the response headers would beContent-Type: application/json; charset=utf-8.
Web services use the HTTP communication standard, so they are sometimes called HTTP or RESTful services. HTTP or RESTful services are what this chapter is about.
Web services can also mean Simple Object Access Protocol (SOAP) services that implement some of the WS-* standards. These standards enable clients and services implemented on different systems to communicate with each other. The WS-* standards were originally defined by IBM with input from other companies like Microsoft.
Understanding Windows Communication Foundation (WCF)
.NET Framework 3.0 and later includes a remote procedure call (RPC) technology named Windows Communication Foundation (WCF). RPC technologies enable code on one system to execute code on another over a network.
WCF makes it easy for developers to create services, including SOAP services that implement WS-* standards. It later also supported building Web/HTTP/REST-style services, but it was rather over-engineered if that was all you needed.
If you have existing WCF services and you would like to port them to modern .NET, then there is an open-source project that had its first General Availability (GA) release in February 2021. You can read about it at the following link:
https://corewcf.github.io/blog/2021/02/19/corewcf-ga-release
An alternative to WCF
The Microsoft recommended alternative to WCF is gRPC. gRPC is a modern cross-platform open-source RPC framework created by Google (unofficially the "g" in gRPC). You will learn more about gRPC in Chapter 18, Building and Consuming Specialized Services.
Understanding HTTP requests and responses for Web APIs
HTTP defines standard types of requests and standard codes to indicate a type of response. Most of them can be used to implement Web API services.
The most common type of request is GET, to retrieve a resource identified by a unique path, with additional options like what media type is acceptable, set as request headers, as shown in the following example:
GET /path/to/resource
Accept: application/json
Common responses include success and multiple types of failure, as shown in the following table:
|
Status code |
Description |
|
|
The path was correctly formed, the resource was successfully found, serialized into an acceptable media type, and then returned in the response body. The response headers specify the |
|
|
Over time a web service may change its resource model including the path used to identify an existing resource. The web service can indicate the new path by returning this status code and a response header named |
|
|
Similar to |
|
|
If the request included the |
|
|
The request was invalid, for example, it used a path for a product using an integer ID where the ID value is missing. |
|
|
The request was valid, the resource was found, but the client did not supply credentials or is not authorized to access that resource. Re-authenticating may enable access, for example, by adding or changing the |
|
|
The request was valid, the resource was found, but the client is not authorized to access that resource. Re-authenticating will not fix the issue. |
|
|
The request was valid, but the resource was not found. The resource may be found if the request is repeated later. To indicate that a resource will never be found, return |
|
|
If the request has an |
|
|
A website hosted in the USA might return this for requests coming from Europe to avoid having to comply with the General Data Protection Regulation (GDPR). The number was chosen as a reference to the novel Fahrenheit 451 in which books are banned and burned. |
|
|
The request was valid, but something went wrong on the server side while processing the request. Retrying again later might work. |
|
|
The web service is busy and cannot handle the request. Trying again later might work. |
Other common types of HTTP requests include POST, PUT, PATCH, or DELETE that create, modify, or delete resources.
To create a new resource, you might make a POST request with a body that contains the new resource, as shown in the following code:
POST /path/to/resource
Content-Length: 123
Content-Type: application/json
To create a new resource or update an existing resource, you might make a PUT request with a body that contains a whole new version of the existing resource, and if the resource does not exist, it is created, or if it does exist, it is replaced (sometimes called an upsert operation), as shown in the following code:
PUT /path/to/resource
Content-Length: 123
Content-Type: application/json
To update an existing resource more efficiently, you might make a PATCH request with a body that contains an object with only the properties that need changing, as shown in the following code:
PATCH /path/to/resource
Content-Length: 123
Content-Type: application/json
To delete an existing resource, you might make a DELETE request, as shown in the following code:
DELETE /path/to/resource
As well as the responses shown in the table above for a GET request, all the types of requests that create, modify, or delete a resource have additional possible common responses, as shown in the following table:
|
Status code |
Description |
|
|
The new resource was created successfully, the response header named |
|
|
The new resource cannot be created immediately so the request is queued for later processing and immediately |
|
|
Commonly used in response to a |
|
|
Returned when the request used a method that is not supported. For example, a web service designed to be read-only may explicitly disallow |
|
|
Returned when the resource in the request body uses a media type that the web service cannot handle. For example, if the body contains a resource in XML format but the web service can only process JSON. |
Creating an ASP.NET Core Web API project
We will build a web service that provides a way to work with data in the Northwind database using ASP.NET Core so that the data can be used by any client application on any platform that can make HTTP requests and receive HTTP responses:
- Use your preferred code editor to add a new project, as defined in the following list:
- Project template: ASP.NET Core Web API /
webapi - Workspace/solution file and folder:
PracticalApps - Project file and folder:
Northwind.WebApi - Other Visual Studio options: Authentication Type: None, Configure for HTTPS: selected, Enable Docker: cleared, Enable OpenAPI support: selected.
- Project template: ASP.NET Core Web API /
- In Visual Studio Code, select
Northwind.WebApias the active OmniSharp project. - Build the
Northwind.WebApiproject. - In the
Controllersfolder, open and reviewWeatherForecastController.cs, as shown in the following code:using Microsoft.AspNetCore.Mvc; namespace Northwind.WebApi.Controllers; [ApiController] [Route("[controller]")] public class WeatherForecastController : ControllerBase { private static readonly string[] Summaries = new[] { "Freezing", "Bracing", "Chilly", "Cool", "Mild", "Warm", "Balmy", "Hot", "Sweltering", "Scorching" }; private readonly ILogger<WeatherForecastController> _logger; public WeatherForecastController( ILogger<WeatherForecastController> logger) { _logger = logger; } [HttpGet] public IEnumerable<WeatherForecast> Get() { return Enumerable.Range(1, 5).Select(index => new WeatherForecast { Date = DateTime.Now.AddDays(index), TemperatureC = Random.Shared.Next(-20, 55), Summary = Summaries[Random.Shared.Next(Summaries.Length)] }) .ToArray(); } }While reviewing the preceding code, note the following:
- The
Controllerclass inherits fromControllerBase. This is simpler than theControllerclass used in MVC because it does not have methods likeViewto generate HTML responses by passing a view model to a Razor file. - The
[Route]attribute registers the/weatherforecastrelative URL for clients to use to make HTTP requests that will be handled by this controller. For example, an HTTP request forhttps://localhost:5001/weatherforecast/would be handled by this controller. Some developers like to prefix the controller name withapi/, which is a convention to differentiate between MVC and Web API in mixed projects. If you use[controller]as shown, it uses the characters beforeControllerin the class name, in this case,WeatherForecast, or you can simply enter a different name without the square brackets, for example,[Route("api/forecast")]. - The
[ApiController]attribute was introduced with ASP.NET Core 2.1 and it enables REST-specific behavior for controllers, like automatic HTTP400responses for invalid models, as you will see later in this chapter. - The
[HttpGet]attribute registers theGetmethod in theControllerclass to respond to HTTPGETrequests, and its implementation uses the sharedRandomobject to return an array ofWeatherForecastobjects with random temperatures and summaries likeBracingorBalmyfor the next five days of weather.
- The
- Add a second
Getmethod that allows the call to specify how many days ahead the forecast should be by implementing the following:- Add a comment above the original method to show the action method and URL path that it responds to.
- Add a new method with an integer parameter named
days. - Cut and paste the original
Getmethod implementation code statements into the newGetmethod. - Modify the new method to create an
IEnumerableof integers up to the number of days requested, and modify the originalGetmethod to call the newGetmethod and pass the value5.
Your methods should be as shown highlighted in the following code:
// GET /weatherforecast
[HttpGet]
public IEnumerable<WeatherForecast> Get() // original method
{
  return Get(5); // five day forecast
}
// GET /weatherforecast/7
[HttpGet("{days:int}")]
public IEnumerable<WeatherForecast> Get(int days) // new method
{
  return Enumerable.Range(1, days).Select(index =>
    new WeatherForecast
    {
      Date = DateTime.Now.AddDays(index),
      TemperatureC = Random.Shared.Next(-20, 55),
      Summary = Summaries[Random.Shared.Next(Summaries.Length)]
    })
    .ToArray();
}
In the [HttpGet] attribute, note the route format pattern {days:int} that constrains the days parameter to int values.
Reviewing the web service's functionality
Now, we will test the web service's functionality:
- If you are using Visual Studio, in Properties, open the
launchSettings.jsonfile, and note that by default, it will launch the browser and navigate to the/swaggerrelative URL path, as shown highlighted in the following markup:"profiles": { "Northwind.WebApi": { "commandName": "Project", "dotnetRunMessages": "true", "launchBrowser": true, "launchUrl": "swagger", "applicationUrl": "https://localhost:5001;http://localhost:5000", "environmentVariables": { "ASPNETCORE_ENVIRONMENT": "Development" } }, - Modify the profile named
Northwind.WebApito setlaunchBrowsertofalse. - For the
applicationUrl, change the random port number forHTTPto5000and forHTTPSto5001. - Start the web service project.
- Start Chrome.
- Navigate to
https://localhost:5001/and note you will get a404status code response because we have not enabled static files and there is not anindex.html, nor is there an MVC controller with a route configured, either. Remember that this project is not designed for a human to view and interact with, so this is expected behavior for a web service.The solution on GitHub is configured to use port
5002because we will change its configuration later in the book. - In Chrome, show Developer tools.
- Navigate to
https://localhost:5001/weatherforecastand note the Web API service should return a JSON document with five random weather forecast objects in an array, as shown in Figure 16.1: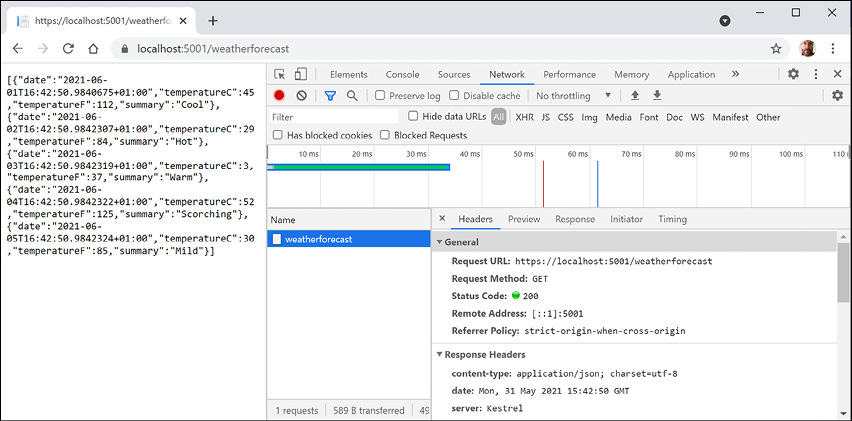
Figure 16.1: A request and response from a weather forecast web service
- Close Developer tools.
- Navigate to
https://localhost:5001/weatherforecast/14and note the response when requesting a two-week weather forecast, as shown in Figure 16.2: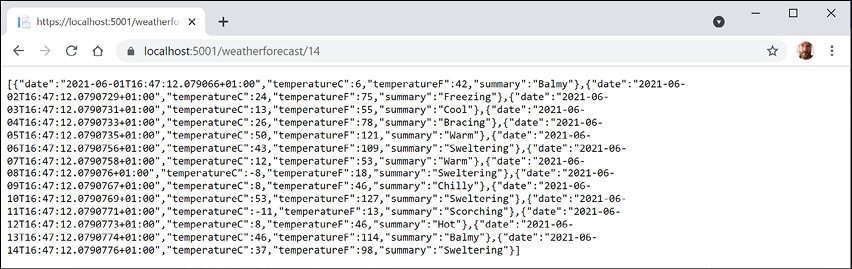
Figure 16.2: A two-week weather forecast as a JSON document
- Close Chrome and shut down the web server.
Creating a web service for the Northwind database
Unlike MVC controllers, Web API controllers do not call Razor views to return HTML responses for website visitors to see in browsers. Instead, they use content negotiation with the client application that made the HTTP request to return data in formats such as XML, JSON, or X-WWW-FORM-URLENCODED in their HTTP response.
The client application must then deserialize the data from the negotiated format. The most commonly used format for modern web services is JavaScript Object Notation (JSON) because it is compact and works natively with JavaScript in a browser when building Single-Page Applications (SPAs) with client-side technologies like Angular, React, and Vue.
We will reference the Entity Framework Core entity data model for the Northwind database that you created in Chapter 13, Introducing Practical Applications of C# and .NET:
- In the
Northwind.WebApiproject, add a project reference toNorthwind.Common.DataContextfor either SQLite or SQL Server, as shown in the following markup:<ItemGroup> <!-- change Sqlite to SqlServer if you prefer --> <ProjectReference Include= "..\Northwind.Common.DataContext.Sqlite\Northwind.Common.DataContext.Sqlite.csproj" /> </ItemGroup> - Build the project and fix any compile errors in your code.
- Open
Program.csand import namespaces for working with web media formatters and the shared Packt classes, as shown in the following code:using Microsoft.AspNetCore.Mvc.Formatters; using Packt.Shared; // AddNorthwindContext extension method using static System.Console; - Add a statement before the call to
AddControllersto register theNorthwinddatabase context class (it will use either SQLite or SQL Server depending on which database provider you referenced in the project file), as shown in the following code:// Add services to the container. builder.Services.AddNorthwindContext(); - In the call to
AddControllers, add a lambda block with statements to write the names and supported media types of the default output formatters to the console, and then add XML serializer formatters, as shown in the following code:builder.Services.AddControllers(options => { WriteLine("Default output formatters:"); foreach (IOutputFormatter formatter in options.OutputFormatters) { OutputFormatter? mediaFormatter = formatter as OutputFormatter; if (mediaFormatter == null) { WriteLine($" {formatter.GetType().Name}"); } else // OutputFormatter class has SupportedMediaTypes { WriteLine(" {0}, Media types: {1}", arg0: mediaFormatter.GetType().Name, arg1: string.Join(", ", mediaFormatter.SupportedMediaTypes)); } } }) .AddXmlDataContractSerializerFormatters() .AddXmlSerializerFormatters(); - Start the web service.
- In a command prompt or terminal, note that there are four default output formatters, including ones that convert
nullvalues into204 No Contentand ones to support responses that are plain text, byte streams, and JSON, as shown in the following output:Default output formatters: HttpNoContentOutputFormatter StringOutputFormatter, Media types: text/plain StreamOutputFormatter SystemTextJsonOutputFormatter, Media types: application/json, text/json, application/*+json - Shut down the web server.
Creating data repositories for entities
Defining and implementing a data repository to provide CRUD operations is good practice. The CRUD acronym includes the following operations:
- C for Create
- R for Retrieve (or Read)
- U for Update
- D for Delete
We will create a data repository for the Customers table in Northwind. There are only 91 customers in this table, so we will store a copy of the whole table in memory to improve scalability and performance when reading customer records.
Good Practice: In a real web service, you should use a distributed cache like Redis, an open-source data structure store that can be used as a high-performance, high-availability database, cache, or message broker.
We will follow modern good practice and make the repository API asynchronous. It will be instantiated by a Controller class using constructor parameter injection, so a new instance is created to handle every HTTP request:
- In the
Northwind.WebApiproject, create a folder namedRepositories. - Add two class files to the
Repositoriesfolder namedICustomerRepository.csandCustomerRepository.cs. - The
ICustomerRepositoryinterface will define five methods, as shown in the following code:using Packt.Shared; // Customer namespace Northwind.WebApi.Repositories; public interface ICustomerRepository { Task<Customer?> CreateAsync(Customer c); Task<IEnumerable<Customer>> RetrieveAllAsync(); Task<Customer?> RetrieveAsync(string id); Task<Customer?> UpdateAsync(string id, Customer c); Task<bool?> DeleteAsync(string id); } - The
CustomerRepositoryclass will implement the five methods, remembering that methods that useawaitinside them must be marked asasync, as shown in the following code:using Microsoft.EntityFrameworkCore.ChangeTracking; // EntityEntry<T> using Packt.Shared; // Customer using System.Collections.Concurrent; // ConcurrentDictionary namespace Northwind.WebApi.Repositories; public class CustomerRepository : ICustomerRepository { // use a static thread-safe dictionary field to cache the customers private static ConcurrentDictionary <string, Customer>? customersCache; // use an instance data context field because it should not be // cached due to their internal caching private NorthwindContext db; public CustomerRepository(NorthwindContext injectedContext) { db = injectedContext; // pre-load customers from database as a normal // Dictionary with CustomerId as the key, // then convert to a thread-safe ConcurrentDictionary if (customersCache is null) { customersCache = new ConcurrentDictionary<string, Customer>( db.Customers.ToDictionary(c => c.CustomerId)); } } public async Task<Customer?> CreateAsync(Customer c) { // normalize CustomerId into uppercase c.CustomerId = c.CustomerId.ToUpper(); // add to database using EF Core EntityEntry<Customer> added = await db.Customers.AddAsync(c); int affected = await db.SaveChangesAsync(); if (affected == 1) { if (customersCache is null) return c; // if the customer is new, add it to cache, else // call UpdateCache method return customersCache.AddOrUpdate(c.CustomerId, c, UpdateCache); } else { return null; } } public Task<IEnumerable<Customer>> RetrieveAllAsync() { // for performance, get from cache return Task.FromResult(customersCache is null ? Enumerable.Empty<Customer>() : customersCache.Values); } public Task<Customer?> RetrieveAsync(string id) { // for performance, get from cache id = id.ToUpper(); if (customersCache is null) return null!; customersCache.TryGetValue(id, out Customer? c); return Task.FromResult(c); } private Customer UpdateCache(string id, Customer c) { Customer? old; if (customersCache is not null) { if (customersCache.TryGetValue(id, out old)) { if (customersCache.TryUpdate(id, c, old)) { return c; } } } return null!; } public async Task<Customer?> UpdateAsync(string id, Customer c) { // normalize customer Id id = id.ToUpper(); c.CustomerId = c.CustomerId.ToUpper(); // update in database db.Customers.Update(c); int affected = await db.SaveChangesAsync(); if (affected == 1) { // update in cache return UpdateCache(id, c); } return null; } public async Task<bool?> DeleteAsync(string id) { id = id.ToUpper(); // remove from database Customer? c = db.Customers.Find(id); if (c is null) return null; db.Customers.Remove(c); int affected = await db.SaveChangesAsync(); if (affected == 1) { if (customersCache is null) return null; // remove from cache return customersCache.TryRemove(id, out c); } else { return null; } } }
Implementing a Web API controller
There are some useful attributes and methods for implementing a controller that returns data instead of HTML.
With MVC controllers, a route like /home/index tells us the controller class name and the action method name, for example, the HomeController class and the Index action method.
With Web API controllers, a route like /weatherforecast only tells us the controller class name, for example, WeatherForecastController. To determine the action method name to execute, we must map HTTP methods like GET and POST to methods in the controller class.
You should decorate controller methods with the following attributes to indicate the HTTP method that they will respond to:
[HttpGet],[HttpHead]: These action methods respond toGETorHEADrequests to retrieve a resource and return either the resource and its response headers or just the response headers.[HttpPost]: This action method responds toPOSTrequests to create a new resource or perform some other action defined by the service.[HttpPut],[HttpPatch]: These action methods respond toPUTorPATCHrequests to update an existing resource either by replacing it or updating a subset of its properties.[HttpDelete]: This action method responds toDELETErequests to remove a resource.[HttpOptions]: This action method responds toOPTIONSrequests.
Understanding action method return types
An action method can return .NET types like a single string value, complex objects defined by a class, record, or struct, or collections of complex objects. The ASP.NET Core Web API will serialize them into the requested data format set in the HTTP request Accept header, for example, JSON, if a suitable serializer has been registered.
For more control over the response, there are helper methods that return an ActionResult wrapper around the .NET type.
Declare the action method's return type to be IActionResult if it could return different return types based on inputs or other variables. Declare the action method's return type to be ActionResult<T> if it will only return a single type but with different status codes.
Good Practice: Decorate action methods with the [ProducesResponseType] attribute to indicate all the known types and HTTP status codes that the client should expect in a response. This information can then be publicly exposed to document how a client should interact with your web service. Think of it as part of your formal documentation. Later in this chapter, you will learn how you can install a code analyzer to give you warnings when you do not decorate your action methods like this.
For example, an action method that gets a product based on an id parameter would be decorated with three attributes – one to indicate that it responds to GET requests and has an id parameter, and two to indicate what happens when it succeeds and when the client has supplied an invalid product ID, as shown in the following code:
[HttpGet("{id}")]
[ProducesResponseType(200, Type = typeof(Product))]
[ProducesResponseType(404)]
public IActionResult Get(string id)
The ControllerBase class has methods to make it easy to return different responses, as shown in the following table:
|
Method |
Description |
|
|
Returns a |
|
|
Returns a |
|
|
Returns a |
|
|
Returns a |
|
|
Returns a |
|
|
Returns a |
Configuring the customer repository and Web API controller
Now you will configure the repository so that it can be called from within a Web API controller.
You will register a scoped dependency service implementation for the repository when the web service starts up and then use constructor parameter injection to get it in a new Web API controller for working with customers.
To show an example of differentiating between MVC and Web API controllers using routes, we will use the common /api URL prefix convention for the customers controller:
- Open
Program.csand import theNorthwind.WebApi.Repositoriesnamespace. - Add a statement before the call to the
Buildmethod, which will register theCustomerRepositoryfor use at runtime as a scoped dependency, as shown highlighted in the following code:builder.Services.AddScoped<ICustomerRepository, CustomerRepository>(); var app = builder.Build();Good Practice: Our repository uses a database context that is registered as a scoped dependency. You can only use scoped dependencies inside other scoped dependencies, so we cannot register the repository as a singleton. You can read more about this at the following link: https://docs.microsoft.com/en-us/dotnet/core/extensions/dependency-injection#scoped
- In the
Controllersfolder, add a new class namedCustomersController.cs. - In the
CustomersControllerclass file, add statements to define a Web API controller class to work with customers, as shown in the following code:using Microsoft.AspNetCore.Mvc; // [Route], [ApiController], ControllerBase using Packt.Shared; // Customer using Northwind.WebApi.Repositories; // ICustomerRepository namespace Northwind.WebApi.Controllers; // base address: api/customers [Route("api/[controller]")] [ApiController] public class CustomersController : ControllerBase { private readonly ICustomerRepository repo; // constructor injects repository registered in Startup public CustomersController(ICustomerRepository repo) { this.repo = repo; } // GET: api/customers // GET: api/customers/?country=[country] // this will always return a list of customers (but it might be empty) [HttpGet] [ProducesResponseType(200, Type = typeof(IEnumerable<Customer>))] public async Task<IEnumerable<Customer>> GetCustomers(string? country) { if (string.IsNullOrWhiteSpace(country)) { return await repo.RetrieveAllAsync(); } else { return (await repo.RetrieveAllAsync()) .Where(customer => customer.Country == country); } } // GET: api/customers/[id] [HttpGet("{id}", Name = nameof(GetCustomer))] // named route [ProducesResponseType(200, Type = typeof(Customer))] [ProducesResponseType(404)] public async Task<IActionResult> GetCustomer(string id) { Customer? c = await repo.RetrieveAsync(id); if (c == null) { return NotFound(); // 404 Resource not found } return Ok(c); // 200 OK with customer in body } // POST: api/customers // BODY: Customer (JSON, XML) [HttpPost] [ProducesResponseType(201, Type = typeof(Customer))] [ProducesResponseType(400)] public async Task<IActionResult> Create([FromBody] Customer c) { if (c == null) { return BadRequest(); // 400 Bad request } Customer? addedCustomer = await repo.CreateAsync(c); if (addedCustomer == null) { return BadRequest("Repository failed to create customer."); } else { return CreatedAtRoute( // 201 Created routeName: nameof(GetCustomer), routeValues: new { id = addedCustomer.CustomerId.ToLower() }, value: addedCustomer); } } // PUT: api/customers/[id] // BODY: Customer (JSON, XML) [HttpPut("{id}")] [ProducesResponseType(204)] [ProducesResponseType(400)] [ProducesResponseType(404)] public async Task<IActionResult> Update( string id, [FromBody] Customer c) { id = id.ToUpper(); c.CustomerId = c.CustomerId.ToUpper(); if (c == null || c.CustomerId != id) { return BadRequest(); // 400 Bad request } Customer? existing = await repo.RetrieveAsync(id); if (existing == null) { return NotFound(); // 404 Resource not found } await repo.UpdateAsync(id, c); return new NoContentResult(); // 204 No content } // DELETE: api/customers/[id] [HttpDelete("{id}")] [ProducesResponseType(204)] [ProducesResponseType(400)] [ProducesResponseType(404)] public async Task<IActionResult> Delete(string id) { Customer? existing = await repo.RetrieveAsync(id); if (existing == null) { return NotFound(); // 404 Resource not found } bool? deleted = await repo.DeleteAsync(id); if (deleted.HasValue && deleted.Value) // short circuit AND { return new NoContentResult(); // 204 No content } else { return BadRequest( // 400 Bad request $"Customer {id} was found but failed to delete."); } } }
While reviewing this Web API controller class, note the following:
- The
Controllerclass registers a route that starts withapi/and includes the name of the controller, that is,api/customers. - The constructor uses dependency injection to get the registered repository for working with customers.
- There are five action methods to perform CRUD operations on customers—two
GETmethods (for all customers or one customer),POST(create),PUT(update), andDELETE. - The
GetCustomersmethod can have astringparameter passed with a country name. If it is missing, all customers are returned. If it is present, it is used to filter customers by country. - The
GetCustomermethod has a route explicitly namedGetCustomerso that it can be used to generate a URL after inserting a new customer. - The
CreateandUpdatemethods both decorate thecustomerparameter with[FromBody]to tell the model binder to populate it with values from the body of thePOSTrequest. - The
Createmethod returns a response that uses theGetCustomerroute so that the client knows how to get the newly created resource in the future. We are matching up two methods to create and then get a customer. - The
CreateandUpdatemethods do not need to check the model state of the customer passed in the body of the HTTP request and return a400 Bad Requestcontaining details of the model validation errors if it is not valid because the controller is decorated with[ApiController], which does this for you.
When an HTTP request is received by the service, then it will create an instance of the Controller class, call the appropriate action method, return the response in the format preferred by the client, and release the resources used by the controller, including the repository and its data context.
Specifying problem details
A feature added in ASP.NET Core 2.1 and later is an implementation of a web standard for specifying problem details.
In Web API controllers decorated with [ApiController] in a project with ASP.NET Core 2.2 or later compatibility enabled, action methods that return IActionResult and return a client error status code, that is, 4xx, will automatically include a serialized instance of the ProblemDetails class in the response body.
If you want to take control, then you can create a ProblemDetails instance yourself and include additional information.
Let's simulate a bad request that needs custom data returned to the client:
- At the top of the implementation of the
Deletemethod, add statements to check if theidmatches the literal string value"bad", and if so, then return a custom problem details object, as shown in the following code:// take control of problem details if (id == "bad") { ProblemDetails problemDetails = new() { Status = StatusCodes.Status400BadRequest, Type = "https://localhost:5001/customers/failed-to-delete", Title = $"Customer ID {id} found but failed to delete.", Detail = "More details like Company Name, Country and so on.", Instance = HttpContext.Request.Path }; return BadRequest(problemDetails); // 400 Bad Request } - You will test this functionality later.
Controlling XML serialization
In Program.cs, we added the XmlSerializer so that our Web API service can return XML as well as JSON if the client requests that.
However, the XmlSerializer cannot serialize interfaces, and our entity classes use ICollection<T> to define related child entities. This causes a warning at runtime, for example, for the Customer class and its Orders property, as shown in the following output:
warn: Microsoft.AspNetCore.Mvc.Formatters.XmlSerializerOutputFormatter[1]
An error occurred while trying to create an XmlSerializer for the type 'Packt.Shared.Customer'.
System.InvalidOperationException: There was an error reflecting type 'Packt.Shared.Customer'.
---> System.InvalidOperationException: Cannot serialize member 'Packt.
Shared.Customer.Orders' of type 'System.Collections.Generic.ICollection`1[[Packt. Shared.Order, Northwind.Common.EntityModels, Version=1.0.0.0, Culture=neutral, PublicKeyToken=null]]', see inner exception for more details.
We can prevent this warning by excluding the Orders property when serializing a Customer to XML:
- In the
Northwind.Common.EntityModels.Sqliteand theNorthwind.Common.EntityModels.SqlServerprojects, openCustomers.cs. - Import the
System.Xml.Serializationnamespace so that we can use the[XmlIgnore]attribute. - Decorate the
Ordersproperty with an attribute to ignore it when serializing, as shown highlighted in the following code:[InverseProperty(nameof(Order.Customer))] [XmlIgnore] public virtual ICollection<Order> Orders { get; set; } - In the
Northwind.Common.EntityModels.SqlServerproject, decorate theCustomerCustomerDemosproperty with[XmlIgnore]too.
Documenting and testing web services
You can easily test a web service by making HTTP GET requests using a browser. To test other HTTP methods, we need a more advanced tool.
Testing GET requests using a browser
You will use Chrome to test the three implementations of a GET request – for all customers, for customers in a specified country, and for a single customer using their unique customer ID:
- Start the
Northwind.WebApiweb service. - Start Chrome.
- Navigate to
https://localhost:5001/api/customersand note the JSON document returned, containing all 91 customers in the Northwind database (unsorted), as shown in Figure 16.3:
Figure 16.3: Customers from the Northwind database as a JSON document
- Navigate to
https://localhost:5001/api/customers/?country=Germanyand note the JSON document returned, containing only the customers in Germany, as shown in Figure 16.4:
Figure 16.4: A list of customers from Germany as a JSON document
If you get an empty array returned, then make sure you have entered the country name using the correct casing because the database query is case-sensitive. For example, compare the results of
ukandUK. - Navigate to
https://localhost:5001/api/customers/alfkiand note the JSON document returned containing only the customer named Alfreds Futterkiste, as shown in Figure 16.5:
Figure 16.5: Specific customer information as a JSON document
Unlike with country names, we do not need to worry about casing for the customer id value because inside the controller class, we normalized the string value to uppercase in code.
But how can we test the other HTTP methods, such as POST, PUT, and DELETE? And how can we document our web service so it's easy for anyone to understand how to interact with it?
To solve the first problem, we can install a Visual Studio Code extension named REST Client. To solve the second, we can use Swagger, the world's most popular technology for documenting and testing HTTP APIs. But first, let's see what is possible with the Visual Studio Code extension.
There are many tools for testing Web APIs, for example, Postman. Although Postman is popular, I prefer REST Client because it does not hide what is actually happening. I feel Postman is too GUI-y. But I encourage you to explore different tools and find the ones that fit your style. You can learn more about Postman at the following link: https://www.postman.com/
Testing HTTP requests with the REST Client extension
REST Client is an extension that allows you to send any type of HTTP request and view the response in Visual Studio Code. Even if you prefer to use Visual Studio as your code editor, it is useful to install Visual Studio Code to use an extension like REST Client.
Making GET requests using REST Client
We will start by creating a file for testing GET requests:
- If you have not already installed REST Client by Huachao Mao (
humao.rest-client), then install it in Visual Studio Code now. - In your preferred code editor, start the
Northwind.WebApiproject web service. - In Visual Studio Code, in the
PracticalAppsfolder, create aRestClientTestsfolder, and then open the folder. - In the
RestClientTestsfolder, create a file namedget-customers.http, and modify its contents to contain an HTTPGETrequest to retrieve all customers, as shown in the following code:GET https://localhost:5001/api/customers/ HTTP/1.1 - In Visual Studio Code, navigate to View | Command Palette, enter
rest client, select the command Rest Client: Send Request, and press Enter, as shown in Figure 16.6: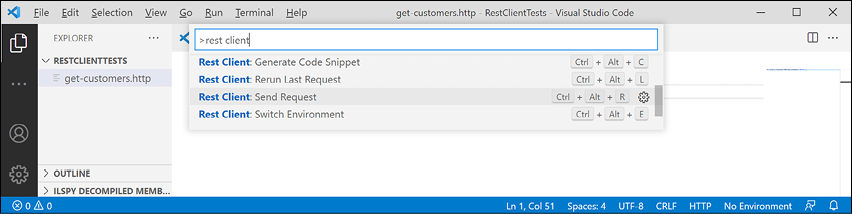
Figure 16.6: Sending an HTTP GET request using REST Client
- Note the Response is shown in a new tabbed window pane vertically and that you can rearrange the open tabs to a horizontal layout by dragging and dropping tabs.
- Enter more
GETrequests, each separated by three hash symbols, to test getting customers in various countries and getting a single customer using their ID, as shown in the following code:### GET https://localhost:5001/api/customers/?country=Germany HTTP/1.1 ### GET https://localhost:5001/api/customers/?country=USA HTTP/1.1 Accept: application/xml ### GET https://localhost:5001/api/customers/ALFKI HTTP/1.1 ### GET https://localhost:5001/api/customers/abcxy HTTP/1.1 - Click the Send Request link above each request to send it; for example, the
GETthat has a request header to request customers in the USA as XML instead of JSON, as shown in Figure 16.7: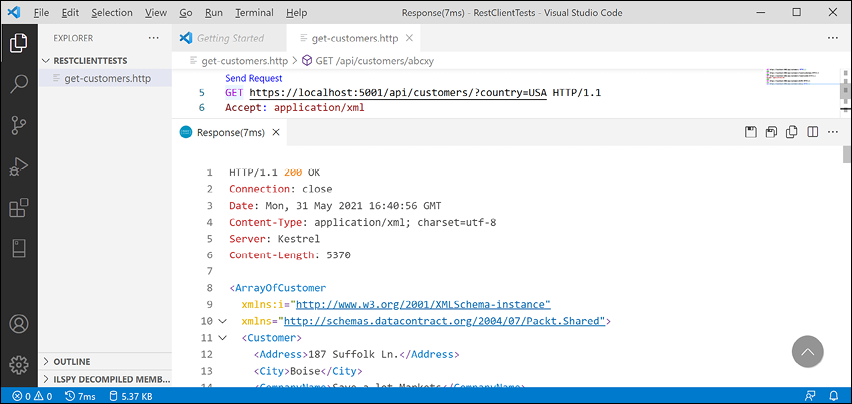
Figure 16.7: Sending a request for XML and getting a response using REST Client
Making other requests using REST Client
Next, we will create a file for testing other requests like POST:
- In the
RestClientTestsfolder, create a file namedcreate-customer.httpand modify its contents to define aPOSTrequest to create a new customer, noting that REST Client will provide IntelliSense while you type common HTTP requests, as shown in the following code:POST https://localhost:5001/api/customers/ HTTP/1.1 Content-Type: application/json Content-Length: 301 { "customerID": "ABCXY", "companyName": "ABC Corp", "contactName": "John Smith", "contactTitle": "Sir", "address": "Main Street", "city": "New York", "region": "NY", "postalCode": "90210", "country": "USA", "phone": "(123) 555-1234", "fax": null, "orders": null } - Due to different line endings in different operating systems, the value for the
Content-Lengthheader will be different on Windows and macOS or Linux. If the value is wrong, then the request will fail. To discover the correct content length, select the body of the request and then look in the status bar for the number of characters, as shown in Figure 16.8: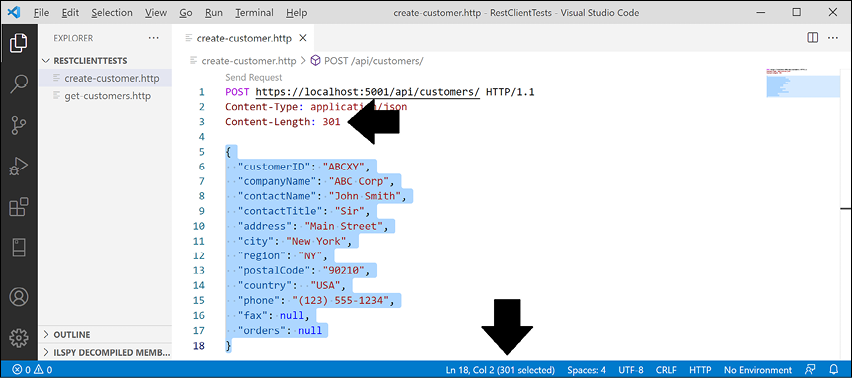
Figure 16.8: Checking the correct content length
- Send the request and note the response is
201 Created. Also note the location (that is, the URL) of the newly created customer ishttps://localhost:5001/api/Customers/abcxy, and includes the newly created customer in the response body, as shown in Figure 16.9: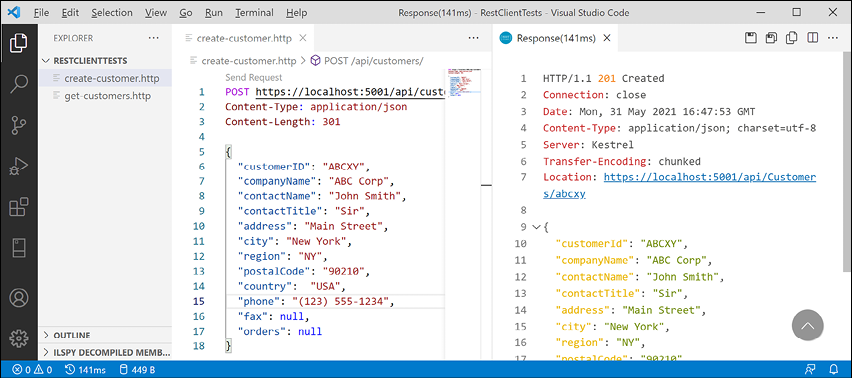
Figure 16.9: Adding a new customer
I will leave you an optional challenge to create REST Client files that test updating a customer (using PUT) and deleting a customer (using DELETE). Try them on customers that do exist as well as customers that do not. Solutions are in the GitHub repository for this book.
Now that we've seen a quick and easy way to test our service, which also happens to be a great way to learn HTTP, what about external developers? We want it to be as easy as possible for them to learn and then call our service. For that purpose, we will use Swagger.
Understanding Swagger
The most important part of Swagger is the OpenAPI Specification, which defines a REST-style contract for your API, detailing all its resources and operations in a human- and machine-readable format for easy development, discovery, and integration.
Developers can use the OpenAPI Specification for a Web API to automatically generate strongly-typed client-side code in their preferred language or library.
For us, another useful feature is Swagger UI, because it automatically generates documentation for your API with built-in visual testing capabilities.
Let's review how Swagger is enabled for our web service using the Swashbuckle package:
- If the web service is running, shut down the web server.
- Open
Northwind.WebApi.csprojand note the package reference forSwashbuckle.AspNetCore, as shown in the following markup:<ItemGroup> <PackageReference Include="Swashbuckle.AspNetCore" Version="6.1.5" /> </ItemGroup> - Update the version of the
Swashbuckle.AspNetCorepackage to the latest, for example, at the time of writing in September 2021, it is6.2.1. - In
Program.cs, note the import for Microsoft's OpenAPI models namespace, as shown in the following code:using Microsoft.OpenApi.Models; - Import Swashbuckle's SwaggerUI namespace, as shown in the following code:
using Swashbuckle.AspNetCore.SwaggerUI; // SubmitMethod - About halfway down
Program.cs, note the statement to add Swagger support including documentation for the Northwind service, indicating that this is the first version of your service, and change the title, as shown highlighted in the following code:builder.Services.AddSwaggerGen(c => { c.SwaggerDoc("v1", new() { Title = "Northwind Service API", Version = "v1" }); }); - In the section that configures the HTTP request pipeline, note the statements to use Swagger and Swagger UI when in development mode, and define an endpoint for the OpenAPI specification JSON document.
- Add code to explicitly list the HTTP methods that we want to support in our web service and change the endpoint name, as shown highlighted in the following code:
var app = builder.Build();
// Configure the HTTP request pipeline.
if (builder.Environment.IsDevelopment())
{
  app.UseSwagger();
  app.UseSwaggerUI(c =>
  {
    c.SwaggerEndpoint("/swagger/v1/swagger.json",
      "Northwind Service API Version 1");
    c.SupportedSubmitMethods(new[] {
      SubmitMethod.Get, SubmitMethod.Post,
      SubmitMethod.Put, SubmitMethod.Delete });
  });
}
Testing requests with Swagger UI
You are now ready to test an HTTP request using Swagger:
- Start the
Northwind.WebApiweb service. - In Chrome, navigate to
https://localhost:5001/swagger/and note that both the Customers and WeatherForecast Web API controllers have been discovered and documented, as well as Schemas used by the API. - Click GET /api/Customers/{id} to expand that endpoint and note the required parameter for the id of a customer, as shown in Figure 16.10:
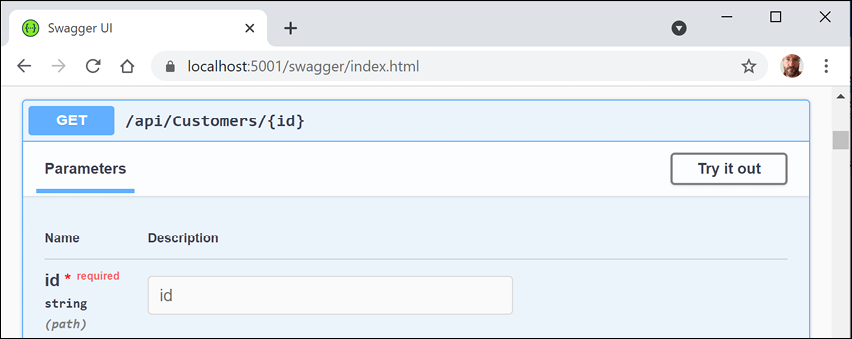
Figure 16.10: Checking the parameters for a GET request in Swagger
- Click Try it out, enter an id of
ALFKI, and then click the wide blue Execute button, as shown in Figure 16.11: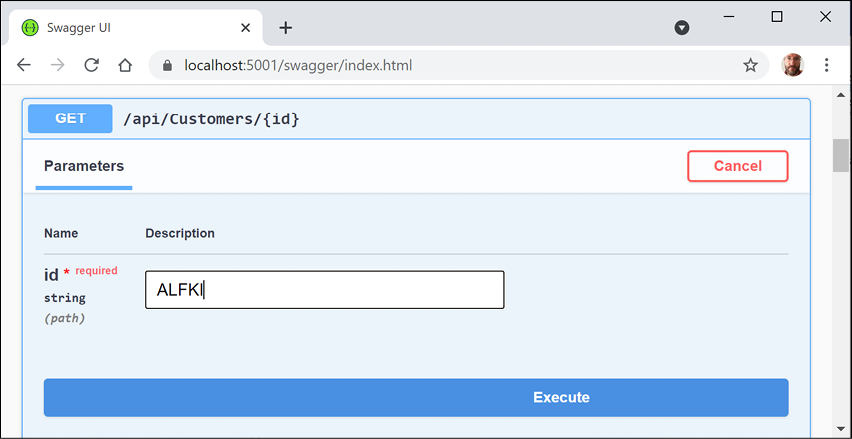
Figure 16.11: Inputting a customer id before clicking the Execute button
- Scroll down and note the Request URL, Server response with Code, and Details including Response body and Response headers, as shown in Figure 16.12:
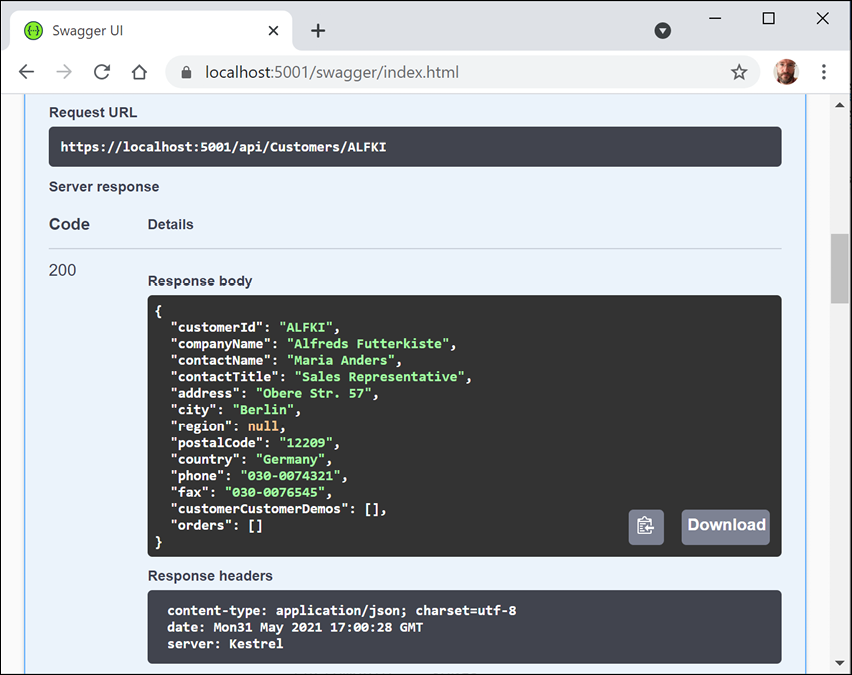
Figure 16.12: Information on ALFKI in a successful Swagger request
- Scroll back up to the top of the page, click POST /api/Customers to expand that section, and then click Try it out.
- Click inside the Request body box, and modify the JSON to define a new customer, as shown in the following JSON:
{ "customerID": "SUPER", "companyName": "Super Company", "contactName": "Rasmus Ibensen", "contactTitle": "Sales Leader", "address": "Rotterslef 23", "city": "Billund", "region": null, "postalCode": "4371", "country": "Denmark", "phone": "31 21 43 21", "fax": "31 21 43 22" } - Click Execute, and note the Request URL, Server response with Code, and Details including Response body and Response headers, noting that a response code of
201means the customer was successfully created, as shown in Figure 16.13: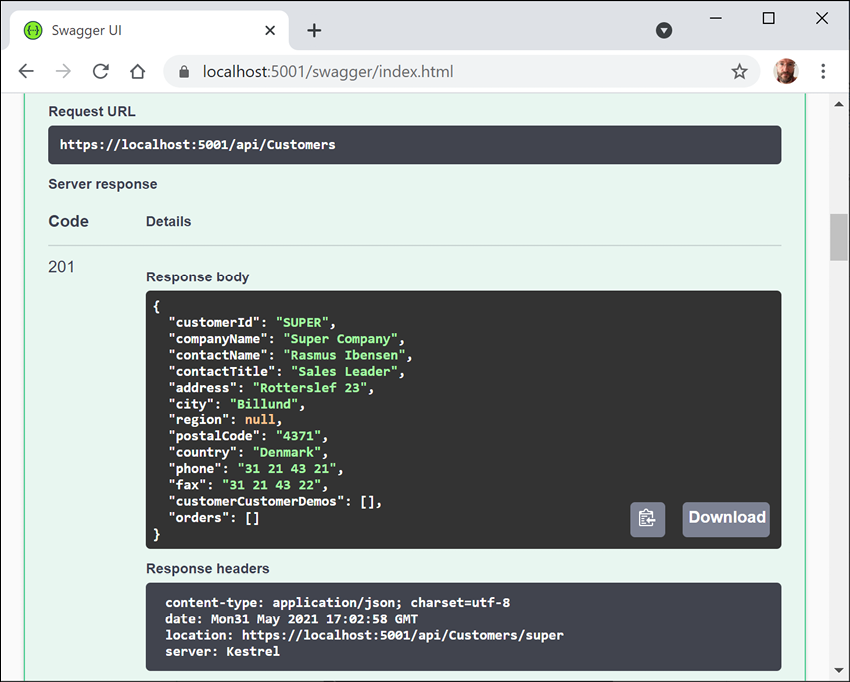
Figure 16.13: Successfully adding a new customer
- Scroll back up to the top of the page, click GET /api/Customers, click Try it out, enter
Denmarkfor the country parameter, and click Execute, to confirm that the new customer was added to the database, as shown in Figure 16.14: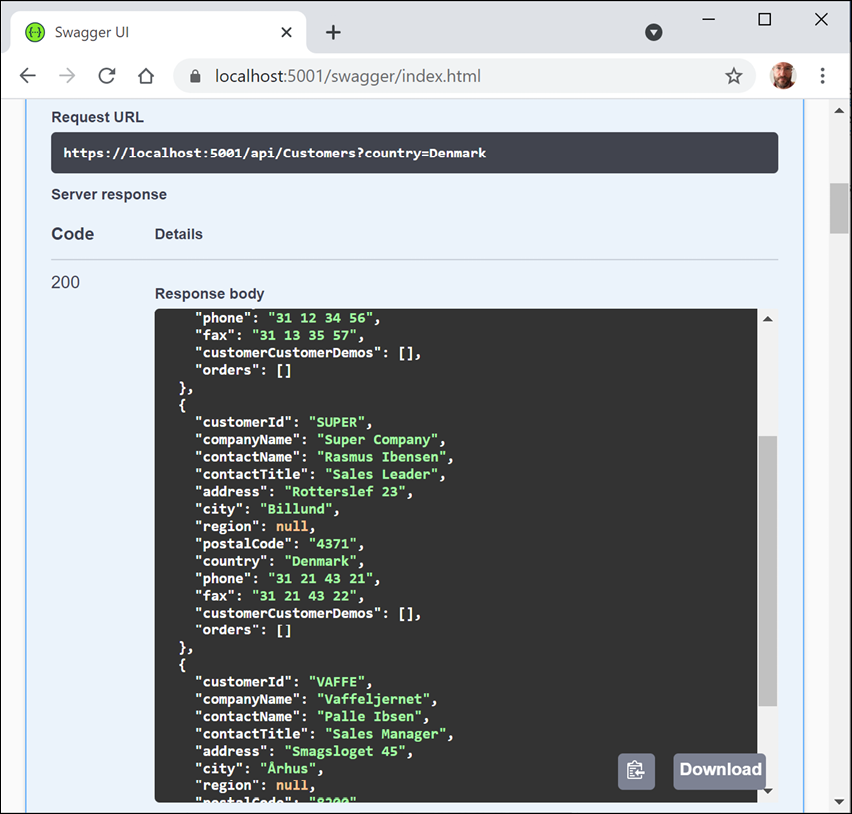
Figure 16.14: Successfully getting customers in Denmark including the newly added customer
- Click DELETE /api/Customers/{id}, click Try it out, enter
superfor the id, click Execute, and note that the Server response Code is204, indicating that it was successfully deleted, as shown in Figure 16.15: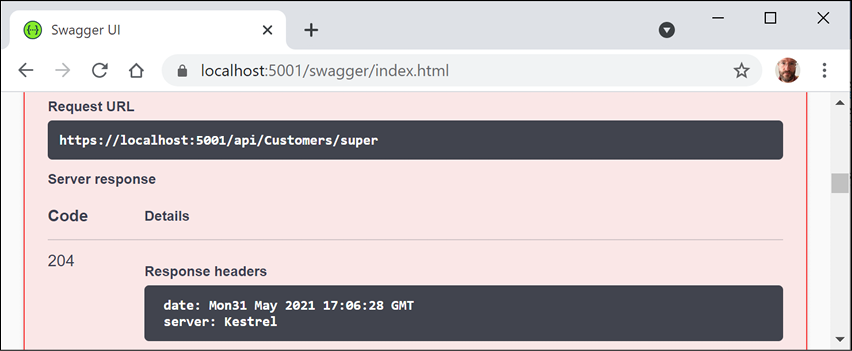
Figure 16.15: Successfully deleting a customer
- Click Execute again, and note that the Server response Code is
404, indicating that the customer does not exist anymore, and the Response body contains a problem details JSON document, as shown in Figure 16.16: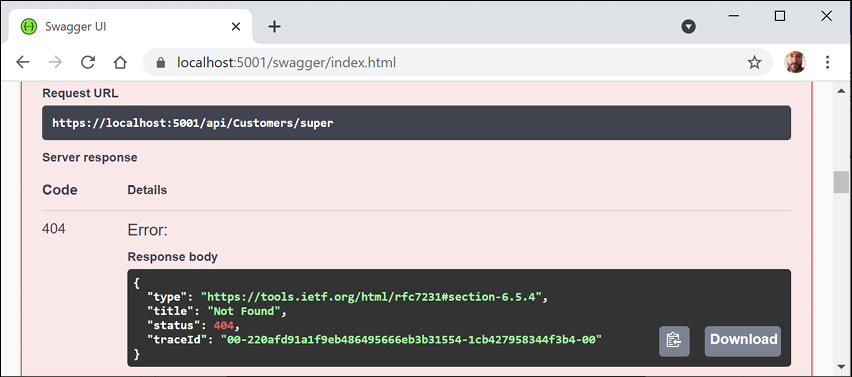
Figure 16.16: The deleted customer does not exist anymore
- Enter
badfor the id, click Execute again, and note that the Server response Code is400, indicating that the customer did exist but failed to be deleted (in this case, because the web service is simulating this error), and the Response body contains a custom problem details JSON document, as shown in Figure 16.17: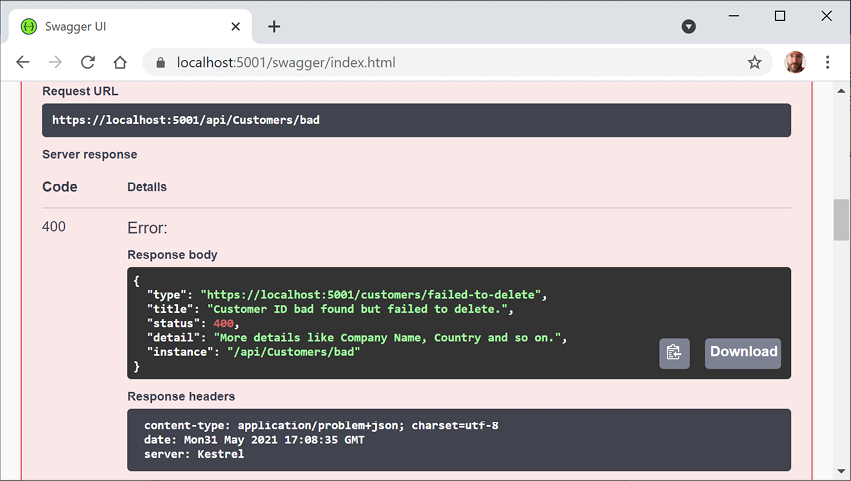
Figure 16.17: The customer did exist but failed to be deleted
- Use the
GETmethods to confirm that the new customer has been deleted from the database (there were originally only two customers in Denmark).I will leave testing updates to an existing customer by using
PUTto the reader. - Close Chrome and shut down the web server.
Enabling HTTP logging
HTTP logging is an optional middleware component that logs information about HTTP requests and HTTP responses including the following:
- Information about the HTTP request
- Headers
- Body
- Information about the HTTP response
This is valuable in web services for auditing and debugging scenarios but beware because it can negatively impact performance. You might also log personally identifiable information (PII) which can cause compliance issues in some jurisdictions.
Let's see HTTP logging in action:
- In
Program.cs, import the namespace for working with HTTP logging, as shown in the following code:using Microsoft.AspNetCore.HttpLogging; // HttpLoggingFields - In the services configuration section, add a statement to configure HTTP logging, as shown in the following code:
builder.Services.AddHttpLogging(options => { options.LoggingFields = HttpLoggingFields.All; options.RequestBodyLogLimit = 4096; // default is 32k options.ResponseBodyLogLimit = 4096; // default is 32k }); - In the HTTP pipeline configuration section, add a statement to add HTTP logging before the call to use routing, as shown in the following code:
app.UseHttpLogging(); - Start the
Northwind.WebApiweb service. - Start Chrome.
- Navigate to
https://localhost:5001/api/customers. - In a command prompt or terminal, note the request and response have been logged, as shown in the following output:
info: Microsoft.AspNetCore.HttpLogging.HttpLoggingMiddleware[1] Request: Protocol: HTTP/1.1 Method: GET Scheme: https PathBase: Path: /api/customers QueryString: Connection: keep-alive Accept: */* Accept-Encoding: gzip, deflate, br Host: localhost:5001 info: Microsoft.AspNetCore.HttpLogging.HttpLoggingMiddleware[2] Response: StatusCode: 200 Content-Type: application/json; charset=utf-8 ... Transfer-Encoding: chunked - Close Chrome and shut down the web server.
You are now ready to build applications that consume your web service.
Consuming web services using HTTP clients
Now that we have built and tested our Northwind service, we will learn how to call it from any .NET app using the HttpClient class and its factory.
Understanding HttpClient
The easiest way to consume a web service is to use the HttpClient class. However, many people use it wrongly because it implements IDisposable and Microsoft's own documentation shows poor usage of it. See the book links in the GitHub repository for articles with more discussion of this.
Usually, when a type implements IDisposable, you should create it inside a using statement to ensure that it is disposed of as soon as possible. HttpClient is different because it is shared, reentrant, and partially thread-safe.
The problem has to do with how the underlying network sockets have to be managed. The bottom line is that you should use a single instance of it for each HTTP endpoint that you consume during the life of your application. This will allow each HttpClient instance to have defaults set that are appropriate for the endpoint it works with, while managing the underlying network sockets efficiently.
Configuring HTTP clients using HttpClientFactory
Microsoft is aware of the issue, and in ASP.NET Core 2.1 they introduced HttpClientFactory to encourage best practice; that is the technique we will use.
In the following example, we will use the Northwind MVC website as a client to the Northwind Web API service. Since both need to be hosted on a web server simultaneously, we first need to configure them to use different port numbers, as shown in the following list:
- The Northwind Web API service will listen on port
5002usingHTTPS. - The Northwind MVC website will continue to listen on port
5000usingHTTPand port5001usingHTTPS.
Let's configure those ports:
- In the
Northwind.WebApiproject, inProgram.cs, add an extension method call toUseUrlsto specify port5002forHTTPS, as shown highlighted in the following code:var builder = WebApplication.CreateBuilder(args); builder.WebHost.UseUrls("https://localhost:5002/"); - In the
Northwind.Mvcproject, openProgram.csand import the namespace for working with HTTP client factory, as shown in the following code:using System.Net.Http.Headers; // MediaTypeWithQualityHeaderValue - Add a statement to enable
HttpClientFactorywith a named client to make calls to the Northwind Web API service using HTTPS on port5002and request JSON as the default response format, as shown in the following code:builder.Services.AddHttpClient(name: "Northwind.WebApi", configureClient: options => { options.BaseAddress = new Uri("https://localhost:5002/"); options.DefaultRequestHeaders.Accept.Add( new MediaTypeWithQualityHeaderValue( "application/json", 1.0)); });
Getting customers as JSON in the controller
We can now create an MVC controller action method that uses the factory to create an HTTP client, makes a GET request for customers, and deserializes the JSON response using convenience extension methods introduced with .NET 5 in the System.Net.Http.Json assembly and namespace:
- Open
Controllers/HomeController.csand declare a field to store the HTTP client factory, as shown in the following code:private readonly IHttpClientFactory clientFactory; - Set the field in the constructor, as shown highlighted in the following code:
public HomeController( ILogger<HomeController> logger, NorthwindContext injectedContext, IHttpClientFactory httpClientFactory) { _logger = logger; db = injectedContext; clientFactory = httpClientFactory; } - Create a new action method for calling the Northwind Web API service, fetching all customers, and passing them to a view, as shown in the following code:
public async Task<IActionResult> Customers(string country) { string uri; if (string.IsNullOrEmpty(country)) { ViewData["Title"] = "All Customers Worldwide"; uri = "api/customers/"; } else { ViewData["Title"] = $"Customers in {country}"; uri = $"api/customers/?country={country}"; } HttpClient client = clientFactory.CreateClient( name: "Northwind.WebApi"); HttpRequestMessage request = new( method: HttpMethod.Get, requestUri: uri); HttpResponseMessage response = await client.SendAsync(request); IEnumerable<Customer>? model = await response.Content .ReadFromJsonAsync<IEnumerable<Customer>>(); return View(model); } - In the
Views/Homefolder, create a Razor file namedCustomers.cshtml. - Modify the Razor file to render the customers, as shown in the following markup:
@using Packt.Shared @model IEnumerable<Customer> <h2>@ViewData["Title"]</h2> <table class="table"> <thead> <tr> <th>Company Name</th> <th>Contact Name</th> <th>Address</th> <th>Phone</th> </tr> </thead> <tbody> @if (Model is not null) { @foreach (Customer c in Model) { <tr> <td> @Html.DisplayFor(modelItem => c.CompanyName) </td> <td> @Html.DisplayFor(modelItem => c.ContactName) </td> <td> @Html.DisplayFor(modelItem => c.Address) @Html.DisplayFor(modelItem => c.City) @Html.DisplayFor(modelItem => c.Region) @Html.DisplayFor(modelItem => c.Country) @Html.DisplayFor(modelItem => c.PostalCode) </td> <td> @Html.DisplayFor(modelItem => c.Phone) </td> </tr> } } </tbody> </table> - In
Views/Home/Index.cshtml, add a form after rendering the visitor count to allow visitors to enter a country and see the customers, as shown in the following markup:<h3>Query customers from a service</h3> <form asp-action="Customers" method="get"> <input name="country" placeholder="Enter a country" /> <input type="submit" /> </form>
Enabling Cross-Origin Resource Sharing
Cross-Origin Resource Sharing (CORS) is an HTTP-header-based standard for protecting web resources when the client and server are on different domains (origins). It allows a server to indicate which origins (defined by a combination of domain, scheme, or port) other than its own it will permit the loading of resources from.
Since our web service is hosted on port 5002 and our MVC website is hosted on ports 5000 and 5001, they are considered different origins and so resources cannot be shared.
It would be useful to enable CORS on the server and configure our web service to only allow requests that originate from the MVC website:
- In the
Northwind.WebApiproject, openProgram.cs. - Add a statement in the services configuration section to add support for CORS, as shown in the following code:
builder.Services.AddCors(); - Add a statement in the HTTP pipeline configuration section, before calling
UseEndpoints, to use CORS and allowGET,POST,PUT, andDELETErequests from any website like Northwind MVC that has an origin ofhttps://localhost:5001, as shown in the following code:app.UseCors(configurePolicy: options => { options.WithMethods("GET", "POST", "PUT", "DELETE"); options.WithOrigins( "https://localhost:5001" // allow requests from the MVC client ); }); - Start the
Northwind.WebApiproject and confirm that the web service is listening only on port5002, as shown in the following output:info: Microsoft.Hosting.Lifetime[14] Now listening on: https://localhost:5002 - Start the
Northwind.Mvcproject and confirm that the website is listening on ports5000and5002, as shown in the following output:info: Microsoft.Hosting.Lifetime[14] Now listening on: https://localhost:5001 info: Microsoft.Hosting.Lifetime[14] Now listening on: http://localhost:5000 - Start Chrome.
- In the customer form, enter a country like
Germany,UK, orUSA, click Submit, and note the list of customers, as shown in Figure 16.18: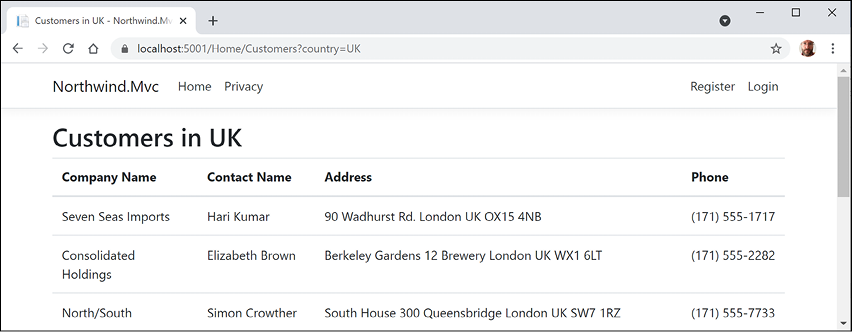
Figure 16.18: Customers in the UK
- Click the Back button in your browser, clear the country textbox, click Submit, and note the worldwide list of customers.
- In a command prompt or terminal, note the
HttpClientwrites each HTTP request that it makes and HTTP response that it receives, as shown in the following output:info: System.Net.Http.HttpClient.Northwind.WebApi.ClientHandler[100] Sending HTTP request GET https://localhost:5002/api/customers/?country=UK info: System.Net.Http.HttpClient.Northwind.WebApi.ClientHandler[101] Received HTTP response headers after 931.864ms - 200 - Close Chrome and shut down the web server.
You have successfully built a web service and called it from an MVC website.
Implementing advanced features for web services
Now that you have seen the fundamentals of building a web service and then calling it from a client, let's look at some more advanced features.
Implementing a Health Check API
There are many paid services that perform site availability tests that are basic pings, some with more advanced analysis of the HTTP response.
ASP.NET Core 2.2 and later makes it easy to implement more detailed website health checks. For example, your website might be live, but is it ready? Can it retrieve data from its database?
Let's add basic health check capabilities to our web service:
- In the
Northwind.WebApiproject, add a project reference to enable Entity Framework Core database health checks, as shown in the following markup:<PackageReference Include= "Microsoft.Extensions.Diagnostics.HealthChecks.EntityFrameworkCore" Version="6.0.0" /> - Build the project.
- In
Program.cs, at the bottom of the services configuration section, add a statement to add health checks, including to the Northwind database context, as shown in the following code:builder.Services.AddHealthChecks() .AddDbContextCheck<NorthwindContext>();By default, the database context check calls EF Core's
CanConnectAsyncmethod. You can customize what operation is run by calling theAddDbContextCheckmethod. - In the HTTP pipeline configuration section, before the call to
MapControllers, add a statement to use basic health checks, as shown in the following code:app.UseHealthChecks(path: "/howdoyoufeel"); - Start the web service.
- Start Chrome.
- Navigate to
https://localhost:5002/howdoyoufeeland note that the web service responds with a plain text response:Healthy. - At the command prompt or terminal, note the SQL statement that was executed to test the health of the database, as shown in the following output:
Level: Debug, Event Id: 20100, State: Executing DbCommand [Parameters=[], CommandType='Text', CommandTimeout='30'] SELECT 1 - Close Chrome and shut down the web server.
Implementing Open API analyzers and conventions
In this chapter, you learned how to enable Swagger to document a web service by manually decorating a controller class with attributes.
In ASP.NET Core 2.2 or later, there are API analyzers that reflect over controller classes that have been annotated with the [ApiController] attribute to document it automatically. The analyzer assumes some API conventions.
To use it, your project must enable the OpenAPI Analyzers, as shown highlighted in the following markup:
<PropertyGroup>
  <TargetFramework>net6.0</TargetFramework>
  <Nullable>enable</Nullable>
  <ImplicitUsings>enable</ImplicitUsings>
  <IncludeOpenAPIAnalyzers>true</IncludeOpenAPIAnalyzers>
</PropertyGroup>
After installing, controllers that have not been properly decorated should have warnings (green squiggles) and warnings when you compile the source code. For example, the WeatherForecastController class.
Automatic code fixes can then add the appropriate [Produces] and [ProducesResponseType] attributes, although this only currently works in Visual Studio. In Visual Studio Code, you will see warnings about where the analyzer thinks you should add attributes, but you must add them yourself.
Implementing transient fault handling
When a client app or website calls a web service, it could be from across the other side of the world. Network problems between the client and the server could cause issues that are nothing to do with your implementation code. If a client makes a call and it fails, the app should not just give up. If it tries again, the issue may now have been resolved. We need a way to handle these temporary faults.
To handle these transient faults, Microsoft recommends that you use the third-party library Polly to implement automatic retries with exponential backoff. You define a policy, and the library handles everything else.
Good Practice: You can read more about how Polly can make your web services more reliable at the following link: https://docs.microsoft.com/en-us/dotnet/architecture/microservices/implement-resilient-applications/implement-http-call-retries-exponential-backoff-polly
Adding security HTTP headers
ASP.NET Core has built-in support for common security HTTP headers like HSTS. But there are many more HTTP headers that you should consider implementing.
The easiest way to add these headers is using a middleware class:
- In the
Northwind.WebApiproject/folder, create a file namedSecurityHeadersMiddleware.csand modify its statements, as shown in the following code:using Microsoft.Extensions.Primitives; // StringValues public class SecurityHeaders { private readonly RequestDelegate next; public SecurityHeaders(RequestDelegate next) { this.next = next; } public Task Invoke(HttpContext context) { // add any HTTP response headers you want here context.Response.Headers.Add( "super-secure", new StringValues("enable")); return next(context); } } - In
Program.cs, in the HTTP pipeline configuration section, add a statement to register the middleware before the call toUseEndpoints, as shown in the following code:app.UseMiddleware<SecurityHeaders>(); - Start the web service.
- Start Chrome.
- Show Developer tools and its Network tab to record requests and responses.
- Navigate to
https://localhost:5002/weatherforecast. - Note the custom HTTP response header that we added named
super-secure, as shown in Figure 16.19: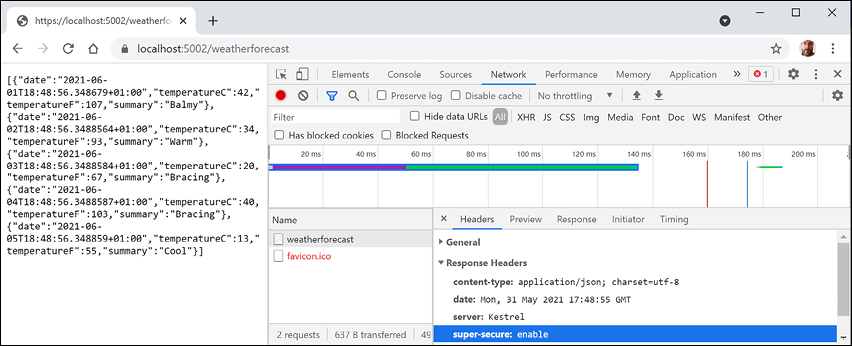
Figure 16.19: Adding a custom HTTP header named super-secure
Building web services using minimal APIs
For .NET 6, Microsoft put a lot of effort into adding new features to the C# 10 language and simplifying the ASP.NET Core libraries to enable the creation of web services using minimal APIs.
You might remember the weather forecast service that is provided in the Web API project template. It shows the use of a controller class to return a five-day weather forecast using faked data. We will now recreate that weather service using minimal APIs.
First, the weather service has a class to represent a single weather forecast. We will need to use this class in multiple projects, so let's create a class library for that:
- Use your preferred code editor to add a new project, as defined in the following list:
- Project template: Class Library /
classlib - Workspace/solution file and folder:
PracticalApps - Project file and folder:
Northwind.Common
- Project template: Class Library /
- Rename
Class1.cstoWeatherForecast.cs. - Modify
WeatherForecast.cs, as shown in the following code:namespace Northwind.Common { public class WeatherForecast { public static readonly string[] Summaries = new[] { "Freezing", "Bracing", "Chilly", "Cool", "Mild", "Warm", "Balmy", "Hot", "Sweltering", "Scorching" }; public DateTime Date { get; set; } public int TemperatureC { get; set; } public int TemperatureF => 32 + (int)(TemperatureC / 0.5556); public string? Summary { get; set; } } }
Building a weather service using minimal APIs
Now let's recreate that weather service using minimal APIs. It will listen on port 5003 and have CORS support enabled so that requests can only come from the MVC website and only GET requests are allowed:
- Use your preferred code editor to add a new project, as defined in the following list:
- Project template: ASP.NET Core Empty /
web - Workspace/solution file and folder:
PracticalApps - Project file and folder:
Minimal.WebApi - Other Visual Studio options: Authentication Type: None, Configure for HTTPS: selected, Enable Docker: cleared, Enable OpenAPI support: selected.
- Project template: ASP.NET Core Empty /
- In Visual Studio Code, select
Minimal.WebApias the active OmniSharp project. - In the
Minimal.WebApiproject, add a project reference to theNorthwind.Commonproject, as shown in the following markup:<ItemGroup> <ProjectReference Include="..\Northwind.Common\Northwind.Common.csproj" /> </ItemGroup> - Build the
Minimal.WebApiproject. - Modify
Program.cs, as shown highlighted in the following code:using Northwind.Common; // WeatherForecast var builder = WebApplication.CreateBuilder(args); builder.WebHost.UseUrls("https://localhost:5003"); builder.Services.AddCors(); var app = builder.Build(); // only allow the MVC client and only GET requests app.UseCors(configurePolicy: options => { options.WithMethods("GET"); options.WithOrigins("https://localhost:5001"); }); app.MapGet("/api/weather", () => { return Enumerable.Range(1, 5).Select(index => new WeatherForecast { Date = DateTime.Now.AddDays(index), TemperatureC = Random.Shared.Next(-20, 55), Summary = WeatherForecast.Summaries[ Random.Shared.Next(WeatherForecast.Summaries.Length)] }) .ToArray(); }); app.Run();Good Practice: For simple web services, avoid creating a controller class, and instead use minimal APIs to put all the configuration and implementation in one place,
Program.cs. - In Properties, modify
launchSettings.jsonto configure theMinimal.WebApiprofile to launch the browser using port5003in the URL, as shown highlighted in the following markup:"profiles": { "Minimal.WebApi": { "commandName": "Project", "dotnetRunMessages": "true", "launchBrowser": true, "applicationUrl": "https://localhost:5003/api/weather", "environmentVariables": { "ASPNETCORE_ENVIRONMENT": "Development" }
Testing the minimal weather service
Before creating a client to the service, let's test that it returns forecasts as JSON:
- Start the web service project.
- If you are not using Visual Studio 2022, start Chrome and navigate to
https://localhost:5003/api/weather. - Note the Web API service should return a JSON document with five random weather forecast objects in an array.
- Close Chrome and shut down the web server.
Adding weather forecasts to the Northwind website home page
Finally, let's add an HTTP client to the Northwind website so that it can call the weather service and show forecasts on the home page:
- In the
Northwind.Mvcproject, add a project reference toNorthwind.Common, as shown highlighted in the following markup:<ItemGroup> <!-- change Sqlite to SqlServer if you prefer --> <ProjectReference Include="..\Northwind.Common.DataContext.Sqlite\Northwind.Common.DataContext.Sqlite.csproj" /> <ProjectReference Include="..\Northwind.Common\Northwind.Common.csproj" /> </ItemGroup> - In
Program.cs, add a statement to configure an HTTP client to call the minimal service on port5003, as shown in the following code:builder.Services.AddHttpClient(name: "Minimal.WebApi", configureClient: options => { options.BaseAddress = new Uri("https://localhost:5003/"); options.DefaultRequestHeaders.Accept.Add( new MediaTypeWithQualityHeaderValue( "application/json", 1.0)); }); - In
HomeController.cs, import theNorthwind.Commonnamespace, and in theIndexmethod, add statements to get and use an HTTP client to call the weather service to get forecasts and store them inViewData, as shown in the following code:try { HttpClient client = clientFactory.CreateClient( name: "Minimal.WebApi"); HttpRequestMessage request = new( method: HttpMethod.Get, requestUri: "api/weather"); HttpResponseMessage response = await client.SendAsync(request); ViewData["weather"] = await response.Content .ReadFromJsonAsync<WeatherForecast[]>(); } catch (Exception ex) { _logger.LogWarning($"The Minimal.WebApi service is not responding. Exception: {ex.Message}"); ViewData["weather"] = Enumerable.Empty<WeatherForecast>().ToArray(); } - In
Views/Home, inIndex.cshtml, import theNorthwind.Commonnamespace and then in the top code block get the weather forecasts from theViewDatadictionary, as shown in the following markup:@{ ViewData["Title"] = "Home Page"; string currentItem = ""; WeatherForecast[]? weather = ViewData["weather"] as WeatherForecast[]; } - In the first
<div>, after rendering the current time, add markup to enumerate the weather forecasts unless there aren't any, and render them in a table, as shown in the following markup:<p> <h4>Five-Day Weather Forecast</h4> @if ((weather is null) || (!weather.Any())) { <p>No weather forecasts found.</p> } else { <table class="table table-info"> <tr> @foreach (WeatherForecast w in weather) { <td>@w.Date.ToString("ddd d MMM") will be @w.Summary</td> } </tr> </table> } </p> - Start the
Minimal.WebApiservice. - Start the
Northwind.Mvcwebsite. - Navigate to
https://localhost:5001/, and note the weather forecast, as shown in Figure 16.20:
Figure 16.20: A five-day weather forecast on the home page of the Northwind website
- View the command prompt or terminal for the MVC website and note the info messages that indicate a request was sent to the minimal API web service
api/weatherendpoint in about 83ms, as shown in the following output:info: System.Net.Http.HttpClient.Minimal.WebApi.LogicalHandler[100] Start processing HTTP request GET https://localhost:5003/api/weather info: System.Net.Http.HttpClient.Minimal.WebApi.ClientHandler[100] Sending HTTP request GET https://localhost:5003/api/weather info: System.Net.Http.HttpClient.Minimal.WebApi.ClientHandler[101] Received HTTP response headers after 76.8963ms - 200 info: System.Net.Http.HttpClient.Minimal.WebApi.LogicalHandler[101] End processing HTTP request after 82.9515ms – 200 - Stop the
Minimal.WebApiservice, refresh the browser, and note that after a few seconds the MVC website home page appears without weather forecasts. - Close Chrome and shut down the web server.
Practicing and exploring
Test your knowledge and understanding by answering some questions, get some hands-on practice, and explore this chapter's topics with deeper research.
Exercise 16.1 – Test your knowledge
Answer the following questions:
- Which class should you inherit from to create a controller class for an ASP.NET Core Web API service?
- If you decorate your controller class with the
[ApiController]attribute to get default behavior like automatic400responses for invalid models, what else must you do? - What must you do to specify which controller action method will be executed in response to an HTTP request?
- What must you do to specify what responses should be expected when calling an action method?
- List three methods that can be called to return responses with different status codes.
- List four ways that you can test a web service.
- Why should you not wrap your use of
HttpClientin ausingstatement to dispose of it when you are finished even though it implements theIDisposableinterface, and what should you use instead? - What does the acronym CORS stand for and why is it important to enable it in a web service?
- How can you enable clients to detect if your web service is healthy with ASP.NET Core 2.2 and later?
- What benefits does endpoint routing provide?
Exercise 16.2 – Practice creating and deleting customers with HttpClient
Extend the Northwind.Mvc website project to have pages where a visitor can fill in a form to create a new customer, or search for a customer and then delete them. The MVC controller should make calls to the Northwind web service to create and delete customers.
Exercise 16.3 – Explore topics
Use the links on the following page to learn more detail about the topics covered in this chapter:
Summary
In this chapter, you learned how to build an ASP.NET Core Web API service that can be called by any app on any platform that can make an HTTP request and process an HTTP response.
You also learned how to test and document web service APIs with Swagger, as well as how to consume services efficiently.
In the next chapter, you will learn to build user interfaces using Blazor, Microsoft's cool new component technology that enables developers to build client-side, single-page applications (SPAs) for websites using C# instead of JavaScript, hybrid apps for desktop, and potentially mobile apps.