15
Building Websites Using the Model-View-Controller Pattern
This chapter is about building websites with a modern HTTP architecture on the server side using Microsoft ASP.NET Core MVC, including the startup configuration, authentication, authorization, routes, request and response pipeline, models, views, and controllers that make up an ASP.NET Core MVC project.
This chapter will cover the following topics:
- Setting up an ASP.NET Core MVC website
- Exploring an ASP.NET Core MVC website
- Customizing an ASP.NET Core MVC website
- Querying a database and using display templates
- Improving scalability using asynchronous tasks
Setting up an ASP.NET Core MVC website
ASP.NET Core Razor Pages are great for simple websites. For more complex websites, it would be better to have a more formal structure to manage that complexity.
This is where the Model-View-Controller (MVC) design pattern is useful. It uses technologies like Razor Pages, but allows a cleaner separation between technical concerns, as shown in the following list:
- Models: Classes that represent the data entities and view models used on the website.
- Views: Razor files, that is,
.cshtmlfiles, that render data in view models into HTML web pages. Blazor uses the.razorfile extension, but do not confuse them with Razor files! - Controllers: Classes that execute code when an HTTP request arrives at the web server. The controller methods usually create a view model that may contain entity models and passes it to a view to generate an HTTP response to send back to the web browser or other client.
The best way to understand using the MVC design pattern for web development is to see a working example.
Creating an ASP.NET Core MVC website
You will use a project template to create an ASP.NET Core MVC website project that has a database for authenticating and authorizing users. Visual Studio 2022 defaults to using SQL Server LocalDB for the accounts database. Visual Studio Code (or more accurately the dotnet tool) uses SQLite by default and you can specify a switch to use SQL Server LocalDB instead.
Let's see it in action:
- Use your preferred code editor to add a MVC website project with authentication accounts stored in a database, as defined in the following list:
- Project template: ASP.NET Core Web App (Model-View-Controller) /
mvc - Language: C#
- Workspace/solution file and folder:
PracticalApps - Project file and folder:
Northwind.Mvc - Options: Authentication Type: Individual Accounts /
--auth Individual - For Visual Studio, leave all other options as their defaults
- Project template: ASP.NET Core Web App (Model-View-Controller) /
- In Visual Studio Code, select
Northwind.Mvcas the active OmniSharp project. - Build the
Northwind.Mvcproject. - At the command line or terminal, use the
helpswitch to see other options for this project template, as shown in the following command:dotnet new mvc --help - Note the results, as shown in the following partial output:
ASP.NET Core Web App (Model-View-Controller) (C#)
Author: Microsoft
Description: A project template for creating an ASP.NET Core application with example ASP.NET Core MVC Views and Controllers. This template can also be used for RESTful HTTP services.
This template contains technologies from parties other than Microsoft, see https://aka.ms/aspnetcore/6.0-third-party-notices for details.
There are many options, especially related to authentication, as shown in the following table:
|
Switches |
Description |
|
|
The type of authentication to use:
|
|
|
Whether to use SQL Server LocalDB instead of SQLite. This option only applies if |
|
|
Determines if the project is configured to use Razor runtime compilation in |
|
|
The target framework for the project. Values can be: |
Creating the authentication database for SQL Server LocalDB
If you created the MVC project using Visual Studio 2022, or you used dotnet new mvc with the -uld or --use-local-db switch, then the database for authentication and authorization will be stored in SQL Server LocalDB. But the database does not yet exist. Let's create it now.
At a command prompt or terminal, in the Northwind.Mvc folder, enter the command to run database migrations so that the database used to store credentials for authentication is created, as shown in the following command:
dotnet ef database update
If you created the MVC project using dotnet new, then the database for authentication and authorization will be stored in SQLite and the file has already been created named app.db.
The connection string for the authentication database is named DefaultConnection and it is stored in the appsettings.json file in the root folder for the MVC website project.
For SQL Server LocalDB (with a truncated connection string), see the following markup:
{
  "ConnectionStrings": {
    "DefaultConnection": "Server=(localdb)\\mssqllocaldb;Database=aspnet-Northwind.Mvc-...;Trusted_Connection=True;MultipleActiveResultSets=true"
  },
For SQLite, see the following markup:
{
  "ConnectionStrings": {
    "DefaultConnection": "DataSource=app.db;Cache=Shared"
  },
Exploring the default ASP.NET Core MVC website
Let's review the behavior of the default ASP.NET Core MVC website project template:
- In the
Northwind.Mvcproject, expand thePropertiesfolder, open thelaunchSettings.jsonfile, and note the random port numbers (yours will be different) configured for the project forHTTPSandHTTP, as shown in the following markup:"profiles": { "Northwind.Mvc": { "commandName": "Project", "dotnetRunMessages": true, "launchBrowser": true, "applicationUrl": "https://localhost:7274;http://localhost:5274", "environmentVariables": { "ASPNETCORE_ENVIRONMENT": "Development" } }, - Change the port numbers to
5001forHTTPSand5000forHTTP, as shown in the following markup:"applicationUrl": "https://localhost:5001;http://localhost:5000", - Save the changes to the
launchSettings.jsonfile. - Start the website.
- Start Chrome and open Developer Tools.
- Navigate to
http://localhost:5000/and note the following, as shown in Figure 15.1:- Requests for HTTP are automatically redirected to HTTPS on port
5001. - The top navigation menu with links to Home, Privacy, Register, and Login. If the viewport width is 575 pixels or less, then the navigation collapses into a hamburger menu.
- The title of the website, Northwind.Mvc, shown in the header and footer.
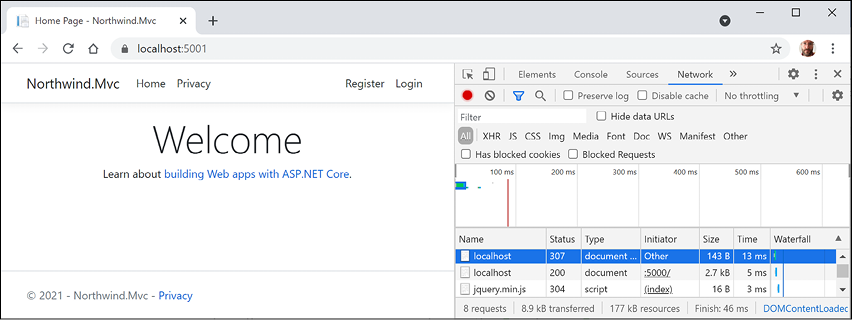
- Requests for HTTP are automatically redirected to HTTPS on port
Figure 15.1: The ASP.NET Core MVC project template website home page
Understanding visitor registration
By default, passwords must have at least one non-alphanumeric character, they must have at least one digit (0-9), and they must have at least one uppercase letter (A-Z). I use Pa$$w0rd in scenarios like this when I am just exploring.
The MVC project template follows best practice for double-opt-in (DOI), meaning that after filling in an email and password to register, an email is sent to the email address, and the visitor must click a link in that email to confirm that they want to register.
We have not yet configured an email provider to send that email, so we must simulate that step:
- In the top navigation menu, click Register.
- Enter an email and password, and then click the Register button. (I used
test@example.comandPa$$w0rd.) - Click the link with the text Click here to confirm your account and note that you are redirected to a Confirm email web page that you could customize.
- In the top navigation menu, click Login, enter your email and password (note that there is an optional checkbox to remember you, and there are links if the visitor has forgotten their password or they want to register as a new visitor), and then click the Log in button.
- Click your email address in the top navigation menu. This will navigate to an account management page. Note that you can set a phone number, change your email address, change your password, enable two-factor authentication (if you add an authenticator app), and download and delete your personal data.
- Close Chrome and shut down the web server.
Reviewing an MVC website project structure
In your code editor, in Visual Studio Solution Explorer (toggle on Show All Files) or in Visual Studio Code EXPLORER, review the structure of an MVC website project, as shown in Figure 15.2:
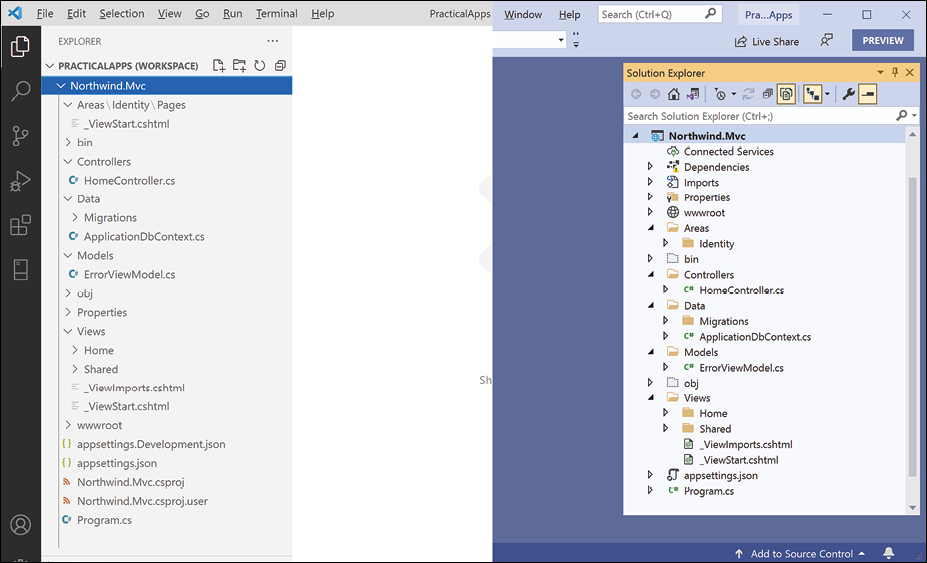
Figure 15.2: The default folder structure of an ASP.NET Core MVC project
We will look in more detail at some of these parts later, but for now, note the following:
Areas: This folder contains nested folders and a file needed to integrate your website project with ASP.NET Core Identity, which is used for authentication.bin,obj: These folders contain temporary files needed during the build process and the compiled assemblies for the project.Controllers: This folder contains C# classes that have methods (known as actions) that fetch a model and pass it to a view, for example,HomeController.cs.Data: This folder contains Entity Framework Core migration classes used by the ASP.NET Core Identity system to provide data storage for authentication and authorization, for example,ApplicationDbContext.cs.Models: This folder contains C# classes that represent all of the data gathered together by a controller and passed to a view, for example,ErrorViewModel.cs.Properties: This folder contains a configuration file for IIS or IIS Express on Windows and for launching the website during development namedlaunchSettings.json. This file is only used on the local development machine and is not deployed to your production website.Views: This folder contains the.cshtmlRazor files that combine HTML and C# code to dynamically generate HTML responses. The_ViewStartfile sets the default layout and_ViewImportsimports common namespaces used in all views like tag helpers:Home: This subfolder contains Razor files for the home and privacy pages.Shared: This subfolder contains Razor files for the shared layout, an error page, and two partial views for logging in and validation scripts.
wwwroot: This folder contains static content used by the website, such as CSS for styling, libraries of JavaScript, JavaScript for this website project, and afavicon.icofile. You also put images and other static file resources like PDF documents in here. The project template includes Bootstrap and jQuery libraries.app.db: This is the SQLite database that stores registered visitors. (If you used SQL Server LocalDB, then it will not be needed.)appsettings.jsonandappsettings.Development.json: These files contain settings that your website can load at runtime, for example, the database connection string for the ASP.NET Core Identity system and logging levels.Northwind.Mvc.csproj: This file contains project settings like the use of the Web .NET SDK, an entry for SQLite to ensure that theapp.dbfile is copied to the website's output folder, and a list of NuGet packages that your project requires, including:Microsoft.AspNetCore.Diagnostics.EntityFrameworkCoreMicrosoft.AspNetCore.Identity.EntityFrameworkCoreMicrosoft.AspNetCore.Identity.UIMicrosoft.EntityFrameworkCore.SqliteorMicrosoft.EntityFrameworkCore.SqlServerMicrosoft.EntityFrameworkCore.Tools
Program.cs: This file defines a hiddenProgramclass that contains theMainentry point. It builds a pipeline for processing incoming HTTP requests and hosts the website using default options like configuring the Kestrel web server and loadingappsettings. It adds and configures services that your website needs, for example, ASP.NET Core Identity for authentication, SQLite or SQL Server for identity data storage, and so on, and routes for your application.
Reviewing the ASP.NET Core Identity database
Open appsettings.json to find the connection string used for the ASP.NET Core Identity database, as shown highlighted for SQL Server LocalDB in the following markup:
{
  "ConnectionStrings": {
    "DefaultConnection": "Server=(localdb)\\mssqllocaldb;Database=aspnet-Northwind.Mvc-2F6A1E12-F9CF-480C-987D-FEFB4827DE22;Trusted_Connection=True;MultipleActiveResultSets=true"
  },
  "Logging": {
    "LogLevel": {
      "Default": "Information",
      "Microsoft": "Warning",
      "Microsoft.Hosting.Lifetime": "Information"
    }
  },
  "AllowedHosts": "*"
}
If you used SQL Server LocalDB for the identity data store, then you can use Server Explorer to connect to the database. You can copy and paste the connection string from the appsettings.json file (but remove the second backslash between (localdb) and mssqllocaldb).
If you installed an SQLite tool such as SQLiteStudio, then you can open the SQLite app.db database file.
You can then see the tables that the ASP.NET Core Identity system uses to register users and roles, including the AspNetUsers table used to store the registered visitor.
Good Practice: The ASP.NET Core MVC project template follows good practice by storing a hash of the password instead of the password itself, which you will learn more about in Chapter 20, Protecting Your Data and Applications.
Exploring an ASP.NET Core MVC website
Let's walk through the parts that make up a modern ASP.NET Core MVC website.
Understanding ASP.NET Core MVC initialization
Appropriately enough, we will start by exploring the MVC website's default initialization and configuration:
- Open the
Program.csfile and note that it uses the top-level program feature (so there is a hiddenProgramclass with aMainmethod). This file can be considered to be divided into four important sections from top to bottom..NET 5 and earlier ASP.NET Core project templates used a
Startupclass to separate these parts into separate methods but with .NET 6, Microsoft encourages putting everything in a singleProgram.csfile. - The first section imports some namespaces, as shown in the following code:
using Microsoft.AspNetCore.Identity; // IdentityUser
using Microsoft.EntityFrameworkCore; // UseSqlServer, UseSqlite
using Northwind.Mvc.Data; // ApplicationDbContext
Remember that by default, many other namespaces are imported using the implicit usings feature of .NET 6 and later. Build the project and then the globally imported namespaces can be found in the following path:
obj\Debug\net6.0\Northwind.Mvc.GlobalUsings.g.cs. - The second section creates and configures a web host builder. It registers an application database context using SQL Server or SQLite with its database connection string loaded from the
appsettings.jsonfile for its data storage, adds ASP.NET Core Identity for authentication and configures it to use the application database, and adds support for MVC controllers with views, as shown in the following code:var builder = WebApplication.CreateBuilder(args); // Add services to the container. var connectionString = builder.Configuration .GetConnectionString("DefaultConnection"); builder.Services.AddDbContext<ApplicationDbContext>(options => options.UseSqlServer(connectionString)); // or UseSqlite builder.Services.AddDatabaseDeveloperPageExceptionFilter(); builder.Services.AddDefaultIdentity<IdentityUser>(options => options.SignIn.RequireConfirmedAccount = true) .AddEntityFrameworkStores<ApplicationDbContext>(); builder.Services.AddControllersWithViews();The
builderobject has two commonly used objects:ConfigurationandServices:Configurationcontains merged values from all the places you could set configuration:appsettings.json, environment variables, command-line arguments, and so onServicesis a collection of registered dependency services
The call to
AddDbContextis an example of registering a dependency service. ASP.NET Core implements the dependency injection (DI) design pattern so that other components like controllers can request needed services through their constructors. Developers register those services in this section ofProgram.cs(or if using aStartupclass then in itsConfigureServicesmethod.) - The third section configures the HTTP request pipeline. It configures a relative URL path to run database migrations if the website runs in development, or a friendlier error page and HSTS for production. HTTPS redirection, static files, routing, and ASP.NET Identity are enabled, and an MVC default route and Razor Pages are configured, as shown in the following code:
// Configure the HTTP request pipeline.
if (app.Environment.IsDevelopment())
{
  app.UseMigrationsEndPoint();
}
else
{
  app.UseExceptionHandler("/Home/Error");
  // The default HSTS value is 30 days. You may want to change this for production scenarios, see https://aka.ms/aspnetcore-hsts.
  app.UseHsts();
}
app.UseHttpsRedirection();
app.UseStaticFiles();
app.UseRouting();
app.UseAuthentication();
app.UseAuthorization();
app.MapControllerRoute(
  name: "default",
  pattern: "{controller=Home}/{action=Index}/{id?}");
app.MapRazorPages();
We learned about most of these methods and features in Chapter 14, Building Websites Using ASP.NET Core Razor Pages.
Good Practice: What does the extension method
UseMigrationsEndPointdo? You could read the official documentation, but it does not help much. For example, it does not tell us what relative URL path it defines by default: https://docs.microsoft.com/en-us/dotnet/api/microsoft.aspnetcore.builder.migrationsendpointextensions.usemigrationsendpoint. Luckily, ASP.NET Core is open source, so we can read the source code and discover what it does, at the following link: https://github.com/dotnet/aspnetcore/blob/main/src/Middleware/Diagnostics.EntityFrameworkCore/src/MigrationsEndPointOptions.cs#L18. Get into the habit of exploring the source code for ASP.NET Core to understand how it works.Apart from the
UseAuthenticationandUseAuthorizationmethods, the most important new method in this section ofProgram.csisMapControllerRoute, which maps a default route for use by MVC. This route is very flexible because it will map to almost any incoming URL, as you will see in the next topic.Although we will not create any Razor Pages in this chapter, we need to leave the method call that maps Razor Page support because our MVC website uses ASP.NET Core Identity for authentication and authorization, and it uses a Razor Class Library for its user interface components, like visitor registration and login.
- The fourth and final section has a thread-blocking method call that runs the website and waits for incoming HTTP requests to respond to, as shown in the following code:
app.Run(); // blocking call
Understanding the default MVC route
The responsibility of a route is to discover the name of a controller class to instantiate and an action method to execute with an optional id parameter to pass into the method that will generate an HTTP response.
A default route is configured for MVC, as shown in the following code:
endpoints.MapControllerRoute(
  name: "default",
  pattern: "{controller=Home}/{action=Index}/{id?}");
The route pattern has parts in curly brackets {} called segments, and they are like named parameters of a method. The value of these segments can be any string. Segments in URLs are not case-sensitive.
The route pattern looks at any URL path requested by the browser and matches it to extract the name of a controller, the name of an action, and an optional id value (the ? symbol makes it optional).
If the user hasn't entered these names, it uses defaults of Home for the controller and Index for the action (the = assignment sets a default for a named segment).
The following table contains example URLs and how the default route would work out the names of a controller and action:
|
URL |
Controller |
Action |
ID |
|
|
Home |
Index |
|
|
|
Muppet |
Index |
|
|
|
Muppet |
Kermit |
|
|
|
Muppet |
Kermit |
Green |
|
|
Products |
Index |
|
|
|
Products |
Detail |
|
|
|
Products |
Detail |
3 |
Understanding controllers and actions
In MVC, the C stands for controller. From the route and an incoming URL, ASP.NET Core knows the name of the controller, so it will then look for a class that is decorated with the [Controller] attribute or derives from a class decorated with that attribute, for example, the Microsoft-provided class named ControllerBase, as shown in the following code:
namespace Microsoft.AspNetCore.Mvc
{
  //
  // Summary:
  // A base class for an MVC controller without view support.
  [Controller]
  public abstract class ControllerBase
  {
...
Understanding the ControllerBase class
As you can see in the XML comment, ControllerBase does not support views. It is used for creating web services, as you will see in Chapter 16, Building and Consuming Web Services.
ControllerBase has many useful properties for working with the current HTTP context, as shown in the following table:
|
Property |
Description |
|
|
Just the HTTP request. For example, headers, query string parameters, the body of the request as a stream that you can read from, the content type and length, and cookies. |
|
|
Just the HTTP response. For example, headers, the body of the response as a stream that you can write to, the content type and length, status code, and cookies. There are also delegates like |
|
|
Everything about the current HTTP context including the request and response, information about the connection, a collection of features that have been enabled on the server with middleware, and a |
Understanding the Controller class
Microsoft provides another class named Controller that your classes can inherit from if they do need view support, as shown in the following code:
namespace Microsoft.AspNetCore.Mvc
{
  //
  // Summary:
  // A base class for an MVC controller with view support.
  public abstract class Controller : ControllerBase,
    IActionFilter, IFilterMetadata, IAsyncActionFilter, IDisposable
  {
...
Controller has many useful properties for working with views, as shown in the following table:
|
Property |
Description |
|
|
A dictionary that the controller can store key/value pairs in that is accessible in a view. The dictionary's lifetime is only for the current request/response. |
|
|
A dynamic object that wraps the |
|
|
A dictionary that the controller can store key/value pairs in that is accessible in a view. The dictionary's lifetime is for the current request/response and the next request/response for the same visitor session. This is useful for storing a value during an initial request, responding with a redirect, and then reading the stored value in the subsequent request. |
Controller has many useful methods for working with views, as shown in the following table:
|
Property |
Description |
|
|
Returns a |
|
|
Returns a |
|
|
Returns a |
|
|
Returns a |
Understanding the responsibilities of a controller
The responsibilities of a controller are as follows:
- Identify the services that the controller needs to be in a valid state and to function properly in their class constructor(s).
- Use the action name to identify a method to execute.
- Extract parameters from the HTTP request.
- Use the parameters to fetch any additional data needed to construct a view model and pass it to the appropriate view for the client. For example, if the client is a web browser, then a view that renders HTML would be most appropriate. Other clients might prefer alternative renderings, like document formats such as a PDF file or an Excel file, or data formats, like JSON or XML.
- Return the results from the view to the client as an HTTP response with an appropriate status code.
Let's review the controller used to generate the home, privacy, and error pages:
- Expand the
Controllersfolder - Open the file named
HomeController.cs - Note, as shown in the following code, that:
- Extra namespaces are imported, which I have added comments for to show which types they are needed for.
- A private read-only field is declared to store a reference to a logger for the
HomeControllerthat is set in a constructor. - All three action methods call a method named
Viewand return the results as anIActionResultinterface to the client. - The
Erroraction method passes a view model into its view with a request ID used for tracing. The error response will not be cached:
using Microsoft.AspNetCore.Mvc; // Controller, IActionResult
using Northwind.Mvc.Models; // ErrorViewModel
using System.Diagnostics; // Activity
namespace Northwind.Mvc.Controllers;
public class HomeController : Controller
{
  private readonly ILogger<HomeController> _logger;
  public HomeController(ILogger<HomeController> logger)
  {
    _logger = logger;
  }
  public IActionResult Index()
  {
    return View();
  }
  public IActionResult Privacy()
  {
    return View();
  }
  [ResponseCache(Duration = 0,
    Location = ResponseCacheLocation.None, NoStore = true)]
  public IActionResult Error()
  {
    return View(new ErrorViewModel { RequestId =
      Activity.Current?.Id ?? HttpContext.TraceIdentifier });
  }
}
If the visitor navigates to a path of / or /Home, then it is the equivalent of /Home/Index because those were the default names for controller and action in the default route.
Understanding the view search path convention
The Index and Privacy methods are identical in implementation, yet they return different web pages. This is because of conventions. The call to the View method looks in different paths for the Razor file to generate the web page.
Let's deliberately break one of the page names so that we can see the paths searched by default:
- In the
Northwind.Mvcproject, expand theViewsfolder and then theHomefolder. - Rename the
Privacy.cshtmlfile toPrivacy2.cshtml. - Start the website.
- Start Chrome, navigate to
https://localhost:5001/, click Privacy, and note the paths that are searched for a view to render the web page (including inSharedfolders for MVC views and Razor Pages), as shown in Figure 15.3:
Figure 15.3: An exception showing the default search path for views
- Close Chrome and shut down the web server.
- Rename the
Privacy2.cshtmlfile back toPrivacy.cshtml.
You have now seen the view search path convention, as shown in the following list:
- Specific Razor view:
/Views/{controller}/{action}.cshtml - Shared Razor view:
/Views/Shared/{action}.cshtml - Shared Razor Page:
/Pages/Shared/{action}.cshtml
Understanding logging
You have just seen that some errors are caught and written to the console. You can write messages to the console in the same way by using the logger.
- In the
Controllersfolder, inHomeController.cs, in theIndexmethod, add statements to use the logger to write some messages of various levels to the console, as shown in the following code:_logger.LogError("This is a serious error (not really!)"); _logger.LogWarning("This is your first warning!"); _logger.LogWarning("Second warning!"); _logger.LogInformation("I am in the Index method of the HomeController."); - Start the
Northwind.Mvcwebsite project. - Start a web browser and navigate to the home page for the website.
- At the command prompt or terminal, note the messages, as shown in the following output:
fail: Northwind.Mvc.Controllers.HomeController[0] This is a serious error (not really!) warn: Northwind.Mvc.Controllers.HomeController[0] This is your first warning! warn: Northwind.Mvc.Controllers.HomeController[0] Second warning! info: Northwind.Mvc.Controllers.HomeController[0] I am in the Index method of the HomeController. - Close Chrome and shut down the web server.
Understanding filters
When you need to add some functionality to multiple controllers and actions, you can use or define your own filters that are implemented as an attribute class.
Filters can be applied at the following levels:
- At the action level by decorating an action method with the attribute. This will only affect the one action method.
- At the controller level by decorating the controller class with the attribute. This will affect all methods of the controller.
- At the global level by adding the attribute type to the
Filterscollection of theMvcOptionsinstance that can be used to configure MVC when calling theAddControllersWithViewsmethod, as shown in the following code:builder.Services.AddControllersWithViews(options => { options.Filters.Add(typeof(MyCustomFilter)); });
Using a filter to secure an action method
You might want to ensure that one particular action method of a controller class can only be called by members of certain security roles. You do this by decorating the method with the [Authorize] attribute, as described in the following list:
[Authorize]: Only allow authenticated (non-anonymous, logged-in) visitors to access this action method.[Authorize(Roles = "Sales,Marketing")]: Only allow visitors who are members of the specified role(s) to access this action method.
Let's see an example:
- In
HomeController.cs, import theMicrosoft.AspNetCore.Authorizationnamespace. - Add an attribute to the
Privacymethod to only allow access to logged-in users who are members of a group/role namedAdministrators, as shown highlighted in the following code:[Authorize(Roles = "Administrators")] public IActionResult Privacy() - Start the website.
- Click Privacy and note that you are redirected to the log in page.
- Enter your email and password.
- Click Log in and note that you are denied access.
- Close Chrome and shut down the web server.
Enabling role management and creating a role programmatically
By default, role management is not enabled in an ASP.NET Core MVC project, so we must first enable it before creating roles, and then we will create a controller that will programmatically create an Administrators role (if it does not already exist) and assign a test user to that role:
- In
Program.cs, in the setup of ASP.NET Core Identity and its database, add a call toAddRolesto enable role management, as shown highlighted in the following code:services.AddDefaultIdentity<IdentityUser>( options => options.SignIn.RequireConfirmedAccount = true) .AddRoles<IdentityRole>() // enable role management .AddEntityFrameworkStores<ApplicationDbContext>(); - In
Controllers, add an empty controller class namedRolesController.csand modify its contents, as shown in the following code:using Microsoft.AspNetCore.Identity; // RoleManager, UserManager using Microsoft.AspNetCore.Mvc; // Controller, IActionResult using static System.Console; namespace Northwind.Mvc.Controllers; public class RolesController : Controller { private string AdminRole = "Administrators"; private string UserEmail = "test@example.com"; private readonly RoleManager<IdentityRole> roleManager; private readonly UserManager<IdentityUser> userManager; public RolesController(RoleManager<IdentityRole> roleManager, UserManager<IdentityUser> userManager) { this.roleManager = roleManager; this.userManager = userManager; } public async Task<IActionResult> Index() { if (!(await roleManager.RoleExistsAsync(AdminRole))) { await roleManager.CreateAsync(new IdentityRole(AdminRole)); } IdentityUser user = await userManager.FindByEmailAsync(UserEmail); if (user == null) { user = new(); user.UserName = UserEmail; user.Email = UserEmail; IdentityResult result = await userManager.CreateAsync( user, "Pa$$w0rd"); if (result.Succeeded) { WriteLine($"User {user.UserName} created successfully."); } else { foreach (IdentityError error in result.Errors) { WriteLine(error.Description); } } } if (!user.EmailConfirmed) { string token = await userManager .GenerateEmailConfirmationTokenAsync(user); IdentityResult result = await userManager .ConfirmEmailAsync(user, token); if (result.Succeeded) { WriteLine($"User {user.UserName} email confirmed successfully."); } else { foreach (IdentityError error in result.Errors) { WriteLine(error.Description); } } } if (!(await userManager.IsInRoleAsync(user, AdminRole))) { IdentityResult result = await userManager .AddToRoleAsync(user, AdminRole); if (result.Succeeded) { WriteLine($"User {user.UserName} added to {AdminRole} successfully."); } else { foreach (IdentityError error in result.Errors) { WriteLine(error.Description); } } } return Redirect("/"); } }- Two fields for the name of the role and email of the user.
- The constructor gets and stores the registered user and role manager dependency services.
- If the
Administratorsrole does not exist, we use the role manager to create it. - We try to find a test user by its email, create it if it does not exist, and then assign the user to the
Administratorsrole. - Since the website uses DOI, we must generate an email confirmation token and use it to confirm the new users email address.
- Success messages and any errors are written out to the console.
- You will be automatically redirected to the home page.
- Start the website.
- Click Privacy and note that you are redirected to the login page.
- Enter your email and password. (I used
mark@example.com.) - Click Log in and note that you are denied access as before.
- Click Home.
- In the address bar, manually enter
rolesas a relative URL path, as shown in the following link:https://localhost:5001/roles. - View the success messages written to the console, as shown in the following output:
User test@example.com created successfully. User test@example.com email confirmed successfully. User test@example.com added to Administrators successfully. - Click Logout, because you must log out and log back in to load your role memberships when they are created after you have already logged in.
- Try accessing the Privacy page again, enter the email for the new user that was programmatically created, for example,
test@example.com, and their password, and then click Log in, and you should now have access. - Close Chrome and shut down the web server.
Using a filter to cache a response
To improve response times and scalability, you might want to cache the HTTP response that is generated by an action method by decorating the method with the [ResponseCache] attribute.
You control where the response is cached and for how long by setting parameters, as shown in the following list:
Duration: In seconds. This sets themax-ageHTTP response header measured in seconds. Common choices are one hour (3600 seconds) and one day (86400 seconds).Location: One of theResponseCacheLocationvalues,Any,Client, orNone. This sets thecache-controlHTTP response header.NoStore: Iftrue, this ignoresDurationandLocationand sets the cache-control HTTP response header tono-store.
Let's see an example:
- In
HomeController.cs, add an attribute to theIndexmethod to cache the response for 10 seconds on the browser or any proxies between the server and browser, as shown highlighted in the following code:[ResponseCache(Duration = 10, Location = ResponseCacheLocation.Any)] public IActionResult Index() - In
Views, inHome, openIndex.cshtml, and add a paragraph to output the current time in long format to include seconds, as shown in the following markup:<p class="alert alert-primary">@DateTime.Now.ToLongTimeString()</p> - Start the website.
- Note the time on the home page.
- Click Register.
- Click Home and note the time on the home page is the same because a cached version of the page is used.
- Click Register. Wait at least ten seconds.
- Click Home and note the time has now updated.
- Click Log in, enter your email and password, and then click Log in.
- Note the time on the home page.
- Click Privacy.
- Click Home and note the page is not cached.
- View the console and note the warning message explaining that your caching has been overridden because the visitor is logged in and, in this scenario, ASP.NET Core uses anti-forgery tokens and they should not be cached, as shown in the following output:
warn: Microsoft.AspNetCore.Antiforgery.DefaultAntiforgery[8] The 'Cache-Control' and 'Pragma' headers have been overridden and set to 'no-cache, no-store' and 'no-cache' respectively to prevent caching of this response. Any response that uses antiforgery should not be cached. - Close Chrome and shut down the web server.
Using a filter to define a custom route
You might want to define a simplified route for an action method instead of using the default route.
For example, to show the privacy page currently requires the following URL path, which specifies both the controller and action:
https://localhost:5001/home/privacy
We could make the route simpler, as shown in the following link:
https://localhost:5001/private
Let's see how to do that:
- In
HomeController.cs, add an attribute to thePrivacymethod to define a simplified route, as shown highlighted in the following code:[Route("private")] [Authorize(Roles = "Administrators")] public IActionResult Privacy() - Start the website.
- In the address bar, enter the following URL path:
https://localhost:5001/private - Enter your email and password, click Log in, and note that the simplified path shows the Privacy page.
- Close Chrome and shut down the web server.
Understanding entity and view models
In MVC, the M stands for model. Models represent the data required to respond to a request. There are two types of models commonly used: entity models and view models.
Entity models represent entities in a database like SQL Server or SQLite. Based on the request, one or more entities might need to be retrieved from data storage. Entity models are defined using classes since they might need to change and then be used to update the underlying data store.
All the data that we want to show in response to a request is the MVC model, sometimes called a view model, because it is a model that is passed into a view for rendering into a response format like HTML or JSON. View models should be immutable, so they are commonly defined using records.
For example, the following HTTP GET request might mean that the browser is asking for the product details page for product number 3:
http://www.example.com/products/details/3
The controller would need to use the ID route value 3 to retrieve the entity for that product and pass it to a view that can then turn the model into HTML for display in a browser.
Imagine that when a user comes to our website, we want to show them a carousel of categories, a list of products, and a count of the number of visitors we have had this month.
We will reference the Entity Framework Core entity data model for the Northwind database that you created in Chapter 13, Introducing Practical Applications of C# and .NET:
- In the
Northwind.Mvcproject, add a project reference toNorthwind.Common.DataContextfor either SQLite or SQL Server, as shown in the following markup:<ItemGroup> <!-- change Sqlite to SqlServer if you prefer --> <ProjectReference Include= "..\Northwind.Common.DataContext.Sqlite\Northwind.Common.DataContext.Sqlite.csproj" /> </ItemGroup> - Build the
Northwind.Mvcproject to compile its dependencies. - If you are using SQL Server, or might want to switch between SQL Server and SQLite, then in
appsettings.json, add a connection string for the Northwind database using SQL Server, as shown highlighted in the following markup:{ "ConnectionStrings": { "DefaultConnection": "Server=(localdb)\\mssqllocaldb;Database=aspnet-Northwind.Mvc-DC9C4FAF-DD84-4FC9-B925-69A61240EDA7;Trusted_Connection=True;MultipleActiveResultSets=true", "NorthwindConnection": "Server=.;Database=Northwind;Trusted_Connection=True;MultipleActiveResultSets=true" }, - In
Program.cs, import the namespace to work with your entity model types, as shown in the following code:using Packt.Shared; // AddNorthwindContext extension method - Before the
builder.Buildmethod call, add statements to load the appropriate connection string and then to register theNorthwinddatabase context, as shown in the following code:// if you are using SQL Server string sqlServerConnection = builder.Configuration .GetConnectionString("NorthwindConnection"); builder.Services.AddNorthwindContext(sqlServerConnection); // if you are using SQLite default is ..\Northwind.db builder.Services.AddNorthwindContext(); - Add a class file to the
Modelsfolder and name itHomeIndexViewModel.cs.Good Practice: Although the
ErrorViewModelclass created by the MVC project template does not follow this convention, I recommend that you use the naming convention{Controller}{Action}ViewModelfor your view model classes. - Modify the statements to define a record that has three properties for a count of the number of visitors, and lists of categories and products, as shown in the following code:
using Packt.Shared; // Category, Product namespace Northwind.Mvc.Models; public record HomeIndexViewModel ( int VisitorCount, IList<Category> Categories, IList<Product> Products ); - In
HomeController.cs, import thePackt.Sharednamespace, as shown in the following code:using Packt.Shared; // NorthwindContext - Add a field to store a reference to a
Northwindinstance, and initialize it in the constructor, as shown highlighted in the following code:public class HomeController : Controller { private readonly ILogger<HomeController> _logger; private readonly NorthwindContext db; public HomeController(ILogger<HomeController> logger, NorthwindContext injectedContext) { _logger = logger; db = injectedContext; } ...ASP.NET Core will use constructor parameter injection to pass an instance of the
NorthwindContextdatabase context using the connection string you specified inProgram.cs. - Modify the statements in the
Indexaction method to create an instance of the view model for this method, simulating a visitor count using theRandomclass to generate a number between 1 and 1000, and using theNorthwinddatabase to get lists of categories and products, and then pass the model to the view, as shown highlighted in the following code:[ResponseCache(Duration = 10, Location = ResponseCacheLocation.Any)] public IActionResult Index() { _logger.LogError("This is a serious error (not really!)"); _logger.LogWarning("This is your first warning!"); _logger.LogWarning("Second warning!"); _logger.LogInformation("I am in the Index method of the HomeController."); HomeIndexViewModel model = new ( VisitorCount: (new Random()).Next(1, 1001), Categories: db.Categories.ToList(), Products: db.Products.ToList() ); return View(model); // pass model to view }
Remember the view search convention: when the View method is called in a controller's action method, ASP.NET Core MVC looks in the Views folder for a subfolder with the same name as the current controller, that is, Home. It then looks for a file with the same name as the current action, that is, Index.cshtml. It will also search for views that match the action method name in the Shared folder and for Razor Pages in the Pages folder.
Understanding views
In MVC, the V stands for view. The responsibility of a view is to transform a model into HTML or other formats.
There are multiple view engines that could be used to do this. The default view engine is called Razor, and it uses the @ symbol to indicate server-side code execution. The Razor Pages feature introduced with ASP.NET Core 2.0 uses the same view engine and so can use the same Razor syntax.
Let's modify the home page view to render the lists of categories and products:
- Expand the
Viewsfolder, and then expand theHomefolder. - Open the
Index.cshtmlfile and note the block of C# code wrapped in@{ }. This will execute first and can be used to store data that needs to be passed into a shared layout file like the title of the web page, as shown in the following code:@{ ViewData["Title"] = "Home Page"; } - Note the static HTML content in the
<div>element that uses Bootstrap for styling.Good Practice: As well as defining your own styles, base your styles on a common library, such as Bootstrap, that implements responsive design.
Just as with Razor Pages, there is a file named
_ViewStart.cshtmlthat gets executed by theViewmethod. It is used to set defaults that apply to all views.For example, it sets the
Layoutproperty of all views to a shared layout file, as shown in the following markup:@{ Layout = "_Layout"; } - In the
Viewsfolder, open the_ViewImports.cshtmlfile and note that it imports some namespaces and then adds the ASP.NET Core tag helpers, as shown in the following code:@using Northwind.Mvc @using Northwind.Mvc.Models @addTagHelper *, Microsoft.AspNetCore.Mvc.TagHelpers - In the
Sharedfolder, open the_Layout.cshtmlfile. - Note that the title is being read from the
ViewDatadictionary that was set earlier in theIndex.cshtmlview, as shown in the following markup:<title>@ViewData["Title"] – Northwind.Mvc</title> - Note the rendering of links to support Bootstrap and a site stylesheet, where
~means thewwwrootfolder, as shown in the following markup:<link rel="stylesheet" href="~/lib/bootstrap/dist/css/bootstrap.css" /> <link rel="stylesheet" href="~/css/site.css" /> - Note the rendering of a navigation bar in the header, as shown in the following markup:
<body> <header> <nav class="navbar ..."> - Note the rendering of a collapsible
<div>containing a partial view for logging in and hyperlinks to allow users to navigate between pages using ASP.NET Core tag helpers with attributes likeasp-controllerandasp-action, as shown in the following markup:<div class= "navbar-collapse collapse d-sm-inline-flex justify-content-between"> <ul class="navbar-nav flex-grow-1"> <li class="nav-item"> <a class="nav-link text-dark" asp-area="" asp-controller="Home" asp-action="Index">Home</a> </li> <li class="nav-item"> <a class="nav-link text-dark" asp-area="" asp-controller="Home" asp-action="Privacy">Privacy</a> </li> </ul> <partial name="_LoginPartial" /> </div>The
<a>elements use tag helper attributes namedasp-controllerandasp-actionto specify the controller name and action name that will execute when the link is clicked on. If you want to navigate to a feature in a Razor Class Library, like theemployeescomponent that you created in the previous chapter, then you useasp-areato specify the feature name. - Note the rendering of the body inside the
<main>element, as shown in the following markup:<div class="container"> <main role="main" class="pb-3"> @RenderBody() </main> </div>The
RenderBodymethod injects the contents of a specific Razor view for a page like theIndex.cshtmlfile at that point in the shared layout. - Note the rendering of
<script>elements at the bottom of the page so that it does not slow down the display of the page and that you can add your own script blocks into an optional defined section namedscripts, as shown in the following markup:<script src="~/lib/jquery/dist/jquery.min.js"></script> <script src="~/lib/bootstrap/dist/js/bootstrap.bundle.min.js"> </script> <script src="~/js/site.js" asp-append-version="true"></script> @await RenderSectionAsync("scripts", required: false)
When asp-append-version is specified with a true value in any element like <img> or <script> along with a src attribute, the Image Tag Helper is invoked (this helper is poorly named because it does not only affect images!).
It works by automatically appending a query string value named v that is generated from a hash of the referenced source file, as shown in the following example generated output:
<script src="~/js/site.js? v=Kl_dqr9NVtnMdsM2MUg4qthUnWZm5T1fCEimBPWDNgM"></script>
If even a single byte within the site.js file changes, then its hash value will be different, and therefore if a browser or CDN is caching the script file, then it will bust the cached copy and replace it with the new version.
Customizing an ASP.NET Core MVC website
Now that you've reviewed the structure of a basic MVC website, you will customize and extend it. You have already registered an EF Core model for the Northwind database, so the next task is to output some of that data on the home page.
Defining a custom style
The home page will show a list of the 77 products in the Northwind database. To make efficient use of space, we want to show the list in three columns. To do this, we need to customize the stylesheet for the website:
- In the
wwwroot\cssfolder, open thesite.cssfile. - At the bottom of the file, add a new style that will apply to an element with the
product-columnsID, as shown in the following code:#product-columns { column-count: 3; }
Setting up the category images
The Northwind database includes a table of eight categories, but they do not have images, and websites look better with some colorful pictures:
- In the
wwwrootfolder, create a folder namedimages. - In the
imagesfolder, add eight image files namedcategory1.jpeg,category2.jpeg, and so on, up tocategory8.jpeg.
You can download images from the GitHub repository for this book at the following link: https://github.com/markjprice/cs10dotnet6/tree/master/Assets/Categories
Understanding Razor syntax
Before we customize the home page view, let's review an example Razor file that has an initial Razor code block that instantiates an order with price and quantity and then outputs information about the order on the web page, as shown in the following markup:
@{
  Order order = new()
  {
    OrderId = 123,
    Product = "Sushi",
    Price = 8.49M,
    Quantity = 3
  };
}
<div>Your order for @order.Quantity of @order.Product has a total cost of $@ order.Price * @order.Quantity</div>
The preceding Razor file would result in the following incorrect output:
Your order for 3 of Sushi has a total cost of $8.49 * 3
Although Razor markup can include the value of any single property using the @object.property syntax, you should wrap expressions in parentheses, as shown in the following markup:
<div>Your order for @order.Quantity of @order.Product has a total cost of $@ (order.Price * order.Quantity)</div>
The preceding Razor expression results in the following correct output:
Your order for 3 of Sushi has a total cost of $25.47
Defining a typed view
To improve the IntelliSense when writing a view, you can define what type the view can expect using an @model directive at the top:
- In the
Views\Homefolder, openIndex.cshtml. - At the top of the file, add a statement to set the model type to use the
HomeIndexViewModel, as shown in the following code:@model HomeIndexViewModelNow, whenever we type
Modelin this view, your code editor will know the correct type for the model and will provide IntelliSense for it.While entering code in a view, remember the following:
- Declare the type for the model, use
@model(with a lowercase m). - Interact with the instance of the model, use
@Model(with an uppercase M).
Let's continue customizing the view for the home page.
- Declare the type for the model, use
- In the initial Razor code block, add a statement to declare a
stringvariable for the current item and under the existing<div>element add new markup to output categories in a carousel and products as an unordered list, as shown in the following markup:@using Packt.Shared @model HomeIndexViewModel @{ ViewData["Title"] = "Home Page"; string currentItem = ""; } <div class="text-center"> <h1 class="display-4">Welcome</h1> <p>Learn about <a href="https://docs.microsoft.com/aspnet/core">building Web apps with ASP.NET Core</a>.</p> <p class="alert alert-primary">@DateTime.Now.ToLongTimeString()</p> </div> @if (Model is not null) { <div id="categories" class="carousel slide" data-ride="carousel" data-interval="3000" data-keyboard="true"> <ol class="carousel-indicators"> @for (int c = 0; c < Model.Categories.Count; c++) { if (c == 0) { currentItem = "active"; } else { currentItem = ""; } <li data-target="#categories" data-slide-to="@c" class="@currentItem"></li> } </ol> <div class="carousel-inner"> @for (int c = 0; c < Model.Categories.Count; c++) { if (c == 0) { currentItem = "active"; } else { currentItem = ""; } <div class="carousel-item @currentItem"> <img class="d-block w-100" src= "~/images/category@(Model.Categories[c].CategoryId).jpeg" alt="@Model.Categories[c].CategoryName" /> <div class="carousel-caption d-none d-md-block"> <h2>@Model.Categories[c].CategoryName</h2> <h3>@Model.Categories[c].Description</h3> <p> <a class="btn btn-primary" href="/category/@Model.Categories[c].CategoryId">View</a> </p> </div> </div> } </div> <a class="carousel-control-prev" href="#categories" role="button" data-slide="prev"> <span class="carousel-control-prev-icon" aria-hidden="true"></span> <span class="sr-only">Previous</span> </a> <a class="carousel-control-next" href="#categories" role="button" data-slide="next"> <span class="carousel-control-next-icon" aria-hidden="true"></span> <span class="sr-only">Next</span> </a> </div> } <div class="row"> <div class="col-md-12"> <h1>Northwind</h1> <p class="lead"> We have had @Model?.VisitorCount visitors this month. </p> @if (Model is not null) { <h2>Products</h2> <div id="product-columns"> <ul> @foreach (Product p in @Model.Products) { <li> <a asp-controller="Home" asp-action="ProductDetail" asp-route-id="@p.ProductId"> @p.ProductName costs @(p.UnitPrice is null ? "zero" : p.UnitPrice.Value.ToString("C")) </a> </li> } </ul> </div> } </div> </div>
While reviewing the preceding Razor markup, note the following:
- It is easy to mix static HTML elements such as
<ul>and<li>with C# code to output the carousel of categories and the list of product names. - The
<div>element with theidattribute ofproduct-columnswill use the custom style that we defined earlier, so all of the content in that element will display in three columns. - The
<img>element for each category uses parentheses around a Razor expression to ensure that the compiler does not include the.jpegas part of the expression, as shown in the following markup:"~/images/category@(Model.Categories[c].CategoryID).jpeg" - The
<a>elements for the product links use tag helpers to generate URL paths. Clicks on these hyperlinks will be handled by theHomeControllerand itsProductDetailaction method. This action method does not exist yet, but you will add it later in this chapter. The ID of the product is passed as a route segment namedid, as shown in the following URL path for Ipoh Coffee:https://localhost:5001/Home/ProductDetail/43.
Reviewing the customized home page
Let's see the result of our customized home page:
- Start the
Northwind.Mvcwebsite project. - Note the home page has a rotating carousel showing categories, a random number of visitors, and a list of products in three columns, as shown in Figure 15.4:
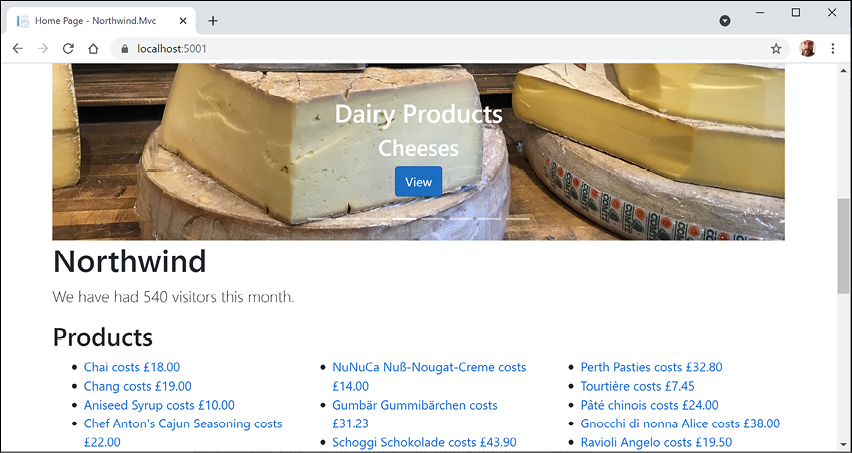
Figure 15.4: The updated Northwind MVC website home page
For now, clicking on any of the categories or product links gives 404 Not Found errors, so let's see how we can implement pages that use the passed parameters to see the details of a product or category.
- Close Chrome and shut down the web server.
Passing parameters using a route value
One way to pass a simple parameter is to use the id segment defined in the default route:
- In the
HomeControllerclass, add an action method namedProductDetail, as shown in the following code:public IActionResult ProductDetail(int? id) { if (!id.HasValue) { return BadRequest("You must pass a product ID in the route, for example, /Home/ProductDetail/21"); } Product? model = db.Products .SingleOrDefault(p => p.ProductId == id); if (model == null) { return NotFound($"ProductId {id} not found."); } return View(model); // pass model to view and then return result }Note the following:
- This method uses a feature of ASP.NET Core called model binding to automatically match the
idpassed in the route to the parameter namedidin the method. - Inside the method, we check to see whether
iddoes not have a value, and if so, we call theBadRequestmethod to return a400status code with a custom message explaining the correct URL path format. - Otherwise, we can connect to the database and try to retrieve a product using the
idvalue. - If we find a product, we pass it to a view; otherwise, we call the
NotFoundmethod to return a404status code and a custom message explaining that a product with that ID was not found in the database.
- This method uses a feature of ASP.NET Core called model binding to automatically match the
- Inside the
Views/Homefolder, add a new file namedProductDetail.cshtml. - Modify the contents, as shown in the following markup:
@model Packt.Shared.Product @{ ViewData["Title"] = "Product Detail - " + Model.ProductName; } <h2>Product Detail</h2> <hr /> <div> <dl class="dl-horizontal"> <dt>Product Id</dt> <dd>@Model.ProductId</dd> <dt>Product Name</dt> <dd>@Model.ProductName</dd> <dt>Category Id</dt> <dd>@Model.CategoryId</dd> <dt>Unit Price</dt> <dd>@Model.UnitPrice.Value.ToString("C")</dd> <dt>Units In Stock</dt> <dd>@Model.UnitsInStock</dd> </dl> </div> - Start the
Northwind.Mvcproject. - When the home page appears with the list of products, click on one of them, for example, the second product, Chang.
- Note the URL path in the browser's address bar, the page title shown in the browser tab, and the product details page, as shown in Figure 15.5:
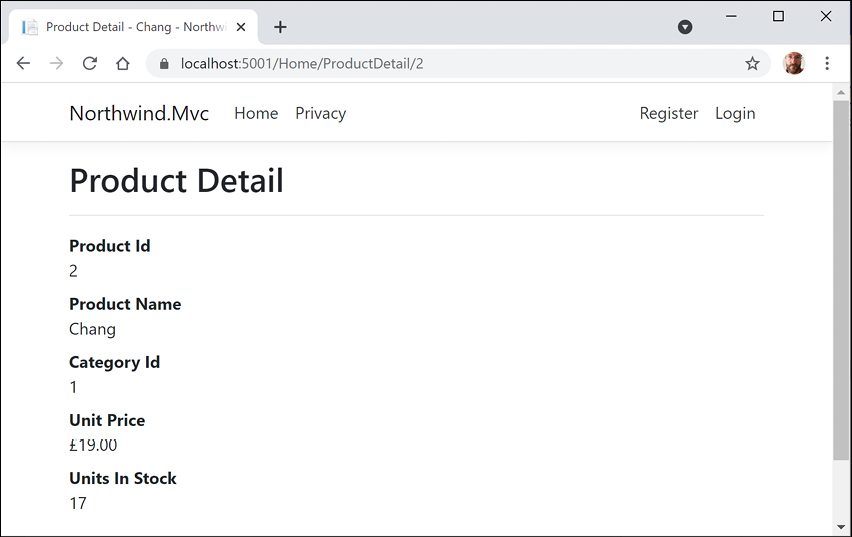
Figure 15.5: The product detail page for Chang
- View Developer tools.
- Edit the URL in the address box of Chrome to request a product ID that does not exist, like 99, and note the 404 Not Found status code and custom error response.
Understanding model binders in more detail
Model binders are powerful, and the default one does a lot for you. After the default route identifies a controller class to instantiate and an action method to call, if that method has parameters, then those parameters need to have values set.
Model binders do this by looking for parameter values passed in the HTTP request as any of the following types of parameters:
- Route parameter, like
idas we did in the previous section, as shown in the following URL path:/Home/ProductDetail/2 - Query string parameter, as shown in the following URL path:
/Home/ProductDetail?id=2 - Form parameter, as shown in the following markup:
<form action="post" action="/Home/ProductDetail">
  <input type="text" name="id" value="2" />
  <input type="submit" />
</form>
Model binders can populate almost any type:
- Simple types, like
int,string,DateTime, andbool. - Complex types defined by
class,record, orstruct. - Collection types, like arrays and lists.
Let's create a somewhat artificial example to illustrate what can be achieved using the default model binder:
- In the
Modelsfolder, add a new file namedThing.cs. - Modify the contents to define a class with two properties for a nullable integer named
Idand astringnamedColor, as shown in the following code:namespace Northwind.Mvc.Models; public class Thing { public int? Id { get; set; } public string? Color { get; set; } } - In
HomeController, add two new action methods, one to show a page with a form and one to display a thing with a parameter using your new model type, as shown in the following code:public IActionResult ModelBinding() { return View(); // the page with a form to submit } public IActionResult ModelBinding(Thing thing) { return View(thing); // show the model bound thing } - In the
Views\Homefolder, add a new file namedModelBinding.cshtml. - Modify its contents, as shown in the following markup:
@model Thing @{ ViewData["Title"] = "Model Binding Demo"; } <h1>@ViewData["Title"]</h1> <div> Enter values for your thing in the following form: </div> <form method="POST" action="/home/modelbinding?id=3"> <input name="color" value="Red" /> <input type="submit" /> </form> @if (Model != null) { <h2>Submitted Thing</h2> <hr /> <div> <dl class="dl-horizontal"> <dt>Model.Id</dt> <dd>@Model.Id</dd> <dt>Model.Color</dt> <dd>@Model.Color</dd> </dl> </div> } - In
Views/Home, openIndex.cshtml, and in the first<div>, add a new paragraph with a link to the model binding page, as shown in the following markup:<p><a asp-action="ModelBinding" asp-controller="Home">Binding</a></p> - Start the website.
- On the home page, click Binding.
- Note the unhandled exception about an ambiguous match, as shown in Figure 15.6:
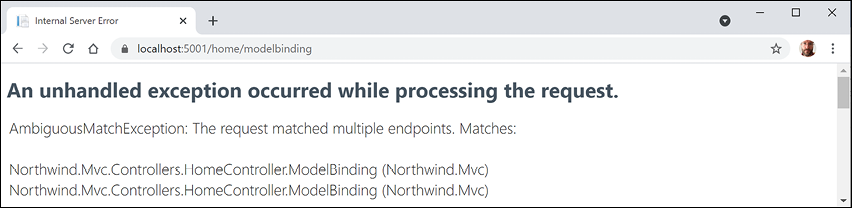
Figure 15.6: An unhandled ambiguous action method mismatch exception
- Close Chrome and shut down the web server.
Disambiguating action methods
Although the C# compiler can differentiate between the two methods by noting that the signatures are different, from the routing of an HTTP request's point of view, both methods are potential matches. We need an HTTP-specific way to disambiguate the action methods.
We could do this by creating different names for the actions or by specifying that one method should be used for a specific HTTP verb, like GET, POST, or DELETE. That is how we will solve the problem:
- In
HomeController, decorate the secondModelBindingaction method to indicate that it should be used for processing HTTPPOSTrequests, that is, when a form is submitted, as shown highlighted in the following code:[HttpPost] public IActionResult ModelBinding(Thing thing)The other
ModelBindingaction method will implicitly be used for all other types of HTTP request, likeGET,PUT,DELETE, and so on. - Start the website.
- On the home page, click Binding.
- Click the Submit button and note the value for the
Idproperty is set from the query string parameter and the value for the color property is set from the form parameter, as shown in Figure 15.7: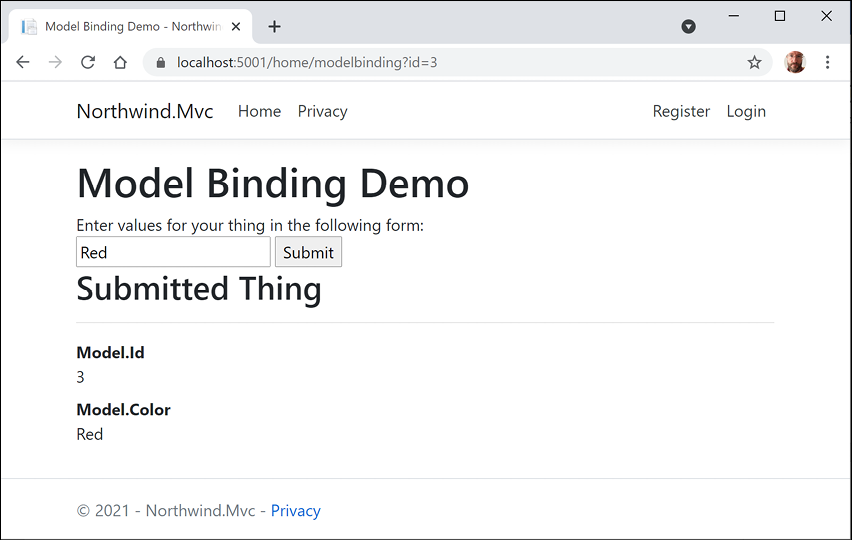
Figure 15.7: The Model Binding Demo page
- Close Chrome and shut down the web server.
Passing a route parameter
Now we will set the property using a route parameter:
- Modify the action for the form to pass the value
2as a route parameter, as shown highlighted in the following markup:<form method="POST" action="/home/modelbinding/2?id=3"> - Start the website.
- On the home page, click Binding.
- Click the Submit button and note the value for the
Idproperty is set from the route parameter and the value for theColorproperty is set from the form parameter. - Close Chrome and shut down the web server.
Passing a form parameter
Now we will set the property using a form parameter:
- Modify the action for the form to pass the value 1 as a form parameter, as shown highlighted in the following markup:
<form method="POST" action="/home/modelbinding/2?id=3"> <input name="id" value="1" /> <input name="color" value="Red" /> <input type="submit" /> </form> - Start the website.
- On the home page, click Binding.
- Click the Submit button and note the values for the
IdandColorproperties are both set from the form parameters.
Good Practice: If you have multiple parameters with the same name, then remember that form parameters have the highest priority and query string parameters have the lowest priority for automatic model binding.
Validating the model
The process of model binding can cause errors, for example, data type conversions or validation errors if the model has been decorated with validation rules. What data has been bound and any binding or validation errors are stored in ControllerBase.ModelState.
Let's explore what we can do with model state by applying some validation rules to the bound model and then showing invalid data messages in the view:
- In the
Modelsfolder, openThing.cs. - Import the
System.ComponentModel.DataAnnotationsnamespace. - Decorate the
Idproperty with a validation attribute to limit the range of allowed numbers to 1 to 10, and one to ensure that the visitor supplies a color, and add a newEmailproperty with a regular expression for validation, as shown highlighted in the following code:public class Thing { [Range(1, 10)] public int? Id { get; set; } [Required] public string? Color { get; set; } [EmailAddress] public string? Email { get; set; } } - In the
Modelsfolder, add a new file namedHomeModelBindingViewModel.cs. - Modify its contents to define a record with properties to store the bound model, a flag to indicate that there are errors, and a sequence of error messages, as shown in the following code:
namespace Northwind.Mvc.Models; public record HomeModelBindingViewModel ( Thing Thing, bool HasErrors, IEnumerable<string> ValidationErrors ); - In
HomeController, in theModelBindingmethod that handles HTTPPOST, comment out the previous statement that passed the thing to the view, and instead add statements to create an instance of the view model. Validate the model and store an array of error messages, and then pass the view model to the view, as shown highlighted in the following code:[HttpPost] public IActionResult ModelBinding(Thing thing) { HomeModelBindingViewModel model = new( thing, !ModelState.IsValid, ModelState.Values .SelectMany(state => state.Errors) .Select(error => error.ErrorMessage) ); return View(model); } - In
Views\Home, openModelBinding.cshtml. - Modify the model type declaration to use the view model class, as shown in the following markup:
@model Northwind.Mvc.Models.HomeModelBindingViewModel - Add a
<div>to show any model validation errors, and change the output of the thing's properties because the view model has changed, as shown highlighted in the following markup:<form method="POST" action="/home/modelbinding/2?id=3"> <input name="id" value="1" /> <input name="color" value="Red" /> <input name="email" value="test@example.com" /> <input type="submit" /> </form> @if (Model != null) { <h2>Submitted Thing</h2> <hr /> <div> <dl class="dl-horizontal"> <dt>Model.Thing.Id</dt> <dd>@Model.Thing.Id</dd> <dt>Model.Thing.Color</dt> <dd>@Model.Thing.Color</dd> <dt>Model.Thing.Email</dt> <dd>@Model.Thing.Email</dd> </dl> </div> @if (Model.HasErrors) { <div> @foreach(string errorMessage in Model.ValidationErrors) { <div class="alert alert-danger" role="alert">@errorMessage</div> } </div> } } - Start the website.
- On the home page, click Binding.
- Click the Submit button and note that
1,Red, andtest@example.comare valid values. - Enter an
Idof13, clear the color textbox, delete the@from the email address, click the Submit button, and note the error messages, as shown in Figure 15.8: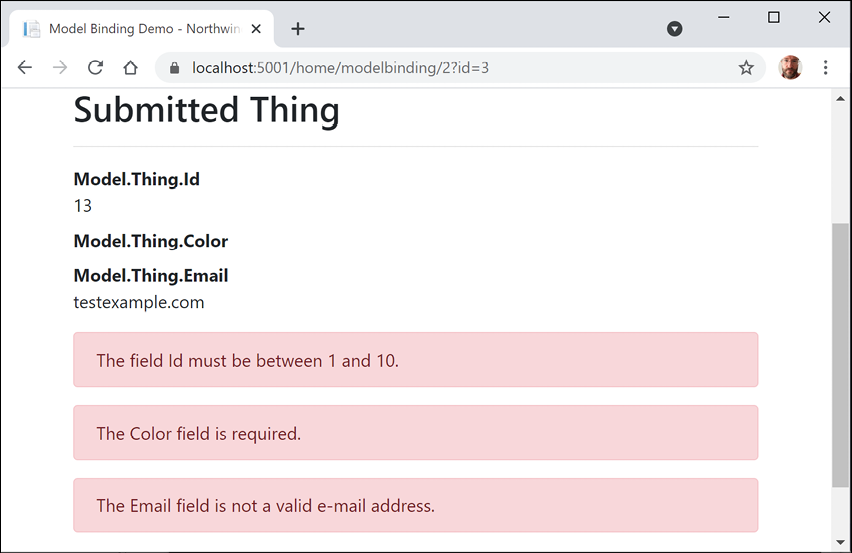
Figure 15.8: The Model Binding Demo page with field validations
- Close Chrome and shut down the web server.
Good Practice: What regular expression does Microsoft use for the implementation of the EmailAddress validation attribute? Find out at the following link: https://github.com/microsoft/referencesource/blob/5697c29004a34d80acdaf5742d7e699022c64ecd/System.ComponentModel.DataAnnotations/DataAnnotations/EmailAddressAttribute.cs#L54
Understanding view helper methods
While creating a view for ASP.NET Core MVC, you can use the Html object and its methods to generate markup.
Some useful methods include the following:
ActionLink: Use this to generate an anchor<a>element that contains a URL path to the specified controller and action. For example,Html.ActionLink(linkText: "Binding", actionName: "ModelBinding", controllerName: "Home")would generate<a href="/home/modelbinding">Binding</a>. You can achieve the same result using the anchor tag helper:<a asp-action="ModelBinding" asp-controller="Home">Binding</a>.AntiForgeryToken: Use this inside a<form>to insert a<hidden>element containing an anti-forgery token that will be validated when the form is submitted.DisplayandDisplayFor: Use this to generate HTML markup for the expression relative to the current model using a display template. There are built-in display templates for .NET types and custom templates can be created in theDisplayTemplatesfolder. The folder name is case-sensitive on case-sensitive filesystems.DisplayForModel: Use this to generate HTML markup for an entire model instead of a single expression.EditorandEditorFor: Use this to generate HTML markup for the expression relative to the current model using an editor template. There are built-in editor templates for .NET types that use<label>and<input>elements, and custom templates can be created in theEditorTemplatesfolder. The folder name is case-sensitive on case-sensitive filesystems.EditorForModel: Use this to generate HTML markup for an entire model instead of a single expression.Encode: Use this to safely encode an object or string into HTML. For example, the string value"<script>"would be encoded as"<script>". This is not normally necessary since the Razor@symbol encodes string values by default.Raw: Use this to render a string value without encoding as HTML.PartialAsyncandRenderPartialAsync: Use these to generate HTML markup for a partial view. You can optionally pass a model and view data.
- In
Views/Home, openModelBinding.cshtml. - Modify the rendering of the
Emailproperty to useDisplayFor, as shown in the following markup:<dd>@Html.DisplayFor(model => model.Thing.Email)</dd> - Start the website.
- Click Binding.
- Click Submit.
- Note the email address is a clickable hyperlink instead of just text.
- Close Chrome and shut down the web server.
- In
Models/Thing.cs, comment out the[EmailAddress]attribute above theEmailproperty. - Start the website.
- Click Binding.
- Click Submit.
- Note the email address is just text.
- Close Chrome and shut down the web server.
- In
Models/Thing.cs, uncomment the[EmailAddress]attribute.
It is the combination of decorating the Email property with the [EmailAddress] validation attribute and rendering it using DisplayFor that notifies ASP.NET Core to treat the value as an email address and therefore render it as a clickable link.
Querying a database and using display templates
Let's create a new action method that can have a query string parameter passed to it and use that to query the Northwind database for products that cost more than a specified price.
In previous examples, we defined a view model that contained properties for every value that needed to be rendered in the view. In this example, there will be two values: a list of products and the price the visitor entered. To avoid having to define a class or record for the view model, we will pass the list of products as the model and store the maximum price in the ViewData collection.
Let's implement this feature:
- In
HomeController, import theMicrosoft.EntityFrameworkCorenamespace. We need this to add theIncludeextension method so that we can include related entities, as you learned in Chapter 10, Working with Data Using Entity Framework Core. - Add a new action method, as shown in the following code:
public IActionResult ProductsThatCostMoreThan(decimal? price) { if (!price.HasValue) { return BadRequest("You must pass a product price in the query string, for example, /Home/ProductsThatCostMoreThan?price=50"); } IEnumerable<Product> model = db.Products .Include(p => p.Category) .Include(p => p.Supplier) .Where(p => p.UnitPrice > price); if (!model.Any()) { return NotFound( $"No products cost more than {price:C}."); } ViewData["MaxPrice"] = price.Value.ToString("C"); return View(model); // pass model to view } - In the
Views/Homefolder, add a new file namedProductsThatCostMoreThan.cshtml. - Modify the contents, as shown in the following code:
@using Packt.Shared @model IEnumerable<Product> @{ string title = "Products That Cost More Than " + ViewData["MaxPrice"]; ViewData["Title"] = title; } <h2>@title</h2> @if (Model is null) { <div>No products found.</div> } else { <table class="table"> <thead> <tr> <th>Category Name</th> <th>Supplier's Company Name</th> <th>Product Name</th> <th>Unit Price</th> <th>Units In Stock</th> </tr> </thead> <tbody> @foreach (Product p in Model) { <tr> <td> @Html.DisplayFor(modelItem => p.Category.CategoryName) </td> <td> @Html.DisplayFor(modelItem => p.Supplier.CompanyName) </td> <td> @Html.DisplayFor(modelItem => p.ProductName) </td> <td> @Html.DisplayFor(modelItem => p.UnitPrice) </td> <td> @Html.DisplayFor(modelItem => p.UnitsInStock) </td> </tr> } <tbody> </table> } - In the
Views/Homefolder, openIndex.cshtml. - Add the following form element below the visitor count and above the Products heading and its listing of products. This will provide a form for the user to enter a price. The user can then click Submit to call the action method that shows only products that cost more than the entered price:
<h3>Query products by price</h3> <form asp-action="ProductsThatCostMoreThan" method="GET"> <input name="price" placeholder="Enter a product price" /> <input type="submit" /> </form> - Start the website.
- On the home page, enter a price in the form, for example,
50, and then click on Submit. - Note the table of the products that cost more than the price that you entered, as shown in Figure 15.9:
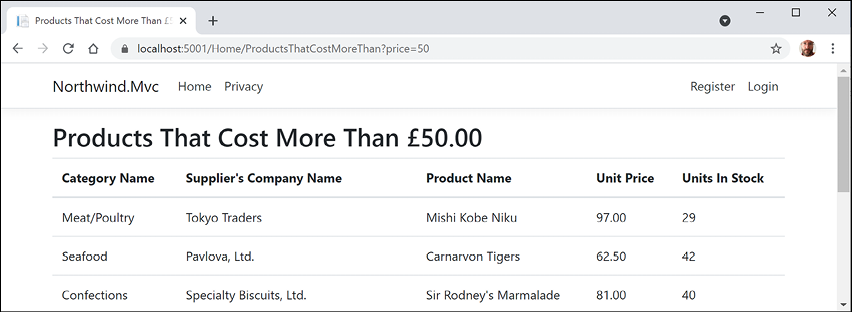
Figure 15.9: A filtered list of products that cost more than £50
- Close Chrome and shut down the web server.
Improving scalability using asynchronous tasks
When building a desktop or mobile app, multiple tasks (and their underlying threads) can be used to improve responsiveness, because while one thread is busy with the task, another can handle interactions with the user.
Tasks and their threads can be useful on the server side too, especially with websites that work with files, or request data from a store or a web service that could take a while to respond. But they are detrimental to complex calculations that are CPU-bound, so leave these to be processed synchronously as normal.
When an HTTP request arrives at the web server, a thread from its pool is allocated to handle the request. But if that thread must wait for a resource, then it is blocked from handling any more incoming requests. If a website receives more simultaneous requests than it has threads in its pool, then some of those requests will respond with a server timeout error, 503 Service Unavailable.
The threads that are locked are not doing useful work. They could handle one of those other requests but only if we implement asynchronous code in our websites.
Whenever a thread is waiting for a resource it needs, it can return to the thread pool and handle a different incoming request, improving the scalability of the website, that is, increasing the number of simultaneous requests it can handle.
Why not just have a larger thread pool? In modern operating systems, every thread in the pool has a 1 MB stack. An asynchronous method uses a smaller amount of memory. It also removes the need to create new threads in the pool, which takes time. The rate at which new threads are added to the pool is typically one every two seconds, which is a loooooong time compared to switching between asynchronous threads.
Good Practice: Make your controller action methods asynchronous.
Making controller action methods asynchronous
It is easy to make an existing action method asynchronous:
- Modify the
Indexaction method to be asynchronous, to return a task, and to await the calls to asynchronous methods to get the categories and products, as shown highlighted in the following code:public async Task<IActionResult> Index() { HomeIndexViewModel model = new ( VisitorCount = (new Random()).Next(1, 1001), Categories = await db.Categories.ToListAsync(), Products = await db.Products.ToListAsync() ); return View(model); // pass model to view } - Modify the
ProductDetailaction method in a similar way, as shown highlighted in the following code:public async Task<IActionResult> ProductDetail(int? id) { if (!id.HasValue) { return BadRequest("You must pass a product ID in the route, for example, /Home/ProductDetail/21"); } Product? model = await db.Products .SingleOrDefaultAsync(p => p.ProductId == id); if (model == null) { return NotFound($"ProductId {id} not found."); } return View(model); // pass model to view and then return result } - Start the website and note that the functionality of the website is the same, but trust that it will now scale better.
- Close Chrome and shut down the web server.
Practicing and exploring
Test your knowledge and understanding by answering some questions, get some hands-on practice, and explore this chapter's topics with deeper research.
Exercise 15.1 – Test your knowledge
Answer the following questions:
- What do the files with the special names
_ViewStartand_ViewImportsdo when created in theViewsfolder? - What are the names of the three segments defined in the default ASP.NET Core MVC route, what do they represent, and which are optional?
- What does the default model binder do, and what data types can it handle?
- In a shared layout file like
_Layout.cshtml, how do you output the content of the current view? - In a shared layout file like
_Layout.cshtml, how do you output a section that the current view can supply content for, and how does the view supply the contents for that section? - When calling the
Viewmethod inside a controller's action method, what paths are searched for the view by convention? - How can you instruct the visitor's browser to cache the response for 24 hours?
- Why might you enable Razor Pages even if you are not creating any yourself?
- How does ASP.NET Core MVC identify classes that can act as controllers?
- In what ways does ASP.NET Core MVC make it easier to test a website?
Exercise 15.2 – Practice implementing MVC by implementing a category detail page
The Northwind.Mvc project has a home page that shows categories, but when the View button is clicked, the website returns a 404 Not Found error, for example, for the following URL:
https://localhost:5001/category/1
Extend the Northwind.Mvc project by adding the ability to show a detail page for a category.
Exercise 15.3 – Practice improving scalability by understanding and implementing async action methods
A few years ago, Stephen Cleary wrote an excellent article for MSDN Magazine explaining the scalability benefits of implementing async action methods for ASP.NET. The same principles apply to ASP.NET Core, but even more so, because unlike the old ASP.NET as described in the article, ASP.NET Core supports asynchronous filters and other components.
Read the article at the following link:
Exercise 15.4 – Practice unit testing MVC controllers
Controllers are where the business logic of your website runs, so it is important to test the correctness of that logic using unit tests, as you learned in Chapter 4, Writing, Debugging, and Testing Functions.
Write some unit tests for HomeController.
Good Practice: You can read more about how to unit test controllers at the following link: https://docs.microsoft.com/en-us/aspnet/core/mvc/controllers/testing
Exercise 15.5 – Explore topics
Use the links on the following page to learn more about the topics covered in this chapter:
Summary
In this chapter, you learned how to build large, complex websites in a way that is easy to unit test by registering and injecting dependency services like database contexts and loggers and is easier to manage with teams of programmers using ASP.NET Core MVC. You learned about configuration, authentication, routes, models, views, and controllers.
In the next chapter, you will learn how to build and consume services that use HTTP as the communication layer, aka web services.