14
Building Websites Using ASP.NET Core Razor Pages
This chapter is about building websites with a modern HTTP architecture on the server side using Microsoft ASP.NET Core. You will learn about building simple websites using the ASP.NET Core Razor Pages feature introduced with ASP.NET Core 2.0 and the Razor class library feature introduced with ASP.NET Core 2.1.
This chapter will cover the following topics:
- Understanding web development
- Understanding ASP.NET Core
- Exploring ASP.NET Core Razor Pages
- Using Entity Framework Core with ASP.NET Core
- Using Razor class libraries
- Configuring services and the HTTP request pipeline
Understanding web development
Developing for the web means developing with Hypertext Transfer Protocol (HTTP), so we will start by reviewing this important foundational technology.
Understanding HTTP
To communicate with a web server, the client, also known as the user agent, makes calls over the network using HTTP. As such, HTTP is the technical underpinning of the web. So, when we talk about websites and web services, we mean that they use HTTP to communicate between a client (often a web browser) and a server.
A client makes an HTTP request for a resource, such as a page, uniquely identified by a Uniform Resource Locator (URL), and the server sends back an HTTP response, as shown in Figure 14.1:
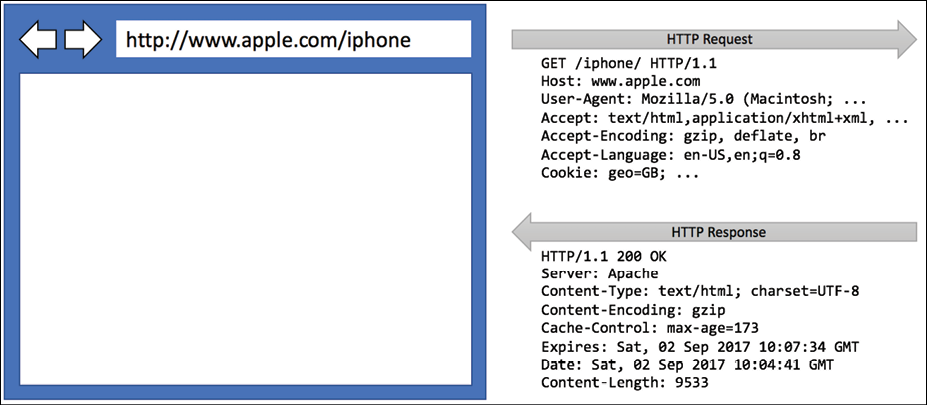
Figure 14.1: An HTTP request and response
You can use Google Chrome and other browsers to record requests and responses.
Good Practice: Google Chrome is available on more operating systems than any other browser, and it has powerful, built-in developer tools, so it is a good first choice of browser for testing your websites. Always test your web application with Chrome and at least two other browsers, for example, Firefox and Safari for macOS and iPhone. Microsoft Edge switched from using Microsoft's own rendering engine to using Chromium in 2019, so it is less important to test with it. If Microsoft's Internet Explorer is used at all, it tends to mostly be inside organizations for intranets.
Understanding the components of a URL
A URL is made up of several components:
- Scheme:
http(clear text) orhttps(encrypted). - Domain: For a production website or service, the top-level domain (TLD) might be
example.com. You might have subdomains such aswww,jobs, orextranet. During development, you typically uselocalhostfor all websites and services. - Port number: For a production website or service,
80forhttp,443forhttps. These port numbers are usually inferred from the scheme. During development, other port numbers are commonly used, such as5000,5001, and so on, to differentiate between websites and services that all use the shared domainlocalhost. - Path: A relative path to a resource, for example,
/customers/germany. - Query string: A way to pass parameter values, for example,
?country=Germany&searchtext=shoes. - Fragment: A reference to an element on a web page using its
id, for example,#toc.
Assigning port numbers for projects in this book
In this book, we will use the domain localhost for all websites and services, so we will use port numbers to differentiate projects when multiple need to execute at the same time, as shown in the following table:
|
Project |
Description |
Port numbers |
|
|
ASP.NET Core Razor Pages website |
|
|
|
ASP.NET Core MVC website |
|
|
|
ASP.NET Core Web API service |
|
|
|
ASP.NET Core Web API (minimal) |
|
|
|
ASP.NET Core OData service |
|
|
|
ASP.NET Core GraphQL service |
|
|
|
ASP.NET Core gRPC service |
|
|
|
Azure Functions nanoservice |
|
Using Google Chrome to make HTTP requests
Let's explore how to use Google Chrome to make HTTP requests:
- Start Google Chrome.
- Navigate to More tools | Developer tools.
- Click the Network tab, and Chrome should immediately start recording the network traffic between your browser and any web servers (note the red circle), as shown in Figure 14.2:
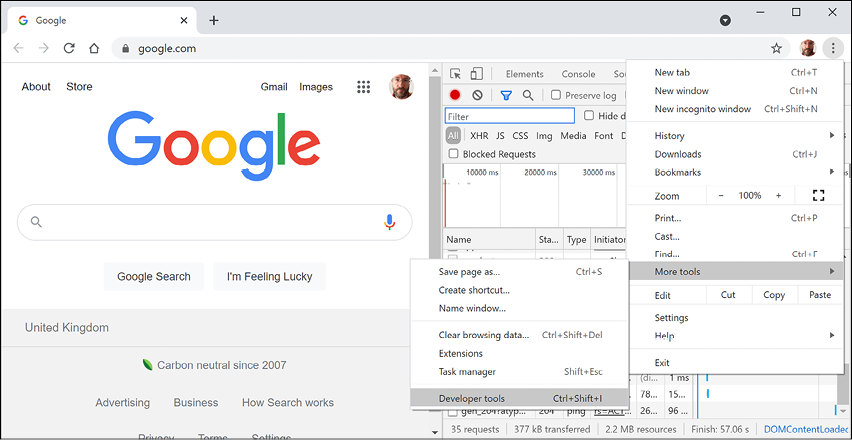
Figure 14.2: Chrome Developer Tools recording network traffic
- In Chrome's address box, enter the address of Microsoft's website for learning ASP.NET, as shown in the following URL:
- In Developer Tools, in the list of recorded requests, scroll to the top and click on the first entry, the row where the Type is document, as shown in Figure 14.3:
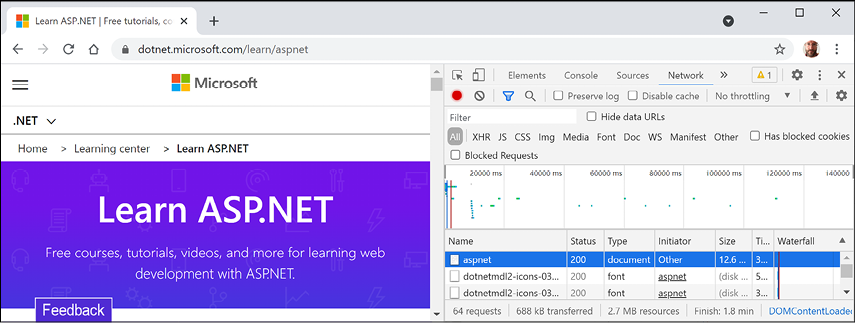
Figure 14.3: Recorded requests in Developer Tools
- On the right-hand side, click on the Headers tab, and you will see details about Request Headers and Response Headers, as shown in Figure 14.4:
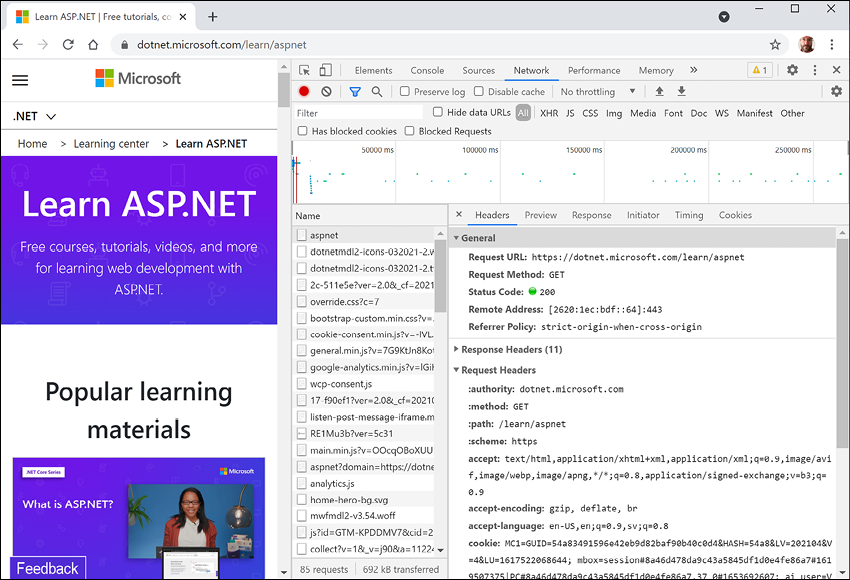
Figure 14.4: Request and response headers
Note the following aspects:
- Request Method is
GET. Other HTTP methods that you could see here includePOST,PUT,DELETE,HEAD, andPATCH. - Status Code is
200 OK. This means that the server found the resource that the browser requested and has returned it in the body of the response. Other status codes that you might see in response to aGETrequest include301 Moved Permanently,400 Bad Request,401 Unauthorized, and404 Not Found. - Request Headers sent by the browser to the web server include:
- accept, which lists what formats the browser accepts. In this case, the browser is saying it understands HTML, XHTML, XML, and some image formats, but it will accept all other files (
*/*). Default weightings, also known as quality values, are1.0. XML is specified with a quality value of0.9so it is preferred less than HTML or XHTML. All other file types are given a quality value of0.8so are least preferred. - accept-encoding, which lists what compression algorithms the browser understands, in this case, GZIP, DEFLATE, and Brotli.
- accept-language, which lists the human languages it would prefer the content to use. In this case, US English, which has a default quality value of
1.0, then any dialect of English that has an explicitly specified quality value of0.9, and then any dialect of Swedish that has an explicitly specified quality value of0.8.
- accept, which lists what formats the browser accepts. In this case, the browser is saying it understands HTML, XHTML, XML, and some image formats, but it will accept all other files (
- Response Headers,
content-encodingtells me the server has sent back the HTML web page response compressed using the GZIP algorithm because it knows that the client can decompress that format. (This is not visible in Figure 14.4 because there is not enough space to expand the Response Headers section.)
- Request Method is
- Close Chrome.
Understanding client-side web development technologies
When building websites, a developer needs to know more than just C# and .NET. On the client (that is, in the web browser), you will use a combination of the following technologies:
- HTML5: This is used for the content and structure of a web page.
- CSS3: This is used for the styles applied to elements on the web page.
- JavaScript: This is used to code any business logic needed on the web page, for example, validating form input or making calls to a web service to fetch more data needed by the web page.
Although HTML5, CSS3, and JavaScript are the fundamental components of frontend web development, there are many additional technologies that can make frontend web development more productive, including Bootstrap, the world's most popular frontend open-source toolkit, and CSS preprocessors such as SASS and LESS for styling, Microsoft's TypeScript language for writing more robust code, and JavaScript libraries such as jQuery, Angular, React, and Vue. All these higher-level technologies ultimately translate or compile to the underlying three core technologies, so they work across all modern browsers.
As part of the build and deploy process, you will likely use technologies such as Node.js; Node Package Manager (npm) and Yarn, which are both client-side package managers; and webpack, which is a popular module bundler, a tool for compiling, transforming, and bundling website source files.
Understanding ASP.NET Core
Microsoft ASP.NET Core is part of a history of Microsoft technologies used to build websites and services that have evolved over the years:
- Active Server Pages (ASP) was released in 1996 and was Microsoft's first attempt at a platform for dynamic server-side execution of website code. ASP files contain a mix of HTML and code that executes on the server written in the VBScript language.
- ASP.NET Web Forms was released in 2002 with the .NET Framework and was designed to enable non-web developers, such as those familiar with Visual Basic, to quickly create websites by dragging and dropping visual components and writing event-driven code in Visual Basic or C#. Web Forms should be avoided for new .NET Framework web projects in favor of ASP.NET MVC.
- Windows Communication Foundation (WCF) was released in 2006 and enables developers to build SOAP and REST services. SOAP is powerful but complex, so it should be avoided unless you need advanced features, such as distributed transactions and complex messaging topologies.
- ASP.NET MVC was released in 2009 to cleanly separate the concerns of web developers between the models, which temporarily store the data; the views, which present the data using various formats in the UI; and the controllers, which fetch the model and pass it to a view. This separation enables improved reuse and unit testing.
- ASP.NET Web API was released in 2012 and enables developers to create HTTP services (aka REST services) that are simpler and more scalable than SOAP services.
- ASP.NET SignalR was released in 2013 and enables real-time communication in websites by abstracting underlying technologies and techniques, such as WebSockets and Long Polling. This enables website features such as live chat or updates to time-sensitive data such as stock prices across a wide variety of web browsers, even when they do not support an underlying technology such as WebSockets.
- ASP.NET Core was released in 2016 and combines modern implementations of .NET Framework technologies such as MVC, Web API, and SignalR, with newer technologies such as Razor Pages, gRPC, and Blazor, all running on modern .NET. Therefore, it can execute cross-platform. ASP.NET Core has many project templates to get you started with its supported technologies.
Good Practice: Choose ASP.NET Core to develop websites and services because it includes web-related technologies that are modern and cross-platform.
ASP.NET Core 2.0 to 2.2 can run on .NET Framework 4.6.1 or later (Windows only) as well as .NET Core 2.0 or later (cross-platform). ASP.NET Core 3.0 only supports .NET Core 3.0. ASP.NET Core 6.0 only supports .NET 6.0.
Classic ASP.NET versus modern ASP.NET Core
Until now, ASP.NET has been built on top of a large assembly in the .NET Framework named System.Web.dll and it is tightly coupled to Microsoft's Windows-only web server named Internet Information Services (IIS). Over the years, this assembly has accumulated a lot of features, many of which are not suitable for modern cross-platform development.
ASP.NET Core is a major redesign of ASP.NET. It removes the dependency on the System.Web.dll assembly and IIS and is composed of modular lightweight packages, just like the rest of modern .NET. Using IIS as the web server is still supported by ASP.NET Core but there is a better option.
You can develop and run ASP.NET Core applications cross-platform on Windows, macOS, and Linux. Microsoft has even created a cross-platform, super-performant web server named Kestrel, and the entire stack is open source.
ASP.NET Core 2.2 or later projects default to the new in-process hosting model. This gives a 400% performance improvement when hosting in Microsoft IIS, but Microsoft still recommends using Kestrel for even better performance.
Creating an empty ASP.NET Core project
We will create an ASP.NET Core project that will show a list of suppliers from the Northwind database.
The dotnet tool has many project templates that do a lot of work for you, but it can be difficult to know which works best for a given situation, so we will start with the empty website project template and then add features step by step so that you can understand all the pieces:
- Use your preferred code editor to add a new project, as defined in the following list:
- Project template: ASP.NET Core Empty /
web - Language: C#
- Workspace/solution file and folder:
PracticalApps - Project file and folder:
Northwind.Web - For Visual Studio 2022, leave all other options as their defaults, for example, Configure for HTTPS selected, and Enable Docker cleared
- Project template: ASP.NET Core Empty /
- In Visual Studio Code, select
Northwind.Webas the active OmniSharp project. - Build the
Northwind.Webproject. - Open the
Northwind.Web.csprojfile and note that the project is like a class library except that the SDK isMicrosoft.NET.Sdk.Web, as shown highlighted in the following markup:<Project Sdk="Microsoft.NET.Sdk.Web"> <PropertyGroup> <TargetFramework>net6.0</TargetFramework> <Nullable>enable</Nullable> <ImplicitUsings>enable</ImplicitUsings> </PropertyGroup> </Project> - If you are using Visual Studio 2022, in Solution Explorer, toggle Show All Files.
- Expand the
objfolder, expand theDebugfolder, expand thenet6.0folder, select theNorthwind.Web.GlobalUsings.g.csfile, and note the implicitly imported namespaces include all the ones for a console app or class library, as well as some ASP.NET Core ones, such asMicrosoft.AspNetCore.Builder, as shown in the following code:// <autogenerated /> global using global::Microsoft.AspNetCore.Builder; global using global::Microsoft.AspNetCore.Hosting; global using global::Microsoft.AspNetCore.Http; global using global::Microsoft.AspNetCore.Routing; global using global::Microsoft.Extensions.Configuration; global using global::Microsoft.Extensions.DependencyInjection; global using global::Microsoft.Extensions.Hosting; global using global::Microsoft.Extensions.Logging; global using global::System; global using global::System.Collections.Generic; global using global::System.IO; global using global::System.Linq; global using global::System.Net.Http; global using global::System.Net.Http.Json; global using global::System.Threading; global using global::System.Threading.Tasks; - Collapse the
objfolder. - Open
Program.cs, and note the following:- An ASP.NET Core project is like a top-level console application, with a hidden
Mainmethod as its entry point that has an argument passed using the nameargs. - It calls
WebApplication.CreateBuilder, which creates a host for the website using defaults for a web host that is then built. - The website will respond to all HTTP
GETrequests with plain text:Hello World!. - The call to the
Runmethod is a blocking call, so the hiddenMainmethod does not return until the web server stops running, as shown in the following code:
var builder = WebApplication.CreateBuilder(args); var app = builder.Build(); app.MapGet("/", () => "Hello World!"); app.Run(); - An ASP.NET Core project is like a top-level console application, with a hidden
- At the bottom of the file, add a statement to write a message to the console after the call to the
Runmethod and therefore after the web server has stopped, as shown highlighted in the following code:app.Run(); Console.WriteLine("This executes after the web server has stopped!");
Testing and securing the website
We will now test the functionality of the ASP.NET Core Empty website project. We will also enable encryption of all traffic between the browser and web server for privacy by switching from HTTP to HTTPS. HTTPS is the secure encrypted version of HTTP.
- For Visual Studio:
- In the toolbar, make sure that Northwind.Web is selected rather than IIS Express or WSL, and switch the Web Browser (Microsoft Edge) to Google Chrome, as shown in Figure 14.5:
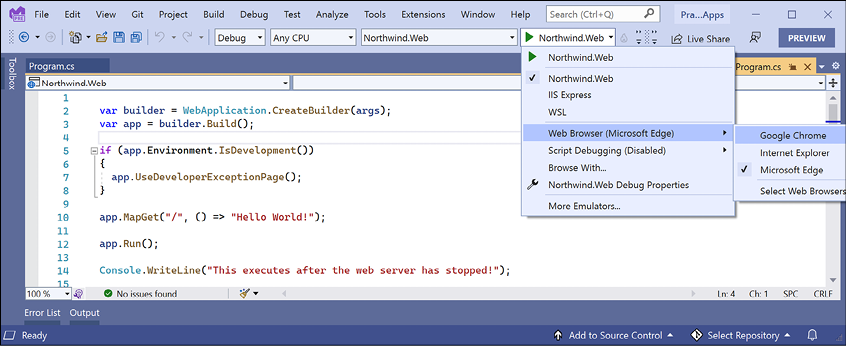
Figure 14.5: Selecting the Northwind.Web profile with its Kestrel web server in Visual Studio
- Navigate to Debug | Start Without Debugging….
- The first time you start a secure website, you will be prompted that your project is configured to use SSL, and to avoid warnings in the browser you can choose to trust the self-signed certificate that ASP.NET Core has generated. Click Yes.
- When you see the Security Warning dialog box, click Yes again.
- In the toolbar, make sure that Northwind.Web is selected rather than IIS Express or WSL, and switch the Web Browser (Microsoft Edge) to Google Chrome, as shown in Figure 14.5:
- For Visual Studio Code, in TERMINAL, enter the
dotnet runcommand. - In either Visual Studio's command prompt window or Visual Studio Code's terminal, note the Kestrel web server has started listening on random ports for HTTP and HTTPS, that you can press Ctrl + C to shut down the Kestrel web server, and the hosting environment is
Development, as shown in the following output:info: Microsoft.Hosting.Lifetime[14] Now listening on: https://localhost:5001 info: Microsoft.Hosting.Lifetime[14] Now listening on: http://localhost:5000 info: Microsoft.Hosting.Lifetime[0] Application started. Press Ctrl+C to shut down. info: Microsoft.Hosting.Lifetime[0] Hosting environment: Development info: Microsoft.Hosting.Lifetime[0] Content root path: C:\Code\PracticalApps\Northwind.WebVisual Studio will also start your chosen browser automatically. If you are using Visual Studio Code, you will have to start Chrome manually.
- Leave the web server running.
- In Chrome, show Developer Tools, and click the Network tab.
- Enter the address
http://localhost:5000/, or whatever port number was assigned to HTTP, and note the response isHello World!in plain text, from the cross-platform Kestrel web server, as shown in Figure 14.6: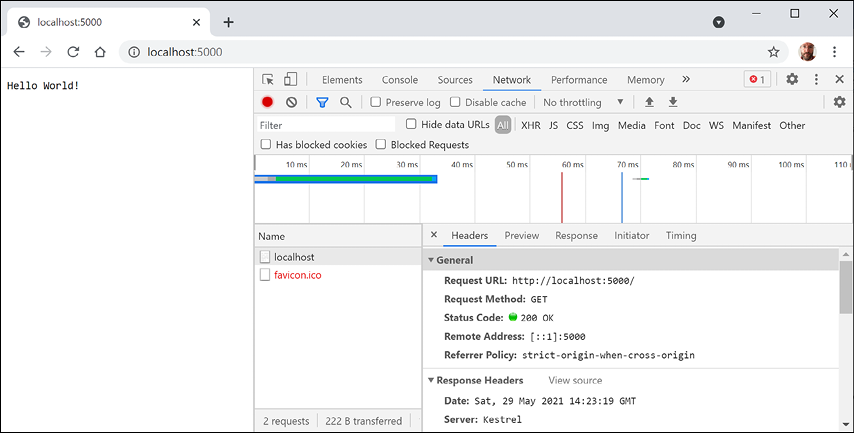
Figure 14.6: Plain text response from http://localhost:5000/
Chrome also requests a
favicon.icofile automatically to show in the browser tab but this is missing so it shows as a404 Not Founderror. - Enter the address
https://localhost:5001/, or whatever port number was assigned to HTTPS, and note if you are not using Visual Studio or if you clicked No when prompted to trust the SSL certificate, then the response is a privacy error, as shown in Figure 14.7: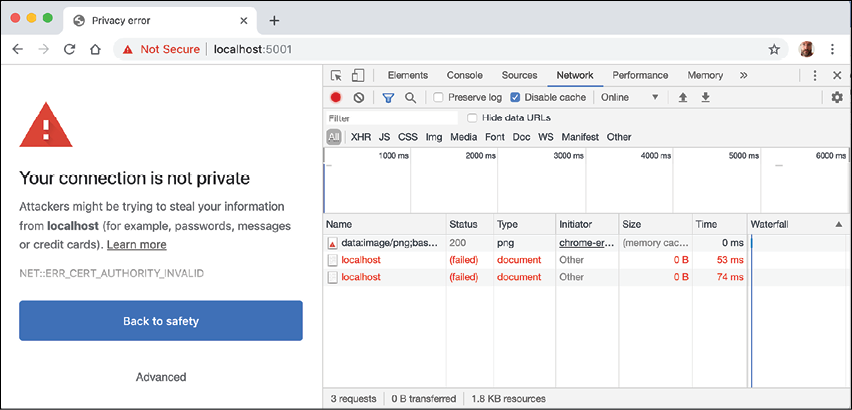
Figure 14.7: Privacy error showing SSL encryption has not been enabled with a certificate
You will see this error when you have not configured a certificate that the browser can trust to encrypt and decrypt HTTPS traffic (and so if you do not see this error, it is because you have already configured a certificate).
In a production environment, you would want to pay a company such as Verisign for an SSL certificate because they provide liability protection and technical support.
For Linux Developers: If you use a Linux variant that cannot create self-signed certificates or you do not mind reapplying for a new certificate every 90 days, then you can get a free certificate from the following link: https://letsencrypt.org
During development, you can tell your OS to trust a temporary development certificate provided by ASP.NET Core.
- At the command line or in TERMINAL, press Ctrl + C to shut down the web server, and note the message that is written, as shown highlighted in the following output:
info: Microsoft.Hosting.Lifetime[0] Application is shutting down... This executes after the web server has stopped! C:\Code\PracticalApps\Northwind.Web\bin\Debug\net6.0\Northwind.Web.exe (process 19888) exited with code 0. - If you need to trust a local self-signed SSL certificate, then at the command line or in TERMINAL, enter the
dotnet dev-certs https --trustcommand, and note the message, Trusting the HTTPS development certificate was requested. You might be prompted to enter your password and a valid HTTPS certificate may already be present.
Enabling stronger security and redirect to a secure connection
It is good practice to enable stricter security and automatically redirect requests for HTTP to HTTPS.
Good Practice: HTTP Strict Transport Security (HSTS) is an opt-in security enhancement that you should always enable. If a website specifies it and a browser supports it, then it forces all communication over HTTPS and prevents the visitor from using untrusted or invalid certificates.
Let's do that now:
- In
Program.cs, add anifstatement to enable HSTS when not in development, as shown in the following code:if (!app.Environment.IsDevelopment()) { app.UseHsts(); } - Add a statement before the call to
app.MapGetto redirect HTTP requests to HTTPS, as shown in the following code:app.UseHttpsRedirection(); - Start the Northwind.Web website project.
- If Chrome is still running, close and restart it.
- In Chrome, show Developer Tools, and click the Network tab.
- Enter the address
http://localhost:5000/, or whatever port number was assigned to HTTP, and note how the server responds with a307 Temporary Redirectto port5001and that the certificate is now valid and trusted, as shown in Figure 14.8: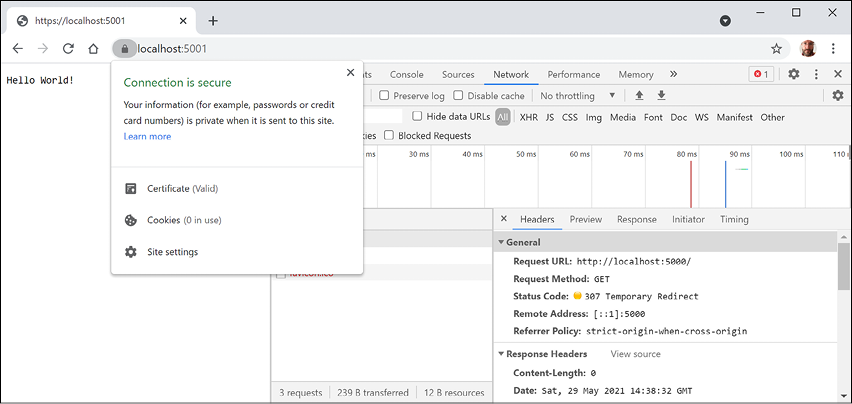
Figure 14.8: The connection is now secured using a valid certificate and a 307 redirect
- Close Chrome.
- Shut down the web server.
Good Practice: Remember to shut down the Kestrel web server whenever you have finished testing a website.
Controlling the hosting environment
In earlier versions of ASP.NET Core, the project template set a rule to say that while in development mode, any unhandled exceptions will be shown in the browser window for the developer to see the details of the exception, as shown in the following code:
if (app.Environment.IsDevelopment())
{
  app.UseDeveloperExceptionPage();
}
With ASP.NET Core 6 and later, this code is executed automatically by default so it is not included in the project template.
How does ASP.NET Core know when we are running in development mode so that the IsDevelopment method returns true? Let's find out.
ASP.NET Core can read from environment variables to determine what hosting environment to use, for example, DOTNET_ENVIRONMENT or ASPNETCORE_ENVIRONMENT.
You can override these settings during local development:
- In the
Northwind.Webfolder, expand the folder namedProperties, open the file namedlaunchSettings.json, and note the profile namedNorthwind.Webthat sets the hosting environment toDevelopment, as shown highlighted in the following configuration:{ "iisSettings": { "windowsAuthentication": false, "anonymousAuthentication": true, "iisExpress": { "applicationUrl": "http://localhost:56111", "sslPort": 44329 } }, "profiles": { "Northwind.Web": { "commandName": "Project", "dotnetRunMessages": "true", "launchBrowser": true, "applicationUrl": "https://localhost:5001;http://localhost:5000", "environmentVariables": { "ASPNETCORE_ENVIRONMENT": "Development" } }, "IIS Express": { "commandName": "IISExpress", "launchBrowser": true, "environmentVariables": { "ASPNETCORE_ENVIRONMENT": "Development" } } } } - Change the randomly assigned port numbers for HTTP to
5000and HTTPS to5001. - Change the environment to
Production. Optionally, changelaunchBrowsertofalseto prevent Visual Studio from automatically launching a browser. - Start the website and note the hosting environment is
Production, as shown in the following output:info: Microsoft.Hosting.Lifetime[0] Hosting environment: Production - Shut down the web server.
- In
launchSettings.json, change the environment back toDevelopment.
The launchSettings.json file also has a configuration for using IIS as the web server using random port numbers. In this book, we will only be using Kestrel as the web server since it is cross-platform.
Separating configuration for services and pipeline
Putting all code to initialize a simple web project in Program.cs can be a good idea, especially for web services, so we will see this style again in Chapter 16, Building and Consuming Web Services.
However, for anything more than the most basic web project, you might prefer to separate configuration into a separate Startup class with two methods:
ConfigureServices(IServiceCollection services): to add dependency services to a dependency injection container, such as Razor Pages support, Cross-Origin Resource Sharing (CORS) support, or a database context for working with the Northwind database.Configure(IApplicationBuilder app, IWebHostEnvironment env): to set up the HTTP pipeline through which requests and responses flow. Call variousUsemethods on theappparameter to construct the pipeline in the order the features should be processed.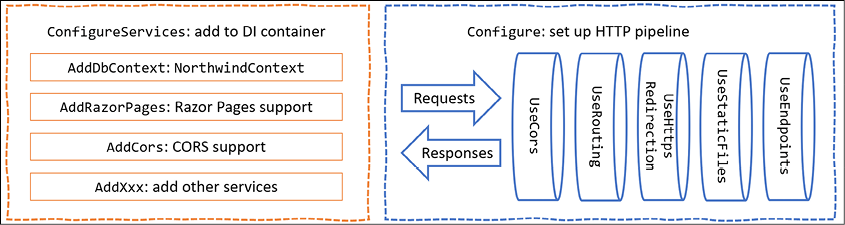
Figure 14.9: Startup class ConfigureServices and Configure methods diagram
Both methods will get called automatically by the runtime.
Let's create a Startup class now:
- Add a new class file to the
Northwind.Webproject namedStartup.cs. - Modify
Startup.cs, as shown in the following code:namespace Northwind.Web; public class Startup { public void ConfigureServices(IServiceCollection services) { } public void Configure( IApplicationBuilder app, IWebHostEnvironment env) { if (!env.IsDevelopment()) { app.UseHsts(); } app.UseRouting(); // start endpoint routing app.UseHttpsRedirection(); app.UseEndpoints(endpoints => { endpoints.MapGet("/", () => "Hello World!"); }); } }Note the following about the code:
- The
ConfigureServicesmethod is currently empty because we do not yet need any dependency services added. - The
Configuremethod sets up the HTTP request pipeline and enables the use of endpoint routing. It configures a routed endpoint to wait for requests using the same map for each HTTPGETrequest for the root path/that responds to those requests by returning the plain text"Hello World!". We will learn about routed endpoints and their benefits at the end of this chapter.
Now we must specify that we want to use the
Startupclass in the application entry point. - The
- Modify
Program.cs, as shown in the following code:using Northwind.Web; // Startup Host.CreateDefaultBuilder(args) .ConfigureWebHostDefaults(webBuilder => { webBuilder.UseStartup<Startup>(); }).Build().Run(); Console.WriteLine("This executes after the web server has stopped!"); - Start the website and note that it has the same behavior as before.
- Shut down the web server.
In all the other website and service projects that we create in this book, we will use the single Program.cs file created by .NET 6 project templates. If you like the Startup.cs way of doing things, then you will see in this chapter how to use it.
Enabling a website to serve static content
A website that only ever returns a single plain text message isn't very useful!
At a minimum, it ought to return static HTML pages, CSS that the web pages will use for styling, and any other static resources, such as images and videos.
By convention, these files should be stored in a directory named wwwroot to keep them separate from the dynamically executing parts of your website project.
Creating a folder for static files and a web page
You will now create a folder for your static website resources and a basic index page that uses Bootstrap for styling:
- In the
Northwind.Webproject/folder, create a folder namedwwwroot. - Add a new HTML page file to the
wwwrootfolder namedindex.html. - Modify its content to link to CDN-hosted Bootstrap for styling, and use modern good practices such as setting the viewport, as shown in the following markup:
<!doctype html>
<html lang="en">
<head>
  <!-- Required meta tags -->
  <meta charset="utf-8" />
  <meta name="viewport" content=
    "width=device-width, initial-scale=1 " />
  <!-- Bootstrap CSS -->
  <link href=
"https://cdn.jsdelivr.net/npm/bootstrap@5.1.0/dist/css/bootstrap.min.css" rel="stylesheet" integrity="sha384-KyZXEAg3QhqLMpG8r+8fhAXLRk2vvoC2f3B09zVXn8CA5QIVfZOJ3BCsw2P0p/We" crossorigin="anonymous">
  <title>Welcome ASP.NET Core!</title>
</head>
<body>
  <div class="container">
    <div class="jumbotron">
      <h1 class="display-3">Welcome to Northwind B2B</h1>
      <p class="lead">We supply products to our customers.</p>
      <hr />
      <h2>This is a static HTML page.</h2>
      <p>Our customers include restaurants, hotels, and cruise lines.</p>
      <p>
        <a class="btn btn-primary"
          href="https://www.asp.net/">Learn more</a>
      </p>
    </div>
  </div>
</body>
</html>
Good Practice: To get the latest <link> element for Bootstrap, copy and paste it from the documentation at the following link: https://getbootstrap.com/docs/5.0/getting-started/introduction/#starter-template.
Enabling static and default files
If you were to start the website now and enter http://localhost:5000/index.html in the address box, the website would return a 404 Not Found error saying no web page was found. To enable the website to return static files such as index.html, we must explicitly configure that feature.
Even if we enable static files, if you were to start the website and enter http://localhost:5000/ in the address box, the website will return a 404 Not Found error because the web server does not know what to return by default if no named file is requested.
You will now enable static files, explicitly configure default files, and change the URL path registered that returns the plain text Hello World! response:
- In
Startup.cs, in theConfiguremethod, add statements after enabling HTTPS redirection to enable static files and default files, and modify the statement that maps aGETrequest to return theHello World!plain text response to only respond to the URL path/hello, as shown highlighted in the following code:app.UseHttpsRedirection(); app.UseDefaultFiles(); // index.html, default.html, and so on app.UseStaticFiles(); app.UseEndpoints(endpoints => { endpoints.MapGet("/hello", () => "Hello World!"); });The call to
UseDefaultFilesmust come before the call toUseStaticFiles, or it will not work! You will learn more about the ordering of middleware and endpoint routing at the end of this chapter. - Start the website.
- Start Chrome and show Developer Tools.
- In Chrome, enter
http://localhost:5000/and note that you are redirected to the HTTPS address on port5001, and theindex.htmlfile is now returned over that secure connection because it is one of the possible default files for this website. - In Developer Tools, note the request for the Bootstrap stylesheet.
- In Chrome, enter
http://localhost:5000/helloand note that it returns the plain textHello World!as before. - Close Chrome and shut down the web server.
If all web pages are static, that is, they only get changed manually by a web editor, then our website programming work is complete. But almost all websites need dynamic content, which means a web page that is generated at runtime by executing code.
The easiest way to do that is to use a feature of ASP.NET Core named Razor Pages.
Exploring ASP.NET Core Razor Pages
ASP.NET Core Razor Pages allow a developer to easily mix C# code statements with HTML markup to make the generated web page dynamic. That is why they use the .cshtml file extension.
By convention, ASP.NET Core looks for Razor Pages in a folder named Pages.
Enabling Razor Pages
You will now copy and change the static HTML page into a dynamic Razor Page, and then add and enable the Razor Pages service:
- In the
Northwind.Webproject folder, create a folder namedPages. - Copy the
index.htmlfile into thePagesfolder. - For the file in the
Pagesfolder, rename the file extension from.htmlto.cshtml. - Remove the
<h2>element that says that this is a static HTML page. - In
Startup.cs, in theConfigureServicesmethod, add a statement to add ASP.NET Core Razor Pages and its related services, such as model binding, authorization, anti-forgery, views, and tag helpers, to the builder, as shown in the following code:services.AddRazorPages(); - In
Startup.cs, in theConfiguremethod, in the configuration to use endpoints, add a statement to call theMapRazorPagesmethod, as shown highlighted in the following code:app.UseEndpoints(endpoints => { endpoints.MapRazorPages(); endpoints.MapGet("/hello", () => "Hello World!"); });
Adding code to a Razor Page
In the HTML markup of a web page, Razor syntax is indicated by the @ symbol. Razor Pages can be described as follows:
- They require the
@pagedirective at the top of the file. - They can optionally have an
@functionssection that defines any of the following:- Properties for storing data values, like in a class definition. An instance of that class is automatically instantiated named
Modelthat can have its properties set in special methods and you can get the property values in the HTML. - Methods named
OnGet,OnPost,OnDelete, and so on that execute when HTTP requests are made, such asGET,POST, andDELETE.
- Properties for storing data values, like in a class definition. An instance of that class is automatically instantiated named
Let's now convert the static HTML page into a Razor Page:
- In the
Pagesfolder, openindex.cshtml. - Add the
@pagestatement to the top of the file. - After the
@pagestatement, add an@functionsstatement block. - Define a property to store the name of the current day as a
stringvalue. - Define a method to set
DayNamethat executes when an HTTPGETrequest is made for the page, as shown in the following code:@page @functions { public string? DayName { get; set; } public void OnGet() { Model.DayName = DateTime.Now.ToString("dddd"); } } - Output the day name inside the second HTML paragraph, as shown highlighted in the following markup:
<p>It's @Model.DayName! Our customers include restaurants, hotels, and cruise lines.</p> - Start the website.
- In Chrome, enter
https://localhost:5001/and note the current day name is output on the page, as shown in Figure 14.10: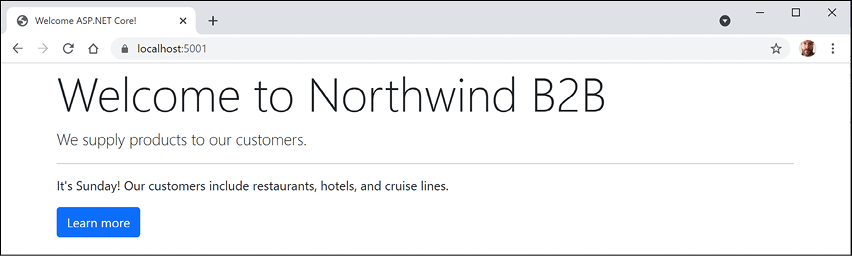
Figure 14.10: Welcome to Northwind page showing the current day
- In Chrome, enter
https://localhost:5001/index.html, which exactly matches the static filename, and note that it returns the static HTML page as before. - In Chrome, enter
https://localhost:5001/hello, which exactly matches the endpoint route that returns plain text, and note that it returnsHello World!as before. - Close Chrome and shut down the web server.
Using shared layouts with Razor Pages
Most websites have more than one page. If every page had to contain all of the boilerplate markup that is currently in index.cshtml, that would become a pain to manage. So, ASP.NET Core has a feature named layouts.
To use layouts, we must create a Razor file to define the default layout for all Razor Pages (and all MVC views) and store it in a Shared folder so that it can be easily found by convention. The name of this file can be anything, because we will specify it, but _Layout.cshtml is good practice.
We must also create a specially named file to set the default layout file for all Razor Pages (and all MVC views). This file must be named _ViewStart.cshtml.
Let's see layouts in action:
- In the
Pagesfolder, add a file named_ViewStart.cshtml. (The Visual Studio item template is named Razor View Start.) - Modify its content, as shown in the following markup:
@{ Layout = "_Layout"; } - In the
Pagesfolder, create a folder namedShared. - In the
Sharedfolder, create a file named_Layout.cshtml. (The Visual Studio item template is named Razor Layout.) - Modify the content of
_Layout.cshtml(it is similar toindex.cshtmlso you can copy and paste the HTML markup from there), as shown in the following markup:<!doctype html> <html lang="en"> <head> <!-- Required meta tags --> <meta charset="utf-8" /> <meta name="viewport" content= "width=device-width, initial-scale=1, shrink-to-fit=no" /> <!-- Bootstrap CSS --> <link href= "https://cdn.jsdelivr.net/npm/bootstrap@5.1.0/dist/css/bootstrap.min.css" rel="stylesheet" integrity="sha384-KyZXEAg3QhqLMpG8r+8fhAXLRk2vvoC2f3B09zVXn8CA5QIVfZOJ3BCsw2P0p/We" crossorigin="anonymous"> <title>@ViewData["Title"]</title> </head> <body> <div class="container"> @RenderBody() <hr /> <footer> <p>Copyright © 2021 - @ViewData["Title"]</p> </footer> </div> <!-- JavaScript to enable features like carousel --> <script src="https://cdn.jsdelivr.net/npm/bootstrap@5.1.0/dist/js/bootstrap.bundle.min.js" integrity="sha384-U1DAWAznBHeqEIlVSCgzq+c9gqGAJn5c/t99JyeKa9xxaYpSvHU5awsuZVVFIhvj" crossorigin="anonymous"></script> @RenderSection("Scripts", required: false) </body> </html>While reviewing the preceding markup, note the following:
<title>is set dynamically using server-side code from a dictionary namedViewData. This is a simple way to pass data between different parts of an ASP.NET Core website. In this case, the data will be set in a Razor Page class file and then output in the shared layout.@RenderBody()marks the insertion point for the view being requested.- A horizontal rule and footer will appear at the bottom of each page.
- At the bottom of the layout is a script to implement some cool features of Bootstrap that we can use later, such as a carousel of images.
- After the
<script>elements for Bootstrap, we have defined a section namedScriptsso that a Razor Page can optionally inject additional scripts that it needs.
- Modify
index.cshtmlto remove all HTML markup except<div class="jumbotron">and its contents, and leave the C# code in the@functionsblock that you added earlier. - Add a statement to the
OnGetmethod to store a page title in theViewDatadictionary, and modify the button to navigate to a suppliers page (which we will create in the next section), as shown highlighted in the following markup:@page @functions { public string? DayName { get; set; } public void OnGet() { ViewData["Title"] = "Northwind B2B"; Model.DayName = DateTime.Now.ToString("dddd"); } } <div class="jumbotron"> <h1 class="display-3">Welcome to Northwind B2B</h1> <p class="lead">We supply products to our customers.</p> <hr /> <p>It's @Model.DayName! Our customers include restaurants, hotels, and cruise lines.</p> <p> <a class="btn btn-primary" href="suppliers"> Learn more about our suppliers</a> </p> </div> - Start the website, visit it with Chrome, and note that it has similar behavior as before, although clicking the button for suppliers will give a
404 Not Founderror because we have not created that page yet.
Using code-behind files with Razor Pages
Sometimes, it is better to separate the HTML markup from the data and executable code, so Razor Pages allows you to do this by putting the C# code in code-behind class files. They have the same name as the .cshtml file but end with .cshtml.cs.
You will now create a page that shows a list of suppliers. In this example, we are focusing on learning about code-behind files. In the next topic, we will load the list of suppliers from a database, but for now, we will simulate that with a hardcoded array of string values:
- In the
Pagesfolder, add two new files namedSuppliers.cshtmlandSuppliers.cshtml.cs. (The Visual Studio item template is named Razor Page - Empty and it creates both files.) - Add statements to the code-behind file named
Suppliers.cshtml.cs, as shown in the following code:using Microsoft.AspNetCore.Mvc.RazorPages; // PageModel namespace Northwind.Web.Pages; public class SuppliersModel : PageModel { public IEnumerable<string>? Suppliers { get; set; } public void OnGet() { ViewData["Title"] = "Northwind B2B - Suppliers"; Suppliers = new[] { "Alpha Co", "Beta Limited", "Gamma Corp" }; } }While reviewing the preceding markup, note the following:
SuppliersModelinherits fromPageModel, so it has members such as theViewDatadictionary for sharing data. You can right-click onPageModeland select Go To Definition to see that it has lots more useful features, such as the entireHttpContextof the current request.SuppliersModeldefines a property for storing a collection ofstringvalues namedSuppliers.- When an HTTP
GETrequest is made for this Razor Page, theSuppliersproperty is populated with some example supplier names from an array ofstringvalues. Later, we will populate this from the Northwind database.
- Modify the contents of
Suppliers.cshtml, as shown in the following markup:@page @model Northwind.Web.Pages.SuppliersModel <div class="row"> <h1 class="display-2">Suppliers</h1> <table class="table"> <thead class="thead-inverse"> <tr><th>Company Name</th></tr> </thead> <tbody> @if (Model.Suppliers is not null) { @foreach(string name in Model.Suppliers) { <tr><td>@name</td></tr> } } </tbody> </table> </div>While reviewing the preceding markup, note the following:
- The model type for this Razor Page is set to
SuppliersModel. - The page outputs an HTML table with Bootstrap styles.
- The data rows in the table are generated by looping through the
Suppliersproperty ofModelif it is notnull.
- The model type for this Razor Page is set to
- Start the website and visit it using Chrome.
- Click on the button to learn more about suppliers, and note the table of suppliers, as shown in Figure 14.11:
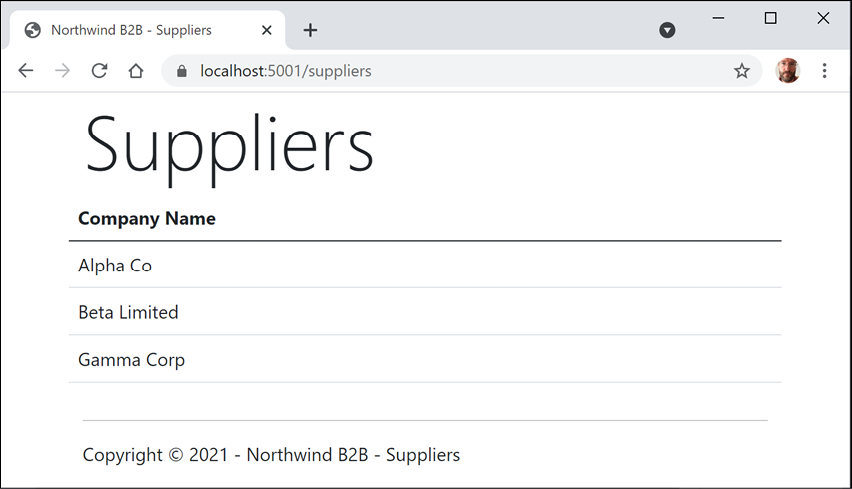
Figure 14.11: The table of suppliers loaded from an array of strings
Using Entity Framework Core with ASP.NET Core
Entity Framework Core is a natural way to get real data into a website. In Chapter 13, Introducing Practical Applications of C# and .NET, you created two pairs of class libraries: one for the entity models and one for the Northwind database context, for either SQL Server or SQLite or both. You will now use them in your website project.
Configure Entity Framework Core as a service
Functionality such as Entity Framework Core database contexts that are needed by ASP.NET Core must be registered as a service during website startup. The code in the GitHub repository solution and below uses SQLite, but you can easily use SQL Server if you prefer.
Let's see how:
- In the
Northwind.Webproject, add a project reference to theNorthwind.Common.DataContextproject for either SQLite or SQL Server, as shown in the following markup:<!-- change Sqlite to SqlServer if you prefer --> <ItemGroup> <ProjectReference Include="..\Northwind.Common.DataContext.Sqlite\ Northwind.Common.DataContext.Sqlite.csproj" /> </ItemGroup>The project reference must go all on one line with no line break.
- Build the
Northwind.Webproject. - In
Startup.cs, import namespaces to work with your entity model types, as shown in the following code:using Packt.Shared; // AddNorthwindContext extension method - Add a statement to the
ConfigureServicesmethod to register theNorthwinddatabase context class, as shown in the following code:services.AddNorthwindContext(); - In the
Northwind.Webproject, in thePagesfolder, openSuppliers.cshtml.cs, and import the namespace for our database context, as shown in the following code:using Packt.Shared; // NorthwindContext - In the
SuppliersModelclass, add a private field to store theNorthwinddatabase context and a constructor to set it, as shown in the following code:private NorthwindContext db; public SuppliersModel(NorthwindContext injectedContext) { db = injectedContext; } - Change the
Suppliersproperty to containSupplierobjects instead ofstringvalues. - In the
OnGetmethod, modify the statements to set theSuppliersproperty from theSuppliersproperty of the database context, sorted by country and then company name, as shown highlighted in the following code:public void OnGet() { ViewData["Title"] = "Northwind B2B - Suppliers"; Suppliers = db.Suppliers .OrderBy(c => c.Country).ThenBy(c => c.CompanyName); } - Modify the contents of
Suppliers.cshtmlto import thePackt.Sharednamespace and render multiple columns for each supplier, as shown highlighted in the following markup:@page @using Packt.Shared @model Northwind.Web.Pages.SuppliersModel <div class="row"> <h1 class="display-2">Suppliers</h1> <table class="table"> <thead class="thead-inverse"> <tr> <th>Company Name</th> <th>Country</th> <th>Phone</th> </tr> </thead> <tbody> @if (Model.Suppliers is not null) { @foreach(Supplier s in Model.Suppliers) { <tr> <td>@s.CompanyName</td> <td>@s.Country</td> <td>@s.Phone</td> </tr> } } </tbody> </table> </div> - Start the website.
- In Chrome, enter
https://localhost:5001/. - Click Learn more about our suppliers and note that the supplier table now loads from the database, as shown in Figure 14.12:
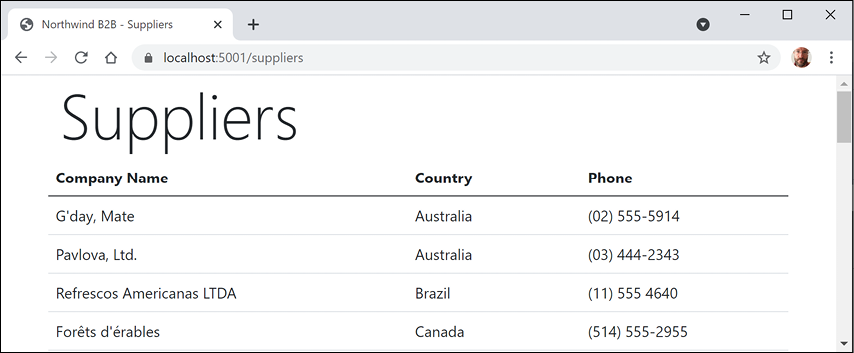
Figure 14.12: The suppliers table loaded from the Northwind database
Manipulating data using Razor Pages
You will now add functionality to insert a new supplier.
Enabling a model to insert entities
First, you will modify the supplier model so that it responds to HTTP POST requests when a visitor submits a form to insert a new supplier:
- In the
Northwind.Webproject, in thePagesfolder, openSuppliers.cshtml.csand import the following namespace:using Microsoft.AspNetCore.Mvc; // [BindProperty], IActionResult - In the
SuppliersModelclass, add a property to store a single supplier and a method namedOnPostthat adds the supplier to theSupplierstable in the Northwind database if its model is valid, as shown in the following code:[BindProperty] public Supplier? Supplier { get; set; } public IActionResult OnPost() { if ((Supplier is not null) && ModelState.IsValid) { db.Suppliers.Add(Supplier); db.SaveChanges(); return RedirectToPage("/suppliers"); } else { return Page(); // return to original page } }
While reviewing the preceding code, note the following:
- We added a property named
Supplierthat is decorated with the[BindProperty]attribute so that we can easily connect HTML elements on the web page to properties in theSupplierclass. - We added a method that responds to HTTP
POSTrequests. It checks that all property values conform to validation rules on theSupplierclass entity model (such as[Required]and[StringLength]) and then adds the supplier to the existing table and saves changes to the database context. This will generate a SQL statement to perform the insert into the database. Then it redirects to theSupplierspage so that the visitor sees the newly added supplier.
Defining a form to insert a new supplier
Next, you will modify the Razor Page to define a form that a visitor can fill in and submit to insert a new supplier:
- In
Suppliers.cshtml, add tag helpers after the@modeldeclaration so that we can use tag helpers such asasp-foron this Razor Page, as shown in the following markup:@addTagHelper *, Microsoft.AspNetCore.Mvc.TagHelpers - At the bottom of the file, add a form to insert a new supplier, and use the
asp-fortag helper to bind theCompanyName,Country, andPhoneproperties of theSupplierclass to the input box, as shown in the following markup:<div class="row"> <p>Enter details for a new supplier:</p> <form method="POST"> <div><input asp-for="Supplier.CompanyName" placeholder="Company Name" /></div> <div><input asp-for="Supplier.Country" placeholder="Country" /></div> <div><input asp-for="Supplier.Phone" placeholder="Phone" /></div> <input type="submit" /> </form> </div>While reviewing the preceding markup, note the following:
- The
<form>element with aPOSTmethod is normal HTML, so an<input type="submit" />element inside it will make an HTTPPOSTrequest back to the current page with values of any other elements inside that form. - An
<input>element with a tag helper namedasp-forenables data binding to the model behind the Razor Page.
- The
- Start the website.
- Click Learn more about our suppliers, scroll down to the bottom of the page, enter
Bob's Burgers,USA, and(603) 555-4567, and click Submit. - Note that you see a refreshed suppliers table with the new supplier added.
- Close Chrome and shut down the web server.
Injecting a dependency service into a Razor Page
If you have a .cshtml Razor Page that does not have a code-behind file, then you can inject a dependency service using the @inject directive instead of constructor parameter injection, and then directly reference the injected database context using Razor syntax in the middle of the markup.
Let's create a simple example:
- In the
Pagesfolder, add a new file namedOrders.cshtml. (The Visual Studio item template is named Razor Page - Empty and it creates two files. Delete the.csfile.) - In
Orders.cshtml, write code to output the number of orders in the Northwind database, as shown in the following markup:@page @using Packt.Shared @inject NorthwindContext db @{ string title = "Orders"; ViewData["Title"] = $"Northwind B2B - {title}"; } <div class="row"> <h1 class="display-2">@title</h1> <p> There are @db.Orders.Count() orders in the Northwind database. </p> </div> - Start the website.
- Navigate to
/ordersand note that you see that there are 830 orders in the Northwind database. - Close Chrome and shut down the web server.
Using Razor class libraries
Everything related to a Razor Page can be compiled into a class library for easier reuse in multiple projects. With ASP.NET Core 3.0 and later, this can include static files such as HTML, CSS, JavaScript libraries, and media assets such as image files. A website can either use the Razor Page's view as defined in the class library or override it.
Creating a Razor class library
Let's create a new Razor class library:
Use your preferred code editor to add a new project, as defined in the following list:
- Project template: Razor Class Library /
razorclasslib - Checkbox/switch: Support pages and views /
-s - Workspace/solution file and folder:
PracticalApps - Project file and folder:
Northwind.Razor.Employees
-s is short for the --support-pages-and-views switch that enables the class library to use Razor Pages and .cshtml file views.
Disabling compact folders for Visual Studio Code
Before we implement our Razor class library, I want to explain a Visual Studio Code feature that confused some readers of a previous edition because the feature was added after publishing.
The compact folders feature means that nested folders such as /Areas/MyFeature/Pages/ are shown in a compact form if the intermediate folders in the hierarchy do not contain files, as shown in Figure 14.13:
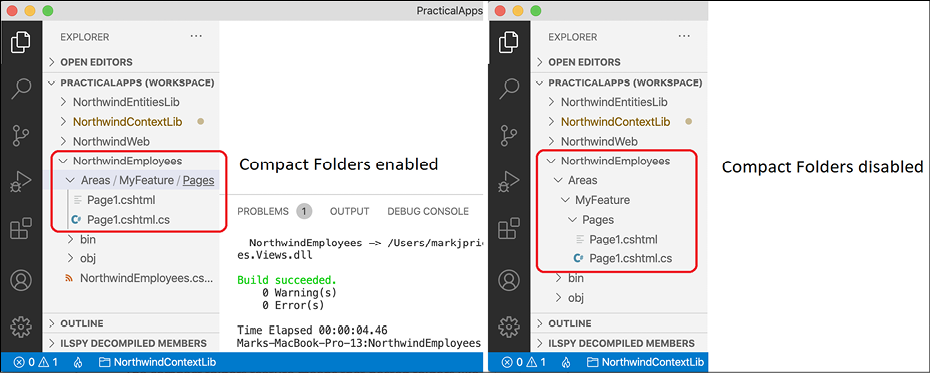
Figure 14.13: Compact folders enabled or disabled
If you would like to disable the Visual Studio Code compact folders feature, complete the following steps:
- On Windows, navigate to File | Preferences | Settings. On macOS, navigate to Code | Preferences | Settings.
- In the Search settings box, enter
compact. - Clear the Explorer: Compact Folders checkbox, as shown in Figure 14.14:
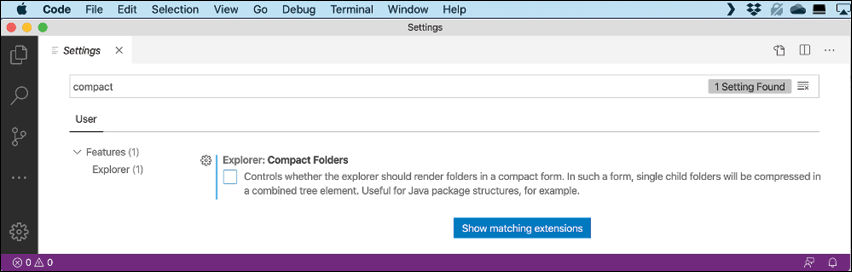
Figure 14.14: Disabling compact folders for Visual Studio Code
- Close the Settings tab.
Implementing the employees feature using EF Core
Now we can add a reference to our entity models to get the employees to show in the Razor class library:
- In the
Northwind.Razor.Employeesproject, add a project reference to theNorthwind.Common.DataContextproject for either SQLite or SQL Server and note the SDK isMicrosoft.NET.Sdk.Razor, as shown highlighted in the following markup:<Project Sdk="Microsoft.NET.Sdk.Razor"> <PropertyGroup> <TargetFramework>net6.0</TargetFramework> <Nullable>enable</Nullable> <ImplicitUsings>enable</ImplicitUsings> <AddRazorSupportForMvc>true</AddRazorSupportForMvc> </PropertyGroup> <ItemGroup> <FrameworkReference Include="Microsoft.AspNetCore.App" /> </ItemGroup> <!-- change Sqlite to SqlServer if you prefer --> <ItemGroup> <ProjectReference Include="..\Northwind.Common.DataContext.Sqlite \Northwind.Common.DataContext.Sqlite.csproj" /> </ItemGroup> </Project>The project reference must go all on one line with no line break. Also, do not mix our SQLite and SQL Server projects or you will see compiler errors. If you used SQL Server in the
Northwind.Webproject, then you must use SQL Server in theNorthwind.Razor.Employeesproject as well. - Build the
Northwind.Razor.Employeesproject. - In the
Areasfolder, right-click theMyFeaturefolder, select Rename, enter the new namePacktFeatures, and press Enter. - In the
PacktFeaturesfolder, in thePagessubfolder, add a new file named_ViewStart.cshtml. (The Visual Studio item template is named Razor View Start. Or just copy it from theNorthwind.Webproject.) - Modify its content to inform this class library that any Razor Pages should look for a layout with the same name as used in the
Northwind.Webproject, as shown in the following markup:@{ Layout = "_Layout"; }We do not need to create the
_Layout.cshtmlfile in this project. It will use the one in its host project, for example, the one in theNorthwind.Webproject. - In the
Pagessubfolder, renamePage1.cshtmltoEmployees.cshtml, and renamePage1.cshtml.cstoEmployees.cshtml.cs. - Modify
Employees.cshtml.csto define a page model with an array ofEmployeeentity instances loaded from the Northwind database, as shown in the following code:using Microsoft.AspNetCore.Mvc.RazorPages; // PageModel using Packt.Shared; // Employee, NorthwindContext namespace PacktFeatures.Pages; public class EmployeesPageModel : PageModel { private NorthwindContext db; public EmployeesPageModel(NorthwindContext injectedContext) { db = injectedContext; } public Employee[] Employees { get; set; } = null!; public void OnGet() { ViewData["Title"] = "Northwind B2B - Employees"; Employees = db.Employees.OrderBy(e => e.LastName) .ThenBy(e => e.FirstName).ToArray(); } } - Modify
Employees.cshtml, as shown in the following markup:@page @using Packt.Shared @addTagHelper *, Microsoft.AspNetCore.Mvc.TagHelpers @model PacktFeatures.Pages.EmployeesPageModel <div class="row"> <h1 class="display-2">Employees</h1> </div> <div class="row"> @foreach(Employee employee in Model.Employees) { <div class="col-sm-3"> <partial name="_Employee" model="employee" /> </div> } </div>
While reviewing the preceding markup, note the following:
- We import the
Packt.Sharednamespace so that we can use classes in it such asEmployee. - We add support for tag helpers so that we can use the
<partial>element. - We declare the
@modeltype for this Razor Page to use the page model class that you just defined. - We enumerate through the
Employeesin the model, outputting each one using a partial view.
Implementing a partial view to show a single employee
The <partial> tag helper was introduced in ASP.NET Core 2.1. A partial view is like a piece of a Razor Page. You will create one in the next few steps to render a single employee:
- In the
Northwind.Razor.Employeesproject, in thePagesfolder, create aSharedfolder. - In the
Sharedfolder, create a file named_Employee.cshtml. (The Visual Studio item template is named Razor View - Empty.) - Modify
_Employee.cshtml, as shown in the following markup:@model Packt.Shared.Employee <div class="card border-dark mb-3" style="max-width: 18rem;"> <div class="card-header">@Model?.LastName, @Model?.FirstName</div> <div class="card-body text-dark"> <h5 class="card-title">@Model?.Country</h5> <p class="card-text">@Model?.Notes</p> </div> </div>
While reviewing the preceding markup, note the following:
- By convention, the names of partial views start with an underscore.
- If you put a partial view in the
Sharedfolder, then it can be found automatically. - The model type for this partial view is a single
Employeeentity. - We use Bootstrap card styles to output information about each employee.
Using and testing a Razor class library
You will now reference and use the Razor class library in the website project:
- In the
Northwind.Webproject, add a project reference to theNorthwind.Razor.Employeesproject, as shown in the following markup:<ProjectReference Include= "..\Northwind.Razor.Employees\Northwind.Razor.Employees.csproj" /> - Modify
Pages\index.cshtmlto add a paragraph with a link to the Packt feature employees page after the link to the suppliers page, as shown in the following markup:<p> <a class="btn btn-primary" href="packtfeatures/employees"> Contact our employees </a> </p> - Start the website, visit the website using Chrome, and click the Contact our employees button to see the cards of employees, as shown in Figure 14.15:
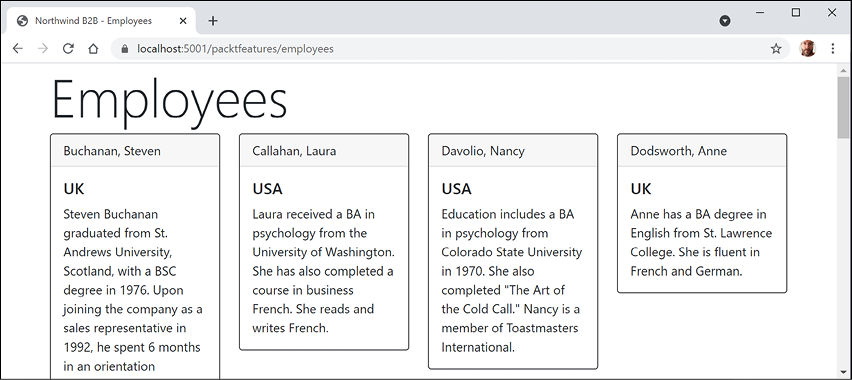
Figure 14.15: A list of employees from a Razor class library feature
Configuring services and the HTTP request pipeline
Now that we have built a website, we can return to the Startup configuration and review how services and the HTTP request pipeline work in more detail.
Understanding endpoint routing
In earlier versions of ASP.NET Core, the routing system and the extendable middleware system did not always work easily together; for example, if you wanted to implement a policy such as CORS in both middleware and MVC. Microsoft has invested in improving routing with a system named endpoint routing introduced with ASP.NET Core 2.2.
Good Practice: Endpoint routing replaces the IRouter-based routing used in ASP.NET Core 2.1 and earlier. Microsoft recommends every older ASP.NET Core project migrates to endpoint routing if possible.
Endpoint routing is designed to enable better interoperability between frameworks that need routing, such as Razor Pages, MVC, or Web APIs, and middleware that needs to understand how routing affects them, such as localization, authorization, CORS, and so on.
Endpoint routing gets its name because it represents the route table as a compiled tree of endpoints that can be walked efficiently by the routing system. One of the biggest improvements is the performance of routing and action method selection.
It is on by default with ASP.NET Core 2.2 or later if compatibility is set to 2.2 or later. Traditional routes registered using the MapRoute method or with attributes are mapped to the new system.
The new routing system includes a link generation service registered as a dependency service that does not need an HttpContext.
Configuring endpoint routing
Endpoint routing requires a pair of calls to the UseRouting and UseEndpoints methods:
UseRoutingmarks the pipeline position where a routing decision is made.UseEndpointsmarks the pipeline position where the selected endpoint is executed.
Middleware such as localization that runs in between these methods can see the selected endpoint and can switch to a different endpoint if necessary.
Endpoint routing uses the same route template syntax that has been used in ASP.NET MVC since 2010 and the [Route] attribute introduced with ASP.NET MVC 5 in 2013. Migration often only requires changes to the Startup configuration.
MVC controllers, Razor Pages, and frameworks such as SignalR used to be enabled by a call to UseMvc or similar methods, but they are now added inside the UseEndpoints method call because they are all integrated into the same routing system along with middleware.
Reviewing the endpoint routing configuration in our project
Review the Startup.cs class file, as shown in the following code:
using Packt.Shared; // AddNorthwindContext extension method
namespace Northwind.Web;
public class Startup
{
public void ConfigureServices(IServiceCollection services)
{
services.AddRazorPages();
services.AddNorthwindContext();
}
public void Configure(
IApplicationBuilder app, IWebHostEnvironment env)
{
if (!env.IsDevelopment())
{
app.UseHsts();
}
app.UseRouting();
app.UseHttpsRedirection();
app.UseDefaultFiles(); // index.html, default.html, and so on
app.UseStaticFiles();
app.UseEndpoints(endpoints =>
{
  endpoints.MapRazorPages();
  endpoints.MapGet("/hello",  () => "Hello World!");
});
}
}
The Startup class has two methods that are called automatically by the host to configure the website.
The ConfigureServices method registers services that can then be retrieved when the functionality they provide is needed using dependency injection. Our code registers two services: Razor Pages and an EF Core database context.
Registering services in the ConfigureServices method
Common methods that register dependency services, including services that combine other method calls that register services, are shown in the following table:
|
Method |
Services that it registers |
|
|
Minimum set of services necessary to route requests and invoke controllers. Most websites will need more configuration than this. |
|
|
Authentication and authorization services. |
|
|
MVC data annotations service. |
|
|
MVC cache tag helper service. |
|
|
Razor Pages service including the Razor view engine. Commonly used in simple website projects. It calls the following additional methods:
|
|
|
Web API explorer service. |
|
|
CORS support for enhanced security. |
|
|
Mappings between a URL format and its corresponding media type. |
|
|
Controller services but not services for views or pages. Commonly used in ASP.NET Core Web API projects. It calls the following additional methods:
|
|
|
Support for |
|
|
Support for Razor view engine including processing the |
|
|
Controller, views, and pages services. Commonly used in ASP.NET Core MVC website projects. It calls the following additional methods:
|
|
|
Similar to |
|
|
Your |
|
|
A custom extension method we created to make it easier to register the |
You will see more examples of using these extension methods for registering services in the next few chapters when working with MVC and Web API services.
Setting up the HTTP request pipeline in the Configure method
The Configure method configures the HTTP request pipeline, which is made up of a connected sequence of delegates that can perform processing and then decide to either return a response themselves or pass processing on to the next delegate in the pipeline. Responses that come back can also be manipulated.
Remember that delegates define a method signature that a delegate implementation can plug into. The delegate for the HTTP request pipeline is simple, as shown in the following code:
public delegate Task RequestDelegate(HttpContext context);
You can see that the input parameter is an HttpContext. This provides access to everything you might need to process the incoming HTTP request, including the URL path, query string parameters, cookies, and user agent.
These delegates are often called middleware because they sit in between the browser client and the website or service.
Middleware delegates are configured using one of the following methods or a custom method that calls them itself:
Run: Adds a middleware delegate that terminates the pipeline by immediately returning a response instead of calling the next middleware delegate.Map: Adds a middleware delegate that creates a branch in the pipeline when there is a matching request usually based on a URL path like/hello.Use: Adds a middleware delegate that forms part of the pipeline so it can decide if it wants to pass the request to the next delegate in the pipeline and it can modify the request and response before and after the next delegate.
For convenience, there are many extension methods that make it easier to build the pipeline, for example, UseMiddleware<T>, where T is a class that has:
- A constructor with a
RequestDelegateparameter that will be passed the next pipeline component - An
Invokemethod with aHttpContextparameter and returns aTask
Summarizing key middleware extension methods
Key middleware extension methods used in our code include the following:
UseDeveloperExceptionPage: Captures synchronous and asynchronousSystem.Exceptioninstances from the pipeline and generates HTML error responses.UseHsts: Adds middleware for using HSTS, which adds theStrict-Transport-Securityheader.UseRouting: Adds middleware that defines a point in the pipeline where routing decisions are made and must be combined with a call toUseEndpointswhere the processing is then executed. This means that for our code, any URL paths that match/or/indexor/supplierswill be mapped to Razor Pages and a match on/hellowill be mapped to the anonymous delegate. Any other URL paths will be passed on to the next delegate for matching, for example, static files. This is why, although it looks like the mapping for Razor Pages and/hellohappen after static files in the pipeline, they actually take priority because the call toUseRoutinghappens beforeUseStaticFiles.UseHttpsRedirection: Adds middleware for redirecting HTTP requests to HTTPS, so in our code a request forhttp://localhost:5000would be modified tohttps://localhost:5001.UseDefaultFiles: Adds middleware that enables default file mapping on the current path, so in our code it would identify files such asindex.html.UseStaticFiles: Adds middleware that looks inwwwrootfor static files to return in the HTTP response.UseEndpoints: Adds middleware to execute to generate responses from decisions made earlier in the pipeline. Two endpoints are added, as shown in the following sub-list:MapRazorPages: Adds middleware that will map URL paths such as/suppliersto a Razor Page file in the/Pagesfolder namedsuppliers.cshtmland return the results as the HTTP response.MapGet: Adds middleware that will map URL paths such as/helloto an inline delegate that writes plain text directly to the HTTP response.
Visualizing the HTTP pipeline
The HTTP request and response pipeline can be visualized as a sequence of request delegates, called one after the other, as shown in the following simplified diagram, which excludes some middleware delegates, such as UseHsts:
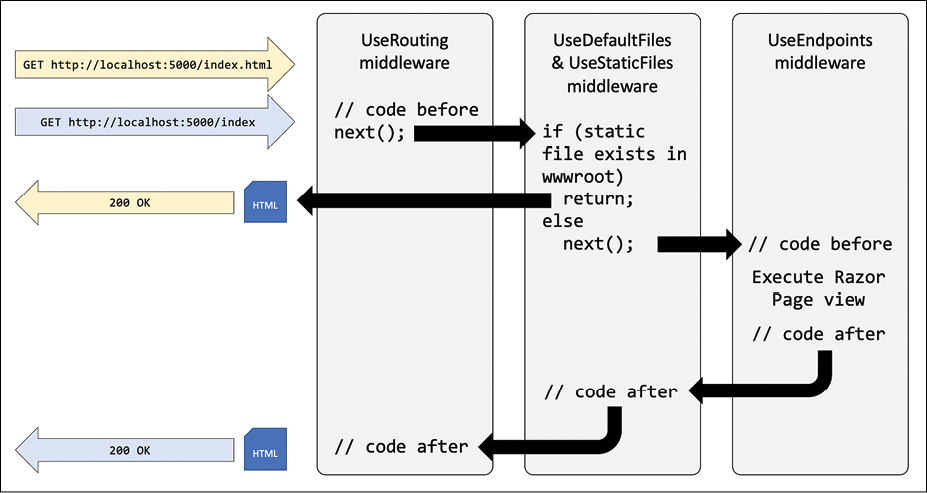
Figure 14.16: The HTTP request and response pipeline
As mentioned before, the UseRouting and UseEndpoints methods must be used together. Although the code to define the mapped routes such as /hello are written in UseEndpoints, the decision about whether an incoming HTTP request URL path matches and therefore which endpoint to execute is made at the UseRouting point in the pipeline.
Implementing an anonymous inline delegate as middleware
A delegate can be specified as an inline anonymous method. We will register one that plugs into the pipeline after routing decisions for endpoints have been made.
It will output which endpoint was chosen, as well as handling one specific route: /bonjour. If that route is matched, it will respond with plain text, without calling any further into the pipeline:
- In
Startup.cs, statically importConsole, as shown in the following code:using static System.Console; - Add statements after the call to
UseRoutingand before the call toUseHttpsRedirectionto use an anonymous method as a middleware delegate, as shown in the following code:app.Use(async (HttpContext context, Func<Task> next) => { RouteEndpoint? rep = context.GetEndpoint() as RouteEndpoint; if (rep is not null) { WriteLine($"Endpoint name: {rep.DisplayName}"); WriteLine($"Endpoint route pattern: {rep.RoutePattern.RawText}"); } if (context.Request.Path == "/bonjour") { // in the case of a match on URL path, this becomes a terminating // delegate that returns so does not call the next delegate await context.Response.WriteAsync("Bonjour Monde!"); return; } // we could modify the request before calling the next delegate await next(); // we could modify the response after calling the next delegate }); - Start the website.
- In Chrome, navigate to
https://localhost:5001/, look at the console output and note that there was a match on an endpoint route/, it was processed as/index, and theIndex.cshtmlRazor Page was executed to return the response, as shown in the following output:Endpoint name: /index Endpoint route pattern: - Navigate to
https://localhost:5001/suppliersand note that you can see that there was a match on an endpoint route/Suppliersand theSuppliers.cshtmlRazor Page was executed to return the response, as shown in the following output:Endpoint name: /Suppliers Endpoint route pattern: Suppliers - Navigate to
https://localhost:5001/indexand note that there was a match on an endpoint route/indexand theIndex.cshtmlRazor Page was executed to return the response, as shown in the following output:Endpoint name: /index Endpoint route pattern: index - Navigate to
https://localhost:5001/index.htmland note that there is no output written to the console because there was no match on an endpoint route but there was a match for a static file, so it was returned as the response. - Navigate to
https://localhost:5001/bonjourand note that there is no output written to the console because there was no match on an endpoint route. Instead, our delegate matched on/bonjour, wrote directly to the response stream, and returned with no further processing. - Close Chrome and shut down the web server.
Practicing and exploring
Test your knowledge and understanding by answering some questions, get some hands-on practice, and explore this chapter's topics with deeper research.
Exercise 14.1 – Test your knowledge
Answer the following questions:
- List six method names that can be specific in an HTTP request.
- List six status codes and their descriptions that can be returned in an HTTP response.
- In ASP.NET Core, what is the
Startupclass used for? - What does the acronym HSTS stand for and what does it do?
- How do you enable static HTML pages for a website?
- How do you mix C# code into the middle of HTML to create a dynamic page?
- How can you define shared layouts for Razor Pages?
- How can you separate the markup from the code-behind in a Razor Page?
- How do you configure an Entity Framework Core data context for use with an ASP.NET Core website?
- How can you reuse Razor Pages with ASP.NET Core 2.2 or later?
Exercise 14.2 – Practice building a data-driven web page
Add a Razor Page to the Northwind.Web website that enables the user to see a list of customers grouped by country. When the user clicks on a customer record, they then see a page showing the full contact details of that customer, and a list of their orders.
Exercise 14.3 – Practice building web pages for console apps
Reimplement some of the console apps from earlier chapters as Razor Pages, for example, from Chapter 4, Writing, Debugging, and Testing Functions, provide a web user interface to output times tables, calculate tax, and generate factorials and the Fibonacci sequence.
Exercise 14.4 – Explore topics
Use the links on the following page to learn more about the topics covered in this chapter:
Summary
In this chapter, you learned about the foundations of web development using HTTP, how to build a simple website that returns static files, and you used ASP.NET Core Razor Pages with Entity Framework Core to create web pages that were dynamically generated from information in a database.
We reviewed the HTTP request and response pipeline, what the helper extension methods do, and how you can add your own middleware that affects processing.
In the next chapter, you will learn how to build more complex websites using ASP.NET Core MVC, which separates the technical concerns of building a website into models, views, and controllers to make them easier to manage.