13
Introducing Practical Applications of C# and .NET
The third and final part of this book is about practical applications of C# and .NET. You will learn how to build cross-platform projects such as websites, services, and mobile and desktop apps.
Microsoft calls platforms for building applications app models or workloads.
In Chapters 1 to 18 and 20, you can use OS-specific Visual Studio or cross-platform Visual Studio Code and JetBrains Rider to build all the apps. In Chapter 19, Building Mobile and Desktop Apps Using .NET MAUI, although you could use Visual Studio Code to build the mobile and desktop app, it is not easy. Visual Studio 2022 for Windows has better support for .NET MAUI than Visual Studio Code does (for now).
I recommend that you work through this and subsequent chapters sequentially because later chapters will reference projects in earlier chapters, and you will build up sufficient knowledge and skills to tackle the trickier problems in later chapters.
In this chapter, we will cover the following topics:
- Understanding app models for C# and .NET
- New features in ASP.NET Core
- Structuring projects
- Using other project templates
- Building an entity data model for Northwind
Understanding app models for C# and .NET
Since this book is about C# 10 and .NET 6, we will learn about app models that use them to build the practical applications that we will encounter in the remaining chapters of this book.
Learn More: Microsoft has extensive guidance for implementing app models in its .NET Application Architecture Guidance documentation, which you can read at the following link: https://www.microsoft.com/net/learn/architecture
Building websites using ASP.NET Core
Websites are made up of multiple web pages loaded statically from the filesystem or generated dynamically by a server-side technology such as ASP.NET Core. A web browser makes GET requests using Unique Resource Locators (URLs) that identify each page and can manipulate data stored on the server using POST, PUT, and DELETE requests.
With many websites, the web browser is treated as a presentation layer, with almost all the processing performed on the server side. Some JavaScript might be used on the client side to implement some presentation features, such as carousels.
ASP.NET Core provides multiple technologies for building websites:
- ASP.NET Core Razor Pages and Razor class libraries are ways to dynamically generate HTML for simple websites. You will learn about them in detail in Chapter 14, Building Websites Using ASP.NET Core Razor Pages.
- ASP.NET Core MVC is an implementation of the Model-View-Controller (MVC) design pattern that is popular for developing complex websites. You will learn about it in detail in Chapter 15, Building Websites Using the Model-View-Controller Pattern.
- Blazor lets you build user interface components using C# and .NET instead of a JavaScript-based UI framework like Angular, React, and Vue. Blazor WebAssembly runs your code in the browser like a JavaScript-based framework would. Blazor Server runs your code on the server and updates the web page dynamically. You will learn about Blazor in detail in Chapter 17, Building User Interfaces Using Blazor. Blazor is not just for building websites; it can also be used to create hybrid mobile and desktop apps.
Building websites using a content management system
Most websites have a lot of content, and if developers had to be involved every time some content needed to be changed, that would not scale well. A Content Management System (CMS) enables developers to define content structure and templates to provide consistency and good design while making it easy for a non-technical content owner to manage the actual content. They can create new pages or blocks of content, and update existing content, knowing it will look great for visitors with minimal effort.
There is a multitude of CMSs available for all web platforms, like WordPress for PHP or Django CMS for Python. CMSs that support modern .NET include Optimizely Content Cloud, Piranha CMS, and Orchard Core.
The key benefit of using a CMS is that it provides a friendly content management user interface. Content owners log in to the website and manage the content themselves. The content is then rendered and returned to visitors using ASP.NET Core MVC controllers and views, or via web service endpoints, known as a headless CMS, to provide that content to "heads" implemented as mobile or desktop apps, in-store touchpoints, or clients built with JavaScript frameworks or Blazor.
This book does not cover .NET CMSs, so I have included links where you can learn more about them in the GitHub repository:
https://github.com/markjprice/cs10dotnet6/blob/main/book-links.md#net-content-management-systems
Building web applications using SPA frameworks
Web applications, also known as Single-Page Applications (SPAs), are made up of a single web page built with a frontend technology such as Blazor WebAssembly, Angular, React, Vue, or a proprietary JavaScript library that can make requests to a backend web service for getting more data when needed and posting updated data using common serialization formats such as XML and JSON. The canonical examples are Google web apps like Gmail, Maps, and Docs.
With a web application, the client side uses JavaScript frameworks or Blazor WebAssembly to implement sophisticated user interactions, but most of the important processing and data access still happens on the server side, because the web browser has limited access to local system resources.
JavaScript is loosely typed and is not designed for complex projects, so most JavaScript libraries these days use Microsoft TypeScript, which adds strong typing to JavaScript and is designed with many modern language features for handling complex implementations.
.NET SDK has project templates for JavaScript and TypeScript-based SPAs, but we will not spend any time learning how to build JavaScript- and TypeScript-based SPAs in this book, even though these are commonly used with ASP.NET Core as the backend, because this book is about C#, it is not about other languages.
In summary, C# and .NET can be used on both the server side and the client side to build websites, as shown in Figure 13.1:
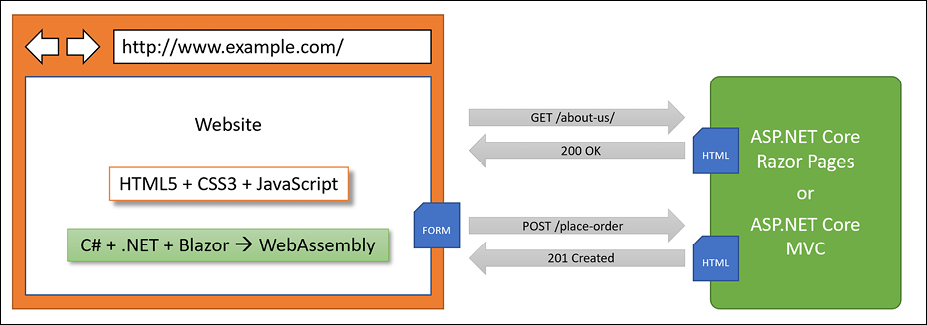
Figure 13.1: The use of C# and .NET to build websites on both the server side and the client side
Building web and other services
Although we will not learn about JavaScript- and TypeScript-based SPAs, we will learn how to build a web service using the ASP.NET Core Web API, and then call that web service from the server-side code in our ASP.NET Core websites, and then later, we will call that web service from Blazor WebAssembly components and cross-platform mobile and desktop apps.
There are no formal definitions, but services are sometimes described based on their complexity:
- Service: all functionality needed by a client app in one monolithic service.
- Microservice: multiple services that each focus on a smaller set of functionalities.
- Nanoservice: a single function provided as a service. Unlike services and microservices that are hosted 24/7/365, nanoservices are often inactive until called upon to reduce resources and costs.
As well as web services that use HTTP as the underlying communication technology and the design principles of the API, we will learn how to build services using other technologies and design philosophies, including:
- gRPC for building highly efficient and performant services with support for almost any platform.
- SignalR for building real-time communications between components.
- OData for wrapping Entity Framework Core and other data models with a web API.
- GraphQL for letting the client control what data is retrieved across multiple data sources.
- Azure Functions for hosting serverless nanoservices in the cloud.
Building mobile and desktop apps
There are two major mobile platforms: Apple's iOS and Google's Android, each with its own programming languages and platform APIs. There are also two major desktop platforms: Apple's macOS and Microsoft's Windows, each with its own programming languages and platform APIs, as shown in the following list:
- iOS: Objective C or Swift and UIkit.
- Android: Java or Kotlin and the Android API.
- macOS: Objective C or Swift and AppKit or Catalyst.
- Windows: C, C++, or many other languages and the Win32 API or Windows App SDK.
Since this book is about modern cross-platform development using C# and .NET it does not include coverage of building desktop apps using Windows Forms, Windows Presentation Foundation (WPF), or Universal Windows Platform (UWP) apps because they are Windows-only.
Cross-platform mobile and desktop apps can be built once for the .NET Multi-platform App User Interfaces (MAUI) platform, and then can run on many mobile and desktop platforms.
.NET MAUI makes it easy to develop those apps by sharing user interface components as well as business logic. They can target the same .NET APIs as used by console apps, websites, and web services. The app will be executed by the Mono runtime on mobile devices and the CoreCLR runtime on desktop devices. The Mono runtime is better optimized for mobile devices compared to the normal .NET CoreCLR runtime. Blazor WebAssembly also uses the Mono runtime because like a mobile app, it is resource constrained.
The apps can exist on their own, but they usually call services to provide an experience that spans across all your computing devices, from servers and laptops to phones and gaming systems.
Future updates to .NET MAUI will support existing MVVM and XAML patterns as well as ones like Model-View-Update (MVU) with C#, which is like Apple's Swift UI.
The penultimate chapter in this sixth edition is Chapter 19, Building Mobile and Desktop Apps Using .NET MAUI, and covers using .NET MAUI to build cross-platform mobile and desktop apps.
Alternatives to .NET MAUI
Before Microsoft created .NET MAUI, third parties created open-source initiatives to enable .NET developers to build cross-platform apps using XAML named Uno and Avalonia.
Understanding Uno Platform
As Uno state on their website, it is "the first and only UI Platform for single-codebase applications for Windows, WebAssembly, iOS, macOS, Android, and Linux."
Developers can reuse 99% of the business logic and UI layer across native mobile, web, and desktop.
Uno Platform uses the Xamarin native platform but not Xamarin.Forms. For WebAssembly, Uno uses the Mono-WASM runtime just like Blazor WebAssembly. For Linux, Uno uses Skia to draw the user interface on the canvas.
Understanding Avalonia
As stated on .NET Foundation's website, Avalonia "is a cross-platform XAML-based UI framework providing a flexible styling system and supporting a wide range of Operating Systems such as Windows, Linux via Xorg, macOS. Avalonia is ready for General-Purpose Desktop App Development."
You can think of Avalonia as a spiritual successor to WPF. WPF, Silverlight, and UWP developers familiar with WPF can continue to benefit from their years of pre-existing knowledge and skills.
It was used by JetBrains to modernize their WPF-based tools and take them cross-platform.
The Avalonia extension for Visual Studio and deep integration with JetBrains Rider makes development easier and more productive.
New features in ASP.NET Core
Over the past few years, Microsoft has rapidly expanded the capabilities of ASP.NET Core. You should note which .NET platforms are supported, as shown in the following list:
- ASP.NET Core 1.0 to 2.2 runs on either .NET Core or .NET Framework.
- ASP.NET Core 3.0 or later only runs on .NET Core 3.0 or later.
ASP.NET Core 1.0
ASP.NET Core 1.0 was released in June 2016 and focused on implementing a minimum API suitable for building modern cross-platform web apps and services for Windows, macOS, and Linux.
ASP.NET Core 1.1
ASP.NET Core 1.1 was released in November 2016 and focused on bug fixes and general improvements to features and performance.
ASP.NET Core 2.0
ASP.NET Core 2.0 was released in August 2017 and focused on adding new features such as Razor Pages, bundling assemblies into a Microsoft.AspNetCore.All metapackage, targeting .NET Standard 2.0, providing a new authentication model, and performance improvements.
The biggest new features introduced with ASP.NET Core 2.0 are ASP.NET Core Razor Pages, which is covered in Chapter 14, Building Websites Using ASP.NET Core Razor Pages, and ASP.NET Core OData support, which is covered in Chapter 18, Building and Consuming Specialized Services.
ASP.NET Core 2.1
ASP.NET Core 2.1 was released in May 2018 and was a Long Term Support (LTS) release, meaning it was supported for three years until August 21, 2021 (LTS designation was not officially assigned to it until August 2018 with version 2.1.3).
It focused on adding new features such as SignalR for real-time communication, Razor class libraries for reusing web components, ASP.NET Core Identity for authentication, and better support for HTTPS and the European Union's General Data Protection Regulation (GDPR), including the topics listed in the following table:
|
Feature |
Chapter |
Topic |
|
Razor class libraries |
14 |
Using Razor class libraries |
|
GDPR support |
15 |
Creating and exploring an ASP.NET Core MVC website |
|
Identity UI library and scaffolding |
15 |
Exploring an ASP.NET Core MVC website |
|
Integration tests |
15 |
Testing an ASP.NET Core MVC website |
|
|
16 |
Creating an ASP.NET Core Web API project |
|
Problem details |
16 |
Implementing a Web API controller |
|
|
16 |
Configuring HTTP clients using HttpClientFactory |
|
ASP.NET Core SignalR |
18 |
Implementing Real-time communication using SignalR |
ASP.NET Core 2.2
ASP.NET Core 2.2 was released in December 2018 and focused on improving the building of RESTful HTTP APIs, updating the project templates to Bootstrap 4 and Angular 6, an optimized configuration for hosting in Azure, and performance improvements, including the topics listed in the following table:
|
Feature |
Chapter |
Topic |
|
HTTP/2 in Kestrel |
14 |
Classic ASP.NET versus modern ASP.NET Core |
|
In-process hosting model |
14 |
Creating an ASP.NET Core project |
|
Endpoint routing |
14 |
Understanding endpoint routing |
|
Health Check API |
16 |
Implementing a health check API |
|
Open API analyzers |
16 |
Implementing Open API analyzers and conventions |
ASP.NET Core 3.0
ASP.NET Core 3.0 was released in September 2019 and focused on fully leveraging .NET Core 3.0 and .NET Standard 2.1, which meant it could not support .NET Framework, and it added useful refinements, including the topics listed in the following table:
|
Feature |
Chapter |
Topic |
|
Static assets in Razor class libraries |
14 |
Using Razor class libraries |
|
New options for MVC service registration |
15 |
Understanding ASP.NET Core MVC startup |
|
ASP.NET Core gRPC |
18 |
Building services using ASP.NET Core gRPC |
|
Blazor Server |
17 |
Building components using Blazor Server |
ASP.NET Core 3.1
ASP.NET Core 3.1 was released in December 2019 and is an LTS release, meaning it will be supported until December 3, 2022. It focused on refinements like partial class support for Razor components and a new <component> tag helper.
Blazor WebAssembly 3.2
Blazor WebAssembly 3.2 was released in May 2020. It was a Current release, meaning that projects had to be upgraded to the .NET 5 version within three months of the .NET 5 release, that is, by February 10, 2021. Microsoft finally delivered on the promise of full-stack web development with .NET, and both Blazor Server and Blazor WebAssembly are covered in Chapter 17, Building User Interfaces Using Blazor.
ASP.NET Core 5.0
ASP.NET Core 5.0 was released in November 2020 and focused on bug fixes, performance improvements using caching for certificate authentication, HPACK dynamic compression of HTTP/2 response headers in Kestrel, nullable annotations for ASP.NET Core assemblies, and a reduction in container image sizes, including the topics listed in the following table:
|
Feature |
Chapter |
Topic |
|
Extension method to allow anonymous access to an endpoint |
16 |
Securing web services |
|
JSON extension methods for |
16 |
Getting customers as JSON in the controller |
ASP.NET Core 6.0
ASP.NET Core 6.0 was released in November 2021 and focused on productivity improvements like minimizing code to implement basic websites and services, .NET Hot Reload, and new hosting options for Blazor, like hybrid apps using .NET MAUI, including the topics listed in the following table:
|
Feature |
Chapter |
Topic |
|
New empty web project template |
14 |
Understanding the empty web template |
|
HTTP logging middleware |
16 |
Enabling HTTP logging |
|
Minimal APIs |
16 |
Implementing minimal Web APIs |
|
Blazor error boundaries |
17 |
Defining Blazor error boundaries |
|
Blazor WebAssembly AOT |
17 |
Enabling Blazor WebAssembly ahead-of-time compilation |
|
.NET Hot Reload |
17 |
Fixing code using .NET Hot Reload |
|
.NET MAUI Blazor apps |
19 |
Hosting Blazor components in .NET MAUI apps |
Building Windows-only desktop apps
Technologies for building Windows-only desktop apps include:
- Windows Forms, 2002.
- Windows Presentation Foundation (WPF), 2006.
- Windows Store apps, 2012.
- Universal Windows Platform (UWP) apps, 2015.
- Windows App SDK (formerly WinUI 3 and Project Reunion) apps, 2021.
Understanding legacy Windows application platforms
With the Microsoft Windows 1.0 release in 1985, the only way to create Windows applications was to use the C language and call functions in three core DLLs named kernel, user, and GDI. Once Windows became 32-bit with Windows 95, the DLLs were suffixed with 32 and became known as Win32 API.
In 1991, Microsoft introduced Visual Basic, which provided developers with a visual, drag-and-drop-from-a-toolbox-of-controls way to build the user interface for Windows applications. It was immensely popular, and the Visual Basic runtime is still distributed as part of Windows 10 today.
With the first version of C# and .NET Framework released in 2002, Microsoft provided technology for building Windows desktop applications named Windows Forms. The equivalent at the time for web development was named Web Forms, hence the complimentary names. The code could be written in either Visual Basic or C# languages. Windows Forms had a similar drag-and-drop visual designer, although it generated C# or Visual Basic code to define the user interface, which can be difficult for humans to understand and edit directly.
In 2006, Microsoft released a more powerful technology for building Windows desktop applications, named Windows Presentation Foundation (WPF), as a key component of .NET Framework 3.0 alongside Windows Communication Foundation (WCF) and Windows Workflow (WF).
Although a WPF app can be created by writing only C# statements, it can also use eXtensible Application Markup Language (XAML) to specify its user interface, which is easy for both humans and code to understand. Visual Studio for Windows is partially built with WPF.
In 2012, Microsoft released Windows 8 with its Windows Store apps that run in a protected sandbox.
In 2015, Microsoft released Windows 10 with an updated Windows Store app concept named Universal Windows Platform (UWP). UWP apps can be built using C++ and the DirectX UI, or JavaScript and HTML, or C# using a custom fork of modern .NET that is not cross-platform but provides full access to the underlying WinRT APIs.
UWP apps can only execute on the Windows 10 platform, not earlier versions of Windows, but UWP apps can run on Xbox and Windows Mixed Reality headsets with motion controllers.
Many Windows developers rejected Windows Store and UWP apps because they have limited access to the underlying system. Microsoft recently created Project Reunion and WinUI 3, which work together to allow Windows developers to bring some of the benefits of modern Windows development to their existing WPF apps and allow them to have the same benefits and system integrations that UWP apps have. This initiative is now known as Windows App SDK.
Understanding modern .NET support for legacy Windows platforms
The on-disk size of the .NET SDKs for Linux and macOS is about 330 MB. The on-disk size of the .NET SDK for Windows is about 440 MB. This is because it includes the Windows Desktop Runtime, which allows the legacy Windows application platforms Windows Forms and WPF to be run on modern .NET.
There are many enterprise applications built using Windows Forms and WPF that need to be maintained or enhanced with new features, but until recently they were stuck on .NET Framework, which is now a legacy platform. With modern .NET and its Windows Desktop Pack, these apps can now use the full modern capabilities of .NET.
Structuring projects
How should you structure your projects? So far, we have built small individual console apps to illustrate language or library features. In the rest of this book, we will build multiple projects using different technologies that work together to provide a single solution.
With large, complex solutions, it can be difficult to navigate amongst all the code. So, the primary reason to structure your projects is to make it easier to find components. It is good to have an overall name for your solution or workspace that reflects the application or solution.
We will build multiple projects for a fictional company named Northwind. We will name the solution or workspace PracticalApps and use the name Northwind as a prefix for all the project names.
There are many ways to structure and name projects and solutions, for example, using a folder hierarchy as well as a naming convention. If you work in a team, make sure you know how your team does it.
Structuring projects in a solution or workspace
It is good to have a naming convention for your projects in a solution or workspace so that any developer can tell what each one does instantly. A common choice is to use the type of project, for example, class library, console app, website, and so on, as shown in the following table:
|
Name |
Description |
|
|
A class library project for common types like interfaces, enums, classes, records, and structs, used across multiple projects. |
|
|
A class library project for common EF Core entity models. Entity models are often used on both the server and client side, so it is best to separate dependencies on specific database providers. |
|
|
A class library project for the EF Core database context with dependencies on specific database providers. |
|
|
An ASP.NET Core project for a simple website that uses a mixture of static HTML files and dynamic Razor Pages. |
|
|
A class library project for Razor Pages used in multiple projects. |
|
|
An ASP.NET Core project for a complex website that uses the MVC pattern and can be more easily unit tested. |
|
|
An ASP.NET Core project for an HTTP API service. A good choice for integrating with websites because they can use any JavaScript library or Blazor to interact with the service. |
|
|
An ASP.NET Core project for an HTTP API service that implements the OData standard to enable a client to control queries. |
|
|
An ASP.NET Core project for an HTTP API service that implements the GraphQL standard to enable a client to control queries. |
|
|
An ASP.NET Core project for a gRPC service. A good choice for integrating with apps built with any language and platform since gRPC has wide support and is highly efficient and performant. |
|
|
An ASP.NET Core project for real-time communication. |
|
|
An ASP.NET Core project for implementing a serverless nanoservice for hosting in Azure Functions. |
|
|
An ASP.NET Core Blazor Server project. |
|
|
An ASP.NET Core Blazor WebAssembly client-side project. |
|
|
An ASP.NET Core Blazor WebAssembly server-side project. |
|
|
A .NET MAUI project for a cross-platform desktop/mobile app. |
|
|
A .NET MAUI project for hosting Blazor components with native integrations with the OS. |
Using other project templates
When you install the .NET SDK, there are many project templates included:
- At a command prompt or terminal, enter the following command:
dotnet new --list - You will see a list of currently installed templates, including templates for Windows desktop development if you are running on Windows, as shown in Figure 13.2:
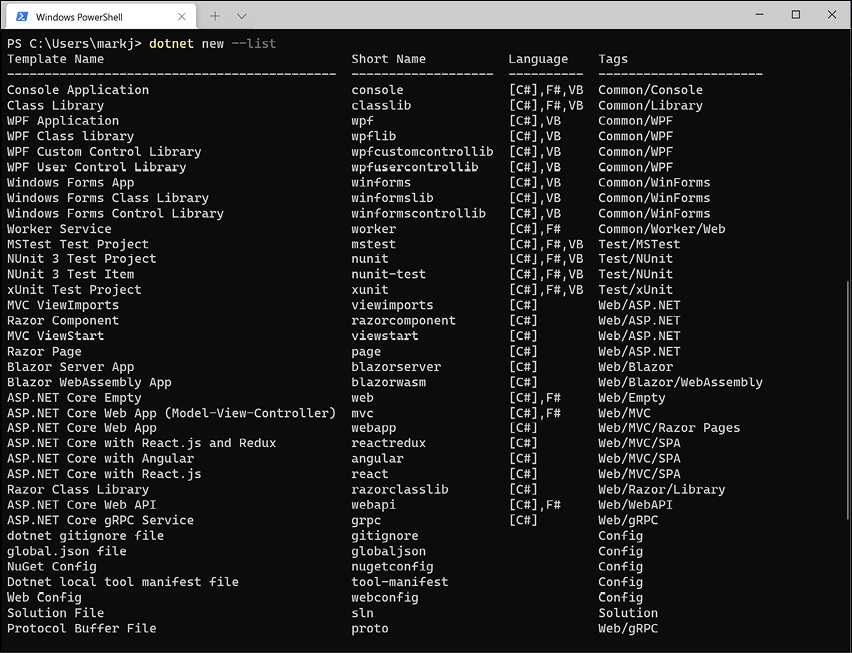
Figure 13.2: A list of dotnet project templates
- Note the web-related project templates, including ones for creating SPAs using Blazor, Angular, and React. But another common JavaScript SPA library is missing: Vue.
Installing additional template packs
Developers can install lots of additional template packs:
- Start a browser and navigate to http://dotnetnew.azurewebsites.net/.
- Enter
vuein the textbox and note the list of available templates for Vue.js, including one published by Microsoft, as shown in Figure 13.3: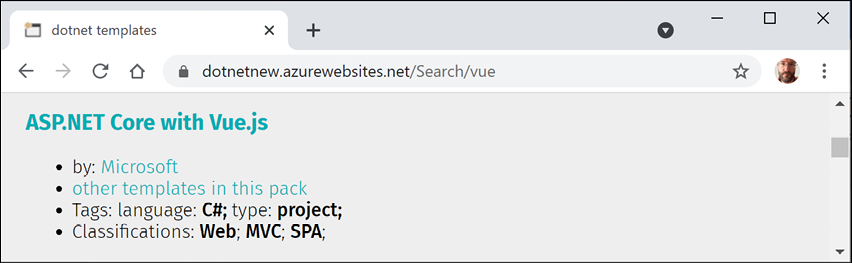
Figure 13.3: A project template for Vue.js by Microsoft
- Click on ASP.NET Core with Vue.js by Microsoft, and note the instructions for installing and using this template, as shown in the following commands:
dotnet new --install "Microsoft.AspNetCore.SpaTemplates" dotnet new vue - Click View other templates in this package, and note that as well as a project template for Vue.js, it also has project templates for Aurelia and Knockout.js.
Building an entity data model for the Northwind database
Practical applications usually need to work with data in a relational database or another data store. In this chapter, we will define an entity data model for the Northwind database stored in SQL Server or SQLite. It will be used in most of the apps that we create in subsequent chapters.
The Northwind4SQLServer.sql and Northwind4SQLite.sql script files are different. The script for SQL Server creates 13 tables as well as related views and stored procedures. The script for SQLite is a simplified version that only creates 10 tables because SQLite does not support as many features. The main projects in this book only need those 10 tables so you can complete every task in this book with either database.
Instructions to install SQL Server and SQLite can be found in Chapter 10, Working with Data Using Entity Framework Core. In that chapter, you will also find instructions for installing the dotnet-ef tool, which you will use to scaffold an entity model from an existing database.
Good Practice: You should create a separate class library project for your entity data models. This allows easier sharing between backend web servers and frontend desktop, mobile, and Blazor WebAssembly clients.
Creating a class library for entity models using SQLite
You will now define entity data models in a class library so that they can be reused in other types of projects including client-side app models. If you are not using SQL Server, you will need to create this class library for SQLite. If you are using SQL Server, then you can create both a class library for SQLite and one for SQL Server and then switch between them as you choose.
We will automatically generate some entity models using the EF Core command-line tool:
- Use your preferred code editor to create a new solution/workspace named
PracticalApps. - Add a class library project, as defined in the following list:
- Project template: Class Library /
classlib - Workspace/solution file and folder:
PracticalApps - Project file and folder:
Northwind.Common.EntityModels.Sqlite
- Project template: Class Library /
- In the
Northwind.Common.EntityModels.Sqliteproject, add package references for the SQLite database provider and EF Core design-time support, as shown in the following markup:<ItemGroup> <PackageReference Include="Microsoft.EntityFrameworkCore.Sqlite" Version="6.0.0" /> <PackageReference Include="Microsoft.EntityFrameworkCore.Design" Version="6.0.0"> <PrivateAssets>all</PrivateAssets> <IncludeAssets>runtime; build; native; contentfiles; analyzers; buildtransitive</IncludeAssets> </PackageReference> </ItemGroup> - Delete the
Class1.csfile. - Build the project.
- Create the
Northwind.dbfile for SQLite by copying theNorthwind4SQLite.sqlfile into thePracticalAppsfolder, and then enter the following command at a command prompt or terminal:sqlite3 Northwind.db -init Northwind4SQLite.sql - Be patient because this command might take a while to create the database structure, as shown in the following output:
-- Loading resources from Northwind4SQLite.sql SQLite version 3.35.5 2021-04-19 14:49:49 Enter ".help" for usage hints. sqlite> - Press Ctrl + C on Windows or Cmd + D on macOS to exit SQLite command mode.
- Open a command prompt or terminal for the
Northwind.Common.EntityModels.Sqlitefolder. - At the command line, generate entity class models for all tables, as shown in the following commands:
dotnet ef dbcontext scaffold "Filename=../Northwind.db" Microsoft.EntityFrameworkCore.Sqlite --namespace Packt.Shared --data-annotationsNote the following:
- The command to perform:
dbcontext scaffold - The connection strings.
"Filename=../Northwind.db" - The database provider:
Microsoft.EntityFrameworkCore.Sqlite - The namespace:
--namespace Packt.Shared - To use data annotations as well as the Fluent API:
--data-annotations
- The command to perform:
- Note the build messages and warnings, as shown in the following output:
Build started...
Build succeeded.
To protect potentially sensitive information in your connection string, you should move it out of source code. You can avoid scaffolding the connection string by using the Name= syntax to read it from configuration - see https://go.microsoft.com/fwlink/?linkid=2131148. For more guidance on storing connection strings, see http://go.microsoft.com/fwlink/?LinkId=723263.
Improving the class-to-table mapping
The dotnet-ef command-line tool generates different code for SQL Server and SQLite because they support different levels of functionality.
For example, SQL Server text columns can have limits to the number of characters. SQLite does not support this. So, dotnet-ef will generate validation attributes to ensure string properties are limited to a specified number of characters for SQL Server but not for SQLite, as shown in the following code:
// SQLite database provider-generated code
[Column(TypeName = "nvarchar (15)")]
public string CategoryName { get; set; } = null!;
// SQL Server database provider-generated code
[StringLength(15)]
public string CategoryName { get; set; } = null!;
Neither database provider will mark non-nullable string properties as required:
// no runtime validation of non-nullable property
public string CategoryName { get; set; } = null!;
// nullable property
public string? Description { get; set; }
// decorate with attribute to perform runtime validation
[Required]
public string CategoryName { get; set; } = null!;
We will make some small changes to improve the entity model mapping and validation rules for SQLite:
- Open the
Customer.csfile and add a regular expression to validate its primary key value to only allow uppercase Western characters, as shown highlighted in the following code:[Key] [Column(TypeName = "nchar (5)")] [RegularExpression("[A-Z]{5}")] public string CustomerId { get; set; } - Activate your code editor's find and replace feature (in Visual Studio 2022, navigate to Edit | Find and Replace | Quick Replace), toggle on Use Regular Expressions, and then type a regular expression in the search box, as shown in the following expression:
\[Column\(TypeName = "(nchar|nvarchar) \((.*)\)"\)\] - In the replace box, type a replacement regular expression, as shown in the following expression:
$&\n [StringLength($2)]After the newline character,
\n, I have included four space characters to indent correctly on my system, which uses two space characters per indentation level. You can insert as many as you wish. - Set the find and replace to search files in the current project.
- Execute the search and replace to replace all, as shown in Figure 13.4:
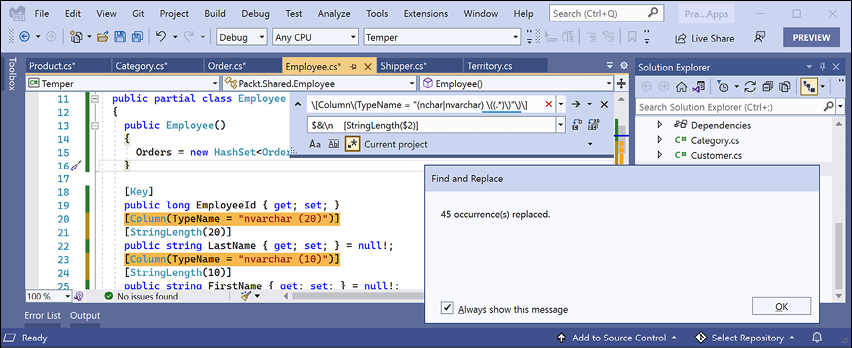
Figure 13.4: Search and replace all matches using regular expressions in Visual Studio 2022
- Change any date/time properties, for example, in
Employee.cs, to use a nullableDateTimeinstead of an array of bytes, as shown in the following code:// before [Column(TypeName = "datetime")] public byte[] BirthDate { get; set; } // after [Column(TypeName = "datetime")] public DateTime? BirthDate { get; set; }Use your code editor's find feature to search for
"datetime"to find all the properties that need changing. - Change any
moneyproperties, for example, inOrder.cs, to use a nullabledecimalinstead of an array of bytes, as shown in the following code:// before [Column(TypeName = "money")] public byte[] Freight { get; set; } // after [Column(TypeName = "money")] public decimal? Freight { get; set; }Use your code editor's find feature to search for
"money"to find all the properties that need changing. - Change any
bitproperties, for example, inProduct.cs, to use aboolinstead of an array of bytes, as shown in the following code:// before [Column(TypeName = "bit")] public byte[] Discontinued { get; set; } = null!; // after [Column(TypeName = "bit")] public bool Discontinued { get; set; }Use your code editor's find feature to search for
"bit"to find all the properties that need changing. - In
Category.cs, make theCategoryIdproperty anint, as shown highlighted in the following code:[Key] public int CategoryId { get; set; } - In
Category.cs, make theCategoryNameproperty required, as shown highlighted in the following code:[Required] [Column(TypeName = "nvarchar (15)")] [StringLength(15)] public string CategoryName { get; set; } - In
Customer.cs, make theCompanyNameproperty required, as shown highlighted in the following code:[Required] [Column(TypeName = "nvarchar (40)")] [StringLength(40)] public string CompanyName { get; set; } - In
Employee.cs, make theEmployeeIdproperty anintinstead of along. - In
Employee.cs, make theFirstNameandLastNameproperties required. - In
Employee.cs, make theReportsToproperty anint?instead of along?. - In
EmployeeTerritory.cs, make theEmployeeIdproperty anintinstead of along. - In
EmployeeTerritory.cs, make theTerritoryIdproperty required. - In
Order.cs, make theOrderIdproperty anintinstead of along. - In
Order.cs, decorate theCustomerIdproperty with a regular expression to enforce five uppercase characters. - In
Order.cs, make theEmployeeIdproperty anint?instead of along?. - In
Order.cs, make theShipViaproperty anint?instead of along?. - In
OrderDetail.cs, make theOrderIdproperty anintinstead of along. - In
OrderDetail.cs, make theProductIdproperty anintinstead of along. - In
OrderDetail.cs, make theQuantityproperty ashortinstead of along. - In
Product.cs, make theProductIdproperty anintinstead of along. - In
Product.cs, make theProductNameproperty required. - In
Product.cs, make theSupplierIdandCategoryIdproperties anint?instead of along?. - In
Product.cs, make theUnitsInStock,UnitsOnOrder, andReorderLevelproperties ashort?instead of along?. - In
Shipper.cs, make theShipperIdproperty anintinstead of along. - In
Shipper.cs, make theCompanyNameproperty required. - In
Supplier.cs, make theSupplierIdproperty anintinstead of along. - In
Supplier.cs, make theCompanyNameproperty required. - In
Territory.cs, make theRegionIdproperty anintinstead of along. - In
Territory.cs, make theTerritoryIdandTerritoryDescriptionproperties required.
Now that we have a class library for the entity classes, we can create a class library for the database context.
Creating a class library for a Northwind database context
You will now define a database context class library:
- Add a class library project to the solution/workspace, as defined in the following list:
- Project template: Class Library /
classlib - Workspace/solution file and folder:
PracticalApps - Project file and folder:
Northwind.Common.DataContext.Sqlite
- Project template: Class Library /
- In Visual Studio, set the startup project for the solution to the current selection.
- In Visual Studio Code, select
Northwind.Common.DataContext.Sqliteas the active OmniSharp project. - In the
Northwind.Common.DataContext.Sqliteproject, add a project reference to theNorthwind.Common.EntityModels.Sqliteproject and add a package reference to the EF Core data provider for SQLite, as shown in the following markup:<ItemGroup> <PackageReference Include="Microsoft.EntityFrameworkCore.SQLite" Version="6.0.0" /> </ItemGroup> <ItemGroup> <ProjectReference Include= "..\Northwind.Common.EntityModels.Sqlite\Northwind.Common .EntityModels.Sqlite.csproj" /> </ItemGroup>The path to the project reference should not have a line break in your project file.
- In the
Northwind.Common.DataContext.Sqliteproject, delete theClass1.csclass file. - Build the
Northwind.Common.DataContext.Sqliteproject. - Move the
NorthwindContext.csfile from theNorthwind.Common.EntityModels.Sqliteproject/folder to theNorthwind.Common.DataContext.Sqliteproject/folder.In Visual Studio Solution Explorer, if you drag and drop a file between projects it will be copied. If you hold down Shift while dragging and dropping, it will be moved. In Visual Studio Code EXPLORER, if you drag and drop a file between projects it will be moved. If you hold down Ctrl while dragging and dropping, it will be copied.
- In
NorthwindContext.cs, in theOnConfiguringmethod, remove the compiler#warningabout the connection string.Good Practice: We will override the default database connection string in any projects such as websites that need to work with the Northwind database, so the class derived from
DbContextmust have a constructor with aDbContextOptionsparameter for this to work, as shown in the following code:public NorthwindContext(DbContextOptions<NorthwindContext> options) : base(options) { } - In the
OnModelCreatingmethod, remove all Fluent API statements that call theValueGeneratedNevermethod to configure primary key properties likeSupplierIdto never generate a value automatically or call theHasDefaultValueSqlmethod, as shown in the following code:modelBuilder.Entity<Supplier>(entity => { entity.Property(e => e.SupplierId).ValueGeneratedNever(); });If we do not remove the configuration like the statements above, then when we add new suppliers, the
SupplierIdvalue would always be 0 and we would only be able to add one supplier with that value and then all other attempts would throw an exception. - For the
Productentity, tell SQLite that theUnitPricecan be converted fromdecimaltodouble. TheOnModelCreatingmethod should now be much simplified, as shown in the following code:protected override void OnModelCreating(ModelBuilder modelBuilder) { modelBuilder.Entity<OrderDetail>(entity => { entity.HasKey(e => new { e.OrderId, e.ProductId }); entity.HasOne(d => d.Order) .WithMany(p => p.OrderDetails) .HasForeignKey(d => d.OrderId) .OnDelete(DeleteBehavior.ClientSetNull); entity.HasOne(d => d.Product) .WithMany(p => p.OrderDetails) .HasForeignKey(d => d.ProductId) .OnDelete(DeleteBehavior.ClientSetNull); }); modelBuilder.Entity<Product>() .Property(product => product.UnitPrice) .HasConversion<double>(); OnModelCreatingPartial(modelBuilder); } - Add a class named
NorthwindContextExtensions.csand modify its contents to define an extension method that adds the Northwind database context to a collection of dependency services, as shown in the following code:using Microsoft.EntityFrameworkCore; // UseSqlite using Microsoft.Extensions.DependencyInjection; // IServiceCollection namespace Packt.Shared; public static class NorthwindContextExtensions { /// <summary> /// Adds NorthwindContext to the specified IServiceCollection. Uses the Sqlite database provider. /// </summary> /// <param name="services"></param> /// <param name="relativePath">Set to override the default of ".."</param> /// <returns>An IServiceCollection that can be used to add more services.</returns> public static IServiceCollection AddNorthwindContext( this IServiceCollection services, string relativePath = "..") { string databasePath = Path.Combine(relativePath, "Northwind.db"); services.AddDbContext<NorthwindContext>(options => options.UseSqlite($"Data Source={databasePath}") ); return services; } } - Build the two class libraries and fix any compiler errors.
Creating a class library for entity models using SQL Server
To use SQL Server, you will not need to do anything if you already set up the Northwind database in Chapter 10, Working with Data Using Entity Framework Core. But you will now create the entity models using the dotnet-ef tool:
- Use your preferred code editor to create a new solution/workspace named
PracticalApps. - Add a class library project, as defined in the following list:
- Project template: Class Library /
classlib - Workspace/solution file and folder:
PracticalApps - Project file and folder:
Northwind.Common.EntityModels.SqlServer
- Project template: Class Library /
- In the
Northwind.Common.EntityModels.SqlServerproject, add package references for the SQL Server database provider and EF Core design-time support, as shown in the following markup:<ItemGroup> <PackageReference Include="Microsoft.EntityFrameworkCore.SqlServer" Version="6.0.0" /> <PackageReference Include="Microsoft.EntityFrameworkCore.Design" Version="6.0.0"> <PrivateAssets>all</PrivateAssets> <IncludeAssets>runtime; build; native; contentfiles; analyzers; buildtransitive</IncludeAssets> </PackageReference> </ItemGroup> - Delete the
Class1.csfile. - Build the project.
- Open a command prompt or terminal for the
Northwind.Common.EntityModels.SqlServerfolder. - At the command line, generate entity class models for all tables, as shown in the following commands:
dotnet ef dbcontext scaffold "Data Source=.;Initial Catalog=Northwind;Integrated Security=true;" Microsoft.EntityFrameworkCore.SqlServer --namespace Packt.Shared --data-annotationsNote the following:
- The command to perform:
dbcontext scaffold - The connection strings.
"Data Source=.;Initial Catalog=Northwind;Integrated Security=true;" - The database provider:
Microsoft.EntityFrameworkCore.SqlServer - The namespace:
--namespace Packt.Shared - To use data annotations as well as the Fluent API:
--data-annotations
- The command to perform:
- In
Customer.cs, add a regular expression to validate its primary key value to only allow uppercase Western characters, as shown highlighted in the following code:[Key] [StringLength(5)] [RegularExpression("[A-Z]{5}")] public string CustomerId { get; set; } = null!; - In
Customer.cs, make theCustomerIdandCompanyNameproperties required. - Add a class library project to the solution/workspace, as defined in the following list:
- Project template: Class Library /
classlib - Workspace/solution file and folder:
PracticalApps - Project file and folder:
Northwind.Common.DataContext.SqlServer
- Project template: Class Library /
- In Visual Studio Code, select
Northwind.Common.DataContext.SqlServeras the active OmniSharp project. - In the
Northwind.Common.DataContext.SqlServerproject, add a project reference to theNorthwind.Common.EntityModels.SqlServerproject and add a package reference to the EF Core data provider for SQL Server, as shown in the following markup:<ItemGroup> <PackageReference Include="Microsoft.EntityFrameworkCore.SqlServer" Version="6.0.0" /> </ItemGroup> <ItemGroup> <ProjectReference Include= "..\Northwind.Common.EntityModels.SqlServer\Northwind.Common .EntityModels.SqlServer.csproj" /> </ItemGroup> - In the
Northwind.Common.DataContext.SqlServerproject, delete theClass1.csclass file. - Build the
Northwind.Common.DataContext.SqlServerproject. - Move the
NorthwindContext.csfile from theNorthwind.Common.EntityModels.SqlServerproject/folder to theNorthwind.Common.DataContext.SqlServerproject/folder. - In
NorthwindContext.cs, remove the compiler warning about the connection string. - Add a class named
NorthwindContextExtensions.cs, and modify its contents to define an extension method that adds the Northwind database context to a collection of dependency services, as shown in the following code:using Microsoft.EntityFrameworkCore; // UseSqlServer using Microsoft.Extensions.DependencyInjection; // IServiceCollection namespace Packt.Shared; public static class NorthwindContextExtensions { /// <summary> /// Adds NorthwindContext to the specified IServiceCollection. Uses the SqlServer database provider. /// </summary> /// <param name="services"></param> /// <param name="connectionString">Set to override the default.</param> /// <returns>An IServiceCollection that can be used to add more services.</returns> public static IServiceCollection AddNorthwindContext( this IServiceCollection services, string connectionString = "Data Source=.;Initial Catalog=Northwind;" + "Integrated Security=true;MultipleActiveResultsets=true;") { services.AddDbContext<NorthwindContext>(options => options.UseSqlServer(connectionString)); return services; } } - Build the two class libraries and fix any compiler errors.
Good Practice: We have provided optional arguments for the AddNorthwindContext method so that we can override the hardcoded SQLite database filename path or the SQL Server database connection string. This will allow us more flexibility, for example, to load these values from a configuration file.
Practicing and exploring
Explore this chapter's topics with deeper research.
Exercise 13.1 – Test your knowledge
- .NET 6 is cross-platform. Windows Forms and WPF apps can run on .NET 6. Can those apps therefore run on macOS and Linux?
- How does a Windows Forms app define its user interface, and why is this a potential problem?
- How can a WPF or UWP app define its user interface, and why is this good for developers?
Exercise 13.2 – Explore topics
Use the links on the following page to learn more detail about the topics covered in this chapter:
Summary
In this chapter, you have been introduced to some of the app models and workloads that you can use to build practical applications using C# and .NET.
You have created two to four class libraries to define an entity data model for working with the Northwind database using either SQLite or SQL Server or both.
In the following six chapters, you will learn the details about how to build the following:
- Simple websites using static HTML pages and dynamic Razor Pages.
- Complex websites using the Model-View-Controller (MVC) design pattern.
- Web services that can be called by any platform that can make an HTTP request and client websites that call those web services.
- Blazor user interface components that can be hosted on a web server, in the browser, or on hybrid web-native mobile and desktop apps.
- Services that implement remote procedure calls using gRPC.
- Services that implement real-time communication using SignalR.
- Services that provide easy and flexible access to an EF Core model.
- Serverless nano services hosted in Azure Functions.
- Cross-platform native mobile and desktop apps using .NET MAUI.