10
Working with Data Using Entity Framework Core
This chapter is about reading and writing to data stores, such as Microsoft SQL Server, SQLite, and Azure Cosmos DB, by using the object-to-data store mapping technology named Entity Framework Core (EF Core).
This chapter will cover the following topics:
- Understanding modern databases
- Setting up EF Core
- Defining EF Core models
- Querying EF Core models
- Loading patterns with EF Core
- Manipulating data with EF Core
- Working with transactions
- Code First EF Core models
Understanding modern databases
Two of the most common places to store data are in a Relational Database Management System (RDBMS) such as Microsoft SQL Server, PostgreSQL, MySQL, and SQLite, or in a NoSQL database such as Microsoft Azure Cosmos DB, Redis, MongoDB, and Apache Cassandra.
Understanding legacy Entity Framework
Entity Framework (EF) was first released as part of .NET Framework 3.5 with Service Pack 1 back in late 2008. Since then, Entity Framework has evolved, as Microsoft has observed how programmers use an object-relational mapping (ORM) tool in the real world.
ORMs use a mapping definition to associate columns in tables to properties in classes. Then, a programmer can interact with objects of different types in a way that they are familiar with, instead of having to deal with knowing how to store the values in a relational table or another structure provided by a NoSQL data store.
The version of EF included with .NET Framework is Entity Framework 6 (EF6). It is mature, stable, and supports an EDMX (XML file) way of defining the model as well as complex inheritance models, and a few other advanced features.
EF 6.3 and later have been extracted from .NET Framework as a separate package so it can be supported on .NET Core 3.0 and later. This enables existing projects like web applications and services to be ported and run cross-platform. However, EF6 should be considered a legacy technology because it has some limitations when running cross-platform and no new features will be added to it.
Using the legacy Entity Framework 6.3 or later
To use the legacy Entity Framework in a .NET Core 3.0 or later project, you must add a package reference to it in your project file, as shown in the following markup:
<PackageReference Include="EntityFramework" Version="6.4.4" />
Good Practice: Only use legacy EF6 if you have to, for example, when migrating a WPF app that uses it. This book is about modern cross-platform development so, in the rest of this chapter, I will only cover the modern Entity Framework Core. You will not need to reference the legacy EF6 package as shown above in the projects for this chapter.
Understanding Entity Framework Core
The truly cross-platform version, EF Core, is different from the legacy Entity Framework. Although EF Core has a similar name, you should be aware of how it varies from EF6. The latest EF Core is version 6.0 to match .NET 6.0.
EF Core 5 and later only support .NET 5 and later. EF Core 3.0 and later only run on platforms that support .NET Standard 2.1, meaning .NET Core 3.0 and later. It does not support .NET Standard 2.0 platforms like .NET Framework 4.8.
As well as traditional RDBMSs, EF Core supports modern cloud-based, nonrelational, schema-less data stores, such as Microsoft Azure Cosmos DB and MongoDB, sometimes with third-party providers.
EF Core has so many improvements that this chapter cannot cover them all. I will focus on the fundamentals that all .NET developers should know and some of the cooler new features.
There are two approaches to working with EF Core:
- Database First: A database already exists, so you build a model that matches its structure and features.
- Code First: No database exists, so you build a model and then use EF Core to create a database that matches its structure and features.
We will start by using EF Core with an existing database.
Creating a console app for working with EF Core
First, we will create a console app project for this chapter:
- Use your preferred code editor to create a new solution/workspace named
Chapter10. - Add a console app project, as defined in the following list:
- Project template: Console Application /
console - Workspace/solution file and folder:
Chapter10 - Project file and folder:
WorkingWithEFCore
- Project template: Console Application /
Using a sample relational database
To learn how to manage an RDBMS using .NET, it would be useful to have a sample one so that you can practice on one that has a medium complexity and a decent amount of sample records. Microsoft offers several sample databases, most of which are too complex for our needs, so instead, we will use a database that was first created in the early 1990s known as Northwind.
Let's take a minute to look at a diagram of the Northwind database. You can use the following diagram to refer to as we write code and queries throughout this book:
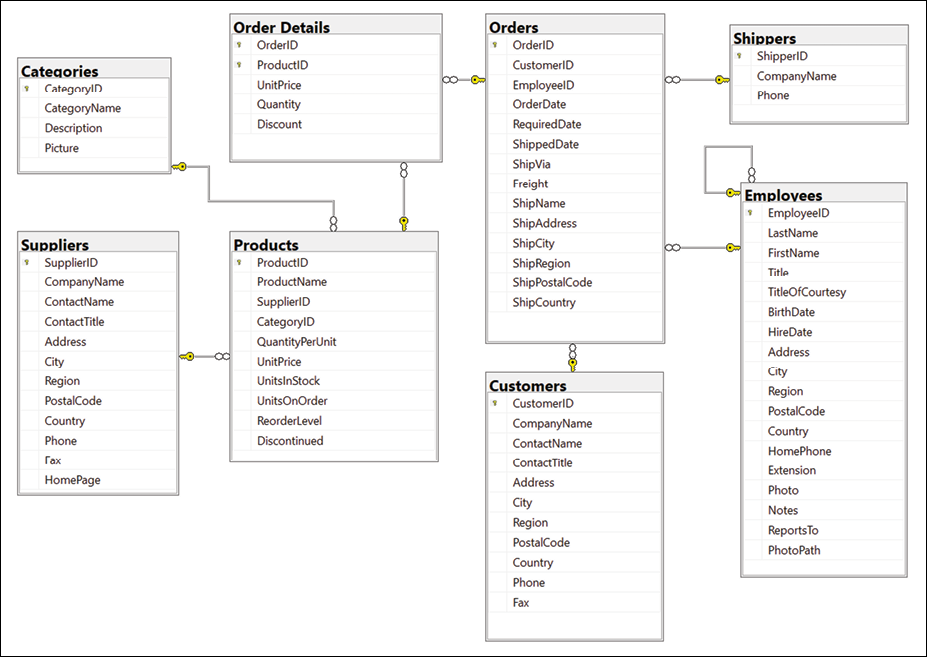
Figure 10.1: The Northwind database tables and relationships
You will write code to work with the Categories and Products tables later in this chapter and other tables in later chapters. But before we do, note that:
- Each category has a unique identifier, name, description, and picture.
- Each product has a unique identifier, name, unit price, units in stock, and other fields.
- Each product is associated with a category by storing the category's unique identifier.
- The relationship between
CategoriesandProductsis one-to-many, meaning each category can have zero or more products.
Using Microsoft SQL Server for Windows
Microsoft offers various editions of its popular and capable SQL Server product for Windows, Linux, and Docker containers. We will use a free version that can run standalone, known as SQL Server Developer Edition. You can also use the Express edition or the free SQL Server LocalDB edition that can be installed with Visual Studio for Windows.
If you do not have a Windows computer or you want to use a cross-platform database system, then you can skip ahead to the topic Using SQLite.
Downloading and installing SQL Server
You can download SQL Server editions from the following link:
https://www.microsoft.com/en-us/sql-server/sql-server-downloads
- Download the Developer edition.
- Run the installer.
- Select the Custom installation type.
- Select a folder for the installation files and then click Install.
- Wait for the 1.5 GB of installer files to download.
- In SQL Server Installation Center, click Installation, and then click New SQL Server stand-alone installation or add features to an existing installation.
- Select Developer as the free edition and then click Next.
- Accept the license terms and then click Next.
- Review the install rules, fix any issues, and then click Next.
- In Feature Selection, select Database Engine Services, and then click Next.
- In Instance Configuration, select Default instance, and then click Next. If you already have a default instance configured, then you could create a named instance, perhaps called
cs10dotnet6. - In Server Configuration, note the SQL Server Database Engine is configured to start automatically. Set the SQL Server Browser to start automatically, and then click Next.
- In Database Engine Configuration, on the Server Configuration tab, set Authentication Mode to Mixed, set the sa account password to a strong password, click Add Current User, and then click Next.
- In Ready to Install, review the actions that will be taken, and then click Install.
- In Complete, note the successful actions taken, and then click Close.
- In SQL Server Installation Center, in Installation, click Install SQL Server Management Tools.
- In the browser window, click to download the latest version of SSMS.
- Run the installer and click Install.
- When the installer has finished, click Restart if needed or Close.
Creating the Northwind sample database for SQL Server
Now we can run a database script to create the Northwind sample database:
- If you have not previously downloaded or cloned the GitHub repository for this book, then do so now using the following link: https://github.com/markjprice/cs10dotnet6/.
- Copy the script to create the Northwind database for SQL Server from the following path in your local Git repository:
/sql-scripts/Northwind4SQLServer.sqlinto theWorkingWithEFCorefolder. - Start SQL Server Management Studio.
- In the Connect to Server dialog, for Server name, enter
.(a dot) meaning the local computer name, and then click Connect.If you had to create a named instance, like
cs10dotnet6, then enter.\cs10dotnet6 - Navigate to File | Open | File....
- Browse to select the
Northwind4SQLServer.sqlfile and then click Open. - In the toolbar, click Execute, and note the the Command(s) completed successfully message.
- In Object Explorer, expand the Northwind database, and then expand Tables.
- Right-click Products, click Select Top 1000 Rows, and note the returned results, as shown in Figure 10.2:
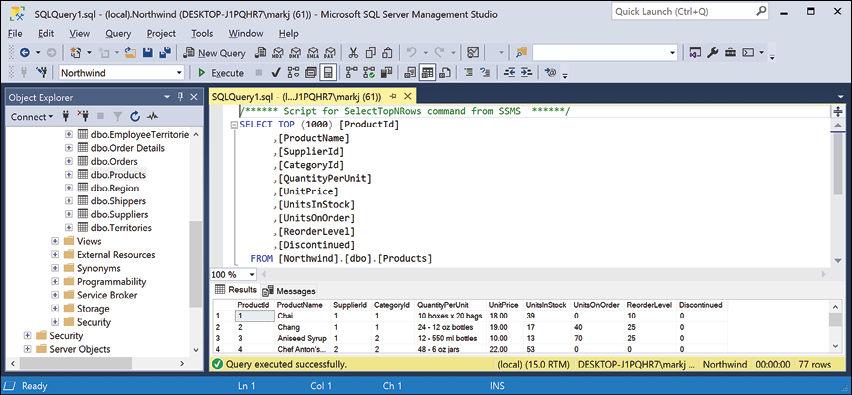
Figure 10.2: The Products table in SQL Server Management Studio
- In the Object Explorer toolbar, click the Disconnect button.
- Exit SQL Server Management Studio.
Managing the Northwind sample database with Server Explorer
We did not have to use SQL Server Management Studio to execute the database script. We can also use tools in Visual Studio including the SQL Server Object Explorer and Server Explorer:
- In Visual Studio, choose View | Server Explorer.
- In the Server Explorer window, right-click Data Connections and choose Add Connection....
- If you see the Choose Data Source dialog, as shown in Figure 10.3, select Microsoft SQL Server and then click Continue:

Figure 10.3: Choosing SQL Server as the data source
- In the Add Connection dialog, enter the server name as
., enter the database name asNorthwind, and then click OK. - In Server Explorer, expand the data connection and its tables. You should see 13 tables, including the Categories and Products tables.
- Right-click the Products table, choose Show Table Data, and note the 77 rows of products are returned.
- To see the details of the Products table columns and types, right-click Products and choose Open Table Definition, or double-click the table in Server Explorer.
Using SQLite
SQLite is a small, cross-platform, self-contained RDBMS that is available in the public domain. It's the most common RDBMS for mobile platforms such as iOS (iPhone and iPad) and Android. Even if you use Windows and set up SQL Server in the previous section, you might want to set up SQLite too. The code that we write will work with both and it can be interesting to see the subtle differences.
Setting up SQLite for macOS
SQLite is included in macOS in the /usr/bin/ directory as a command-line application named sqlite3.
Setting up SQLite for Windows
On Windows, we need to add the folder for SQLite to the system path so it will be found when we enter commands at a command prompt or terminal:
- Start your favorite browser and navigate to the following link: https://www.sqlite.org/download.html.
- Scroll down the page to the Precompiled Binaries for Windows section.
- Click sqlite-tools-win32-x86-3360000.zip. Note the file might have a higher version number after this book is published.
- Extract the ZIP file into a folder named
C:\Sqlite\. - Navigate to Windows Settings.
- Search for
environmentand choose Edit the system environment variables. On non-English versions of Windows, please search for the equivalent word in your local language to find the setting. - Click the Environment Variables button.
- In System variables, select Path in the list, and then click Edit….
- Click New, enter
C:\Sqlite, and press Enter. - Click OK.
- Click OK.
- Click OK.
- Close Windows Settings.
Setting up SQLite for other OSes
SQLite can be downloaded and installed for other OSes from the following link: https://www.sqlite.org/download.html.
Creating the Northwind sample database for SQLite
Now we can create the Northwind sample database for SQLite using an SQL script:
- If you have not previously cloned the GitHub repository for this book, then do so now using the following link: https://github.com/markjprice/cs10dotnet6/.
- Copy the script to create the Northwind database for SQLite from the following path in your local Git repository:
/sql-scripts/Northwind4SQLite.sqlinto theWorkingWithEFCorefolder. - Start a command line in the
WorkingWithEFCorefolder:- On Windows, start File Explorer, right-click the
WorkingWithEFCorefolder, and select New Command Prompt at Folder or Open in Windows Terminal. - On macOS, start Finder, right-click the
WorkingWithEFCorefolder, and select New Terminal at Folder.
- On Windows, start File Explorer, right-click the
- Enter the command to execute the SQL script using SQLite and create the
Northwind.dbdatabase, as shown in the following command:sqlite3 Northwind.db -init Northwind4SQLite.sql - Be patient because this command might take a while to create the database structure. Eventually, you will see the SQLite command prompt, as shown in the following output:
-- Loading resources from Northwind4SQLite.sql SQLite version 3.36.0 2021-08-24 15:20:15 Enter ".help" for usage hints. sqlite> - Press Ctrl + C on Windows or Ctrl + D on macOS to exit SQLite command mode.
- Leave your terminal or command prompt window open because you will use it again soon.
Managing the Northwind sample database with SQLiteStudio
You can use a cross-platform graphical database manager named SQLiteStudio to easily manage SQLite databases:
- Navigate to the following link, https://sqlitestudio.pl, and download and extract the application to your preferred location.
- Start SQLiteStudio.
- On the Database menu, choose Add a database.
- In the Database dialog, in the File section, click on the yellow folder button to browse for an existing database file on the local computer, select the
Northwind.dbfile in theWorkingWithEFCorefolder, and then click OK. - Right-click on the Northwind database and choose Connect to the database. You will see the 10 tables that were created by the script. (The script for SQLite is simpler than the one for SQL Server; it does not create as many tables or other database objects.)
- Right-click on the Products table and choose Edit the table.
- In the table editor window, note the structure of the
Productstable, including column names, data types, keys, and constraints, as shown in Figure 10.4: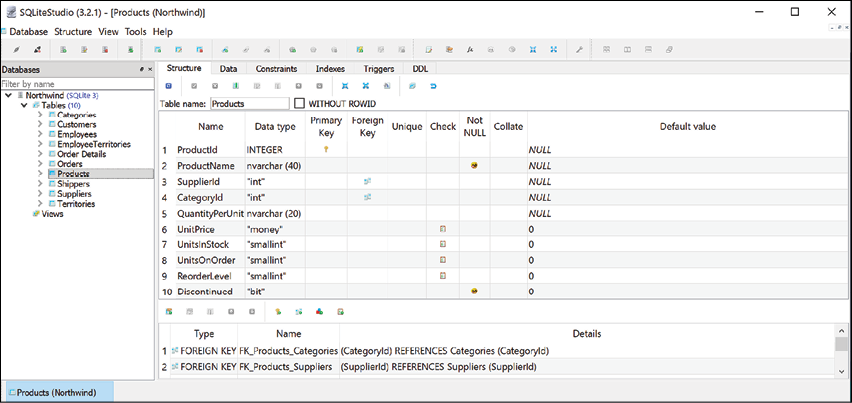
Figure 10.4: The table editor in SQLiteStudio showing the structure of the Products table
- In the table editor window, click the Data tab, and you will see 77 products, as shown in Figure 10.5:
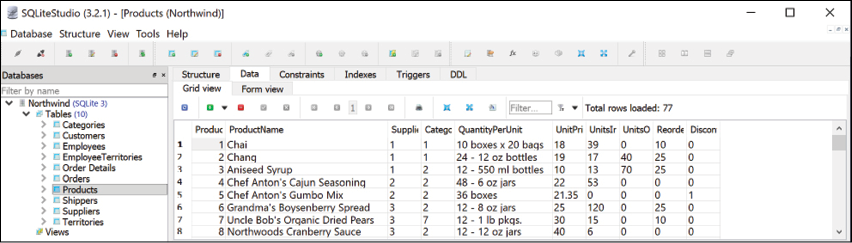
Figure 10.5: The Data tab showing the rows in the Products table
- In the Database window, right-click Northwind and select Disconnect from the database.
- Exit SQLiteStudio.
Setting up EF Core
Before we dive into the practicalities of managing data using EF Core, let's briefly talk about choosing between EF Core data providers.
Choosing an EF Core database provider
To manage data in a specific database, we need classes that know how to efficiently talk to that database.
EF Core database providers are sets of classes that are optimized for a specific data store. There is even a provider for storing the data in the memory of the current process, which can be useful for high-performance unit testing since it avoids hitting an external system.
They are distributed as NuGet packages, as shown in the following table:
|
To manage this data store |
Install this NuGet package |
|
Microsoft SQL Server 2012 or later |
|
|
SQLite 3.7 or later |
|
|
MySQL |
|
|
In-memory |
|
|
Azure Cosmos DB SQL API |
|
|
Oracle DB 11.2 |
|
You can install as many EF Core database providers in the same project as you need. Each package includes the shared types as well as provider-specific types.
Connecting to a database
To connect to an SQLite database, we just need to know the database filename, set using the parameter Filename.
To connect to an SQL Server database, we need to know multiple pieces of information, as shown in the following list:
- The name of the server (and the instance if it has one).
- The name of the database.
- Security information, such as username and password, or if we should pass the currently logged-on user's credentials automatically.
We specify this information in a connection string.
For backward compatibility, there are multiple possible keywords we can use in an SQL Server connection string for the various parameters, as shown in the following list:
Data Sourceorserveroraddr: These keywords are the name of the server (and an optional instance). You can use a dot.to mean the local server.Initial Catalogordatabase: These keywords are the name of the database.Integrated Securityortrusted_connection: These keywords are set totrueorSSPIto pass the thread's current user credentials.MultipleActiveResultSets: This keyword is set totrueto enable a single connection to be used to work with multiple tables simultaneously to improve efficiency. It is used for lazy loading rows from related tables.
As described in the list above, when you write code to connect to an SQL Server database, you need to know its server name. The server name depends on the edition and version of SQL Server that you will connect to, as shown in the following table:
|
SQL Server edition |
Server name \ Instance name |
|
LocalDB 2012 |
|
|
LocalDB 2016 or later |
|
|
Express |
|
|
Full/Developer (default instance) |
|
|
Full/Developer (named instance) |
|
Good Practice: Use a dot . as shorthand for the local computer name. Remember that server names for SQL Server are made of two parts: the name of the computer and the name of an SQL Server instance. You provide instance names during custom installation.
Defining the Northwind database context class
The Northwind class will be used to represent the database. To use EF Core, the class must inherit from DbContext. This class understands how to communicate with databases and dynamically generate SQL statements to query and manipulate data.
Your DbContext-derived class should have an overridden method named OnConfiguring, which will set the database connection string.
To make it easy for you to try SQLite and SQL Server, we will create a project that supports both, with a string field to control which is used at runtime:
- In the
WorkingWithEFCoreproject, add package references to the EF Core data provider for both SQL Server and SQLite, as shown in the following markup:<ItemGroup> <PackageReference Include="Microsoft.EntityFrameworkCore.Sqlite" Version="6.0.0" /> <PackageReference Include="Microsoft.EntityFrameworkCore.SqlServer" Version="6.0.0" /> </ItemGroup> - Build the project to restore packages.
- Add a class file named
ProjectConstants.cs. - In
ProjectConstants.cs, define a class with a public string constant to store the database provider name that you want to use, as shown in the following code:namespace Packt.Shared; public class ProjectConstants { public const string DatabaseProvider = "SQLite"; // or "SQLServer" } - In
Program.cs, import thePackt.Sharednamespace and output the database provider, as shown in the following code:WriteLine($"Using {ProjectConstants.DatabaseProvider} database provider."); - Add a class file named
Northwind.cs. - In
Northwind.cs, define a class namedNorthwind, import the main namespace for EF Core, make the class inherit fromDbContext, and in anOnConfiguringmethod, check theproviderfield to either use SQLite or SQL Server, as shown in the following code:using Microsoft.EntityFrameworkCore; // DbContext, DbContextOptionsBuilder using static System.Console; namespace Packt.Shared; // this manages the connection to the database public class Northwind : DbContext { protected override void OnConfiguring( DbContextOptionsBuilder optionsBuilder) { if (ProjectConstants.DatabaseProvider == "SQLite") { string path = Path.Combine( Environment.CurrentDirectory, "Northwind.db"); WriteLine($"Using {path} database file."); optionsBuilder.UseSqlite($"Filename={path}"); } else { string connection = "Data Source=.;" + "Initial Catalog=Northwind;" + "Integrated Security=true;" + "MultipleActiveResultSets=true;"; optionsBuilder.UseSqlServer(connection); } } }If you are using Visual Studio for Windows, then the compiled application executes in the
WorkingWithEFCore\bin\Debug\net6.0folder so it will not find the database file. - In Solution Explorer, right-click the
Northwind.dbfile and select Properties. - In Properties, set Copy to Output Directory to Copy always.
- Open
WorkingWithEFCore.csprojand note the new elements, as shown in the following markup:<ItemGroup> <None Update="Northwind.db"> <CopyToOutputDirectory>Always</CopyToOutputDirectory> </None> </ItemGroup>If you are using Visual Studio Code, then the compiled application executes in the
WorkingWithEFCorefolder so it will find the database file without it being copied. - Run the console application and note the output showing which database provider you chose to use.
Defining EF Core models
EF Core uses a combination of conventions, annotation attributes, and Fluent API statements to build an entity model at runtime so that any actions performed on the classes can later be automatically translated into actions performed on the actual database. An entity class represents the structure of a table and an instance of the class represents a row in that table.
First, we will review the three ways to define a model, with code examples, and then we will create some classes that implement those techniques.
Using EF Core conventions to define the model
The code we will write will use the following conventions:
- The name of a table is assumed to match the name of a
DbSet<T>property in theDbContextclass, for example,Products. - The names of the columns are assumed to match the names of properties in the entity model class, for example,
ProductId. - The
string.NET type is assumed to be anvarchartype in the database. - The
int.NET type is assumed to be aninttype in the database. - The primary key is assumed to be a property that is named
IdorID, or when the entity model class is namedProduct, then the property can be namedProductIdorProductID. If this property is an integer type or theGuidtype, then it is also assumed to be anIDENTITYcolumn (a column type that automatically assigns a value when inserting).
Good Practice: There are many other conventions that you should know, and you can even define your own, but that is beyond the scope of this book. You can read about them at the following link: https://docs.microsoft.com/en-us/ef/core/modeling/
Using EF Core annotation attributes to define the model
Conventions often aren't enough to completely map the classes to the database objects. A simple way of adding more smarts to your model is to apply annotation attributes.
Some common attributes are shown in the following table:
|
Attribute |
Description |
|
|
Ensures the value is not |
|
|
Ensures the value is up to 50 characters in length. |
|
|
Ensures the value matches the specified regular expression. |
|
|
Specifies the column type and column name used in the table. |
For example, in the database, the maximum length of a product name is 40, and the value cannot be null, as shown highlighted in the following Data Definition Language (DDL) code that defines how to create a table named Products with its columns, data types, keys, and other constraints:
CREATE TABLE Products (
    ProductId       INTEGER       PRIMARY KEY,
    ProductName     NVARCHAR (40) NOT NULL,
    SupplierId      "INT",
    CategoryId      "INT",
    QuantityPerUnit NVARCHAR (20),
    UnitPrice       "MONEY"       CONSTRAINT DF_Products_UnitPrice DEFAULT (0),
    UnitsInStock    "SMALLINT"    CONSTRAINT DF_Products_UnitsInStock DEFAULT (0),
    UnitsOnOrder    "SMALLINT"    CONSTRAINT DF_Products_UnitsOnOrder DEFAULT (0),
    ReorderLevel    "SMALLINT"    CONSTRAINT DF_Products_ReorderLevel DEFAULT (0),
    Discontinued    "BIT"         NOT NULL
                                  CONSTRAINT DF_Products_Discontinued DEFAULT (0),
    CONSTRAINT FK_Products_Categories FOREIGN KEY (
        CategoryId
    )
    REFERENCES Categories (CategoryId),
    CONSTRAINT FK_Products_Suppliers FOREIGN KEY (
        SupplierId
    )
    REFERENCES Suppliers (SupplierId),
    CONSTRAINT CK_Products_UnitPrice CHECK (UnitPrice >= 0),
    CONSTRAINT CK_ReorderLevel CHECK (ReorderLevel >= 0),
    CONSTRAINT CK_UnitsInStock CHECK (UnitsInStock >= 0),
    CONSTRAINT CK_UnitsOnOrder CHECK (UnitsOnOrder >= 0)
);
In a Product class, we could apply attributes to specify this, as shown in the following code:
[Required]
[StringLength(40)]
public string ProductName { get; set; }
When there isn't an obvious map between .NET types and database types, an attribute can be used.
For example, in the database, the column type of UnitPrice for the Products table is money. .NET does not have a money type, so it should use decimal instead, as shown in the following code:
[Column(TypeName = "money")]
public decimal? UnitPrice { get; set; }
Another example is for the Categories table, as shown in the following DDL code:
CREATE TABLE Categories (
    CategoryId   INTEGER       PRIMARY KEY,
    CategoryName NVARCHAR (15) NOT NULL,
    Description  "NTEXT",
    Picture      "IMAGE"
);
The Description column can be longer than the maximum 8,000 characters that can be stored in a nvarchar variable, so it needs to map to ntext instead, as shown in the following code:
[Column(TypeName = "ntext")]
public string Description { get; set; }
Using the EF Core Fluent API to define the model
The last way that the model can be defined is by using the Fluent API. This API can be used instead of attributes, as well as being used in addition to them. For example, to define the ProductName property, instead of decorating the property with two attributes, an equivalent Fluent API statement could be written in the OnModelCreating method of the database context class, as shown in the following code:
modelBuilder.Entity<Product>()
  .Property(product => product.ProductName)
  .IsRequired()
  .HasMaxLength(40);
This keeps the entity model class simpler.
Understanding data seeding with the Fluent API
Another benefit of the Fluent API is to provide initial data to populate a database. EF Core automatically works out what insert, update, or delete operations must be executed.
For example, if we wanted to make sure that a new database has at least one row in the Product table, then we would call the HasData method, as shown in the following code:
modelBuilder.Entity<Product>()
  .HasData(new Product
  {
    ProductId = 1,
    ProductName = "Chai",
    UnitPrice = 8.99M
  });
Our model will map to an existing database that is already populated with data so we will not need to use this technique in our code.
Building an EF Core model for the Northwind tables
Now that you've learned about ways to define an EF Core model, let's build a model to represent two tables in the Northwind database.
The two entity classes will refer to each other, so to avoid compiler errors, we will create the classes without any members first:
- In the
WorkingWithEFCoreproject, add two class files namedCategory.csandProduct.cs. - In
Category.cs, define a class namedCategory, as shown in the following code:namespace Packt.Shared; public class Category { } - In
Product.cs, define a class namedProduct, as shown in the following code:namespace Packt.Shared; public class Product { }
Defining the Category and Product entity classes
The Category class, also known as an entity model, will be used to represent a row in the Categories table. This table has four columns, as shown in the following DDL:
CREATE TABLE Categories (
    CategoryId   INTEGER       PRIMARY KEY,
    CategoryName NVARCHAR (15) NOT NULL,
    Description  "NTEXT",
    Picture      "IMAGE"
);
We will use conventions to define:
- Three of the four properties (we will not map the
Picturecolumn). - The primary key.
- The one-to-many relationship to the
Productstable.
To map the Description column to the correct database type, we will need to decorate the string property with the Column attribute.
Later in this chapter, we will use the Fluent API to define that CategoryName cannot be null and is limited to a maximum of 15 characters.
Let's go:
- Modify the
Categoryentity model class, as shown in the following code:using System.ComponentModel.DataAnnotations.Schema; // [Column] namespace Packt.Shared; public class Category { // these properties map to columns in the database public int CategoryId { get; set; } public string? CategoryName { get; set; } [Column(TypeName = "ntext")] public string? Description { get; set; } // defines a navigation property for related rows public virtual ICollection<Product> Products { get; set; } public Category() { // to enable developers to add products to a Category we must // initialize the navigation property to an empty collection Products = new HashSet<Product>(); } }The
Productclass will be used to represent a row in theProductstable, which has ten columns.You do not need to include all columns from a table as properties of a class. We will only map six properties:
ProductId,ProductName,UnitPrice,UnitsInStock,Discontinued, andCategoryId.Columns that are not mapped to properties cannot be read or set using the class instances. If you use the class to create a new object, then the new row in the table will have
NULLor some other default value for the unmapped column values in that row. You must make sure that those missing columns are optional or have default values set by the database or an exception will be thrown at runtime. In this scenario, the rows already have data values and I have decided that I do not need to read those values in this application.We can rename a column by defining a property with a different name, like
Cost, and then decorating the property with the[Column]attribute and specifying its column name, likeUnitPrice.The final property,
CategoryId, is associated with aCategoryproperty that will be used to map each product to its parent category. - Modify the
Productclass, as shown in the following code:using System.ComponentModel.DataAnnotations; // [Required], [StringLength] using System.ComponentModel.DataAnnotations.Schema; // [Column] namespace Packt.Shared; public class Product { public int ProductId { get; set; } // primary key [Required] [StringLength(40)] public string ProductName { get; set; } = null!; [Column("UnitPrice", TypeName = "money")] public decimal? Cost { get; set; } // property name != column name [Column("UnitsInStock")] public short? Stock { get; set; } public bool Discontinued { get; set; } // these two define the foreign key relationship // to the Categories table public int CategoryId { get; set; } public virtual Category Category { get; set; } = null!; }
The two properties that relate the two entities, Category.Products and Product.Category, are both marked as virtual. This allows EF Core to inherit and override the properties to provide extra features, such as lazy loading.
Adding tables to the Northwind database context class
Inside your DbContext-derived class, you must define at least one property of the DbSet<T> type. These properties represent the tables. To tell EF Core what columns each table has, the DbSet<T> properties use generics to specify a class that represents a row in the table. That entity model class has properties that represent its columns.
The DbContext-derived class can optionally have an overridden method named OnModelCreating. This is where you can write Fluent API statements as an alternative to decorating your entity classes with attributes.
Let's write some code:
- Modify the
Northwindclass to add statements to define two properties for the two tables and anOnModelCreatingmethod, as shown highlighted in the following code:public class Northwind : DbContext { // these properties map to tables in the database public DbSet<Category>? Categories { get; set; } public DbSet<Product>? Products { get; set; } protected override void OnConfiguring( DbContextOptionsBuilder optionsBuilder) { ... } protected override void OnModelCreating( ModelBuilder modelBuilder) { // example of using Fluent API instead of attributes // to limit the length of a category name to 15 modelBuilder.Entity<Category>() .Property(category => category.CategoryName) .IsRequired() // NOT NULL .HasMaxLength(15); if (ProjectConstants.DatabaseProvider == "SQLite") { // added to "fix" the lack of decimal support in SQLite modelBuilder.Entity<Product>() .Property(product => product.Cost) .HasConversion<double>(); } } }
In EF Core 3.0 and later, the decimal type is not supported by the SQLite database provider for sorting and other operations. We can fix this by telling the model that decimal values can be converted to double values when using the SQLite database provider. This does not actually perform any conversion at runtime.
Now that you have seen some examples of defining an entity model manually, let's see a tool that can do some of the work for you.
Setting up the dotnet-ef tool
.NET has a command-line tool named dotnet. It can be extended with capabilities useful for working with EF Core. It can perform design-time tasks like creating and applying migrations from an older model to a newer model and generating code for a model from an existing database.
The dotnet ef command-line tool is not automatically installed. You have to install this package as either a global or local tool. If you have already installed an older version of the tool, then you should uninstall any existing version:
- At a command prompt or terminal, check if you have already installed
dotnet-efas a global tool, as shown in the following command:dotnet tool list --global - Check in the list if an older version of the tool has been installed, like the one for .NET Core 3.1, as shown in the following output:
Package Id Version Commands ------------------------------------- dotnet-ef 3.1.0 dotnet-ef - If an old version is already installed, then uninstall the tool, as shown in the following command:
dotnet tool uninstall --global dotnet-ef - Install the latest version, as shown in the following command:
dotnet tool install --global dotnet-ef --version 6.0.0 - If necessary, follow any OS-specific instructions to add the
dotnet toolsdirectory to your PATH environment variable as described in the output of installing thedotnet-eftool.
Scaffolding models using an existing database
Scaffolding is the process of using a tool to create classes that represent the model of an existing database using reverse engineering. A good scaffolding tool allows you to extend the automatically generated classes and then regenerate those classes without losing your extended classes.
If you know that you will never regenerate the classes using the tool, then feel free to change the code for the automatically generated classes as much as you want. The code generated by the tool is just the best approximation.
Good Practice: Do not be afraid to overrule a tool when you know better.
Let's see if the tool generates the same model as we did manually:
- Add the
Microsoft.EntityFrameworkCore.Designpackage to theWorkingWithEFCoreproject. - At a command prompt or terminal in the
WorkingWithEFCorefolder, generate a model for theCategoriesandProductstables in a new folder namedAutoGenModels, as shown in the following command:dotnet ef dbcontext scaffold "Filename=Northwind.db" Microsoft.EntityFrameworkCore.Sqlite --table Categories --table Products --output-dir AutoGenModels --namespace WorkingWithEFCore.AutoGen --data-annotations --context NorthwindNote the following:
- The command action:
dbcontext scaffold - The connection string:
"Filename=Northwind.db" - The database provider:
Microsoft.EntityFrameworkCore.Sqlite - The tables to generate models for:
--table Categories --table Products - The output folder:
--output-dir AutoGenModels - The namespace:
--namespace WorkingWithEFCore.AutoGen - To use data annotations as well as the Fluent API:
--data-annotations - To rename the context from [database_name]Context:
--context Northwind
For SQL Server, change the database provider and connection string, as shown in the following command:
dotnet ef dbcontext scaffold "Data Source=.;Initial Catalog=Northwind;Integrated Security=true;" Microsoft.EntityFrameworkCore.SqlServer --table Categories --table Products --output-dir AutoGenModels --namespace WorkingWithEFCore.AutoGen --data-annotations --context Northwind - The command action:
- Note the build messages and warnings, as shown in the following output:
Build started... Build succeeded. To protect potentially sensitive information in your connection string, you should move it out of source code. You can avoid scaffolding the connection string by using the Name= syntax to read it from configuration - see https://go.microsoft.com/fwlink/?linkid=2131148. For more guidance on storing connection strings, see http://go.microsoft.com/fwlink/?LinkId=723263. Skipping foreign key with identity '0' on table 'Products' since principal table 'Suppliers' was not found in the model. This usually happens when the principal table was not included in the selection set. - Open the
AutoGenModelsfolder and note the three class files that were automatically generated:Category.cs,Northwind.cs, andProduct.cs. - Open
Category.csand note the differences compared to the one you created manually, as shown in the following code:using System; using System.Collections.Generic; using System.ComponentModel.DataAnnotations; using System.ComponentModel.DataAnnotations.Schema; using Microsoft.EntityFrameworkCore; namespace WorkingWithEFCore.AutoGen { [Index(nameof(CategoryName), Name = "CategoryName")] public partial class Category { public Category() { Products = new HashSet<Product>(); } [Key] public long CategoryId { get; set; } [Required] [Column(TypeName = "nvarchar (15)")] // SQLite [StringLength(15)] // SQL Server public string CategoryName { get; set; } [Column(TypeName = "ntext")] public string? Description { get; set; } [Column(TypeName = "image")] public byte[]? Picture { get; set; } [InverseProperty(nameof(Product.Category))] public virtual ICollection<Product> Products { get; set; } } }- It decorates the entity class with the
[Index]attribute that was introduced in EF Core 5.0. This indicates properties that should have an index. In earlier versions, only the Fluent API was supported for defining indexes. Since we are working with an existing database, this is not needed. But if we want to recreate a new empty database from our code then this information will be needed. - The table name in the database is
Categoriesbut thedotnet-eftool uses the Humanizer third-party library to automatically singularize the class name toCategory, which is a more natural name when creating a single entity. - The entity class is declared using the
partialkeyword so that you can create a matchingpartialclass for adding additional code. This allows you to rerun the tool and regenerate the entity class without losing that extra code. - The
CategoryIdproperty is decorated with the[Key]attribute to indicate that it is the primary key for this entity. The data type for this property isintfor SQL Server andlongfor SQLite. - The
Productsproperty uses the[InverseProperty]attribute to define the foreign key relationship to theCategoryproperty on theProductentity class.
- It decorates the entity class with the
- Open
Product.csand note the differences compared to the one you created manually. - Open
Northwind.csand note the differences compared to the one you created manually, as shown in the following edited-for-space code:using Microsoft.EntityFrameworkCore; namespace WorkingWithEFCore.AutoGen { public partial class Northwind : DbContext { public Northwind() { } public Northwind(DbContextOptions<Northwind> options) : base(options) { } public virtual DbSet<Category> Categories { get; set; } = null!; public virtual DbSet<Product> Products { get; set; } = null!; protected override void OnConfiguring( DbContextOptionsBuilder optionsBuilder) { if (!optionsBuilder.IsConfigured) { #warning To protect potentially sensitive information in your connection string, you should move it out of source code. You can avoid scaffolding the connection string by using the Name= syntax to read it from configuration - see https://go.microsoft.com/fwlink/?linkid=2131148. For more guidance on storing connection strings, see http://go.microsoft.com/fwlink/?LinkId=723263. optionsBuilder.UseSqlite("Filename=Northwind.db"); } } protected override void OnModelCreating(ModelBuilder modelBuilder) { modelBuilder.Entity<Category>(entity => { ... }); modelBuilder.Entity<Product>(entity => { ... }); OnModelCreatingPartial(modelBuilder); } partial void OnModelCreatingPartial(ModelBuilder modelBuilder); } }- The
Northwinddata context class ispartialto allow you to extend it and regenerate it in the future. - It has two constructors: a default parameter-less one and one that allows options to be passed in. This is useful in apps where you want to specify the connection string at runtime.
- The two
DbSet<T>properties that represent theCategoriesandProductstables are set to thenull-forgiving value to prevent static compiler analysis warnings at compile time. It has no effect at runtime. - In the
OnConfiguringmethod, if options have not been specified in the constructor, then it defaults to using a connection string that looks for the database file in the current folder. It has a compiler warning to remind you that you should not hardcode security information in this connection string. - In the
OnModelCreatingmethod, the Fluent API is used to configure the two entity classes, and then a partial method namedOnModelCreatingPartialis invoked. This allows you to implement that partial method in your own partialNorthwindclass to add your own Fluent API configuration that will not be lost if you regenerate the model classes.
- The
- Close the automatically generated class files.
Configuring preconvention models
Along with support for the DateOnly and TimeOnly types for use with the SQLite database provider, one of the new features introduced with EF Core 6 is configuring preconvention models.
As models become more complex, relying on conventions to discover entity types and their properties and successfully map them to tables and columns becomes harder. It would be useful if you could configure the conventions themselves before they are used to analyze and build a model.
For example, you might want to define a convention to say that all string properties should have a maximum length of 50 characters as a default, or any property types that implement a custom interface should not be mapped, as shown in the following code:
protected override void ConfigureConventions(
  ModelConfigurationBuilder configurationBuilder)
{
  configurationBuilder.Properties<string>().HaveMaxLength(50);
  configurationBuilder.IgnoreAny<IDoNotMap>();
}
In the rest of this chapter, we will use the classes that you manually created.
Querying EF Core models
Now that we have a model that maps to the Northwind database and two of its tables, we can write some simple LINQ queries to fetch data. You will learn much more about writing LINQ queries in Chapter 11, Querying and Manipulating Data Using LINQ.
For now, just write the code and view the results:
- At the top of
Program.cs, import the main EF Core namespace to enable the use of theIncludeextension method to prefetch from a related table:using Microsoft.EntityFrameworkCore; // Include extension method - At the bottom of
Program.cs, define aQueryingCategoriesmethod, and add statements to do these tasks, as shown in the following code:- Create an instance of the
Northwindclass that will manage the database. Database context instances are designed for short lifetimes in a unit of work. They should be disposed of as soon as possible so we will wrap it in ausingstatement. In Chapter 14, Building Websites Using ASP.NET Core Razor Pages, you will learn how to get a database context using dependency injection. - Create a query for all categories that include their related products.
- Enumerate through the categories, outputting the name and number of products for each one:
static void QueryingCategories() { using (Northwind db = new()) { WriteLine("Categories and how many products they have:"); // a query to get all categories and their related products IQueryable<Category>? categories = db.Categories? .Include(c => c.Products); if (categories is null) { WriteLine("No categories found."); return; } // execute query and enumerate results foreach (Category c in categories) { WriteLine($"{c.CategoryName} has {c.Products.Count} products."); } } } - Create an instance of the
- At the top of
Program.cs, after outputting the database provider name, call theQueryingCategoriesmethod, as shown highlighted in the following code:WriteLine($"Using {ProjectConstants.DatabaseProvider} database provider."); QueryingCategories(); - Run the code and view the result (if run with Visual Studio 2022 for Windows using the SQLite database provider), as shown in the following output:
Using SQLite database provider.
Categories and how many products they have:
Using C:\Code\Chapter10\WorkingWithEFCore\bin\Debug\net6.0\Northwind.db database file.
Beverages has 12 products.
Condiments has 12 products.
Confections has 13 products.
Dairy Products has 10 products.
Grains/Cereals has 7 products.
Meat/Poultry has 6 products.
Produce has 5 products.
Seafood has 12 products.
If you run with Visual Studio Code using the SQLite database provider, then the path will be the WorkingWithEFCore folder. If you run using the SQL Server database provider, then there is no database file path output.
Warning! If you see the following exception when using SQLite with Visual Studio 2022, the most likely problem is that the Northwind.db file is not being copied to the output directory. Make sure Copy to Output Directory is set to Copy always:
Unhandled exception. Microsoft.Data.Sqlite.SqliteException (0x80004005): SQLite Error 1: 'no such table: Categories'.
Filtering included entities
EF Core 5.0 introduced filtered includes, which means you can specify a lambda expression in the Include method call to filter which entities are returned in the results:
- At the bottom of
Program.cs, define aFilteredIncludesmethod, and add statements to do these tasks, as shown in the following code:- Create an instance of the
Northwindclass that will manage the database. - Prompt the user to enter a minimum value for units in stock.
- Create a query for categories that have products with that minimum number of units in stock.
- Enumerate through the categories and products, outputting the name and units in stock for each one:
static void FilteredIncludes() { using (Northwind db = new()) { Write("Enter a minimum for units in stock: "); string unitsInStock = ReadLine() ?? "10"; int stock = int.Parse(unitsInStock); IQueryable<Category>? categories = db.Categories? .Include(c => c.Products.Where(p => p.Stock >= stock)); if (categories is null) { WriteLine("No categories found."); return; } foreach (Category c in categories) { WriteLine($"{c.CategoryName} has {c.Products.Count} products with a minimum of {stock} units in stock."); foreach(Product p in c.Products) { WriteLine($" {p.ProductName} has {p.Stock} units in stock."); } } } } - Create an instance of the
- In
Program.cs, comment out theQueryingCategoriesmethod and invoke theFilteredIncludesmethod, as shown highlighted in the following code:WriteLine($"Using {ProjectConstants.DatabaseProvider} database provider."); // QueryingCategories(); FilteredIncludes(); - Run the code, enter a minimum for units in stock like
100, and view the result, as shown in the following output:Enter a minimum for units in stock: 100 Beverages has 2 products with a minimum of 100 units in stock. Sasquatch Ale has 111 units in stock. Rhönbräu Klosterbier has 125 units in stock. Condiments has 2 products with a minimum of 100 units in stock. Grandma's Boysenberry Spread has 120 units in stock. Sirop d'érable has 113 units in stock. Confections has 0 products with a minimum of 100 units in stock. Dairy Products has 1 products with a minimum of 100 units in stock. Geitost has 112 units in stock. Grains/Cereals has 1 products with a minimum of 100 units in stock. Gustaf's Knäckebröd has 104 units in stock. Meat/Poultry has 1 products with a minimum of 100 units in stock. Pâté chinois has 115 units in stock. Produce has 0 products with a minimum of 100 units in stock. Seafood has 3 products with a minimum of 100 units in stock. Inlagd Sill has 112 units in stock. Boston Crab Meat has 123 units in stock. Röd Kaviar has 101 units in stock.
Unicode characters in the Windows console
There is a limitation with the console provided by Microsoft on versions of Windows before the Windows 10 Fall Creators Update. By default, the console cannot display Unicode characters, for example, in the name Rhönbräu.
If you have this issue, then you can temporarily change the code page (also known as the character set) in a console to Unicode UTF-8 by entering the following command at the prompt before running the app:
chcp 65001
Filtering and sorting products
Let's explore a more complex query that will filter and sort data:
- At the bottom of
Program.cs, define aQueryingProductsmethod, and add statements to do the following, as shown in the following code:- Create an instance of the
Northwindclass that will manage the database. - Prompt the user for a price for products. Unlike the previous code example, we will loop until the input is a valid price.
- Create a query for products that cost more than the price using LINQ.
- Loop through the results, outputting the Id, name, cost (formatted in US dollars), and the number of units in stock:
static void QueryingProducts() { using (Northwind db = new()) { WriteLine("Products that cost more than a price, highest at top."); string? input; decimal price; do { Write("Enter a product price: "); input = ReadLine(); } while (!decimal.TryParse(input, out price)); IQueryable<Product>? products = db.Products? .Where(product => product.Cost > price) .OrderByDescending(product => product.Cost); if (products is null) { WriteLine("No products found."); return; } foreach (Product p in products) { WriteLine( "{0}: {1} costs {2:$#,##0.00} and has {3} in stock.", p.ProductId, p.ProductName, p.Cost, p.Stock); } } } - Create an instance of the
- In
Program.cs, comment out the previous method, and call theQueryingProductsmethod - Run the code, enter
50when prompted to enter a product price, and view the result, as shown in the following output:Products that cost more than a price, highest at top. Enter a product price: 50 38: Côte de Blaye costs $263.50 and has 17 in stock. 29: Thüringer Rostbratwurst costs $123.79 and has 0 in stock. 9: Mishi Kobe Niku costs $97.00 and has 29 in stock. 20: Sir Rodney's Marmalade costs $81.00 and has 40 in stock. 18: Carnarvon Tigers costs $62.50 and has 42 in stock. 59: Raclette Courdavault costs $55.00 and has 79 in stock. 51: Manjimup Dried Apples costs $53.00 and has 20 in stock.
Getting the generated SQL
You might be wondering how well written the SQL statements are that are generated from the C# queries we write. EF Core 5.0 introduced a quick and easy way to see the SQL generated:
- In the
FilteredIncludesmethod, before using theforeachstatement to enumerate the query, add a statement to output the generated SQL, as shown highlighted in the following code:WriteLine($"ToQueryString: {categories.ToQueryString()}"); foreach (Category c in categories) - In
Program.cs, comment out the call to theQueryingProductsmethod and uncomment the call to theFilteredIncludesmethod. - Run the code, enter a minimum for units in stock like
99, and view the result (when run with SQLite), as shown in the following output:Enter a minimum for units in stock: 99 Using SQLite database provider. ToQueryString: .param set @_stock_0 99 SELECT "c"."CategoryId", "c"."CategoryName", "c"."Description", "t"."ProductId", "t"."CategoryId", "t"."UnitPrice", "t"."Discontinued", "t"."ProductName", "t"."UnitsInStock" FROM "Categories" AS "c" LEFT JOIN ( SELECT "p"."ProductId", "p"."CategoryId", "p"."UnitPrice", "p"."Discontinued", "p"."ProductName", "p"."UnitsInStock" FROM "Products" AS "p" WHERE ("p"."UnitsInStock" >= @_stock_0) ) AS "t" ON "c"."CategoryId" = "t"."CategoryId" ORDER BY "c"."CategoryId", "t"."ProductId" Beverages has 2 products with a minimum of 99 units in stock. Sasquatch Ale has 111 units in stock. Rhönbräu Klosterbier has 125 units in stock. ...
Note the SQL parameter named @_stock_0 has been set to a minimum stock value of 99.
For SQL Server, the SQL generated is slightly different, for example, it uses square brackets instead of double-quotes around object names, as shown in the following output:
Enter a minimum for units in stock: 99
Using SqlServer database provider.
ToQueryString: DECLARE @__stock_0 smallint = CAST(99 AS smallint);
SELECT [c].[CategoryId], [c].[CategoryName], [c].[Description], [t].[ProductId], [t].[CategoryId], [t].[UnitPrice], [t].[Discontinued], [t].[ProductName], [t].[UnitsInStock]
FROM [Categories] AS [c]
LEFT JOIN (
    SELECT [p].[ProductId], [p].[CategoryId], [p].[UnitPrice], [p].[Discontinued], [p].[ProductName], [p].[UnitsInStock]
    FROM [Products] AS [p]
    WHERE [p].[UnitsInStock] >= @__stock_0
) AS [t] ON [c].[CategoryId] = [t].[CategoryId]
ORDER BY [c].[CategoryId], [t].[ProductId]
Logging EF Core using a custom logging provider
To monitor the interaction between EF Core and the database, we can enable logging. This requires the following two tasks:
- The registering of a logging provider.
- The implementation of a logger.
Let's see an example of this in action:
- Add a file to your project named
ConsoleLogger.cs. - Modify the file to define two classes, one to implement
ILoggerProviderand one to implementILogger, as shown in the following code, and note the following:ConsoleLoggerProviderreturns an instance ofConsoleLogger. It does not need any unmanaged resources, so theDisposemethod does not do anything, but it must exist.ConsoleLoggeris disabled for log levelsNone,Trace, andInformation. It is enabled for all other log levels.ConsoleLoggerimplements itsLogmethod by writing toConsole:
using Microsoft.Extensions.Logging; // ILoggerProvider, ILogger, LogLevel using static System.Console; namespace Packt.Shared; public class ConsoleLoggerProvider : ILoggerProvider { public ILogger CreateLogger(string categoryName) { // we could have different logger implementations for // different categoryName values but we only have one return new ConsoleLogger(); } // if your logger uses unmanaged resources, // then you can release them here public void Dispose() { } } public class ConsoleLogger : ILogger { // if your logger uses unmanaged resources, you can // return the class that implements IDisposable here public IDisposable BeginScope<TState>(TState state) { return null; } public bool IsEnabled(LogLevel logLevel) { // to avoid overlogging, you can filter on the log level switch(logLevel) { case LogLevel.Trace: case LogLevel.Information: case LogLevel.None: return false; case LogLevel.Debug: case LogLevel.Warning: case LogLevel.Error: case LogLevel.Critical: default: return true; }; } public void Log<TState>(LogLevel logLevel, EventId eventId, TState state, Exception? exception, Func<TState, Exception, string> formatter) { // log the level and event identifier Write($"Level: {logLevel}, Event Id: {eventId.Id}"); // only output the state or exception if it exists if (state != null) { Write($", State: {state}"); } if (exception != null) { Write($", Exception: {exception.Message}"); } WriteLine(); } } - At the top of
Program.cs, add statements to import the namespaces needed for logging, as shown in the following code:using Microsoft.EntityFrameworkCore.Infrastructure; using Microsoft.Extensions.DependencyInjection; using Microsoft.Extensions.Logging; - We already used the
ToQueryStringmethod to get the SQL forFilteredIncludesso we do not need to add logging to that method. To both theQueryingCategoriesandQueryingProductsmethods, add statements immediately inside theusingblock for theNorthwinddatabase context to get the logging factory and register your custom console logger, as shown highlighted in the following code:using (Northwind db = new()) { ILoggerFactory loggerFactory = db.GetService<ILoggerFactory>(); loggerFactory.AddProvider(new ConsoleLoggerProvider()); - At the top of
Program.cs, comment out the call to theFilteredIncludesmethod and uncomment the call to theQueryingProductsmethod. - Run the code and view the logs, which are partially shown in the following output:
...
Level: Debug, Event Id: 20000, State: Opening connection to database 'main' on server '/Users/markjprice/Code/Chapter10/WorkingWithEFCore/Northwind.db'.
Level: Debug, Event Id: 20001, State: Opened connection to database 'main' on server '/Users/markjprice/Code/Chapter10/WorkingWithEFCore/Northwind.db'.
Level: Debug, Event Id: 20100, State: Executing DbCommand [Parameters=[@__price_0='?'], CommandType='Text', CommandTimeout='30']
SELECT "p"."ProductId", "p"."CategoryId", "p"."UnitPrice", "p"."Discontinued", "p"."ProductName", "p"."UnitsInStock"
FROM "Products" AS "p"
WHERE "p"."UnitPrice" > @__price_0
ORDER BY "product"."UnitPrice" DESC
...
Your logs might vary from those shown above based on your chosen database provider and code editor, and future improvements to EF Core. For now, note that different events like opening a connection or executing a command have different event ids.
Filtering logs by provider-specific values
The event id values and what they mean will be specific to the .NET data provider. If we want to know how the LINQ query has been translated into SQL statements and is executing, then the event Id to output has an Id value of 20100:
- Modify the
Logmethod inConsoleLoggerto only output events with anIdof20100, as highlighted in the following code:public void Log<TState>(LogLevel logLevel, EventId eventId, TState state, Exception? exception, Func<TState, Exception, string> formatter) { if (eventId.Id == 20100) { // log the level and event identifier Write("Level: {0}, Event Id: {1}, Event: {2}", logLevel, eventId.Id, eventId.Name); // only output the state or exception if it exists if (state != null) { Write($", State: {state}"); } if (exception != null) { Write($", Exception: {exception.Message}"); } WriteLine(); } } - In
Program.cs, uncomment theQueryingCategoriesmethod and comment out the other methods so that we can monitor the SQL statements that are generated when joining two tables. - Run the code, and note the following SQL statements that were logged, as shown in the following output that has been edited for space:
Using SQLServer database provider.
Categories and how many products they have:
Level: Debug, Event Id: 20100, State: Executing DbCommand [Parameters=[], CommandType='Text', CommandTimeout='30']
SELECT [c].[CategoryId], [c].[CategoryName], [c].[Description], [p].[ProductId], [p].[CategoryId], [p].[UnitPrice], [p].[Discontinued], [p].[ProductName], [p].[UnitsInStock]
FROM [Categories] AS [c]
LEFT JOIN [Products] AS [p] ON [c].[CategoryId] = [p].[CategoryId]
ORDER BY [c].[CategoryId], [p].[ProductId]
Beverages has 12 products.
Condiments has 12 products.
Confections has 13 products.
Dairy Products has 10 products.
Grains/Cereals has 7 products.
Meat/Poultry has 6 products.
Produce has 5 products.
Seafood has 12 products.
Logging with query tags
When logging LINQ queries, it can be tricky to correlate log messages in complex scenarios. EF Core 2.2 introduced the query tags feature to help by allowing you to add SQL comments to the log.
You can annotate a LINQ query using the TagWith method, as shown in the following code:
IQueryable<Product>? products = db.Products?
  .TagWith("Products filtered by price and sorted.")
  .Where(product => product.Cost > price)
  .OrderByDescending(product => product.Cost);
This will add an SQL comment to the log, as shown in the following output:
-- Products filtered by price and sorted.
Pattern matching with Like
EF Core supports common SQL statements including Like for pattern matching:
- At the bottom of
Program.cs, add a method namedQueryingWithLike, as shown in the following code, and note:- We have enabled logging.
- We prompt the user to enter part of a product name and then use the
EF.Functions.Likemethod to search anywhere in theProductNameproperty. - For each matching product, we output its name, stock, and if it is discontinued:
static void QueryingWithLike() { using (Northwind db = new()) { ILoggerFactory loggerFactory = db.GetService<ILoggerFactory>(); loggerFactory.AddProvider(new ConsoleLoggerProvider()); Write("Enter part of a product name: "); string? input = ReadLine(); IQueryable<Product>? products = db.Products? .Where(p => EF.Functions.Like(p.ProductName, $"%{input}%")); if (products is null) { WriteLine("No products found."); return; } foreach (Product p in products) { WriteLine("{0} has {1} units in stock. Discontinued? {2}", p.ProductName, p.Stock, p.Discontinued); } } } - In
Program.cs, comment out the existing methods, and callQueryingWithLike. - Run the code, enter a partial product name such as
che, and view the result, as shown in the following output:Using SQLServer database provider. Enter part of a product name: che Level: Debug, Event Id: 20100, State: Executing DbCommand [Parameters=[@__Format_1='?' (Size = 40)], CommandType='Text', CommandTimeout='30'] SELECT "p"."ProductId", "p"."CategoryId", "p"."UnitPrice", "p"."Discontinued", "p"."ProductName", "p"."UnitsInStock" FROM "Products" AS "p" WHERE "p"."ProductName" LIKE @__Format_1 Chef Anton's Cajun Seasoning has 53 units in stock. Discontinued? False Chef Anton's Gumbo Mix has 0 units in stock. Discontinued? True Queso Manchego La Pastora has 86 units in stock. Discontinued? False Gumbär Gummibärchen has 15 units in stock. Discontinued? False
EF Core 6.0 introduces another useful function, EF.Functions.Random, that maps to a database function returning a pseudo-random number between 0 and 1 exclusive. For example, you could multiply the random number by the count of rows in a table to select one random row from that table.
Defining global filters
Northwind products can be discontinued, so it might be useful to ensure that discontinued products are never returned in results, even if the programmer does not use Where to filter them out in their queries:
- In
Northwind.cs, modify theOnModelCreatingmethod to add a global filter to remove discontinued products, as shown highlighted in the following code:protected override void OnModelCreating(ModelBuilder modelBuilder) { ... // global filter to remove discontinued products modelBuilder.Entity<Product>() .HasQueryFilter(p => !p.Discontinued); } - Run the code, enter the partial product name
che, view the result, and note that Chef Anton's Gumbo Mix is now missing, because the SQL statement generated includes a filter for theDiscontinuedcolumn, as shown highlighted in the following output:SELECT "p"."ProductId", "p"."CategoryId", "p"."UnitPrice", "p"."Discontinued", "p"."ProductName", "p"."UnitsInStock" FROM "Products" AS "p" WHERE ("p"."Discontinued" = 0) AND "p"."ProductName" LIKE @__Format_1 Chef Anton's Cajun Seasoning has 53 units in stock. Discontinued? False Queso Manchego La Pastora has 86 units in stock. Discontinued? False Gumbär Gummibärchen has 15 units in stock. Discontinued? False
Loading patterns with EF Core
There are three loading patterns that are commonly used with EF Core:
- Eager loading: Load data early.
- Lazy loading: Load data automatically just before it is needed.
- Explicit loading: Load data manually.
In this section, we're going to introduce each of them.
Eager loading entities
In the QueryingCategories method, the code currently uses the Categories property to loop through each category, outputting the category name and the number of products in that category.
This works because when we wrote the query, we enabled eager loading by calling the Include method for the related products.
Let's see what happens if we do not call Include:
- Modify the query to comment out the
Includemethod call, as shown in the following code:IQueryable<Category>? categories = db.Categories; //.Include(c => c.Products); - In
Program.cs, comment out all methods exceptQueryingCategories. - Run the code and view the result, as shown in the following partial output:
Beverages has 0 products.
Condiments has 0 products.
Confections has 0 products.
Dairy Products has 0 products.
Grains/Cereals has 0 products.
Meat/Poultry has 0 products.
Produce has 0 products.
Seafood has 0 products.
Each item in foreach is an instance of the Category class, which has a property named Products, that is, the list of products in that category. Since the original query is only selected from the Categories table, this property is empty for each category.
Enabling lazy loading
Lazy loading was introduced in EF Core 2.1, and it can automatically load missing related data. To enable lazy loading, developers must:
- Reference a NuGet package for proxies.
- Configure lazy loading to use a proxy.
Let's see this in action:
- In the
WorkingWithEFCoreproject, add a package reference for EF Core proxies, as shown in the following markup:<PackageReference Include="Microsoft.EntityFrameworkCore.Proxies" Version="6.0.0" /> - Build the project to restore packages.
- Open
Northwind.cs, and call an extension method to use lazy loading proxies at the top of theOnConfiguringmethod, as shown highlighted in the following code:protected override void OnConfiguring( DbContextOptionsBuilder optionsBuilder) { optionsBuilder.UseLazyLoadingProxies();Now, every time the loop enumerates, and an attempt is made to read the
Productsproperty, the lazy loading proxy will check if they are loaded. If not, it will load them for us "lazily" by executing aSELECTstatement to load just that set of products for the current category, and then the correct count will be returned to the output. - Run the code and note that the product counts are now correct. But you will see that the problem with lazy loading is that multiple round trips to the database server are required to eventually fetch all the data, as shown in the following partial output:
Categories and how many products they have:
Level: Debug, Event Id: 20100, State: Executing DbCommand [Parameters=[], CommandType='Text', CommandTimeout='30']
SELECT "c"."CategoryId", "c"."CategoryName", "c"."Description" FROM "Categories" AS "c"
Level: Debug, Event Id: 20100, State: Executing DbCommand [Parameters=[@ p_0='?'], CommandType='Text', CommandTimeout='30']
SELECT "p"."ProductId", "p"."CategoryId", "p"."UnitPrice",
"p"."Discontinued", "p"."ProductName", "p"."UnitsInStock"
FROM "Products" AS "p"
WHERE ("p"."Discontinued" = 0) AND ("p"."CategoryId" = @ p_0)
Beverages has 11 products.
Level: Debug, Event ID: 20100, State: Executing DbCommand [Parameters=[@ p_0='?'], CommandType='Text', CommandTimeout='30']
SELECT "p"."ProductId", "p"."CategoryId", "p"."UnitPrice",
"p"."Discontinued", "p"."ProductName", "p"."UnitsInStock"
FROM "Products" AS "p"
WHERE ("p"."Discontinued" = 0) AND ("p"."CategoryId" = @ p_0)
Condiments has 11 products.
Explicit loading entities
Another type of loading is explicit loading. It works in a similar way to lazy loading, with the difference being that you are in control of exactly what related data is loaded and when:
- At the top of
Program.cs, import the change tracking namespace to enable us to use theCollectionEntryclass to manually load related entities, as shown in the following code:using Microsoft.EntityFrameworkCore.ChangeTracking; // CollectionEntry - In the
QueryingCategoriesmethod, modify the statements to disable lazy loading and then prompt the user as to whether they want to enable eager loading and explicit loading, as shown in the following code:IQueryable<Category>? categories; // = db.Categories; // .Include(c => c.Products); db.ChangeTracker.LazyLoadingEnabled = false; Write("Enable eager loading? (Y/N): "); bool eagerloading = (ReadKey().Key == ConsoleKey.Y); bool explicitloading = false; WriteLine(); if (eagerloading) { categories = db.Categories?.Include(c => c.Products); } else { categories = db.Categories; Write("Enable explicit loading? (Y/N): "); explicitloading = (ReadKey().Key == ConsoleKey.Y); WriteLine(); } - In the
foreachloop, before theWriteLinemethod call, add statements to check if explicit loading is enabled, and if so, prompt the user as to whether they want to explicitly load each individual category, as shown in the following code:if (explicitloading) { Write($"Explicitly load products for {c.CategoryName}? (Y/N): "); ConsoleKeyInfo key = ReadKey(); WriteLine(); if (key.Key == ConsoleKey.Y) { CollectionEntry<Category, Product> products = db.Entry(c).Collection(c2 => c2.Products); if (!products.IsLoaded) products.Load(); } } WriteLine($"{c.CategoryName} has {c.Products.Count} products."); - Run the code:
- Press
Nto disable eager loading. - Then press
Yto enable explicit loading. - For each category, press
YorNto load its products as you wish.
- Press
I chose to load products for only two of the eight categories, Beverages and Seafood, as shown in the following output that has been edited for space:
Categories and how many products they have:
Enable eager loading? (Y/N): n
Enable explicit loading? (Y/N): y
Level: Debug, Event Id: 20100, State: Executing DbCommand [Parameters=[], CommandType='Text', CommandTimeout='30']
SELECT "c"."CategoryId", "c"."CategoryName", "c"."Description" FROM "Categories" AS "c"
Explicitly load products for Beverages? (Y/N): y
Level: Debug, Event Id: 20100, State: Executing DbCommand [Parameters=[@ p_0='?'], CommandType='Text', CommandTimeout='30']
SELECT "p"."ProductId", "p"."CategoryId", "p"."UnitPrice",
"p"."Discontinued", "p"."ProductName", "p"."UnitsInStock"
FROM "Products" AS "p"
WHERE ("p"."Discontinued" = 0) AND ("p"."CategoryId" = @ p_0)
Beverages has 11 products.
Explicitly load products for Condiments? (Y/N): n
Condiments has 0 products.
Explicitly load products for Confections? (Y/N): n
Confections has 0 products.
Explicitly load products for Dairy Products? (Y/N): n
Dairy Products has 0 products.
Explicitly load products for Grains/Cereals? (Y/N): n
Grains/Cereals has 0 products.
Explicitly load products for Meat/Poultry? (Y/N): n
Meat/Poultry has 0 products.
Explicitly load products for Produce? (Y/N): n
Produce has 0 products.
Explicitly load products for Seafood? (Y/N): y
Level: Debug, Event ID: 20100, State: Executing DbCommand [Parameters=[@ p_0='?'], CommandType='Text', CommandTimeout='30']
SELECT "p"."ProductId", "p"."CategoryId", "p"."UnitPrice",
"p"."Discontinued", "p"."ProductName", "p"."UnitsInStock"
FROM "Products" AS "p"
WHERE ("p"."Discontinued" = 0) AND ("p"."CategoryId" = @ p_0)
Seafood has 12 products.
Good Practice: Carefully consider which loading pattern is best for your code. Lazy loading could literally make you a lazy database developer! Read more about loading patterns at the following link: https://docs.microsoft.com/en-us/ef/core/querying/related-data
Manipulating data with EF Core
Inserting, updating, and deleting entities using EF Core is an easy task to accomplish.
DbContext maintains change tracking automatically, so the local entities can have multiple changes tracked, including adding new entities, modifying existing entities, and removing entities. When you are ready to send those changes to the underlying database, call the SaveChanges method. The number of entities successfully changed will be returned.
Inserting entities
Let's start by looking at how to add a new row to a table:
- In
Program.cs, create a new method namedAddProduct, as shown in the following code:static bool AddProduct( int categoryId, string productName, decimal? price) { using (Northwind db = new()) { Product p = new() { CategoryId = categoryId, ProductName = productName, Cost = price }; // mark product as added in change tracking db.Products.Add(p); // save tracked change to database int affected = db.SaveChanges(); return (affected == 1); } } - In
Program.cs, create a new method namedListProductsthat outputs the Id, name, cost, stock, and discontinued properties of each product sorted with the costliest first, as shown in the following code:static void ListProducts() { using (Northwind db = new()) { WriteLine("{0,-3} {1,-35} {2,8} {3,5} {4}", "Id", "Product Name", "Cost", "Stock", "Disc."); foreach (Product p in db.Products .OrderByDescending(product => product.Cost)) { WriteLine("{0:000} {1,-35} {2,8:$#,##0.00} {3,5} {4}", p.ProductId, p.ProductName, p.Cost, p.Stock, p.Discontinued); } } }Remember that
1,-35means left-align argument 1 within a 35-character-wide column and3,5means right-align argument 3 within a 5-character-wide column. - In
Program.cs, comment out previous method calls, and then callAddProductandListProducts, as shown in the following code:// QueryingCategories(); // FilteredIncludes(); // QueryingProducts(); // QueryingWithLike(); if (AddProduct(categoryId: 6, productName: "Bob's Burgers", price: 500M)) { WriteLine("Add product successful."); } ListProducts(); - Run the code, view the result, and note the new product has been added, as shown in the following partial output:
Add product successful.
Id  Product Name              Cost Stock Disc.
078 Bob's Burgers          $500.00       False
038 Côte de Blaye          $263.50    17 False
020 Sir Rodney's Marmalade  $81.00    40 False
...
Updating entities
Now, let's modify an existing row in a table:
- In
Program.cs, add a method to increase the price of the first product with a name that begins with a specified value (we'll use Bob in our example) by a specified amount like $20, as shown in the following code:static bool IncreaseProductPrice( string productNameStartsWith, decimal amount) { using (Northwind db = new()) { // get first product whose name starts with name Product updateProduct = db.Products.First( p => p.ProductName.StartsWith(productNameStartsWith)); updateProduct.Cost += amount; int affected = db.SaveChanges(); return (affected == 1); } } - In
Program.cs, comment out the wholeifblock that callsAddProduct, and add a call toIncreaseProductPricebefore the call to list products, as shown highlighted in the following code:/* if (AddProduct(categoryId: 6, productName: "Bob's Burgers", price: 500M)) { WriteLine("Add product successful."); } */ if (IncreaseProductPrice( productNameStartsWith: "Bob", amount: 20M)) { WriteLine("Update product price successful."); } ListProducts(); - Run the code, view the result, and note that the existing entity for Bob's Burgers has increased in price by $20, as shown in the following partial output:
Update product price successful.
Id  Product Name              Cost Stock Disc.
078 Bob's Burgers          $520.00       False
038 Côte de Blaye          $263.50    17 False
020 Sir Rodney's Marmalade  $81.00    40 False
...
Deleting entities
You can remove individual entities with the Remove method. RemoveRange is more efficient when you want to delete multiple entities.
Now let's see how to delete rows from a table:
- At the bottom of
Program.cs, add a method to delete all products with a name that begins with a specified value (Bob in our example), as shown in the following code:static int DeleteProducts(string productNameStartsWith) { using (Northwind db = new()) { IQueryable<Product>? products = db.Products?.Where( p => p.ProductName.StartsWith(productNameStartsWith)); if (products is null) { WriteLine("No products found to delete."); return 0; } else { db.Products.RemoveRange(products); } int affected = db.SaveChanges(); return affected; } } - In
Program.cs, comment out the wholeifstatement block that callsIncreaseProductPrice, and add a call toDeleteProducts, as shown in the following code:int deleted = DeleteProducts(productNameStartsWith: "Bob"); WriteLine($"{deleted} product(s) were deleted."); - Run the code and view the result, as shown in the following output:
1 product(s) were deleted.
If multiple product names started with Bob, then they are all deleted. As an optional challenge, modify the statements to add three new products that start with Bob and then delete them.
Pooling database contexts
The DbContext class is disposable and is designed following the single-unit-of-work principle. In the previous code examples, we created all the DbContext-derived Northwind instances in a using block so that Dispose is properly called at the end of each unit of work.
A feature of ASP.NET Core that is related to EF Core is that it makes your code more efficient by pooling database contexts when building websites and services. This allows you to create and dispose of as many DbContext-derived objects as you want, knowing that your code is still as efficient as possible.
Working with transactions
Every time you call the SaveChanges method, an implicit transaction is started so that if something goes wrong, it will automatically roll back all the changes. If the multiple changes within the transaction succeed, then the transaction and all changes are committed.
Transactions maintain the integrity of your database by applying locks to prevent reads and writes while a sequence of changes is occurring.
Transactions are ACID, which is an acronym explained in the following list:
- A is for atomic. Either all the operations in the transaction commit, or none of them do.
- C is for consistent. The state of the database before and after a transaction is consistent. This is dependent on your code logic; for example, when transferring money between bank accounts, it is up to your business logic to ensure that if you debit $100 in one account, you credit $100 in the other account.
- I is for isolated. During a transaction, changes are hidden from other processes. There are multiple isolation levels that you can pick from (refer to the following table). The stronger the level, the better the integrity of the data. However, more locks must be applied, which will negatively affect other processes. Snapshot is a special case because it creates multiple copies of rows to avoid locks, but this will increase the size of your database while transactions occur.
- D is for durable. If a failure occurs during a transaction, it can be recovered. This is often implemented as a two-phase commit and transaction logs. Once the transaction is committed it is guaranteed to endure even if there are subsequent errors. The opposite of durable is volatile.
Controlling transactions using isolation levels
A developer can control transactions by setting an isolation level, as described in the following table:
|
Isolation level |
Lock(s) |
Integrity problems allowed |
|
|
None |
Dirty reads, nonrepeatable reads, and phantom data |
|
|
When editing, it applies read lock(s) to block other users from reading the record(s) until the transaction ends |
Nonrepeatable reads and phantom data |
|
|
When reading, it applies edit lock(s) to block other users from editing the record(s) until the transaction ends |
Phantom data |
|
|
Applies key-range locks to prevent any action that would affect the results, including inserts and deletes |
None |
|
|
None |
None |
Defining an explicit transaction
You can control explicit transactions using the Database property of the database context:
- In
Program.cs, import the EF Core storage namespace to use theIDbContextTransactioninterface, as shown in the following code:using Microsoft.EntityFrameworkCore.Storage; // IDbContextTransaction - In the
DeleteProductsmethod, after the instantiation of thedbvariable, add statements to start an explicit transaction and output its isolation level. At the bottom of the method, commit the transaction, and close the brace, as shown highlighted in the following code:static int DeleteProducts(string name) { using (Northwind db = new()) { using (IDbContextTransaction t = db.Database.BeginTransaction()) { WriteLine("Transaction isolation level: {0}", arg0: t.GetDbTransaction().IsolationLevel); IQueryable<Product>? products = db.Products?.Where( p => p.ProductName.StartsWith(name)); if (products is null) { WriteLine("No products found to delete."); return 0; } else { db.Products.RemoveRange(products); } int affected = db.SaveChanges(); t.Commit(); return affected; } } } - Run the code and view the result using SQL Server, as shown in the following output:
Transaction isolation level: ReadCommitted - Run the code and view the result using SQLite, as shown in the following output:
Transaction isolation level: Serializable
Code First EF Core models
Sometimes you will not have an existing database. Instead, you define the EF Core model as Code First, and then EF Core can generate a matching database using create and drop APIs.
Good Practice: The create and drop APIs should only be used during development. Once you release the app, you do not want it to delete a production database!
For example, we might need to create an application for managing students and courses for an academy. One student can sign up to attend multiple courses. One course can be attended by multiple students. This is an example of a many-to-many relationship between students and courses.
Let's model this example:
- Use your preferred code editor to add a new console app named
CoursesAndStudentsto theChapter10solution/workspace. - In Visual Studio, set the startup project for the solution to the current selection.
- In Visual Studio Code, select
CoursesAndStudentsas the active OmniSharp project. - In the
CoursesAndStudentsproject, add package references for the following packages:Microsoft.EntityFrameworkCore.SqliteMicrosoft.EntityFrameworkCore.SqlServerMicrosoft.EntityFrameworkCore.Design
- Build the
CoursesAndStudentsproject to restore packages. - Add classes named
Academy.cs,Student.cs, andCourse.cs. - Modify
Student.cs, and note that it is a POCO (plain old CLR object) with no attributes decorating the class, as shown in the following code:namespace CoursesAndStudents; public class Student { public int StudentId { get; set; } public string? FirstName { get; set; } public string? LastName { get; set; } public ICollection<Course>? Courses { get; set; } } - Modify
Course.cs, and note that we have decorated theTitleproperty with some attributes to provide more information to the model, as shown in the following code:using System.ComponentModel.DataAnnotations; namespace CoursesAndStudents; public class Course { public int CourseId { get; set; } [Required] [StringLength(60)] public string? Title { get; set; } public ICollection<Student>? Students { get; set; } } - Modify
Academy.cs, as shown in the following code:using Microsoft.EntityFrameworkCore; using static System.Console; namespace CoursesAndStudents; public class Academy : DbContext { public DbSet<Student>? Students { get; set; } public DbSet<Course>? Courses { get; set; } protected override void OnConfiguring( DbContextOptionsBuilder optionsBuilder) { string path = Path.Combine( Environment.CurrentDirectory, "Academy.db"); WriteLine($"Using {path} database file."); optionsBuilder.UseSqlite($"Filename={path}"); // optionsBuilder.UseSqlServer(@"Data Source=.;Initial Catalog=Academy;Integrated Security=true;MultipleActiveResultSets=true;"); } protected override void OnModelCreating(ModelBuilder modelBuilder) { // Fluent API validation rules modelBuilder.Entity<Student>() .Property(s => s.LastName).HasMaxLength(30).IsRequired(); // populate database with sample data Student alice = new() { StudentId = 1, FirstName = "Alice", LastName = "Jones" }; Student bob = new() { StudentId = 2, FirstName = "Bob", LastName = "Smith" }; Student cecilia = new() { StudentId = 3, FirstName = "Cecilia", LastName = "Ramirez" }; Course csharp = new() { CourseId = 1, Title = "C# 10 and .NET 6", }; Course webdev = new() { CourseId = 2, Title = "Web Development", }; Course python = new() { CourseId = 3, Title = "Python for Beginners", }; modelBuilder.Entity<Student>() .HasData(alice, bob, cecilia); modelBuilder.Entity<Course>() .HasData(csharp, webdev, python); modelBuilder.Entity<Course>() .HasMany(c => c.Students) .WithMany(s => s.Courses) .UsingEntity(e => e.HasData( // all students signed up for C# course new { CoursesCourseId = 1, StudentsStudentId = 1 }, new { CoursesCourseId = 1, StudentsStudentId = 2 }, new { CoursesCourseId = 1, StudentsStudentId = 3 }, // only Bob signed up for Web Dev new { CoursesCourseId = 2, StudentsStudentId = 2 }, // only Cecilia signed up for Python new { CoursesCourseId = 3, StudentsStudentId = 3 } )); } }Good Practice: Use an anonymous type to supply data for the intermediate table in a many-to-many relationship. The property names follow the naming convention
NavigationPropertyNamePropertyName, for example,Coursesis the navigation property name andCourseIdis the property name soCoursesCourseIdwill be the property name of the anonymous type. - In
Program.cs, at the top of the file, import the namespace for EF Core and working with tasks, and statically importConsole, as shown in the following code:using Microsoft.EntityFrameworkCore; // for GenerateCreateScript() using CoursesAndStudents; // Academy using static System.Console; - In
Program.cs, add statements to create an instance of theAcademydatabase context and use it to delete the database if it exists, create the database from the model and output the SQL script it uses, and then enumerate the students and their courses, as shown in the following code:using (Academy a = new()) { bool deleted = await a.Database.EnsureDeletedAsync(); WriteLine($"Database deleted: {deleted}"); bool created = await a.Database.EnsureCreatedAsync(); WriteLine($"Database created: {created}"); WriteLine("SQL script used to create database:"); WriteLine(a.Database.GenerateCreateScript()); foreach (Student s in a.Students.Include(s => s.Courses)) { WriteLine("{0} {1} attends the following {2} courses:", s.FirstName, s.LastName, s.Courses.Count); foreach (Course c in s.Courses) { WriteLine($" {c.Title}"); } } } - Run the code, and note that the first time you run the code it will not need to delete the database because it does not exist yet, as shown in the following output:
Using C:\Code\Chapter10\CoursesAndStudents\bin\Debug\net6.0\Academy.db database file. Database deleted: False Database created: True SQL script used to create database: CREATE TABLE "Courses" ( "CourseId" INTEGER NOT NULL CONSTRAINT "PK_Courses" PRIMARY KEY AUTOINCREMENT, "Title" TEXT NOT NULL ); CREATE TABLE "Students" ( "StudentId" INTEGER NOT NULL CONSTRAINT "PK_Students" PRIMARY KEY AUTOINCREMENT, "FirstName" TEXT NULL, "LastName" TEXT NOT NULL ); CREATE TABLE "CourseStudent" ( "CoursesCourseId" INTEGER NOT NULL, "StudentsStudentId" INTEGER NOT NULL, CONSTRAINT "PK_CourseStudent" PRIMARY KEY ("CoursesCourseId", "StudentsStudentId"), CONSTRAINT "FK_CourseStudent_Courses_CoursesCourseId" FOREIGN KEY ("CoursesCourseId") REFERENCES "Courses" ("CourseId") ON DELETE CASCADE, CONSTRAINT "FK_CourseStudent_Students_StudentsStudentId" FOREIGN KEY ("StudentsStudentId") REFERENCES "Students" ("StudentId") ON DELETE CASCADE ); INSERT INTO "Courses" ("CourseId", "Title") VALUES (1, 'C# 10 and .NET 6'); INSERT INTO "Courses" ("CourseId", "Title") VALUES (2, 'Web Development'); INSERT INTO "Courses" ("CourseId", "Title") VALUES (3, 'Python for Beginners'); INSERT INTO "Students" ("StudentId", "FirstName", "LastName") VALUES (1, 'Alice', 'Jones'); INSERT INTO "Students" ("StudentId", "FirstName", "LastName") VALUES (2, 'Bob', 'Smith'); INSERT INTO "Students" ("StudentId", "FirstName", "LastName") VALUES (3, 'Cecilia', 'Ramirez'); INSERT INTO "CourseStudent" ("CoursesCourseId", "StudentsStudentId") VALUES (1, 1); INSERT INTO "CourseStudent" ("CoursesCourseId", "StudentsStudentId") VALUES (1, 2); INSERT INTO "CourseStudent" ("CoursesCourseId", "StudentsStudentId") VALUES (2, 2); INSERT INTO "CourseStudent" ("CoursesCourseId", "StudentsStudentId") VALUES (1, 3); INSERT INTO "CourseStudent" ("CoursesCourseId", "StudentsStudentId") VALUES (3, 3); CREATE INDEX "IX_CourseStudent_StudentsStudentId" ON "CourseStudent" ("StudentsStudentId"); Alice Jones attends the following 1 course(s): C# 10 and .NET 6 Bob Smith attends the following 2 course(s): C# 10 and .NET 6 Web Development Cecilia Ramirez attends the following 2 course(s): C# 10 and .NET 6 Python for Beginners- The
Titlecolumn isNOT NULLbecause the model was decorated with[Required]. - The
LastNamecolumn isNOT NULLbecause the model usedIsRequired(). - An intermediate table named
CourseStudentwas created to hold information about which students attend which courses.
- The
- Use Visual Studio Server Explorer or SQLiteStudio to connect to the
Academydatabase and view the tables, as shown in Figure 10.6:
Figure 10.6: Viewing the Academy database in SQL Server using Visual Studio 2022 Server Explorer
Understanding migrations
After publishing a project that uses a database, it is likely that you will later need to change your entity data model and therefore the database structure. At that point, you should not use the Ensure methods. Instead, you need to use a system that allows you to incrementally update the database schema while preserving any existing data in the database. EF Core migrations are that system.
Migrations get complex fast, so are beyond the scope of this book. You can read about them at the following link: https://docs.microsoft.com/en-us/ef/core/managing-schemas/migrations/
Practicing and exploring
Test your knowledge and understanding by answering some questions, get some hands-on practice, and explore this chapter's topics with deeper research.
Exercise 10.1 – Test your knowledge
Answer the following questions:
- What type would you use for the property that represents a table, for example, the
Productsproperty of a database context? - What type would you use for the property that represents a one-to-many relationship, for example, the
Productsproperty of aCategoryentity? - What is the EF Core convention for primary keys?
- When might you use an annotation attribute in an entity class?
- Why might you choose the Fluent API in preference to annotation attributes?
- What does a transaction isolation level of
Serializablemean? - What does the
DbContext.SaveChanges()method return? - What is the difference between eager loading and explicit loading?
- How should you define an EF Core entity class to match the following table?
CREATE TABLE Employees( EmpId INT IDENTITY, FirstName NVARCHAR(40) NOT NULL, Salary MONEY ) - What benefit do you get from declaring entity navigation properties as
virtual?
Exercise 10.2 – Practice exporting data using different serialization formats
In the Chapter10 solution/workspace, create a console application named Exercise02 that queries the Northwind database for all the categories and products, and then serializes the data using at least three formats of serialization available to .NET. Which format of serialization uses the least number of bytes?
Exercise 10.3 – Explore topics
Use the links on the following page to learn more detail about the topics covered in this chapter:
Exercise 10.4 – Explore NoSQL databases
This chapter focused on RDBMSs such as SQL Server and SQLite. If you wish to learn more about NoSQL databases, such as Cosmos DB and MongoDB, and how to use them with EF Core, then I recommend the following links:
- Welcome to Azure Cosmos DB: https://docs.microsoft.com/en-us/azure/cosmos-db/introduction
- Use NoSQL databases as a persistence infrastructure: https://docs.microsoft.com/en-us/dotnet/standard/microservices-architecture/microservice-ddd-cqrs-patterns/nosql-database-persistence-infrastructure
- Document Database Providers for Entity Framework Core: https://github.com/BlueshiftSoftware/EntityFrameworkCore
Summary
In this chapter, you learned how to connect to an existing database, how to execute a simple LINQ query and process the results, how to use filtered includes, how to add, modify, and delete data, and how to build entity data models for an existing database, such as Northwind. You also learned how to define a Code First model and use it to create a new database and populate it with data.
In the next chapter, you will learn how to write more advanced LINQ queries to select, filter, sort, join, and group.